Posts Tagged ‘command’

Howto create Linux Music Audio CD from MP3 files / Create playable WAV format Audio CD Albums from MP3s

Tuesday, July 16th, 2019

cdburning-audio-music-cd-from-mp3-on-linuxcomapct-disc-tux-linux-logo

Recently my Mother asked me to prepare a Music Audio CD for her from a popular musician accordionist Stefan Georgiev from Dobrudja who has a unique folklore Bulgarian music.

As some of older people who still remember the age of the CD and who had most likely been into the CD burning Copy / Piracy business so popular in the countries of the ex-USSR so popular in the years 1995-2000 audio ,  Old CD Player Devices were not able to play the MP3 file format due to missing codecs (as MP3 was a proprietary compression that can't be installed on every device without paying the patent to the MP3 compression rights holder.

The revolutionary MP3 compression used to be booming standard for transferring Music data due to its high compression which made an ordinary MP3 of 5 minutes of 5MB (10+ times more compression than an ordinary classic WAV Audio the CPU intensiveness of MP3 files that puts on the reading device, requiring the CD Player to have a more powerful CPU.

Hence  due to high licensing cost and requirement for more powerful CPU enabled Audio Player many procuders of Audio Players never introduced MP3 to their devices and MP3 Neve become a standard for the Audio CD that was the standard for music listening inside almost every car out there.

Nowdays it is very rare need to create a Audio CD as audio CDs seems to be almost dead (As I heard from a Richard Stallman lecture In USA nowadays there is only 1 shop in the country where you can still buy CD or DVD drives) and only in third world as Africa Audio CDs perhaps are still in circulation.

Nomatter that as we have an old Stereo CD player on my village and perhaps many others, still have some old retired CD reading devices being able to burn out a CD is a useful thing.

Thus to make mother happy and as a learning excercise, I decided to prepare the CD for her on my Linux notebook.
Here I'll shortly describe the takes I took to make it happen which hopefully will be useful for other people that need to Convert and burn Audio CD from MP3 Album.


1. First I downloaded the Album in Mp3 format from Torrent tracker

My homeland Bulgaria and specific birth place place the city of Dobrich has been famous its folklore:  Galina Durmushlijska and Stefan Georgiev are just 2 of the many names along with Оркестър Кристал (Orchestra Crystal) and the multitude of gifted singers. My mother has a santiment for Stefan Georgiev, as she listened to this gifted accordinist on her Uncle's marriage.

Thus In my case this was (Стефан Георгиев Хора и ръченици от Добруджа) the album full song list here If you're interested to listen the Album and Enjoy unique Folklore from Dobrudja (Dobrich) my home city, Stefan Georgiev's album Hora and Rachenica Dances is available here


Stefan_Georgiev-old-audio-Music-CD-Hora-i-Rychenici-ot-Dobrudja-Horos-and-Ruchenitsas-from-Dobrudja-CD_Cover
I've downloaded them from Bulgarian famous torrent tracker zamunda.net in MP3 format.
Of course you need to have a CD / DVD readed and write device on the PC which nowdays is not present on most modern notebooks and PCs but as a last resort you can buy some cheap External Optical CD / DVD drive for 25 to 30$ from Amazon / Ebay etc.


2. You will need to install a couple of programs on Linux host (if you don't have it already)


To be able to convert from command line from MP3 to WAV you will need as minimum ffmpeg and normalize-audio packages as well as some kind of command line burning tool like cdrskin  wodim which is
the fork of old good known cdrecord, so in case if you you're wondering what happened with it just
use instead wodim.

Below is a good list of tools (assuming you have enough HDD space) to install:


root@jeremiah:/ # apt-get install –yes dvd+rw-tools cdw cdrdao audiotools growisofs cdlabelgen dvd+rw-tools k3b brasero wodim ffmpeg lame normalize-audio libavcodec58


Note that some of above packages I've installed just for other Write / Read operations for DVD drives and you might not need that but it is good to have it as some day in future you will perhaps need to write out a DVD or something.
Also the k3b here is specific to KDE and if you're a GNOME user you could use Native GNOME Desktop app such brasero or if you're in a more minimalistic Linux desktop due to hardware contrains use XFCE's native xfburn program.

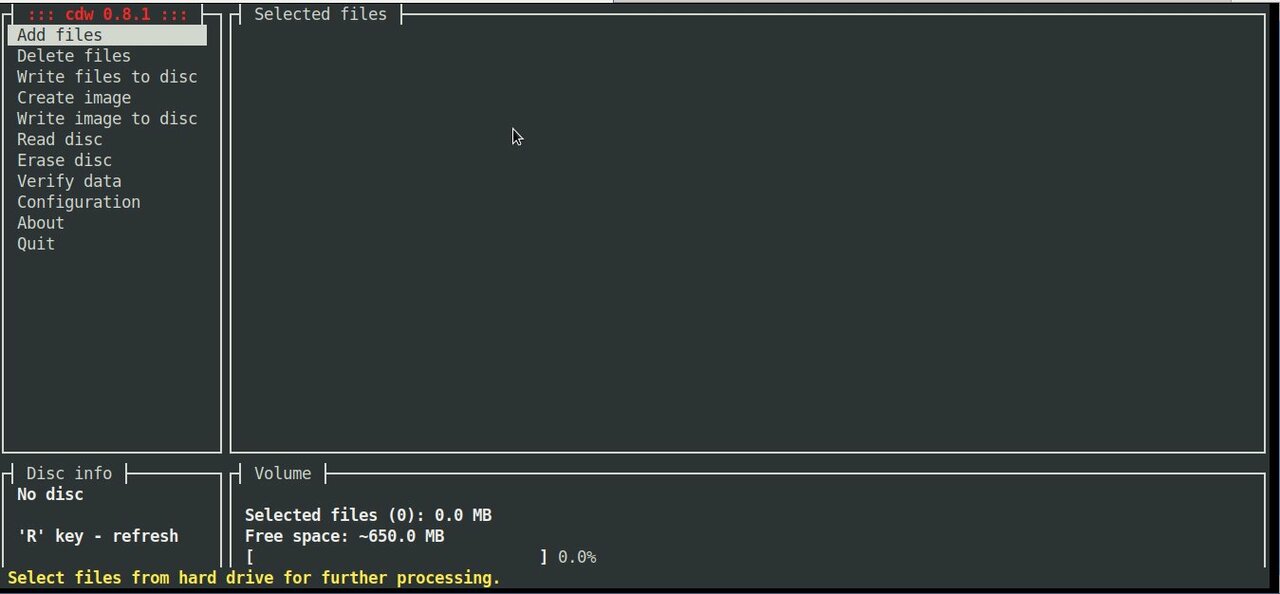
If you're a console / terminal geek like me you will definitely enjoy to use cdw
 

root@jeremiah:/ # apt-cache show cdw|grep -i description -A 1
Description-en: Tool for burning CD's – console version
 Ncurses-based frontend for wodim and genisoimage. It can handle audio and

Description-md5: 77dacb1e6c00dada63762b78b9a605d5
Homepage: http://cdw.sourceforge.net/


3. Selecting preferred CD / DVD / BD program to use to write out the CD from Linux console


cdw uses wodim (which is a successor of good old known console cdrecord command most of use used on Linux in the past to burn out new Redhat / Debian / different Linux OS distro versions for upgrade purposes on Desktop and Server machines.

To check whether your CD / DVD drive is detected and ready to burn on your old PC issue:


root@jeremiah:/# wodim -checkdrive
Device was not specified. Trying to find an appropriate drive…
Detected CD-R drive: /dev/cdrw
Using /dev/cdrom of unknown capabilities
Device type    : Removable CD-ROM
Version        : 5
Response Format: 2
Capabilities   :
Vendor_info    : 'HL-DT-ST'
Identification : 'DVDRAM GT50N    '
Revision       : 'LT20'
Device seems to be: Generic mmc2 DVD-R/DVD-RW.
Using generic SCSI-3/mmc   CD-R/CD-RW driver (mmc_cdr).
Driver flags   : MMC-3 SWABAUDIO BURNFREE
Supported modes: TAO PACKET SAO SAO/R96P SAO/R96R RAW/R16 RAW/R96P RAW/R96R

You can also use xorriso (whose added value compared to other console burn cd tools is is not using external program for ISO9660 formatting neither it use an external or an external burn program for CD, DVD or BD (Blue Ray) drive but it has its own libraries incorporated from libburnia-project.org libs.

Below output is from my Thinkpad T420 notebook. If the old computer CD drive is there and still functional in most cases you should not get issues to detect it.

cdw ncurses text based CD burner tool's interface is super intuitive as you can see from below screenshot:
cdw-burn-cds-from-console-terminal-on-GNU-Linux-and-FreeBSD-old-PC-computer

CDW has many advanced abilities such as “blanking” a disk or ripping an audio CD on a selected folder. To overcome the possible problem of CDW not automatically detecting the disk you have inserted you can go to the “Configuration” menu, press F5 to enter the Hardware options and then on the first entry press enter and choose your device (by pressing enter again). Save the setting with F9.
 

4. Convert MP3 / MP4 Files or whatever format to .WAV to be ready to burn to CD


Collect all the files you want to have collected from the CD album in .MP3 a certain directory and use a small one liner loop to convert files to WAV with ffmpeg:
 

cd /disk/Music/Mp3s/Singer-Album-directory-with-MP3/

for i in $( ls *.mp3); do ffmpeg -i $i $i.wav; done


If you don't have ffmpeg installed and have mpg123 you can also do the Mp3 to WAV conversion with mpg123 cmd like so:


for i in $( ls ); do mpg123 -w $i.wav $i.mp3; done


Another alternative for conversion is to use good old lame (used to create Mp3 audio files but abling to also) decode
mp3 to wav.


lame –decode somefile.mp3 somefile.wav


In the past there was a burn command tool that was able to easily convert MP3s to WAV but in up2date Linux modern releases it is no longer available most likely due to licensing issues, for those on older Debian Linux 7 / 8 / 9 / Ubuntu 8 to 12.XX / old Fedoras etc. if you have the command you can install burn and use it (and not bother with shell loops):

apt-get install burn

or

yum install burn


Once you have it to convert


$ burn -A -a *.mp3


5. Fix file naming to remove empty spaces such as " " and substitute to underscores as some Old CD Players are
unable to understand spaces in file naming with another short loop.


for f in *; do mv "$f" `echo $f | tr ' ' '_'`; done


6. Normalize audio produced .WAV files (set the music volume to a certain level)


In case if wondering why normalize audio is needed here is short extract from normalize-audio man page command description to shed some light.

"normalize-audio  is  used  to  adjust  the volume of WAV or MP3 audio files to a standard volume level.  This is useful for things like creating mp3 mixes, where different recording levels on different albums can cause the volume to  vary  greatly from song to song."
 

cd /disk/Music/Mp3s/Singer-Album-directory-with-MP3/

normalize-audio -m *.wav


7. Burn the produced normalized Audio WAV files to the the CD


wodim -v -fix -eject dev='/dev/sr0' -audio -pad *.wav


Alternatively you can conver all your MP3 files to .WAV with anything be it audacity
or another program or even use 
GNOME's CDBurn tool brasero (if gnome user) or KDE's CDBurn which in my opinion is
the best CD / DVD burning application for Linux K3B.

Burning Audio CD with K3b is up to few clicks and super easy and even k3b is going to handle the MP3 to WAV file Conversion itself. To burn audio with K3B just run it and click over 'New Audio CD Project'.
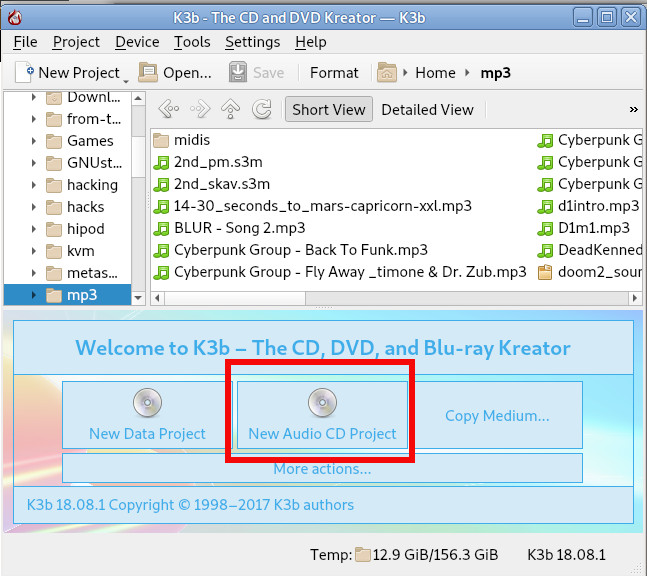
k3b-on-debian-gnu-linux-burn-audio-cd-screenshot

For those who want to learn a bit more on CD / DVD / Blue-Ray burning on GNU / Linux good readings are:
Linux CD Burning Mini Howto, is Linux's CD Writing Howto on ibiblio (though a bit obsolete) or Debian's official documentation on BurnCD.
 

8. What we learned here


Though the accent of this tutorial was how to Create Audio Music CD from MP3 on GNU / Linux, the same commands are available in most FreeBSD / NetBSD / OpenBSD ports tree so you can use the same method to build prepare Audio Music CD on *BSDs.

In this article, we went through few basic ways on how to prepare WAV files from MP3 normalize the new created WAV files on Linux, to prepare files for creation of Audio Music CD for the old mom or grandma's player or even just for fun to rewind some memories. For GUI users this is easily done with  k3b,  brasero or xfburn.

I've pointed you to cdw a super useful text ncurses tool that makes CD Burninng from plain text console (on servers) without a Xorg / WayLand  GUI installed super easy. It was shortly reviewed what has changed over the last few years and why and why cdrecord was substituted for wodim. A few examples were given on how to handle conversion through bash shell loops and you were pointed to some extra reading resources to learn a bit more on the topic.
There are plenty of custom scripts around for doing the same CD Burn / Covnersion tasks, so pointing me to any external / Shell / Perl scripts is mostly welcome.

Hope this learned you something new, Enjoy ! 🙂
Export / Import PuTTY Tunnels SSH Sessions from one to another Windows machine howto

Thursday, January 31st, 2019

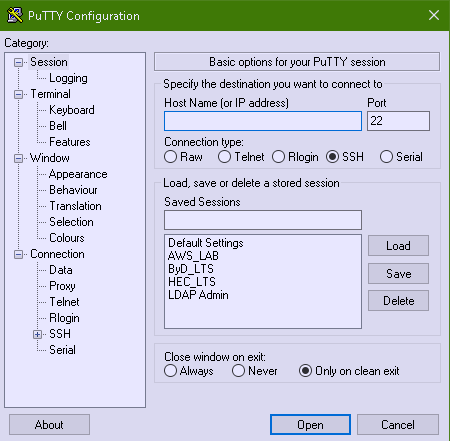
Putty-copy-ssh-tunnels-howto-from-one-to-another-windows-machine-3

As I've started on job position – Linux Architect in last November 2018 in Itelligence AG as a contractor (External Service) – a great German company who hires the best IT specialists out there and offers a flexible time schedules for emploees doing various very cool IT advanced operations and Strategic advancement of SAP's Cloud used Technology and Services improvements for SAP SE – SAP S4HANA and HEC (HANA Enterprise Cloud) and been given for work hardware a shiny Lenovo Thinkpad 500 Laptop with Windows 10 OS (SAP pre-installed), I needed to make some SSH Tunnels to machines to (Hop Station / Jump hosts) for that purpose, after some experimenting with MobaXterm Free (Personal Edition 11.0) and the presumable limitations of tunnels of the free client as well as my laziness to add the multiple ssh tunnels to different ssh / rdp / vnc etc. servers, finally I decided to just copy all the tunnels from a colleague who runs Putty and again use the good old Putty – old school Winblows SSH Terminal Client but just for creating the SSH tunnels and for rest use MobaXterm, just like in old times while still employe in Hewlett Packard. For that reason to copy the Tunnels from my dear German Colleague Henry Beck (A good herated collegue who works in field of Storage dealing with NetApps / filer Clusters QNap etc.).

Till that moment I had no idea how copying a saved SSH Tunnels definition is possible, I did a quick research just to find out this is done not with Putty Interface itself but, insetead through dumping Windows Putty Stored Registry records into a File, then transfer to the PC where Tunnels needs to be imported and then again (either double click the registry file) to load it, into registry or use Windows registry editor command line interface reg, here is how:
 

1. Export


Run cmd.exe (note below command) 

requires elevated Run as Administrator prompt:

Only sessions:

regedit /e "%USERPROFILE%\Desktop\putty-sessions.reg" HKEY_CURRENT_USER\Software\SimonTatham\PuTTY\Sessions

All settings:

regedit /e "%USERPROFILE%\Desktop\putty.reg" HKEY_CURRENT_USER\Software\SimonTatham

Powershell:

If you have powershell installed on machine, to dump

Only sessions:


reg export HKCU\Software\SimonTatham\PuTTY\Sessions ([Environment]::GetFolderPath("Desktop") + "\putty-sessions.reg")

All settings:

reg export HKCU\Software\SimonTatham ([Environment]::GetFolderPath("Desktop") + "\putty.reg")


2. Import

Double-click on the 

*.reg

 file and accept the import.


Alternative ways:


cmd.exe

require elevated command prompt:

regedit /i putty-sessions.reg regedit /i putty.reg

PowerShell:

reg import putty-sessions.reg reg import putty.reg


Below are some things to consider:

Note !do not replace 

SimonTatham

 with your username.


Note !: It will create a 

reg

 file on the Desktop of the current user (for a different location modify path)


Note !: It will not export your related (old system stored) SSH keys.

What to expect next?

Putty-Tunnels-SSH-Sessions-screenshot-Windows

The result is in Putty you will have the Tunnel sessions loadable when you launch (Portable or installed) Putty version.
Press Load button over the required saved Tunnels list and there you go under


Connection SSH -> Tunnels 


you will see all the copied tunnels.

Enjoy!

How to make sure your Linux system users won’t hide or delete their .bash_history / Securing .bash_history file – Protect Linux system users shell history

Monday, July 19th, 2010

linux-bin-bash-600x600logo
If you're running multi user login Linux system, you have probably realized that there are some clever users that prefer to prevent their command line executed commands to be logged in .bash_history.
To achieve that they use a number of generally known methodologist to prevent the Linux system from logging into their $HOME/.bash_history file (of course if running bash as a default user shell).
This though nice for the user is a real nightmare for the sysadmin, since he couldn't keep track of all system command events executed by users. For instance sometimes an unprivilegd user might be responsible for executing a malicious code which crashes or breaks your server.
This is especially unpleasent, because you will find your system crashed and if it's not some of the system services that causes the issue you won’t even be able to identify which of all the users is the malicious user account and respectively the code excecuted which fail the system to the ground.
In this post I will try to tell you a basic ways that some malevolent users might use to hide their bash history from the system administrator.
I will also discuss a few possible ways to assure your users .bash_history keeps intact and possibly the commands executed by your users gets logged in in their.
The most basic way that even an unexperienced shell user will apply if he wants to prevent his .bash_history from sys admins review would be of directly wiping out the .bash_history file from his login account or alternatively emptying it with commands like:

malicious-user@server:~$ rm -f. bash_history
ormalicious-user@server:~# cat /dev/null > ~/.bash_history

In order to prevent this type of attack against cleaning the .bash_history you can use the chattr command.
To counter attack this type of history tossing method you can set your malicious-user .bash_history’s file the (append only flag) with chattr like so:

root@server:~# cd /home/malicious-user/
root@server:~# chattr +a .bash_history

It’s also recommended that the immunable flag is placed to the file ~/.profile in user home

root@server:~# chattr +i ~/.profile

It would be probably also nice to take a look at all chattr command attributes since the command is like swiss army knife for the Linux admin:
Here is all available flags that can be passed to chattr
append only (a)
compressed (c)
don~@~Yt update atime (A)
synchronous directory updates (D)
synchronous updates (S)
data journalling (j)
no dump (d)
top of directory hierarchy (T)
no tail-merging (t)
secure deletion (s)
undeletable (u)
immutable (i)

It’s also nice that setting the “append only” flag in to the user .bash_history file prevents the user to link the .bash_history file to /dev/null like so:

malicious-user@server:~$ ln -sf /dev/null ~/.bash_history
ln: cannot remove `.bash_history': Operation not permitted

malicious-user@server:~$ echo > .bash_history
bash: .bash_history: Operation not permitted

However this will just make your .bash_history append only, so the user trying to execute cat /dev/null > .bash_history won’t be able to truncate the content of .bash_history.

Unfortunately he will yet be able to delete the file with rm so this type of securing your .bash_history file from being overwritten is does not completely guarantee you that user commands will get logged.
Also in order to prevent user to play tricks and escape the .bash_history logging by changing the default bash shell variables for HISTFILE an d HISTFILESIZE, exporting them either to a different file location or a null file size.
You have to put the following bash variables to be loaded in /etc/bash.bashrc or in /etc/profile
# #Prevent unset of histfile, /etc/profile
HISTFILE=~/.bash_history
HISTSIZE=10000
HISTFILESIZE=999999
# Don't let the users enter commands that are ignored# in the history file
HISTIGNORE=""
HISTCONTROL=""
readonly HISTFILE
readonly HISTSIZE
readonly HISTFILESIZE
readonly HISTIGNORE
readonly HISTCONTROL
export HISTFILE HISTSIZE HISTFILESIZE HISTIGNORE HISTCONTROL

everytime a user logs in to your Linux system the bash commands above will be set.
The above tip is directly taken from Securing debian howto which by the way is quite an interesting and nice reading for system administrators 🙂

If you want to apply an append only attribute to all user .bash_history to all your existing Linux server system users assuming the default users directory is /home in bash you can execute the following 1 liner shell code:

#Set .bash_history as attr +a
2. find /home/ -maxdepth 3|grep -i bash_history|while read line; do chattr +a "$line"; done

Though the above steps will stop some of the users to voluntary clean their .bash_history history files it won’t a 100% guaranttee that a good cracker won’t be able to come up with a way to get around the imposed .bash_history security measures.

One possible way to get around the user command history prevention restrictions for a user is to simply using another shell from the ones available on the system:
Here is an example:

malicious-user:~$ /bin/csh
malicious-user:~>

csh shell logs by default to the file .history

Also as far as I know it should be possible for a user to simply delete the .bash_history file overwritting all the .bash_history keep up attempts up-shown.
If you need a complete statistics about accounting you’d better take a look at The GNU Accounting Utilities

In Debian the GNU Accounting Utilities are available as a package called acct, so installation of acct on Debian is as simple as:

debian:~# apt-get install acct

I won’t get into much details about acct and would probably take a look at it in my future posts.
For complete .bash_history delete prevention maybe the best practice is to useg grsecurity (grsec)

Hopefully this article is gonna be a step further in tightening up your Server or Desktop Linux based system security and will also give you some insight on .bash_history files 🙂 .

Virtualbox Shared folder set up on Linux between Host and Guest OS – Set up Virtualbox shared folder to Copy files from PC Host to Guest

Wednesday, September 12th, 2018

mount-shares-between-host-OS-and-guest-virtual-machine-howto-virtualbox-vbox-logo

How to set-up Virtualbox shared folder to Copy files from PC Host  and Guest Virtualized OS?

Running VirtualBox Host is an easy thing to set-up across all Operating Systems.  Once you have it sooner or later you will need to copy files from the VM Host OS (that in my case is GNU / Linux) to the virtualized Guest operating system (again in my case that's again another Linux ISO running indide the Virtual Machine).

Below are steps to follow To use Virtualbox Shared Folder functionality to copy files between VBox and your Desktop / server Linux install.

1. Install Virtualbox Guest Additions CD Image ISO

I've explained how to add the Guest Additions CD image thoroughfully in my previous article Howto enable Copy / Paste Virtualbox betwen Linux guest and Host OS
Anyways I'll repeat myself below for sake of clarity:

To do so use Oracle VBox menus (on the booted virtualized OS VBox window):


Devices -> Insert Guest additions CD Image


Mount the ISO inside the Linux Virtual Machine:

root@debian:~# mount /media/cdrom1/
 

If the mount fails and there are no files inside the mount point it might be because the virtualbox-dkms and virtualbox-guest-dkms packages might be missing on the Host OS.

To install them (on Debian GNU / Linux) assuming that you're using virtualbox default distro packages /etc/apt/sources.list :
 

apt-get install –yes -qq virtualbox-dkms virtualbox-guest-dkms


and run:


root@debian:/media/cdrom1# cd /media/cdrom1; sh VBoxLinuxAdditions.run


2. Create directory for Shared Folder that will be used to access Host / OS files from the Guest Virtualized OS
 

root@debian:~# mkdir /mnt/shared_folder


3. Map from VBox program interface Shared folder settings and Mount /mnt/shared_folder location

virtualbox-virtual-machine-devices-shared-folders-shared-folder-settings-linux-screenshot


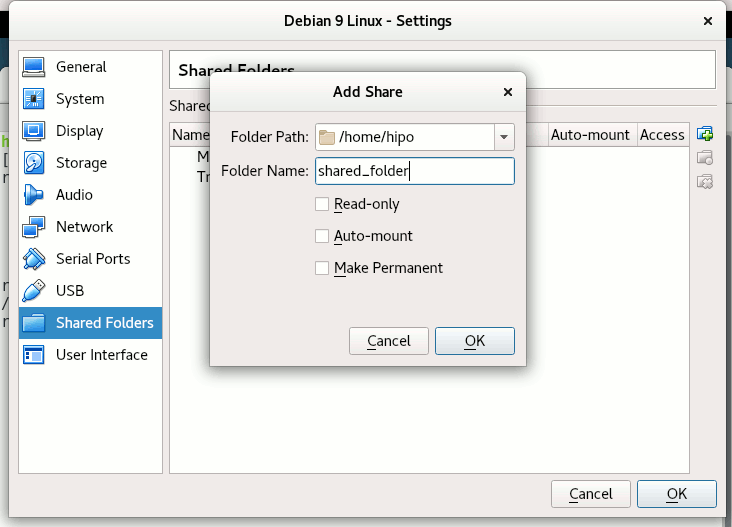
Devices -> Shared Folder -> Shared Folder settings -> Transient Folders (click blue folder add small button right)


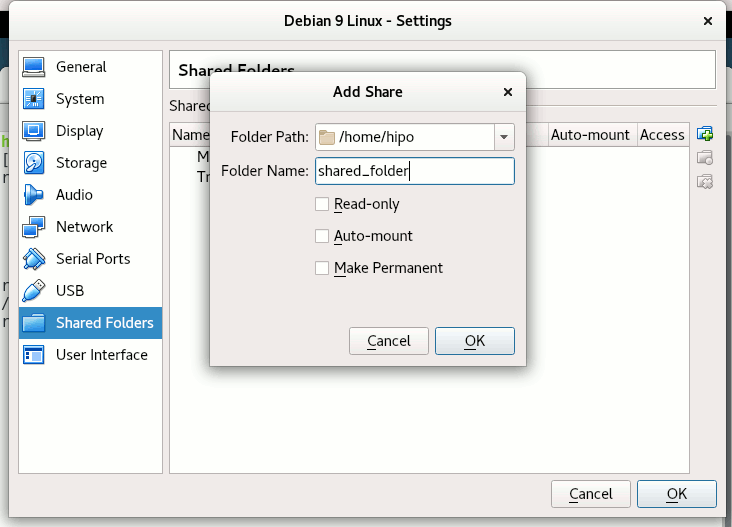
From Transient Folders add whatever directory you want to be shared from your local notebook / PC to the VM.

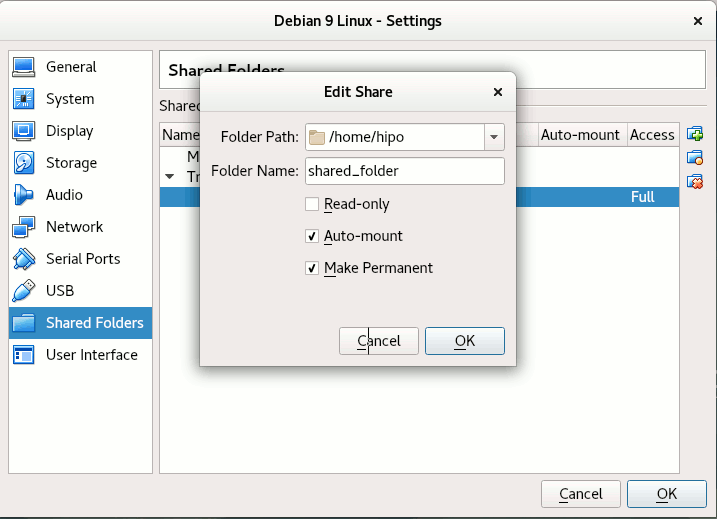
virtualbox-devices-Shared-Folder-Add-Shared-Folder-add-share-linux-screenshotDepending on whether you would like to mount the shared folder only for reading files (choose Read Only) to make it a permanent shared folder (and not just for the one session of current running Virtual Machine until its killed use Make Permanent) or check Auto-Mount tick if you want the shared_folder mapping to be mounted on every VM boot.
Once the shared_folder directory location is set-up from GUI menu click OK and in order for the settings to take effect, you'll need to restart the VM Guest with Linux (use halt command from terminal) or Power Off the Machine via the VBox menus.

To mount use command like:

mount -t vboxsf name_of_folder_linked_from_vbox  /mnt/name_folder_guest_os/


mount-vboxsf-shared-folder-mnt-shared-linux-guest-screenshot

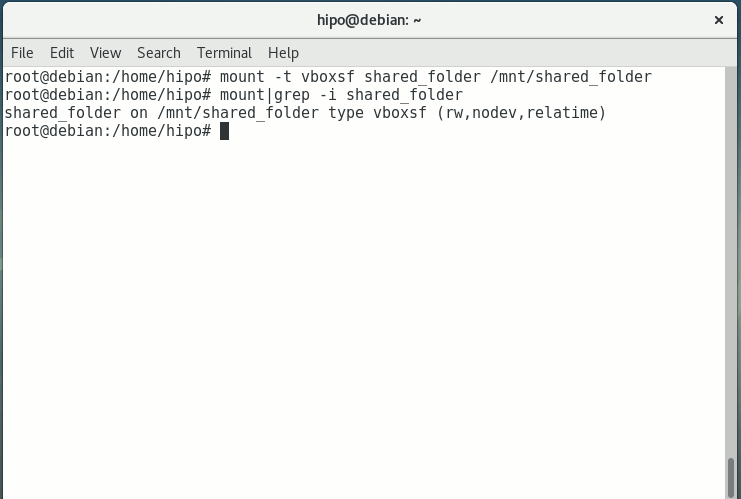
In my case I wanted to share home folder /home so the command I used is:

root@debian:~# mount -t vboxsf  shared_folder /mnt/shared_folder


If everything is fine your Host OS file content from /home will be visible (for read and write if you Mapped it so) 
under /mnt/shared_folder …

And as Turtles Ninja used to heavily say Cowabunga !!! 🙂
You have it mounted and ready for file share between Desktop -> Virtualized OS.


Bear in mind that above mount command has to run as root (superuser) to succeed.

You now could copy files from your Host OS (running the Virtual Machine) and the Guest OS (Virtualized OS) using /mnt/shared_folder mount point without problems.

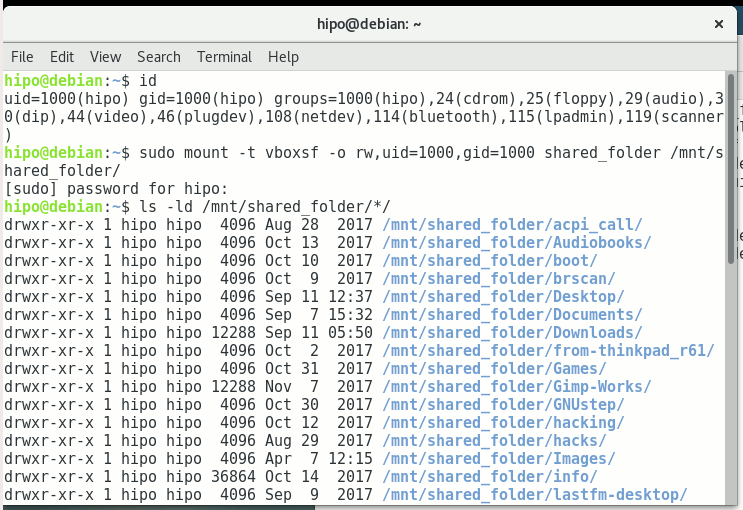
The example is if you want to share files between VirtualBox installed Linux and the Guest (Desktop / server) OS, however at many cases mounting your Host OS directory for root users might be not very practical but, instead you might prefer to do the mount for specific non admin user, for example I prefer to do the shared folder mount with my pointed non-root username hipo.

Here is how to do above VM shared_folder mount for non-root user:

First you need to know the exact UID / GID (User ID / Group ID) of user, you can get that with id command:


hipo@linux:~$  id
uid=1000(hipo) gid=1000(hipo) groups=1000(hipo),24(cdrom),25(floppy),29(audio),30(dip),44(video),46(plugdev),108(netdev),114(bluetooth),115(lpadmin),119(scanner)


As you see UID / GID in my case are 1000 / 1000

hipo@linux:~$ sudo mount -t vboxsf -o rw,uid=1000,gid=1000 shared_folder /mnt/shared_folder


mount-virtual-box-shared_folder-with-non-administration-permissions-non-root-permissions-id-and-mount-command-screenshot-linux


4. Mounting configured shared_folder to automatically mount into the Guest OS Linux on every boot

a) Configuring shared_folder auto-mount using /etc/rc.local

If you need the shared_folder to automatically mount next-time you boot the virtual machine quickest way is to add the mount command to /etc/rc.local (on Debian 8 and Debian 9 and newer Ubuntu Linuxes rc.local is missing by default to enable it to work like it worked before read follow my previous article ).

b) Configuring auto-mount for shared_folder through /etc/fstab

The more professional way to auto-mount on emulated OS VM boot time,  you could add the vboxsf mount definitions to /etc/fstab with your favourite text-editor mcedit, nano, joe etc. … (for me that's vim).

Syntax of /etc/fstab is as follows:
 

<Device> <Mount Point> <Type> <Options> <Dump> <Pass>

root@linux:~# vim /etc/fstab


shared_folder /mnt/shared_folder                                vboxsf rw,uid=1000,gid=1000 0 0

Note that you will want to change 1000 / 1000, id / gid with the ones of the non-admin user you would like to add to mount it for.

A quick way to add it to /etc/fstab with a shell one-liner is with command
 

root@linux:~# echo 'shared_folder /mnt/shared_folder                                vboxsf rw,uid=1000,gid=1000 0  0' >> /etc/fstab

An alternative way to add a user to have permissions for vboxsf file system (without specifying the long -o uid=1000,gid=1000 options is to simply add the username in question to group vboxsf like so:

c) Adding non super user username to vboxsf group

root@linux:~# usermod -G vboxsf hipo
root@linux:~# grep -i vboxsf /etc/group
vboxsf:x:999:hipo


hipo@linux:~$ sudo mount -t vboxsf  shared_folder /mnt/shared_folder


without the extra arguments and the options to pass to /etc/fstab (for eventual requirement to auto mount the shared_folder) would be more simple e.g.:


echo 'shared_folder /mnt/shared_folder                                vboxsf ' >> /etc/fstab


One note to make here is if the uesr is added to vboxsf the line for /etc/fstab to auto mount to mount for root user and non-root will be identical.

Then you can get the /etc/fstab auto-mount configured tested by running:

c) Checking auto-mount is working

hipo@linux:~# mount -a
hipo@linux:~# mount |grep -i vboxsf
shared_folder on /mnt/shared_folder type vboxsf (rw,nodev,relatime)


5. What if you end up with mounting failed errors ? – What might be causing the mounting failed Protocol error (a few things to check to solve)


In case of troubles with the mount you might get an error like:

hipo@linux:~# mount -t vboxsf  share_folder /mnt/shared_folder

/sbin/mount.vboxsf: mounting failed with the error: Protocol error


This error might be caused because of Insert Guest Additions CD Image might be not properly enabled and installed using the ISO provided VBoxLinuxAdditions.sh shell script.
Other common reason you might get this error if you have mistyped the Folder name: given in Shared Folders -> Folder Path -> Add Share for example I have given shared_folder as a Map name but as you can see in above mount -t vboxsf, I've mistyped share_folder instead of the correct one shared_folder inserted.
In some VBox releases this error was caused by bugs in the Virtual Machine.
 

virtualbox-virtual-machine-shared-folder-transient-folder-add-folder-linux-VM-guest-linux

One useful tip is to be able to check whether a Virtualbox Virtual Machine has a configured shared_folder (if you're logging to manage the machine on remote server – nomatter whether you have logged in with VNC / Teamviewer / Citrix etc. or via SSH session.

To do so use VBoxControl as of time of writting usually located on most distributions under (/usr/bin/VBoxControl)


hipo@linux:~# VBoxControl sharedfolder list -automount
Oracle VM VirtualBox Guest Additions Command Line Management Interface Version 5.2.18
(C) 2008-2018 Oracle Corporation
All rights reserved.


Auto-mounted Shared Folder mappings (0):

No Shared Folders available.

You can use VBoxControl command to get set and list a number of settings on the VBox VM, here is an useful example with it where you get information about numerous VBox info values:


root@linux:~# VBoxControl guestproperty enumerate
Oracle VM VirtualBox Guest Additions Command Line Management Interface Version 5.2.18
(C) 2008-2018 Oracle Corporation
All rights reserved.


Name: /VirtualBox/GuestInfo/OS/Product, value: Linux, timestamp: 1536681633430852000, flags: <NULL>
Name: /VirtualBox/GuestInfo/Net/0/V4/IP, value: 10.0.2.15, timestamp: 1536681633438717000, flags: <NULL>
Name: /VirtualBox/HostInfo/GUI/LanguageID, value: en_US, timestamp: 1536697521395621000, flags: RDONLYGUEST
Name: /VirtualBox/GuestInfo/Net/0/MAC, value: 08002762FA1C, timestamp: 1536681633442120000, flags: <NULL>
Name: /VirtualBox/GuestInfo/OS/ServicePack, value: <NULL>, timestamp: 1536681633431259000, flags: <NULL>
Name: /VirtualBox/HostInfo/VBoxVerExt, value: 5.2.18, timestamp: 1536681619002646000, flags: TRANSIENT, RDONLYGUEST
Name: /VirtualBox/GuestInfo/Net/0/V4/Netmask, value: 255.255.255.0, timestamp: 1536681633440157000, flags: <NULL>
Name: /VirtualBox/GuestInfo/OS/Version, value: #1 SMP Debian 4.9.110-3+deb9u2 (2018-08-13), timestamp: 1536681633431125000, flags: <NULL>
Name: /VirtualBox/GuestAdd/VersionExt, value: 5.2.18, timestamp: 1536681633431582000, flags: <NULL>
Name: /VirtualBox/GuestAdd/Revision, value: 124319, timestamp: 1536681633432515000, flags: <NULL>
Name: /VirtualBox/HostGuest/SysprepExec, value: <NULL>, timestamp: 1536681619002355000, flags: TRANSIENT, RDONLYGUEST
Name: /VirtualBox/GuestInfo/OS/LoggedInUsers, value: 1, timestamp: 1536681673447293000, flags: TRANSIENT, TRANSRESET
Name: /VirtualBox/GuestInfo/Net/0/Status, value: Up, timestamp: 1536681633443911000, flags: <NULL>
Name: /VirtualBox/GuestInfo/Net/0/Name, value: enp0s3, timestamp: 1536681633445302000, flags: <NULL>
Name: /VirtualBox/HostGuest/SysprepArgs, value: <NULL>, timestamp: 1536681619002387000, flags: TRANSIENT, RDONLYGUEST
Name: /VirtualBox/GuestAdd/Version, value: 5.2.18, timestamp: 1536681633431419000, flags: <NULL>
Name: /VirtualBox/HostInfo/VBoxRev, value: 124319, timestamp: 1536681619002668000, flags: TRANSIENT, RDONLYGUEST
Name: /VirtualBox/GuestInfo/Net/0/V4/Broadcast, value: 10.0.2.255, timestamp: 1536681633439531000, flags: <NULL>
Name: /VirtualBox/HostInfo/VBoxVer, value: 5.2.18, timestamp: 1536681619002613000, flags: TRANSIENT, RDONLYGUEST
Name: /VirtualBox/GuestInfo/OS/LoggedInUsersList, value: hipo, timestamp: 1536681673446498000, flags: TRANSIENT, TRANSRESET
Name: /VirtualBox/GuestInfo/Net/Count, value: 1, timestamp: 1536698949773993000, flags: <NULL>
Name: /VirtualBox/GuestInfo/OS/Release, value: 4.9.0-7-amd64, timestamp: 1536681633431001000, flags: <NULL>
Name: /VirtualBox/GuestInfo/OS/NoLoggedInUsers, value: false, timestamp: 1536681673447965000, flags: TRANSIENT, TRANSRESET
Name: /VirtualBox/GuestAdd/HostVerLastChecked, value: 5.2.18, timestamp: 1536681702832389000, flags: <NULL>

Hope you enjoyed ! Have phun! 🙂

Linux “bash: mail: command not found” error fix – Installing mail cli on Fedora, Debian, CentOS, Ubuntu

Friday, September 7th, 2018

bash-mail-command-not-found-error-fix-linux-installing-bsd-mailx-linux-fedora-debian-centos

If you just hired a cheap VPS with some kind of Linux OS installed or just installed a home Linux test system environment inside a Virtual Machine (such as VirtualBox) on your notebook and you want to read system email reports delivered by services (e.g. track possible errors with the OS) or simply test whether Email relaying is configured properly

and you end up with shell error:

bash: mail: command not found

because mail command is missing and you wonder what Linux package you have to install in order to have the lovely mail / mailx command back on the OS … this article will help you how you can easily solve it by installing the mailx binary file (e.g. install the package providing it depending on the Linux Distribution Operating System you face the problem on.

1.  Install mailx command on Debian / Ubuntu / Mint and other .deb based Linux
 

root@linux:~# apt-get install –yes bsd-mailx


An alternative way to install the mailx system binary is to install  mailutils package

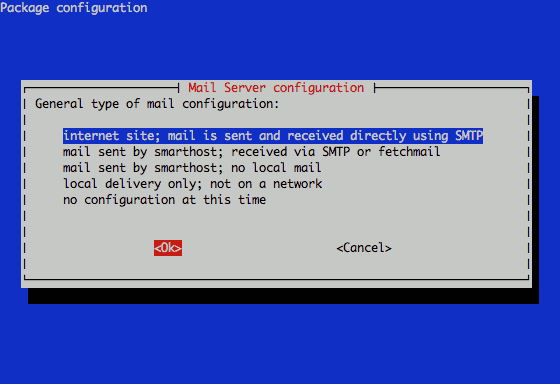
which will set up the system with essential mail related programs and set up a light Exim MTA and common server Email surrounding  so you can easily configure default installed Exim Mail Server to serve as an SMTP relay (through dpkg-reconfigure exim4-config) command


root@linux~:# apt-get install mailutils
Reading package lists… Done
Building dependency tree       
Reading state information… Done
The following additional packages will be installed:
  exim4-base exim4-config exim4-daemon-light guile-2.0-libs libgsasl7
  libkyotocabinet16v5 libmailutils5 libmariadbclient18 libntlm0
  mailutils-common mysql-common
Suggested packages:
  eximon4 exim4-doc-html | exim4-doc-info spf-tools-perl swaks mailutils-mh
  mailutils-doc
The following NEW packages will be installed:
  exim4-base exim4-config exim4-daemon-light guile-2.0-libs libgsasl7
  libkyotocabinet16v5 libmailutils5 libmariadbclient18 libntlm0 mailutils


root@linux:~# dpkg-reconfigure exim4-config


dpkg-reconfigure-exim4-config-debian-linux-exim4-email-server-screenshot

2. Install mailx Linux command on Fedora / CentOS / RHEL e.g. Redhat based distros


On RPM based distrubutions the package name is different from debians to install it there you have to fetch and install current distro mailx .rpm

To install mail command on older CentOS / Redhat 7/6/5 distributions


[root@centos:~]# yum install -y mailx


On Fedora 22+ version yum auto-dependency tool was substituted with dnf:


[root@fedora:~]# dnf install -y mailx


3. Send Test Email with mail command


root@linux:~# echo "Sample Message Body" | mail -s "Whatever … Message Subject" remote_receiver@remote-server-email-address.com


Check the mailbox, you just sent the sample email, hopefully if MTA is relaying correctly and the SMTP relay is properly delivering the email should be at the recipient address.

DOOM 1, DOOM 2, DOOM 3 game wad files for download / Playing Doom on Debian Linux via FreeDoom open source doom engine

Thursday, March 24th, 2011

Doom 2 game screenshot

Every now and then as an ex-gamer I do remember the good glorious times of the DooM oldschool 3d shooter game.

As a Linux user I do have the option to play Doom 1 and Doom 2 straight using the GPLed version of the game called FreeDoom

FreeDoom comes with a custom wad file called freedoom.wad which is a considerably good remake of the doom game, but still I don't find so funny and bringing memories as the original game.

Thus in order to experience the original doom game play, levels and sound on my Linux, I need to use the original doom wad files

The DooM original wad files are already an abandonware and nowdays it's a bit hard to be found. Still the wad files for the games are available for download on some major torrent trackers like piratebay but it takes time to find them therefore I decided to publicly share the Doom 1, Doom 2 and Doom 3 wad files to be easier for me to later put and play them on Linux and BSD operating systems, on the other hand I do think this files might be useful for many other oldschool DooM fans out there.

Here are the files for download:

1. Download doom 1, doom 2 and doom 3 wad files + extra of plutonia wad and tnt wad rar archive

2. Download Doom1.wad file
3. Download Doom2.wad file
4. Download Doom3.wad file

(Note that this is not original Doom3.wad – For free, its custom doom wad for prboom engine!!!)
5. Download Doom Plutonia.wad
6. Download Doom Tnt.wad

On my Debian Linux with the freedoom package in order to play the Doom1 or Doom2 wad files it's necessary to download and place the doom1.wad or doom2.wad files into the directory /usr/share/games/doom

It's important that the WAD files names does not contain capital letters (e.g. the files need to be placed with file names doom1.wad and doom2.wad)

The FreeDoom port package in Debian Lenny and Squeeze is available to be installed easily through apt like so:

debian:~# apt-get install prboom freedoom

To start up the doom2 game, issue the command:

debian:~# prboom

prboom also allows you to select a custom .wad file you want to play, for a custom wad file you can invoke the command:

debian:~# prboom -file yourwadfilename


UPDATE: A bonus you might seriously Enjoy, if you happen to be DooM 2 game fan / addict is an Awesome MIDIS Soundtrack by Bobby Prince you can download it song by song in midi format here or if you prefer download the whole doom 2 Bobby Prince midi songs archive
Enjoy the nice oldschool game 😉

How to install BlueJeans Video calls, sharing, Conference software on Debian / Ubuntu Linux – Convert RPM to DEB package with alien howto

Tuesday, August 28th, 2018

bluejeans-linux-logo

As I'm currently looking for ways to maximize my incomes without taking participation in 5 days week 8 hours schedule in a Big Corporation office job (which prooved for me to be a terrible slavery) I decided to give Free Lancing a try once again. 
Historically I have registrations in some of the most popular Free Lancing services Web platforms such as freelancer.com and upwork.com.
But none of them really was easy enough to handle as applying and winning a project there is usually a lot of headbanging into the walls and the platforms are full of clients that are looking for free lancers for short-term projects the work selection there required too much work, often projects offered there are seriously under-paid and its really hard to negotiate with many of the clients as they're unprofessional in the fields they're working (don't get me wrong I'm not saying many people are not very successful with this platforms, and that the platforms are not providing work for me I only say it is not really something to my liking …

In the mean time if you happen to read this article and looking for a High Quality Empoyee Cheap System Administrator or automation developmer, an IT counseling FreeLancer or a Ultra cheap WebHosting service in the European Union, I'll be very happy if you become my client.

Anyways … further on I decided to further experiment a little bit with other Free Lancing platforms (suggested by a friend Mitko Ivanov who helped me a lot with things and is continuing to help me over the last year ).

So following his kind suggestion I already tried one of the popular FreeLancing freeeup.com which is looking only for a best specialists into the fields of Marketing, Development, System Administration etc. but even though I tried hard with them the guys decided I am not matching there criteria for a the best 1% of all the people in the field of IT so my application for the platform was rejected twice over the last 1 month and a half.

Another similar new platform for free lancing that looks promising that I've learned about is toptal.com (there site Slogan is Hire FreeLance Talent from the Top 3%) so I went there and registered.

I had hit a road block there too as it seems, there website registration form was not tested enough with non-Windows operating systems with Mozilla Firefox and as it happens that I am using Debian GNU / Linux for my Desktop their drop-down menus was not working, just like some of the form on their website regular expression checks failed.

I've contacted the guys to inform them about their problems (and they kindly advised) I just give a try a registration with different browser (i.e. Google Chrome) which I immediately did and registratoin there was finally a success.
I have to say the new user application form registration of toptal also annoyed me with the stupid requirement to provide a picture in 1000px x 1000px but as this freelancing platform is still new and has way to go until it is established name in the field of freelancing such as upwork.com and I warmly excuse them.

Once registerered for them the user has to schedule an entry interview just like it goes with a standard company interview with a kind of Human Resources (HR) specialist and I guess some technical guys in order to evaluate on your value (Ha-Ha, someone else to determine your value is already crazy but all crazy employees do it still, of course I don't care as I well know that my value is much more than what they put on me).
The online interview once scheduled has to be done in a Web Meeting (Online Rooms) Platform called BlueJeans similar to Cisco WebEx (that is today heavily used in Corporate world in companies such as Hewlett Packard where we used it heavily, IBM, Concentrix etc.) and others Zoom, JoinMe GotoMeeting, HighFive.

As you could guess BlueJeans (which is by the way a Cloud based meeting software – yackes !) is planned to work mainly on Windows and Mac OS Operating Systems and even though there is a BlueJeans Linux version the provided binary is only for RedHat based linuxes in the RPM binary package format, so in order for me to participate in the scheduled meeting, I either had to port the package and install it on my Debian (what triggeted me to write this article or) use a Virtual Machine such as VirtualBox or VMWare running some kind of Windows OS such as Windows 8 / 10 etc.

Even though I have a Windows 10 OS testbed in a Virtualbox container, I preferred to not use it for BlueJeans and do it the hard way and install BlueJeans on my Debian 9.5 Stretch Linux.

That appeared to be a relatively easy process, so below is how I did it:

1. Download alien convertion (tool) that allows you to convert RPM -> deb, Slackware -> Deb and Linux Standard Base (LDB) packages to deb package format


noah:~# apt-get install –yes alien


2. Download latest BlueJeans version from BlueJeans website
 

As of time of writting this article the download link for bluejeans online conferencing software is here


noah:~# wget https://swdl.bluejeans.com/desktop/linux/1.36/1.36.9/bluejeans-1.36.9.x86_64.rpm


3. Convert bluejeans rpm package with alien


noah:~# alien –to-deb bluejeans-*.rpm


Warning: Skipping conversion of scripts in package bluejeans: postinst postrm preinst prerm
Warning: Use the –scripts parameter to include the scripts.
bluejeans_1.36.9-2_amd64.deb generated
root@jericho:/home/hipo/Свалени# dpkg -i bluejeans_*.deb
Selecting previously unselected package bluejeans.
(Reading database … 516203 files and directories currently installed.)
Preparing to unpack bluejeans_1.36.9-2_amd64.deb …
Unpacking bluejeans (1.36.9-2) …
Setting up bluejeans (1.36.9-2) …


4. Install the deb package as usual with dpkg tool


noah: ~# dpkg -i bluejeans_*.deb


By default BlueJeans were installed under directory /opt/bluejeans


noah:~# ls -al /opt/bluejeans/bluejeans-bin
-rwxr-xr-x 1 root root 72423392 Jun 14 02:31 /opt/bluejeans/bluejeans-bin*


5. Fix missing library links if such are present in order to make BlueJeans workable

Historically I have dealt with many Linux programs that are provided only in RPM package format and I knew that often once an RPM is converted to DEB with alien due to the package dependency differences on Redhats (CentOS / Fedora etc.) there are problems with missing libraries.

This time this was the case as well, so as usual right after install I did a check up with ldd (print shared object dependencies Linux command) to find out about missing libraries and one library appeared missing.


noah:~# ldd /opt/bluejeans/bluejeans-bin
    linux-vdso.so.1 (0x00007fffa2182000)
    librt.so.1 => /lib/x86_64-linux-gnu/librt.so.1 (0x00007fae95f5e000)
    libdl.so.2 => /lib/x86_64-linux-gnu/libdl.so.2 (0x00007fae95d5a000)
    libgtk-x11-2.0.so.0 => /usr/lib/x86_64-linux-gnu/libgtk-x11-2.0.so.0 (0x00007fae95718000)
    libgdk-x11-2.0.so.0 => /usr/lib/x86_64-linux-gnu/libgdk-x11-2.0.so.0 (0x00007fae95463000)
    libatk-1.0.so.0 => /usr/lib/x86_64-linux-gnu/libatk-1.0.so.0 (0x00007fae9523d000)
    libpangocairo-1.0.so.0 => /usr/lib/x86_64-linux-gnu/libpangocairo-1.0.so.0 (0x00007fae95030000)
    libgdk_pixbuf-2.0.so.0 => /usr/lib/x86_64-linux-gnu/libgdk_pixbuf-2.0.so.0 (0x00007fae94e0c000)
    libcairo.so.2 => /usr/lib/x86_64-linux-gnu/libcairo.so.2 (0x00007fae94aef000)
    libpango-1.0.so.0 => /usr/lib/x86_64-linux-gnu/libpango-1.0.so.0 (0x00007fae948aa000)
    libfreetype.so.6 => /usr/lib/x86_64-linux-gnu/libfreetype.so.6 (0x00007fae945f5000)
    libfontconfig.so.1 => /usr/lib/x86_64-linux-gnu/libfontconfig.so.1 (0x00007fae943b2000)
    libgobject-2.0.so.0 => /usr/lib/x86_64-linux-gnu/libgobject-2.0.so.0 (0x00007fae9415e000)
    libglib-2.0.so.0 => /usr/lib/x86_64-linux-gnu/libglib-2.0.so.0 (0x00007fae93e48000)
    libX11.so.6 => /usr/lib/x86_64-linux-gnu/libX11.so.6 (0x00007fae93b0a000)
    libXi.so.6 => /usr/lib/x86_64-linux-gnu/libXi.so.6 (0x00007fae938fa000)
    libnss3.so => /usr/lib/x86_64-linux-gnu/libnss3.so (0x00007fae935b1000)
    libnssutil3.so => /usr/lib/x86_64-linux-gnu/libnssutil3.so (0x00007fae93381000)
    libsmime3.so => /usr/lib/x86_64-linux-gnu/libsmime3.so (0x00007fae93154000)
    libplc4.so => /usr/lib/x86_64-linux-gnu/libplc4.so (0x00007fae92f4f000)
    libnspr4.so => /usr/lib/x86_64-linux-gnu/libnspr4.so (0x00007fae92d10000)
    libgconf-2.so.4 => /usr/lib/x86_64-linux-gnu/libgconf-2.so.4 (0x00007fae92adf000)
    libexpat.so.1 => /lib/x86_64-linux-gnu/libexpat.so.1 (0x00007fae928ad000)
    libXext.so.6 => /usr/lib/x86_64-linux-gnu/libXext.so.6 (0x00007fae9269b000)
    libXfixes.so.3 => /usr/lib/x86_64-linux-gnu/libXfixes.so.3 (0x00007fae92495000)
    libXrender.so.1 => /usr/lib/x86_64-linux-gnu/libXrender.so.1 (0x00007fae9228b000)
    libXcomposite.so.1 => /usr/lib/x86_64-linux-gnu/libXcomposite.so.1 (0x00007fae92088000)
    libasound.so.2 => /usr/lib/x86_64-linux-gnu/libasound.so.2 (0x00007fae91d8a000)
    libXdamage.so.1 => /usr/lib/x86_64-linux-gnu/libXdamage.so.1 (0x00007fae91b87000)
    libXtst.so.6 => /usr/lib/x86_64-linux-gnu/libXtst.so.6 (0x00007fae91981000)
    libpthread.so.0 => /lib/x86_64-linux-gnu/libpthread.so.0 (0x00007fae91763000)
    libcap.so.2 => /lib/x86_64-linux-gnu/libcap.so.2 (0x00007fae9155d000)
    libudev.so.0 => not found
    libdbus-1.so.3 => /lib/x86_64-linux-gnu/libdbus-1.so.3 (0x00007fae9130c000)
    libnotify.so.4 => /usr/lib/x86_64-linux-gnu/libnotify.so.4 (0x00007fae91104000)
    libstdc++.so.6 => /usr/lib/x86_64-linux-gnu/libstdc++.so.6 (0x00007fae90d85000)
    libm.so.6 => /lib/x86_64-linux-gnu/libm.so.6 (0x00007fae909f2000)
    libgcc_s.so.1 => /lib/x86_64-linux-gnu/libgcc_s.so.1 (0x00007fae907db000)
    libc.so.6 => /lib/x86_64-linux-gnu/libc.so.6 (0x00007fae90421000)
    /lib64/ld-linux-x86-64.so.2 (0x00007fae96166000)
    libgmodule-2.0.so.0 => /usr/lib/x86_64-linux-gnu/libgmodule-2.0.so.0 (0x00007fae9021d000)
    libgio-2.0.so.0 => /usr/lib/x86_64-linux-gnu/libgio-2.0.so.0 (0x00007fae8fe7f000)
    libpangoft2-1.0.so.0 => /usr/lib/x86_64-linux-gnu/libpangoft2-1.0.so.0 (0x00007fae8fc6a000)
    libfribidi.so.0 => /usr/lib/x86_64-linux-gnu/libfribidi.so.0 (0x00007fae8fa53000)
    libXinerama.so.1 => /usr/lib/x86_64-linux-gnu/libXinerama.so.1 (0x00007fae8f850000)
    libXrandr.so.2 => /usr/lib/x86_64-linux-gnu/libXrandr.so.2 (0x00007fae8f645000)
    libXcursor.so.1 => /usr/lib/x86_64-linux-gnu/libXcursor.so.1 (0x00007fae8f43b000)
    libpng16.so.16 => /usr/lib/x86_64-linux-gnu/libpng16.so.16 (0x00007fae8f208000)
    libz.so.1 => /lib/x86_64-linux-gnu/libz.so.1 (0x00007fae8efea000)
    libpixman-1.so.0 => /usr/lib/x86_64-linux-gnu/libpixman-1.so.0 (0x00007fae8ed44000)
    libxcb-shm.so.0 => /usr/lib/x86_64-linux-gnu/libxcb-shm.so.0 (0x00007fae8eb41000)
    libxcb.so.1 => /usr/lib/x86_64-linux-gnu/libxcb.so.1 (0x00007fae8e919000)
    libxcb-render.so.0 => /usr/lib/x86_64-linux-gnu/libxcb-render.so.0 (0x00007fae8e70b000)
    libthai.so.0 => /usr/lib/x86_64-linux-gnu/libthai.so.0 (0x00007fae8e501000)
    libuuid.so.1 => /lib/x86_64-linux-gnu/libuuid.so.1 (0x00007fae8e2fa000)
    libffi.so.6 => /usr/lib/x86_64-linux-gnu/libffi.so.6 (0x00007fae8e0f1000)
    libpcre.so.3 => /lib/x86_64-linux-gnu/libpcre.so.3 (0x00007fae8de7f000)
    libplds4.so => /usr/lib/x86_64-linux-gnu/libplds4.so (0x00007fae8dc7b000)
    libgthread-2.0.so.0 => /usr/lib/x86_64-linux-gnu/libgthread-2.0.so.0 (0x00007fae8da79000)
    libdbus-glib-1.so.2 => /usr/lib/x86_64-linux-gnu/libdbus-glib-1.so.2 (0x00007fae8d851000)
    libsystemd.so.0 => /lib/x86_64-linux-gnu/libsystemd.so.0 (0x00007fae8d5c9000)
    libselinux.so.1 => /lib/x86_64-linux-gnu/libselinux.so.1 (0x00007fae8d3a1000)
    libresolv.so.2 => /lib/x86_64-linux-gnu/libresolv.so.2 (0x00007fae8d18a000)
    libmount.so.1 => /lib/x86_64-linux-gnu/libmount.so.1 (0x00007fae8cf31000)
    libharfbuzz.so.0 => /usr/lib/x86_64-linux-gnu/libharfbuzz.so.0 (0x00007fae8cc81000)
    libXau.so.6 => /usr/lib/x86_64-linux-gnu/libXau.so.6 (0x00007fae8ca7d000)
    libXdmcp.so.6 => /usr/lib/x86_64-linux-gnu/libXdmcp.so.6 (0x00007fae8c877000)
    libdatrie.so.1 => /usr/lib/x86_64-linux-gnu/libdatrie.so.1 (0x00007fae8c66f000)
    liblzma.so.5 => /lib/x86_64-linux-gnu/liblzma.so.5 (0x00007fae8c449000)
    liblz4.so.1 => /usr/lib/x86_64-linux-gnu/liblz4.so.1 (0x00007fae8c22c000)
    libgcrypt.so.20 => /lib/x86_64-linux-gnu/libgcrypt.so.20 (0x00007fae8bf10000)
    libblkid.so.1 => /lib/x86_64-linux-gnu/libblkid.so.1 (0x00007fae8bcc1000)
    libgraphite2.so.3 => /usr/lib/x86_64-linux-gnu/libgraphite2.so.3 (0x00007fae8ba94000)
    libbsd.so.0 => /lib/x86_64-linux-gnu/libbsd.so.0 (0x00007fae8b87d000)
    libgpg-error.so.0 => /lib/x86_64-linux-gnu/libgpg-error.so.0 (0x00007fae8b65d000)


As I am on my notebook with Debian 9 and on Debian / Ubuntus and other Linuxes udevd daemon and connected libraries are long time existing, it was obvious the problems to dependencies are because of missing library links (or library version inconsistencies).

To find out what kind of libudev.so* are present I used slocate package (locate) command.


noah:~# locate libudev.so
/lib/i386-linux-gnu/libudev.so.1
/lib/i386-linux-gnu/libudev.so.1.6.10
/lib/x86_64-linux-gnu/libudev.so
/lib/x86_64-linux-gnu/libudev.so.1
/lib/x86_64-linux-gnu/libudev.so.1.6.10


Obviously the missing library libudev.so.0 was present under a different name so I give a try to just create a new symbolic link from libudev.so.1 to libudev.so.0 hoping that the libudev library version Blue Jeans was compiled against did not have a missing binary objects from the ones installed on my OS.


noah:~# ln -sf /lib/x86_64-linux-gnu/libudev.so.1 /lib/x86_64-linux-gnu/libudev.so.0


noah:~# ldd /opt/bluejeans/bluejeans-bin |grep -i 'not found'


Above command did not return any missing libraries, so I went further and executed it.

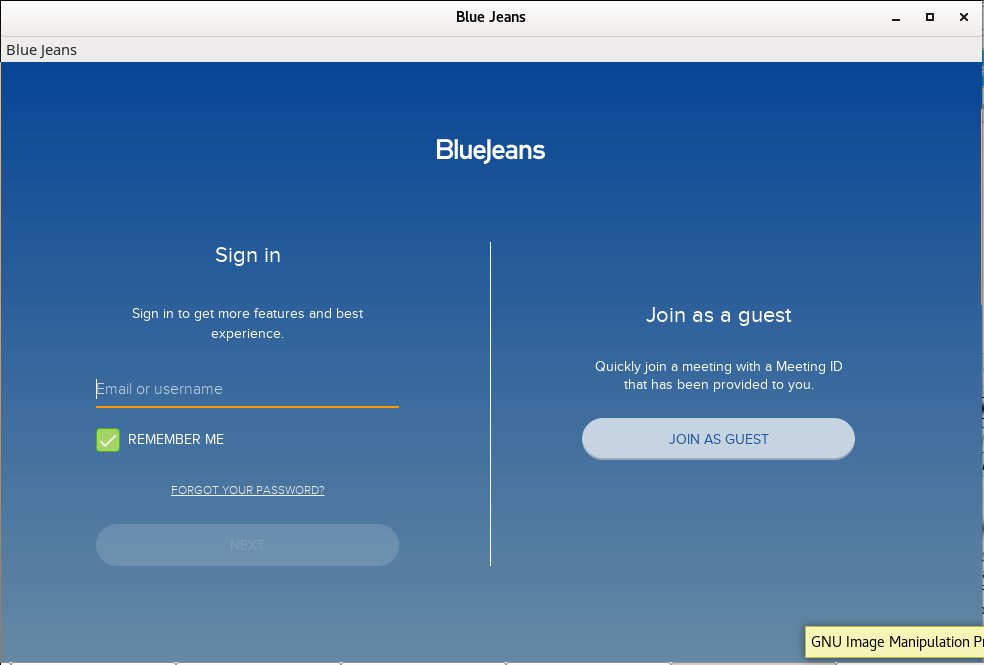
6. Go start BlueJeans and register a user or use the anonymous login to be ready for the scheduled online meting

… And, Guess, what it works! 🙂


noah:~# /opt/bluejeans/bluejeans-bin


To make it easy to remember to later start the binary under a familiar name, I've also created a link into


noah:~# ln -sf /opt/bluejeans/bluejeans-bin /usr/bin/bluejeans


noah:~#  sudo su – hipo
hipo@noah:~$ /usr/bin/bluejeans


bluejeans-video-conferencing-online-sharing-meeting-software-running-on-debian-gnu-linux-screenshot
 

How to use zip command to archive directory and files in GNU / Linux

Monday, November 6th, 2017

how-to-use-zip-command-to-archive-directory-and-files-in-gnu-linux-and-freebsd

How to zip directory or files with ZIP command in LInux or any other Unix like OS?

Why would you want to ZIP files in Linux if you have already gzip and bzip archive algorithms? Well for historical reasons .ZIP is much supported across virtually all major operating systems like Unix, Linux, VMS, MSDOS, OS/2, Windows NT, Minix, Atari and Macintosh, FreeBSD, OpenBSD, NetBSD, Amiga and Acorn RISC and many other operating systems.

Assuming that zip command line tool is available across most GNU / Linux and WinZIP is available across almost all Windowses, the reason you might need to create .zip archive might be to just transfer the files from your Linux / FreeBSD desktop system or a friend with M$ Windows.

So below is how to archive recursively files inside a directory using zip command:
 

 $ zip -r myvacationpics.zip /home/your-directory/your-files-pictures-text/


or you can write it shorter with omitting .zip as by default zip command would create .zip files


$ zip -r whatever-zip-file-name /home/your-directory/your-files-pictures-text/


The -r tells zip to recurse into directories (e.g. archive all files and directories inside your-files-pictures-text/)

If you need to archive just a files recursively with a file extension such as .txt inside current directory


$ zip -R my-zip-archive.zip '*.txt'


Above command would archive any .txt found inside your current directory if the zip command is for example issued from /home/hipo all found files such as /home/hipo/directory1, /home/hipo/directory2, /home/hipo/directory2/directory3/directory4 and all the contained subdirs that contain any .txt extension files will be added to the archive.

For the Linux desktop users that are lazy and want to zip files without much typing take a look at PeaZip for Linux 7Z / ZIP GUI interface tool