Posts Tagged ‘line’
Thursday, June 19th, 2014 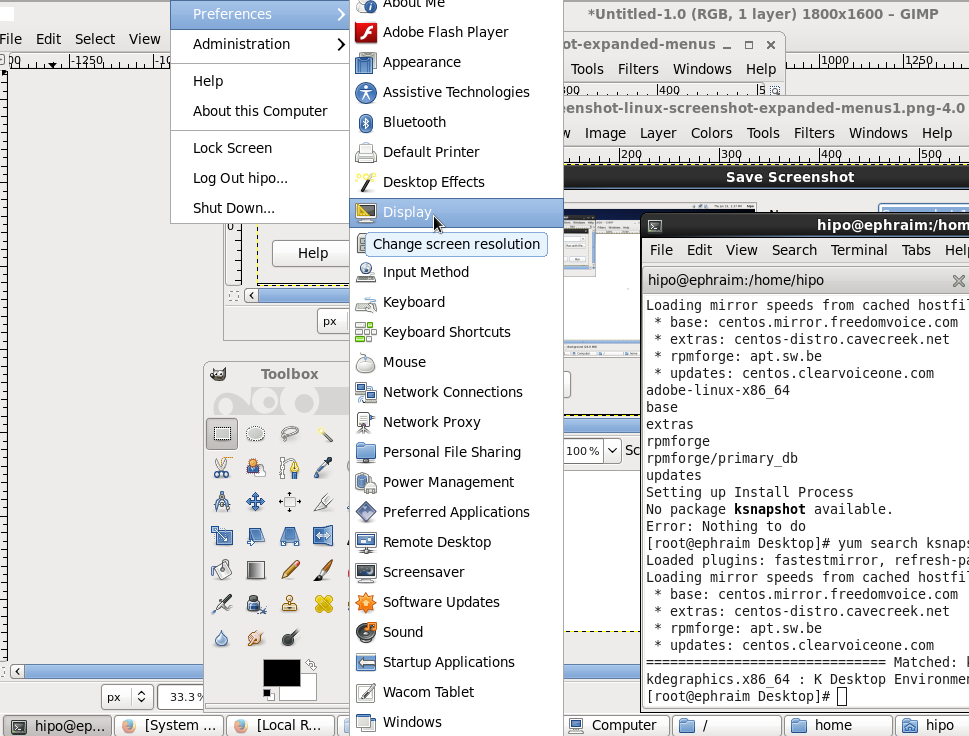
If you're using actively Linux or FreeBSD on Desktop PC and experimenting with software, taking personal notes, developing software for Linux, writting documentation, participating in free software community etc., you will certainly need use screenshot heavily.
Taking a screenshot in Linux is done in same way as in any modern operating system by using the Print Screen (PrtScr) button, however there are few Nuts & Bolts of Linux screenshotting, to take advantage of full power of screenshot creation (i.e. be able to do some screenshot customization) which are not offered by default screenshot utilities (GNOME – gnome-screenshot and KDE's KSnapshot)
Here are few useful Linux /BSD Screenshot Tips and Tricks:
If you have done screenshots of Linux running programs more than few times already, you have probably noticed the usual way to screenshot by pressing Print Screen (PrtScr) button to take snapshot of the expanded GNOME / KDE menu is not working. In that order of thought you probably wondered whether it is possible to take a screenshot of an expanded menus? As a Linux user, I've been asking myself this question too, and feeling irritated that I cannot prepare screenshot of a GNOME running application expanded menu. I've found two ways (though there are probably many more to make screenshot of an expanded Linux menu). Here is how:
Create screenshot of running application expanded menus
1. Taking screenshot of expanded menu using the command line
As with everything in Linux, there aremultiple ways to make screenshot of expanded Linux menus.
- Make timed screenshot of the screen scheduled to screenshot after a set number of seconds.
The quickest way for to screenshot expanded menu is to use gnome-panel-screenshot or ksnapshot from command line. It is interesting pressing Prt Sc kbd button in GNOME invokes gnome-screenshot and in KDE uses ksnapshot
gnome-panel-screenshot --delay 5
To not spend time running it from gnome-terminal (in GNOME desktop), press Alt+F2 (simultaneously) and use the Run Application command shortcut.
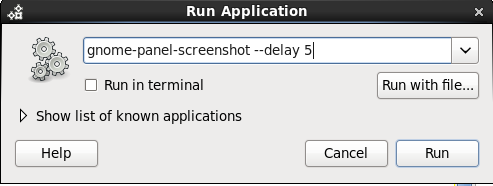
This will instruct Screenshot utility to wait for 5 seconds before capturing your desktop this should be enough time for you to go to navigate to expanded menu which you want to get screenshotted.
- Make timed screenshot of the screen in GUI with GIMP
(If you're wonderhing what kind of Linux is on screenshot – this is Trisquel – Run Free! GNU / Linux. It is a Spanish distribution focused on providing 100% free software in it – without proprietary firmware or software. Trisquel is based on Debian and uses the dpkg / apt-get package managers. Trisquel is a recommended Linux to use by Richard Stallman and The Free Software Foundation).
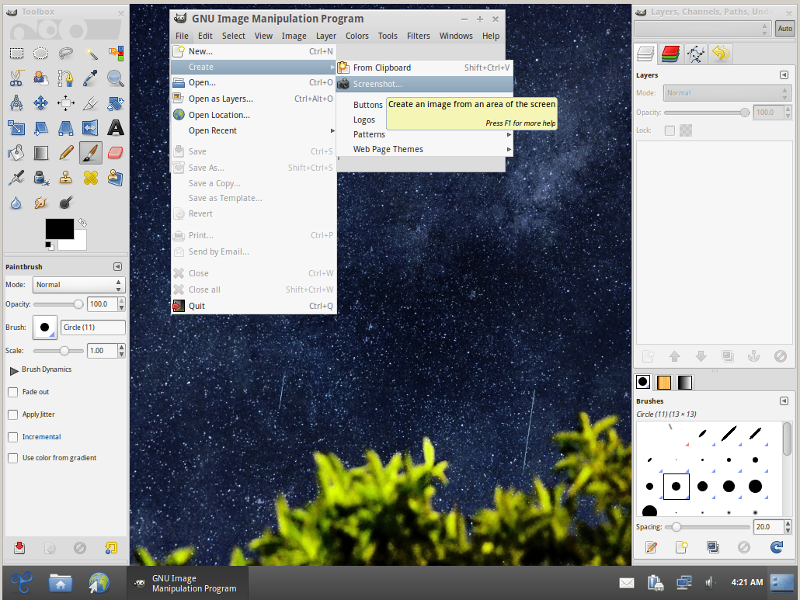
To make timed screenshot with GIMP use menus:
File -> Create -> Screenshot
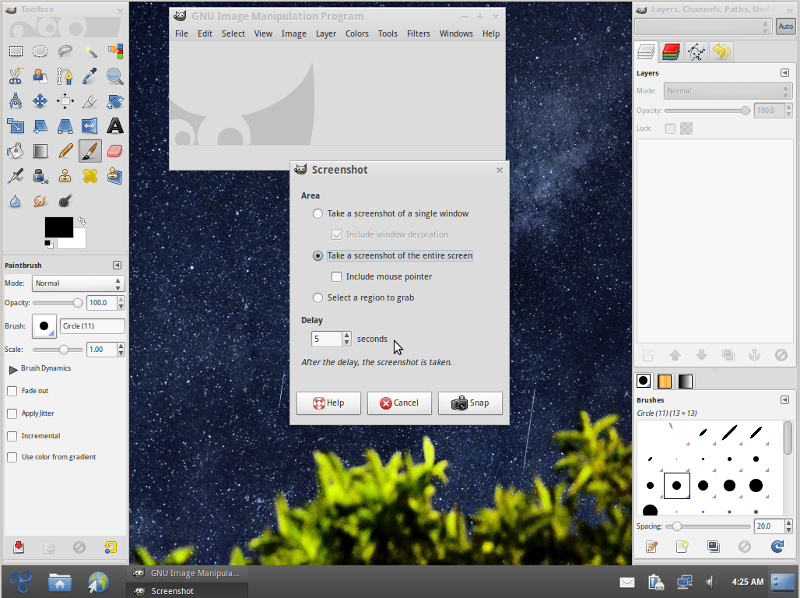
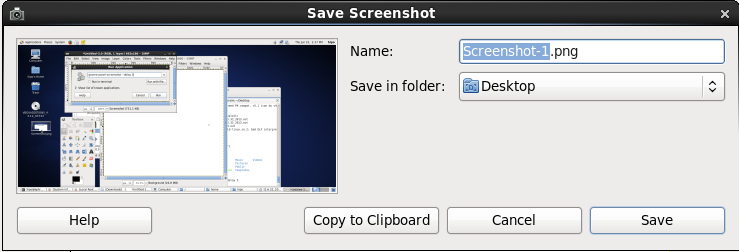
Chosee whether you want to Take screenshot of the entire screen or a Region to Grab and set your wanted Delay
Screenshot will be prepared on $HOME/Desktop, after set time.
Tags: BSD, Gnome, line, Linux, make, menus, running, screenshot, time, use
Posted in Everyday Life, FreeBSD, Linux and FreeBSD Desktop, Various | No Comments »
Tuesday, August 19th, 2014 
I'm filling up a TOP (Turn to Production) form for a project where my part as Web and Middleware Engineer included install of Tomcat 7 and Java 1.7 on Windows server 2008 R2 standard. TOP is required Excel sheet standard document used by many large companies to fill in together with Project Manager before the server is to be launched into Production mode.
Therefore I needed to find out previously installed Tomcat and Java version, here is how:
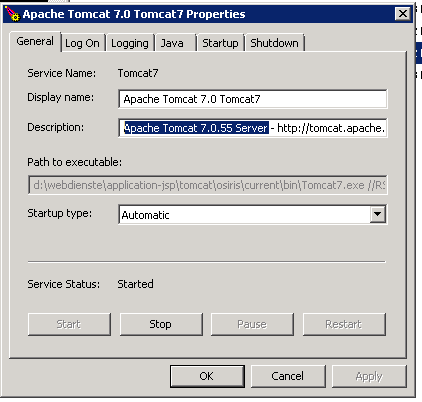
1. Go to Tomcat install directory and (click twice) run twice Tomcat7w
As tomcat is installed in Custom location in D:webdienste in this case I had to run:
D:webdiensteapplication-jsptomcatapplication-namecurrentbinTomcat7w.exe
I run it using command line (cmd.exe), however you can run it via Windows Explorer, if you're lazy typing.
You will get a window pop up like on below screenshot:
In this case Installed Tomcat version was 7.0.55
If you need to check the version on older Tomcat application server install you can run instead Tomcat6w – whether its Tomcat version 6 or Tomcat5w – for Tomcat ver. 5
In order to Check the java version the quickest way is via command line, again run cmd.exe from
Start -> Run -> cmd.exe
Then cd to whenever is Java VM installed the usual location where it gets installed for Java 1.7 on Windows is:
C:Program FilesJavajre7bin
Java 8 common location is:
C:Program FilesJavajre8bin
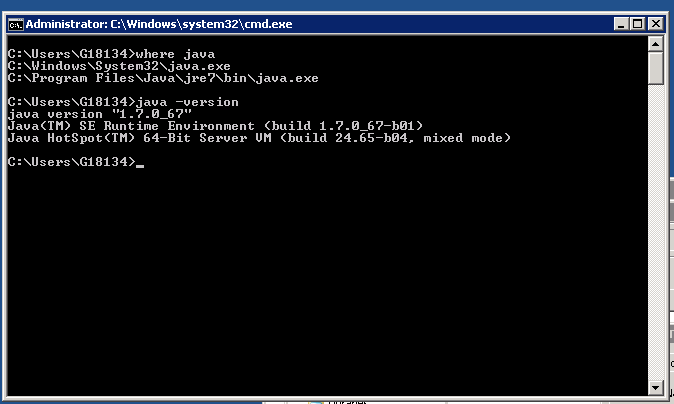
Java would automatically add PATH to Windows default PATH definitions during install, hence to find out exactly where java is installed on Windows server, type in cmd:
where java
Then to check the exact installed Java version on Win host is by invoking java (jre) cli with -version parameter:
java -version
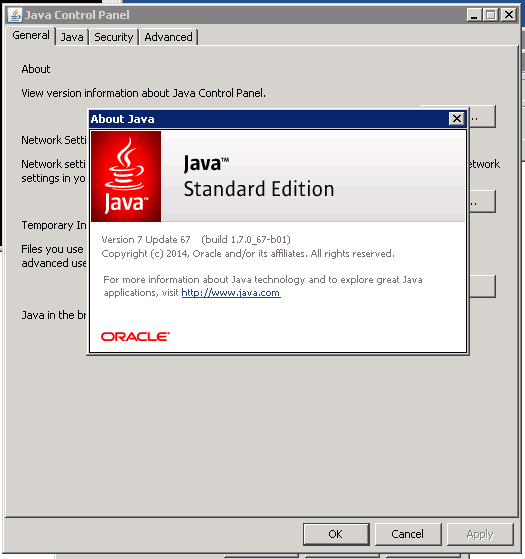
If you're lazy to type in commands, you can also check Java version in Windows from GUI by using:
Java Control Panel
To launch it in:
Start -> (Search Program and Files)
field type:
Java Conf and click on Java Control Panel
Then click on
General (tab) -> About
Tags: command, exe, How to, Installed Tomcat, line, location, Path, run, type, version, windows explorer
Posted in Everyday Life, System Administration, Various, Web and CMS, Windows | 1 Comment »
Thursday, January 22nd, 2015 
I'm responsbile for a project environment made up of 3 components which is occasionally dying. Here is a short raw overview of environment
- Apache Reverse Proxy (entry door to app server)
- Tomcat Server with an Application enabling web access
- A Java Standalone application using SQLite database
The Tomcat and Java Standalone application is running on top of Windows 2008 RC2 Standard, the overall environment is becoming inacessible periodically and in order to solve that the customer decided to implement a daily Windows server reboot in my opinion this is very bad approach as it is much better to just set an auto reboot of each of components using few tiny batch scripts and Windows Taskmgr, however as the customer is king and decided to implement the reboot its their own thing.
However even fter the daily server reboot was set once a week or so the application was becoming inaccessible and a Tomcat server restart was necessery as a fix.
Finally as a work-around to the issue, I've proposed the logical thing to automatically restart Tomcat once a day early in morning, here is how Tomcat auto Restart was implemented on the Win server:
1. Check out the name of running Tomcat service
First thing is to use the sc command to find out the Tomcat application name:
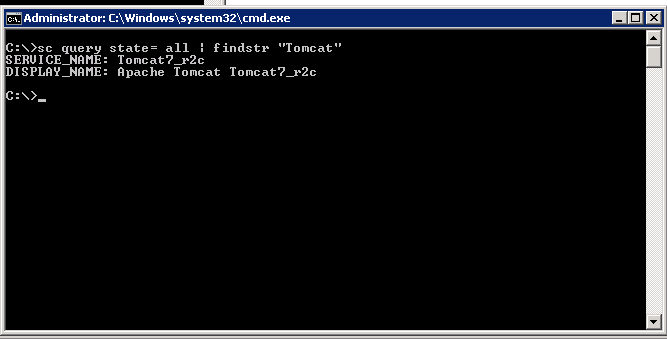
C:UsersGeorgi>sc query state= all| findstr "Tomcat"
SERVICE_NAME: Tomcat7_r2c
DISPLAY_NAME: Apache Tomcat Tomcat7_r2c
C:UsersGeorgi>
2. Create bat script to stop and start Tomcat service
Press keyboard Win-button + R, start notepad type inside:
@echo off
sc stop Tomcat7_r2c && sc start Tomcat7_r2c
(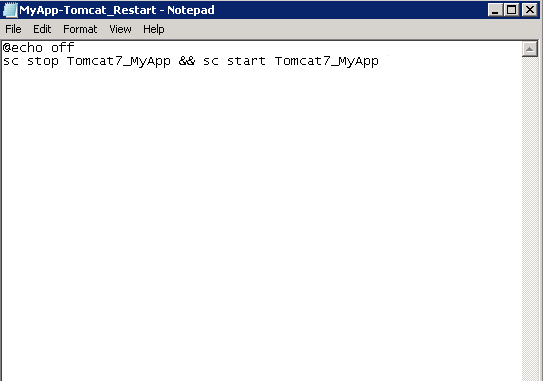
Don't be confused from screenshot that I have Tomcat7_MyApp instead of Tomcat7_r2c, but I made screenshot in hurry for another app.
Save the file, somewhere (preferrably) in application folder/bin/ it is best to save it once with bat extension MyApp-Tomcat_Restart.bat and once as MyApp-Tomcat_Restart.xml (XML format file is later needed for import to Task Scheduler which understands .XMLs). The .bat file is good to have because it is useful to somtimes restart Tomcat manually by running it (in case of some sudden Tomcat Appserver occurs even though the auto-restart script).
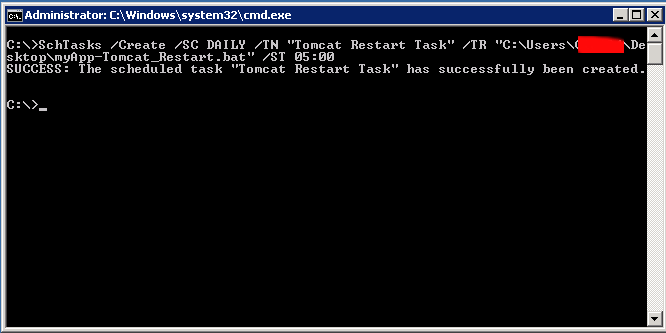
3. Create new Task using command line (cmd.exe)
Task can be created also from command line using following syntax:
schtasks /Create [/S [/U [/P [ ]]]]
/XML <xmlfile> /TN <taskname>
Simple way to create a new Windows task is shown in below command, it will set my Tomcat Restart script to run everyday in 05:00 early morning when no employees are using the system:
schTasks /Create /SC DAILY /TN "My Task" /TR "C:UsersGeorgiDesktopmyApp-Tomcat_Restart.bat" /ST 05:00
SUCCESS: The scheduled task "Tomcat Restart Task" has successfully been created.
4. Create / Import new Windows "Cron" job
Alternative way is to use Task Scheduler GUI frontend and create new (Basic Task) or import just created script
To run Windows Task Scheduler from comamnd line :
Taskschd.msc
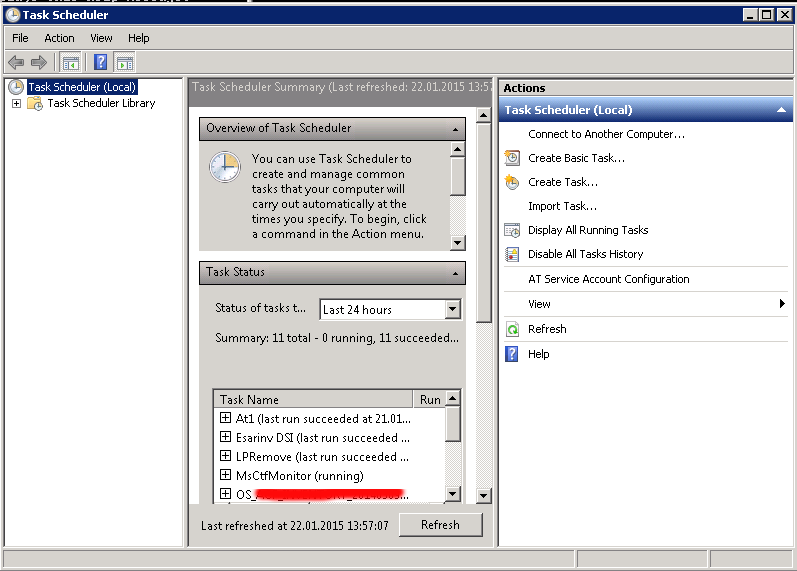
To import already existing .XML formatted file for Task scheduler, right click on the Task Scheduler (Local) and select Import task
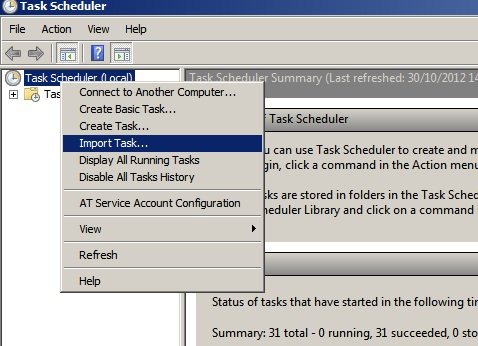
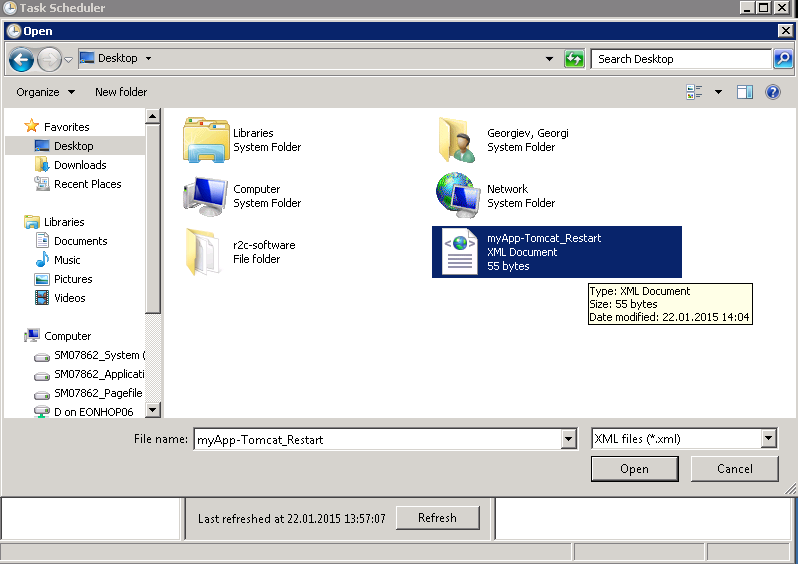
Import the myApp-Tomcat_Restart.XML previously created file
Adjust settings to suit your needs, but what change atleast:
- the path to the myApp-Tomcat_Restart.bat file in Actions tab
- the Local User account with which script will be running (administrator) in General tab
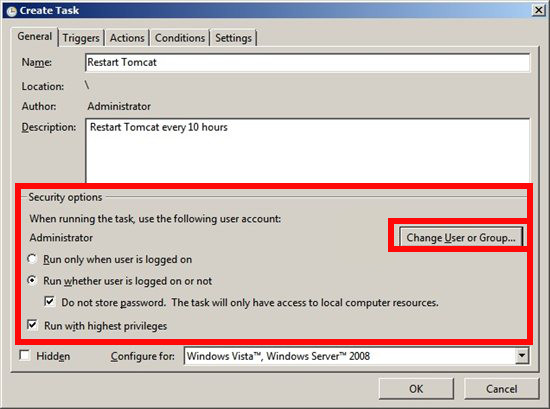
After making all changes you will be prompted for server Administrator account password
5. check existing Win Cron job from command line
To see the configured (Scheduled Tasks) in command line mode with a command:
Schtasks.exe
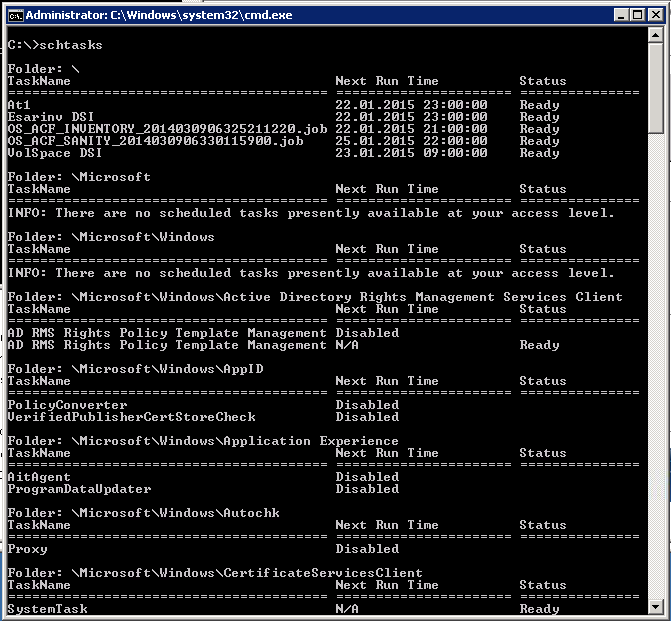
The command is Windows equivalent to UNIX / Linux's crontab, e.g.:
crontab -u root -l
6. Delete existing Windows Task Job from Command line
If you happen to need to delete just created task or any other task from command line (Assuming that you know the previously created task name), use cmd:
C:>schtasks /Delete /TN "Tomcat Restart Task"
WARNING: Are you sure you want to remove the task "Tomcat Restart Task" (Y/N)? y
SUCCESS: The scheduled task "Tomcat Restart Task" was successfully deleted.
Task completed, Tomcat will auto-restart on Windows host at your scheduled time. Feedback is mostly welcome 🙂
Enjoy
Tags: Apache Tomcat Tomcat7_r2c, auto reboot, command, community, Create Import, customer, Delete, door, environment, job, line, opinion, scripts, state, syntax, thing, Tomcat Restart Task, Windows Taskmgr
Posted in Everyday Life, System Administration, Various, Web and CMS, Windows | 2 Comments »
Sunday, October 30th, 2011 
Have you ever been in need to execute some commands scheduled via a crontab, every let’s say 5 seconds?, naturally this is not possible with crontab, however adding a small shell script to loop and execute a command or commands every 5 seconds and setting it up to execute once in a minute through crontab makes this possible.
Here is an example shell script that does execute commands every 5 seconds:
#!/bin/bash
command1_to_exec='/bin/ls';

command2_to_exec='/bin/pwd';

for i in $(echo 1 2 3 4 5 6 7 8 9 10 11); do

sleep 5;

$command1_to_exec; $command2_to_exec;

done
This script will issue a sleep every 5 seconds and execute the two commands defined as $command1_to_exec and $command2_to_exec
Copy paste the script to a file or fetch exec_every_5_secs_cmds.sh from here
The script can easily be modified to execute on any seconds interval delay, the record to put on cron to use with this script should look something like:
# echo '* * * * * /path/to/exec_every_5_secs_cmds.sh' | crontab -
Where of course /path/to/exec_every_5_secs_cmds.sh needs to be modified to a proper script name and path location.
Another way to do the on a number of seconds program / command schedule without using cron at all is setting up an endless loop to run/refresh via /etc/inittab with a number of predefined commands inside. An example endless loop script to run via inittab would look something like:
while [ 1 ]; do

/bin/ls

sleep 5;

done
To run the above sample never ending script using inittab, one needs to add to the end of inittab, some line like:
mine:234:respawn:/path/to/script_name.sh
A quick way to add the line from consone would be with echo:
echo 'mine:234:respawn:/path/to/script' >> /etc/inittab
Of course the proper paths, should be put in:
Then to load up the newly added inittab line, inittab needs to be reloaded with cmd:
# init q
I've also red, some other methods suggested to run programs on a periodic seconds basis using just cron, what I found in stackoverflow.com's as a thread proposed as a solution is:
* * * * * /foo/bar/your_script

* * * * * sleep 15; /foo/bar/your_script

* * * * * sleep 30; /foo/bar/your_script

* * * * * sleep 45; /foo/bar/your_script
One guy, even suggested a shorted way with cron:
0/15 * * * * * /path/to/my/script
Tags: bashcommand, basis, com, command, command2, copy, copy paste, course, cron, crontab, echo 1, echo echo, endless loop, exec, file, foo, foo bar, freebsd, gnu linux, How to, init, inittab, interval, line, Linux, location, loop, mine, minute, name, nbsp, number, Path, predefined commands, pwd, record, refresh, respawn, run, script, script name, secs, SHA, Shell, shell script, sleep, something, stackoverflow, thread, time, time interval, way
Posted in Linux, Linux and FreeBSD Desktop, System Administration, Various | 1 Comment »
Thursday, February 14th, 2013 
I have a Debian GNU / Linux squeeze with bluetooth and bluetooth is started automatically on system boot. This is pretty annoying, cause I use bluetooth quite rarely.
disable / enable bluetooth via terminal is controlled via Linux sysfs virtual filesystem. The command to disable bluetooth one time is:
debian:~# echo 0 > /sys/devices/platform/thinkpad_acpi/bluetooth_enable
It is efficient in terms of energy saving especially if you use often your notebook on battery to turn off bluetooth permanently and only enable it when needed with:
debian:~# echo 1 > /sys/devices/platform/thinkpad_acpi/bluetooth_enable
To permanently disable bluetooth on Linux boot use:
# service bluetooth stop
In /etc/rc.local before exit 0 line place:
echo 0 > /sys/devices/platform/thinkpad_acpi/bluetooth_enable
An alternative method to permanently disable bluetooth (on other non-Thinkpad – any brand laptops) is via rfkill (bluetooth device control interface), on Ubuntu rfkill is installed by default but Debian users has to explicitly install it via apt:
debian:~# apt-get install –yes rfkill
Once rfkill is installed on host put a line before exit 0 in /etc/local:
rfkill block bluetooth
Tags: acpi, alternative, brand, control interface, debian gnu, debian users, echo 1, exit, lenovo thinkpad, line, Linux, linux ibm, notebook, one time, platform, squeeze, system boot, thinkpad laptops, Ubuntu, virtual filesystem
Posted in Bluetooth, Linux and FreeBSD Desktop, Various | No Comments »
Saturday, April 7th, 2012 I've recently wanted to use PHP's embedded system(""); – external command execute function in order to use ls + wc to calculate the number of files stored in a directory. I know many would argue, this is not a good practice and from a performance view point it is absolutely bad idea. However as I was lazy to code ti in PHP, I used the below line of code to do the task:
<?

echo "Hello, ";

$line_count = system("ls -1 /dir/|wc -l");

echo "File count in /dir is $line_count \n";

?>
This example worked fine for me to calculate the number of files in my /dir, but unfortunately the execution output was also visialized in the browser. It seems this is some kind of default behaviour in both libphp and php cli. I didn't liked the behaviour so I checked online for a solution to prevent the system(); from printing its output.
What I found as a recommendations on many pages is instead of system(); to prevent command execution output one should use exec();.
Therefore I used instead of my above code:
<?

echo "Hello, ";

$line_count = exec("ls -1 /dir/|wc -l");

echo "File count in /dir is $line_count \n";

?>
By the way insetad of using exec();, it is also possible to just use ` (backtick) – in same way like in bash scripting's “.
Hence the above code can be also written for short like this:
<?

echo "Hello, ";

$line_count = `ls -1 /dir/|wc -l`;

echo "File count in /dir is $line_count \n";

?>
🙂
Tags: Auto, backtick, bad idea, behaviour, browser, code lt, command, command execution, count, default behaviour, dir, Draft, exec, execution, file, fine, function, idea, kind, libphp, line, online, order, performance, performance view, quot, solution, task, way
Posted in Programming, Web and CMS | 2 Comments »
Sunday, June 12th, 2011 I’ve been assigned the task to add on one of the qmail powered servers I administrate about 50 email addresses via command line.
Each email addresses was required to be configured to have the same mail password.
Adding the email addresses via an interface would be a killing time consuming task and will probably require at least 1 hour of time to add the emails with qmailwebmin, qadmin, qubit or the other vpopmail qmail web administration interfaces available nowdays.
To solve the task, I’ve used a line oner bash shell script which reads all my 80 emails from a file and adds them with vpopmail’s command line tool vpasswd on the mail server.
Here is the one liner shell script I’ve written to solve the task:
debian:~# while read line; do vadduser $line Email_Pass_Phrase; done < email_list_file.txt
In above’s code I’ve used the email_list_file.txt file is a text file on the server and contains list of all my 50 email addresses, where each line in the file contains one email. The Email_Pass_Phrase is actually the password I’ve set for all the new email addresses being created with vpasswd
That’s all now the 50 email addresses on the server are created and I’ve saved at least one hour of boring repeating actions in the browser 😉
Tags: administrate, bash shell script, browser, command, command line tool, consuming, email accounts, email addresses, email list, file, file txt, interface, killing time, line, little shell, lt, mail password, mail server, new email, nowdays, password, phrase, qadmin, Qmail, qubit, read, servers, Shell, ssh, time, time consuming task, tool, TXT, vadduser, vpasswd, vpopmail, web administration
Posted in Qmail, System Administration | No Comments »
Monday, March 21st, 2011 I’m trying to install subscribe-to-comments wordpress plugin in order to make my users to easily set a tick and receive new emails if somebody replies to their comments in my blog. Pitily downloading and trying to install the subscribe-to-comments wordpress plugin was failing after it’s activation with an error message:
PHP Fatal error: Cannot redeclare show_subscription_checkbox() (previously declared in /var/www/blog/wp-content/plugins/subscribe-to-comments/subscribe-to-comments.php:12) in /var/www/blog/wp-content/plugins/subscribe-to-comments.php on line 58"
I did my best to edit the subscribe-to-comments.php to fix up the fatal error but it was no go, so after a bunch of research I’ve found out somebody created a new version of the plugin under the name subscribe-to-comments-reloaded .
I’ve proceeded and gave a try to subscribe-to-comments-reloaded as a substitute to the old broken subscribe-to-comments .
Enabling the subscribe-to-commets-reloaded worked out of the box and the plugin now works perfectly fine and even better is enabling all the functionaity of the subscribe-to-comments
Cheers 🙂
Tags: activation, blog, bunch, Cheers, ERROR, error message, fatal error, fine, functionaity, line, name, order, php, plugin, quot, redeclare, show, Solving "Cannot redeclare show_subscription_checkbox() (previously declared in .. wp-content/plugins/subscribe-to-comments/subscribe-to-comments.php", Subscription, substitute, tick, var, version, www
Posted in Various, Web and CMS, Wordpress | 3 Comments »
Sunday, February 26th, 2012 In my last article, I've explained How to create PNG, JPG, GIF pictures from one single PDF document
Convertion of PDF to images is useful, however as PNG and JPEG graphic formats are raster graphics the image quality gets crappy if the picture is zoomed to lets say 300%.
This means convertion to PNG / GIF etc. is not a good practice especially if image quality is targetted.
I myself am not a quality freak but it was interesting to find out if it is possible to convert the PDF pages to SVG (Scalable Vector Graphics) graphics format.
Converting PDF to SVG is very easy as for GNU / Linux there is a command line tool called pdf2svg
pdf2svg's official page is here
The traditional source way compile and install is described on the homepage. For Debian users pdf2svg has already existing a deb package.
To install pdf2svg on Debian use:
debian:~# apt-get install --yes pdf2svg

...
Once installed usage of pdf2svg to convert PDF to multiple SVG files is analogous to imagemagick's convert .
To convert the 44 pages Projects.pdf to multiple SVG pages – (each PDF page to a separate SVG file) issue:
debian:~/project-pdf-to-images$ for i in $(seq 1 44); do \

pdf2svg Projects.pdf Projects-$i.SVG $i; \

done
This little loop tells each page number from the 44 PDF document to be stored in separate SVG vector graphics file:
debian:~/project-pdf-to-images$ ls -1 *.svg|wc -l

44
For BSD users and in particular FreeBSD ones png2svg has a bsd port in:
/usr/ports/graphics/pdf2svg
Installing on BSD is possible directly via the port and convertion of PDF to SVG on FreeBSD, should be working in the same manner. The only requirement is that bash shell is used for the above little bash loop, as by default FreeBSD runs the csh.
On FreeBSD launch /usr/local/bin/bash, before following the Linux instructions if you're not already in bash.
Now the output SVG files are perfect for editting with Inkscape or Scribus and the picture quality is way superior to old rasterized (JPEG, PNG) images
Tags: Auto, bash shell, bsd users, command line tool, Convert, Converting, convertion, crappy, deb, deb package, debian project, debian users, document, documentConvertion, Draft, editting, format, freak, GIF, gnu linux, graphic formats, Graphics, graphics format, graphics graphics, homepage, Image, image quality, ImageMagick, inkscape, issue, JPG, jpg gif, line, Linux, nbsp, number, package, page, pdf document, picture, png, png images, Projects, raster graphics, rasterized, Scalable, scalable vector graphics, Scribus, Shell, svg file, svg files, tool, traditional source, use, vector, way
Posted in Linux, Linux and FreeBSD Desktop, System Administration | No Comments »
Saturday, May 28th, 2011 If you’re installing some PHP based CMS/blog like (Joomla or WordPress) or some kind of template and suddenly you stumble on a error:
Deprecated: Function split() is deprecated in /usr/local/www/websitedomain/templates/youbizz/html/modules.php on line 78
In order to fix that the file which spits the error message, in my case modules.php needs to be modified and the split php function has to be substituted with explode on every occuring place.
I experienced this error on FreeBSD 7_2 with php version 5.3.5 installed from ports.
This simple fix works fine.
Tags: blog, cms, Deprecated, ERROR, error message, file, fine, fix, freebsd, function, kind, line, order, php 5, place, ports, template, usr, version, websitedomain, Wordpress, www, youbizz
Posted in FreeBSD, Joomla, System Administration, Wordpress | 4 Comments »


Solving “Cannot redeclare show_subscription_checkbox() (previously declared in .. wp-content/plugins/subscribe-to-comments/subscribe-to-comments.php”
Monday, March 21st, 2011I’m trying to install subscribe-to-comments wordpress plugin in order to make my users to easily set a tick and receive new emails if somebody replies to their comments in my blog. Pitily downloading and trying to install the subscribe-to-comments wordpress plugin was failing after it’s activation with an error message:
PHP Fatal error: Cannot redeclare show_subscription_checkbox() (previously declared in /var/www/blog/wp-content/plugins/subscribe-to-comments/subscribe-to-comments.php:12) in /var/www/blog/wp-content/plugins/subscribe-to-comments.php on line 58"I did my best to edit the subscribe-to-comments.php to fix up the fatal error but it was no go, so after a bunch of research I’ve found out somebody created a new version of the plugin under the name subscribe-to-comments-reloaded .
I’ve proceeded and gave a try to subscribe-to-comments-reloaded as a substitute to the old broken subscribe-to-comments .
Enabling the subscribe-to-commets-reloaded worked out of the box and the plugin now works perfectly fine and even better is enabling all the functionaity of the subscribe-to-comments
Cheers 🙂
Tags: activation, blog, bunch, Cheers, ERROR, error message, fatal error, fine, functionaity, line, name, order, php, plugin, quot, redeclare, show, Solving "Cannot redeclare show_subscription_checkbox() (previously declared in .. wp-content/plugins/subscribe-to-comments/subscribe-to-comments.php", Subscription, substitute, tick, var, version, www
Posted in Various, Web and CMS, Wordpress | 3 Comments »