Posts Tagged ‘run’
Thursday, May 22nd, 2014 
I'm doing another server services decomissioning and part of decomissioning plan is: Removing application and all related scripts from related machines (FTP, RSYNC, …). In project documentation I found a list with Cron enabled shell scripts:
#Cron tab excerpt:
1,11,21,31,41,51 * * * */webservices/tools/scripts/rsync_portal_sync.sh
that has to be deleted, however there was nowhere mentioned under what kind of credentials (with what kind of user) are the cron scripts running? Hence I had to look up all users that has cronjobs and find inside each user's cronjobs whether respective script is set to run. Herein I will explain shortly how I did that.
Cronjobs by default has few locations from where cronjobs are setupped depending on their run time schedule. First place I checked for the scripts is
/etc/crontabs
 # cat /etc/crontabs SHELL=/bin/sh

PATH=/usr/bin:/usr/sbin:/sbin:/bin:/usr/lib/news/bin

MAILTO=root

#

# check scripts in cron.hourly, cron.daily, cron.weekly, and cron.monthly

#

-*/15 * * * * root test -x /usr/lib/cron/run-crons && /usr/lib/cron/run-crons >/dev/null 2>&1

59 * * * * root rm -f /var/spool/cron/lastrun/cron.hourly

14 4 * * * root rm -f /var/spool/cron/lastrun/cron.daily

29 4 * * 6 root rm -f /var/spool/cron/lastrun/cron.weekly

44 4 1 * * root rm -f /var/spool/cron/lastrun/cron.monthly
I was not really user via what user is shell script run, therefore I looked first if someone doesn't set the script to run via crontab's standard locations for Daily, Hourly,Weekly and Monthly cronjobs:
a) Daily set cron jobs are in:
/etc/cron.daily/
b) Hourly set cron jobs:
/etc/cron.hourly
c) Weekly cron jobs are in:
/etc/cron.weekly/
d) Monthly cron jobs:
/etc/cron.monthly
There is also a location read by crontab for all Software (package distribution) specific cronjobs – all run under root user privileges.:
e) Software specific script cron jobs are in:
/etc/cron.d/
As the system has about 327 users in /etc/passwd, checking each user's cronjob manually with:
# crontab -u UserName -l
was too much time consuming thus it is a good practice to list
/var/spool/cron/*
directory and to see which users has cron jobs defined
# ls -al /var/spool/cron/*
-rw——- 1 root root 11 2007-07-09 17:08 /var/spool/cron/deny
/var/spool/cron/lastrun:
total 0
drwxr-xr-x 2 root root 80 2014-05-22 11:15 .
drwx—— 4 root root 120 2008-02-25 15:45 ..
-rw-r–r– 1 root root 0 2014-05-22 04:15 cron.daily
/var/spool/cron/tabs:
total 8
drwx—— 2 root root 72 2014-04-03 03:43 .
drwx—— 4 root root 120 2008-02-25 15:45 ..
-rw——- 1 root root 4901 2014-04-03 03:43 root
/var/spool/cron – is crond (/usr/bin/cron/)'s spool directory.
# ls -al /var/spool/cron/tabs/ total 8

drwx------ 2 root root 72 2014-04-03 03:43 .

drwx------ 4 root root 120 2008-02-25 15:45 ..

-rw------- 1 root root 4901 2014-04-03 03:43 root
Above output shows only root superuser has defined crons.
Alternative way to check all user crontabs is via quick Linux one liner shell script show all user cron jobs
for i in $(cat /etc/passwd | sed -e "s#:# #g" | awk '{ print $1 }'); do

echo "user $i --- crontab ---";

crontab -u $i -l 2>&1 >/dev/null;

echo '----------';

done|less
Note that above short script has to run with root user. Enjoy 🙂
Tags: checking, cron, cron jobs, etc passwd, jobs, kind, lib, Linux, root, root root, run, script, scripts, show, spool, time consuming, total, var
Posted in Everyday Life, System Administration, Various | No Comments »
Saturday, June 21st, 2014 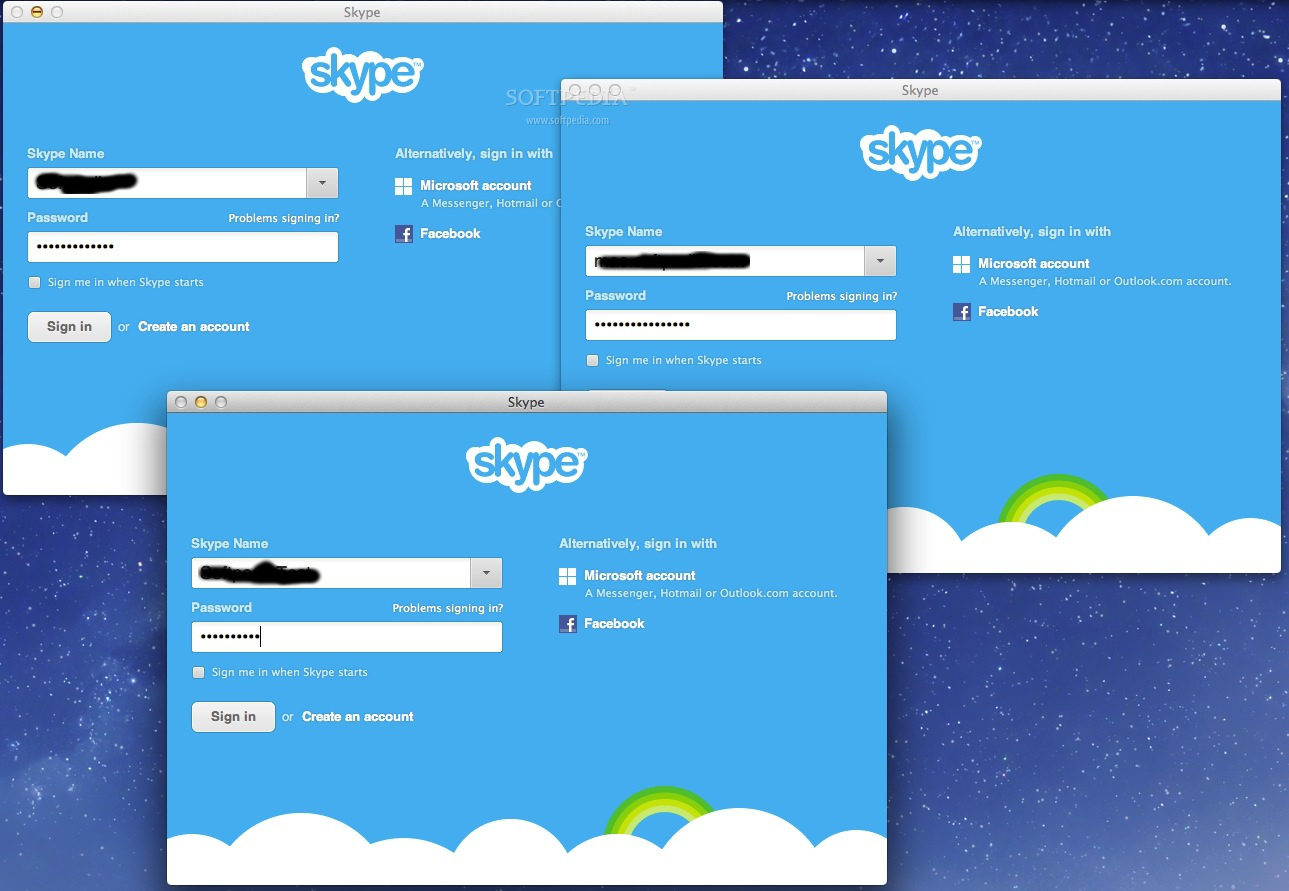
For people running Mac OS X, the question of how is it possible to use 2 skype accounts in parallel on Mac probably makes good sense?
I don't own a Mac notebook and thefore I'm a Mac newbie, however, I'm into situation where I and my wife Svetlana went (for 3 days) to my hometown Dobrich and we have with us only her Mac OS X powered Mac Book air.
One user is already logged in Skype, (my wife) is expecting some relatives and friends to contact us and same time I had to login to check few servers via ssh and discuss some server downtime issues from yesterday in Skype .
Thus we need 2 skype instances to run separately on her Macbook air powered PC with Mac OS X Leopard
Earlier I've blogged how to make 2 and more Skype accounts work simultaneously on one Windows PC because I had to set it up for a company, in this short article I will explain how is possible to run many skype clients on Mac OS X.
1. Open Mac Terminal from Finder

2. In Terminal run the first Skype Instance
Type in Terminal:
open /Applications/Skype.app/Contents/MacOS/Skype
3. Run Second Skype instance
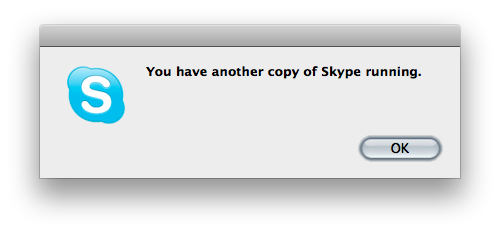
In older Skype Mac OS versions, I read the
/secondary
Skype command option was there and could be used to run a second parallel skype instance on Mac, however in newer releases this option was removed and if you try to invoke it warning window pops up saying an instance is already running.
To get around the issue and run the second Skype, quickest way is to run another Skype client under privileged user through sudo command (this is unsecure – but anyways as Mac OS is proprietary and we don't have access to code and probably there are tons of spy and report software integrated into the OS, it doesn't really matter.)
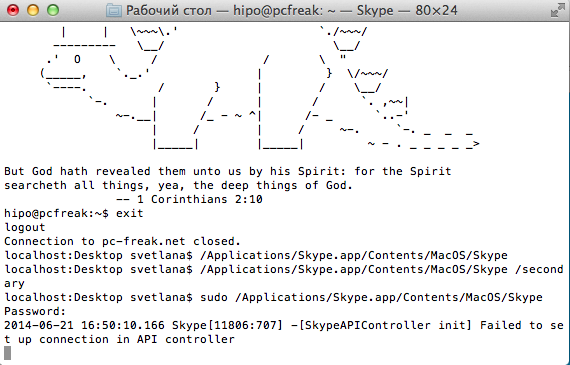
To get around the issue and run the second Skype, quickest way is to run another Skype client under privileged user through sudo command (this is unsecure – but anyways as Mac OS is proprietary and we don't have access to code and probably there are tons of spy and report software integrated into the OS, it doesn't really matter.)
4. Script it into 2nd_skype.sh for later use
To run and use two parallel skypes regularly it might be useful to make shell script out of it and place it somewhere, 2nd_skype.sh script should be something like:
#!/bin/bash

open /Applications/Skype.app/Contents/MacOS/Skype

sudo /Applications/Skype.app/Contents/MacOS/Skype
Then make the script executable with:
chmod a+x 2nd_skype.sh
5. Run more than 2 Skypes (Run multiple Skypes on same Mac PC hack)
There is another "hack" method with deleting the Skype.pid (Process ID). Skype recognize where it is running by checking its Skype.pid on start up.
Deleting the pid after each next Skype client launch, allow the user to run as many Skypes as you want on Mac OS X but it is not clear for how long it time it will work.
rm -f ~/Library/Application Support/Skype/Skype.pid
Then launch again Skype in background from Mac Terminal
open -nW '/Application/Skype.app' &
In case if you wonder why the open command is used, since above line could be run also directly and Skype will pop-up, by using open command you instruct the program to detach itself from Terminal from which it run, so later if Terminal is closed Skype app. will not terminate.
Another approach is to create, a many users lets say 5 users and use the Skype sudo run method each client with a separate user.
sudo user1 /Applications/Skype.app/Contents/MacOS/Skype
sudo user2 /Applications/Skype.app/Contents/MacOS/Skype
sudo user3 /Applications/Skype.app/Contents/MacOS/Skype
sudo user4 /Applications/Skype.app/Contents/MacOS/Skype
sudo user5 /Applications/Skype.app/Contents/MacOS/Skype
I enclose the script with the custom icon (Skype) ready to be launched and Voila, on script launch Skype multiple login prompts pops up.
For the lazy ones who don't want to tamper with writting scripts or doing hacks to run Skype multiple times on Mac there is even a Multi Skype Launcher app for Mac.
Tags: Applications Skype, check, code, command, contact, Deleting, good, Mac Book, make, OS, pops, question, run, sense, shell script, software, sudo, yesterday
Posted in Curious Facts, Everyday Life, Mac OS X, Various | 3 Comments »
Tuesday, June 24th, 2014 
Those who have to deal with network security or do periodic UNIX / Windows server security audits know well Nmap (Network Mapper).
NMAP is the swiss army knife tool of choice of both crackers and security exports and it is a must have exploration tool.
For those who just heard of Nmap or want to learn more on Nmap basics, I recommend my previos articles how to check Windows / Linux host port security (by examples) and test a local network for open Windows shares.
Nmap is one of the most improtant tools for every cracker (white, grey black hat "hacker"). Nmap is a legendary hack tool and probably the prevelent networt security port scanner tool over the last 10 years on all major Operating Systems. Nmap's high portability is thanks to being open source, being ported so far for:
Window – Zen, Mac OS and Linux, FreeBSD, OpenBSD, NetBSD and even obscure proprietary operating systems like Hewlett Packard's UNIX – HP-UX, Sun Microsystems's UNIX variant Solaris. It is in an interesting fact to mention probably not much known Sun Solaris's core code base is based on Berkley's BSD 4.4 whose fork nowadays give birth to FreeBSD and rest of *BSD family OSes.
Nmap evolved a lot through the last 7 years from only having a command line interface for hardcode console geeks like me to having a nice shiny GUI frontendinterface ZenMap.
Nmap is popular for being one of the hack tools in the famous move The Matrix (II) – Reloaded.
As hacking and security penetration is quickly moving from PC Desktops and Notebooks to more mobile and stealth variants with recent boom of smartphones – it is no strange that Nmap got ported to the most wide-spread (and very Linux compatible) – Android OS under the name ANmap (Android Map).
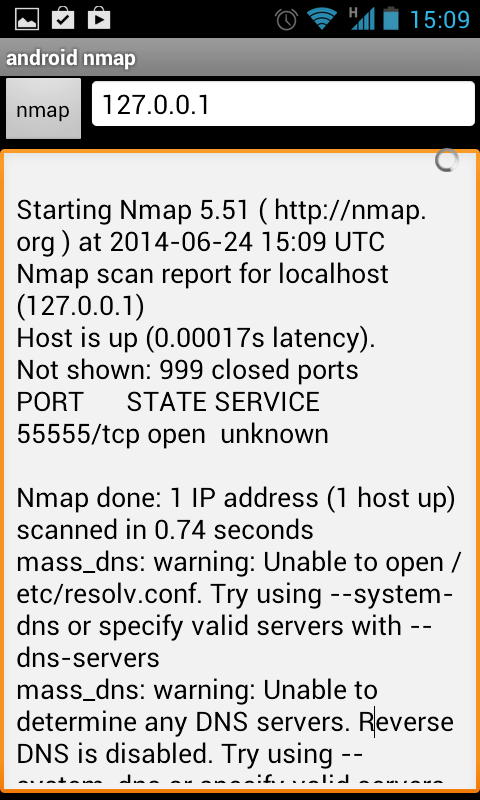
ANMap source code and apk – (Android Package file) is on GoogleCode here.
By the way using your android device to scan your own Android device on localhost (just like on above screenshot), could be quite helpful and often could reveal some unwated services, run by malware or viruses application.
To get full use of ANmap's full functionality (Stealth Scan, Full version and port scan etc.) just like on other operating systems ANmap has to run with super user privileges .
To be able to run applications with Super user access on Android you need to have ROOTED ANDROID (Tablet / Phone) device – rooting android is just a simply hack that makes Android OS to run certain applciations with root (administrator privileges). Usually Rooting a device breaks ups vendor (reseller) guarantees, so if you root your device to run ANmap on it be very careful to which application you give access to run as super user!
As Anmap page reads: There are some little bugs, as domain names resolving and unroot scanning.
If you want to use Anmap only command line interface (without gui).
Download compiled nmap with data files in this tar ball or this zip archive and keep it in one folder.
Than connect to localhost via ConnectBot, untar and start scanning:
$ tar -xvf nmap-5.51-1.tar

$ su

# ./nmap 127.0.0.1
Happy scanning 🙂
Tags: Android Map, command line interface, local network, nmap, operating systems, port scanner, port security, run, security, swiss army knife, Windows Linux
Posted in Mobile Phone Apps & Games, Movie Reviews, System Administration | 2 Comments »
Wednesday, July 23rd, 2014 
Debian 7 stable as most stable Debian releases includes custom Open Source Oracle Java Virtual Machine version called IcedTea OpenJDK, just like with sun's proprietary java, open sourced icedtea fork is made of two components:
JRE – Java Runtime Environment
and
JDK – Java Development Kit).
1. installing OpenJDK Open Source Java Virtual Machine on Debian GNU / Linux

The default meta-package for install java-jre is default-jre meta package which by default on Debian Wheezy points to openjdk:
apt-cache depends default-jdk
default-jdk
Depends: default-jre
Depends: openjdk-6-jdk
If you want to install default Open Source Java Debian package implementation run:
apt-get –yes install default-jre
…
apt-get –yes install default-jdk
…
2. Installing Oracle Java VM 7 on Debian / Ubuntu Linux and deb derivatives

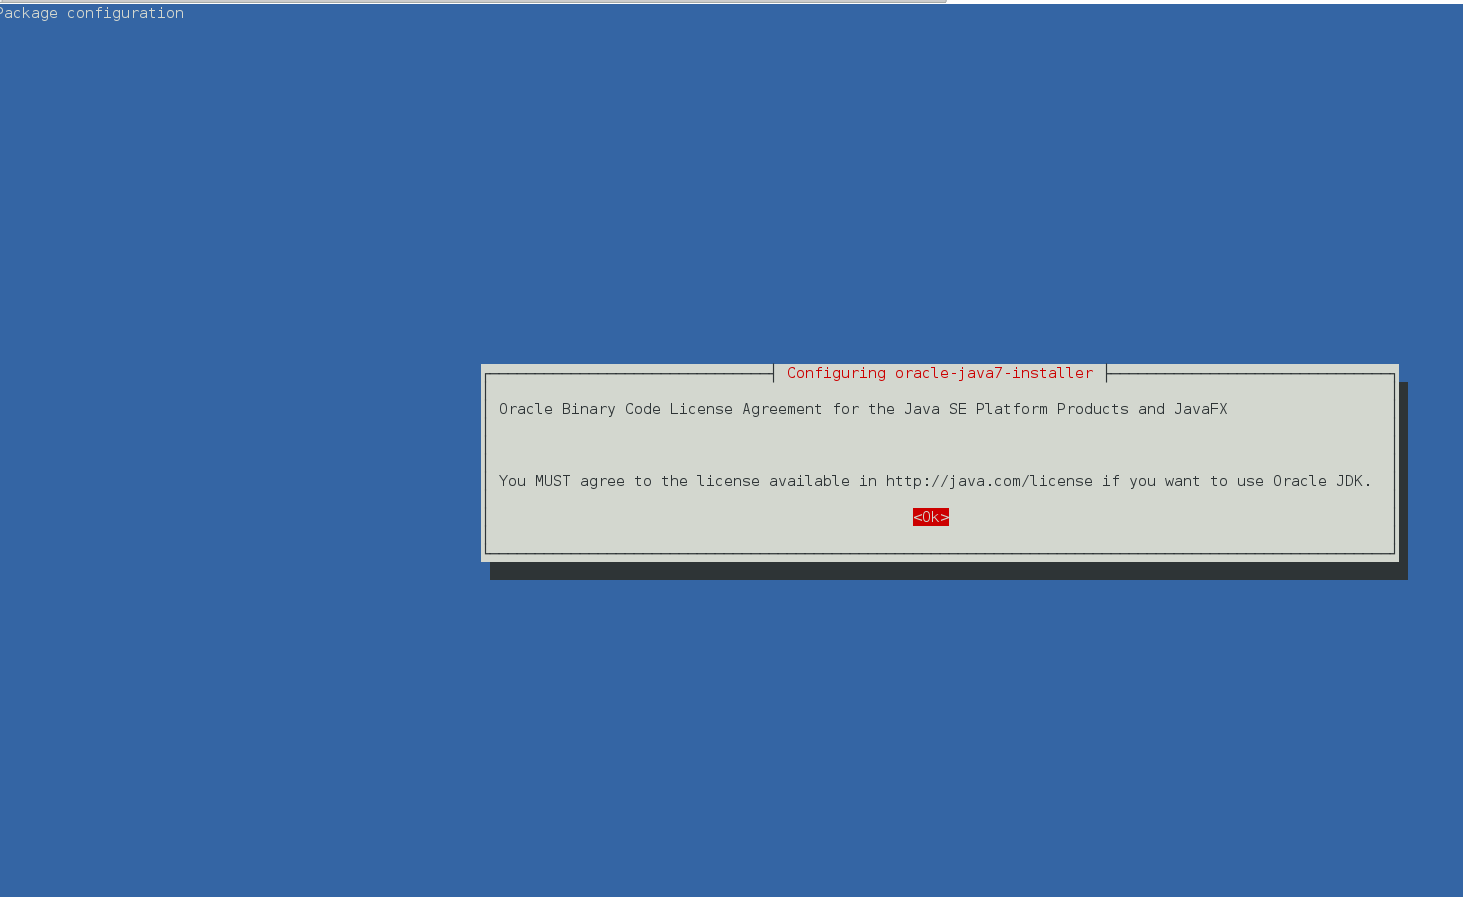
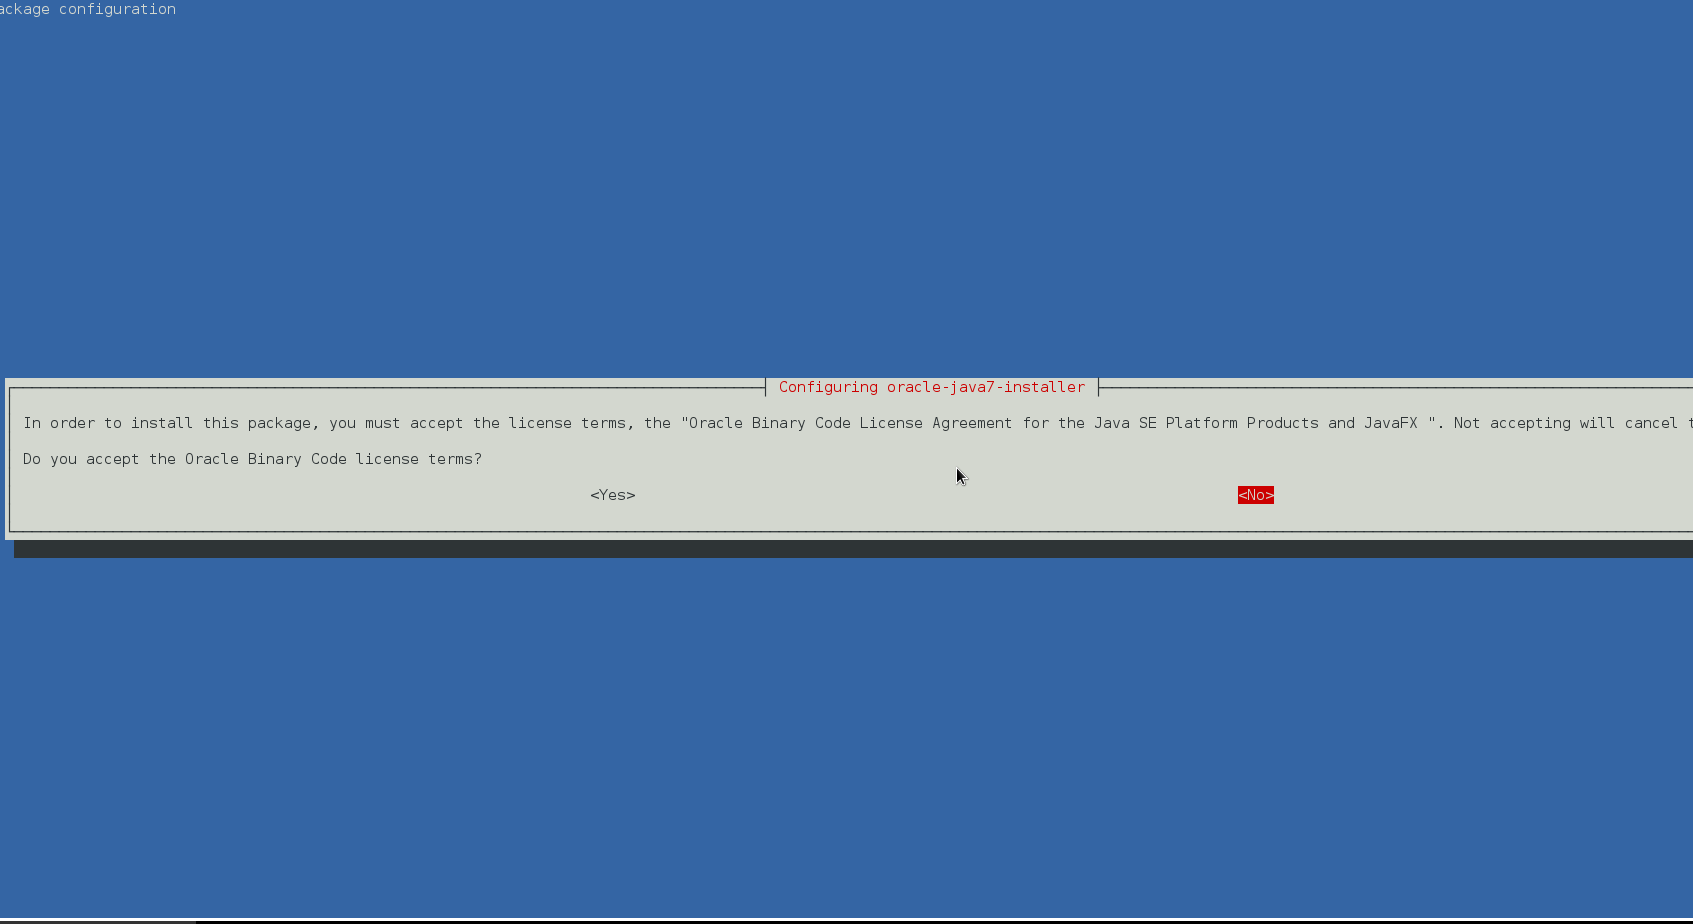
Also it is possible to install Oracle Java 7 from binary via apt-get by adding a custom Ubuntu repository containing deb Oracle proprietary java install package called oracle-java7-installer:
echo "deb http://ppa.launchpad.net/webupd8team/java/ubuntu precise main" | tee -a /etc/apt/sources.list
echo "deb-src http://ppa.launchpad.net/webupd8team/java/ubuntu precise main" | tee -a /etc/apt/sources.list
apt-key adv –keyserver hkp://keyserver.ubuntu.com:80 –recv-keys EEA14886
apt-get update
apt-get install –yes oracle-java7-installer
Above apt-get command can be used also to install Oracle Sun Java on Ubuntu Linux and other Debian derivatives, for example you can install it like this on Linux Mint and rest of deb based Desktop oriented Linuces …
If you already have the openjdk installed together with oracle java jdk, to make oracle jdk the default Virtual Machine install also oracle-java7-set-default:
apt-get install oracle-java7-set-default
3. Installing Oracle Java 8 the debian way on Debian and Ubuntu Linux
echo "deb http://ppa.launchpad.net/webupd8team/java/ubuntu trusty main" | tee /etc/apt/sources.list.d/webupd8team-java.list
echo "deb-src http://ppa.launchpad.net/webupd8team/java/ubuntu trusty main" | tee -a /etc/apt/sources.list.d/webupd8team-java.list
apt-key adv –keyserver keyserver.ubuntu.com –recv-keys EEA14886
apt-get update
apt-get install oracle-java8-installer
4. Install Oracle Proprietary Java on Debian Linux using any version from Oracle website
As some written software requires custom ex-SUN Microsystems and currently owned by Oracle Java proprietary non-free binaries to install them on Debian Linux 7, there is a way to download any sun java jdk version, create .deb package and install the package with dpkg.
Here is how:
a.) Install java-package meta-package
apt-get –yes install java-package
Building dependency tree
Reading state information… Done
The following extra packages will be installed:
autopoint debhelper gettext git git-man html2text intltool-debian liberror-perl libgettextpo0 libmail-sendmail-perl libsys-hostname-long-perl po-debconf rsync
Suggested packages:
dh-make gettext-doc git-daemon-run git-daemon-sysvinit git-doc git-el git-arch git-cvs git-svn git-email git-gui gitk gitweb libmail-box-perl
The following NEW packages will be installed:
autopoint debhelper gettext git git-man html2text intltool-debian java-package liberror-perl libgettextpo0 libmail-sendmail-perl libsys-hostname-long-perl po-debconf rsync
0 upgraded, 14 newly installed, 0 to remove and 112 not upgraded.
Need to get 11.8 MB of archives.
After this operation, 24.7 MB of additional disk space will be used.
b.) Download your desiresd Oracle Java version
Then according to your Debian Linux platform install (32-bit x86 or 64-bit amd64) go in a browser to:
http://www.oracle.com/technetwork/java/javase/downloads/index.html
Accept the agreement and download latest Java release, if you need to install some specific Oracle Java version check out there Old Java download versions (archives) page
Note that in order to download, either you will need some text-browser like elinks or you will need to have a GUI environment with IceWeasel / Epiphany etc. If you're already using the Linux as a desktop environment with GNOME and you used IceWeasel to download java jdk it will be downloaded into /tmp
cd /tmp
make-jpkg <downloaded_jdk_file>
Install the binary package created:
dpkg -i oracle-j2sdk1.7_1.7.0+update44_amd64.deb
Enjoy 🙂
Tags: downloads, echo, How to, Java Development Kit, JDK, JRE, list, need, Open Source Oracle Java Virtual Machine, ppa, run
Posted in Everyday Life, Java, Linux, Linux and FreeBSD Desktop, Various | 1 Comment »
Tuesday, August 19th, 2014 
I'm filling up a TOP (Turn to Production) form for a project where my part as Web and Middleware Engineer included install of Tomcat 7 and Java 1.7 on Windows server 2008 R2 standard. TOP is required Excel sheet standard document used by many large companies to fill in together with Project Manager before the server is to be launched into Production mode.
Therefore I needed to find out previously installed Tomcat and Java version, here is how:
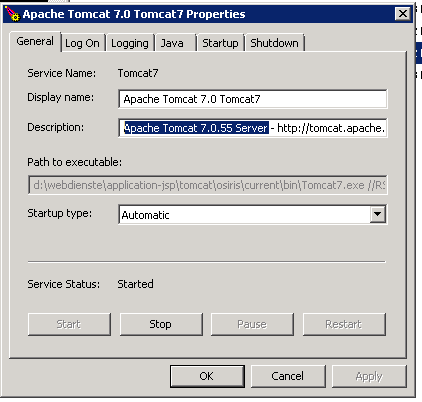
1. Go to Tomcat install directory and (click twice) run twice Tomcat7w
As tomcat is installed in Custom location in D:webdienste in this case I had to run:
D:webdiensteapplication-jsptomcatapplication-namecurrentbinTomcat7w.exe
I run it using command line (cmd.exe), however you can run it via Windows Explorer, if you're lazy typing.
You will get a window pop up like on below screenshot:
In this case Installed Tomcat version was 7.0.55
If you need to check the version on older Tomcat application server install you can run instead Tomcat6w – whether its Tomcat version 6 or Tomcat5w – for Tomcat ver. 5
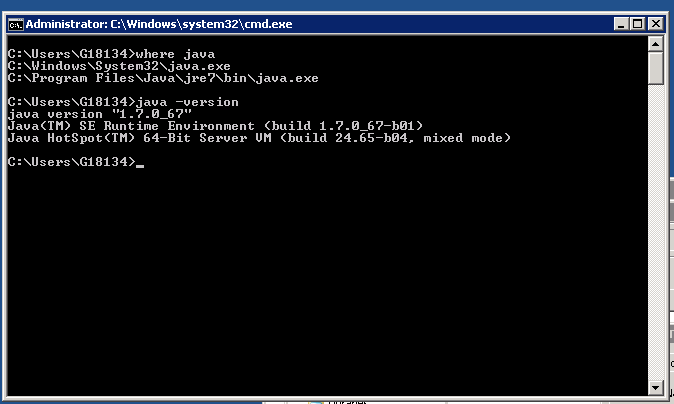
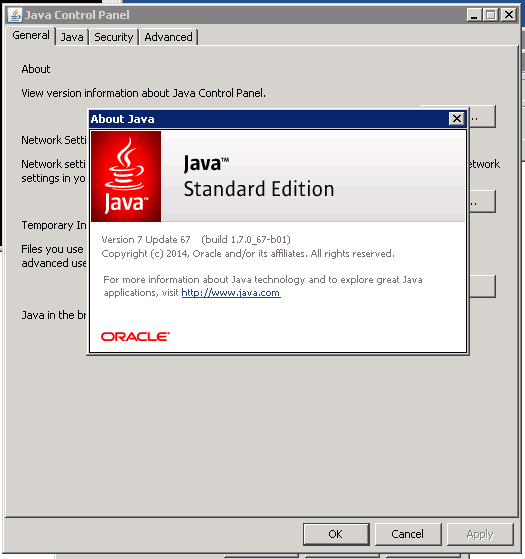
In order to Check the java version the quickest way is via command line, again run cmd.exe from
Start -> Run -> cmd.exe
Then cd to whenever is Java VM installed the usual location where it gets installed for Java 1.7 on Windows is:
C:Program FilesJavajre7bin
Java 8 common location is:
C:Program FilesJavajre8bin
Java would automatically add PATH to Windows default PATH definitions during install, hence to find out exactly where java is installed on Windows server, type in cmd:
where java
Then to check the exact installed Java version on Win host is by invoking java (jre) cli with -version parameter:
java -version
If you're lazy to type in commands, you can also check Java version in Windows from GUI by using:
Java Control Panel
To launch it in:
Start -> (Search Program and Files)
field type:
Java Conf and click on Java Control Panel
Then click on
General (tab) -> About
Tags: command, exe, How to, Installed Tomcat, line, location, Path, run, type, version, windows explorer
Posted in Everyday Life, System Administration, Various, Web and CMS, Windows | 1 Comment »
Wednesday, September 10th, 2014 
A very little is known in these days especially among young people of Europe about the terrible attrocities of the Jewish Holocaust and the concentration camps like Auschwitz organized by Hitler's Nazi Germany in World War II.
Schindler's List is a very good American movie (from 1993) retelling a true story about how enterpreneur Oskar Schindler managed to save about 1200 Jewish people from extermination in the camp of dead – Auschwitz during WWII.
Schindler's List is a movie that shows how even a deeply business oriented money obsessed man like O.

Schindler was before the beginning of war could grow in the love of Christ and Christian faith to risk his life and well being in order to be liable and honest with himself in a years when most of Nazi's Germans become totally unhuman and obsessed to wipe out existence of Old Testament God's Choosen People – The Jewish.
The movie is based on a popular novel Schindler's Ark by Canadian Thomas Keneally about how the German Shindler saved lifes of thousand Polish-Jewish refugees by creating an own business (fabric) run in Nazi's Germany before WWII and later inside a concentration camp. The movie is shot by the the film legend Steven Spilberg (who is also a Jew) intentionally Black and White to put an extra artistic impact and is very much made to look like a documentary.
The movie is 3 hours 28 minutes of Drama and has multiple awards for Best Picture, Best Director, Best Adapted Screenplay, and Best Original Score. The movie plot starts from how the anti-semitism in Germany started and how it progressed a little time before the emerge of war and the start of Jewish persecution. The main actors are Oscar Schindler a member of German Nazi Party whose dream is to make a big fortune out of the war. By using bribes and his bright manipulative personality he manages to bribe Wehrmacht (German Armed Forces) and WWII SS (German special forces). Schindler uses the local Jewish Itzhak Stern who has plenty of contacts in Jewish Business community and black marketers to form a cheap-hand jewish labour force for his factory for metal vessels to be used within Germany Nazi's Army. Many high qualified jewish was more than happy to be hired in his "Fabryka Oskara Schindlera" fabric, because this was quite a better alternative than being in one of the deadly concentration camps.

The movie shows, how jewish were forced to obey an always changing and unclear criterias in order to convince them they're no good for nothing and thus for Nazis to find reason to kill as many as possible of them. At a certain point the situation gets out of control and Jewish peoples who are forced to live in Jewish ghettos start being randomly mass murdered for missing reasons in Płaszów concentration camp. SS-Untersturmführer (second lieutenant) Amon Goeth is responsible to oversee the Plaszow camp , once the camp completes its construction by jews, he orders getto liquidated.

As the Germans start loosing the war, an order is made to sent all surviving jews to the most deadly Nazi concentration camp Auschwitz.

Oscan Schindler (also known by all jews as the director), witnesses the jewish massacres and in being profoundly affected, makes full effort to convince the Nazis the his company jews are important as a workforce and he needs them to produce ammos and military weapons in order to make full profit.
He has to pay almost all his earned money in early prior war times and first 2 war years in order to ransom the jews and sents him to work in another established factory of his (he manages to convince Nazis that even children and handicapped are useful for his company thus managing to save a multitude of doomed innocent people. As the train carrying women and children is accidentally redirected to Auschwitz-Birkenau, Schindler bribes the commandant of Auschwitz with a bag of diamonds to win their release.
In his new factory Shindler forbids the SS guards to enter the factory and orders the production of ammos and weapons to be produced defective by his workers. Letting them to even to observe their Jewish Shabbath (Sabbath). In the next 7 months Shindler bribes multiple Nazi officials and runs out of money in 1945 exactly when the War in Europe is over with Germany surrender. The SS Guards are being ordered to kill the Jews as the red-army is advancing and soon liberate the concentration camp, however Shindler succesfully convinces SS's to let Jews alive and go to their families and homes.

As a sign of thankstfullness his jewish workers give Schindler a signed statement attesting to his role saving Jewish lives, together with a ring engraved with a Talmudic quotation: "Whoever saves one life saves the world entire.". Schindler is deeply ashamed for not doing even more to save more Jews from extermination. Schindler has to flee the concentration camp to escape being killed by the approaching red-army. On next morning Soviet soldier comes and announces liberation of Jews. The evil Hitler follower Goeth is executed for his crimes against humanity and his unwillingness to refuse his Nazis ideas.
The movie is quite hard to grasp, so prepare for a lot of bloody scenes, nomatter that it is one of the best movies I've seen and has good spiritual elements. It is also good to see for it shows that the Good always triumphs victoriously over the evil.
Happy Watching!
Tags: beginning, company, concentration camps, europe, germany, Germany Nazi, good, kill, life, little time, look, make, money, movie, Old Testament God, order, run, WWII
Posted in Everyday Life, Movie Reviews, Various | 1 Comment »
Sunday, October 30th, 2011 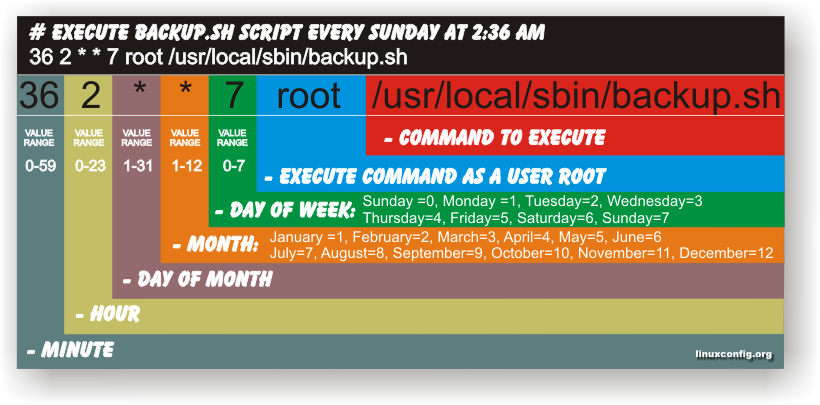
Have you ever been in need to execute some commands scheduled via a crontab, every let’s say 5 seconds?, naturally this is not possible with crontab, however adding a small shell script to loop and execute a command or commands every 5 seconds and setting it up to execute once in a minute through crontab makes this possible.
Here is an example shell script that does execute commands every 5 seconds:
#!/bin/bash
command1_to_exec='/bin/ls';

command2_to_exec='/bin/pwd';

for i in $(echo 1 2 3 4 5 6 7 8 9 10 11); do

sleep 5;

$command1_to_exec; $command2_to_exec;

done
This script will issue a sleep every 5 seconds and execute the two commands defined as $command1_to_exec and $command2_to_exec
Copy paste the script to a file or fetch exec_every_5_secs_cmds.sh from here
The script can easily be modified to execute on any seconds interval delay, the record to put on cron to use with this script should look something like:
# echo '* * * * * /path/to/exec_every_5_secs_cmds.sh' | crontab -
Where of course /path/to/exec_every_5_secs_cmds.sh needs to be modified to a proper script name and path location.
Another way to do the on a number of seconds program / command schedule without using cron at all is setting up an endless loop to run/refresh via /etc/inittab with a number of predefined commands inside. An example endless loop script to run via inittab would look something like:
while [ 1 ]; do

/bin/ls

sleep 5;

done
To run the above sample never ending script using inittab, one needs to add to the end of inittab, some line like:
mine:234:respawn:/path/to/script_name.sh
A quick way to add the line from consone would be with echo:
echo 'mine:234:respawn:/path/to/script' >> /etc/inittab
Of course the proper paths, should be put in:
Then to load up the newly added inittab line, inittab needs to be reloaded with cmd:
# init q
I've also red, some other methods suggested to run programs on a periodic seconds basis using just cron, what I found in stackoverflow.com's as a thread proposed as a solution is:
* * * * * /foo/bar/your_script

* * * * * sleep 15; /foo/bar/your_script

* * * * * sleep 30; /foo/bar/your_script

* * * * * sleep 45; /foo/bar/your_script
One guy, even suggested a shorted way with cron:
0/15 * * * * * /path/to/my/script
Tags: bashcommand, basis, com, command, command2, copy, copy paste, course, cron, crontab, echo 1, echo echo, endless loop, exec, file, foo, foo bar, freebsd, gnu linux, How to, init, inittab, interval, line, Linux, location, loop, mine, minute, name, nbsp, number, Path, predefined commands, pwd, record, refresh, respawn, run, script, script name, secs, SHA, Shell, shell script, sleep, something, stackoverflow, thread, time, time interval, way
Posted in Linux, Linux and FreeBSD Desktop, System Administration, Various | 1 Comment »
Saturday, May 4th, 2013 
Whether you tried running simultaneously more than 1 Skype clients by clicking twice on Skype Desktop icon or invoking Skype via Windows Start menu; You already have figured out that Skype on Windows is set-up by defaykt to only support one logged in Skype user.
In case you wonder why on earth someone might need to run in parallel few Skype accounts on one Windows PC, possible scenario is;;;
You work for a company and just for clarity you have to communicate with clients from one skype name and with another skype name to communicate to company management.
In Linux in Skype version this is not so and thus for people like me who come from Linux it is rather uneasy to not be able to login in second Skype instance, whether you go to a friend who already keeps logged in with his Skype user …
Thus this triggered me to research a bit if simulatenous user login is possible?
Yes it is possible and very easy, to do so the user has to run manually Skype from command line like so:
On 32bit PC hardware with 32 bit of Microsoft Windows issue in win cmd.exe (command prompt) from:
START -> RUN -> cmd.exe
cd C:\\Program Files\\Skype\Phone\\
C:\\Program Files\\Skype\\Skype /secondary
or to directly paste in command prompt:
“C:\\Program Files\\Skype\\Phone\\Skype.exe” /secondary
If you are on a 64bit machine run in cmd prompt:
“C:\\Program Files (x86)\\Skype\Phone\\Skype.exe” /secondary
To easily run few instances of Skype in parallel, you can make shortcuts on Desktop. pointing to any of both above commands.
That's all now you can login as many skype users as you like on 1 Win PC. All parallel logged in users can receive and write messages. However you should bear in mind that situation with answering Skype calls is a bit complicated as you cannot speak in parallel through different logged in skype users. Anyhow whether you have to react on Skype voice / video calls incoming in similar or same time from 2 skype accounts, you can use – Set Skype Call on Hold functionality and hence keep voice video in parallel with different skype accounts.
Tags: bear in mind, bit, Call, clarity, cmd, command, company management, desktop icon, earth, exe, instances, Linux, login, machine, Microsoft, microsoft windows, pc hardware, run, Run Skype, Shortcuts, Skype, Skype Desktop, support, video, Windows, windows pc, windows xp
Posted in Everyday Life, Various, Windows | 1 Comment »
Wednesday, February 26th, 2014 
Having a combination of Apache webservice Reverse Proxy to redirect invisibly traffic to a number of Tomcat server positioned in a DMZ is a classic task in big companies Corporate world.
Hence if you work for company like IBM or HP sooner or later you will need to configure Apache Webserver cluster with few running Jakarta Tomcat Application servers behind. Scenario with necessity to access a java based application via Tomcat which requires logging (authentication) relaying on establishing and keeping a session ID is probably one of the most common ones and if you do it for first time you will probably end up with Session ID issues. Session ID issues are hard to capture at first as on first glimpse application will seem to be working but users will have to re-login all the time even though the programmers might have coded for a session to expiry in 30 minutes or so.
… I mean not having configured Session ID prevention to Tomcats will cause random authentication session expiries and users using the Tomcat app will be unable to normally access below application with authenticated credentials. The solution to these is known under term "Sticky sessions"
To configure Sticky sessions you need to already have configured Apache/s with following minimum configuration:
- enabled mod_proxy, proxy_balancer_module, proxy_http_module and or mod_proxy_ajp (in Apache config)
LoadModule proxy_module modules/mod_proxy.so
LoadModule proxy_balancer_module modules/mod_proxy_balancer.so
LoadModule proxy_http_module modules/mod_proxy_http.so
- And configured and tested Tomcats running an Application reachable via AJP protocol
Below example assumes there is Reverse Proxy Load Balancer Apache which has to forward all traffic to 2 tomcats. The config can easily be extended for as many as necessary by adding more BalancerMembers.
In Apache webserver (apache2.conf / httpd.conf) you need to have JSESSIONID configured. These JSESSIONID is going to be appended to each client request from Reverse Proxy to each of Tomcat servers with value opened once on authentication to first Tomcat node to each of the other ones.
 <Proxy balancer://mycluster>

BalancerMember ajp://10.16.166.53:11010/ route=delivery1

BalancerMember ajp://10.16.166.66:11010/ route=delivery2

</Proxy>
 ProxyRequests Off

ProxyPass / balancer://mycluster/ stickysession=JSESSIONID

ProxyPassReverse / balancer://mycluster/
The two variables route=delivery1 and route=delivery2 are routed to hosts identificators that also has to be present in Tomcat server configurations
In Tomcat App server First Node (server.xml)
<Engine name="Catalina" defaultHost="localhost" jvmRoute="delivery1">
In Tomcat App server Second Node (server.xml)
<Engine name="Catalina" defaultHost="localhost" jvmRoute="delivery2">
Once Sticky Sessions are configured it is useful to be able to track they work fine this is possible through logging each of established JESSSIONIDs, to do so add in httpd.conf
LogFormat "%h %l %u %t \"%r\" %>s %b \"%{Referer}i\" \"%{User-Agent}i\"\"%{JSESSIONID}C\"" combined
After modifications restart Apache and Tomcat to load new configs. In Apache access.log the proof should be the proof that sessions are preserved via JSESSIONID, there should be logs like:
127.0.0.1 - - [18/Sep/2013:10:02:02 +0800] "POST /examples/servlets/servlet/RequestParamExample HTTP/1.1" 200 662 "http://localhost/examples/servlets/servlet/RequestParamExample" "Mozilla/5.0 (X11; Linux x86_64; rv:17.0) Gecko/20130807 Firefox/17.0""B80557A1D9B48EC1D73CF8C7482B7D46.server2"
127.0.0.1 - - [18/Sep/2013:10:02:06 +0800] "GET /examples/servlets/servlet/RequestInfoExample HTTP/1.1" 200 693 "http://localhost/examples/servlets/" "Mozilla/5.0 (X11; Linux x86_64; rv:17.0) Gecko/20130807 Firefox/17.0""B80557A1D9B48EC1D73CF8C7482B7D46.server2"
That should solve problems with mysterious session expiries 🙂
Tags: AJP, apache webserver, apache2, application, authentication, combination, conf, configured, DMZ, Engine, First Node, hp, httpd, ID, Jakarta Tomcat Application, JESSIONID, JSESSIONID, localhost, need, number, proof, proxy, request, Reverse Proxy, Reverse Proxy Load Balancer Apache, run, Second Node, server, session, working, xml
Posted in Linux, System Administration, Various | 2 Comments »
Tuesday, February 18th, 2014 
Some time ago I blogged about how to make your sysadmin more enjoyable with figlet and toilet console ASCII art text generators
Besides toilet and figlet another cool entertainment proggie is cowsay. On my home Linux router I use cowsay together with a tiny shell script to generate me a random Cow Ascii Art fun picture each time I login to my Linux. cowrand is set to run for my user through ~/.bashrc.
In the spirit of ascii art fun arts today I've stumbled on another cool and uselesss few kilobytes program called "SL". SL is very simple all it does is it cheers up you by displaying a an animated train going through the screen once you type by mistake "sl" instead of ls (list command).
To enjoy it on debian based distributions install it with apt:
# apt-get install --yes sl
SL 's name is a playful joke itself as well it stands for Steam Locomotive.
To get some more ASCII art fun, try telnetting to towel.blinkenlights.nl – There is a synthesised ASCII Art text version video of Star Wars – Episode IV
# telnet towel.blinkenlights.nl

If you know other cool ASCII art animation scripts / ASCII art games or anything related to ASCII art for Linux / Windows, please drop me a comment.
Tags: animation, Ascii, bashrc, cheer, cool, Cow Ascii Art, figlet, fun, Linux, linux windows, run, scripts, simple, SL, toilet, train, version, video
Posted in Curious Facts, Entertainment, Everyday Life, Games Linux, System Administration | 1 Comment »


