Posts Tagged ‘check’

How to check if shared library is loaded in AIX OS – Fix missing libreadline.so.7

Thursday, February 20th, 2020

ibm-aix-logo1

I've had to find out whether an externally Linux library is installed  on AIX system and whether something is not using it.
The returned errors was like so:


# gpg –export -a

Could not load program gpg:
Dependent module /opt/custom/lib/libreadline.a(libreadline.so.7) could not be loaded.
Member libreadline.so.7 is not found in archive


After a bit of investigation, I found that gpg was failing cause it linked to older version of libreadline.so.6, the workaround was to just substitute the newer version of libreadline.so.7 over the original installed one.

Thus I had a plan to first find out whether this libreadline.a is loaded and recognized by AIX UNIX first and second find out whether some of the running processes is not using that library.
I've come across this interesting IBM official documenation that describes pretty good insights on how to determine whether a shared library  is currently loaded on the system. which mentions the genkld command that is doing
exactly what I needed.

In short:
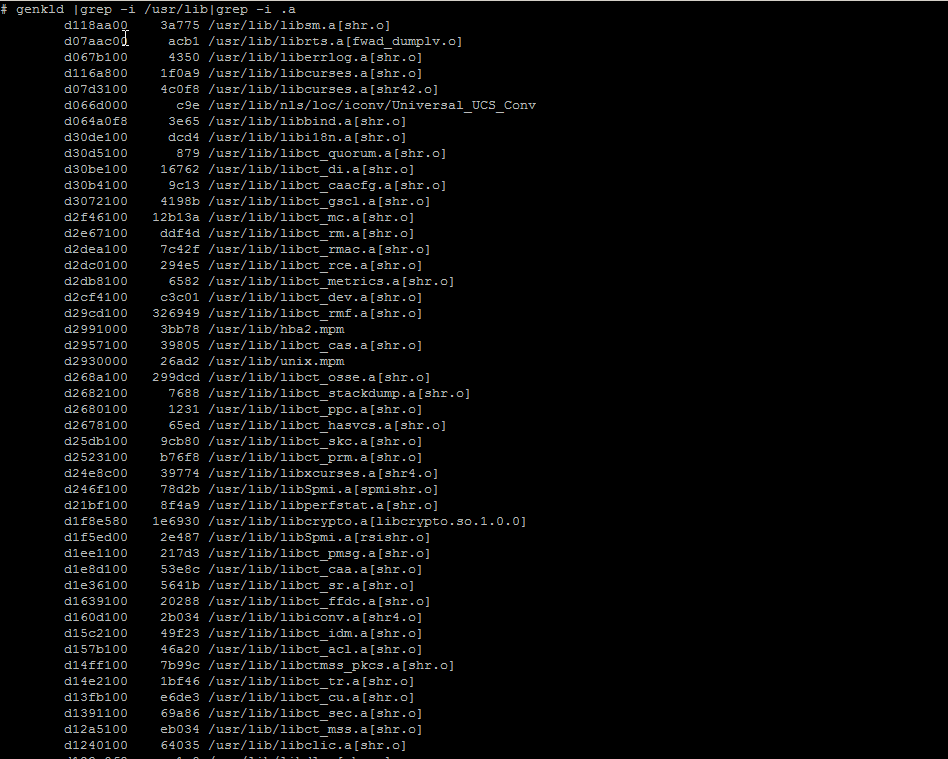
genkld – creates a list that is printed to the console that shows all loaded shared libraries

genkld-screenshot-aix-unix

Next I used lsof (list open files) command to check whether there is in real time opened libraries by any of the running programs on the system.

After not finding anything and was sure the library is neither loaded as a system library in AIX nor it is used by any of the currently running AIX processes, I was sure I could proceed to safely overwrite libreadline.a (libreadline.so.6) with libreadline.a with (libreadline.so.7).

The result of that is again a normally running gpg as ldd command shows the binary is again normally linked to its dependend system libraries.
 

aix# ldd /usr/bin/gpg
/usr/bin/gpg needs:
         /usr/lib/threads/libc.a(shr.o)
         /usr/lib/libpthreads.a(shr_comm.o)
         /usr/lib/libpthreads.a(shr_xpg5.o)
         /opt/freeware/lib/libintl.a(libintl.so.1)
         /opt/freeware/lib/libreadline.a(libreadline.so.7)
         /opt/freeware/lib/libiconv.a(libiconv.so.2)
         /opt/freeware/lib/libz.a(libz.so.1)
         /opt/freeware/lib/libbz2.a(libbz2.so.1)
         /unix
         /usr/lib/libcrypt.a(shr.o)
         /opt/freeware/lib/libiconv.a(shr4.o)
         /usr/lib/libcurses.a(shr42.o)


# gpg –version
gpg (GnuPG) 1.4.22
Copyright (C) 2015 Free Software Foundation, Inc.
License GPLv3+: GNU GPL version 3 or later <http://gnu.org/licenses/gpl.html>
This is free software: you are free to change and redistribute it.
There is NO WARRANTY, to the extent permitted by law.


Home: ~/.gnupg
Supported algorithms:
Pubkey: RSA, RSA-E, RSA-S, ELG-E, DSA
Cipher: IDEA, 3DES, CAST5, BLOWFISH, AES, AES192, AES256, TWOFISH,
        CAMELLIA128, CAMELLIA192, CAMELLIA256
Hash: MD5, SHA1, RIPEMD160, SHA256, SHA384, SHA512, SHA224
Compression: Uncompressed, ZIP, ZLIB, BZIP2


Check when Windows Active Directory user expires and set user password expire to Never

Thursday, January 9th, 2020

micorosoft-windows-10-logo-net-user-command-check-expiry-dates

If you're working for a company that is following high security / PCI Security Standards and you're using m$ Windows OS that belongs to the domain it is useful to know when your user is set to expiry
to know how many days are left until you'll be forced to change your Windows AD password.
In this short article I'll explain how to check Windows AD last password set date / date expiry date and how you can list expiry dates for other users, finally will explain how to set your expiry date to Never
to get rid of annoying change password every 90 days.


1. Query domain Username for Password set / Password Expires set dates

To know this info you need to know the Password expiration date for Active Directory user account, to know it just open Command Line Prompt cmd.exe

And run command:


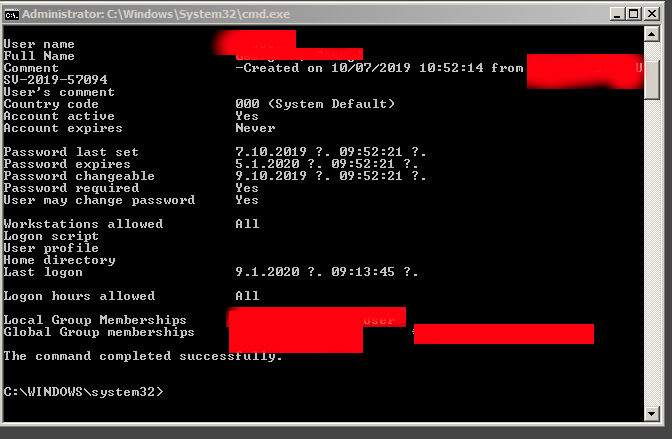
NET USER Your-User-Name /domain


net-user-domain-command-check-AD-user-expiry

Note that, many companies does only connect you to AD for security reason only on a VPN connect with something like Cisco AnyConnect Secure Mobility Client whatever VPN connect tool is used to encrypt the traffic between you and the corporate DMZ-ed network

Below is basic NET USER command usage args:

Net User Command Options
 

Item          Explanation

net user    Execute the net user command alone to show a very simple list of every user account, active or not, on the computer you're currently using.

username    This is the name of the user account, up to 20 characters long, that you want to make changes to, add, or remove. Using username with no other option will show detailed information about the user in the Command Prompt window.

password    Use the password option to modify an existing password or assign one when creating a new username. The minimum characters required can be viewed using the net accounts command. A maximum of 127 characters is allowed1.
*    You also have the option of using * in place of a password to force the entering of a password in the Command Prompt window after executing the net user command.

/add    Use the /add option to add a new username on the system.
options    See Additional Net User Command Options below for a complete list of available options to be used at this point when executing net user.

/domain    This switch forces net user to execute on the current domain controller instead of the local computer.

/delete    The /delete switch removes the specified username from the system.

/help    Use this switch to display detailed information about the net user command. Using this option is the same as using the net help command with net user: net help user.
/?    The standard help command switch also works with the net user command but only displays the basic command syntax. Executing net user without options is equal to using the /? switch.


2. Listing all Active Directory users last set date / never expires and expiration dates


If you have the respective Active Directory rights and you have the Remote Server Administration Tools for Windows (RSAT Tools), you are able to do also other interesting stuff,


such as

– using PowerShell to list all user last set dates, to do so use Open Power Shell and issue:
 

get-aduser -filter * -properties passwordlastset, passwordneverexpires |ft Name, passwordlastset, Passwordneverexpires


get-aduser-properties-passwordlastset-passwordneverexpires1

This should show you info as password last set date and whether password expiration is set for account.

– Using PS to get only the password expirations for all AD existing users is with:


Get-ADUser -filter {Enabled -eq $True -and PasswordNeverExpires -eq $False} –Properties "DisplayName", "msDS-UserPasswordExpiryTimeComputed" |
Select-Object -Property "Displayname",@{Name="ExpiryDate";Expression={[datetime]::FromFileTime($_."msDS-UserPasswordExpiryTimeComputed")}}


If you need the output data to get stored in CSV file delimitered format you can add to above PS commands
 

| export-csv YOUR-OUTPUT-FILE.CSV


3. Setting a user password to never Expiry


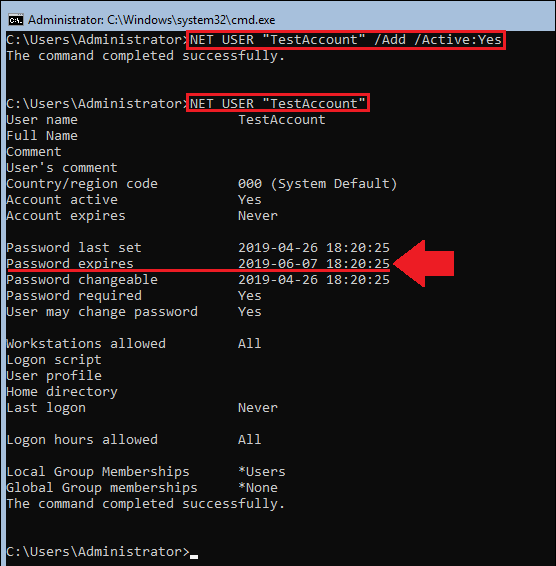
If the user was created with NET USER command by default it will have been created to have a password expiration. 
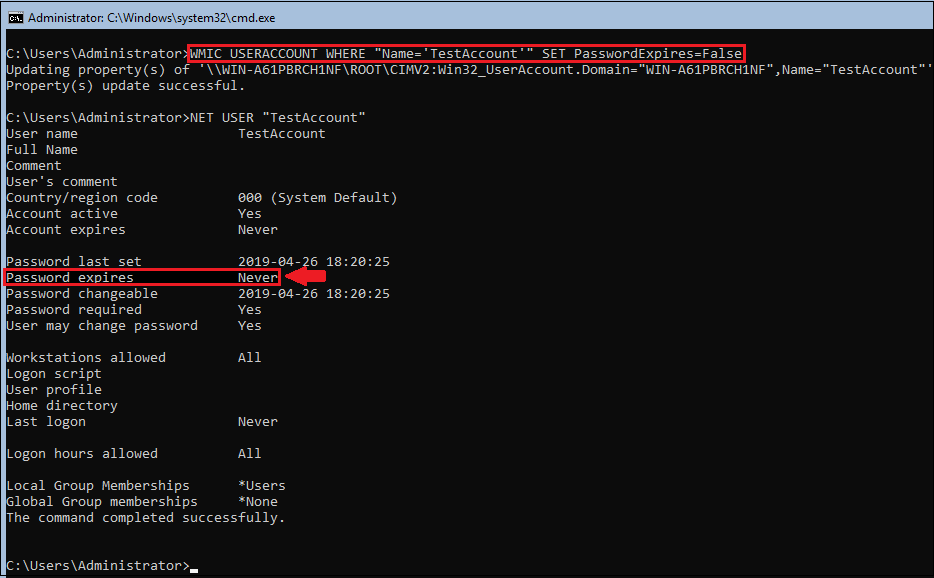
However if you need to create new users for yourself (assuming you have the rights), with passwords that never expire on lets say Windows Server 2016 – (if you don't care about security so much), use:
 

NET USER "Username" /Add /Active:Yes

WMIC USERACCOUNT WHERE "Name='Username' SET PasswordExpires=False


NET-USER-ADD_Active-yes-Microsoft-Windows-screenshot

NET-USER-set-password-policy-to-Never-expiry-MS-Windows

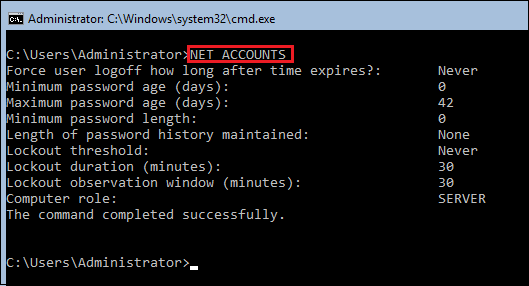
To view the general password policies, type following:
 

NET ACCOUNTS


NET-ACCOUNTS-view-default-Microsoft-Windows-password-policy


Getting Console and Graphical hardware system information on Linux with cpuinfo, neofetch, CPU-X (CPU-Z Unix alternative), I-nex and inxi

Tuesday, September 17th, 2019

getting-console-information-and-graphical-hardware-system-information-Linux-cpuinfo-neofetch-cpu-x-i-nex-1

Earlier I've wrote extensive article on how to get hardware information on Linux using tools such as dmidecode, hardinfo, lshw, hwinfo, x86info and biosdecode but there are few other hardware reporting tools for Linux worthy to mention that has been there for historical reasons such as cpuinfo as we as some new shiny ones such as neofetch (a terminal / console hardware report tool as well the CPU-X and I-Nex  which is Linux equivalent to the all known almost standard for Windows hardware detection CPU-Z worthy to say few words about.
 

1. cpuinfo


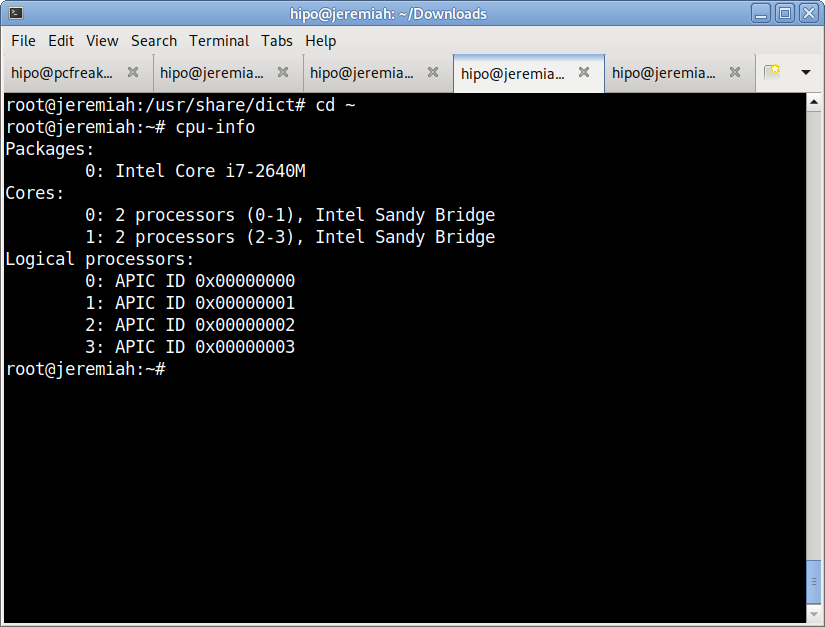
Perhaps the most basic tool to give you a brief information about your Processor type (model) number of Cores and Logical Processors is cpuinfo

I remember cpuinfo has been there since the very beginning on almost all Linux distributions's repository, nowadays its popularity of the days when the kings on the Linux OS server scenes were Slackware, Caldera OpenLinux and Redhat 6.0 Linux and Debian 3.0  declined but still for scripting purposes it is handy small proggie.
To install and run it in Debian  / Ubuntu / Mint Linux etc.:


aptitude install -y cpuinfo

/usr/bin/cpu-info


Linux-get-processor-system-info-in-console-cpu-info


2. neofetch


The next one worthy to install and check is neofetch (a cross-platform and easy-to-use system information
 command line script that collects your Linux system information and display it on the terminal next to an image, it could be your distributions logo or any ascii art of your choice.)

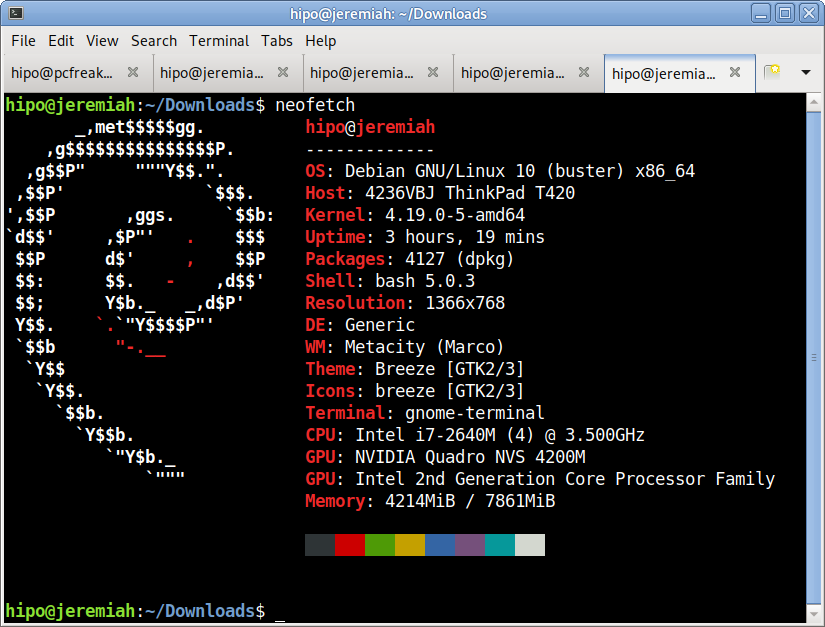
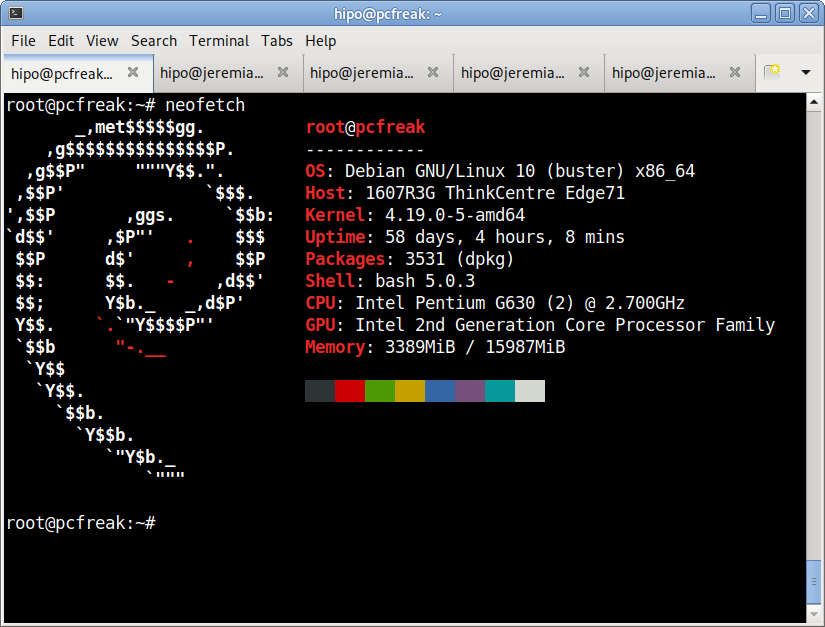
The cool thing about neofetch is besides being able to identify the System server / desktop hardware parameters, it gives some basic info about number of packages installed on the system, memory free and in use, used kernel and exact type of System (be it Dell PowerEdge Model XX, IBM eSeries Model / HP Proliant Model etc.

neofetch-OS-hardware-information-Linux-ascii-system-info-desktop-notebook

neofetch info generated on my home used Lenovo Thikpad T420

neofetch-OS-hardware-information-Linux-ascii-system-info-pcfreak-home-server
neofetch info from www.pc-freak.net running current machine

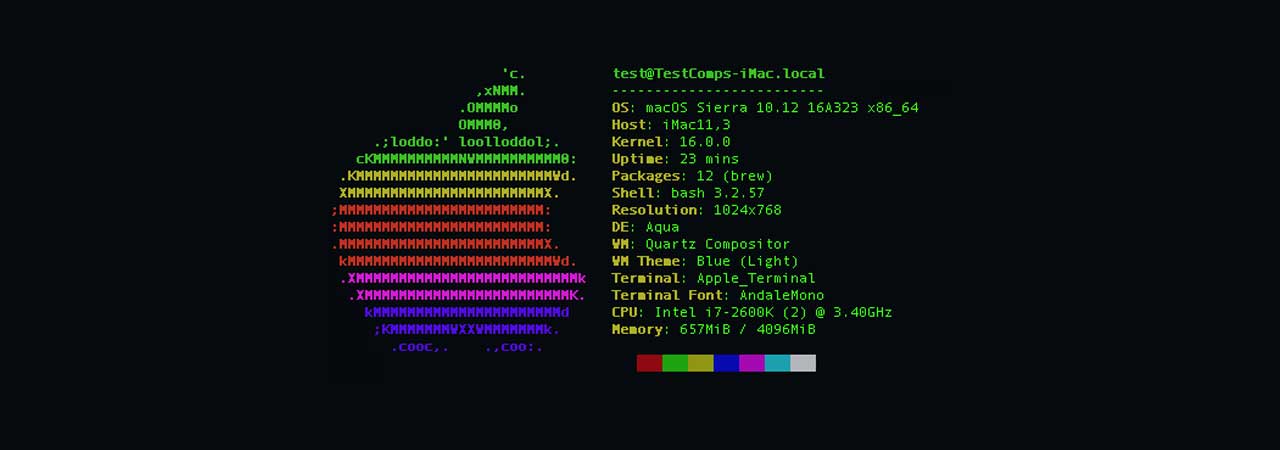
neofetch even supports Mac OS X and Windows OS ! 🙂

To install neofetch on Mac OS X:
 

/usr/bin/ruby -e "$(curl -fsSL https://raw.githubusercontent.com/Homebrew/install/master/install)"


or via Mac ported packages using brew

brew install neofetch


neofetch-screenshot-from-Mac-OS-X

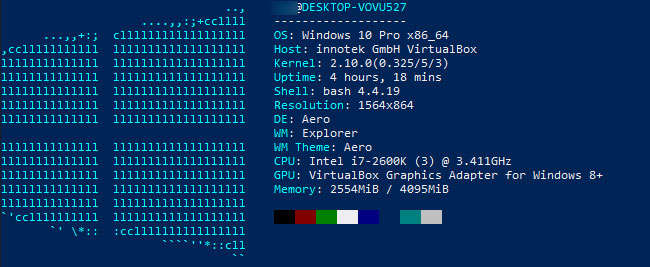
neofetch is even installable on Windows OS that has the scoop command line installer tool installer manager with below PowerShell code in cmd.exe (Command line):

powershell Set-ExecutionPolicy RemoteSigned -scope CurrentUser
iex (new-object net.webclient).downloadstring('https://get.scoop.sh')
scoop install git
scoop install neofetch

neofetch-microsoft-windows-hardware-command-line-report-tool-screenshot


By the way Scoop was quite a finding for me and it is pretty handy to install plenty of useful command line Linux / UNIX tools, such as curl, wget, git etc. in the same easy straight forward way as a standard yum or apt-get on Windows (without explicitly installing things as GnuWin and CygWin).
 

3. CPU-X graphical user interface hardware report Linux GUI alternative to Windows CPU-Z


The packages for CPU-X are a bit outdated and even though there are rpm packages for Fedora, OpenSuSE and .deb package for Debian for Debian, Ubuntu and ArchLinux (pacman), there is no up to date version for Debian 10 and the package builds distributed for different Linux distros are a bit outdated.

Thus to install CPU-X on any Linux distribution it is perhaps best to use the portable version (static binary) of CPU-X.
It is currently available on https://github.com/X0rg/CPU-X/releases

To install latest portable version of CPU-X

wget https://github.com/X0rg/CPU-X/releases/download/v3.2.4/CPU-X_v3.2.4_portable.tar.gz

mkdir CPU-X
cd CPU-X

tar -zxvvf CPU-X_v3.2.4_portable.tar.gz
-rwxr-xr-x yohan/users 4563032 2019-01-13 22:15 CPU-X_v3.2.4_portable.bsd64
-rwxr-xr-x yohan/users 5484968 2019-01-13 22:15 CPU-X_v3.2.4_portable.linux64


cp -rpf CPU-X_v3.2.4_portable.linux64 /usr/local/bin/
ln -sf /usr/local/bin/CPU-X_v3.2.4_portable.linux64 /usr/local/bin/cpu-x


Next run as superuser (root)
 

hipo@jeremiah:~$ su -c 'cpu-x'


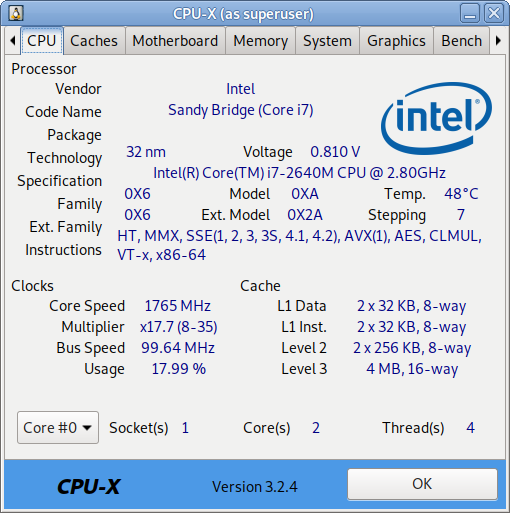
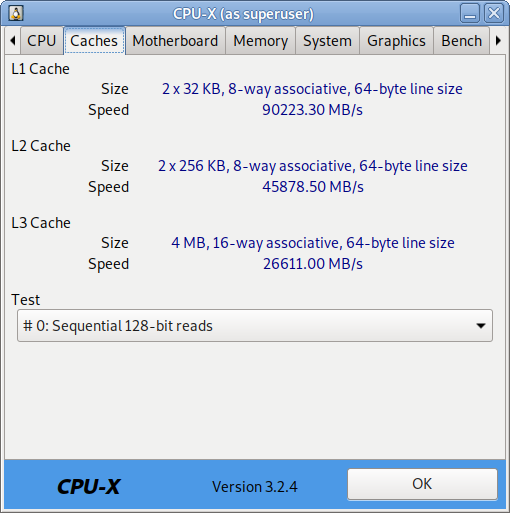
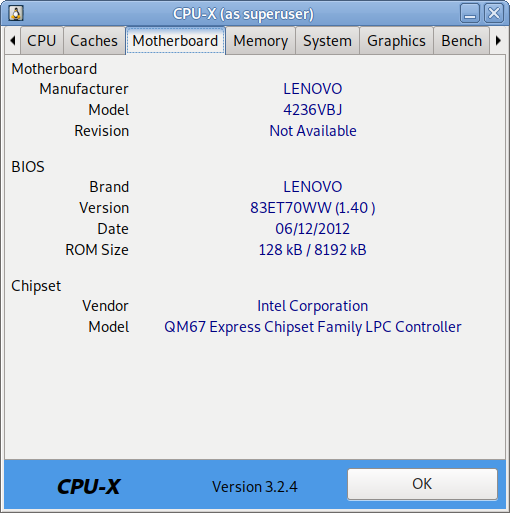
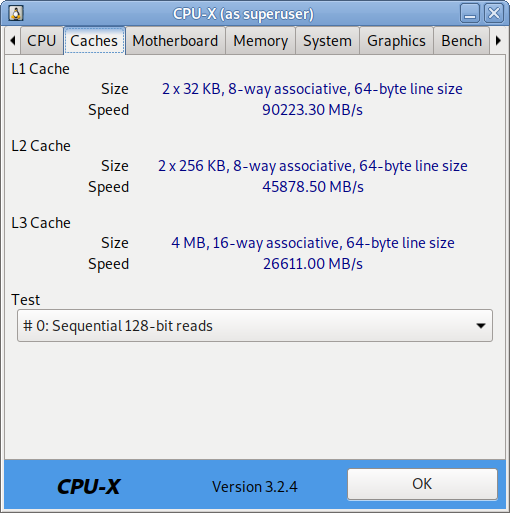
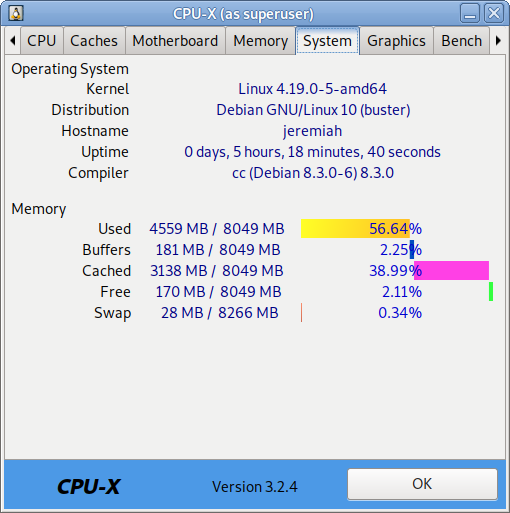
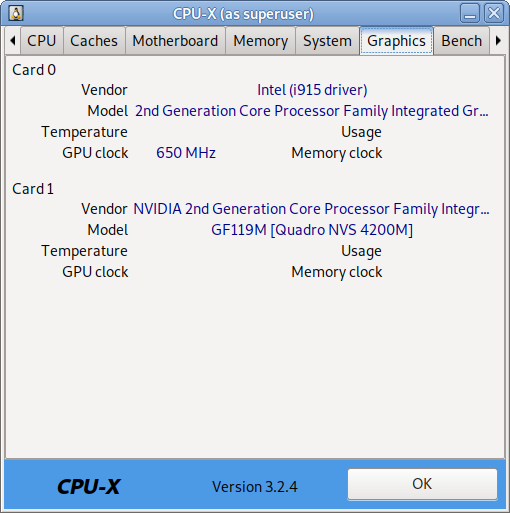
As seen from below screenshots cpu-x reports a lot of concrete specific hardware data on:

  • Processor
  • Motherboard
  • Memory
  • System
  • Graphic card
  • Performance

cpu-x-cpu-cpu-z-alternative-linux-screenshot-CPU-info

cpu-x-cpu-cpu-z-alternative-linux-screenshot-caches-info

cpu-x-cpu-cpu-z-alternative-linux-screenshot-Motherboard-info

cpu-x-cpu-cpu-z-alternative-linux-screenshot-memory-info

cpu-x-cpu-cpu-z-alternative-linux-screenshot-system-info

cpu-x-cpu-cpu-z-alternative-linux-screenshot-graphics-info

CPU-X can be installed also on FreeBSD very easily by just installing from BSD port tree sysutils/cpu-x/
It is also said to work on other *BSDs, NetBSD, OpenBSD Unixes but I guess this will require a manual compilation based on FreeBSD's port Makefile.

4. I-Nex another GUI alternative to CPU-Z for UNIX / Linux

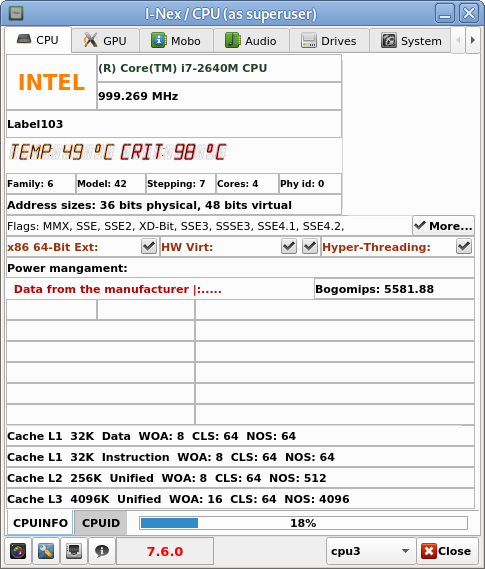
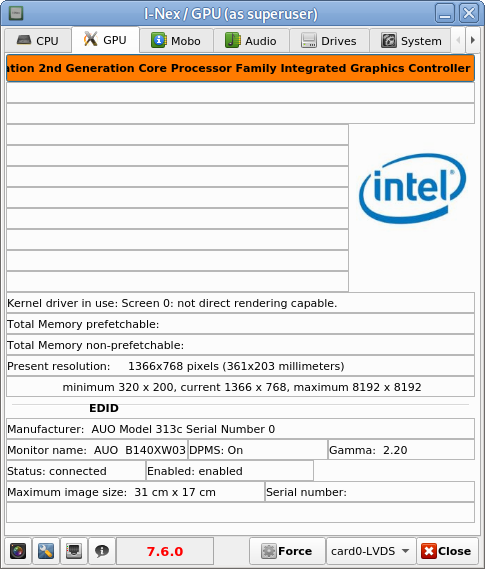
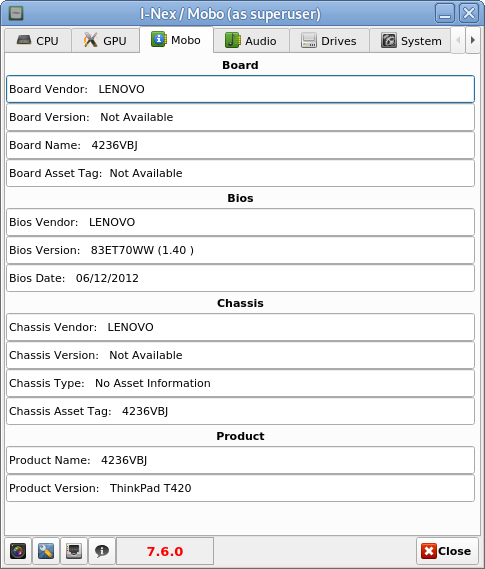
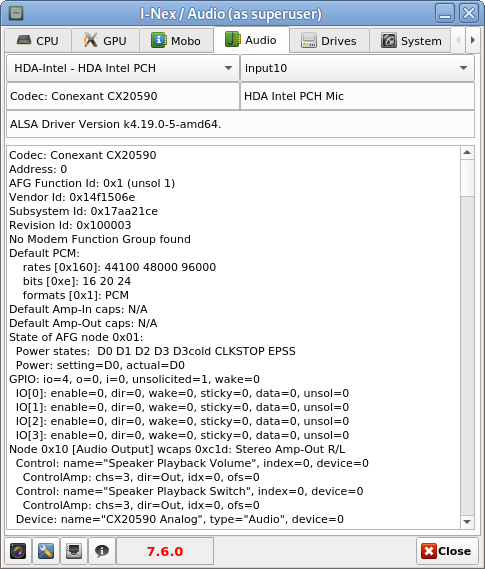
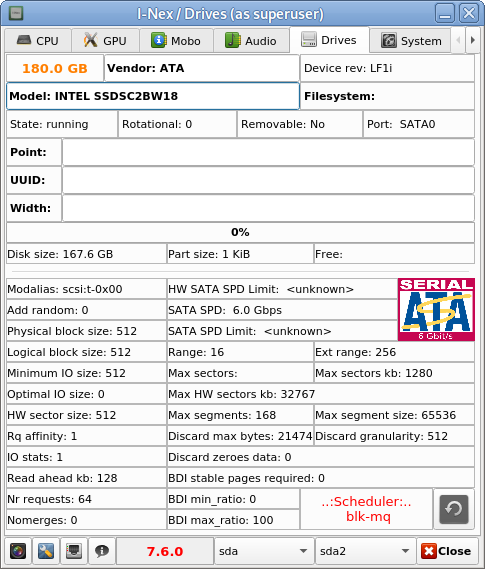
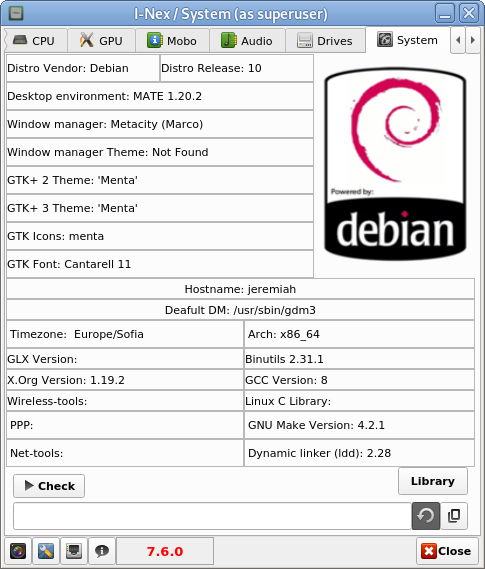
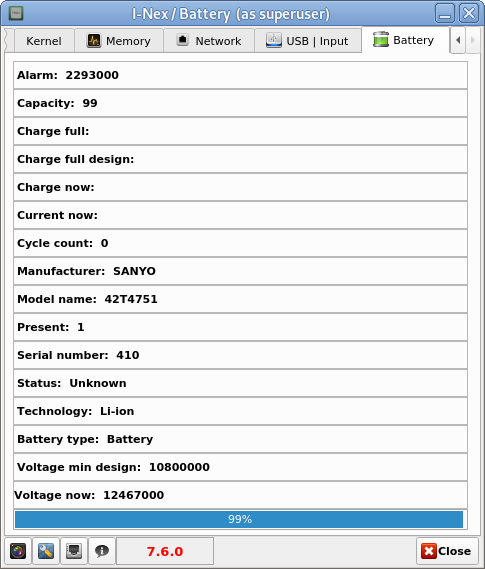
I-Nex is even more useful for general hardware reporting as it reports many hardware specifications not reported by CPU-X such as Battery type and Model Name  (if the hardware report is on a laptop), info on USB devices slots or plugged USB devices brand and specifications, the available Network devices on the system (MAC Addresses) of each of it, Installed and used drivers on Hard Disk (ATA / SATA / SCSI / SSD), HW Sector size, Logical Block size, HDD Sectors count and other specific Hard Drive data as well as information on available Audio (Sound Blaster) devices (HDA-Intel), used Codecs, loaded kernel ALSA driver, Video card used and most importantly indicators on Processor reported CPU (temperature).


To install I-nex

Go to https://launchpad.net/i-nex or any of the mirror links where it resides and install the respective package, in my case, I was doing the installation on Debian Linux, so fetched current latest amd64 package which as of moment of writting this article is i-nex_7.6.0-0-bzr977-20161012-ubuntu16.10.1_amd64.deb , next installed it with dpkg
 

dpkg -i i-nex_7.6.0-0-bzr977-20161012-ubuntu16.10.1_amd64.deb


As the package was depending on some other .deb packages, which failed to install to install the missing ones I had to further run
 

apt –fix-broken install

i-nex-cpu-info-linux-hardware-info-program


hre

I-Nex thermal indicators about CPU temperature on a Linux Desktop notebook

i-nex-gpu-info-linux-hardware-info-program

i-nex-mobo-info-linux-hardware-info-program

i-nex-audio-info-linux-hardware-info-program

i-nex-drivers-info-linux-hardware-info-program

i-nex-system-info-linux-hardware-info-program

i-nex-battery-info-linux-hardware-info-program


There are other Hardware identification report tools such as CUDA-Z that are useful to check if you have Nvidia Video Card hardware Installed on the PC to check the status of CUDA enabled GPUs, useful if working with nVidia Geforce, Quadro, Tesla cards and ION chipsets.

If you use it however be aware that CUDA-Z is not compatible with 3rd-party linux drivers for NVidia so make sure you have the current official Nvidia version.


5. Inxi full featured system information script


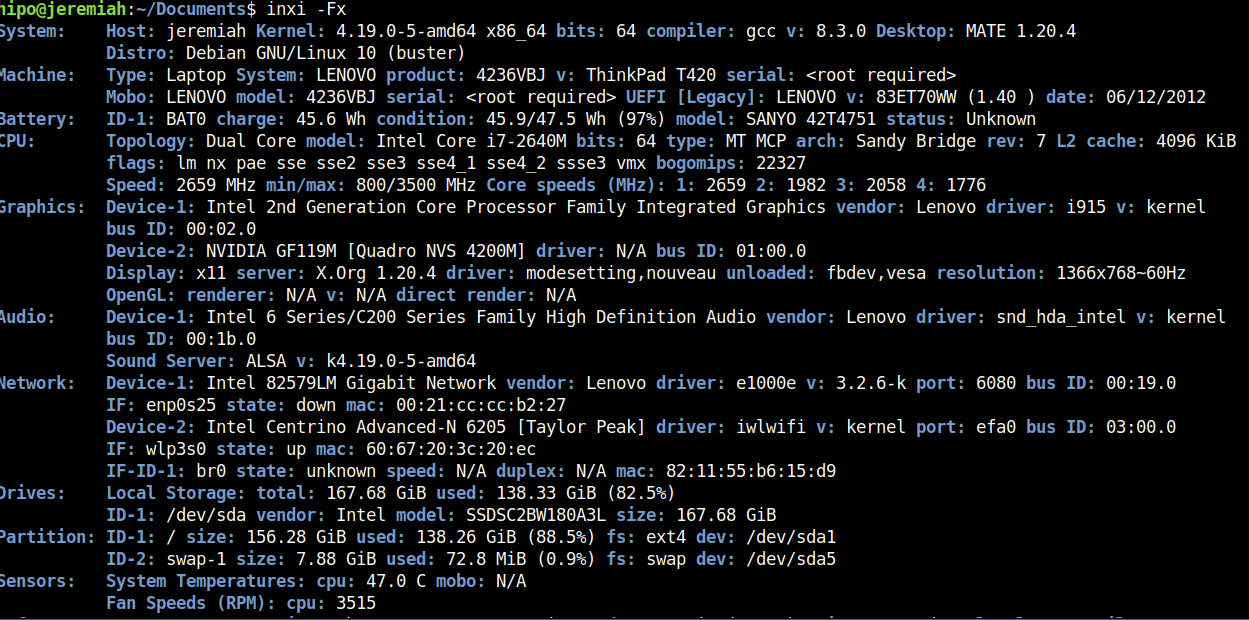
Inxi is a 10000 lines mega bash script that fetches hardware details from multiple different sources in /proc /sys and from commands on the system, and generates a beautiful looking console report that non technical users can read easily.

inxi-10-k-mega-bash-shell-script-reporting-on-installed-system-computer-hardware


inxi -Fx


inxi-report-on-installed-hardware-on-my-lenovo-thinkpad-home-laptop

Each of the pointed above tools has different method of collection of Hardware information from various resources e.g. – kernel loaded modules, dmesg, files like /proc/meminfo /proc/version /proc/scsi/scsi /proc/partitions.
Hence some of the tools are likely to report more info than otheres, so in case if some information you need regarding the system plugged in hardware is missing you can perhaps obtain it from another program. Most Linux distribution desktop provided GNOME package are including Hardinfo gui tool, but in many cases above mentioned tools are likely to add even more on info on what is inside your PC Box.
If you're aware of others tools that are useful not mentioned here please share it.

Check the count and monitor of established / time_wait TCP, UDP connections on Linux and Windows with netstat command

Wednesday, February 6th, 2019

netstat-windows-linux-commands-to-better-understand-your-server-type-of-networrk-tcp-udp-connections

For me as a GNU / Linux sysadmin it is intuitive to check on a server the number of established connections / connections in time_wait state and so on .

I will not explain why this is necessery as every system administrator out there who had a performance or network issues due to server / applications connection overload or have been a target of Denial of Service (DoS)
or Distributed Denial of Service attacks (DDoS)  
is well aware that a number of connections in different states such as SYN_ACK /  TIME_WAIT or ESTABLISHED state could be very nasty thing and could cause a productive application or Infrastructure service to be downed for some time causing from thousands of Euros to even millions to some bussinesses as well as some amount of data loss …

To prevent this therefore sysadmins should always take a look periodically on the Connection states on the adminned server (and in this number I say not only sys admins but DevOps guys who are deploying micro-services for a customer in the Cloud – yes I believe Richard Stallman is right here they're clouding your minds :).

Even though cloud services could provide a very high amount of Hardware (CPU / Memory / Storage) resources, often for custom applications migrating the application in the Cloud does not solve it's design faults or even problems on a purely classical system administration level.


1. Get a statistic for FIN_WAIT1, FOREIGN, SYNC_RECV, LAST_ACK, TIME_WAIT, LISTEN and ESTABLISHED  Connections on GNU / Linux


On GNU / Linux and other Linux like UNIXes the way to do it is to grep out the TCP / UDP connection type you need via netstat a very useful cmd in that case is:


root@pcfreak:~# netstat -nat | awk '{print $6}' | sort | uniq -c | sort -n
      1 established)
      1 FIN_WAIT1
      1 Foreign
      1 SYN_RECV
      3 LAST_ACK
      4 FIN_WAIT2
      8 TIME_WAIT
     45 LISTEN
    147 ESTABLISHED


2. Netstat 1 liner to Get only established and time_wait connections state 


Other ways to check only TCP ESTABLISHED connections on Linux I use frequently are:


root@pcfreak:~# netstat -etna|grep -i establi|wc -l
145


netstat-connection-types-statistics-linux-established-time-wait-check-count

Or to get whole list of connections including the ones who are about to be esatablished in FIN_WAIT2, TIME_WAIT, SYN_RECV state:


root@pcfreak:~# netstat -tupen |wc -l
164


3. Other Linux useful one liner commands to track your connection types
 

netstat -n -p | grep SYN_REC | sort -u

List out the all IP addresses involved instead of just count.

netstat -n -p | grep SYN_REC | awk '{print $5}' | awk -F: '{print $1}'


List all the unique IP addresses of the node that are sending SYN_REC connection status.

netstat -ntu | awk '{print $5}' | cut -d: -f1 | sort | uniq -c | sort -n


Use netstat command to calculate and count the number of connections each IP address makes to the server.

netstat -anp |grep 'tcp\|udp' | awk '{print $5}' | cut -d: -f1 | sort | uniq -c | sort -n


List count of number of connections the IPs are connected to the server using TCP or UDP protocol.

netstat -ntu | grep ESTAB | awk '{print $5}' | cut -d: -f1 | sort | uniq -c | sort -nr


Check on ESTABLISHED connections instead of all connections, and displays the connections count for each IP.


netstat -plan|grep :80|awk {'print $5'}|cut -d: -f 1|sort|uniq -c|sort -nk 1


Show and list IP address and its connection count that connect to port 80 on the server. Port 80 is used mainly by HTTP web page request.

Examples are taken from this nice blog post


4. Check the count of esatblished connections on M$ Windows


As I'm forced to optimize a couple of Microsoft Windows DNS servers which are really slow to resolve the
The logical question for me was how the Established and TIME_WAIT state connections then could be checked on Windows OS, after a quick investigation online I've come up with this:


C:\Users\admin> netstat -nao | find /i "estab" /c
78


netstat-check-number-of-established-ports-connections-windows


C:\Users\admin> netsatt -nao | find /i "time_wait" /c
333


If you're used to Linux watch command, then to do same on Windows OS (e.g. check the output of netstat) command every second
and print output use:


netstat –an 1 | find “3334”


Below commands will show stats for services listening on TCP port 3334

To find out which process on system sends packets to remote destination:


netstat –ano 1 | find “Dest_IP_Addr”


The -o parameter outputs the process ID (PID) responsible for the connection.
then if you need further you can find the respective process name with tasklist< cmd.
Another handy Windows netstat option is -b which will show EXE file running as long as
the related used DLL Libraries which use TCP / UDP .

Other useful netsatat Win example is to grep for a port and show all established connections for it with:


netstat –an 1 | find “8080” | find “ESTABLISHED”


5. Closure


Hopefully this article will give you some idea on what is eating your bandwidth connections or overloading your GNU / Linux – Windows systems. And will point you to the next in line logical thing to do optimization / tuning
settings to be made on your system for example if Linux with sysctl – see my previous relater article here

I'll be intested to hear from sysadm colleagoes for other useful ways to track connections perhaps with something like ss tool (a utility to investigate sockets).
Also any optimization hints that would cause servers less downtime and improve network / performance thouroughput is mostly welcome.


Install JBL Go Bluetooth Speaker on Debian GNU / Linux and Ubuntu

Thursday, August 24th, 2017

jbl-go-on-gnu-how-to-install-on-debian-and-ubuntu-linux

Here is how to configure a JBL Go Bluetooth (Wireless) speaker and presumably other Bluetooth external speakers to Debian GNU / Linux Wheezy 7 and Ubuntu 14.04 . 1. Install following bunch of deb packages

debian:~# apt-get install pulseaudio pulseaudio-module-bluetooth pavucontrol bluez-firmware

Here it is notable to mention pavucontrol if you have previously played more extensively on GNU / Linux you should have already used if not it is really cozy volume control tool with a lot of tuning options regarding pulseaudio stream server. Considering that like me you're using a GNOME as a desktop environment you will also need gnome-bluetooth package, e.g.:

debian:~# apt-get install gnome-bluetooth

As Pulseaudio is used as a sound streaming server in GNU / Linux (assuming your Debian version is using it you'll also need to have installed pulseaudio-module-bluetooth)

debian:~# apt-get install pulseaudio-module

For Ubuntu 14.04 GNU / Linux users the list of necessery bluetooth packages is a bit longer, if you're on this OS go and install:

debian:~# apt-get install bluez bluez-alsa bluez-audio bluez-btsco bluez-compat bluez-cups bluez-dbg bluez-gstreamer bluez-hcidump bluez-pcmcia-support bluez-tools bluez-utils python-bluez bluewho indicator-bluetooth libbluetooth-dev libgnome-bluetooth11 libbluetooth3 python-gobject python-dbus

Moreover you will need pulseaudio-module-bluetooth deb package installed in order to be able to select the desired sound output.

Next it is time to restart Bluetooth service

debian:~# service bluetooth restart
[ ok ] Stopping bluetooth: rfcomm /usr/sbin/bluetoothd.
[ ok ] Starting bluetooth: bluetoothd rfcomm.

It is also a good idea to restart pulseaudio snd streaming server in order to load the newly installed pulseaudio bluetooth module settings, to do so issue:

debian:~# killall pulseaudio

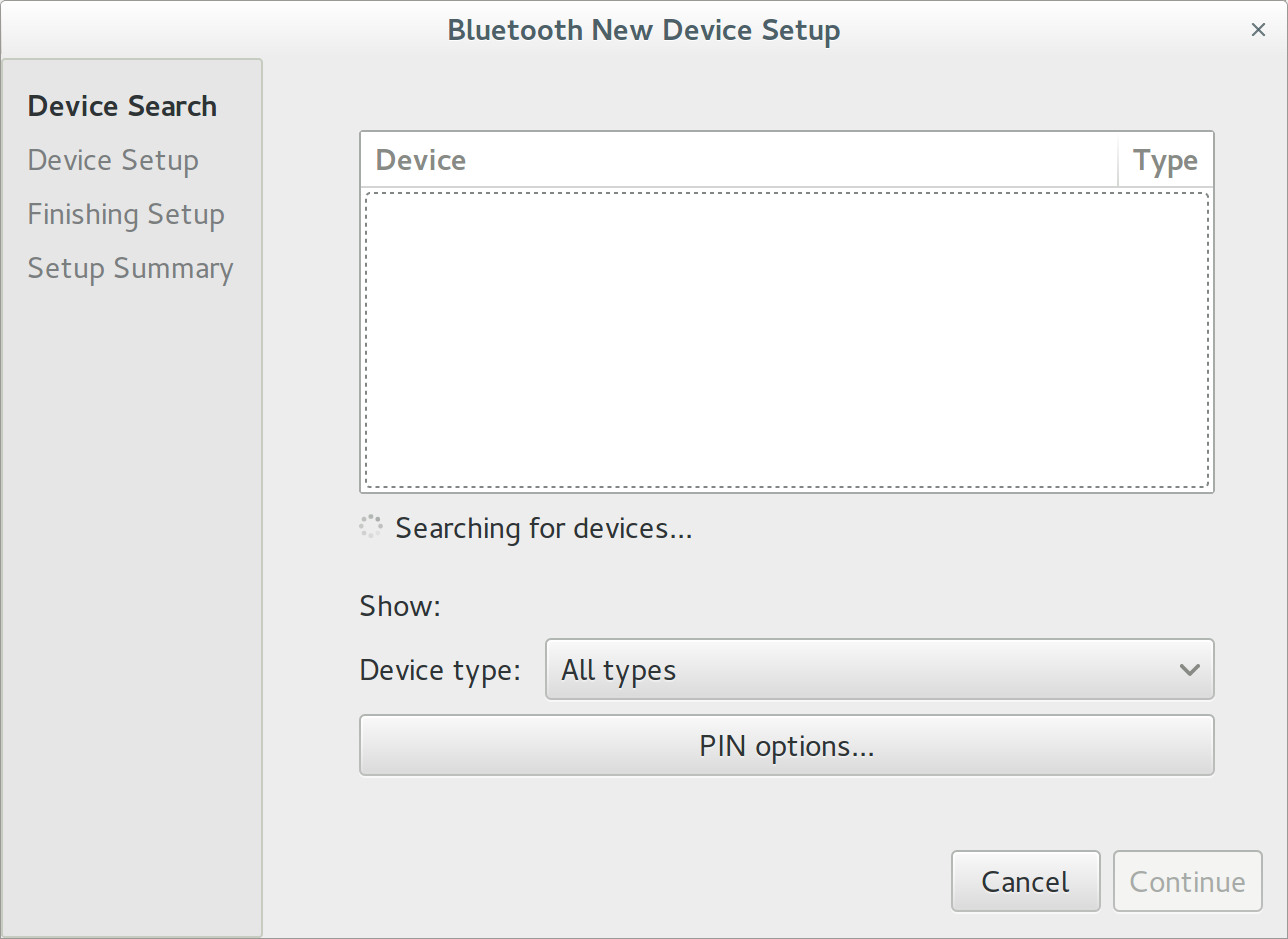
And try to establish connection from Gnome-Bluetooth to the JBL Go (press the JBL Go bluetooth button) and search from the Linux bluetooth interface, once founded connect it.

bluetooth-new-device-setup

jbl-go-connected-screenshot

Before JBL Go appears to list listable blootooth devices you will also need to run following command:

debian:~# pactl load-module module-bluetooth-discover
26

This command is to connect bluetooth discovered JBL Go device to the audio sink interface.

It is generally idea to add this line also to /etc/rc.local to make the setting permanently executed on every Linux boot.

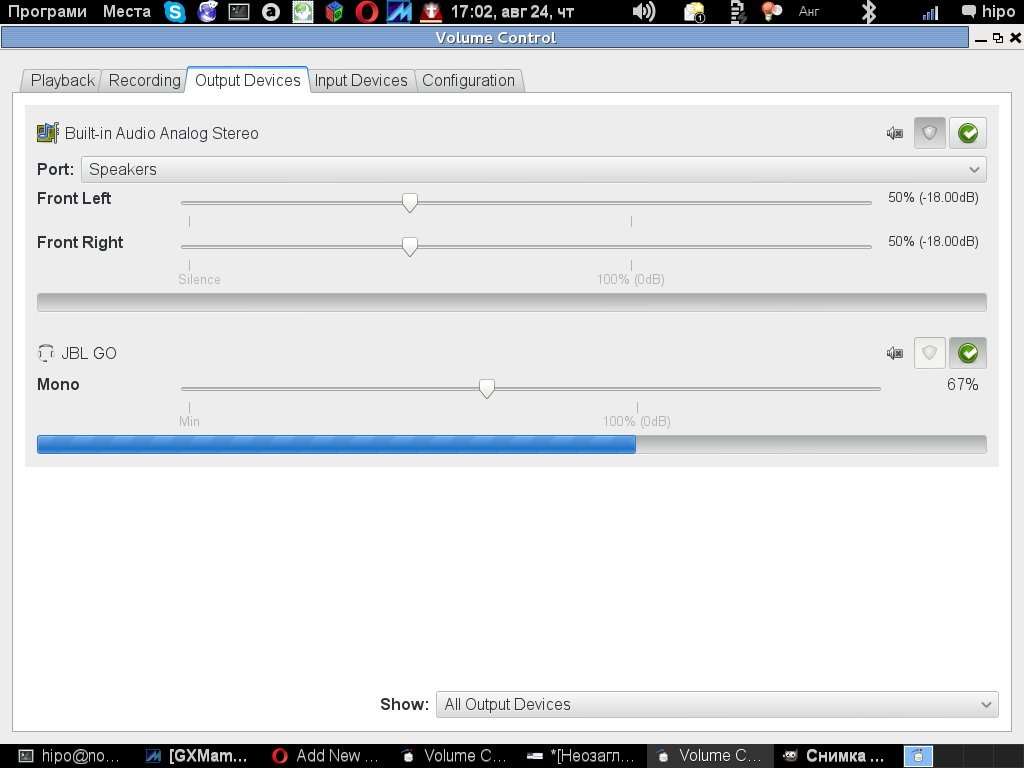
Now you can launch pavucontrol and hopefully the JBL GO bluetooth speaker should be visible as an option, check out my below screenshot:


In case you further experience issues connecting the Bluetooth Speaker I would recommend to check out this Debian a2dp page at the end of the page are troubleshooting suggestions.

Troubleshooting

Refused to switch profile to a2dp_sink: Not connected

Bluetooth headset is connected, but ALSA/PulseAudio fails to pick up the connected device or there's no device to pick. This happens because GDM captures A2DP sink on session start, as GDM needs pulseaudio in the gdm session for accessibility. For example, the screen reader requires it. See 805414 for some discussion.


Workaround 1: disable pulseaudio in gdm

In order to prevent GDM from capturing the A2DP sink on session start, edit /var/lib/gdm3/.config/pulse/client.conf (or create it, if it doesn't exist):


autospawn = no
daemon-binary = /bin/true

After that you have to grant access to this file to Debian-gdm user:


chown Debian-gdm:Debian-gdm /var/lib/gdm3/.config/pulse/client.conf

You will also need to disable pulseaudio startup:


rm /var/lib/gdm3/.config/systemd/user/sockets.target.wants/pulseaudio.socket

In order to auto-connect a2dp for some devices, add this to /etc/pulse/default.pa:


load-module module-switch-on-connect

Logout your Desktop environment and restart gdm3 /etc/init.d/gdm3 restart or Reboot the PC and then it should be fine.


Now the sound device (bluetooth headset) should be accessible through pavucontrol and standard audio device manager.


Workaround 2: disable pulseaudio's bluetooth in gdm

The actual solution package maintainers are looking into next is to simply disable the bluetooth sink in the gdm pulseaudio daemon so that it doesn't take over the device. Add this to /var/lib/gdm3/.config/pulse/default.pa:


#!/usr/bin/pulseaudio -nF
#
# load system wide configuration
.include /etc/pulse/default.pa
### unload driver modules for Bluetooth hardware
.ifexists module-bluetooth-policy.so
unload-module module-bluetooth-policy
.endif
.ifexists module-bluetooth-discover.so
unload-module module-bluetooth-discover
.endif

Though this article explains how to connect a bluetooth speaker connecting Bluetooth Speaker to GNU / Linux is done in analogous way


How to check Linux OS install date / How long ago was Linux installed

Sunday, October 22nd, 2017

If you're sysadmin who inherited a few hundreds of Linux machines from a previous admin and you're in process of investigating how things were configured by the previous administrator one of the crucial things to find out might be

How Long ago was Linux installed?

Here is how to check the Linux OS install date.

The universal way nomatter the Linux distribution is to use fullowing command:


root@pcfreak:~# tune2fs -l /dev/sda1 | grep 'Filesystem created:'
Filesystem created:       Thu Sep  6 21:44:22 2012


Above command assumes the Linux's root partition / is installed on /dev/sda1 however if your case is different, e.g. the primary root partition is installed on /dev/sda2 or /dev/sdb1 / dev/sdb2 etc. just place the right first partition into the command.

If primary install root partition is /dev/sdb1 for example:
 

root@pcfreak:~# tune2fs -l /dev/sdb1 | grep 'Filesystem created:'


To find out what is the root partition of the Linux server installed use fdisk command:


root@pcfreak:~# fdisk -l


Disk /dev/sda: 465,8 GiB, 500107862016 bytes, 976773168 sectors
Units: sectors of 1 * 512 = 512 bytes
Sector size (logical/physical): 512 bytes / 512 bytes
I/O size (minimum/optimal): 512 bytes / 512 bytes
Disklabel type: dos
Disk identifier: 0x00051eda

Device     Boot     Start       End   Sectors   Size Id Type
/dev/sda1  *         2048 965193727 965191680 460,2G 83 Linux
/dev/sda2       965195774 976771071  11575298   5,5G  5 Extended
/dev/sda5       965195776 976771071  11575296   5,5G 82 Linux swap / Solaris

Disk /dev/sdb: 111,8 GiB, 120034123776 bytes, 234441648 sectors
Units: sectors of 1 * 512 = 512 bytes
Sector size (logical/physical): 512 bytes / 512 bytes
I/O size (minimum/optimal): 512 bytes / 512 bytes
Disklabel type: dos
Disk identifier: 0x00000000


Other ways to check the Linux OS install date on Debian / Ubuntu / Mint etc. deb. based GNU / Linux


Deban based Linux distributions do create an initial /var/log/installer directory containing various install information such as hardware-summary, partition, initial installed deb packages, exact version of Linux distribution, and the way it was installed either it was installed from an ISO image, or it was network install etc.


root@pcfreak:~# ls -al /var/log/installer/
total 1228
drwxr-xr-x  3 root root   4096 sep  6  2012 ./
drwxr-xr-x 72 root root  12288 окт 22 06:26 ../
drwxr-xr-x  2 root root   4096 sep  6  2012 cdebconf/
-rw-r–r–  1 root root  17691 sep  6  2012 hardware-summary
-rw-r–r–  1 root root    163 sep  6  2012 lsb-release
-rw——-  1 root root 779983 sep  6  2012 partman
-rw-r–r–  1 root root  51640 sep  6  2012 status
-rw——-  1 root root 363674 sep  6  2012 syslog


If those directory is missing was wiped out by the previous administrator, to clear up traces of his previous work before he left job another possible way to find out exact install date is to check timestamp of /lost+found directory;
 

root@pcfreak:~# ls -ld /lost+found/
drwx—— 2 root root 16384 sep  6  2012 /lost+found//


Check OS Linux install date on (Fedora, CentOS, Scientific Linux, Oracle and other Redhat RPM based Distros)


[root@centos: ~]# rpm -qi basesystem
Name        : basesystem
Version     : 10.0
Release     : 7.el7
Architecture: noarch
Install Date: Mon 02 May 2016 19:20:58 BST
Group       : System Environment/Base
Size        : 0
License     : Public Domain
Signature   : RSA/SHA256, Tue 01 Apr 2014 14:23:16 BST, Key ID     199e2f91fd431d51
Source RPM  : basesystem-10.0-7.el7.src.rpm
Build Date  : Fri 27 Dec 2013 17:22:15 GMT
Build Host  : ppc-015.build.eng.bos.redhat.com
Relocations : (not relocatable)
Packager    : Red Hat, Inc. <http://bugzilla.redhat.com/bugzilla>
Vendor      : Red Hat, Inc.
Summary     : The skeleton package which defines a simple Red Hat Enterprise Linux system
Description :
Basesystem defines the components of a basic Red Hat Enterprise Linux
system (for example, the package installation order to use during
bootstrapping). Basesystem should be in every installation of a system,
and it should never be removed.