Posts Tagged ‘screen’
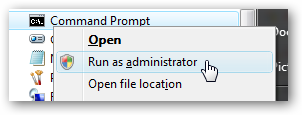
Wednesday, November 23rd, 2011 I needed to show the Administrator user on one Windows 7 install.
Achieving this is done through command prompt – cmd.exe where the command prompt with the exclusive option of Run as Administrator .
The exact command that unhides the Administrator user so further on on next windows login screen one sees Administrator user ready for use is:
C:> net user administrator /active:yes
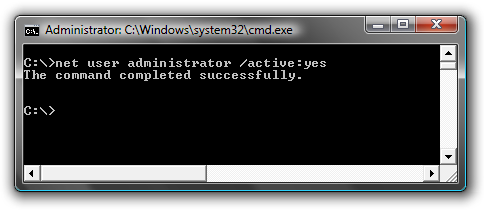
Unhiding Administrator user is always handy whether one needs to do some bunch of operations with Super User. After finishing all my required tasks with administrator I reverted back and hid the Administrator user once again like so:
C:> net user administrator /active:no
This commands also works fine on Vista and presumably on Windows XP.
Tags: Achieving, administrator, bunch, cmd, command, command prompt, exact command, exe, fine, login, option, run, screen, show, Super, unhide, Unhiding, use, User, Vista, Windows, windows xp
Posted in System Administration, Various, Windows | No Comments »
Friday, January 27th, 2012 By default latest Debian GDM does not provide an automatic way to login using user AVATARS (like Windows does).
This is pretty strange, especially if you compare to Ubuntu and many other Linux distributions which already has support for AVATAR login via GDM
The reason for this is that currently Debian is shipped with old version of gdm2 and this gdm version does not have support for clickable login avatars.
Debian looks by default like this:
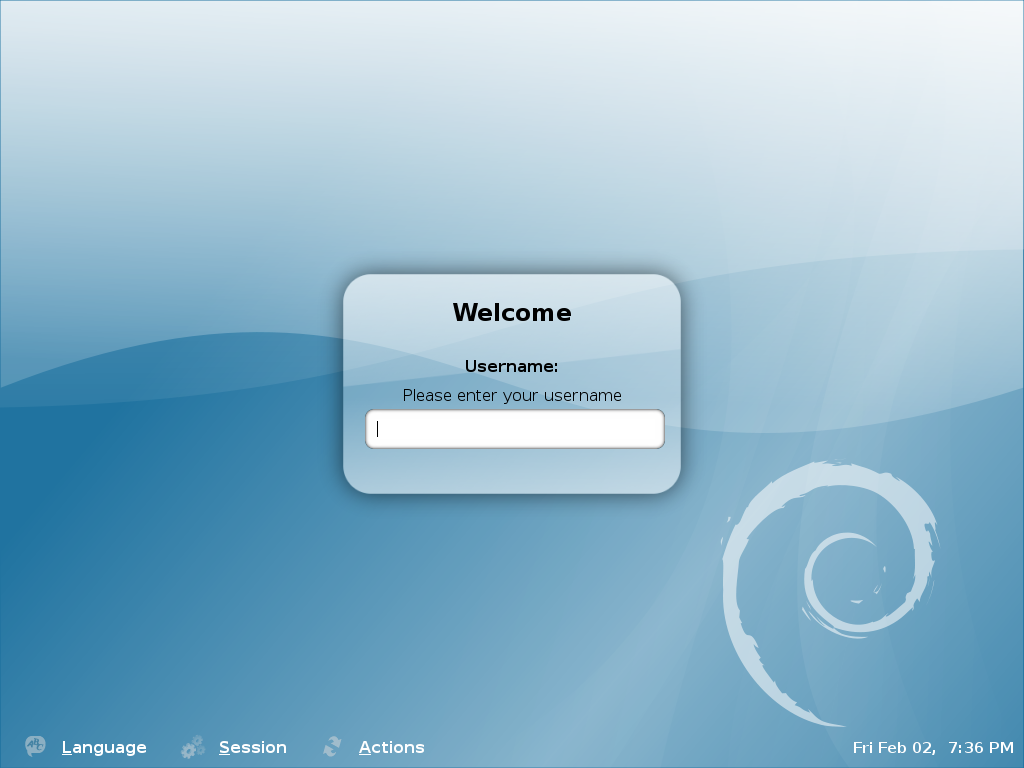
Thanksfully this non-user friendly GNOME login screen behaviour can be changed by simply installing gdm3
root@debian:~# apt-get --yes install gdm3

...
This will remove the old gdm installed package as well as fast-user-switch-applet and install the gdm3.
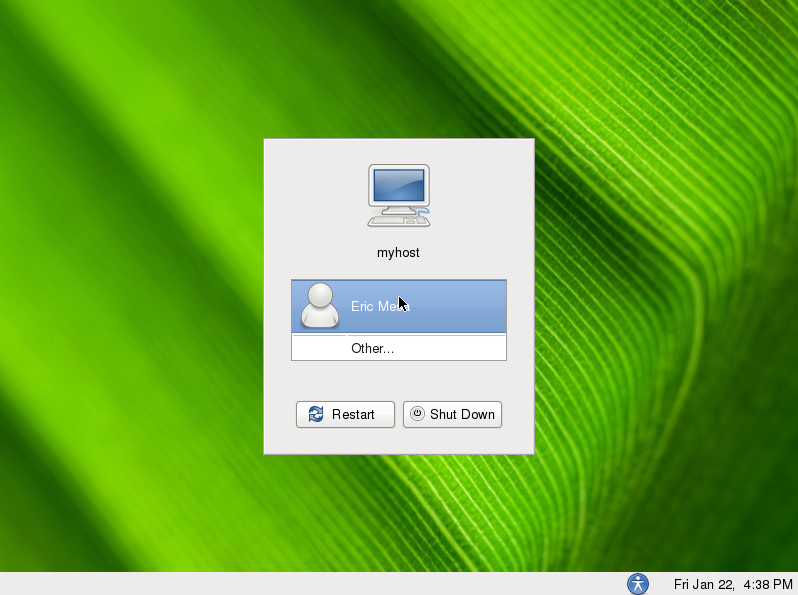
Having installed the gdm3 with configured a background will look like so:
I was quite stunned that gdm3 does not have included support for themes . As far as I've spoken with some ppl in irc.freenode #gnome the reason for this oddity is it crashed a lot when a theme is configred.
By default the gdm2 themes are provided by a package called gdm-themes, since gdm3 does not support themes (yet), the package gdm3-themes is missing.
Tags: avatar, avatars, behaviour, Debian, debian gnu, freenode, GDM, Gnome, gnu linux, Linux, linux distributions, login, nbsp, non-user, oddity, old version, package, ppl, reason, root, screen, squeeze, support, support themes, Thanksfully, theme, Ubuntu, version, way
Posted in Gnome, Linux, Linux and FreeBSD Desktop, Various | No Comments »
Thursday, February 23rd, 2012 1. Install the slackware binary package xfce4-screenshooter.
For the latest Slackware Linux release which as of time of writting is 13.37 xfce4-screenshooter-1.7.9-i486-3sl.txz can be download from here
Install of xfce4-screenshooter-1.7.9-i486-3sl.txz is done with slackware's usual installpkg package manager command:
bash-4.1# /sbin/installpkg xfce4-screenshooter-1.7.9-i486-3sl.txz
By the way, I haven't used slackware for a long time so in the mean time since Slackware 13, the default slackware packages format .tgz is now substituted with the newer .txz (better compressed .txz). The old .tgz was simply a tar archive with DEFLATE gzip. The newer .txz packages bundled with newer slackware releases are using the LZMA2 (XZ) chain algorithm for compression. LZMA implies higher compression than even bzip2 and this is the reason why Patrick Volkerding – the one man army man behind Slackware decided to use it.
The reason Vollerding choose using .txz is slackware network distribution will load up less the networks and will take less time for downloading extra slackware packages via the internet. The .txz also reduces slackware main CD size so more packages can be contained in the same 700MB sized slack install CD.
Anyways now back to the installation of xfce-screenshooter.
Once installed to runit use the Xfce menus:
Xfce Menu -> Accesories -> Screenshot
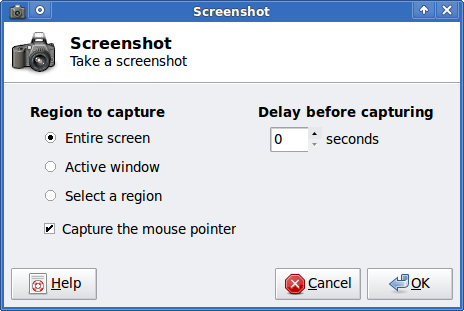
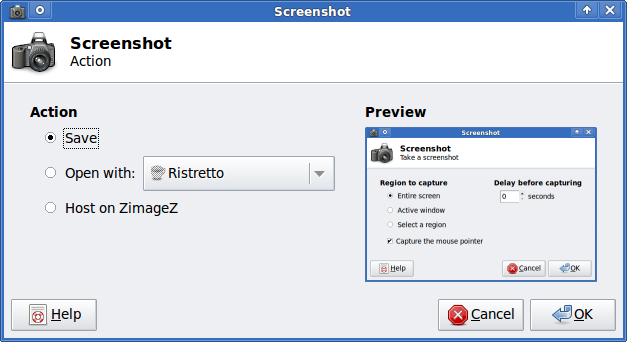
Next you will see the xfce-screenshooter program to pop-up:
To take a snapshot of the screen use:
Entire Screen -> Save
Tags: algorithm, army man, Auto, binary package, compression, distribution, download, Draft, format, graphical environment, gzip, Install, installation, Linux, long time, LZMA, man army, manager, mean time, menu, menus, nbsp, network distribution, package, reason, screen, size, slack, slackware packages, snapshot, tar archive, tgz, time, txzBy, Vollerding, writting, XFCE, xfce4
Posted in Linux, Linux and FreeBSD Desktop, System Administration | 2 Comments »
Saturday, April 9th, 2011 I have noticed that many blogs nowdays offer an email subscription box to simplify the subscription procedure for the blog readers.
My blog was lacking this feature so I took the time to find out how can I add an e-mail subscription box field on my blog.
My research has shown me that the easiest way to add the subscription box is by using Google’s Feedburner RSS service .
I’ve been using Google FeedBurner for quite some time and I’ve already 27 subscriptions with it.
Earlier when I added a FeedBurner subsciption to my blog I’ve blogged about it, so if you’re not acquainted on how to add FeedBurner service to your blog, you might want to read my previous article Adding RSS Feed to WordPress in conjunction with FeedBurner / WordPress add-to-any-subscribe plugin
In this article I will explain in short step by step, how to add the subscrpition email box to your wordpress I assume, that the reader has already enabled and configured registration with Feedburner, if you still haven’t just skip few lines above and check my previous article.
I would hereby skip the explanation of why feedburner as an RSS is so advantageous for every blog owner and readers and skip further to the email subscription procedure step by step instructions:
Step 1: Login to your FeedBurner Account
In my case my feedburner account url is accessed via the URL http://feeds.feedburner.com/WalkingInLightWithChrist-FaithComputingDiary
I have been properly logged in to my feedburner, so to view statistics of my current feeds subscription and to configure various variables of feedburner I had to access the URL address: http://feedburner.google.com/fb/a/myfeeds, a very quick shortcut to my feedburner account settings is also avaialable by simply accessing the URL: http://feedburner.com
Step 2: Click on the link that says My Feeds
If you have configured feeds for your feedburner you will get the list of feedburner feeds, (one could have multiple feeds, let’s say if you have a couple of blogs or sites and you use one feedburner account to podcast your feeds for each of the separated blogs or sites.
Step 3: Click over the feed you want to have the feedburner email subscription box
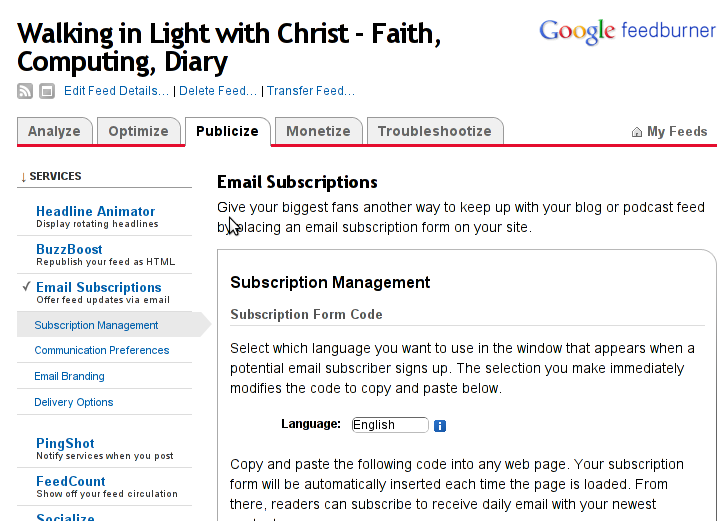
Below you see the screenshot of my configured feedburner feed:
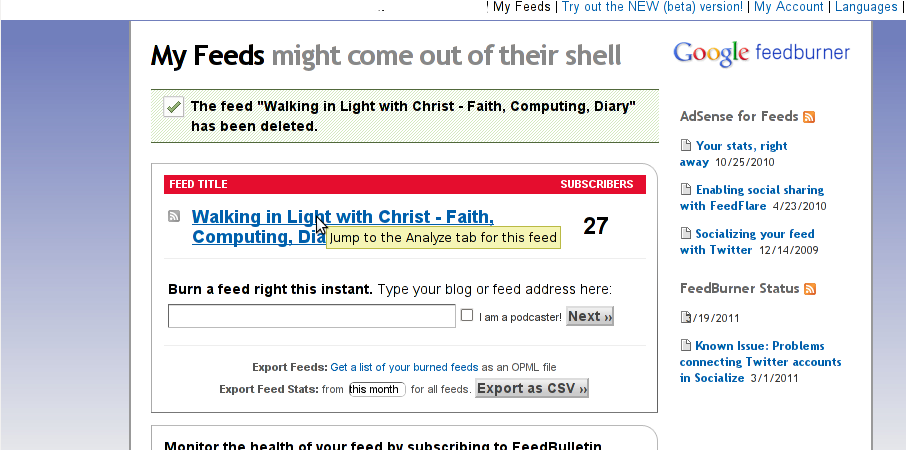
Right after clicking on your configured feed in my case Walking in Light With Christ – Faith, Computing, Diary you will see the screen:
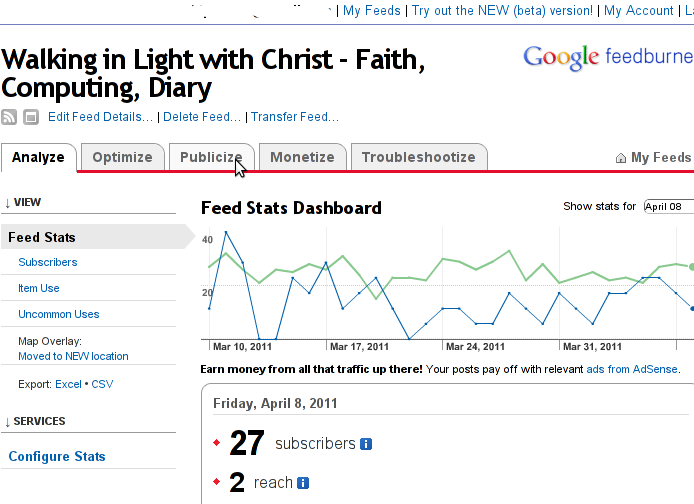
Step 4: Click on Publicize menu
You will see the following two screens while scrolling with your browser:
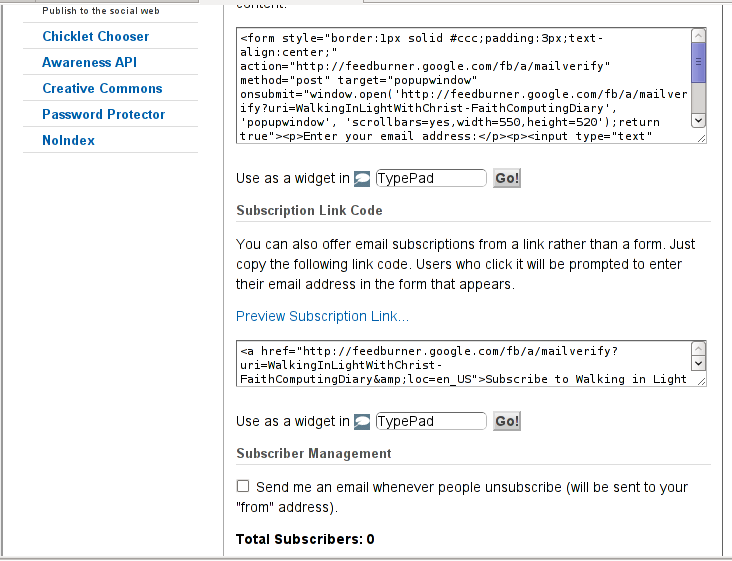
You see in the second screenshot above there is a textbox with a html form code, to set the feedburner subscription to appear on your blog you need to copy/paste this code and put it on your blog.
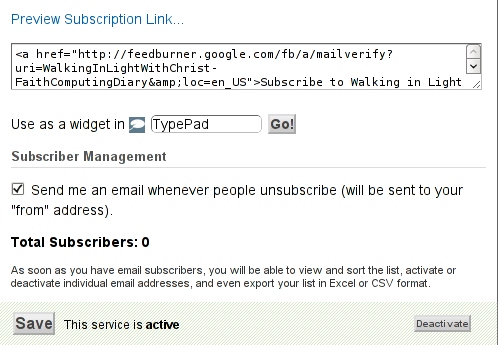
After copy/pasting the code, don’t forget to scroll down in your browser and save the email subscription generated form settings, (NB! if you don’t save it it want be working even if you install it on your blog).
Here is the Save button screenshot:
Step 5: Setting up feedburner email textbox to wordpress
In order to set up the just copied html and css form code you need to login to your wordpress blog admin and go to:
Appearance -> Widgets
Scroll over the Available Widgets list, find the Text Widget and press the Add button to include the Text Widget to your blog sidebar.
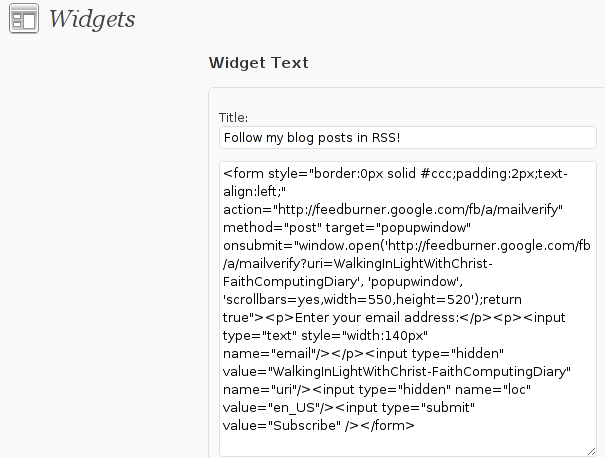
Further on the same Widgets page, go to the Sidebar menu find the just added Text Widget and click over the Edit link:

Here is my screenshot of the edit screen of the Text Widget:
Step 6. Add the feedburner email subscription box to single posts blog views
This step is not a requirement, but I found it for myself to be vital, as it might rise some more subscribers to my blog, if my blog readers finds individual indexed pages in Google.
This step is also highly dependant on the wordpress theme you use, I use the old wordpress default theme and it’s default behaviour is not to show up the wordpress sidebar, whether an individual wordpress post is clicked over, therefore to enable my feedburner subscription box for individual posts I also need to place the form code obtained from Feedburner.com’s to my templates single.php
If you’re using some kind of theme that doesn’t have the non-sidebar single post behaviour you might skip forward this step, otherwise just continue on reading.
To include the feedburner email form subscription to my single posts I edited blog/wp-content/themes/default/single.php
In the single.php file find the code:
<?php comments_template(); ?>
Immediately after the above code place your feedburner form code, like you see in below screenshot:

Step 7: Modify your form code css and javascript to make your feedburner more accustomed for your needs
Again this step is voluntary and is not necessery I’ve disliked the default way the form is formatted so I played a bit with few of it’s values to customize it to my likings, the things which I have changed a bit in the provided feedburner form code was:
- Remove the Delivered by Feedburner text from the form
-
>To do so in the issued feedburner form code below when you copy the code paste it to some text editor and remove from the code the text:<p>Delivered by <a href=”http://feedburner.google.com” target=”_blank”>FeedBurner</a></p>
- – Change the subsciption box width and height:
-
style=”width:140px”Changed that to:style=”width:120px”also I’ve changed:’scrollbars=yes,width=550,height=520’to:’scrollbars=yes,width=450,height=420’Another point of interest for adjustmnets in the feedburner for are in the form code:
- Remove feedburner subscription form default bordering
-
form style=”border:1px solid #ccc;padding:3px;text-align:center;”I’ve changed that to:form style=”border:0px solid #ccc;padding:2px;text-align:center;”By changing the css values border:1px to border:0px I have instructed the subscription box to show up without borders.
That’s all now refresh in your browser and check if the feedburner email subscription form is showing up properly to your wordpress.
To completely ensure yourself it works correctly try to subscribe yourself to the form and during your next blog post you should receive an email notifying you about the newly written article.
You can see, my blog feedburner subscription form on the blog right sidebar or on the below picture:
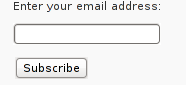
Hope that article will help somebody out there.
Tags: account settings, blogs, Button, Click, code, configure, conjunction, e mail, explanation, feature, Feed, Feedburner, form, google, mail subscription, menu, php, plugin, podcast, quite some time, screen, screenshot, scroll, sidebar, statistics, step 1, step 2, subsciption, subscription procedure, subscriptions, subscrpition, time, url, url address, variables, Wordpress
Posted in Various, Web and CMS, Wordpress | 7 Comments »
Thursday, July 14th, 2011 
My WordPress blog had an odd problem, all on the blog, worked just fine except the Widgets add new widget drag and drop functionality.
As there was new version of wordpress available I tried updating but this fixed the missing drag and drop widget functionality neither, so finally after a bit of googling and experimentation to follow suggested fixes like using the enable Accessiblity Mode button on top Widgets.Thus the common suggested fix that worked for most of the people who stumbled upon this annoying wordpress bug was to simply nagivate to:
Appearance -> Widgets -> Screen Options -> Enable Accessibility Mode
As for me pressing over the Screen Options was impossible (nothing happened when I pressed over it), finally I’ve found a hack 😉
The hack is quite simple, all I had to do is just pass a variable ?widgets-access=on to the widget.php php script
Therefore the fix to the problem was as follows http://blog.mysite.com/wp-admin/widgets.php?widgets-access=on
And done, FIXED! 😉
Tags: Appearance, blog, Button, common, drag, drop functionality, fine, fix, FIXED, functionality, googling, hack, Mode, mode button, ModeAs, mysite com, nagivate, odd problem, php, problem, screen, screen options, script, scriptTherefore, version, widget, Widgets, Wordpress, wordpress blog
Posted in Web and CMS, Wordpress | 3 Comments »
Friday, January 20th, 2012 Today I had a task to change an old CRT Monitor to LCD BENQ Model FP61E on a computer running Microsoft Windows XP SP3.
Changing phyiscally the monitors and restarting the computer to load with the new BENQ monitor ended up with the LCD Monitor showing a blank screen with error:
Out of Range
making the computer completely unusable.
Thanksfully in Windows Safe Mode the monitor was able to display the screen properly, so I had an option to operate somehow on the pc
My guess was that the Out of Range monitor problems were caused by an incorrect (monitor unsupported resolution).
Therefore what I tried as a fix to make it work was:
1. Enter Windows Safe Mode and change (lower the resolution) to 640×480, and restart the PC.
Unfortunately using this classical way to fix such issues failed… so I thought of some options.
2. Disable the video card NVIDIA Riva TNT2 Model 64 driver and check if this will make any difference.
I come up with the idea the Out of Range LCD issues might be caused by the Video card driver cause I've noticed in safe mode a standard VESA like VGA Driver shipped with Windows worked just fine.
To Disable the currently loaded NVIDIA Riva TNT2 Model 64/ Model 64Pro I used:
System -> Device Manager -> Hardware (Tab) -> Display Adapters
Clicking on Display Adapters the NVIDIA Riva TNT2 Model 64 appears using the option menu on it one can choose to disable the driver.
Further on restart Windows, to test if the XP will load properly with disabled NVidia video drivers.
Onwards it was clear the whole Out of Range issues were caused by some kind of conflict between the LCD BENQ FP61E Monitor and the NVIDIA Riva TNT2 Model 64
Often latest video drivers solves hardware incompitability issues and fix many bugs, upgrading the driver to latest is always a good idea.
3. Therefore I Upgraded the NVIDIA Riva TNT2 64 driver (using Safe Mode) to the latest available from Nvidia's official site.
Weirdly Upgrading NVidia Riva TNT2 drivers to the latest did not fix the Out of Range blank screen error.
After a bit of thinking on what to do to make the Monitor work fine with the Nvidia driver, I thought of completely uninstalling the Nvidia drivers and installing them again might be a fix.
In my previous experience with Windows at many occasions, uninstalling a driver failing to properly work and installing it again with a working version was a good fix.
4. Uninstall the NVIDIA Riva TNT2 Model and Install the latest driver.
Uninstalling and Installing the Video driver had to be done in Windows Safe Mode again, in normal mode the windows was not displaying anything.
After The driver installation program completes the installation it requires a restart. After the restart the Video driver gets loaded fine and Windows loaded up in Normal mode as usual 😉
Tags: Auto, blank screen, card, cause, change, CRT, device manager, Display, display adapters, Draft, hardware tab, Install, installation, manager gt, menu, microsoft windows, Model, monitor problems, nvidia, nvidia riva tnt2 64, nvidia riva tnt2 64 driver, nvidia riva tnt2 model 64, nvidia video drivers, Onwards, option, option menu, range resolution, resolution problems, riva tnt2 model 64, Safe, screen, tnt2 model 64 driver, Uninstalling, Upgraded, vesa, VGA, vga driver, video card driver, Weirdly, windows safe mode, work
Posted in Everyday Life, Windows | No Comments »
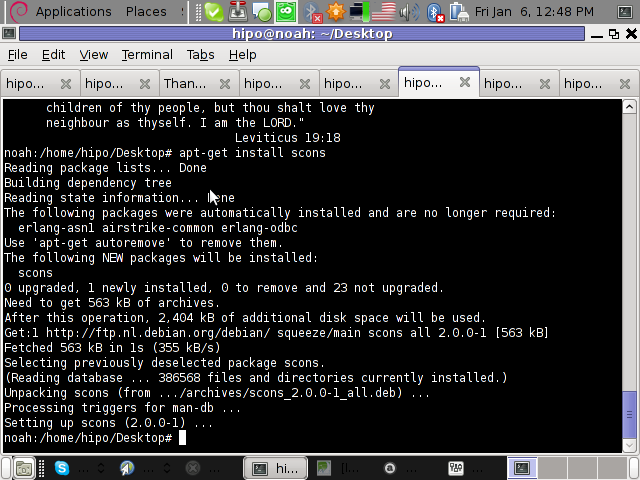
Friday, January 6th, 2012 I'm testing some old school arcade games, available from Debian's package repositories and quitting one of the games ended me up with a GNOME Screen Resolution of 640×480 pixels.
I wanted to revert back to the Classics resolution, so what I would normally do to do that is use >GNOME menus:
System -> Preferences -> Monitors
In that huge screen resolution on my 14 inch lenovo notebook screen, however the System menu cannot fit in 640×480 resolution. You can see the non-screen fitting System on the screenshot below:
Having this situation, I needed a way to change back to my normal daily used 1024x768px screen resolution to continue my daily work by some other way.
One possible solution I thought of was Logging Off Gnome and logging again. Loggig off and log on again would usually restart the initiated GNOME session and therefore will reset the screen resolution to my default 1024×768 / 32 bit color.
Having the unobservable System gnome panel menu on my screen however made using the usual Log off procedure via System -> Log Out myusername impossible…
Another possible way to actually restart my screen and hence revert back to my original resolution is achiavable using the classical restart X server key switch CTRL + ALT + backspace (bckspc) . Though this was a possible approach to the situation, I had a bunch of programs already running on my desktop and I did not wanted to interrupt my desktop session, what I was looking for is simply change the screen resolution size .
With all said I had to look up for alternative way (preferably easy) way, to revert back my screen resolution to my desired 1024×768.
As a console guy, I was interested if there is some kind of possibility to change my GNOME resolution directly using xterm or gnome-terminal , after a bit of check up online, I've found few threads started by people who were looking just like me for a way to change GNOME / KDE screen resolution size on various distributions Linux desktops as well on Free/Net/Open/BSDs. The answer to the question on few places was the command xrandr which I had used some few years ago to initiate remote X server connections via SSH
xrandr is actually a great tool part of the x11-xserver-utils
Actually xrandr is capable of doing a few things besides setting the screen resolution size, just to name a few it supports change the screen orientation, reflection of the output of the screen, adjust brightness, set color gamma etc. etc.
It is good to mention that xrandr changes the resolution not on a GNOME level but on Xorg server level.
Using xrandr to change the screen resolution appeared to be very easy.
1. First I issued xrandr to check all the supported xrandr resolutions by my X server
hipo@noah:~/Desktop$ xrandr Screen 0: minimum 320 x 200, current 1024 x 768, maximum 8192 x 8192VGA1 disconnected (normal left inverted right x axis y axis)LVDS1 connected 1024x768+0+0 (normal left inverted right x axis y axis) 304mm x 228mm 1024x768 60.0*+ 50.0 800x600 60.3 56.2 640x480 60.0 59.9 TV1 disconnected (normal left inverted right x axis y axis)hipo@noah:~/Desktop$
From the output you can see I have 3 basic resolutions configured in my Xorg, I can switch between.
2. To switch to my previous default screen resolution
hipo@noah:~/Desktop$ xrandr -s 1024x768
After using xrandr command to revert back to my default screen size, I realized there is two other (partially command line partially gui) way to change to 1024×768 pixels.3. Through launching gnome Control Center and searching for Monitors menu.
If one prefers this way he can;
i) press ALT+F2 to invoke Gnome's Run Application dialog
ii) issue gnome-control-center command:
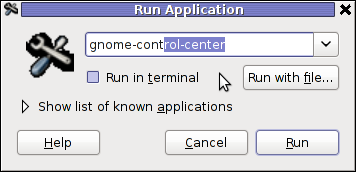
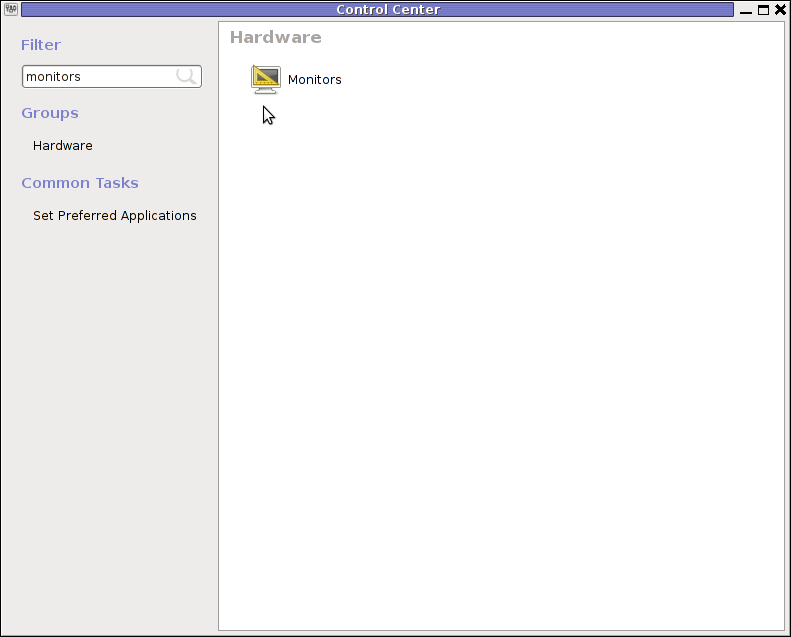
4. By invoking gnome's Control Panel -> Monitors settings window by a command
hipo@noah:~/Desktop$ gnome-display-properties
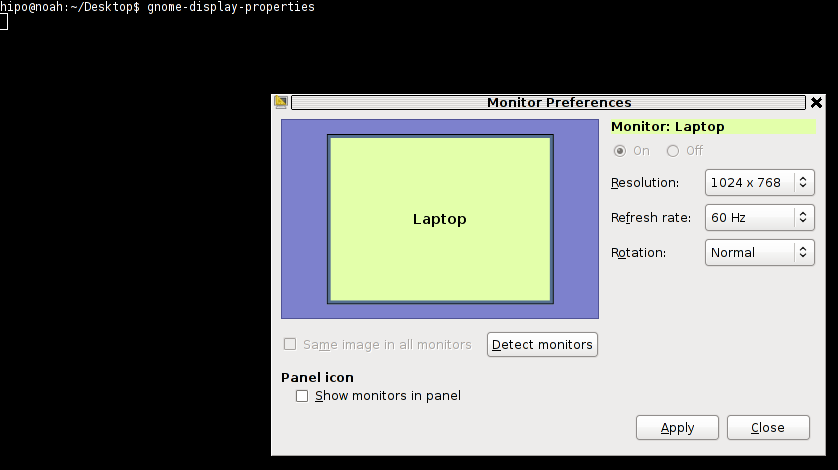
Tags: Alt, arcade games, Auto, bckspc, change, debian gnu, Desktop, Draft, freebsd, Gnome, gnome panel, gnome resolution, gnu linux, hipo, key switch, level, Linux, menu, menus, Monitors, noah, notebook, old school, package, panel menu, possibility, possible solution, repositories, resolution size, right, screen, screenshot, size, system menu, terminal, threads, work, x server, Xorg, xterm
Posted in FreeBSD, Linux and FreeBSD Desktop | 2 Comments »
Thursday, December 15th, 2011 
I’m writting some game reviews and movie reviews, every now and then and therefore being able to capture a fullscreen running program like let’s say mplayer or vlc or some full screen running game is something I really need.
The usual PrtScr button which normally works to prepare screenshots in GNOME or KDE, however is not working if the root window handler is being passed to a different program than the Window Manager and pressing it while inside of many older programs or applicationsdoes not produce a print screen of the current screen.
Anyways I found a hack to this using the good old ImageMagick – import command line screenshotting program.
To take a screenshot of a certain program run from gnome-terminal or konsole using import cmd its possible to use a quick one liner which will take a snapshot of the root Window the started program will use.
Let’s say you want to make a screenshot of the entry screen of the FreeDOOM (DooM 3d shooter classical game arcade free Software Alternative).
Launch gnome-terminal or konsole , xterm , depending on the GUI environment you use and issue the commands:
debian:~$ ( sleep 15; import -window root my_desired_screenshot_name.png ) &

debian:~$ freedoom
The first command will launch import after a sleep of 15 secs and therefore will screenshot the active window which will be at focus after 15 seconds, where the & sign will background it and the second one will launch FreeDooM . You will have to wait for a certain secs and switch to the exact screen you will want to screenshot.
If you want to screenshot some game scene that will appear in 20 minutes change above sleep 15 cmd to be to something like sleep 180
That method can be used for screenshotting any other program running on fullscreen, the method is a bit inflexible as you will have to adjust a timing but it works fine 😉
Tags: bit, Button, classical game, cmd, Desktop, desktop environment, exact screen, first command, FreeDooM, fullscreen, game arcade, game reviews, game scene, Gnome, GNU, gnu linux, gui environment, how to take a screenshot, ImageMagick, import, import command, import window, launch, Linux, mplayer, PrtScr, root, root window, running game, screen, screenshot, shooter, sign, sleep, software, something, timing, VLC, xterm
Posted in FreeBSD, Linux, Linux and FreeBSD Desktop, Various | No Comments »
Tuesday, December 13th, 2011 
Facebook and Youtube has become for just a few years a defacto standard service for 80% of computer users in our age.
This is true and it seems there is growing tendency for people to adopt new easy to use services and a boom in the social networks.
We’ve seen that with the fast adoption of the anti-human freedom program Skype , the own privacy breaching FaceBook as well as the people interests tracking service YouTube.
We’ve seen similar high adoption rates in earlier times as well with the already dying (if not dead MySpace), with the early yahoo mail boom etc and in even earlier times with the AltaVista search engine use.
However this time it appears Youtube and FaceBook are here to stay with us and become standard online services for longer times …
Many people who work in office all day staring in a computer screen as well as growing teenagers and practically anyone in the developed and the development world is using those services heavily for (in between 5 to 10 hours a day or more). The Software as a Service users spends approximately half of their time spend on the internet in Youtube or and Facebook.
Its true Youtube can be massively educative with this global database of videos on all kind of topics and in some cases facebook can be considered helpful in keeping in touch people or keeping a catalog of pictures easily accessible from everywhere, however when few services becomes more used and influential than other provided services on the internet this makes these services harmful to the communities and destroyes cultures. The concentration of most of the human popuplation who uses high technologies around few online services creates a big electronic monopoly. In other words the tendency, we see of amalgamation of businesses in real world (building of big malls and destroyment of small and middle sized shops is being observed in the Internet space.
Besides that Facebook and Youtube and Twitter are highly contrary to the true hacker spirit and creates a big harm for intellectuals and other kind of tight and technical community culture by creating one imaginative casual disco culture without any deepness of thought or spirit.
Its observable that most of the people that are heavily using those services are turning into (if not exaggerate) a brainless consumer zombies, a crowd of pathless people who watch videos and pictures and write meaningless commentaries all day long.
You have as a result a “unified dumbness” (dumbness which unifies people).
Even if we can accept the grown and fully formed character people are aware of the threats of using Youtube or Facebook, this is definitely not the case with the growing people which are still in a process of building personality and personal likings.
The harmful resuls that the so called Social networks create can be seen almost everywhere, most of the cafeterias I visit the bar tender uses facebook or youtube all da long, most of random people I see outside in a coffee or university or any public institution where internet access is available they are again in Youtube and Facebook. The result is people almost did not use the Net but just hang around in those few services wasting network bandwidth and loading networks and computer equipment and spending energy for nothing. The wasteful computer and Internet deepens the ecologic problems as energy is spend on nonsense and not goal oriented tasks but on “empty” false entertainment.
Hence the whole original idea of internet for many is changed and comes to few words ( Skype, Youtube, Facebook etc.
Besides that youngsters instead of reading some classical valuable books, are staring in the computer screen most of their cognitive time at only this few “services” and are learned to become more a consumers than self opinion thinkers and inventors.
I have not lately met any growing real thinking man. I’ve seen already by own experience the IQ level of younger generations than mine (I’m 28) is getting downer and downer. Where I see as a main cause the constant interaction with technology built in a way to restrict, a consumers technology so to say.
Facebook and Youtube puts in young and growing man’s mind, the wrong idea that they should be limited choice people always praising what is newest and brightest (without taking in consideration any sight effects). These services lead people to the idea that one should always be with the crowds and never have a solid own opinion or solid state on lifely matters. As said own opionion is highly mitigated especially in facebook where all young people try to look not what they really are but copy / paste some trendy buzz words, modern style or just copying the today’s hearoes of the day. This as one can imagine prevents a person of getting a strong unique self identity and preference on things.
Many of the older people or computer illiterates can hardly recognize the severe problems, as they’re not aware on the technical side of things and does not realize how much security compromising as well as binding the constant exposure to those online hives are.
The purpose of this small post is hence just a small attempt to try to raise up some awareness of the potential problems, we as society might face very soon if we continue to follow the latest buzz trends instead of stop for a moment have a profound think on what is the moral consequences of giving so much power on Internet medias like Facebook and Youtube? …
Tags: adoption rates, age, AltaVista, altavista search engine, amalgamation, computer screen, computer users, consumer, Culture, defacto, disco, downer, earlier times, Engine, facebook, freak, freedom, freedom program, global database, half, human freedom, impact, internet space, mail boom, malls, middle, monopoly, Myspace, negative impact, opinion, popuplation, quot, screen, Search, service users, Skype, social networks, software, technology, tendency, time, tru, yahoo mail, youtube
Posted in Everyday Life, Various | 7 Comments »
Tuesday, November 29th, 2011 The classical way to keep a process running in background after log out of a shell is using screen
Anyways using screen is not the only way to detach a running process , GNU / Linux and BSDs (Free, Open, Net BSDs) had a command nohup which aim is to run a command immune to hangups, with output to a non-tty
Let’s say one wants to keep track (log) constantly ICMP traffic to a certain host with ping command on a UNIX server / desktop which doesn’t have the screen manager … terminal emulation program installed. Achieving this task is possible with nohup cmd by backgrounding the ping process, like so:
guoi@host:~$ nohup ping google.com >ping.log &[1] 45931hipo@host:~$ nohup: ignoring input and redirecting stderr to stdout
Afterwards even after closing up the opened ssh session or console (tty) / terminal (pts) on which the ping process is background nohup prevents the ping to be sent kill SIGNAL so the process continues running in the background.
Later on to check in real time the statistics of the continuous ICMP ping requests tail, less, or cat can be used for example watching the tail:
hipo@host:~$ tail -f ping.log

64 bytes from fx-in-f106.1e100.net (74.125.39.106): icmp_req=562 ttl=51 time=44.0 ms

64 bytes from fx-in-f106.1e100.net (74.125.39.106): icmp_req=563 ttl=51 time=43.8 ms

64 bytes from fx-in-f106.1e100.net (74.125.39.106): icmp_req=564 ttl=51 time=43.3 ms

64 bytes from fx-in-f106.1e100.net (74.125.39.106): icmp_req=565 ttl=51 time=43.1 ms

64 bytes from fx-in-f106.1e100.net (74.125.39.106): icmp_req=566 ttl=51 time=43.4 ms

64 bytes from fx-in-f106.1e100.net (74.125.39.106): icmp_req=567 ttl=51 time=43.6 ms
I’m using Linux / BSD for quite a lot of time and never before put in use the nohup cmd I guess there are more ppl who never heard of this handy UNIX basic command. Hope I’m not the only one who never heard about it and its useful knowledge to someone out. Cheers 😉
Tags: aim, BSDs, cheer, Cheers, cmd, com, Desktop, detach, Free, fx, gnu linux, google, Hope, host, ICMP, icmp ping, log amp, manager, msi, net, nohup, Open, ping, ping command, ppl, real time, req, screen, server desktop, Shell, someone, ssh, ssh session, stderr, terminal, terminal emulation program, time, tty, unix server, useful knowledge
Posted in FreeBSD, Linux, System Administration | 1 Comment »


