Posts Tagged ‘server’

Run native Internet Explorer 6 on latest Debian / Ubuntu Linux with IEs4Linux

Thursday, July 24th, 2014

Install-internet-explorer-on-debian-linux-IEs4Linux_logo.svg
If you're a GNU / Linux Desktop user like me and you have to administrate hybrid server environments running mixture of MS Windows with Microsoft IIS webserver running active server pages (.ASP) developed application or UNIX / GNU Linux servers web applications using Mono as a server-side language, often you need to have browser which properly supports  Internet Explorer Trident web (layout) renderer (also famous as MSHTML).

Having Internet Explorer on your Linux is very useful for web developers who want to test how their website works under IE.

Of course you can always install Windows in Virtualbox VM and do your testing in the Virtual Machine but this takes time to install and also puts a useless load to a PC ….

IES4 Linux is a Linux free (open source) shell script that lets you run Internet Explorer on your Linux desktop.

ies4linux scripts collection uses emulation with WINE (Wine is Not Emulator) emulator to run the native  Windows Internet Explorer thus before use it you have to install Wine.

There are plenty of tutorials online about ies4Linux, problem is as it is not updated and developed most tutorials doesn't work on Debian Wheezy / Ubuntu and rest of deb based linux distros.
This is why I decided to write just another ies4linux tutorial that actually works!

On Debian / Ubuntu / Mint Linux install via apt-get:

apt-get –yes install wine

Then with a non-root user download ies4linux-latest.tar.gz. Just in case ies4linux-latest.tar.gz disappears in future I've created also a ies4linux-latest.tar.gz mirror for download here

and unarchive tar archive:

wget http://www.tatanka.com.br/ies4linux/downloads/ies4linux-latest.tar.gz
tar -zxvf ies4linux-latest.tar.gz
cd ies4linux-*
./ies4linux

You will get:
 

IEs4Linux 2 is developed to be used with recent Wine versions (0.9.x). It seems that you are using an old version. It's recommended that you update your wine to the latest version (Go to: winehq.com).

You need to install cabextract first!
Download it here: http://www.kyz.uklinux.net/cabextract.php

To fulfill this requirement you will need to also cabetract package which is luckily part of Debian:
 

apt-get install –yes cabextract

On wine version 1.0 and onwards winprefixcreate has been changed to winecfg binary.
To prevent missing wineprefixcreate, errors during ies4linux installer run  its necessery to symlink as a workaround:
 

ln -sv /usr/bin/winecfg /usr/bin/wineprefixcreate


To continue with Internet Explorer ies4Linux installater run again:

./ies4linux

images/internet-explorer-for-linux-debian-gnu-linux-screenshot

/images/internet-explorer-4-linux-installer-debian-gnu-linu-screenshot

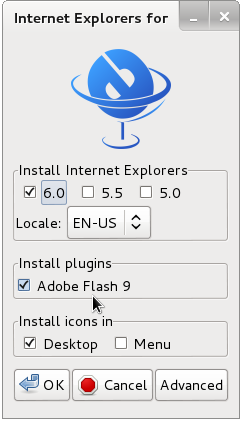
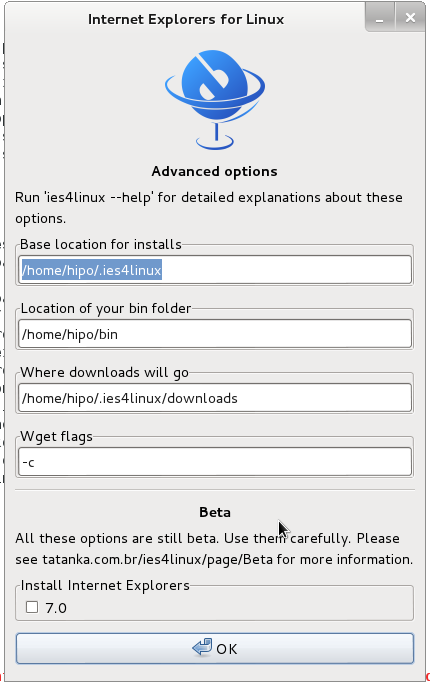
You will get the installer GUI window with selection option which Internet Explorer version you want. Choose between IE 5.0, IE 5.5 and IE 6. It is also possible to install IE 7 which is still considered beta version and is less tested and unstable, will probably lead to crashes. If you want to install also IE 7 check it as an option from Advanced menu.

/images/ies4linux-internet-explorer-installer-debian-gnu-linux-screenshot

If you get permission errors after running ies4Linux gui installer to solve that chown recursively directory to the user with which you will be running it:
 

chown -R hipo:hipo ies4linux-2.99.0.1


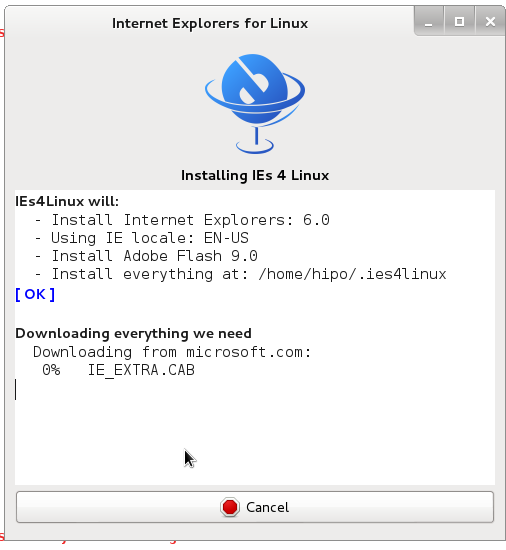
Internet Explorer for Linux downloader, will connect Microsoft.com website and download DCOM, MCF and various IE required .CAB files.

If you get some ies4linux GUI installer unexpected crashes you can try to download all required IE binaries, surrounding files and flash player using no-gui installer with cmd:
 

./ies4linux –no-gui –install-corefonts

IEs4Linux 2 is developed to be used with recent Wine versions (0.9.x). It seems that you are using an old version. It's recommended that you update your wine to the latest version (Go to: winehq.com).

IEs4Linux will:
  – Install Internet Explorers: 6.0
  – Using IE locale: EN-US
  – Install Adobe Flash 9.0
  – Install MS Core Fonts
  – Install everything at: /home/hipo/.ies4linux
[ OK ]

Downloading everything we need
  Downloading from microsoft.com:
   DCOM98.EXE
   mfc42.cab
   249973USA8.exe
   ADVAUTH.CAB
   CRLUPD.CAB
   HHUPD.CAB
   IEDOM.CAB
   IE_EXTRA.CAB
   IE_S1.CAB
   IE_S2.CAB
   IE_S5.CAB
   IE_S4.CAB
   IE_S3.CAB
   IE_S6.CAB
   SETUPW95.CAB
   FONTCORE.CAB
   FONTSUP.CAB
   VGX.CAB
   SCR56EN.CAB

  Downloading from macromedia.com:
   100% swflash.cab

  Downloading from sourceforge.net
   0%   webdin32.exe[ OK ]bdin32.exe

Installing IE 6
  Initializing
  Creating Wine Prefix
Your wine does not have wineprefixcreate installed. Maybe you are running an old Wine version. Try to update it to the latest version.

To fix the error:

Your wine does not have wineprefixcreate installed. Maybe you are running an old Wine version. Try to update it to the latest version.

vim lib/functiions.sh

Go to line 36 (Type :36 in vim)

Line:

wine –version 2>&1 | grep -q "0.9." || warning $MSG_WARNING_OLDWINE

Has to be changed to:

wine –version 2>&1 | egrep -q "0.9.|-1." || warning $MSG_WARNING_OLDWINE


Also you need to substitute wineprefixcreate to wineboot (if you haven't already symlinked wineprefixcreate to winecfg – as pointed earlier in article.

To do so make following substitution in lib/install.sh and in lib/functions.sh

cp -rpf lib/install.sh lib/install.sh.bak; cat lib/install.sh |sed -e 's#wineprefixcreate#wineboot#g' > lib/install_new.sh; mv lib/install_new.sh lib/install.sh

cp -rpf lib/install.sh lib/functions.sh.bak; cat lib/functions.sh |sed -e 's#wineprefixcreate#wineboot#g' > lib/functions_new.sh; mv lib/functions_new.sh lib/functions.sh


Also it is necessery to change default corefonts download url which points to sourceforge but is failing. I've made mirror of corefonts files here
 

cp -rpf lib/install.sh lib/install.sh.bak; cat lib/install.sh |sed -e 's#http://internap.dl.sourceforge.net/sourceforge/corefonts/#www.pc-freak.net/files/corefonts/#g' > lib/install_new.sh; mv lib/install_new.sh lib/install.sh

Re-run the ies4linux console installer:
 

 ./ies4linux –no-gui –install-corefonts

….
Es4Linux installations finished!

On installation success you should get output like this
Hopefully you will see no errors like in my case, if you get the corefonts download error again re-run the installer and it should succesully download the files.

To then run ies4linux:

~/bin/ie6


internet-explorer-ies4linx-running-on-debian-gnu-linux-screenshot
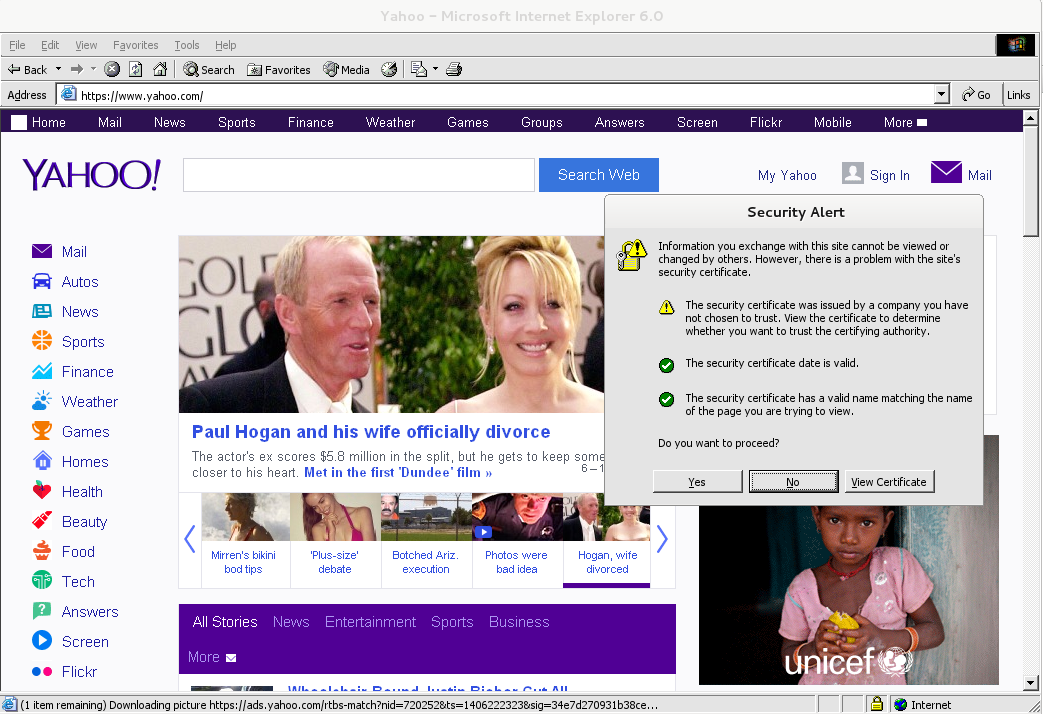
Though Ies 4 Linux is good for basic testing it is not psosible to use the browser for normal browsing because its a bit buggy and slow.

By default Internet Explorer 6 behavior is to prompt security alert on various actions, though this might be useful for debugging it is really annoying so I personally disabled those by decreasing from:

Tools -> Internet Options -> Security -> (Security Level)
I've decreased it from Medium to Medium-Low

ies4Linux was not developed since 2008 and as of time of writting ies4linux official project website seems abandoned.


Fix “tar: Error exit delayed from previous errors” and its cause and solution

Monday, August 18th, 2014

fix-solve-tar-error-delayed-exit-from-previous-errors-tarball-error

tar: Error exit delayed from previous errors

error is a very common error encountered when creating archives (or backing up server configurations / websites / sql binary data). The error is quite unexplanatory and whenever creating files verbose in order to see the files added to archve in "real time" with lets say:

tar -czvf /tmp/filename_backup_date-of-backup.tar.gz /home/websites /home/sql


its pretty hard to track on exactly which file is the backup producing the Error exit delayed from previous errors, this is especially the case whenever adding to archive directories containing millions of tiny few kilobyte sized files. Many novice on uncautious Linux admins , might simply ignore the warning if they're in a hurry / are having excessive work to be done as there will be .tar.gz backup produced and whenever uncompressed most of the files are there and the backup error would seem not of a big issue.

However as backuping files is vital stuff, especially when moving the files from a server to be decomissioned you have to be extra careful and make the backup properly, e.g. figure out the cause of the error, to do so log the full output of tar operations with tee command, like so:

tar -czvf /tmp/filename_backup_date-of-backup.tar.gz /home/websites/ /home/sql | tee /tmp/backup_tar_full_output.log

Then you will have to review the file and lookup for errors with less search string – / (slash) – look for "error" and "permission den" keywords and this should point you to what is causing the error. In cases when millions of files are to be archived, the log might grow really big and hard to process, therefore a much quicker way to understand what's happening is to only log and show in shell standard output last file error with > (shell redirect):
 

tar -czvf /tmp/filename_backup_date-of-backup.tar.gz /home/websites /home/sql > /tmp/backup_failure-cause.log


tar: www.ur-website.com-http/2.0.63/conf/tnsnames.ora.20080918: Cannot open: Permission denied
tar: Removing leading `/' from member names

The error indicates clearly the cause of error is lack of Permissions to read the file tnsnames.ora.20080918 so solution is to either grant permissions to non-root user with (chmod / chown) cmds, in my case grant perms to user hipo with which tar is ran, or run again the website backup with superuser, I usually just run with root user to prevent tampering with original permissions, e.g. to solve the error, either:

$ su root
# tar -czvf /tmp/filename_backup_date-of-backup.tar.gz /home/websites /home/sql

Or even better if sudo is installed and user is added to /etc/sudoers file

$ sudo tar -czvf /tmp/filename_backup_date-of-backup.tar.gz /home/websites /home/sql


Though permission errors is the most often reason for:

tar: Error exit delayed from previous errors, you should keep in mind that in some cases the error might be caused due to failing RAID membered disk drive or single hdd failure on systems that are not in some RAID array


Manually deleting spam comments from WordPress blogs and websites to free disk space and optimize MySQL

Monday, November 24th, 2014

WordPress-delete_spam_comments_manually_with_sql_query_to-optimize_mysql-and-free-disk-space
If you're a web-hosting company or a web-development using WordPress to build multitudes of customer blogs or just an independent blogger or sys-admin with a task to optimize a server's MySQL allocated storage  / performance on triads of WordPress-es a a good tip that would help is to removing wp_comments marked as spam.

Even though sites might be protected of thousands of spam message daily caught by WP anti-spam plugin Akismet, spam caught messages aer forwarder by Akismet to WP's Spam filter and kept wp_comments table with comments_approved column  record 'spam'.

Therefore you will certainly gain of freeing disk space uselessly allocated by spam messages into current MySQL server storage dir (/var/lib/mysql   /usr/local/mysql/data – the directory where my.cnf tells the server to keep its binary data .MYI, .MYD, .frm files) as well as save a lot of disk space by excluding the useless spam messages from SQL daily backup archives.

Here is how to remove manually spam comments from a WordPress blog under database (wp_blog1);

mysql> use wp_blog1;
mysql> describe wp_comments;
+———————-+———————+——+—–+———————+—————-+
| Field | Type | Null | Key | Default | Extra |
+———————-+———————+——+—–+———————+—————-+
| comment_ID | bigint(20) unsigned | NO | PRI | NULL | auto_increment |
| comment_post_ID | bigint(20) unsigned | NO | MUL | 0 | |
| comment_author | tinytext | NO | | NULL | |
| comment_author_email | varchar(100) | NO | | | |
| comment_author_url | varchar(200) | NO | | | |
| comment_author_IP | varchar(100) | NO | | | |
| comment_date | datetime | NO | | 0000-00-00 00:00:00 | |
| comment_date_gmt | datetime | NO | MUL | 0000-00-00 00:00:00 | |
| comment_content | text | NO | | NULL | |
| comment_karma | int(11) | NO | | 0 | |
| comment_approved | varchar(20) | NO | MUL | 1 | |
| comment_agent | varchar(255) | NO | | | |
| comment_type | varchar(20) | NO | | | |
| comment_parent | bigint(20) unsigned | NO | MUL | 0 | |
| user_id | bigint(20) unsigned | NO | | 0 | |
+———————-+———————+——+—–+———————+—————-+


The most common and quick way useful for scripting (whether you have to do it for multiple blogs with separate dbs) is to delete all comments being filled as 'Spam'.

To delete all messages which were filled by Akismet's spam filter with high probabily being a spam issue from mysql cli interface:

DELETE FROM wp_comments WHERE comment_approved = 'spam';


For Unread (Unapproved) messages the value of comment_approved field are 0 or 1, 0 if the comment is Red and Approved and 1 if still it is to be marked as read (and not spam).
If a wordpress gets heavily hammered with mainly spam and the probability that unapproved message is different from spam is low and you want to delete any message waiting for approvel as not being spam from wordpress use following SQL query:

DELETE FROM wp_comments WHERE comment_approved = 0;

Another not very common you might want to do is delete only all apprved comments:

DELETE FROM wp_comments WHERE comment_approved = 1;

For old installed long time unmaintained blogs (with garbish content), it is very likely that 99% of the messages might be spam and in case if there are already >= 100 000 spam messages and you don't have the time to inspect 100 000 spam comments to get only some 1000 legitimate and you want to delete completely all wordpress comments for a blog in one SQL query use:

TRUNCATE wp_comments;

Another scenario if you know a blog has been maintained until certain date and comments were inspected and then it was left unmaintained for few years without any spam detect and clear plugin like Akismet, its worthy to delete all comments starting from the date wordpress site stopped to be maintained:

DELETE FROM wp_comments WHERE comment_date > '2008-11-20 05:00:10' AND comment_date <= '2014-11-24 00:30:00'

Optimize WordPress Pictures with EWWW Image Optimizer, Async JS and CSS and Autoptimize for better Search Engine Ranking

Tuesday, December 9th, 2014


wordpress-ewww-image-optimizer_settings_screenshot-plugin-seo-for-images-wp_3

While optimizing picture performance with console tools optipng, jpegoptin, jpegtran, pngcrush (could save you a lot of server space and make pictures downloads faster (and hence increase your website responsiveness and SEO – check out), still for Blogs and WebSites based on WordPress its not worthy to loose time with console acrobatics but simply use EWWW Image Optimizer to Optimize all old or new uploaded Images.

To work EWWW Image Optimizer needs jpegtran, optipng, pngout and gifsicle to be installed on the Linux / BSD server. EWWW Image Optimizer can load the command line tools also from a Cloud, if a cloud service is running on the server. Once installed the plugin does scan all the imported WordPress Media files and can be run to optimize picture files on present blog psot / pages.

EWWW Image Opitimizer plugin does a good job in reducing file size on  NextGEN, GRAND FlAGallery galleries.

wordpress-ewww-image-optimizer_settings_screenshot-plugin-seo-for-images-wp

Here is how EWWW Image Optimizer works taken from plugin's website:
How are JPGs optimized?

Lossless optimization is done with the command jpegtran -copy all -optimize -progressive -outfile optimized-file original-file. Optionally, the -copy switch gets the 'none' parameter if you choose to strip metadata from your JPGs on the options page. Lossy optimization is done using the outstanding JPEGmini utility.
It is better if the server has not the jpegtran, pngout, gifsicle utilities installed as the plugin provides an uptodate static compiled Linux binaries.

How are PNGs optimized?

There are three parts (and all are optional). First, using the command pngquant original-file, then using the commands pngout-static -s2 original-file and optipng -o2 original-file. You can adjust the optimization levels for both tools on the settings page. Optipng is an automated derivative of pngcrush, which is another widely used png optimization utility.

How are GIFs optimized?

Using the command gifsicle -b -O3 –careful original file. This is particularly useful for animated GIFs, and can also streamline your color palette. That said, if your GIF is not animated, you should strongly consider converting it to a PNG. PNG files are almost always smaller, they just don't do animations. The following command would do this for you on a Linux system with imagemagickconvert somefile.gif somefile.png

wordpress-ewww-image-optimizer_settings_screenshot-plugin-seo-for-images-wp

Some othe plugins that could strenghten your WordPress Search Engine Optimization ranking worthy to check are:
 

  • Async JS and CSS
     

Most importantly plugin solves "Render-blocking JavaScript and CSS" warning shown during site audit with  Google Developers PageSpeed InsightBy the way Google PageSpeed Insight is a precious tool so I recommend you check if you already haven't, Google's suggestions could often double or triple daily site visitors 

What Async JS and CSS does is:

Converts render-blocking CSS and JS files into NON-render-blocking, improving performance of web page

async_js_and_css_wordpress-plugin_configuration_menu

The plugin makes ALL scripts loaded by other plugins to be loaded in asynchronous. All CSS files will be inserted inline into the document code or moved from the document beginning to the end, just before closing BODY tag (or just where you placed wp_foot() function). There are various methods to do that via plugin configuration page.
 

  • Autoptimize


    Wordpress-Autoptimize-screenshot-a-plugin-to-minify-wordpress-html-js-and-css-scripts

Autoptimize speeds up your website and helps you save bandwidth by aggregating and minimizing JS, CSS and HTML.

What does the plugin do to help speed up site?

It concatenates all scripts and styles, minifies and compresses them, adds expires headers, caches them, and moves styles to the page head, and scripts to the footer. It also minifies the HTML code itself, making your page really lightweight. Autoptimize is very much like WP Mnify (CSS / JS) minifaction WP plugin. The only difference and reason why you might want to use WP Mnify is it does HTML minification – something that WP Minify does not. Both plugins play nice together the only thing to be careful is not to configure CSS / JS minification in both Autoptimize and WP Minifyas this might slower instead of fasten the WP site.

A great bunch of other useful WP plugins to make a WordPress Blog friendly to Search Engines is here.

How to create ssh tunnels / ssh tunneling on Linux and FreeBSD with openssh

Saturday, November 26th, 2011

ssh-tunnels-port-forwarding-windows-linux-bypassing-firewall-diagram
SSH tunneling
allows to send and receive traffic using a dedicated port. Using an ssh traffic can have many reasons one most common usage reason is to protect the traffic from a host to a remote server or to access port numbers which are by other means blocked by firewall, e.g.: (get around firewall filtering)
SSH tunneling works only with TCP traffic. The way to make ssh tunnel is with cmds:

host:/root# ssh -L localhost:deshost:destport username@remote-server.net
host:/root# ssh -R restport:desthost:localport username@remote-server.net
host:/root# ssh -X username@remote-server.net

This command will make ssh to bind a port on localhost of the host host:/root# machine to the host desthost:destport (destination host : destinationport). Important to say deshost is the host destination visible from the remote-server.net therefore if the connection is originating from remote-server.net this means desthost will be localhost.
Mutiple ssh tunnels to multiple ports using the above example commands is possible. Here is one example of ssh tunneling
Let’s say its necessery to access an FTP port (21) and an http port (80), listening on remote-server.net In that case desthost will be localhost , we can use locally the port (8080) insetad of 80, so it will be no necessery to make the ssh tunnel with root (admin privileges). After the ssh session gets opened both services will be accessible on the local ports.

host:/home/user$ ssh -L 21:localhost:21 -L 8080:localhost:80 user@remote-server.net

That’s all enjoy 😉

Preserve Session IDs of Tomcat cluster behind Apache reverse proxy / Sticky sessions with mod_proxy and Tomcat

Wednesday, February 26th, 2014

apache_and_tomcat_merged_logo_prevent_sticky_sessions
Having a combination of Apache webservice Reverse Proxy to redirect invisibly traffic to a number of Tomcat server positioned in a DMZ is a classic task in big companies Corporate world.
Hence if you work for company like IBM or HP sooner or later you will need to configure Apache Webserver cluster with few running Jakarta Tomcat Application servers behind. Scenario with necessity to access a java based application via Tomcat which requires logging (authentication) relaying on establishing and keeping a session ID is probably one of the most common ones and if you do it for first time you will probably end up with Session ID issues.  Session ID issues are hard to capture at first as on first glimpse application will seem to be working but users will have to re-login all the time even though the programmers might have coded for a session to expiry in 30 minutes or so.

… I mean not having configured Session ID prevention to Tomcats will cause random authentication session expiries and users using the Tomcat app will be unable to normally access below application with authenticated credentials. The solution to these is known under term "Sticky sessions"
To configure Sticky sessions you need to already have configured Apache/s with following minimum configuration:

  • enabled mod_proxy, proxy_balancer_module, proxy_http_module and or mod_proxy_ajp (in Apache config)

  LoadModule proxy_module modules/mod_proxy.so
LoadModule proxy_balancer_module modules/mod_proxy_balancer.so
LoadModule proxy_http_module modules/mod_proxy_http.so

  • And configured and tested Tomcats running an Application reachable via AJP protocol

Below example assumes there is Reverse Proxy Load Balancer Apache which has to forward all traffic to 2 tomcats. The config can easily be extended for as many as necessary by adding more BalancerMembers.

In Apache webserver (apache2.conf / httpd.conf) you need to have JSESSIONID configured. These JSESSIONID is going to be appended to each client request from Reverse Proxy to each of Tomcat servers with value opened once on authentication to first Tomcat node to each of the other ones.

<Proxy balancer://mycluster>
BalancerMember ajp://10.16.166.53:11010/ route=delivery1
BalancerMember ajp://10.16.166.66:11010/ route=delivery2
</Proxy>

ProxyRequests Off
ProxyPass / balancer://mycluster/ stickysession=JSESSIONID
ProxyPassReverse / balancer://mycluster/

The two variables route=delivery1 and route=delivery2 are routed to hosts identificators that also has to be present in Tomcat server configurations
In Tomcat App server First Node (server.xml)

<Engine name="Catalina" defaultHost="localhost" jvmRoute="delivery1">

In Tomcat App server Second Node (server.xml)

<Engine name="Catalina" defaultHost="localhost" jvmRoute="delivery2">

Once Sticky Sessions are configured it is useful to be able to track they work fine this is possible through logging each of established JESSSIONIDs, to do so add in httpd.conf

LogFormat "%h %l %u %t \"%r\" %>s %b \"%{Referer}i\" \"%{User-Agent}i\"\"%{JSESSIONID}C\"" combined

After modifications restart Apache and Tomcat to load new configs. In Apache access.log the proof should be the proof that sessions are preserved via JSESSIONID, there should be logs like:
 

127.0.0.1 - - [18/Sep/2013:10:02:02 +0800] "POST /examples/servlets/servlet/RequestParamExample HTTP/1.1" 200 662 "http://localhost/examples/servlets/servlet/RequestParamExample" "Mozilla/5.0 (X11; Linux x86_64; rv:17.0) Gecko/20130807 Firefox/17.0""B80557A1D9B48EC1D73CF8C7482B7D46.server2"

127.0.0.1 - - [18/Sep/2013:10:02:06 +0800] "GET /examples/servlets/servlet/RequestInfoExample HTTP/1.1" 200 693 "http://localhost/examples/servlets/" "Mozilla/5.0 (X11; Linux x86_64; rv:17.0) Gecko/20130807 Firefox/17.0""B80557A1D9B48EC1D73CF8C7482B7D46.server2"

That should solve problems with mysterious session expiries 🙂

Useful VIM editor tip colorscheme evening – make your configurations look brighter in VI

Monday, February 24th, 2014

I just learned about cool VIM option from a collegue:

:colorscheme evening

What it does it makes configurations in vim edit look brighter like you seen in below screenshots.

– Before :colorscheme evening vim command

colorscheme_vim-linux-editor-options-screenshot

– After :colorscheme evening

colorscheme2_vim-linux-editor-options-screenshot

The option is really useful as often editing a config in vim on a random server is too dark and in order to read the config you have to strain your eyes in long term leading to eye damage.

Any other useful vim options, you use daily?

Web Application Load Balancer types and when to use what kind of Load Balancer

Monday, February 3rd, 2014

General load balancer types description / active / passive / static / dynamic and additional
In this small article I will try to clear it up the general types of Web Server Load Balancers available. Whether one choose a Load Balancer he has the option to use a software LB or a hardware LB one there are plenty of software load balancer scripts out there. In this pos t I will mention just what choice is available in hardware load balancer interface BigIP LTM F5 standard. Generally BigIP LTM Load Balancers can be grouped in Static, Dynamic and Additional. One or more Load Balancers can be configured in front of group or farm of appplication servers. When more than one load balancer is used in front of application Load Balancer could be Active Load Balancer and Passive Load Balancer.
Below information will hopefully be useful to Web and Middleware working sys admins and anybody involved in frequent and large web systems integration.

Static Load Balancing

LB_RoundRobin_ type of load balancing example picture


Round Robin
Load Balancing

This is the default load balancing method. Round Robin mode passes each new connection request to the next server in line, eventually distributing connections evenly across the array of machines being load balanced.
Round Robin mode works well in most configurations, especially if the equipment that you are load balancing is roughly equal in processing speed and memory.

ratio_member_load_balancer picture diagram

Ratio (member) / Ratio (node) Load Balancer

   
The Ratio (member) system distributes connections among pool members or nodes in a static rotation according to ratio weights that you define. In this case, the number of connections that each system receives over time is proportionate to the ratio weight you defined for each pool member or node. You set a ratio weight when you create each pool member or node.

These are static load balancing methods, basing distribution on user-specified ratio weights that are proportional to the capacity of the servers.

dynamic_ratio_member_load_balancer picture diagram

Dynamic Load Balancers


Dynamic Ratio (member) Dynamic Ratio (node) LB

The Dynamic Ratio load balancing select a server based on various aspects of real-time server performance analysis. These methods are similar to the Ratio methods, except that with Dynamic Ratio methods, the ratio weights are system-generated, and the values of the ratio weights are not static. These methods are based on continuous monitoring of the servers, and the ratio weights are therefore continually changing.
   
The Dynamic Ratio LBs are used specifically for load balancing traffic to RealNetworks® RealSystem® Server platforms, Windows® platforms equipped with Windows Management Instrumentation (WMI), or any server equipped with an SNMP agent such as the UC Davis SNMP agent or Windows 2000 Server SNMP agent.

dynamic_load_balancing load balancer diagram picture with circles

Fastest (node) /Fastest (application) LB

   
The Fastest methods select a server based on the least number of current sessions. The following rules apply to the Fastest load balancing methods:

These LB require that you assign both a Layer 7 and a TCP type of profile to the virtual server interface where LB IP is binded.
If a Layer 7 profile is not configured, the virtual server falls back to Least Connections load balancing mode.

Note: If the OneConnect feature is enabled, the Least Connections methods do not include idle connections in the calculations when selecting a pool member or node. The Least Connections balancing use only active connections in their calculations.
   
Fastest node load balancing is useful in environments where nodes are distributed across separate logical networks.


Least Connections (member) / Least Connections (node) LB    

The Least Connections method are relatively simple in that the system passes a new connection to the pool member or node that has the least number of active connections.

Note: If the OneConnect feature is enabled, the Least Connections methods do not include idle connections in the calculations when selecting a pool member or node. The Least Connections methods use only active connections in their calculations.
   
The Least Connections balancing function best in environments where the servers have similar capabilities. Otherwise, some amount of latency can occur.

For example, consider the case where a pool has two servers of differing capacities, A and B. Server A has 95 active connections with a connection limit of 100, while server B has 96 active connections with a much larger connection limit of 500. In this case, the Least Connections method selects server A, the server with the lowest number of active connections, even though the server is close to reaching capacity.

If you have servers with varying capacities, consider using the Weighted Least Connections load balancing instead.


Weighted Least Connections (member) / Weighted Least Connections (node)

Like  Least Connections, these load balancing methods select pool members or nodes based on the number of active connections. However, the Weighted Least Connections methods also base their selections on server capacity.

The Weighted Least Connections (member) method specifies that the system uses the value you specify in Connection Limit to establish a proportional algorithm for each pool member. The system bases the load balancing decision on that proportion and the number of current connections to that pool member. Example is member_a has 40 connections and its connection limit is 200, so it is at 20% of capacity. Similarly, member_b has 40 connections and its connection limit is 400, so it is at 10% of capacity. In this case, the system select selects member_b. This algorithm requires all pool members to have a non-zero connection limit specified.

The Weighted Least Connections (node) method specifies that the system uses the value you specify in the node's Connection Limit setting and the number of current connections to a node to establish a proportional algorithm. This algorithm requires all nodes used by pool members to have a non-zero connection limit specified.

If all servers have equal capacity, these load balancing  behave in the same way as the Least Connections methods.

Note: If the OneConnect feature is enabled, the Weighted Least Connections methods do not include idle connections in the calculations when selecting a pool member or node. The Weighted Least Connections  use only active connections in their calculations.
   

Weighted Least Connections methods work best in environments where the servers have differing capacities.
For example, if two servers have the same number of active connections but one server has more capacity than the other, the BIG-IP system calculates the percentage of capacity being used on each server and uses that percentage in its calculations.


Observed (member) / Observed (node)

With the Observed methods, nodes are ranked based on the number of connections. The Observed methods track the number of Layer 4 connections to each node over time and creates a ratio for load balancing.
   

The need for the Observered methods is rare, and they are not recommended for large pools.

Predictive (member) / Predictive (node)

The Predictive methods use the ranking methods used by the Observed methods, where servers are rated according to the number of current connections. However, with the Predictive methods, the BIG-IP system analyzes the trend of the ranking over time, determining whether a nodes performance is currently improving or declining. The servers with performance rankings that are currently improving, rather than declining, receive a higher proportion of the connections.
   

The need for the Predictive methods is rare, and they are not recommend for large pools.

Least Sessions LB type

The Least Sessions method selects the server that currently has the least number of entries in the persistence table. Use of this load balancing method requires that the virtual server reference a type of profile that tracks persistence connections, such as the Source Address Affinity or Universal profile type.

Note: The Least Sessions methods are incompatible with cookie persistence.
   
The Least Sessions method works best in environments where the servers or other equipment that you are load balancing have similar capabilities.


L3 Address

L3 Address is same LB type as Least Connections methods.
  

Mysql: How to disable single database without dropping or renaming it

Wednesday, January 22nd, 2014

mysql rename forbid disable database howto logo, how to disable single database without dropping it
A colleague of mine working on MySQL database asked me How it is possible to disable a MySQL database. He is in situation where the client has 2 databases and application and is not sure which of the two databases the application uses. Therefore the client asked one of the database is disabled and wait for few hours and see if something will break / stop working and in that way determine which of the two database is used by application.

My first guess was to backup both databases and drop one of them, then if it is the wrong one to restore from the SQL dump backup, however this wasn't acceptable solution. So second I though of RENAME of database to another one and then reverting the name, however as it is written in MySQL documentation RENAME database function was removed from MySQL (found to be dangerous) since version 5.1.23 onwards. Anyhow there is a quick hack to rename mysql database using a for loop shell script one below:

mysql -e "CREATE DATABASE \`new_database\`;"
for table in `mysql -B -N -e "SHOW TABLES;" old_database`
do
  mysql -e "RENAME TABLE \`old_database\`.\`$table\` to \`new_database\`.\`$table\`"
  done
  mysql -e "DROP DATABASE \`old_database\`;"

Other possible solution was to change permissions of Application used username, however this was also complicated from mysql cli, hence I thought of installing and using PHPMyAdmin to make modify of db user permissions easier but on this server there wasn't Apache installed and MySQL is behind a firewall and only accessible via java tomcat host.

Finally after some pondering what can be done I came with solution to request to disable mysql database using chmod in /var/lib/mysql/data/, i.e.:

sql-server:~# chmod 0 /var/lib/mysql/databasename

Where databasename is the same as the database is named listable via mysql cli.

After doing it that way with no need to restart MySQL server database stopped to appear in show databases; and client confirmed that disabled database is no longer needed so we proceeded dropping it.

Hope this little article will help someone out there. Cheers :

Httpwatch a must have web developer and web hosting sysadmin Firefox / Internet Explorer / IPad / IPhone add-on

Monday, December 16th, 2013


Today a colleague of mine referred me to a wonderful Mozilla Firefox (Windows / Mac) plugin called HttpWatch.

HttpWatch is an HTTP sniffer for IE, Firefox, iPhone & iPad
that provides new insights into how your website loads and performs.
The plugin is quite simple it shows you all requests from your Browser to remote server with plenty of Debug information (on the fly). You can see exactly the Commands sent over the HTTP protocol as well as returned request status responce from Web Server (i.e. 200, 300, 400). By knowing the status returned by webserver you can debug odd problems with website authentication as well as oddities caused by proxies you don't know about. Besides showing responce returned on web requests HttpWatch shows also hand-shake of session ID variables. This makes the plugin  precious for Web developers and System Administrators working in Web & Middleware (Linux / Windows based Web Hosting companies)  etc.

HttpWatch is also a must have plugin for anyone looking to optimize a website for speed or for fixingwebsite responce time bottleneck issues. The size of plugin is quite big as of time of writting about 18.2 Megabytes. HttpWatch comes with separate app installer like any other stand alone Windows application.  Unfortunately Httpwatch does not have a version for GNU / Linux. Linux users could use HTTPFox, Google Chrome Developer tools or
Firebug.

Once you have plugin installed to check what's happening with a website access in (Firefox) select Tools -> HttpWatch. You will get a bottom screen new window with deug info.

httpwatch debugging accessed website information - web browser tool to optimize your website

Here is list of some of the many things for which plugin is useful;

  • Records HTTP
  • Decrypts HTTPS Traffic
  • Integrates with Internet Explorer & Firefox
  • Supports the SPDY Protocol in Firefox
  • Standalone Log File Viewer
  • Summary of Recorded Traffic
  • Grouping of Requests by Page
  • Collect Log Files From Your Customers
  • Request Level Time Charts
  • Real-Time Page Level Time Charts
  • Page Events
  • Detects Potential Problems
  • Customizable Data Columns
  • Data Tips
  • Automation Support
  • Advanced Filtering
  • Millisecond Level Timing
  • HTTP Compression
  • Network Level Performance Data
  • Extended Cookie Information
  • Shows Interaction with Browser Cache
  • Raw HTTP Streams
  • Export Data to CSV, HAR and XML
  • Import HAR files
  • Customizable CSV Export
  • Keyboard Accelerators
  • Access to Cached and Downloaded Content
  • Accurately Records Requests and Responses
  • Automatic Recording and Saving

Finally HttpWatch is a plugin to have next to Yahoo's YSlow, FasterfoxFireBug and Firefox's Web Developer plugin