
Recently I wrote a post on how to enable Jumbo Frames on GNU / Linux , therefore I thought it will be useful to write how Jumbo Frames network boost can be achieved on FreeBSD too.
I will skip the details of what is Jumbo Frames, as in the previous article I have thoroughfully explained. Just in short to remind you what is Jumbo Frames and why you might need it? – it is a way to increase network MTU transfer frames from the MTU 1500 to MTU of 9000 bytes
It is interesting to mention that according to specifications, the maximum Jumbo Frames MTU possible for assignment are of MTU=16128
Just like on Linux to be able to take advantage of the bigger Jumbo Frames increase in network thoroughput, you need to have a gigabyt NIC card/s on the router / server.
1. Increasing MTU to 9000 to enable Jumbo Frames "manually"
Just like on Linux, the network tool to use is ifconfig. For those who don't know ifconfig on Linux is part of the net-tools package and rewritten from scratch especially for GNU / Linux OS, whether BSD's ifconfig is based on source code taken from 4.2BSD UNIX
As you know, network interface naming on FreeBSD is different, as there is no strict naming like on Linux (eth0, eth1, eth2), rather the interfaces are named after the name of the NIC card vendor for instance (Intel(R) PRO/1000 NIC is em0), RealTek is rl0 etc.
To set Jumbro Frames Maximum Transmission Units of 9000 on FreeBSD host with a Realtek and Intel gigabyt ethernet cards use:
freebsd# /sbin/ifconfig em0 192.168.1.2 mtu 9000

freebsd# /sbin/ifconfig rl0 192.168.2.2 mtu 9000
!! Be very cautious here, as if you're connected to the system remotely over ssh you might loose connection to it because of broken routing.
To prevent routing loss problems, if you're executing the above two commands remotely, you better run them in GNU screen session:
freebsd# screen

freebsd# /sbin/ifconfig em0 192.168.1.2 mtu 9000; /sbin/ifconfig rl0 192.168.1.2 mtu 9000; \

/etc/rc.d/netif restart; /etc/rc.d/routed restart
2. Check MTU settings are set to 9000
If everything is fine the commands will return empty output, to check further the MTU is properly set to 9000 issue:
freebsd# /sbin/ifconfig -a|grep -i em0em0: flags=8843<UP,BROADCAST,RUNNING,SIMPLEX,MULTICAST> metric 0 mtu 9000freebsd# /sbin/ifconfig -a|grep -i rl0

rl0: flags=8843<UP,BROADCAST,RUNNING,SIMPLEX,MULTICAST> metric 0 mtu 9000
3. Reset routing for default gateway
If you have some kind of routing assigned for em0 and rl0, network interfaces they will be affected by the MTU change and the routing will be gone. To reset the routing to the previously properly assigned routing, you have to restart the BSD init script taking care for assigning routing on system boot time:
freebsd# /etc/rc.d/routing restart

default 192.168.1.1 done

add net default: gateway 192.168.1.1

Additional routing options: IP gateway=YES.
4. Change MTU settings for NIC card with route command
There is also a way to assign higher MTU without "breaking" the working routing, e.g. avoiding network downtime with bsd route command:
freebsd# grep -i defaultrouter /etc/rc.conf

defaultrouter="192.168.1.1"

freebsd# /sbin/route change 192.168.1.1 -mtu 9000

change host 192.168.1.1
5. Finding the new MTU NIC settings on the FreeBSD host
freebsd# /sbin/route -n get 192.168.1.1

route to: 192.168.1.1

destination: 192.168.1.1

interface: em0

flags: <UP,HOST,DONE,LLINFO,WASCLONED>

recvpipe sendpipe ssthresh rtt,msec rttvar hopcount mtu expire

0 0 0 0 0 0 9000 1009
6. Set Jumbo Frames to load automatically on system load
To make the increased MTU to 9000 for Jumbo Frames support permanent on a FreeBSD system the /etc/rc.conf file is used:
The variable for em0 and rl0 NICs are ifconfig_em0 and ifconfig_rl0.
The lines to place in /etc/rc.conf should be similar to:
ifconfig_em0="inet 192.168.1.1 netmask 255.255.255.0 media 1000baseTX mediaopt half-duplex mtu 9000"

ifconfig_em0="inet 192.168.1.1 netmask 255.255.255.0 media 1000baseTX mediaopt half-duplex mtu 9000"
Change in the above lines the gateway address 192.168.1.1 and the netmask 255.255.255.0 to yours corresponding gw and netmask.
Also in the above example you see the half-duplex ifconfig option is set insetad of full-duplex in order to prevent some duplex mismatches. A full-duplex could be used instead, if you're completely sure on the other side of the host is configured to support full-duplex connections. Otherwise if you try to set full-duplex with other side set to half-duplex or auto-duplex a duplex mismatch will occur. If this happens insetad of taking the advantage of the Increase Jumbo Frames MTU the network connection could become slower than originally with standard ethernet MTU of 1500. One other bad side if you end up with duplex-mismatch could be a high number of loss packets and degraded thoroughout …
7. Setting Jumbo Frames for interfaces assigning dynamic IP via DHCP
If you need to assign an MTU of 9000 for a gigabyt network interfaces, which are receiving its TCP/IP network configuration over DHCP server.
First, tell em0 and rl0 network interfaces to dynamically assign IP addresses via DHCP proto by adding in /etc/rc.conf:
ifconfig_em0="DHCP"

ifconfig_rl0="DHCP"
Secondly make two files /etc/start_if.em0 and /etc/start_if.rl0 and include in each file:
ifconfig em0 media 1000baseTX mediaopt full-duplex mtu 9000

ifconfig rl0 media 1000baseTX mediaopt full-duplex mtu 9000
Copy / paste in root console:
echo 'ifconfig em0 media 1000baseTX mediaopt full-duplex mtu 9000' >> /etc/start_if.em0

echo 'ifconfig rl0 media 1000baseTX mediaopt full-duplex mtu 9000' >> /etc/start_if.rl0
Finally, to load the new MTU for both interfaces, reload the IPs with the increased MTUs:
freebsd# /etc/rc.d/routing restart

default 192.168.1.1 done

add net default: gateway 192.168.1.1
8. Testing if Jumbo Frames is working correctly
To test if an MTU packs are transferred correctly through the network you can use ping or tcpdumpa.) Testing Jumbo Frames enabled packet transfers with tcpdump
freebsd# tcpdump -vvn | grep -i 'length 9000'
You should get output like:
16:40:07.432370 IP (tos 0x0, ttl 50, id 63903, offset 0, flags [DF], proto TCP (6), length 9000) 192.168.1.2.80 > 192.168.1.1.60213: . 85825:87285(1460) ack 668 win 14343

16:40:07.432588 IP (tos 0x0, ttl 50, id 63904, offset 0, flags [DF], proto TCP (6), length 9000) 192.168.1.2.80 > 192.168.1.1.60213: . 87285:88745(1460) ack 668 win 14343

16:40:07.433091 IP (tos 0x0, ttl 50, id 63905, offset 0, flags [DF], proto TCP (6), length 9000) 192.168.1.2.80 > 192.168.1.1.60213: . 23153:24613(1460) ack 668 win 14343

16:40:07.568388 IP (tos 0x0, ttl 50, id 63907, offset 0, flags [DF], proto TCP (6), length 9000) 192.168.1.2.80 > 192.168.1.1.60213: . 88745:90205(1460) ack 668 win 14343

16:40:07.568636 IP (tos 0x0, ttl 50, id 63908, offset 0, flags [DF], proto TCP (6), length 9000) 192.168.1.2.80 > 192.168.1.1.60213: . 90205:91665(1460) ack 668 win 14343

16:40:07.569012 IP (tos 0x0, ttl 50, id 63909, offset 0, flags [DF], proto TCP (6), length 9000) 192.168.1.2.80 > 192.168.1.1.60213: . 91665:93125(1460) ack 668 win 14343

16:40:07.569888 IP (tos 0x0, ttl 50, id 63910, offset 0, flags [DF], proto TCP (6), length 9000) 192.168.1.2.80 > 192.168.1.1.60213: . 93125:94585(1460) ack 668 win 14343
b.) Testing if Jumbo Frames are enabled with ping
– Testing Jumbo Frames with ping command on Linux
linux:~# ping 192.168.1.1 -M do -s 8972

PING 192.168.1.1 (192.168.1.1) 8972(9000) bytes of data.

9000 bytes from 192.168.1.1: icmp_req=1 ttl=52 time=43.7 ms

9000 bytes from 192.168.1.1: icmp_req=2 ttl=52 time=43.3 ms

9000 bytes from 192.168.1.1: icmp_req=3 ttl=52 time=43.5 ms

9000 bytes from 192.168.1.1: icmp_req=4 ttl=52 time=44.6 ms

--- 192.168.0.1 ping statistics ---

4 packets transmitted, 4 received, 0% packet loss, time 3003ms

rtt min/avg/max/mdev = 2.397/2.841/4.066/0.708 ms
If you get insetad an an output like:
From 192.168.1.2 icmp_seq=1 Frag needed and DF set (mtu = 1500)

From 192.168.1.2 icmp_seq=1 Frag needed and DF set (mtu = 1500)

From 192.168.1.2 icmp_seq=1 Frag needed and DF set (mtu = 1500)

From 192.168.1.2 icmp_seq=1 Frag needed and DF set (mtu = 1500)
--- 192.168.1.1 ping statistics ---
0 packets transmitted, 0 received, +4 errors
This means a packets with maximum MTU of 1500 could be transmitted and hence something is not okay with the Jumbo Frames config.
Another helpful command in debugging MTU and showing which host in a hop queue support jumbo frames is Linux's traceroute
To debug a path between host and target, you can use:
linux:~# traceroute --mtu www.google.com

...
If you want to test the Jumbo Frames configuration from a Windows host use ms-windows ping command like so:
C:\>ping 192.168.1.2 -f -l 8972

Pinging 192.168.1.2 with 8972 bytes of data:

Reply from 192.168.1.2: bytes=8972 time=2ms TTL=255

Reply from 192.168.1.2: bytes=8972 time=2ms TTL=255

Reply from 192.168.1.2: bytes=8972 time=2ms TTL=255

Reply from 192.168.1.2: bytes=8972 time=2ms TTL=255

Ping statistics for 192.168.1.2:

Packets: Sent = 4, Received = 4, Lost = 0 (0% loss),

Approximate round trip times in milli-seconds:

Minimum = 2ms, Maximum = 2ms, Average = 2ms
Here -l 8972 value is actually equal to 9000. 8972 = 9000 – 20 (20 byte IP header) – 8 (ICMP header)


How to add OpenID functionality to WordPress Comments / What is OpenID?
Tuesday, February 14th, 2012I've recently decided to add Comment as OpenID functionality to my wordpress blog. The reasons to do that is that I myself have today created an OpenID account. Already million of people have OpenID account without even knowing. Most major search engines and social websites like Google, Yahoo, Live Journal, Hyves, Blogger, Flicker, MySpace automatically creates an OpenID account for newly registered users.
It is up to the user to check with each of the aforementioned providers what is the URL of their OpenID account.
Even though OpenID popularity is steadly rising, I'm sure there are still plenty of users who did not heard, used or noticed OpenID yet.
So What the heck is OpenID?
For all those who still haven't heard about it, OpenID is a universal web site login system With just one "unified" OpenID account the user can login to multiple websites with no need to create multiple accounts across each and every different website on the internet.
The only requirement for the user to be able to use OpenID is that the website in question to have (support) for OpenID credential and the user to have existing OpenID account.
Therefore using one single OpenID you can sign in as a certain user to multiple websites on the internet with no need for annoying registration process to each and every new website you encounter. Another benefit OpenID gives to the user is that you don't have to memorize or keep notes of a tens or thousands of different login accounts across the many different websites on the net.
Using OpenID also saves the user from troubles with forgotten password or username as just one OpenID login is used to login you everywhere.
For WordPress blogging platform the Russian Igor Korolev, has written a wordpress plugin – comments-to-wordpress . This plugin adds support for OpenID authentication in WordPress comments.
Here is how to OpenID to WordPress:
1. Download the comments-with-wordpress plugin and unzipAs of writting of this article latest comments-to-wordpress plugin is ver. 1.4.
Download the plugin to blog path directory lets say, /var/www/blog/wp-content/plugins/ and unzip:
# cd /var/www/blog/wp-content/plugins

# wget http://downloads.wordpress.org/plugin/comments-with-openid.zip

...

# unzip comments-with-openid.zip

...
I've also done a mirror for download of comments-with-openid 1.4 here
2. Enable Comments with OpenID wp plugin
Next the plugin has to be Enabled, just like any other wordpress plugin via admin menus:
Plugins -> Inactive -> Comments with OpenID (enable)
Once the plugin is enaabled it is necessery to add some code with a text editor in file /var/www/blog/wp-content/themes/default/comments.php
Small noet to make here: If you're not using the default WordPress theme (like I do), you will have to edit the /themes/your-theme-name/comments.php instead.
Inside the file look for the form input fields:
<p> <input type="text" name="author" ....

...

<p> <input type="text" name="email" id="email" ....

...

<p> <input type="text" name="url" id="url" ....

...
Before the html tags code:
Paste the following code:
<?php comments_with_openid(); ?>
Save the comments.php file and you Identification for new comments with OpenID will appear in your wordpress Comments form.
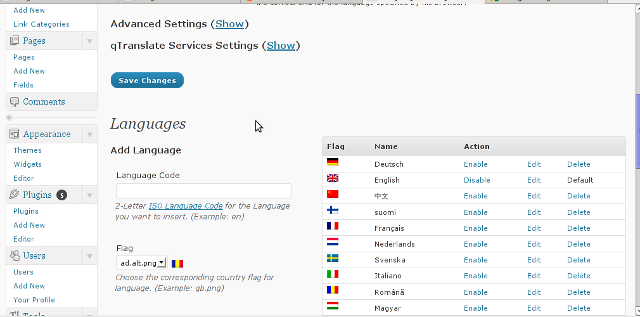
The OpenID plugin will add a number of service OpenIDs to choose between like you can see in my blog's plugin section or the screenshot below:
The URL https://www.google.com/accounts/o8/id is just a sample and showed because I clicked on the Google icon. If you have a Google profile you can check the exact ID and use it as URL there. Simply if your browser is logged in Gmail and you have Google profile. OpenID should work. As you can see the plugin supports a number of services which already support OpenID auth, the list of services can be easily extended by adding minor changes in …/plugins/comments-with-openid/comments-with-openid.php
There is also another wordpress plugin with the openid name – http://wordpress.org/extend/plugins/openid/
Downloading and enabling the other openid plugin also adds support for OpenID login in your http://your-url.com/wp-admin/ login page.
Installing the OpenID plugin is needed especially if you're a blogger blogging on 5 or 10 different topic oriented blogs, once downloading and installing the OpenID plugin will allow you to login across the blog ring without loosing time or bothering to remember different passwords across all the blogs. Here is a screenshot of the /wp-admin wordpress login page with the OpenID wp plugin enabled:
As of time of writting according to http://openid.net/get-an-openid/what-is-openid/'s website there are over 50000 major websites on the net already accepting OpenID login.
Of course as every technlogy OpenID is not perfect and along with its convenience in some cases it could impose security hole. OpenID opponents claim under some circumstances OpenID is prone to forgery, XSS (cross site scripting) and XSFR attacks. Everyone who is about to use OpenID should be also aware of the great security risk it impose if one OpenID account gets stolen through sniffing, this could mean multiple websites can be accesses with the one single OpenID by the malicious user and a lot of confidential data owned by the user can be revealed or deleted …
With this said I think OpenID is not a recommended login technology for Windows users, as windows is famous for being vulnerable to so many Viruses and Spyware/Malware etc..
With non-free software OSes like MS Windows, the user never cannot for sure if the system is infected, hence using OpenID to transfer credentials over the internet or store an OpenID SSL/(TLS) certificate to identify in websites is TOO DANGEROUS!
Hope this article was helpful. Cya
Tags: authentication, Auto, benefit, code, Comment, Draft, file, functionality, google, hyves, igor korolev, Journal, login, login accounts, major search engines, need, openid, password, php, platform, plugin, popularity, quot, Russian, Search, support, tens, text, type, universal web, url, username, wget, what the heck, Wordpress, writting, Yahoo
Posted in System Administration, Web and CMS, Wordpress | 2 Comments »