Posts Tagged ‘default’

How to harden Linux Security and imprpove network efficiency on Kernel sysctl Level to Stop SYN flood

Friday, July 8th, 2011

Power up Linux and protect against DDoS with sysctl var optimization

Some long time ago I’ve written an article Optimizing Linux tcp/ip networking

In the article I’ve examined a number of Linux kernel sysctl variables, which significantly improve the way TCP/IP networking is handled by a non router Linux based servers.

As the time progresses I’ve been continuing to read materials on blogs and internet sites on various tips and anti Denial of Service rules which one could apply on newly installed hosting (Apache/MySql/Qmail/Proxy) server to improve webserver responce times and tighten the overall security level.

In my quest for sysctl 😉 I found a few more handy sysctl variables apart from the old ones I incorporate on every Linux server I adminstrate.
The sysctl variables improves the overall network handling efficiency and protects about common SYN/ACK Denial of service attacks.

Here are the extra sysctl variables I started incorporating just recently:

############ IPv4 Sysctl Settings ################
#Enable ExecShield protection (randomize virtual assigned space to protect against many exploits)
kernel.randomize_va_space = 1
#Increase the number of PIDs processes could assign this is very needed especially on more powerful servers
kernel.pid_max = 65536
# Prevent against the common 'syn flood attack'
net.ipv4.tcp_syncookies = 1
# Controls the use of TCP syncookies two is generally a better idea, though you might experiment
#net.ipv4.tcp_syncookies = 1
net.ipv4.tcp_synack_retries = 2
##################################################
#
############## IPv6 Sysctl Settings ################
# Number of Router Solicitations to send until assuming no routers are present.
net.ipv6.conf.default.router_solicitations = 0
# Accept Router Preference in RA? Again not necessery if the server is not a router
net.ipv6.conf.default.accept_ra_rtr_pref = 0
# Learn Prefix Information in Router Advertisement (Unnecessery) for non-routers
net.ipv6.conf.default.accept_ra_pinfo = 0
# disable accept of hop limit settings from other routers (could be used for DoS)
net.ipv6.conf.default.accept_ra_defrtr = 0
# disable ipv6 global unicasts server assignments
net.ipv6.conf.default.autoconf = 0
# neighbor solicitations to send out per address (better if disabled)
net.ipv6.conf.default.dad_transmits = 0
# disable assigning more than 1 address per network interface
net.ipv6.conf.default.max_addresses = 1
#####################################################


To use this settings paste the above sysctl variables in /etc/sysctl.conf and ask sysctl command to read and apply the newly added conf settings:

server:~# sysctl -p
...

Hopefully you should not get errors while applying the sysctl settings, if you get some errors, it’s possible some of the variable is differently named (depending on the Linux kernel version) or the Linux distribution on which sysctl’s are implemented.

For some convenience I’ve created unified sysctl variables /etc/sysct.conf containing the newly variables I started implementing to servers with the ones I already exlpained in my previous post Optimizing Linux TCP/IP Networking

Here is the optimized / hardened sysctl.conf file for download

I use this exact sysctl.conf these days on both Linux hosting / VPS / Mail servers etc. as well as on my personal notebook 😉

Here is also the the complete content of above’s sysctl.conf file, just in case if somebody wants to directly copy/paste it in his /etc/sysctl.conf

# Sysctl kernel variables to improve network performance and protect against common Denial of Service attacks
# It's possible that not all of the variables are working on all Linux distributions, test to make sure
# Some of the variables might need a slight modification to match server hardware, however in most cases it should be fine
# variables list compiled by hip0
### https://www.pc-freak.net
#### date 08.07.2011
############ IPv4 Sysctl Kernel Settings ################
net.ipv4.ip_forward = 0
# ( Turn off IP Forwarding )
net.ipv4.conf.default.rp_filter = 1
# ( Control Source route verification )
net.ipv4.conf.default.accept_redirects = 0
# ( Disable ICMP redirects )
net.ipv4.conf.all.accept_redirects = 0
# ( same as above )
net.ipv4.conf.default.accept_source_route = 0
# ( Disable IP source routing )
net.ipv4.conf.all.accept_source_route = 0
# ( - || - )net.ipv4.tcp_fin_timeout = 40
# ( Decrease FIN timeout ) - Useful on busy/high load server
net.ipv4.tcp_keepalive_time = 4000
# ( keepalive tcp timeout )
net.core.rmem_default = 786426
# Receive memory stack size ( a good idea to increase it if your server receives big files )
##net.ipv4.tcp_rmem = "4096 87380 4194304"
net.core.wmem_default = 8388608
#( Reserved Memory per connection )
net.core.wmem_max = 8388608
net.core.optmem_max = 40960
# ( maximum amount of option memory buffers )
# tcp reordering, increase max buckets, increase the amount of backlost
net.ipv4.tcp_max_tw_buckets = 360000
net.ipv4.tcp_reordering = 5
##net.core.hot_list_length = 256
net.core.netdev_max_backlog = 1024
#Enable ExecShield protection (randomize virtual assigned space to protect against many exploits)
kernel.randomize_va_space = 1
#Increase the number of PIDs processes could assign this is very needed especially on more powerful servers
kernel.pid_max = 65536
# Prevent against the common 'syn flood attack'net.ipv4.tcp_syncookies = 1
# Controls the use of TCP syncookies two is generally a better idea, though you might experiment
#net.ipv4.tcp_syncookies = 1
net.ipv4.tcp_synack_retries = 2
###################################################
############## IPv6 Sysctl Settings ################
# Number of Router Solicitations to send until assuming no routers are present.
net.ipv6.conf.default.router_solicitations = 0
# Accept Router Preference in RA? Again not necessery if the server is not a router
net.ipv6.conf.default.accept_ra_rtr_pref = 0
# Learn Prefix Information in Router Advertisement (Unnecessery) for non-routersnet.
ipv6.conf.default.accept_ra_pinfo = 0
# disable accept of hop limit settings from other routers (could be used for DoS)
net.ipv6.conf.default.accept_ra_defrtr = 0
# disable ipv6 global unicasts server assignmentsnet.
ipv6.conf.default.autoconf = 0
# neighbor solicitations to send out per address (better if disabled)
net.ipv6.conf.default.dad_transmits = 0
# disable assigning more than 1 address per network interfacenet.
ipv6.conf.default.max_addresses = 1
#####################################################
# Reboot if kernel panic
kernel.panic = 20

These sysctl settings will tweaken the Linux kernel default network settings performance and you will notice the improvements in website responsiveness immediately in some cases implementing this kernel level goodies will make the server perform better and the system load might decrease even 😉

This optimizations on a kernel level are not only handy for servers, their implementation on Linux Desktop should also have a positive influence on the way the network behaves and could improve significantly the responce times of opening pages in Firefox/Opera/Epiphany Torrent downloads etc.

Hope this kernel tweakenings are helpful to someone.
Cheers 😉
Monitoring MySQL server queries and debunning performance (slow query) issues with native MySQL commands and with mtop, mytop

Thursday, May 10th, 2012

If you're a Linux server administrator running MySQL server, you need to troubleshoot performance and bottleneck issues with the SQL database every now and then. In this article, I will pinpoint few methods to debug basic issues with MySQL database servers.

1. Troubleshooting MySQL database queries with native SQL commands

a)One way to debug errors and get general statistics is by logging in with mysql cli and check the mysql server status:

# mysql -u root -p
mysql> SHOW STATUS;
+-----------------------------------+------------+
| Variable_name | Value |
+-----------------------------------+------------+
| Aborted_clients | 1132 |
| Aborted_connects | 58 |
| Binlog_cache_disk_use | 185 |
| Binlog_cache_use | 2542 |
| Bytes_received | 115 |
.....
.....
| Com_xa_start | 0 |
| Compression | OFF |
| Connections | 150000 |
| Created_tmp_disk_tables | 0 |
| Created_tmp_files | 221 |
| Created_tmp_tables | 1 |
| Delayed_errors | 0 |
| Delayed_insert_threads | 0 |
| Delayed_writes | 0 |
| Flush_commands | 1 |
.....
.....
| Handler_write | 132 |
| Innodb_page_size | 16384 |
| Innodb_pages_created | 6204 |
| Innodb_pages_read | 8859 |
| Innodb_pages_written | 21931 |
.....
.....
| Slave_running | OFF |
| Slow_launch_threads | 0 |
| Slow_queries | 0 |
| Sort_merge_passes | 0 |
| Sort_range | 0 |
| Sort_rows | 0 |
| Sort_scan | 0 |
| Table_locks_immediate | 4065218 |
| Table_locks_waited | 196 |
| Tc_log_max_pages_used | 0 |
| Tc_log_page_size | 0 |
| Tc_log_page_waits | 0 |
| Threads_cached | 51 |
| Threads_connected | 1 |
| Threads_created | 52 |
| Threads_running | 1 |
| Uptime | 334856 |
+-----------------------------------+------------+
225 rows in set (0.00 sec)

SHOW STATUS; command gives plenty of useful info, however it is not showing the exact list of queries currently processed by the SQL server. Therefore sometimes it is exactly a stucked (slow queries) execution, you need to debug in order to fix a lagging SQL. One way to track this slow queries is via enabling mysql slow-query.log. Anyways enabling the slow-query requires a MySQL server restart and some critical productive database servers are not so easy to restart and the SQL slow queries have to be tracked "on the fly" so to say.
Therefore, to check the exact (slow) queries processed by the SQL server (without restarting it), do
 

mysql> SHOW processlist;
+——+——+—————+——+———+——+————–+——————————————————————————————————+
| Id | User | Host | db | Command | Time | State | Info |
+——+——+—————+——+———+——+————–+——————————————————————————————————+
| 609 | root | localhost | blog | Sleep | 5 | | NULL |
| 1258 | root | localhost | NULL | Sleep | 85 | | NULL |
| 1308 | root | localhost | NULL | Query | 0 | NULL | show processlist |
| 1310 | blog | pcfreak:64033 | blog | Query | 0 | Sending data | SELECT comment_author, comment_author_url, comment_content, comment_post_ID, comment_ID, comment_aut |
+——+——+—————+——+———+——+————–+——————————————————————————————————+
4 rows in set (0.00 sec)
mysql>

SHOW processlist gives a good view on what is happening inside the SQL.

To get more complete information on SQL query threads use the full extra option:

mysql> SHOW full processlist;

This gives pretty full info on running threads, but unfortunately it is annoying to re-run the command again and again – constantly to press UP Arrow + Enter keys.

Hence it is useful to get the same command output, refresh periodically every few seconds. This is possible by running it through the watch command:

debian:~# watch "'show processlist' | mysql -u root -p'secret_password'"

watch will run SHOW processlist every 2 secs (this is default watch refresh time, for other timing use watch -n 1, watch -n 10 etc. etc.

The produced output will be similar to:

Every 2.0s: echo 'show processlist' | mysql -u root -p'secret_password' Thu May 10 17:24:19 2012

Id User Host db Command Time State Info
609 root localhost blog Sleep 3 NULL1258 root localhost NULL Sleep 649 NULL1542 blog pcfreak:64981 blog Query 0 Copying to tmp table \
SELECT p.ID, p.post_title, p.post_content,p.post_excerpt, p.pos
t_date, p.comment_count, count(t_r.o
1543 root localhost NULL Query 0 NULL show processlist

Though this "hack" is one of the possible ways to get some interactivity on what is happening inside SQL server databases and tables table. for administering hundred or thousand SQL servers running dozens of queries per second – monitor their behaviour few times aday using mytop or mtop is times easier.

Though, the names of the two tools are quite similar and I used to think both tools are one and the same, actually they're not but both are suitable for monitoring sql database execution in real time.

As a sys admin, I've used mytop and mtop, on almost each Linux server with MySQL server installed.
Both tools has helped me many times in debugging oddities with sql servers. Therefore my personal view is mytop and mtop should be along with the Linux sysadmin most useful command tools outfit, still I'm sure many administrators still haven't heard about this nice goodies.

1. Installing mytop on Debian, Ubuntu and other deb based GNU / Linux-es

mytop is available for easy install on Debian and across all debian / ubuntu and deb derivative distributions via apt.

Here is info obtained with apt-cache show

debian:~# apt-cache show mytop|grep -i description -A 3
Description: top like query monitor for MySQL
Mytop is a console-based tool for monitoring queries and the performance
of MySQL. It supports version 3.22.x, 3.23.x, 4.x and 5.x servers.
It's written in Perl and support connections using TCP/IP and UNIX sockets.

Installing the tool is done with the trivial:

debian:~# apt-get --yes install mytop
....

mtop used to be available for apt-get-ting in Debian Lenny and prior Debian releases but in Squeeze onwards, only mytop is included (probably due to some licensing incompitabilities with mtop??).

For those curious on how mtop / mytop works – both are perl scripts written to periodically connects to the SQL server and run commands similar to SHOW FULL PROCESSLIST;. Then, the output is parsed and displayed to the user.

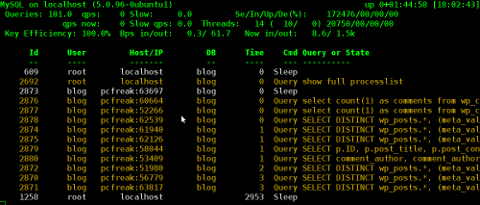
Here how mytop running, looks like:

MyTOP showing queries running on Ubuntu 8.04 Linux - Debugging interactively top like MySQL

2. Installing mytop on RHEL and CentOS

By default in RHEL and CentOS and probably other RedHat based Linux-es, there is neither mtop nor mytop available in package repositories. Hence installing the tools on those is only available from 3rd parties. As of time of writting an rpm builds for RHEL and CentOS, as well as (universal rpm distros) src.rpm package is available on http://pkgs.repoforge.org/mytop/. For the sake of preservation – if in future those RPMs disappear, I made a mirror of mytop rpm's here

Mytop rpm builds depend on a package perl(Term::ReadKey), my attempt to install it on CentOS 5.6, returned following err:

[root@cenots ~]# rpm -ivh mytop-1.4-2.el5.rf.noarch.rpm
warning: mytop-1.4-2.el5.rf.noarch.rpm: Header V3 DSA signature: NOKEY, key ID 6b8d79e6
error: Failed dependencies:
perl(Term::ReadKey) is needed by mytop-1.4-2.el5.rf.noarch

The perl(Term::ReadKey package is not available in CentOS 5.6 and (probably other centos releases default repositories so I had to google perl(Term::ReadKey) I found it on http://rpm.pbone.net/ package repository, the exact url to the rpm dependency as of time of writting this post is:

ftp://ftp.pbone.net/mirror/yum.trixbox.org/centos/5/old/perl-Term-ReadKey-2.30-2.rf.i386.rpm

Quickest, way to install it is:

[root@centos ~]# rpm -ivh ftp://ftp.pbone.net/mirror/yum.trixbox.org/centos/5/old/perl-Term-ReadKey-2.30-2.rf.i386.rpmRetrieving ftp://ftp.pbone.net/mirror/yum.trixbox.org/centos/5/old/perl-Term-ReadKey-2.30-2.rf.i386.rpmPreparing... ########################################### [100%]
1:perl-Term-ReadKey ########################################### [100%]

This time mytop, install went fine:

[root@centos ~]# rpm -ivh mytop-1.4-2.el5.rf.noarch.rpm
warning: mytop-1.4-2.el5.rf.noarch.rpm: Header V3 DSA signature: NOKEY, key ID 6b8d79e6
Preparing... ########################################### [100%]
1:mytop ########################################### [100%]

To use it further, it is the usual syntax:

mytop -u username -p 'secret_password' -d database

CentOS Linux MyTOP MySQL query benchmark screenshot - vpopmail query

3. Installing mytop and mtop on FreeBSD and other BSDs

To debug the running SQL queries in a MySQL server running on FreeBSD, one could use both mytop and mtop – both are installable via ports:

a) To install mtop exec:

freebsd# cd /usr/ports/sysutils/mtop
freebsd# make install clean
....

b) To install mytop exec:

freebsd# cd /usr/ports/databases/mytop
freebsd# make install clean
....

I personally prefer to use mtop on FreeBSD, because once run it runs prompts the user to interactively type in the user/pass

freebsd# mtop

Then mtop prompts the user with "interactive" dialog screen to type in user and pass:

Mtop interactive type in username and password screenshot on FreeBSD 7.2

It is pretty annoying, same mtop like syntax don't show user/pass prompt:

freebsd# mytop
Cannot connect to MySQL server. Please check the:

* database you specified "test" (default is "test")
* username you specified "root" (default is "root")
* password you specified "" (default is "")
* hostname you specified "localhost" (default is "localhost")
* port you specified "3306" (default is 3306)
* socket you specified "" (default is "")
The options my be specified on the command-line or in a ~/.mytop
config file. See the manual (perldoc mytop) for details.
Here's the exact error from DBI. It might help you debug:
Unknown database 'test'

The correct syntax to run mytop instead is:

freebsd# mytop -u root -p 'secret_password' -d 'blog'

Or the longer more descriptive:

freebsd# mytop --user root --pass 'secret_password' --database 'blog'

By the way if you take a look at mytop's manual you will notice a tiny error in documentation, where the three options –user, –pass and –database are wrongly said to be used as -user, -pass, -database:

freebsd# mytop -user root -pass 'secret_password' -database 'blog'
Cannot connect to MySQL server. Please check the:

* database you specified "atabase" (default is "test")
* username you specified "ser" (default is "root")
* password you specified "ass" (default is "")
* hostname you specified "localhost" (default is "localhost")
* port you specified "3306" (default is 3306)
* socket you specified "" (default is "")a
...
Access denied for user 'ser'@'localhost' (using password: YES)

Actually it is interesting mytop, precededed historically mtop.
mtop was later written (probably based on mytop), to run on FreeBSD OS by a famous MySQL (IT) spec — Jeremy Zawodny .
Anyone who has to do frequent MySQL administration tasks, should already heard Zawodny's name.
For those who haven't, Jeremy used to be a head database administrators and developer in Yahoo! Inc. some few years ago.
His website contains plenty of interesting thoughts and writtings on MySQL server and database management
 

FreeBSD 10.0 RELEASE is out pkg_add FreeBSD default package manager to be substituted with pkg

Thursday, January 23rd, 2014

freebsd 10 is out logo pkg add to be removed - freebsd big news pkg_add to be substituted by another package manager

New latest version of FreeBSD 10.0-RELEASE is out this. FBSD 10  is the latest stable release of 10 branch. The biggest change in FBSD 10 is removal of long time used pkg_add and its substitute with the newer and more advanced pkg. For BSD users who don't know pkg  stiill check out handbook on pkgng

Key highlights of FreeBSD 10 as taken from FreeBSD-10.0-RELEASE announcement;
 

  • GCC is no longer installed by default on architectures where clang(1) is the default compiler.

  • Unbound has been imported to the base system as the local caching DNS resolver.

  • BIND has been removed from the base system.

  • make(1) has been replaced with bmake(1), obtained from the NetBSD Project.

  • pkg(7) is now the default package management utility.

  • pkg_add(1), pkg_delete(1), and related tools have been removed.

  • Major enhancements in virtualization, including the addition of bhyve(8), virtio(4), and native paravirtualized drivers providing support for FreeBSD as a guest operating system on Microsoft Hyper-V.

  • TRIM support for Solid State Drives has been added to ZFS.

  • Support for the high-performance LZ4 compression algorithm has been added to ZFS.

    There is a big news for Raspberry Pi lovers as from FreeBSD 10 there is an official support for Raspberry Pi
    Happy new release. Cheers to testers 🙂

Set up Modsecurity on Debian 7 GNU / Linux to mitigate websites virus infections / Cross Site Scripting and SQL Injects

Friday, September 6th, 2013

mod security raise up your Apache webserver security and protect against cross site scripting javascript hacks and viruses

There are plenty of tutorials around on how to install and configure modsecurity  So This tutorial is nothing new, but I decided to write it since, I had to install mod_security on Debian Wheezy to protect a Debian Linux server websites from being periodically infected with Viruses / XSS / Backdoored Javascripts and Trojan horses.

Everyone who used Debian stable distribution knows the packages included in it are usually about 2 years older than latest available. Situation with latest Debian stable Wheezy  is same, but anyways even a bit outdated my experience so far is mod_security does a great job of protecting Apache sites …

1. Install libapache-mod-security and other libraries (not obligitory), but useful on most Apache + PHP servers

  Run below commands to add xml and rest of useful Apache stuff:


apt-get install libxml2 libxml2-dev libxml2-utils
apt-get install libaprutil1 libaprutil1-dev

Above commands will install a bunch of other dependency packages.

Next install mod-security deb. Run below command, to install and activate modsecurity. Note that installing libapache-mod-security will also automatically restart the Apache server.
 

apt-get install libapache-mod-security

Next to enable all functionality of modsecurity headers Apache module is required as well, activate it with:

 
a2enmod headers
service apache2 restart

2. Make sure mod_security Apache config looks like


<IfModule security2_module>
# Default Debian dir for modsecurity's persistent data
SecDataDir /var/cache/modsecurity
# Include all the *.conf files in /etc/modsecurity.
# Keeping your local configuration in that directory
# will allow for an easy upgrade of THIS file and
# make your life easier
Include "/etc/modsecurity/*.conf"
</IfModule>

Important part of conf is  "Include "/etc/modsecurity/*.conf"" line. /etc/modsecurity directory is main place to set up and configure modsecurity. This configuration file, combined with mod-security.load, do everything necessary to load the modsecurity into Apache server.

3.Enable and Load modsecurity default configuration rules:

So far, modsecurity is loaded into the apache server, but isn't stopping any attempts of hack scripts / Viruses / or automated tools to exploit Vulnerabilities in Web Applications. To make modsecurity start filtering requests, should activate  modsecurity specific configuration and load some regular expression rules.
First to do is enable "recommended" modsecurity configuration file:
 

Code:
cd /etc/modsecurity
mv modsecurity.conf-recommended modsecurity.conf

Default configuration from recommended conf enables modsecurity in an "examine only" mode. In order to make full use of the module, we have to make a few changes. With  favorite text editor open modsecurity.conf (mine is vim)and make the following change:

Code:
SecRuleEngine On

This makes modsecurity to block requests based on its (pre-written) developer rules. Other settings in this file that are useful to know about are the debug controls, very useful, whether you have to debug problems with sites not properly opening due to server enabled mod_security.
 

Code:
#SecDebugLog /opt/modsecurity/var/log/debug.log
#SecDebugLogLevel 3

This controls how much information is stored in modsecurity's "audit log as well as keeps track of attacks launched to server. Default debug level of 3 is pretty much and stores "everything". This is dangerous as a huge logs are produces on  busy servers.
 

Code:
SecAuditLogParts ABIJDEFHZ

4. Enable extra modsecurity prevention rules

Modsecurity works by using rules by pre-defined patterns used to recognize when your website/s is being probed or attacked. Once installed modsecurity base package as a dependency modsecurity-crs package is installed. modsecurity-crs contains addition free core rule set. Current Core rule from modsecurity.org are newer than version included with wheezy,  thus rules lack a bit behind but this is only option whether using default debian bundled packge otherwise manual modsecurity recompile is required. We all know how bad it is to custom compile software on production machines, so custom compile experiments are really bad idea.

CRS (Core Rule Set) is installed in /usr/share/modsecurity-crs. This directory contains an "activated_rules" directory present also in /etc/modsecurity

Quickest way to activate rules is by symlinking from the actual config and rule files into the /etc/modsecurity config directory.

We'll be making links from the /usr/share/modsecurity location into /etc/modsecurity to activate some other useful modsec useful rules. First link main crs config file:
 

ln -s /usr/share/modsecurity-crs/modsecurity_crs_10_setup.conf /etc/modsecurity/modsecurity_crs_10_setup.conf

This file provides some basic configuration directives for crs.

Futher on, link each rule file in the base_rules and optional_rules directories using 2 tiny bash loops.


cd /usr/share/modsecurity-crs/base_rules
for f in * ; do sudo ln -s /usr/share/modsecurity-crs/base_rules/$f /etc/modsecurity/$f ; done
cd /usr/share/modsecurity-crs/optional_rules
for f in * ; do sudo ln -s /usr/share/modsecurity-crs/optional_rules/$f /etc/modsecurity/$f ; done

With that done, there's one more edit to check if modsecurity blocking works as expected. Open the /etc/modsecurity/modsecurity.conf file and add the following lines at the end (this is from the free, modsecurity pdf book, link provided below)


SecRule ARGS "MY_UNIQUE_TEST_STRING"\
"phase:1,log,deny,status:503"

Finally after all configuration rules are loaded to modsec, Usual Apache restart is required:

 
/etc/init.d/apache2 restart

Whether no fatal errors pop up and Apache starts normally, now modsecurity should be properly running.

5. Verify if modsecurity is set-up and kicking ass

To verify installation, open a browser and access some of hosted websites  like this:
http://www.your-server-domain.com/?test=MY_UNIQUE_TEST_STRING

A sure sign that modsec works is  503 "Service Temporarily Unavailable" message from Apache. Alternatively  examine server's modsec audit log file (default location in /var/log/apache2/modsec_audit.log) (grep the string MY_UNIQUE_TEST_STRING. You should see full transcript of the communication between your browser and server logged. Depending on amount of site traffic gets make sure to monitor  size of file for some minutes to make sure it doesn't grow too big and it doesn't fill up quickly your HDD.

Well now all fine your Apache server security is better for sure and by God's grace you should not have to deal with hundreds of hours of sites recovery after a bunch of client's websites are hacked.

Feedback and comments are mostly welcome. Enjoy 😉

swap_pager_getswapspace: failed, MySQL troubles on FreeBSD 7.2 cause and solution

Tuesday, May 3rd, 2011

Every now and then my FreeBSD router dmesg ( /var/log/dmesg.today ) logs, gets filled with error messages like:

pid 86369 (httpd), uid 80, was killed: out of swap space
swap_pager_getswapspace(14): failed
swap_pager_getswapspace(16): failed
swap_pager_getswapspace(11): failed
swap_pager_getswapspace(12): failed
swap_pager_getswapspace(16): failed
swap_pager_getswapspace(14): failed
swap_pager_getswapspace(16): failed
swap_pager_getswapspace(8): failed

Using swapinfo during the swap_pager_getswapspace(16): failed messages were logged in, I figured out that definitely the swap memory over-use is the bottleneck for the troubles, to find this I used the command:

freebsd# swapinfo
Device 1K-blocks Used Avail Capacity Type
/dev/ad0s1b 49712 45920 3792 92% Interleaved

After some investigation, I’ve figured out that the MySQL server is causing the kernel exceeded swap troubles.

My current MySQL server version is installed from the ports tree, whether I’m using the bsd port /usr/ports/databases/mysql51-server/ and it appears to work just fine.

However I have noticed that the mysql-server is missing a my.cnf file!, which means the mysql server is running under a mode with some kind of default configurations.

Strangely in the system process list it appeared it is using a default my.cnf file located in /var/db/mysql/my.cnf

Below you see the paste from the ps command:

ps axuww freebsd# ps axuww | grep -i my.cnf | grep -v grep
mysql 7557 0.0 0.1 3464 1268 p1 I 12:03PM 0:00.01 /bin/sh /usr/local/bin/mysqld_safe --defaults-extra-file=/var/db/mysql/my.cnf --user=mysql --datadir=/var/db/mysql --pid-file=/var/db/mysql/pcfreak.pidmysql 7589 0.0 5.1 93284 52852 p1 I 12:03PM 0:59.01 /usr/local/libexec/mysqld --defaults-extra-file=/var/db/mysql/my.cnf --basedir=/usr/local --datadir=/var/db/mysql --user=mysql --pid-file=/var/db/mysql/pcfreak.pid --port=3306 --socket=/tmp/mysql.sock

Nevertheless it appeared the sql server is running the file /var/db/mysql/my.cnf conf was not existing! This was really weird for me as I’m used to have the default my.cnf from my previous experience with Linux servers!

Thus the next logical thing I did was to create my.cnf conf file in order to be able to have a proper limiting configuration for the sql server.

The FreeBSD my.cnf skele files are found in /usr/local/share/mysql/, here are the 4 files one can use as a starting basis for further configuration of the mysql-server.

freebsd# ls -al /usr/local/share/mysql/my-*.cnf
-r--r--r-- 1 root wheel 4948 Aug 12 2009 /usr/local/share/mysql/my-huge.cnf
-r--r--r-- 1 root wheel 20949 Aug 12 2009 /usr/local/share/mysql/my-innodb-heavy-4G.cnf
-r--r--r-- 1 root wheel 4924 Aug 12 2009 /usr/local/share/mysql/my-large.cnf
-r--r--r-- 1 root wheel 4931 Aug 12 2009 /usr/local/share/mysql/my-medium.cnf
-r--r--r-- 1 root wheel 2502 Aug 12 2009 /usr/local/share/mysql/my-small.cnf

I have chosen to use the my-medium.cnf as a skele to tune up, as my server is not high iron one e.g. the host I run the mysql is a (simple dual core 1.2Ghz system).

Further on I copied the /usr/local/share/mysql/my-medium.cnf to /var/db/mysql/my.cnf e.g.:

freebsd# cp -rpf /usr/local/share/mysql/my-medium.cnf /var/db/mysql/my.cnf

As a next step to properly tune up the default values of the newly copied my.cnf to my specific server I used the Tuning-Primer MySQL tuning script

Using tuning-primer.sh is really easy as all I did is download, launch it and follow the script suggestions to correct some of the values already in my.cnf

I have finally ended up with the following my.cnf after using tuning-primer.sh to optimize mysql server to work with my bsd host

Now I really hope the shitty swap_pager_getswapspace: failed errors would not haunt me once again by crashing my server and causing mem overheads.

Still I wonder why the port developer Alex Dupre – ale@FreeBSD.org choose not to provide the default mysql51-server conf with some kind of my.cnf file? I hope he had a good reason.

Change default new created Debian users insecure (all users read) permissons to secure

Tuesday, September 11th, 2012

In older versions of Debian, the directory permnissions of /home/ directory used to be secure. As of time of writing this post in Debian GNU / Linux Squeeze (6.0.5), default permissions are set to such, that all permissions are set readable for all users. e.g.:

debian:~$ ls -al /home/test
drwxr-xr-x 3 test test 4096 Jul 24 10:51 test

This kind of permissions are probably set like this because of Apache configuration to display every user custom file content in web via /home/[users]/public_html through http://website-url.com/~test … (whatever) ~username.

This is great for machines which are supposed to be used for hosting, but for mail server or SQL Database host such permissions of new created users is quite insecure practice. Also such a /home directory settings are not good even for Webserver hosting servers, which did not display any web content via /home/ users directories.

Therefore on each new configured Debian server it is a wonderful practice to change default new created user to only readable, writable and executable by the user itself ….

To do so;

1. Edit /etc/adduser.conf

Change the variable:

DIR_MODE=755

to

DIR_MODE=700

This will not affect the permissions of current existing directories in /home/, i.e. /home/user1 , /home/user2 etc. but any new created one with adduser or useradd cmd will get permissions of 700

Here are permissions of recent created user syrma:

debian:~# useradd syrma
debian:~# ls -ld /home/syrma
drwxr-xr-x 98 syrma syrma 12288 7 ceâ—ˆ 13,56 hipo/

In /etc/adduserconf, there are plenty of other useful options, you might want to tune (depending on the type of new configured server). Few worthy to change sometimes are:

FIRST_UID=1000, LAST_UID=29999
FIRST_GID=1000, LAST_GID=29999

This two controls how the USER IDSs (UID) and GROUP IDs (GID)s will get assigned. In some cases it might be useful to assign new users from 1000 onwards.

Another helpful variable to tune for creating new users from there is DSHELL, on Linux defaulting to DSHELL=bash shell.

If there is a necessity to set a GLOBAL new created user quota, this is easily done also via adduser.conf. The file allows you to disable certain strings in username from present in new user logins, configure if new users will have their separate directory or belong to a system wide (user group – like in Slackware) and few others. I suggest anyone new to Linux who hears it for a first time check it.

It is maybe worthy to mention in present moment on Ubuntu Linux, by default /etc/adduser.conf, DIR_HOME=700 (is restrictive).
For some new users, who try to configure Apache read /home/[user_dir]/public_html. This could lead to unexplainable errors like:

[Tue Sep 11 10:20:17 2012] [crit] [client 127.0.0.1] (13) Permission denied:/home/syrma/.htaccess pcfg_openfile: unable to check htaccess file, ensure it is readable

This error is due to /home/syrma, improper permissions (Apache) server user (www-data) fails to read /home/syrma directory content and the Apache forked child exits with the respective error.log critical err.

If you get some errors like this, the fix is to just make the directory with readable and executable flag for all users:

# chmod -R 0755 /home/syrma

Selecting Best Wireless channel / Choosing Best Wi-FI channel for Wireless Routers or (How to improve Wireless Network performance)

Monday, February 22nd, 2010

Wireless AP
Below are some valuable advices on Wireless Access Point initial install and configuration to better off your Wireless connection.It’s worthy to note that the 2.4 GHz

Wi-Fi signal range is divided into a number of smaller bands or “channels,” similar to television channels. I decided to run my wireless on channel 12 since this there was no other wireless routers operating on that frequency, though most routers are preconfigured to spread it’s signal on channel 6.

There is a difference in channels available for setup for 802.11b and 802.11g wireless networks in the United States and the European Union. In the USA the wireless channels available are from (1 to 11) whether in the EU it’s in the range of (1-13). Each of the Wireless channels run on a different frequency.

The lower the number of the channel is the lowest the radiating frequence band on which data is transmitted .Subsequently, increasing the channel increases the frequency slightly. Therefore the higher the channel you select on your AP the lesser the overlap with other devices running on the same channel and thus the lesser the possibility to overlap and interference.
It’s quite likely that you experience problems, if you use the default wireless channel which is 6.
If that’s the case it’s recommended to use either channel 1 or channel 11. In case of interference, i.e. overlap with other wireless networks, cellphones etc., there are 2 possible ways to approach the situation. In case of smaller interference, any change in channel on which there is no wireless device running could fix it up. The second way is to choose a wireless channel for your router in between 1,6 or 11 in (The USA) or 1,7,13 in Europe.
Up to 3 networks can run on the same space with minimum interference, therefore it would be a wise idea to check the list of wireless routers in your and check if there are others running on the same frequency.
As I mentioned in the beginning of the post I initially started running my wireless on channel 12, however after I discovered it is recommended to run your wireless router either on channel 1 7 or 13 in Europe I switched my D-Link DI-524 wireless router to transmit it’s signal on Channel 13.

I should testify that after changing the wireless channel, there was quite an improvement in my wireless connection.For instance before I change to Channel 13 (when my wireless internet was still streamed on channel 12) my wireless had constantly issues with disconnects because of low wireless signal.

Back then My wireless located physically in like 35 meters away set in another room, I can see my wireless router hardly connected on like 35%, changing to channel 13 enhanced my connection to the current 60% wireless router availability.

It’s also an interesting fact that Opened Wireless networks had better network thoroughput, so if you’re living in a house with a neighbors a bit distant from your place then you might consider it as a good idea to completely wipe out Wireless Router security encryption and abandon the use of WEP or WPA network encryption.

In case if all of the above is not working for you, you might consider take a close look at your Wireless Wireless LAN pc card and see if there are no any kind of bumps there. Another really interesting fact to know is that many people here in Bulgaria tend to configure there Wireless Access Points on channels either 1,6 or 11 which is quite inadequate considering that we’re in the EU and we should use a wireless channel between 1, 7 or 13 as prescribed for EU citizens.

Another thing not to forget is to place your wireless in a good way and prevent it from interferences with other computer equipment. For example keep the router at least few meters away from PC equipment, printers, scanners, cellphones, microwaves. Also try to put your wireless router on some kind of central place in your home, if you want to have the wireless signal all around your place.

At my place I have a microwave in the Kitchen which is sometimes an obstacle for the Wireless signal to flow properly to my notebook, fortunately this kind of interference happens rare (only when the Microwove is used to warm-up food etc.).Upgrading 802.11b wireless card / router to a better one as 802.11g is a wise idea too. 802.11g are said to be like 5 times faster than 802.11b.

You can expect 802.11b wireless network to transfer maximum between 2-5 Mbp/s whether 802.11g is claimed to transfer at approximately (12 to 23 Mbp/s). If even though the above prescriptions there is no wireless signal at some remote place at your home, you might consider adding a wireless repeater or change the AP router antenna.

By default wireless Routers are designed to be omni-directional (in other terms they broadcast the wireless signal all around the place. Thus is quite unhandy if you intend to use your Wireless net only in certain room or location at your place. If that’s the case for you, you might consider upgrading to a hi-gain antenna that will focus the wireless signal to an exact direction. Let me close this article with a small diagram taken from the net which illustrates a good router placement that will enable you to have a wwireless connection all over your place.

improve wireless router placement diagram

Xubuntu improve default picture viewing with gpicview

Tuesday, March 13th, 2012

The default picture viewer on Xubuntu's XFCE is risterroro. Risterroro is quite lightweight, but anyways is lacking even basic functionality with reading a number of pictures in a directory and showing, them one by one lacks any picture automated slider. The lack of picture back/forward functionality makes picture viewing very inconvenient on those Linux distro.

Ristretto Screenshot on Xubuntu Linux Desktop

Thanksfully this kind of unconfortable default behaviour on Xubuntu can easily be changed to use a handy picture viewer program called gpicview xubuntu-linux:~# apt-get install --yes gpicview

gpicviewer grandmothers screenshot on Xubuntu Linux

Gpicview is a good minimalistic program which has all the functionality of the default GNOME picture viewer program eog – (eye of the Gnome). If you're aaccustomed to GNOME's eog you can always install and use eog instead 🙂

Boost local network performance (Increase network thoroughput) by enabling Jumbo Frames on GNU / Linux

Saturday, March 10th, 2012

Jumbo Frames boost local network performance in GNU / Linux

So what is Jumbo Frames? and why, when and how it can increase the network thoroughput on Linux?

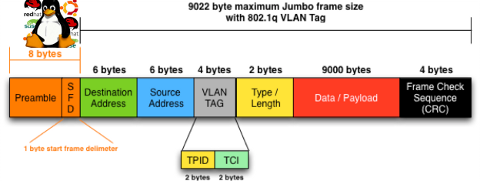
Jumbo Frames are Ethernet frames with more than 1500 bytes of payload. They can carry up to 9000 bytes of payload. Many Gigabit switches and network cards supports them.
Jumbo frames is a networking standard for many educational networks like AARNET. Unfortunately most commercial ISPs doesn't support them and therefore enabling Jumbo frames will rarely increase bandwidth thoroughput for information transfers over the internet.
Hopefully in the years to come with the constant increase of bandwidths and betterment of connectivity, jumbo frames package transfers will be supported by most ISPs as well.
Jumbo frames network support is just great for is small local – home networks and company / corporation office intranets.

Thus enabling Jumbo Frame is absolutely essential for "local" ethernet networks, where large file transfers occur frequently. Such networks are networks where, there is often a Video or Audio streaming with high quality like HD quality on servers running File Sharing services like Samba, local FTP sites,Webservers etc.

One other advantage of enabling jumbo frames is reduce of general server overhead and decrease in CPU load / (CPU usage), when transferring large or enormous sized files.Therefore having jumbo frames enabled on office network routers with GNU / Linux or any other *nix OS is vital.

Jumbo Frames traffic is supported in GNU / Linux kernel since version 2.6.17+ in earlier 2.4.x it was possible through external third party kernel patches.

1. Manually increase MTU to 9000 with ifconfig to enable Jumbo frames

debian:~# /sbin/ifconfig eth0 mtu 9000

The default MTU on most GNU / Linux (if not all) is 1500, to check the default set MTU with ifconfig:

linux:~# /sbin/ifconfig eth0|grep -i mtu
UP BROADCAST MULTICAST MTU:1500 Metric:1

To take advantage of Jumbo Frames, all that has to be done is increase the default Maximum Transmission Unit from 1500 to 9000

For those who don't know MTU is the largest physical packet size that can be transferred over the network. MTU is measured by default in bytes. If a information has to be transferred over the network which exceeds the lets say 1500 MTU (bytes), it will be chopped and transferred in few packs each of 1500 size.

MTUs differ on different netework topologies. Just for info here are the few main MTUs for main network types existing today:
 

  • 16 MBit/Sec Token Ring – default MTU (17914)
  • 4 Mbits/Sec Token Ring – default MTU (4464)
  • FDDI – default MTU (4352)
  • Ethernet – def MTU (1500)
  • IEEE 802.3/802.2 standard – def MTU (1492)
  • X.25 (dial up etc.) – def MTU (576)
  • Jumbo Frames – def max MTU (9000)

Setting the MTU packet frames to 9000 to enable Jumbo Frames is done with:

linux:~# /sbin/ifconfig eth0 mtu 9000

If the command returns nothing, this most likely means now the server can communicate on eth0 with MTUs of each 9000 and therefore the network thoroughput will be better. In other case, if the network card driver or card is not a gigabit one the cmd will return error:

SIOCSIFMTU: Invalid argument

2. Enabling Jumbo Frames on Debian / Ubuntu etc. "the Debian way"

a.) Jumbo Frames on ethernet interfaces with static IP address assigned Edit /etc/network/interfaces and you should have for each of the interfaces you would like to set the Jumbo Frames, records similar to:

Raising the MTU to 9000 if for one time can be done again manually with ifconfig

debian:~# /sbin/ifconfig eth0 mtu 9000

iface eth0 inet static
address 192.168.0.5
network 192.168.0.0
gateway 192.168.0.254
netmask 255.255.255.0
mtu 9000

For each of the interfaces (eth1, eth2 etc.), add a chunk similar to one above changing the changing the IPs, Gateway and Netmask.

If the server is with two gigabit cards (eth0, eth1) supporting Jumbo frames add to /etc/network/interfaces :

iface eth0 inet static
address 192.168.0.5
network 192.168.0.0
gateway 192.168.0.254
netmask 255.255.255.0
mtu 9000

iface eth1 inet static
address 192.168.0.6
network 192.168.0.0
gateway 192.168.0.254
netmask 255.255.255.0
mtu 9000

b.) Jumbo Frames on ethernet interfaces with dynamic IP obtained via DHCP

Again in /etc/network/interfaces put:

auto eth0
iface eth0 inet dhcp
post-up /sbin/ifconfig eth0 mtu 9000

3. Setting Jumbo Frames on Fedora / CentOS / RHEL "the Redhat way"

Enabling jumbo frames on all Gigabit lan interfaces (eth0, eth1, eth2 …) in Fedora / CentOS / RHEL is done through files:
 

  • /etc/sysconfig/network-script/ifcfg-eth0
  • /etc/sysconfig/network-script/ifcfg-eth1

etc. …
append in each one at the end of the respective config:

MTU=9000

[root@fedora ~]# echo 'MTU=9000' >> /etc/sysconfig/network-scripts/ifcfg-eth


a quick way to set Maximum Transmission Unit to 9000 for all network interfaces on on Redhat based distros is by executing the following loop:

[root@centos ~]# for i in $(echo /etc/sysconfig/network-scripts/ifcfg-eth*); do \echo 'MTU=9000' >> $i
done

P.S.: Be sure that all your interfaces are supporting MTU=9000, otherwise increase while the MTU setting is set will return SIOCSIFMTU: Invalid argument err.
The above loop is to be used only, in case you have a group of identical machines with Lan Cards supporting Gigabit networks and loaded kernel drivers supporting MTU up to 9000.

Some Intel and Realtek Gigabit cards supports only a maximum MTU of 7000, 7500 etc., so if you own a card like this check what is the max MTU the card supports and set it in the lan device configuration.
If increasing the MTU is done on remote server through SSH connection, be extremely cautious as restarting the network might leave your server inaccessible.

To check if each of the server interfaces are "Gigabit ready":

[root@centos ~]# /sbin/ethtool eth0|grep -i 1000BaseT
1000baseT/Half 1000baseT/Full

If you're 100% sure there will be no troubles with enabling MTU > 1500, initiate a network reload:

[root@centos ~]# /etc/init.d/network restart
...

4. Enable Jumbo Frames on Slackware Linux

To list the ethernet devices and check they are Gigabit ones issue:

bash-4.1# lspci | grep [Ee]ther
0c:00.0 Ethernet controller: D-Link System Inc Gigabit Ethernet Adapter (rev 11)
0c:01.0 Ethernet controller: D-Link System Inc Gigabit Ethernet Adapter (rev 11)

Setting up jumbo frames on Slackware Linux has two ways; the slackware way and the "universal" Linux way:

a.) the Slackware way

On Slackware Linux, all kind of network configurations are done in /etc/rc.d/rc.inet1.conf

Usual config for eth0 and eth1 interfaces looks like so:

# Config information for eth0:
IPADDR[0]="10.10.0.1"
NETMASK[0]="255.255.255.0"
USE_DHCP[0]=""
DHCP_HOSTNAME[1]=""
# Config information for eth1:
IPADDR[1]="10.1.1.1"
NETMASK[1]="255.255.255.0"
USE_DHCP[1]=""
DHCP_HOSTNAME[1]=""

To raise the MTU to 9000, the variables MTU[0]="9000" and MTU[1]="9000" has to be included after each interface config block, e.g.:

# Config information for eth0:
IPADDR[0]="172.16.1.1"
NETMASK[0]="255.255.255.0"
USE_DHCP[0]=""
DHCP_HOSTNAME[1]=""
MTU[0]="9000"
# Config information for eth1:
IPADDR[1]="10.1.1.1"
NETMASK[1]="255.255.255.0"
USE_DHCP[1]=""
DHCP_HOSTNAME[1]=""
MTU[1]="9000"

bash-4.1# /etc/rc.d/rc.inet1 restart
...

b.) The "Universal" Linux way

This way is working on most if not all Linux distributions.
Insert in /etc/rc.local:

/sbin/ifconfig eth0 mtu 9000 up
/sbin/ifconfig eth1 mtu 9000 up

5. Check if Jumbo Frames are properly enabled

There are at least two ways to display the MTU settings for eths.

a.) Using grepping the MTU from ifconfig

linux:~# /sbin/ifconfig eth0|grep -i mtu
UP BROADCAST MULTICAST MTU:9000 Metric:1
linux:~# /sbin/ifconfig eth1|grep -i mtu
UP BROADCAST MULTICAST MTU:9000 Metric:1

b.) Using ip command from iproute2 package to get MTU

linux:~# ip route get 192.168.2.134
local 192.168.2.134 dev lo src 192.168.2.134
cache mtu 9000 advmss 1460 hoplimit 64

linux:~# ip route show dev wlan0
192.168.2.0/24 proto kernel scope link src 192.168.2.134
default via 192.168.2.1

You see MTU is now set to 9000, so the two server lans, are now able to communicate with increased network thoroughput.
Enjoy the accelerated network transfers 😉