Posts Tagged ‘default’

Possible way to Improve wordpress performance with wp-config.php 4 config variables

Tuesday, March 6th, 2012

Wordpress improve performance wp-config.php logo chromium effect GIMP

Nowdays WordPress is ran by million of blogs and websites all around the net. I myself run wordpress for this blog in general wordpress behaves quite well in terms of performance. However as with time the visitors tend to increase, on frequently updated websites or blogs. As a consequence, the blog / website performance slowly starts to decrease as result of the MySQL server read / write operations creating I/O and CPU load overheads. Buying a new hardware and migrating the wordpress database is a possible solution, however for many small or middle size wordpress blogs en sites like mine this is not easy task. Getting a dedicated server or simply upgrading your home server hardware is expensive and time consuming process… In my efforts to maximize my hardware utilization and increase my blog decaying performance I've stumbled on the article Optimize WordPress performance with wp-config.php

According to the article there are 4 simple wp-config.php config directvies useful in decreasing a lot of queries to the MySQL server issued with each blog visitor.

define('WP_HOME','http://www.yourblog-or-siteurl.com');
define('WP_SITEURL','http://www.yourblog-or-siteurl.com');
define('TEMPLATEPATH', '/var/www/blog/wp-content/themes/default');
define('STYLESHEETPATH', '/var/www/blog/wp-content/themes/default');

1. WP_HOME and WP_SITEURL wp-config.php directvies

The WP_HOME and WP_SITEURL variables are used to hard-code the address of the wordpress blog or site url, so wordpress doesn't have to check everytime in the database on every user request to know it is own URL address.

2. TEMPLATEPATH and TEMPLATEPATH wp variables

This variables will surely improve performance to Wodpress blogs which doesn't implement caching. On wp install with enabled caching plugins like WordPress Super Cache, Hyper Cache or WordPress Db Cache is used, I don't know if this variables will have performance impact …

So far I have tested the vars on a couple of wordpress based installs with caching enabled and even on them it seems the pages load faster than before, but I cannot say this for sure as I did not check the site loading time in advance before hardcoding the vars.

Anyways even if the suggested variables couldn't make positive impact on performance, having the four variables in wp-config.php is a good practice for blogs or websites which are looking for extra clarity.
For multiple wordpress installations living on the same server, having defined the 4 vars in different wordpress seems like a good idea too.

How to fix a broken QMAIL queue with queue-repair and qmhandle

Friday, May 27th, 2011

How qmail works, qmail queue picture :)

The aim of this small post is to give just a brief idea of how I fix my qmail server after breaking it or in case it is broken after mail bomb attacks, etc.

Most common cases when I break my qmail queue myself, are after I’m implementing some new patches and reinstall parts of the qmail server with a patched version of default qmail binaries.
On other occasions, I simply used the qmailctl to start or stop the server as a part of some routine tasks necessery for the administration of the qmail server.

Everybody who has already experience with qmail should have experienced, that qmail is very fragile and could break even with a simple changes, though if it works once it’s rock solid piece of mail servant.

Below I explain few ways I used through my days as a qmail sys admin to deal with broken or messed queues.

1. Fixing a broken qmail queue using automatic tools There are few handy tools which in most cases are able to solve issues with the queue, one very popular one isqueue-repair – check http://pyropus.ca/software/queue-repair/.
Installation of qmail-repair is dead easy, but it needs to be installed from source as no official debian package is available:

linux:/usr/local/src# wget http://pyropus.ca/software/queue-repair/queue-repair-0.9.0.tar.gz
linux:/usr/local/src# tar -xzvvf queue-repair-0.9.0.tar.gzdrwxr-xr-x charlesc/qcc 0 2003-10-22 16:54 queue-repair-0.9.0/
-rw-r--r-- charlesc/qcc 268 2003-10-22 16:54 queue-repair-0.9.0/TODO
-rw-r--r-- charlesc/qcc 1700 2003-10-22 16:54 queue-repair-0.9.0/CHANGELOG
-rw-r--r-- charlesc/qcc 18007 2003-10-22 16:54 queue-repair-0.9.0/COPYING
-rw-r--r-- charlesc/qcc 1098 2003-10-22 16:54 queue-repair-0.9.0/BLURB
-rwxr-xr-x charlesc/qcc 26286 2003-10-22 16:54 queue-repair-0.9.0/queue_repair.py

To check if there are issues fixable within the qmail queue it’s as easy as:

linux:/usr/local/src# cd queue-repair-0.9.0
linux:/usr/local/src/queue-repair-0.9.0# ./queue-repair -t
...
checking files...
checking queue/mess files...
checking split locations...

The tool will walk through the mail sub-directories containing mail queued files in /var/qmail/queue and will list any issues found.
It’s recommended that the qmail server is stopped before any queue modify operations are issued on the server:

linux:/usr/local/src# qmailctl stop
...

Further on in order to solve any found issues with the queue, there is the “-r”/repair option:

linux:/usr/local/src/queue-repair-0.9.0# ./queue-repair -r
...

Another tool which comes handy whether a repair of a messed qmail queue is needed is qmhandlehttp://sourceforge.net/projects/qmhandle/

The use of qmhandle is also pretty easy, all one has to do is to follow the usual classical steps of a download the source & compile:

linux:/usr/local/src# wget https://www.pc-freak.net/files/qmhandle-1.3.2.tar.gz
linux:/usr/local/src# tar -zxvvf qmhandle-1.3.2
...
linux:/usr/local/src# cd qmhandle-1.3.2

Once again it’s necessery that the qmail server is stopped via its init script before qmHandle tool is used, e.g.:

linux:~# qmailctl stop
...

There is a difference between qmail queue repair tool and qmail handle , while qmail queue-repair tool is used to fix improper permissions of queued files with the qmail queue, qmhandle ‘s application is to completely delete the stored mail contents of a broken queue.

Deleting all the qmail queue content is in some cases the only option to fix the queue.
Often such a drastic measure is required after a heavy mail server overload, let’s say a result of spammers or caused by virus infected mail users which send a massive amounts of spam mails.

Thus at many cases when queue-repair was unable to solve a queue mess, I use qmhandble and sacrifice all the queued emails by completely wiping them out like so:

linux:/usr/local/src/qmhandle-1.3.2# ./qmhandle -D
...

Above command would eradicate all queued emails. Hopefully after the qmail server gets launched again with qmailctl start all the mail server operations should be back to normal.

Note that the use of qmhandle’s queue delete capabilities is pretty dangerous, if you forgot to stop the qmail server before issuing the above command!

Note that in order to use both qmHandle and queue-repair tools you will need to install python interpreter as both of the tools are written in python.

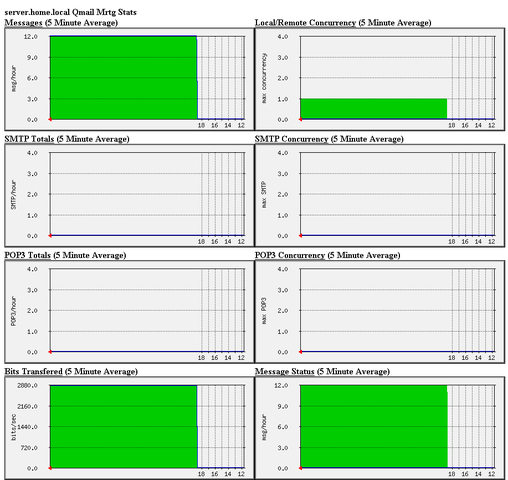
To check what is currently in the queue in Qmail, there are also native tools available, as you should probably know if you have dealt with qmail, e.g.:

debian:~# qmail-qstat
messages in queue: 2
messages in queue but not yet preprocessed: 0

Often when there are problems with Qmail and more specificly with qmail server queue the qmail-qstat command does show messages in queue, however when an attempt to check what kind of messages are in the queue with qmail-qread no messages are shown, for instance below you see an example of that, even though qmail-qstat claims 2 messages are in the queue, qmail-qread is unable to list the messages:

debian:~# qmail-qread
debian:~#

If all is fine with qmail queue above’s qmail-qread command should have returned something similar to:

debian:~# qmail-qread
26 May 2011 07:46:47 GMT #659982 3517 <hipo@www.pc-freak.net>
remote somemail@gmail.nl
26 May 2011 07:46:47 GMT #659983 3517 <hipo@www.pc-freak.net>

2. Fixing qmail queue manually This is very dangerous initiative, so before you try anything, make sure that you know what you’re doing, the possibility that you make the situation worst if you attempt to tamper manually the qmail queue is quite high 🙂

However if you’re still convinced to try fixing it manually, take a look at /var/qmail/queue it’s very likely that there are permission issues with some of the queued files, in order to fix the situation it’s necessery that the following directories:

/var/qmail/queue/mess/
/var/qmail/queue/remote/
/var/qmail/queue/bounce
/var/qmail/queue/info

gets explored with midnight commander / mc or some kind of convenient file explorer.

If there are queued files owned by users different from qmailq and user group qmail , for instance if owned by the root user, a simple chown qmailq:qmail to the wrong permissions file, should be able to resolve the issues.

Apart from all I explain above, there are many other ways suggested online on howto clean a qmail queue, one very popular one is using James’s qfixq shell script.

This script as of this very date is not working on Debian based systems, the script is dedicated initially to run on Fedora and Redhat based Linuces

Moreover myy experience with qfixq was never successful.

One very important note which is often a cause of many problems, is always make sure you stop and start the qmail server with an interval of at least of 10 seconds.

I’ve managed many servers which after an immediate (undelayed) qmailctl stop and qmailctl start was unable to run the whole engine of the qmail server (and either email sending or email receiving was not properly working) afterwards.

In that cases many weird behaviours are common, consider this seriously if you deal with the qmail-queue, it might happen that even if you have fixed your qmail queue, after a restart the qmail might breaks up.
I’ve experienced this kind of oddities numerous times, thus when I do changes to qmail I always make sure I restart the server a couple of times (at least 5 times 😉 ) always with a good delay between the HUPs.

And as always with qmail prayer is always needed, this server is complex, you never know what will happen next 🙂

How to change Return Path variable in Qmail

Friday, July 1st, 2011

The Return Path variable on one of the qmail mail servers I manage was improperly set.
New newsletter mails initiated by the php scripts on the mail server had the improper return path set in the mail headers, like so:

Return-Path: <anonymous@mail.mymailserver.com>

Therefore many mail servers dropped messages as the set Return Path variable in the headers was incorrectly set to the domain mail.mymailserver.com

Thus to change the Return Path to the correct one that should have been mymailserver.com I had to include mymailserver.com in qmail’s control file /var/qmail/control/bouncehost, e.g.

root@qmail:~# echo 'mymailserver.com' > /var/qmail/control/bouncehost
root@qmail:~# echo 'mymailserver.com' > /var/qmail/control/doublebouncehost

By the way the return path in qmail is set by:

> qmail-inject and qmail-send

There seems to be also some way to ovewrite the default set return-path variable with some php variables but I have never tried this one.
Cheers 😉
 

How to set applications (programs) Autorun on XFCE in Xubuntu Linux

Monday, January 16th, 2012

I needed to set TeamViewer to autorun, each and every startup on one Xubuntu Linux

Xubuntu is running by default with Xfce 4 . Xfce is a sort of a very liteweight GNOME like graphical environment.

In Gnome the way that is through invoking the gnome-session-manager .

In Xfce the command is almost analogous doing changes is done by running:

user@xubuntu:~$ xfce4-session-manager

XFce session manager Xubuntu Linux screenshot
Further on simply use the Add button to add applications to load each time user (opens xfce session) / logs in.
Cheers 😉

Use rsync to copy from files from destination host to source host (rsync reverse copy) / few words on rsync

Monday, January 9th, 2012

I've recently had to set up a backup system to synchronize backup archive files between two remote servers and as I do usually with this situation I just set up a crontab job to periodically execute rsync to copy data from source server to the destination server . Copying SRC to DEST is the default behaviour rsync uses, however in this case I had to copy from the destination server to the source server host (in other words sync files the reversely.

The usual way to copy with rsync via SSH (from SRC to DEST) is using a cmd line like:

debian:~$ /usr/bin/rsync -avz -e ssh backup-user@xxx.xxx.xxx.xxx:/home/backup-user/my-directory .

Where the xxx.xxx.xxx.xxx is my remote server IP with which files are synched.
According to rsync manual, the proposed docs SYNOPSIS is in the format;
Local: rsync [OPTION…] SRC… [DEST

Obviusly the default way to use rsync is to copy source to destination which I used until now, but in this case I had to the other way around and copy files from a destination host to the source server. It was logical that swapping the SRC and DEST would complete my required task. Anyways I consulted with some rsync gurus in irc.freenode.net , just to make sure it is proper to just swap the SRC, DEST arguments.
I was told this is possible, so I swapped args;

debian:~$ /usr/bin/rsync -avz -e ssh . backup-user@xxx.xxx.xxx.xxx:/home/backup-user/my-directory
...

Surprisingly this worked 😉 Anyways I was adviced by by a good guy nick named scheel , that putting -e ssh to command line is generally unnecessery except if there is no some uncommon used SSH port over which the data is transferred. An example case in which -e 'ssh is necessery would be if transferring via lets say SSH port 1234;

rsync -avz -e 'ssh -p1234' /source user@host:/dest

In all other cases omitting '-e ssh' is better as '-e ssh' is rsync default. Therefore my final swapped line I put in cron to copy from a destinatio to source host with rsync looked like so:

05 03 2 * * /usr/bin/ionice -c 3 /usr/bin/rsync -avz my-directory backup-user@xxx.xxx.xxx.xxx:/home/backup-user/ >/dev/null 2>&1
 

A sysctl Linux variable to change randomly temporary the PC mac address for IPv6 and increase anonymity on IPv6 networks

Tuesday, September 20th, 2011

To prevent tracking and increase anonymity in IPv6 networks the Linux kernel has a variable to change randomly the MAC identifier. This feature will be very useful in terms of security in the short future, when all the IPv4 IP addresses are finished. The UIE (Extended Unified Udentifier) for an ipv6 address can be changed with command:

sysctl -w net.ipv6.conf.all.use_tempaddr=2 Microsoft Windows Vista and Windows 7 has the UIE enabled by default, enabling the random MAC changes automatically for a host cvan be done as usual by adding the net.ipv6.conf.all_use_tempaddr=2 to /etc/sysctl.conf

On an IPv6 network every ifconfig eth0 down and ifconfig eth0 up will instruct the lan card to be set a different MAC address for the ipv6 ip on the interface.

Changing the UIE randomly however also have security downsides if the host gets infected with a Virus or Worm. The security downsides of the enabled UIE affects mainly Windows hosts on IPv6 networks as UIE variable is enabled by default there.I’ve found this great tip in an article in the latest Linux Magazine October 2011. Its the first time I saw a paper Linux Magazine, the magazine contains a lot of helpful info on the latest Linux developments and latest trends in the Linux world. Subscription to receive the magazine via normal post is for the magazine costs 6.65 EUR per month (80 EUR) yearly. The 80 euro yearly includes 12 CDS (each magazine is bundled with a newly launched new version of a Linux distribution).
There is also a cheaper subscription for the magazine which costs 64.90 EUR.

Using perl and sed to substitute strings in multiple files on Linux and BSD

Friday, August 26th, 2011

Using perl and sed to replace strings in files on Linux, FreeBSD, OpenBSD, NetBSD and other UnixOn many occasions when had to administer on Linux, BSD, SunOS or any other *nix, there is a need to substitute strings inside files or group of files containing a certain string with another one.

The task is not too complex and many of the senior sysadmins out there would certainly already has faced this requirement and probably had a good idea on files substitution with perl and sed, however I’m quite sure there are dozen of system administrators out there who did not know, how and still haven’t faced a situation where there i a requirement to substitute from a command shell or via a scripting language.

This article tagets exactly these system administrators who are not 100% sys op Gurus 😉

1. Substitute text strings inside files on Linux and BSD with perl

Perl programming language has originally been created to do a lot of text manipulation as well as most of the Linux / Unix based hosts today have installed working copy of perl , therefore using perl as a mean to substitute one string in a file to another one is maybe the best way to completet the task.
Another good thing about perl is that text processing with it is said to be in most cases a bit faster than sed .
However it is still dependent on the string to be substituted I haven’t done benchmark tests to positively say 100% that always perl is quicker, however my common sense suggests perl will be quicker.

Now enough talk here is a very simple way to substitute a reoccuring, text string inside a file with another chosen one is like so:

debian:~# perl -pi -e 's/foo/bar/g' file1 file2

This will substitute the string foo with bar everywhere it’s matched in file1 and file2

However the above code is a bit “dangerous” as it does not preserve a backup copy of the original files, where string is substituted is not made.
Therefore using the above command should only be used where one is 100% sure about the string changes to be made.

Hence a better idea whether conducting the text substitution is to keep also the original file backup under a let’s say .bak extension. To achieve that I use perl as follows:

freebsd# perl -i.bak -p -e 's/syzdarma/magdanoz/g;' file1 file2

This command creates copies of the original files file1 and file2 under the names file1.bak and file2.bak , the files file1 and file2 text occurance of strings syzdarma will get substituted with magdanoz using the option /g which means – (substitute globally).

2. Substitute string in all files inside directory using perl on Linux and BSD

Every now and then the there is a need to do manipulations with large amounts of files, I can’t right now remember a good scenario where I had to change all occuring matching strings to anther one to all files located inside a directory, anyhow I’ve done this on a number of occasions.

A good way to do a mass file string substitution on Linux and BSD hosts equipped with a bash shell is via the commands:

debian:/root/textfiles:# for i in $(echo *.txt); do perl -i.bak -p -e 's/old_string/new_string/g;' $i; done

Where the text files had the default txt file extension .txt

Above bash loop prints each of the files located in /root/textfiles and substitutes everywhere (globally) the old_string with new_string .

Another alternative to the above example to replace multiple occuring text string in all files in multiple directories is possible using a combination of shell commands grep, perl, sort, uniq and xargs .
Let’s say that one wants to match everywhere inside the root directory and all the descendant directories for files with a custom string and substitute it to another one, this can be done with the cmd:

debian:~# grep -R -files-with-matches 'old_string' / | sort | uniq | xargs perl -pi~ -e 's/old_string/new_string/g'

This command will lookup for string old_string in all files in the / – root directory and in case of occurance will substitute with new_string (This command’s idea was borrowed as an idea from http://linuxadmin.org so thx.).

Using the combination of 5 commands, however is not very wise in terms of efficiency.

Therefore to save some system resources, its better in terms of efficiency to take advantage of the find command in combination with xargs , here is how:

debian:~# find / | xargs grep 'old_string' -sl |uniq | xargs perl -pi~ -e 's/old_string/new_string/g'

Once again the find command example will do exactly the same as the substitute method with grep -R …

As enough is said about the way to substitute text strings inside files using perl, I will further explain how text strings can be substituted using sed

The main reason why using sed could be a better choice in some cases is that Unices are not equipped by default with perl interpreter. In general the amount of servers who contains installed sed compared to the ones with perl language interpreter is surely higher.

3. Substitute text strings inside files on Linux and BSD with sed stream editor

In many occasions, wether a website is hosted, one needs to quickly conduct a change in string inside all files located in a directory, to resolve issues with static urls directly encoded in html.
To achieve this task here is a code using two little bash script loops in conjunctions with sed, echo and mv commands:

debian:/var/www/website# for i in $(ls -1); do cat $i |sed -e "s#index.htm#http://www.webdomain.com/#g">$i.new; done
debian:/var/www/website# for i in $(ls *.new); do mv $i $(echo $i |sed -e "s#.new##g"); done

The above command sed -e “s#index.htm#http://www.webdomain.com/#g”, instructs sed to substitute all appearance of the text string index.htm to the new text string http://www.webdomain.com

First for bash loop, creates all the files with substituted string to file1.new, file2.new, file3.new etc.
The second for loop uses mv to overwrite the original input files file1, file2, file3, etc. with the newly created ones file1.new, file2.new, file3.new

There is a a way shorter way to conclude the same text substitutions task using a simpler one liner with only using sed and bash’s eval capabilities, here is how:

debian:/var/www/website# sed -i 's/old_string/new_string/g' *

Above command will change old_string to new_string inside all files in directory /var/www/website

Whether a change has to be made with less than 1024 files using this method might be more efficient, however whether a text substitute has to be done to let’s say 5000+ the above simplistic version will not work. An error of Argument list too long will prevent the sed -i ‘s/old_string/new_string/g’ to complete its task.

The above for loop 2 liner should be also working without problems with FreeBSD and the rest of BSD derivatives, though I have not tested it yet, hence any feedback from FreeBSD guys is mostly welcome.

Consider that in order to have the for loops commands work on FreeBSD or NetBSD, they have to be run under a bash shell.
That’s all folks thanks the Lord for letting me write this nice article, I hope it gives some insights on how multiple files text replace on Unix works .
Cheers 😉

Installing qmailmrtg (qmail graph statistics on qmail activity) on Debian Lenny

Monday, April 19th, 2010

1. First it’s necessery to have the mrtg debian package installed.
If it’s not installed then we have to install it:

debian-server:~# apt-get install mrtg

2. Second download the qmailmrtg source binary
To download the latest current source release of qmailmrtg execute:

debian-server:~# wget http://www.inter7.com/qmailmrtg7/qmailmrtg7-4.2.tar.gz

It’s a pity qmailmrtg is not available for download via debian repositories.

3. Third download the qmail.mrtg.cfg configuration file

debian-server~# wget https://www.pc-freak.net/files/qmail.mrtg.cfg

Now you have to put the file somewhere, usually it’s best to put it in the /etc/ directory.
Make sure the file is existing in /etc/qmail.mrtg.cfg
4. Untar compile and install qmailmrtg binary


debian-server:~# tar -xzvvf qmailmrtg7-4.2.tar.gz
...
debian-server:~# make && make install

strip qmailmrtg7
cp qmailmrtg7 /usr/local/bin
rm -rf *.o qmailmrtg7 checkq core
cc checkq.c -o checkq
./checkq
cc -s -O qmailmrtg7.c -o qmailmrtg7
qmailmrtg7.c: In function ‘main’:
qmailmrtg7.c:69: warning: incompatible implicit declaration of
built-in function ‘exit’
qmailmrtg7.c:93: warning: incompatible implicit declaration of
built-in function ‘exit’
qmailmrtg7.c:131: warning: incompatible implicit declaration of
built-in function ‘exit’
qmailmrtg7.c:137: warning: incompatible implicit declaration of
built-in function ‘exit’

5. Set proper file permissions according to the user you indent to execute qmailmrtg as
I personally execute it as root user, if you intend to do so as well set a permissions to
/etc/qmail.mrtg.cfg of 700.
In order to do that issue the command:

debian-server:~# chmod 700 /etc/qmail.mrtg.cfg

6. You will now need to modify the qmail.mrtg.cfg according to your needs
There you have to set a proper location where the qmailmrtg shall generate it’s html data files.
I use the /var/www/qmailmrtg qmailmrtg log file location. If you will do so as wellyou have to create the directory.

7. Create qmailmrtg html log files directory

debian-server:~# mkdir /var/log/qmailmrtg

8. Now all left is to set a proper cron line to periodically invoke qmailmrtg in order to generate qmail activity statistics.

Before we add the desired root’s crontab instructions we have to open the crontab for edit, using the command.

debian-server:~# crontab -u root -e

I personally use and recommend the following line as a line to be added to root’s crontab.

0-55/5 * * * * env LANG=C /usr/bin/mrtg /etc/qmail.mrtg.cfg > /dev/null
9. Copy index.html from qmailmrtg source directory to /var/log/qmailmrtg


debian-server:/usr/local/src/qmailmrtg7-4.2# cp -rpf index.html /var/log/qmailmrtg

10. Last step is to make sure Apache’s configuration contains lines that will enable you to access the qmail activity statistics.

The quickest way to do that in Debian running Apache 2.2 is to edit /etc/apache2/apache2.conf and add a directory Alias as follows

Alias /qmailmrtg/ "/var/www/qmailmrtg/"

Now after Apache restart /etc/init.d/apache2 restart
You should be now able to access the qmail mrtg qmail log statistics through your Apache’s default configured host.
For instance, assuming your default configured Apache host is domain.com. You’ll be able to reach the qmailmrtg statistics through an url like:

http://domain.com/qmailmrtg/

After I verified and ensured myself qmail mrtg is working correctly after all the above explained steps partook I wasn’t happy with some headlines in the index.html and the html tile of qmailmrtg,
so as a last step I manually edited the /var/www/qmailmrtg/index.html to attune it to my likings.

Here is a screenshot of the qmailmrtg web statistics in action.

qmail mrtg on debian lenny