Posts Tagged ‘security’
Friday, February 6th, 2015 
If you're long time Linux sysadmin but you haven't need to adminster SuSE Linux still and your company buys other business / company which already owns some SuSE servers and you need to deal with them, even though you're just starting up with SuSE Linux but you had already plenty of experience with other Linux distributions Fedora / RHEL / CentOS, don't worry set up / stop / start a service (daemon) to boot on Linux boot time is just the same as any other Redhat (RPM) Linux based distributions. it is done by multiple shell scripts located in /etc/init.d directory which can be manually stopped start by issuing the script with an argument e.g
suse:/etc/init.d# cd /etc/init.d/
suse:/etc/init.d# ./snmpd
Usage: ./snmpd {start|stop|try-restart|restart|force-reload|reload|status}
To configure how each of the /etc/init.d/ existent service boots you can the use good old /sbin/chkconfig (a script written in perl) – which you already know from Fedora / CentOS and other RPM distros.
1. Get a list of all enabled on boot SuSE Linux services
To get a list of all set up to run on boot SuSE server services with chkconfig:
suse:/etc/init.d# /sbin/chkfong –list
Makefile 0:off 1:off 2:off 3:off 4:off 5:off 6:off
OVCtrl 0:off 1:off 2:off 3:on 4:on 5:on 6:off
SuSEfirewall2_init 0:off 1:off 2:off 3:off 4:off 5:off 6:off
SuSEfirewall2_setup 0:off 1:off 2:off 3:off 4:off 5:off 6:off
Tivoli_lcfd1 0:off 1:off 2:on 3:on 4:off 5:on 6:off
Tivoli_lcfd1.bkp 0:off 1:off 2:off 3:off 4:off 5:off 6:off
aaeventd 0:off 1:off 2:off 3:off 4:off 5:off 6:off
acpid 0:off 1:off 2:on 3:on 4:off 5:on 6:off
alsasound 0:off 1:off 2:on 3:on 4:off 5:on 6:off
apache2-eis 0:off 1:off 2:off 3:off 4:off 5:off 6:off
atd 0:off 1:off 2:off 3:off 4:off 5:off 6:off
auditd 0:off 1:off 2:off 3:on 4:off 5:on 6:off
autofs 0:off 1:off 2:off 3:off 4:off 5:off 6:off
autoyast 0:off 1:off 2:off 3:off 4:off 5:off 6:off
boot.apparmor 0:off 1:off 2:on 3:on 4:off 5:on 6:off B:on
cron 0:off 1:off 2:on 3:on 4:off 5:on 6:off
dbus 0:off 1:off 2:off 3:on 4:off 5:on 6:off
earlykbd 0:off 1:off 2:off 3:off 4:off 5:on 6:off
earlysyslog 0:off 1:off 2:off 3:off 4:off 5:on 6:off
esound 0:off 1:off 2:off 3:off 4:off 5:off 6:off
evms 0:off 1:off 2:off 3:off 4:off 5:off 6:off
fbset 0:off 1:on 2:on 3:on 4:off 5:on 6:off
firstboot 0:off 1:off 2:off 3:off 4:off 5:off 6:off
fixperms 0:off 1:off 2:off 3:off 4:off 5:off 6:off
gpm 0:off 1:off 2:off 3:off 4:off 5:off 6:off
gssd 0:off 1:off 2:off 3:off 4:off 5:off 6:off
gwproxy 0:off 1:off 2:on 3:on 4:off 5:on 6:off
haldaemon 0:off 1:off 2:off 3:on 4:off 5:on 6:off
hp-health 0:off 1:off 2:on 3:on 4:on 5:on 6:off
hp-ilo 0:off 1:off 2:off 3:on 4:off 5:on 6:off
hp-snmp-agents 0:off 1:off 2:on 3:on 4:on 5:on 6:off
hpsmhd 0:off 1:off 2:off 3:on 4:on 5:on 6:off
idmapd 0:off 1:off 2:off 3:off 4:off 5:off 6:off
ipmi 0:off 1:off 2:off 3:off 4:off 5:off 6:off
ipmi.hp 0:off 1:off 2:off 3:off 4:off 5:off 6:off
irq_balancer 0:off 1:on 2:on 3:on 4:off 5:on 6:off
itcaIBMTivoliCommonAgent0 0:off 1:off 2:on 3:on 4:off 5:on 6:off
jboss 0:off 1:off 2:off 3:off 4:off 5:off 6:off
joystick 0:off 1:off 2:off 3:off 4:off 5:off 6:off
kadmind 0:off 1:off 2:off 3:off 4:off 5:off 6:off
kbd 0:off 1:on 2:on 3:on 4:off 5:on 6:off S:on
kdump 0:off 1:off 2:off 3:off 4:off 5:off 6:off
kpropd 0:off 1:off 2:off 3:off 4:off 5:off 6:off
krb524d 0:off 1:off 2:off 3:off 4:off 5:off 6:off
krb5kdc 0:off 1:off 2:off 3:off 4:off 5:off 6:off
ldap 0:off 1:off 2:off 3:on 4:off 5:on 6:off
lm_sensors 0:off 1:off 2:off 3:off 4:off 5:off 6:off
lw_agt 0:off 1:off 2:off 3:off 4:off 5:off 6:off
mdadmd 0:off 1:off 2:off 3:off 4:off 5:off 6:off
microcode 0:off 1:on 2:on 3:on 4:off 5:on 6:off S:on
multipathd 0:off 1:off 2:off 3:off 4:off 5:off 6:off
mysql 0:off 1:off 2:off 3:off 4:off 5:off 6:off
network 0:off 1:off 2:on 3:on 4:off 5:on 6:off
nfs 0:off 1:off 2:off 3:on 4:off 5:on 6:off
nfsboot 0:off 1:off 2:off 3:on 4:off 5:on 6:off
nfsserver 0:off 1:off 2:off 3:off 4:off 5:off 6:off
nohup.out 0:off 1:off 2:off 3:off 4:off 5:off 6:off
novell-zmd 0:off 1:off 2:off 3:off 4:off 5:off 6:off
nscd 0:off 1:off 2:off 3:on 4:off 5:on 6:off
ntp 0:off 1:off 2:on 3:on 4:off 5:on 6:off
openct 0:off 1:off 2:off 3:off 4:off 5:off 6:off
opsware-agent 0:off 1:off 2:off 3:on 4:on 5:on 6:off
osddownt 0:off 1:off 2:off 3:on 4:on 5:on 6:off
ovpa 0:on 1:off 2:on 3:on 4:off 5:on 6:off
pcscd 0:off 1:off 2:off 3:off 4:off 5:off 6:off
pctl 0:off 1:off 2:on 3:on 4:off 5:on 6:off
portmap 0:off 1:off 2:off 3:on 4:off 5:on 6:off
postfix 0:off 1:off 2:off 3:on 4:off 5:on 6:off
powerd 0:off 1:off 2:off 3:off 4:off 5:off 6:off
powersaved 0:off 1:off 2:off 3:off 4:off 5:off 6:off
random 0:off 1:off 2:on 3:on 4:off 5:on 6:off
raw 0:off 1:off 2:off 3:off 4:off 5:off 6:off
resmgr 0:off 1:off 2:on 3:on 4:off 5:on 6:off
rpasswdd 0:off 1:off 2:off 3:off 4:off 5:off 6:off
rpmconfigcheck 0:off 1:off 2:off 3:off 4:off 5:off 6:off
rrdtools 0:off 1:off 2:off 3:on 4:off 5:on 6:off
rsyncd 0:off 1:off 2:off 3:off 4:off 5:off 6:off
saslauthd 0:off 1:off 2:off 3:off 4:off 5:off 6:off
skeleton.compat 0:off 1:off 2:off 3:off 4:off 5:off 6:off
slurpd 0:off 1:off 2:off 3:off 4:off 5:off 6:off
smartd 0:off 1:off 2:off 3:off 4:off 5:off 6:off
smpppd 0:off 1:off 2:off 3:off 4:off 5:off 6:off
snmpd 0:off 1:off 2:on 3:on 4:off 5:on 6:off
splash 0:off 1:on 2:on 3:on 4:off 5:on 6:off S:on
splash_early 0:off 1:off 2:on 3:on 4:off 5:on 6:off
sshd 0:off 1:off 2:off 3:on 4:off 5:on 6:off
suseRegister 0:off 1:off 2:off 3:off 4:off 5:off 6:off
svcgssd 0:off 1:off 2:off 3:off 4:off 5:off 6:off
syslog 0:off 1:off 2:on 3:on 4:off 5:on 6:off
sysstat 0:off 1:off 2:off 3:off 4:off 5:off 6:off
tecad_logfile 0:off 1:off 2:off 3:on 4:off 5:on 6:off
tomcat55 0:off 1:off 2:off 3:off 4:off 5:off 6:off
tomcat_eis 0:off 1:off 2:off 3:off 4:off 5:off 6:off
tpmgwproxy.sh 0:off 1:off 2:on 3:on 4:off 5:on 6:off
uc4_smgrp 0:off 1:off 2:off 3:on 4:off 5:on 6:off
uc4_smgrq1 0:off 1:off 2:off 3:on 4:off 5:on 6:off
xbis-ldap-tool 0:off 1:off 2:off 3:off 4:off 5:off 6:off
xdm 0:off 1:off 2:off 3:off 4:off 5:on 6:off
xfs 0:off 1:off 2:off 3:off 4:off 5:off 6:off
xinetd 0:off 1:off 2:off 3:off 4:off 5:off 6:off
ypbind 0:off 1:off 2:off 3:off 4:off 5:off 6:off
xinetd based services:
chargen: off
chargen-udp: off
daytime: off
daytime-udp: off
echo: off
echo-udp: off
netstat: off
rsync: off
servers: off
services: off
systat: off
time: off
time-udp: off
2. Stop / Disable a service in all Linux boot runlevels or in a concrete one
As you should know already in Linux there are multiple runlevels in which server can boot, under normal circumstances SuSE servers (as of time of writting) this article boots into runlevel 3, if you'r'e unsure about the runlevel you can check it with runlevel command:
suse:/etc/init.d# /sbin/runlevel
N 3
To stop a service on all possible boot runlevels – 1,2,3,4,5
suse:/etc/init.d# /sbin/chkconfig xinetd off
If you want to stop xinetd or any other service just for certain runlevels (lets say run-level 3,4,5):
suse:/etc/init.d# chkconfig –level 345 xinetd off
3. Start / Enable a service for a runlevel or all boot levels 1,2,3,4,5
To disable boot.apparmor on all boot runlevels – kernel enhancement that enabled to set a limited set of resources for services (good for tightened security, but often creating issues with some external server configured services).
suse:/etc/init.d# chkconfig boot.apparmor off
Or for single boot modes again with –level option:
suse:/etc/init.d# chkconfig –level 345 boot.apparmor off
suse:/etc/init.d# chkconfig xfs off
4. SuSE Linux Package management zypper console tool
If you need / wonder how to install /remove / update a service on a SuSE Linux server, take a look at zypper tool.
zypper is a command-line interface to ZYPP system management library.
To install a package / service with zypper the syntax is very much like yum, for example:
suse: ~# zypper install vim -emacs
will remove emacs editor and install Vi Improved
The equivalent of yum -y Fedora command in SuSE Enterprise Linux is –non-interactive option
suse:~# zypper –non-interactive install
In SuSE it is pretty annoying when you're asked for accepting licensing on some proprietary (external vendor) non-free software packages to get around this:
suse:~# zypper patch –auto-agree-with-licenses
To keep the SuSE server up2date – i.e. SLES equivalent of CentOS's yum update && yum upgrade
suse:~# zypper list-patches
Loading repository data…
Reading installed packages…
Repository | Name | Version | Category | Status
————————————+———–+———+———-+——-
Updates for openSUSE 11.3 11.3-1.82 | lxsession | 2776 | security | needed
suse:~# zypper patch-check
Loading repository data…
Reading installed packages…
5 patches needed (1 security patch)
To look for a certain package with Zypper (equivalent of yum search packagename)
suse: ~# zypper search apache
To verify whether an RPM installed package dependecies are OK:
suse:~# zypper verify
The equivalent of Fedora yum update command in SuSE (SLES) are:
suse:~# zypper refresh
To force a complete refresh and rebuild of the database, including a forced download of raw metadata.
suse:~# zypper refresh -fdb
For people that are used to ncurses (midnight commander) like text interface you can also use yoast2 (text GUI) package manager:
suse:~# yoast2
If a package is messed you can always go back and use good old RPM (Redhat Package Manager) to solve it.
Tags: boot time, boots, command, good, How to, init, Linux, multiple, package, security, servers, shell scripts, time, update
Posted in Everyday Life, SuSE Linux, System Administration, Various | No Comments »
Friday, December 9th, 2011 I have few servers, which have automatically enabled IPv6 protocols (IPv6 gets automatically enabled on Debian), as well as on most latest Linux distribituions nowdays.
Disabling IPv6 network protocol on Linux if not used has 2 reasons:
1. Security (It’s well known security practice to disable anything not used on a server)
Besides that IPv6 has been known for few criticil security vulnerabilities, which has historically affected the Linux kernel.
2. Performance (Sometimes disabling IPv6 could have positive impact on IPv4 especially on heavy traffic network servers).
I’ve red people claiming disabling IPv6 improves the DNS performance, however since this is not rumors and did not check it personally I cannot positively confirm this.
Disabling IPv6 on all GNU / Linuces can be achieved by changing the kernel sysctl settings net.ipv6.conf.all.disable_ipv6 by default net.ipv6.conf.all.disable_ipv6 equals 1 which means IPv6 is enabled, hence to disable IPv6 I issued:
server:~# sysctl net.ipv6.conf.all.disable_ipv6=0
To set it permanently on system boot I put the setting also in /etc/sysctl.conf :
server:~# echo 'net.ipv6.conf.all.disable = 1 >> /etc/sysctl.conf
The aforedescribed methods should be working on most Linux kernels version > 2.6.27 in that number it should work 100% on recent versions of Fedora, CentOS, Debian and Ubuntu.
To disable IPv6 protocol on Debian Lenny its necessery to blackist the ipv6 module in /etc/modprobe.d/blacklist by issuing:
echo 'blacklist ipv6' >> /etc/modprobe.d/blacklist
On Fedora / CentOS there is a another universal “Redhat” way disable IPv6.
On them disabling IPv6 is done by editting /etc/sysconfig/network and adding:
NETWORKING_IPV6=no

IPV6INIT=no
I would be happy to hear how people achieved disabling the IPv6, since on earlier and (various by distro) Linuxes the way to disable the IPv6 is probably different.
Alto to stop Iptables IPV6 on CentOS / Fedora and RHEL issue:
# service ip6tables stop
# service ip6tables off
Tags: blackist, boot, Cannot, CentOS, conf, Debian, Disabling, distro, DNS, echo, fedora, gnu linux, heavy traffic, How to, impact, ipv, ipv4, ipv6, kernel, kernel 2, Linux, linux kernel, linux kernels, methodology, modprobe, Module, necessery, net, network, network protocol, network servers, Networking, number, performance, Protocol, protocols, quot, Redhat, security, security practice, security vulnerabilities, sysconfig, sysctl, system boot, traffic network, Ubuntu, version, way, working
Posted in Computer Security, Linux, System Administration, Various | No Comments »
Friday, July 8th, 2011 
Some long time ago I’ve written an article Optimizing Linux tcp/ip networking
In the article I’ve examined a number of Linux kernel sysctl variables, which significantly improve the way TCP/IP networking is handled by a non router Linux based servers.
As the time progresses I’ve been continuing to read materials on blogs and internet sites on various tips and anti Denial of Service rules which one could apply on newly installed hosting (Apache/MySql/Qmail/Proxy) server to improve webserver responce times and tighten the overall security level.
In my quest for sysctl 😉 I found a few more handy sysctl variables apart from the old ones I incorporate on every Linux server I adminstrate.
The sysctl variables improves the overall network handling efficiency and protects about common SYN/ACK Denial of service attacks.
Here are the extra sysctl variables I started incorporating just recently:
############ IPv4 Sysctl Settings ################

#Enable ExecShield protection (randomize virtual assigned space to protect against many exploits)

kernel.randomize_va_space = 1

#Increase the number of PIDs processes could assign this is very needed especially on more powerful servers

kernel.pid_max = 65536

# Prevent against the common 'syn flood attack'

net.ipv4.tcp_syncookies = 1

# Controls the use of TCP syncookies two is generally a better idea, though you might experiment

#net.ipv4.tcp_syncookies = 1

net.ipv4.tcp_synack_retries = 2

##################################################

#

############## IPv6 Sysctl Settings ################

# Number of Router Solicitations to send until assuming no routers are present.

net.ipv6.conf.default.router_solicitations = 0

# Accept Router Preference in RA? Again not necessery if the server is not a router

net.ipv6.conf.default.accept_ra_rtr_pref = 0

# Learn Prefix Information in Router Advertisement (Unnecessery) for non-routers

net.ipv6.conf.default.accept_ra_pinfo = 0

# disable accept of hop limit settings from other routers (could be used for DoS)

net.ipv6.conf.default.accept_ra_defrtr = 0

# disable ipv6 global unicasts server assignments

net.ipv6.conf.default.autoconf = 0

# neighbor solicitations to send out per address (better if disabled)

net.ipv6.conf.default.dad_transmits = 0

# disable assigning more than 1 address per network interface

net.ipv6.conf.default.max_addresses = 1

#####################################################
To use this settings paste the above sysctl variables in /etc/sysctl.conf and ask sysctl command to read and apply the newly added conf settings:
server:~# sysctl -p

...
Hopefully you should not get errors while applying the sysctl settings, if you get some errors, it’s possible some of the variable is differently named (depending on the Linux kernel version) or the Linux distribution on which sysctl’s are implemented.
For some convenience I’ve created unified sysctl variables /etc/sysct.conf containing the newly variables I started implementing to servers with the ones I already exlpained in my previous post Optimizing Linux TCP/IP Networking
Here is the optimized / hardened sysctl.conf file for download
I use this exact sysctl.conf these days on both Linux hosting / VPS / Mail servers etc. as well as on my personal notebook 😉
Here is also the the complete content of above’s sysctl.conf file, just in case if somebody wants to directly copy/paste it in his /etc/sysctl.conf
# Sysctl kernel variables to improve network performance and protect against common Denial of Service attacks

# It's possible that not all of the variables are working on all Linux distributions, test to make sure

# Some of the variables might need a slight modification to match server hardware, however in most cases it should be fine

# variables list compiled by hip0

### https://www.pc-freak.net

#### date 08.07.2011

############ IPv4 Sysctl Kernel Settings ################

net.ipv4.ip_forward = 0

# ( Turn off IP Forwarding )

net.ipv4.conf.default.rp_filter = 1

# ( Control Source route verification )

net.ipv4.conf.default.accept_redirects = 0

# ( Disable ICMP redirects )

net.ipv4.conf.all.accept_redirects = 0

# ( same as above )

net.ipv4.conf.default.accept_source_route = 0

# ( Disable IP source routing )

net.ipv4.conf.all.accept_source_route = 0

# ( - || - )net.ipv4.tcp_fin_timeout = 40

# ( Decrease FIN timeout ) - Useful on busy/high load server

net.ipv4.tcp_keepalive_time = 4000

# ( keepalive tcp timeout )

net.core.rmem_default = 786426

# Receive memory stack size ( a good idea to increase it if your server receives big files )

##net.ipv4.tcp_rmem = "4096 87380 4194304"

net.core.wmem_default = 8388608

#( Reserved Memory per connection )

net.core.wmem_max = 8388608

net.core.optmem_max = 40960

# ( maximum amount of option memory buffers )

# tcp reordering, increase max buckets, increase the amount of backlost

net.ipv4.tcp_max_tw_buckets = 360000

net.ipv4.tcp_reordering = 5

##net.core.hot_list_length = 256

net.core.netdev_max_backlog = 1024

#Enable ExecShield protection (randomize virtual assigned space to protect against many exploits)

kernel.randomize_va_space = 1

#Increase the number of PIDs processes could assign this is very needed especially on more powerful servers

kernel.pid_max = 65536

# Prevent against the common 'syn flood attack'net.ipv4.tcp_syncookies = 1

# Controls the use of TCP syncookies two is generally a better idea, though you might experiment

#net.ipv4.tcp_syncookies = 1

net.ipv4.tcp_synack_retries = 2

###################################################

############## IPv6 Sysctl Settings ################

# Number of Router Solicitations to send until assuming no routers are present.

net.ipv6.conf.default.router_solicitations = 0

# Accept Router Preference in RA? Again not necessery if the server is not a router

net.ipv6.conf.default.accept_ra_rtr_pref = 0

# Learn Prefix Information in Router Advertisement (Unnecessery) for non-routersnet.

ipv6.conf.default.accept_ra_pinfo = 0

# disable accept of hop limit settings from other routers (could be used for DoS)

net.ipv6.conf.default.accept_ra_defrtr = 0

# disable ipv6 global unicasts server assignmentsnet.

ipv6.conf.default.autoconf = 0

# neighbor solicitations to send out per address (better if disabled)

net.ipv6.conf.default.dad_transmits = 0

# disable assigning more than 1 address per network interfacenet.

ipv6.conf.default.max_addresses = 1

#####################################################

# Reboot if kernel panic

kernel.panic = 20
These sysctl settings will tweaken the Linux kernel default network settings performance and you will notice the improvements in website responsiveness immediately in some cases implementing this kernel level goodies will make the server perform better and the system load might decrease even 😉
This optimizations on a kernel level are not only handy for servers, their implementation on Linux Desktop should also have a positive influence on the way the network behaves and could improve significantly the responce times of opening pages in Firefox/Opera/Epiphany Torrent downloads etc.
Hope this kernel tweakenings are helpful to someone.
Cheers 😉
Tags: adminstrate, amount, anti, apache mysql, autoconf, default, default network, default router, Denial, denial of service, denial of service attacks, exploits, file, harden, How to, imprpove, internet sites, ip networking, ipv, ipv4, ipv6, kernel, kernel level, level, Linux, Linux Security, linux server, memory, network efficiency, non, number, protection, proxy server, Qmail, quot, ra, randomize, reordering, responce, responce times, router linux, routers, rtr, security, security level, serverskernel, Service, solicitations, Source, SYN, syn flood attack, sysctl, time, variables, wmem
Posted in Computer Security, Linux, Linux and FreeBSD Desktop, System Administration | 4 Comments »
Wednesday, June 29th, 2011 
I’m using access to the mysql servers via localhost with mysql cli on daily basis.
With time I’ve figured out that it’s pretty unahandy to always login with my root mysql password, I mean each time to enter it, e.g.:
root@mysql-server:~# mysql -u root

Enter password:

...
Thus to make my life a way easier I decided to store my mysql root password in order to allow my root admin user to be able to login to my mysql server without asking for password. This saves time and nerves, as I’m not supposed to look up for the password file I store my server mysql root pass.
To allow my mysql cli interface, to login passwordless to the SQL server I had to create the file /root/.my.cnf readable only for my root user and store my MySQL username and password there.
Here is a sample /root/.my.cnf file:
root@mysql-server:~# cat /root/.my.cnf

[client]

user="root"

pass="mysecretMySQLPasswordgoeshere"
Now next time I use the mysql console interface to access my mysql server I don’t have to supply the password, here is how easier is the mysql login afterwards:
root@mysql-server:~# mysql -u root

Welcome to the MySQL monitor. Commands end with ; or g.

Your MySQL connection id is 3520

Server version: 5.0.77 Source distribution
Type ‘help;’ or ‘h’ for help. Type ‘c’ to clear the buffer.
mysql>
The only downside of using .my.cnf to store permanently the mysql server root and password is from security standpoint.
If for instance somebody roots my servers, where I have stored my root user/pwds in .my.cnf , he will be able immediately to get access to the MySQL server.
Another possible security flaw with using the mysql passwordless login “trick” is if somebody forgets to set proper file permissions to, .my.cnf
Once again the file should possess the permissons of:
root@mysql-server:~# ls -al /root/.my.cnf

-rw------- 1 root root 90 Apr 2 00:05 /root/.my.cnf
Any other permissons might allow non-privileged users to read the file and gain unathorized admin access to the SQL server.
Tags: Auto, basis, buffer, cat, cli, client, cnf, connection id, daily basis, distribution type, downside, Draft, file, file permissions, help, life, localhost, mysql connection, mysql servers, order, password, password file, root, root admin, root password, root root, root user, security, security flaw, security standpoint, server mysql, server root, server version, source distribution, standpoint, time, type, username, version, way
Posted in FreeBSD, Linux, MySQL, System Administration | No Comments »
Thursday, March 1st, 2012 I have a Godaddy account for already 4 years or so and with time I tend to login and use Godaddy to set DNS records or buy a new domain way more often if compared to the old days.
By default GoDaddy creates numeric accounts names (Customer Number as they call it), example:
Godaddy username: 1424915

Godaddy password: myVerySecretRandomPassword123
Being in necessity to often login to godady it started getting more and more annoying with every single day as it is pretty hard for me to memorize the not so intuitive 1424915, therefore everytime I had to login to Godaddy, I had to check in my notes again and again what is my Username
This costs me a lot of time, so finally in a quick chat with a friend today, he mentioned about having the same issue and explained he just recently changed his (Customer Number) numeric Username to a easy to remember login text string.
I know that changing the Username from an ID to a word in GoDaddy is possible for a long time and I even did it before for one Godaddy Account owned by a company. However just until today, I did not changed my GoDaddy Account number to intuitive text phrase for the simple reason I did not have time to check, how changing the account username and password in Godaddy could be done
Anyways today this friends small chat, triggered me to take few seconds and check in Godaddy's website navigation on how changing the ugly number ID to a shiny username was possible. This is how this little article got born 🙂
So enough jibberish, here is how I changed my Customer Number username to a desired easy to memorize:
1. Login to Godaddy with your Customer Number
2. Navigate to My Account -> Update Security Settings

My Account -> Update Security Settings
Fill in properly all the input (red start) fields seen on the screenshot and click Save Changes . Once you see a message settings are Saved. It is generally a good idea to open some different kind of browser and try logging in with the new set username and password.
Update Security Settings is also the place for people who would like to change Godaddy account password.
Be 100% sure to check the new username/password pair in another browser (without logging out with the one you just use) or you will end up unable to login to your godaddy account !!!
Its also a good idea in any case to, have written down somewhere on paper Godaddy's Call-in-PIN, this is just a precaution to assure yourself that you will be able to restore your account username/password in case if lost.
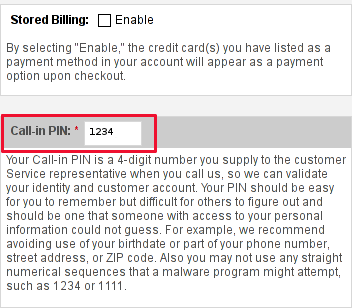
If you haven't used the Call In PIN, I hope you will never need to. Anyways just as a matter of info this PIN can help you in some cases where you have to identify yourself as the owner of your Godaddy account (Something like the Debit / Credit cards CVV code [positioned on the card back] ). I've only used the Call in PIN in few occasions by Godaddy's tech support, where I contacted them directly by email to ask some specific questions on how to do stuff inside my account.
I know this article, will be boring for some of my readers, so if this is the case please accept my humble apologies … anyways it will help me orient myself in the future if I forgot how I did it and hopefully will be useful to someone else.
Tags: account username, Auto, Call, Call-in, chat with a friend, company, customer number, default, DNS, dns records, domain, domain register, Draft, everytime, godaddy, info, INPUT, login, long time, navigation, number, number id, phrase, place, reason, screenshot, security, security settings, single day, Start, text, text phrase, text string, time, website navigation
Posted in Everyday Life, Various, Web and CMS | 2 Comments »
Thursday, February 2nd, 2012 I'm managing few wordpress installations which requires me to type in:
Hostname , FTP Username and FTP Password , every single time a plugin update is issued and I want to upgrade to the new version.
Below is a screenshot of this annoying behaviour:
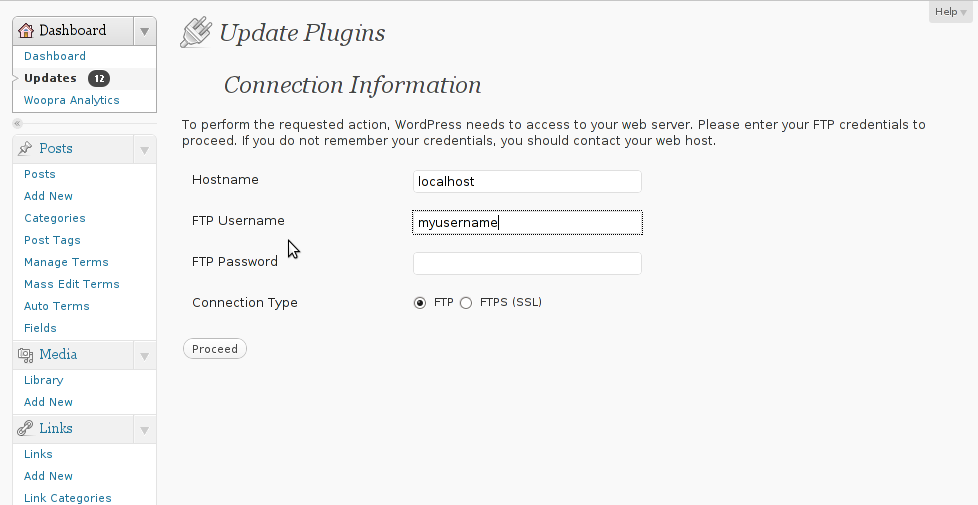
As you can see in the above screenshot, there is no way through Update Plugins web interface to store the password permanently. Hence the only option to store it permanently is to manually edit wp-config.php (file located in wordpress docroot, e.g. /path/to/wordpress/wp-config.php , inside the file find the line:
define ('WPLANG', '');
Right after it put a code similar to:
define('FS_METHOD', 'ftpsockets');

define('FTP_BASE', '/path/to/wordpress/');

define('FTP_CONTENT_DIR', '/path/to/wordpress/wp-content/');

define('FTP_PLUGIN_DIR ', '/path/to/wordpress/wp-content/plugins/');

define('FTP_USER', 'Username');

define('FTP_PASS', 'Password');

define('FTP_HOST', 'localhost');
Change the above defines:
path/to/wordpress/ – with your wordpress location directory.
Username and Password – with your respective FTP username and password. The localhost
That's all, from now onwards the User/Password prompt will not appear anymore. Consider there is a security downside of storing the FTP User/Pass in wp-config.php , if someone is able to intrude the wordpress install and access the documentroot of the wordpress install he we'll be able to obtain the ftp user/pass and log in the server directly via FTP protocol.
Tags: Auto, base path, behaviour, config, content, documentroot, downside, Draft, file, g path, host, line, localhost, location, location directory, password, Path, php, plugin, Protocol, screenshot, security, someone, time, type, update, User, version, way, web interface
Posted in System Administration, Web and CMS, Wordpress | 1 Comment »
Sunday, December 25th, 2011 There is a brand new remote FreeBSD vulnerability in telnetd in all its versions starting from version 7 to 9. It is therefore advisable that the telnet daemon be completely disabled.
To disable telnetd on FreeBSD:
1. Open /etc/inetd.conf
freebsd# vi /etc/inetd.conf
2. Comment out the line
telnet stream tcp nowait root /usr/libexec/telnetd telnetd
e.g.:
#telnet stream tcp nowait root /usr/libexec/telnetd telnetd
3. Restart inetd
freebsd# /etc/rc.d/inetd restart
The whole remote root telnetd FreeBSD security advisory (SA), can be read here
Tags: brand, Comment, conf, daemon, freebsd, freebsd security, inetd, libexec, line, line telnet, nowait, Restart, root, security, security advisory, stream, tcp, Telnet, telnetd, usr, version, vulnerability
Posted in Computer Security, FreeBSD, System Administration | 1 Comment »
Thursday, October 27th, 2011 I just installed munin to track in web the performance of few Debian servers. I’ve configured munin to open via a Virtualhosts in Apache. As its always wise to protect any statistics data about the server from the unwanted possible security violators, I decided to protect Munin with Apache .htaccess.
The munin htmldir output dir is configured to be in /var/www/munin, hence I protected my munin with password by:
1. Creating .htaccess file in /var/www/munin with following content
AuthUserFile /etc/apache2/.munin_htpasswd

AuthGroupFile /dev/null

AuthName EnterPassword

AuthType Basic
require user admin
2. Creating /etc/apache2/.munin_htpasswd with htpasswd (htaccess password generator cmd)
debian:/var/www/munin# htpasswd -c /etc/apache2/.munin_htpasswd admin

New password:

Re-type new password:

Adding password for user admin
Another important thing I had to do is set my VirtualHost file to be configured with AllowOverride All , if AllowOverride All is missing the .htaccess and .htpasswd are not red at all.
Afterwards munin is protected with password, and when my virtualdomain where munin lays e.g. http://munin.mydomain.com is accessed the .htpasswd password dialog pops up 😉
Tags: Allowoverride, apache, apache htaccess, AuthGroupFile, AuthType, AuthUserFile, Creating, data, dev, dialog, dir, EnterPassword, generator, GNU, htaccess password generator, htpasswd, Linux, null, password, performance, pops, security, servers, statistics data, var, Virtualhost, web statistics, www
Posted in Linux, System Administration, Web and CMS | No Comments »
Monday, May 2nd, 2011 On each and every newly installed Linux or FreeBSD server. I’m always very cautious about three configuration directives for the ssh server.
This are X11Forwarding , Protocol and PermitRootLogin
One needs to be very watchful about this three ones, as tuning the right values surely prevents the server from many of the security issues that might rise up with the SSH server.
Many Linuxes like Debian and Ubuntu comes with X11Forwarding yes e.g. (X11Forwarding) enabled by default, this is an useless option in most of the cases as the servers I do administrate does not run a X environment.
Some older Linux distributions I have dealt with has the ssh Protocol 1 enabled by default and therefore, whether I do inherit an old server I have to start administrating the first thing I do is to check if the /etc/ssh/sshd_config‘s Protocol 1 option is enabled and if it is enabled I disable it.
PermitRootLogin is also an option which I often turn off as logging in via remote ssh is potentially dangerous as root password might get sniffed.
In overall the 3 sshd option’s I do check out in /etc/sshd/sshd_config on each newly installed Linux server are:
X11Forwarding yes

PermitRootLogin yes

Protocol 1
I always change this three options in my /etc/sshd/sshd_config
to:
X11Forwarding no

PermitRootLogin no

Protocol 2
One other options sshd server options which is good to be tuned is:
LoginGraceTime 120
Decreasing it to:
LoginGraceTime 60
is generally a good idea.
Of course after the changes I do restart the ssh daemon in order for the new configuration to take place:
linux:~# /etc/init.d/sshd restart

...
Tags: administrate, config, configuration directives, course, Debian, Forwarding, freebsd, idea, init, Linux, linux distributions, linuxes, noProtocol, old server, option, order, password, PermitRootLogin, PermitRootLoginOne, place, Protocol, root, root password, security, security issues, security tips, server options, server security, servers, ssh, ssh daemon, ssh protocol, ssh server, sshd server, Ubuntu, yesPermitRootLogin
Posted in FreeBSD, Linux, System Administration | No Comments »
Monday, April 11th, 2011 A friend of mine has recommended, few websites which are quite useful in checking what kind of information a remote website could possibly retrieve about your system. I’ve found quite useful as they expose the high level of browser security there is nowdays even on a Linux based systems.
I’ve been stunned that so many information about my Linux desktop could be mined even when I use my browser through a tor network.
Here are the websites you might also like to check and possibly afterwards improve your Browser security:
http://anon.inf.tu-dresden.de/help/jap_help/en/help/security_test.html
http://www.proxy-list.org/en/show-my-ip.php
http://leader.ru/secure/who.html
I was rather shocked that some information that could be retrieved on my Linux host could even reveal fundamental details about my Linux Desktop like a version of my currently running Linux kernel!
In the past I’ve blogged an article which is quite related to the topic of Internet Anonimity and Browser security
You might consider checking my old article How to improve your web browser security and better secure your personal identity privacy on the internet here
I will take some steps further to look on how to further decrease the amount of OS sensitive data revealed by my browser and will further blog when I find ways for better ways to anonimize my surging.
Tags: amount, anonimity, anonimize, blog, browser, checking, Desktop, dresden, host, identity, information, ip, kernel, kind, level, Linux, linux desktop, linux host, mine, network, personal identity, Privacy, privacy on the internet, proxy list, ru, security, security test, sensitive data, topic, tor, version, web, web browser security, website
Posted in Computer Security, Linux, Linux and FreeBSD Desktop | 2 Comments »


How to turn off telnetd on FreeBSD
Sunday, December 25th, 2011There is a brand new remote FreeBSD vulnerability in telnetd in all its versions starting from version 7 to 9. It is therefore advisable that the telnet daemon be completely disabled.
To disable telnetd on FreeBSD:
1. Open /etc/inetd.conf
freebsd# vi /etc/inetd.conf
2. Comment out the line
telnet stream tcp nowait root /usr/libexec/telnetd telnetd
e.g.:
#telnet stream tcp nowait root /usr/libexec/telnetd telnetd
3. Restart inetd
freebsd# /etc/rc.d/inetd restart
The whole remote root telnetd FreeBSD security advisory (SA), can be read here
Tags: brand, Comment, conf, daemon, freebsd, freebsd security, inetd, libexec, line, line telnet, nowait, Restart, root, security, security advisory, stream, tcp, Telnet, telnetd, usr, version, vulnerability
Posted in Computer Security, FreeBSD, System Administration | 1 Comment »