Posts Tagged ‘usr’
Tuesday, June 3rd, 2014 
If you're configuring a new Webserver or adding a new VirtualHost to an existing Apache configuration you will need to restart Apache with or without graceful option once Apache is restarted to assure Apache is continuously running on server (depending on Linux distribution) issue:
1. On Debian Linux / Ubuntu servers
# ps axuwf|grep -i apache|grep -v grep
root 23280 0.0 0.2 388744 16812 ? Ss May29 0:13 /usr/sbin/apache2 -k start
www-data 10815 0.0 0.0 559560 3616 ? S May30 2:25 _ /usr/sbin/apache2 -k start
www-data 10829 0.0 0.0 561340 3600 ? S May30 2:31 _ /usr/sbin/apache2 -k start
www-data 10906 0.0 0.0 554256 3580 ? S May30 0:20 _ /usr/sbin/apache2 -k start
www-data 10913 0.0 0.0 562488 3612 ? S May30 2:32 _ /usr/sbin/apache2 -k start
www-data 10915 0.0 0.0 555524 3588 ? S May30 0:19 _ /usr/sbin/apache2 -k start
www-data 10935 0.0 0.0 553760 3588 ? S May30 0:29 _ /usr/sbin/apache2 -k start
…
2. On CentOS, Fedora, RHEL and SuSE Linux and FreeBSD
ps ax | grep httpd | grep -v grep
7661 ? Ss 0:00 /usr/sbin/httpd
7664 ? S 0:00 /usr/sbin/httpd
7665 ? S 0:00 /usr/sbin/httpd
7666 ? S 0:00 /usr/sbin/httpd
7667 ? S 0:00 /usr/sbin/httpd
7668 ? S 0:00 /usr/sbin/httpd
7669 ? S 0:00 /usr/sbin/httpd
7670 ? S 0:00 /usr/sbin/httpd
7671 ? S 0:00 /usr/sbin/httpd
Whether a new Apache IP Based VirtualHosts are added to already existing Apache and you have added new
Listen 1.1.1.1:80
Listen 1.1.1.1:443
directives, after Apache is restarted to check whether Apache is listening on port :80 and :443
netstat -ln | grep -E ':80|443'
tcp 0 0 0.0.0.0:80 0.0.0.0:* LISTEN
tcp 0 0 0.0.0.0:443 0.0.0.0:* LISTEN
Meaning of 0.0.0.0 is that Apache is configured to Listen on Any Virtualhost IPs and interfaces. This output is usually returned whether in Apache config httpd.conf / apache2.conf webserver is configured with directive.
Listen *:80
If in netstat output there is some IP poping up for example "192.168.1.1:http", this means that only connections to the "192.168.1.1" IP address will be accepted by Apache.
Another way to look for Apache in netstat (in case Apache is configured to listen on some non-standard port number) is with:
netstat -l |grep -E 'http|www'
tcp 0 0 *:www *:* LISTEN
As sometimes it might be possible that Apache is listening but its processes are in in defunct (Zommbie) state it is always a good idea, also to check if pages server by Apache are opening in browser (check it with elinks, lynx or curl)
To get more thorough information on Apache listened ports, protocol, user with which Apache is running nomatter of Linux distribution use lsof command:
/usr/bin/lsof -i|grep -E 'httpd|http|www'
httpd 6982 nobody 3u IPv4 29388359 0t0 TCP www.pc-freak.net:https (LISTEN)
httpd 18071 nobody 3u IPv4 702790659 0t0 TCP www.pc-freak.net:http (LISTEN)
httpd 18071 nobody 4u IPv4 702790661 0t0 TCP www.pc-freak.net.net:https (LISTEN)
…
If Apache is not showing up even though restarted check what is going wrong in the error logs:
– on Debian standard error log is /var/log/apache2/error.log
– On RHEL, CentOS, SuSE std. error log is in /var/log/httpd/error.log
– on FeeBSD /var/log/httpd-error.log
Tags: check, configured, grep, httpd, Linux, log, need, nobody, option, port, ports, rhel, running, sbin, Ss May29, tcp, usr, var
Posted in Everyday Life, Linux, System Administration, Web and CMS | No Comments »
Wednesday, June 18th, 2014 
There are plenty of GNU / Linux softwares to monitor server performance (hard disk space, network and CPU load) and general hardware health both text based for SSH console) and from web.
Just to name a few for console precious tools, such are:
And for web based Linux / Windows server monitoring my favourite tools are:
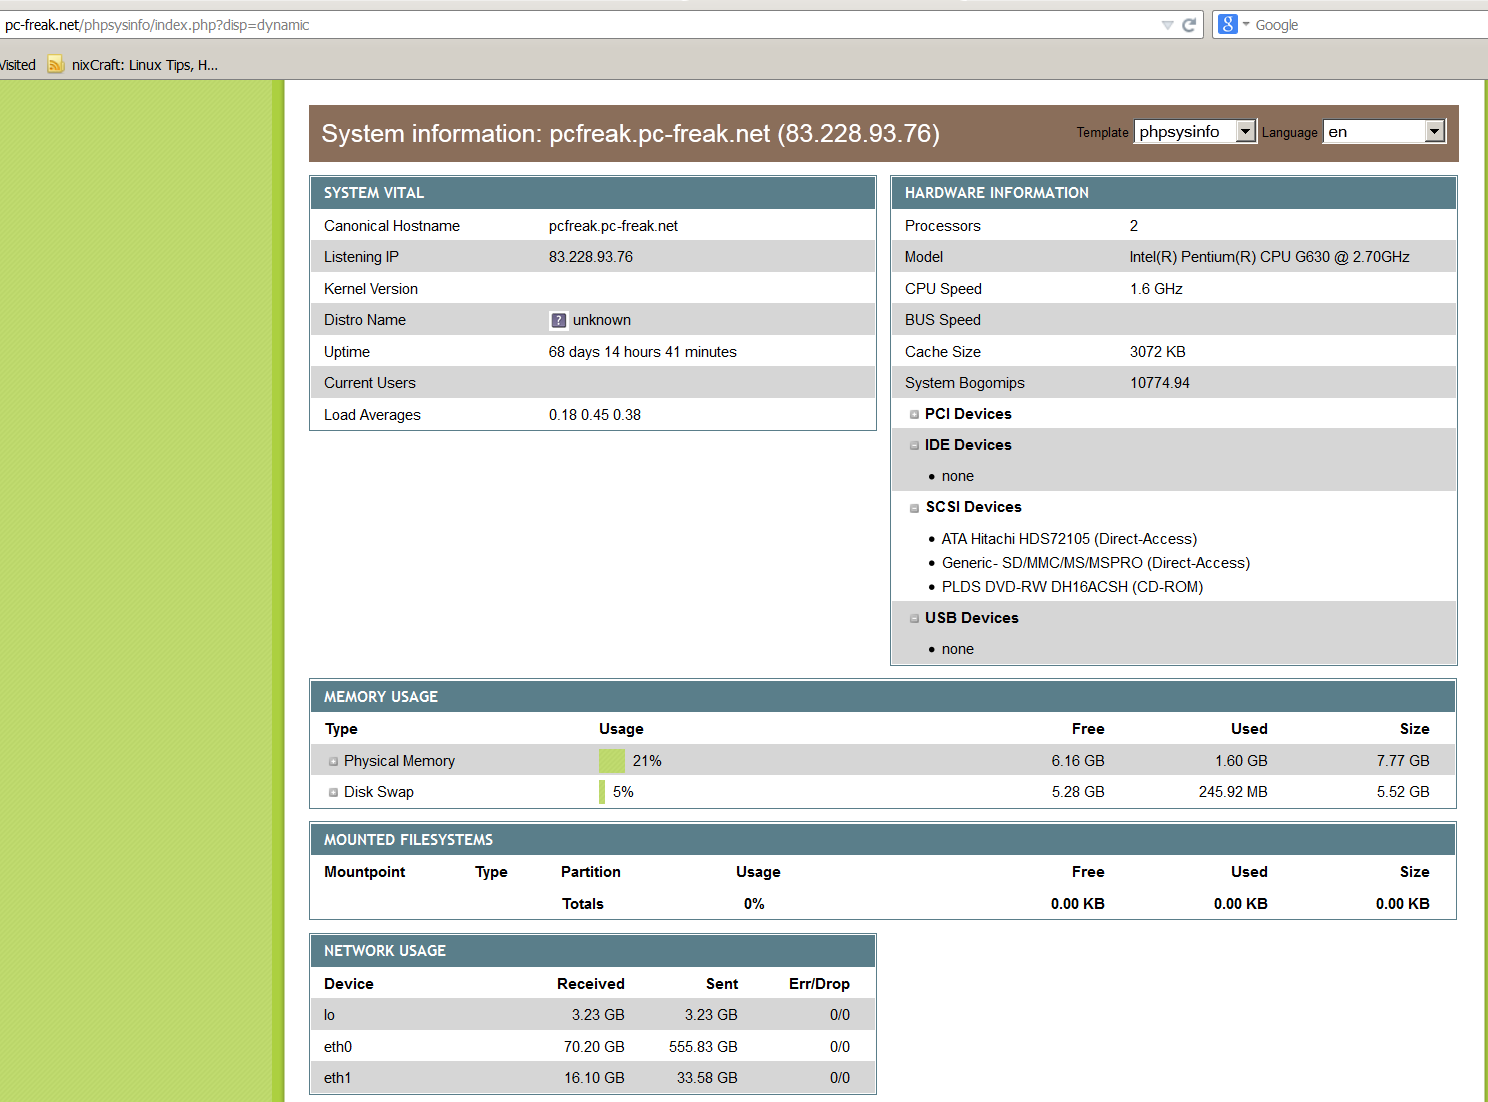
phpsysinfo is yet another web based Linux monitoring software for small companies or home router use it is perfect for people who don't want to spend time learning how to configure complicated and robust multiple server monitoring software like Nagios or Icanga.
phpsysinfo is quick and dirty way to monitor system uptime, network, disk and memory usage, get information on CPU model, attached IDEs, SCSI devices and PCIs from the web and is perfect for Linux servers already running Apache and PHP.
1. Installing PHPSysInfo on Debian, Ubuntu and deb derivative Linux-es
PHPSysInfo is very convenient and could be prefered instead of above tools for the reason it is available by default in Debian and Ubuntu package repositories and installable via apt-get and it doesn't require any further configuration, to roll it you install you place a config and you forget it.
# apt-cache show phpsysinfo |grep -i desc -A 2
Description: PHP based host information
phpSysInfo is a PHP script that displays information about the
host being accessed.
Installation is a piece of cake:
# apt-get install --yes phpsysinfo
…
Add phpsysinfo directives to /etc/apache2/conf.d/phpsysinfo.conf to make it accessible via default set Apache vhost domain under /phpsysinfo
Paste in root console:
cat > /etc/apache2/conf.d/phpsysinfo.conf <<-EOF
Alias /phpsysinfo /usr/share/phpsysinfo
<Location /phpsysinfo>
 Options None
 Order deny,allow
 Deny from all
 #Allow from localhost
 #Allow from 192.168.56.2
 Allow from all
</Location>
EOF
Above config will allow access to /phpsysinfo from any IP on the Internet, this could be a security hole, thus it is always better to either protect it with access .htaccess password login or allow it only from certain IPs, from which you will access it with something like:
Allow from 192.168.2.100
Then restart Apache server:
# /etc/init.d/apache2 restart
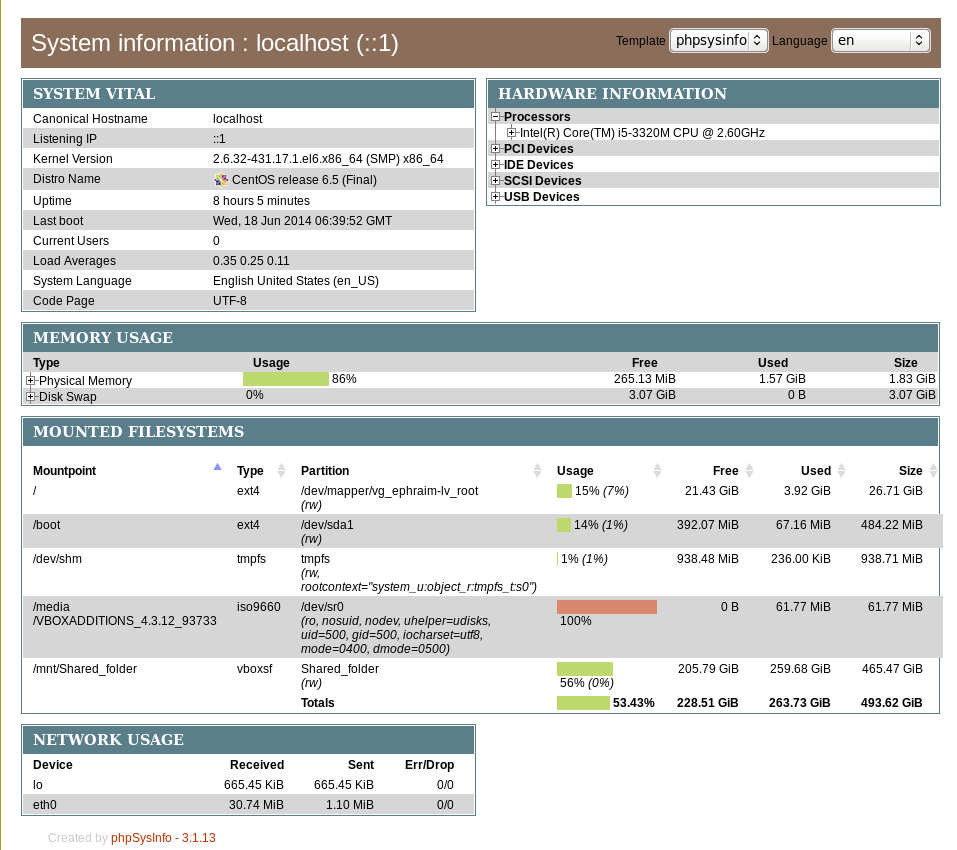
To access phpsysinfo monitoring gathered statistics, access it in a browser http://defaultdomain.com/phpsysinfo/
2. Installing PHPSysinfo on CentOS, Fedora and RHEL Linux
Download and untar
# cd /var/www/html

# wget https://github.com/phpsysinfo/phpsysinfo/archive/v3.1.13.tar.gz

# tar -zxvf phpsysinfo-3.1.13.tar.gz

# ln -sf phpsysinfo-3.1.13 phpsysinfo

# mv phpsysinfo.ini.new phpsysinfo.ini
Install php php-xml and php-mbstring RPM packages
yum -y install php php-xml php-mbstring

...
Start Apache web service
[root@ephraim html]# /etc/init.d/httpd restart
…
[root@ephraim html]# ps ax |grep -i http

 8816 ?        Ss     0:00 /usr/sbin/httpd

 8819 ?        S      0:00 /usr/sbin/httpd
As PhpSysInfo is written in PHP it is also possible to install phpsysinfo on Windows.
phpsysinfo is not the only available simple monitoring server performance remotely tool, if you're looking for a little bit extended information and a better visualization interface alternative to phpsysinfo take a look at linux-dash.
In context of web monitoring other 2 web PHP script tools useful in remote server monitoring are:
OpenStatus – A simple and effective resource and status monitoring script for multiple servers.
LookingGlass – User-friendly PHP Looking Glass (Web interface to use Host (Nslookup), Ping, Mtr – Matt Traceroute)
Tags: configure, default, hard disk, information, init, installation, linux windows, little bit, php, rhel, script, security hole, server performance, system, usr, web
Posted in Monitoring, System Administration, Various, Web and CMS | No Comments »
Friday, August 8th, 2014 
If're a Linux user and you need to script certain page extraction from PDF files, crypt protect with password a PDF file or decrypt (remote password protection from PDF) or do some kind of structural transformation of existing PDF file you can use a QPDF command line utility. qpdf is in active development and very convenient tool for Website developers (PHP / Perl / Python), as often on websites its necessery to write code to cut / tailer / restructure PDFs.
1. Install QPDF from deb / rpm package
qpdf is instalalble by default in deb repositories on Debian / Ubuntu GNU / (deb derivative) Linux-es to install it apt-get it
apt-get install –yes qpdf
On RPM based distribution CentOS / SuSE / RHEL / Fedora Linux to install qpdf, fetch the respective distribution binary from rpmfind.net or to install latest version of qpdf build it from source code.
2. Install QPDF from source
To build latest qpdf from source
- on RPM based distributions install with yum fullowing packages:
yum -y install zlib-devel pcre-devel gcc gcc-c++
- on Deb based Linuces, you will need to install
apt-get install –yes build-essential gcc dpkg-dev g++ zlib1g-dev
Then to build gather latest qpdf source from here
cd /usr/local/src
wget -q https://www.pc-freak.net/files/qpdf-5.1.2.tar.gz
tar -zxvf qpdf-5.1.2.tar.gz
cd qpdf-5.1.2/
./configure
make
make install
Once it is installed, if you get error on qpdf runtime:
/usr/local/bin/qpdf: error while loading shared libraries: libqpdf.so.13: cannot open shared object file: No such file or directory
To solve the error find in your compile directory libqpdf.so.13 and copy it to /usr/lib or /usr/local/lib
cp -rpf ./libqpdf/build/.libs/libqpdf.so.13 /usr/local/lib
3. Decrypt password encrypted (protected) PDF file
if you have time and you like reading be sure to check the extensive qpdf-manual.
To remove password from a PDF file protected with a password with qpdf
qpdf –password=SECRET-PASSWORD –decrypt input-file.pdf output-file.pdf
QPDF has a vast range of split and merge features. It can combine all the files in a folder (*.pdf), you can use it to try to recover damaged pdf files, extract individual pages from PDF, dump and reverse page range, make new created PDF with old PDF's reversed pages (pages 1,2,3,4 to become in order 4,3,2,1), apply some single pdf file metadata to multiple files.
4. Try to Recover damaged PDF file
To try to recover some damaged file with qpdf:
qpdf file-to-repair.pdf repaired-file.pdf
5. Extract certain pages or page range from PDF
It is recommended to use the version built from source to extract certain page range from PDF
/usr/local/bin/qpdf –empty –pages input-file.pdf 1-5 — outfile-file.pdf
If you wanted to take pages 1–5 from file1.pdf and pages 11–15 from file2.pdf in reverse, you would run
qpdf file1.pdf –pages file1.pdf 1-5 file2.pdf 15-11 — outfile.pdf
Tags: command, error while loading shared libraries, Extracting, kind, make, need, page, password, protection, QPDF, range, rpm, script, source code, use, usr, utility
Posted in Everyday Life, System Administration, Various, Web and CMS | 1 Comment »
Monday, July 11th, 2011 
If you are stuffed with errors in /var/log/mysqld.log similar to:
110711 11:00:48 [ERROR] /usr/libexec/mysqld: Incorrect information in file: './anyboots_moncler_spaccio/zen_seo_cache.frm'

110711 11:00:48 [ERROR] /usr/libexec/mysqld: Incorrect information in file: './anyboots_moncler_spaccio/zen_sessions.frm'
This is a sure sign something terrible has happened with your mysql database tables that lead to corruption.
Having corrupt table in mysql installation can severely lead to data loss as well as significantly reduce the speed and performance of a MySQL server in this awful times mysqlcheck is the best friend of the administrator, here is how you can check and repair broken tables in MySQL server:
mysql-server:~# mysqlcheck --all-databases -u root -p

chillor_hjbgl.vn_users OK

chillor_lul.mybb_adminlog OK

chillor_lul.mybb_adminoptions OK

chillor_lul.mybb_adminsessions OK

chillor_lul.mybb_adminviews OK

chillor_lul.mybb_announcements OK

...
You will notice the corrupt sql tables will be reported as corrupt by the tool and mysqlcheck will try it’s best to recover the corrupt tables.
In most cases this should be enough to recover corrupt tables.
Tags: adminlog, best friend, corruption, database tables, databases, ERROR, file, hjbgl, installation, libexec, loss, lul, moncler, mybb, Mysql, mysql database, mysql server, mysqld, OKchillor, pchillor, performance, repair, root, SEO, server mysql, sessions, something, spaccio, speed and performance, sql tables, tool, usr, var, zen
Posted in Linux, MySQL, System Administration | No Comments »
Friday, July 29th, 2011 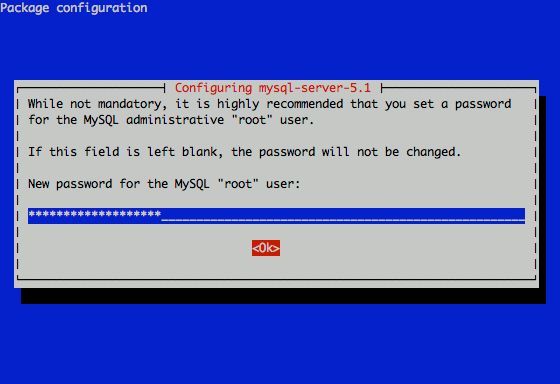
I had to change my mysql root password for one of the servers since during the install I mispasted the password in the MySQL password prompt I needed the pwd to be changed.
Here is how I changed it to my desired one:
linux:~# /usr/bin/mysqladmin -u root -p'OLD_PASSWORD_STRING' password NEW_PASSWORD_STRING

linux:~#
The password gets changed immediately 😉
If a new password has to be set to a passwordless mysql server, the command to be issued is:
linux:~# /usr/bin/mysqladmin -u root password PASSWORD_STRING
Changing the MySQL password is also possible with mysql cli, after connecting to the sql server, though this method is a bit more time consuming. Here is how to do it from mysql console:
linux:~# mysql -u root -p

Server version: 5.1.49-3 (Debian)
Copyright (c) 2000, 2010, Oracle and/or its affiliates. All rights reserved.
This software comes with ABSOLUTELY NO WARRANTY. This is free software,
and you are welcome to modify and redistribute it under the GPL v2 license
Type ‘help;’ or ‘h’ for help. Type ‘c’ to clear the current input statement.
mysql> use mysql;
mysql> update user set password=PASSWORD(“NEW_PASSWORD”) where User=’root’;mysql> flush privileges;
Of course it’s possible to do change the root pass via phpmyadmin
Cheers 😉
Tags: Cheers, cli, command, consuming, Copyright, course, free software, gpl v2, help, input statement, licenseType, Linux, mysqladmin, Old, oracle, password, password string, phpmyadmin, Privileges, pwd, root, root password, server root, servers, software, sql server, string password, time, time consuming, type, use, usr, usr bin, version, warranty
Posted in Linux, MySQL, System Administration | No Comments »
Wednesday, August 17th, 2011 One server recently installed with Qmail + Vpopmail and Squirrelmail had just been reported to me that the webmail is failing to properly login existent users on the server via the IMAP protocol.
I’ve checked on port 143 to see if couriertpcd process is properly listening with netstat -tlnp as well as used telnet to check if I can normally connect with telnet to the imap port and it seemed there is no issue with IMAP
Further on I checked /var/log/mail.log and there I found the following error message popping up:
Aug 17 08:56:27 mail-serv imapd: LOGIN FAILED, user=hipo@mail-serv.com, ip=[::ffff:127.0.0.1]

Aug 17 08:56:27 mail-serv imapd: authentication error: Connection refused

Aug 17 08:56:29 mail-serv imapd: Connection, ip=[::ffff:127.0.0.1]

Aug 17 08:56:29 mail-serv imapd: authdaemon: s_connect() failed: Connection refused

Aug 17 08:56:29 mail-serv imapd: [Hint: perhaps authdaemond is not running?]
The error was shown each time I do get a failure in Squirrelmail in my browser to connect to IMAP with the error:
ERROR: Connection dropped by IMAP server.
As the log revealed the courier-authdaemond was not up and running on the system. I thus launched it :
qmail:~# /usr/local/sbin/authdaemond stop

qmail:~# /usr/local/sbin/authdaemond start

qmail:~# /etc/init.d/imap start
I’ve later on figured out the strange, was caused because of a server reboot, during boot process authdaemond did not properly load up, therefore to prevent future problems like this one, I’ve put authdaemond and /etc/init.d/imap scripts to load up via /etc/rc.local :
qmail:~# echo '/usr/local/sbin/authdaemond stop' >> /etc/rc.local

qmail:~# echo '/usr/local/sbin/authdaemond start' >> /etc/rc.local

qmail:~# echo '/etc/init.d/imap start' >> /etc/rc.local
Tags: authdaemon, authentication error, boot, boot process, browser, com, connection, connection ip, ERROR, error error, error message, failure, ffff, imap port, imap protocol, IMAPFurther, issue, localqmail, login, mail, mail log, nbsp, port, port 143, Protocol, Qmail, Reboot, sbin, scripts, squirrelmail, startI, startqmail, Stop, time, usr, var, vpopmail
Posted in Linux, Qmail, System Administration | No Comments »
Monday, March 5th, 2012 
One of the companies, where I'm employed runs nginx as a CDN (Content Delivery Network) server.
Actually nginx, today has become like a standard for delivering tremendous amounts of static content to clients.
The nginx, server load has recently increased with the number of requests, we have much more site visitors now.
Just recently I've noticed the log files are growing to enormous sizes and in reality this log files are not used at all.
As I've used disabling of web server logging as a way to improve Apache server performance in past time, I thought of implying the same little "trick" to improve the hardware utilization on the nginx server as well.
To disable logging, I proceeded and edit the /usr/local/nginx/conf/nginx.conf file, commenting inside every occurance of:
access_log /usr/local/nginx/logs/access.log main;
to
#access_log /usr/local/nginx/logs/access.log main;
Next, to load the new nginx.conf settings I did a restart:
nginx:~# killall -9 nginx; sleep 1; /etc/init.d/nginx start
I expected, this should be enough to disable completely access.log, browser request logins. Unfortunately /usr/local/nginx/logs/access.log was still displaying growing with:
nginx:~# tail -f /usr/local/nginx/logs/access.log
After a bit thorough reading of nginx.conf config rules, I've noticed there is a config directive:
access_log off;
Therefore to succesfully disable logging I had to edit config occurance of:
access_log /usr/local/nginx/logs/access.log main
to
After a bit thorough reading of nginx.conf config rules, I've noticed there is a config directive:
access_log off;
Therefore to succesfully disable logging I had to edit config occurance of:
access_log /usr/local/nginx/logs/access.log main
to
access_log /usr/local/nginx/logs/access.log main

access_log off;
Finally to load the new settings, which thanksfully this time worked, I did nginx restart:
nginx:~# killall -9 nginx; sleep 1; /etc/init.d/nginx start
And hooray! Thanks God, now nginx logging is disabled!
As a result, as expected the load avarage on the server reduced a bit 🙂
Tags: apache, apache server, Auto, avarage, browser, CDN, conf, config, config rules, content delivery network, Draft, enormous sizes, file, god, hardware, hooray, init, killall, log browser, logs, network server, nginx, occurance, performance, quot, reading, request, Result, server load, server logging, server performance, sleep, static content, time, today, usr, utilization, way, web server
Posted in Linux, System Administration, Various | 3 Comments »
Tuesday, September 14th, 2010 I’ve recently received a number of images in JPEG format as a feedback on a project plan that was constructed by a team I’m participating at the university where I study.
Somebody from my project group has scanned or taken snapshots of each of the hard copy paper feedback and has sent it to my mail.
I’ve received 13 images so I had to open them one by one to get each of the Project Plan to read the feedback on the page this was really unhandy, so I decided to give it a try on how to generate a common PDF file from all my picture files.
Thanksfully it happened to be very easy and trivial using the good old Image Magick
In order to complete the task of generating one PDF from a number of pictures all I did was.1. Switch to the directory where I have saved all my jpeg images
debian:~# cd /home/hipo/Desktop/my_images_directory/
2. Use the convert binary part of imagemagick package to generate the actual PDF file from the group of images
debian:~# convert *.jpg outputpdffile.pdf
If the images are numbered and contain many scanned pages of course you can always pass by all the images to the /usr/bin/convert binary, like for instance:
debian:~# convert 1.jpg 2.jpg 3.jpg 4.jpg 5.jpg outputpdffile.pdf
Even though in my case I had to convert to PDF from multiple JPEG (JPG) pictures, convertion with convert is not restricted to convert only from JPEG, but you can also convert to PDF by using other graphical file formats.
For instance to convert multiple PNG pictures to a single PDF file the command will be absolutely the same except you change the file extension of the graphic files e.g.:
debian:~# convert 1.PNG 2.PNG 3.PNG 4.PNG 5.PNG OUTPUT-PDF-FILE.PDF
I was quite happy eventually to know Linux is so flexible and such a trivial things are able to be completed in such an easy way.
Tags: cd home, convertion, copy, course, Create PDF file from (jpg) pictures in Linux, Desktop, feedback, file, file extension, file formats, format, gif images, graphic files, hipo, home, Image, image magick, ImageMagick, images directory, instance, JPEG, jpeg images, jpg gif, Linux, Magick, mail, number, order, OUTPUT-PDF-FILE, outputpdffile, package, page, Paper, picture, png, project, project group, snapshots, somebody, switch, team, Thanksfully, trivial things, unhandy, usr, usr bin, way
Posted in Linux, Linux and FreeBSD Desktop, Various | 5 Comments »
Saturday, May 28th, 2011 If you’re installing some PHP based CMS/blog like (Joomla or WordPress) or some kind of template and suddenly you stumble on a error:
Deprecated: Function split() is deprecated in /usr/local/www/websitedomain/templates/youbizz/html/modules.php on line 78
In order to fix that the file which spits the error message, in my case modules.php needs to be modified and the split php function has to be substituted with explode on every occuring place.
I experienced this error on FreeBSD 7_2 with php version 5.3.5 installed from ports.
This simple fix works fine.
Tags: blog, cms, Deprecated, ERROR, error message, file, fine, fix, freebsd, function, kind, line, order, php 5, place, ports, template, usr, version, websitedomain, Wordpress, www, youbizz
Posted in FreeBSD, Joomla, System Administration, Wordpress | 4 Comments »
Saturday, June 18th, 2011 After installing the Tweet Old Post wordpress plugin and giving it, I’ve been returned an error of my PHP code interpreter:
Call to undefined function: curl_init()
As I’ve consulted with uncle Google’s indexed forums 😉 discussing the issues, I’ve found out the whole issues are caused by a missing php curl module
My current PHP installation is installed from the port tree on FreeBSD 7.2. Thus in order to include support for php curl it was necessery to install the port /usr/ports/ftp/php5-curl :
freebsd# cd /usr/ports/ftp/php5-curl

freebsd# make install clean
(note that I’m using the php5 port and it’s surrounding modules).
Fixing the Call to undefined function: curl_init() on Linux hosts I suppose should follow the same logic, e.g. one will have to install php5-curl to resolve the issue.
Fixing the missing curl_init() function support on Debian for example will be as easy as using apt to install the php5-curl package, like so:
debian:~# apt-get install php5-curl

...
Now my tweet-old-post curl requirement is matched and the error is gone, hooray 😉
Tags: call to undefined function, Debian, ERROR, fatal error, freebsd, function, google, hooray, init function, installation, interpreter, issue, Linux, linux hosts, logic, Module, necessery, note, Old, order, package, php code, php installation, plugin, port, ports, post, requirement, support, tree, usr
Posted in FreeBSD, Linux, Wordpress | No Comments »


