Posts Tagged ‘web’

Start Stop Restart Microsoft IIS Webserver from command line and GUI

Thursday, April 17th, 2014

start-stop-restart-microsoft-iis-howto-iis-server-logo
For a decomissioning project just recently I had the task to stop Microsoft IIS  on Windows Server system.
If you have been into security for a while you know well how many vulnerabilities Microsoft (Internet Information Server) Webserver used to be. Nowadays things with IIS are better but anyways it is better not to use it if possible …

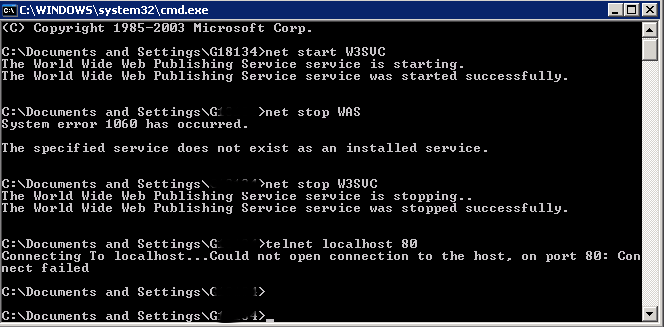
Nomatter what the rason if you need to make IIS stop serving web pages here is how to do it via command line:

At Windows Command Prompt, type:

net stop WAS

If the command returns error message to stop it type:

net stop W3SVC

stop-microsoft-IIS-webservice
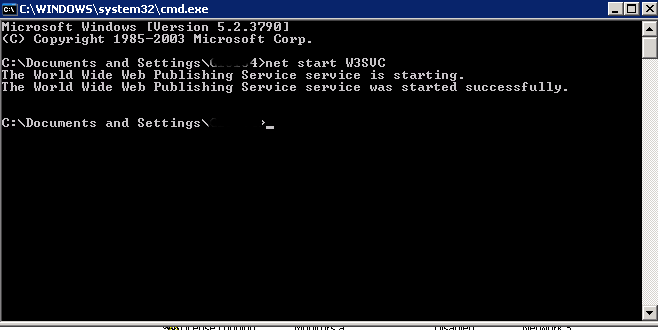
Just in case you have to start it again run:

net start W3SVC

start-restart-IIS-webserver-screenshot

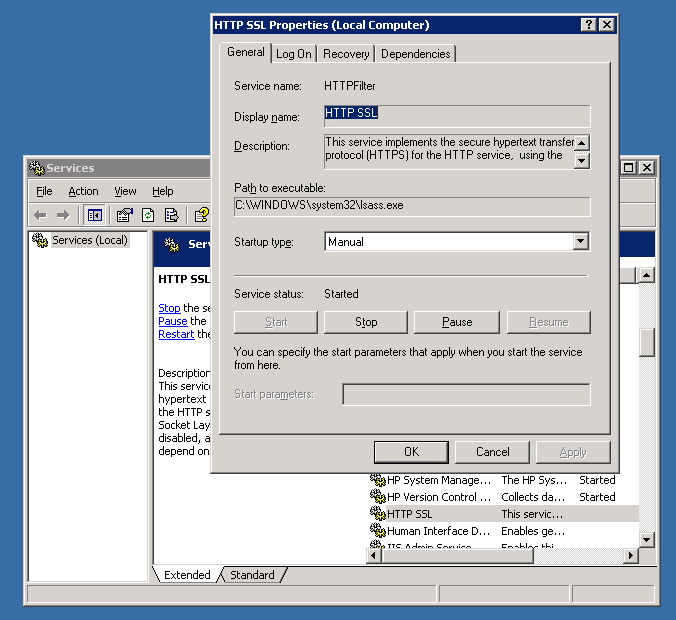
For those who prefer to do it from GUI interface, launch services.msc command from Windows Run:

> services.msc

services-msc-stop-microsoft-iis-webserver

In list of services lookup for
IIS Admin Service and HTTP SSL
a) (Click over it with right mouse button -> Properties)
b) Set Startup type to Manual
c) Click Stop Button

You're done now IIS is stopped to make sure it is stopped you can run from cmd.exe:

telnet localhost 80

when not working you should get 'Could not open connection to the host. on port 80: Connection failed' like shown up in screenshot.

Mount remote Linux SSHFS Filesystem harddisk on Windows Explorer SWISH SSHFS file mounter and a short evaluation on what is available to copy files to SSHFS from Windows PC

Monday, February 22nd, 2016

swish-mount-and-copy-files-from-windows-to-linux-via-sshfs-mount

I'm forced to use Windows on my workbook and I found it really irritating, that I can't easily share files in a DropBox, Google Drive, MS OneDrive, Amazon Storage or other cloud-storage free remote service. etc.
I don't want to use DropBox like non self-hosted Data storage because I want to keep my data private and therefore the only and best option for me was to make possible share my Linux harddisk storage
dir remotely to the Windows notebook.

I didn't wanted to setup some complex environment such as Samba Share Server (which used to be often a common option to share file from Linux server to Windows), neither wanted to bother with  installing FTP service and bother with FTP clients, or configuring some other complex stuff such as WebDav – which BTW is an accepted and heavily used solution across corporate clients to access read / write files on a remote Linux servers.
Hence, I made a quick research what else besides could be used to easily share files and data from Windows PC / notebook to a home brew or professional hosting Linux server.

It turned out, there are few of softwares that gives a similar possibility for a home lan small network Linux / Windows hybrid network users such, here is few of the many:

  • SyncThingSyncthing is an open-source file synchronization client/server application, written in Go, implementing its own, equally free Block Exchange Protocol. The source code's content-management repository is hosted on GitHub


    syncthing-logo

  • OwnCloud – ownCloud provides universal access to your files via the web, your computer or your mobile devices


    owncloud-logo

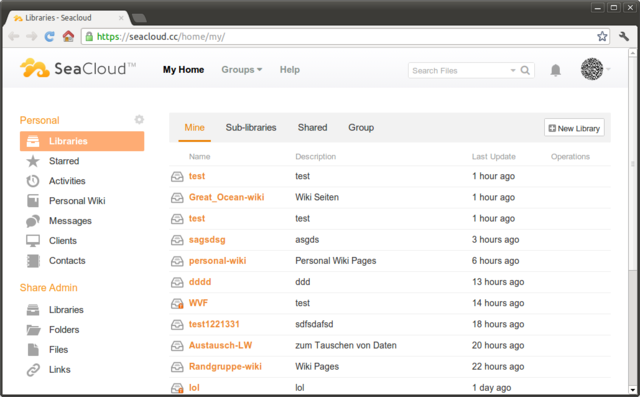
  • Seafile – Seafile is a file hosting software system. Files are stored on a central server and can be synchronized with personal computers and mobile devices via the Seafile client. Files can also be accessed via the server's web interface


seafile-client-in-browser

I've checked all of them and give a quick try of Syncthing which is really easy to start, just download the binary launch it and configure it under https://Localhost:8385 URL from a browser on the Linux server.
Syncthing seemed to be nice and easy to configure solution to be able to Sync files between Server A (Windows) and Server B(Linux) and guess many would enjoy it, if you want to give it a try you can follow this short install syncthing article.
However what I didsliked in both SyncThing and OwnCloud and Seafile and all of the other Sync file solutions was, they only supported synchronization via web and didn't seemed to have a Windows Explorer integration and did required
the server to run more services, posing another security hole in the system as such third party softwares are not easily to update and maintain.

Because of that finally after rethinking about some other ways to copy files to a locally mounted Sync directory from the Linux server, I've decided to give SSHFS a try. Mounting SSHFS between two Linux / UNIX hosts is
quite easy task with SSHFS tool

In Windows however the only way I know to transfer files to Linux via SSHFS was with WinSCP client and other SCP clients as well as the experimental:

As well as few others such as ExpandDrive, Netdrive, Dokan SSHFS (mirrored for download here)
I should say that I first decided to try copying few dozen of Gigabyte movies, text, books etc. using WinSCP direct connection, but after getting a couple of timeouts I was tired of WinSCP and decided to look for better way to copy to remote Linux SSHFS.
However the best solution I found after a bit of extensive turned to be:

SWISH – Easy SFTP for Windows

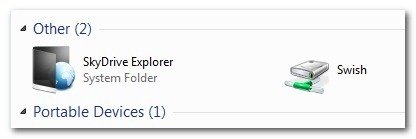
Swish is very straight forward to configure compared to all of them you download the .exe which as of time of writting is at version 0.8.0 install on the PC and right in My Computer you will get a New Device called Swish next to your local and remote drives C:/ D:/ , USBs etc.

swish-new-device-to-appear-in-my-computer-to-mount-sshfs

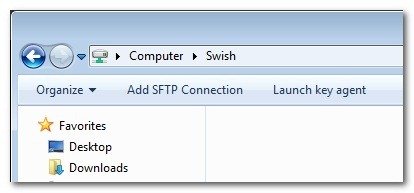
As you see in below screenshot two new non-standard buttons will Appear in Windows Explorer that lets you configure SWISH

windows-mount-sshfs-swish-add-sftp-connection-button-screenshot

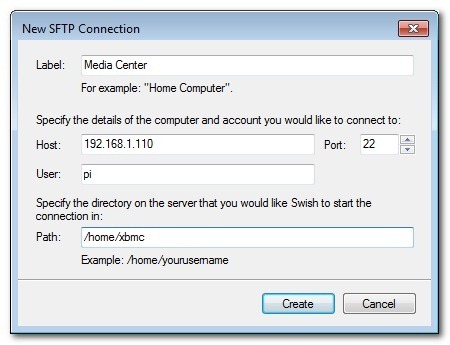
Next and final step before you have the SSHFS remote Linux filesystem visible on Windows Xp / 7 / 8 / 10 is to fill in remote Linux hostname address (or even better fill in IP to get rid of possible DNS issues), UserName (UserID) and Direcory to mount.

swish-new-fill-in-dialog-to-make-new-linux-sshfs-mount-directory-possible-on-windows

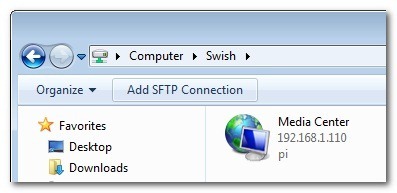
Then you will see the SSHFS moutned:

swish-sshfs-mounted-on-windows

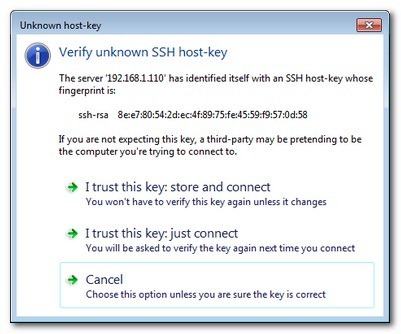
You will be asked to accept the SSH host-key as it used to be unknown so far

swish-mount-sshfs-partition-on-windows-from-remote-linux-accept-key

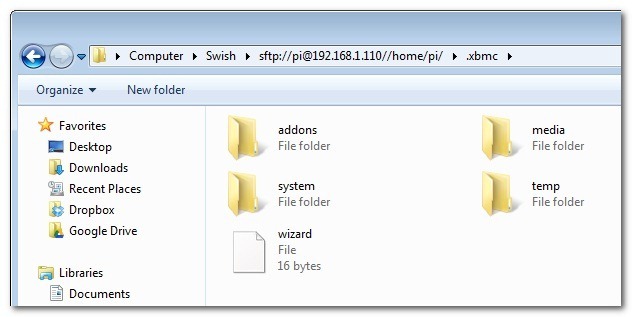
That's it now you will see straight into Windows Explorer the remote Linux SSHFS mounted:

remote-sshfs-linux-filesystem-mounted-in-windows-explorer-with-swish

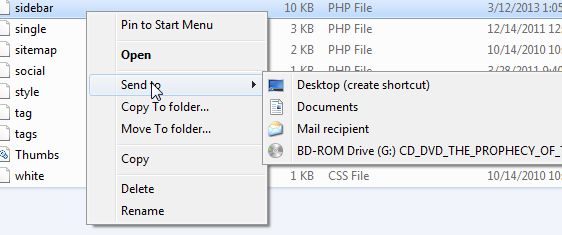
Once setupped a Swish connection to copy files directly to it you can use the Send to Embedded Windows dialog, as in below screenshot

swish-send-to-files-windows-screenshot

The only 3 problem with SWISH are:

1. It doesn't support Save password, so on every Windows PC reboot when you want to connect to remote Linux SSHFS, you will have to retype remote login user pass.
Fron security stand point this is not such a bad thing, but it is a bit irritating to everytime type the password without an option to save permanently.
The good thing here is you can use Launch Key Agent
as visible in above screenshot and set in Putty Key Agent your remote host SSH key so the passwordless login will work without any authentication at
all however, this might open a security hole if your Win PC gets infected by virus, which might delete something on remote mounted SSHFS filesystem so I personally prefer to retype password on every boot.

2. it is a bit slow so if you're planning to Transfer large amounts of Data as hundreds of megabytes, expect a very slow transfer rate, even in a Local  10Mbit Network to transfer 20 – 30 GB of data, it took me about 2-3 hours or so.
SWISH is not actively supported and it doesn't have new release since 20th of June 2013, but for the general work I need it is just perfect, as I don't tent to be Synchronizing Dozens of Gigabytes all the time between my notebook PC and the Linux server.

3. If you don't use the established mounted connection for a while or your computer goes to sleep mode after recovering your connection to remote Linux HDD if opened in Windows File Explorer will probably be dead and you will have to re-enable it.

For Mac OS X users who want to mount / attach remote directory from a Linux partitions should look in fuguA Mac OS X SFTP, SCP and SSH Frontend

I'll be glad to hear from people on other good ways to achieve same results as with SWISH but have a better copy speed while using SSHFS.

Fix “FAIL – Application at context path /application-name could not be started” deployment error in Tomcat manager

Thursday, October 1st, 2015

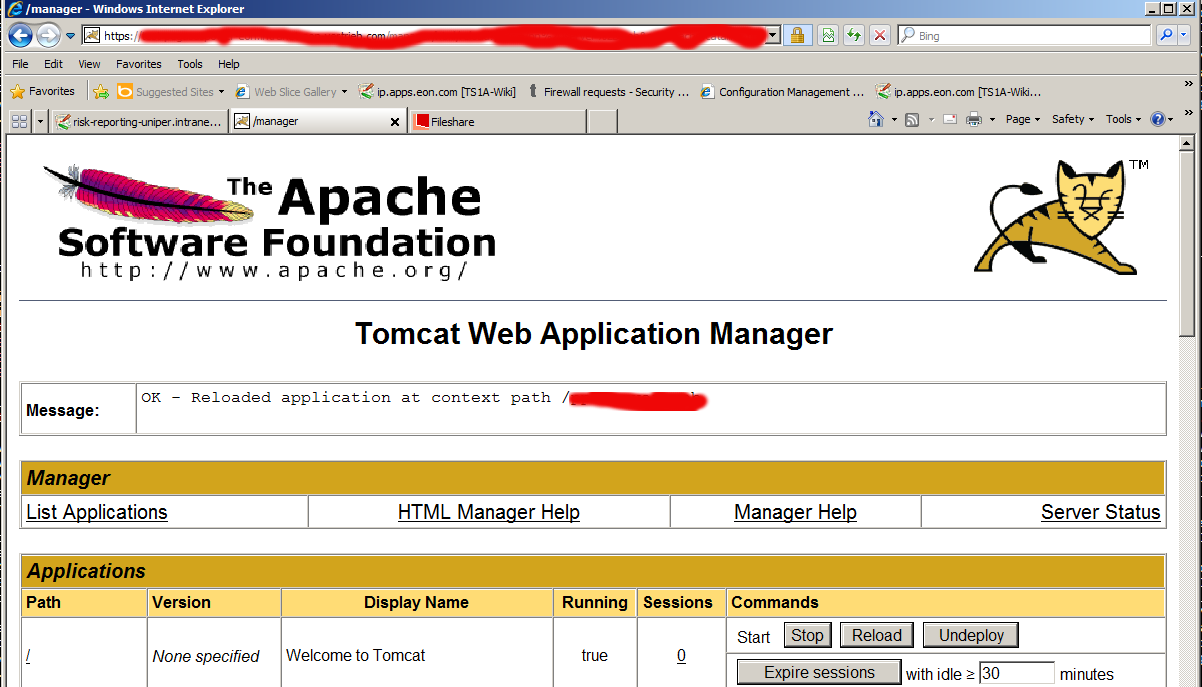
tomcat-manager-FAIL-Application-at-context-path-application-name-could-not-be-started-fix-solution-error

While deploying an environment called "Interim" which is pretty much like a testing Java application deployed from a Java EAR (Enterprise Archive) file from within a Tomcat Manager GUI web interface after stopping the application and trying to start it, the developers come across the error:


FAIL – Application at context path /application-name could not be started


The error puzzled me for a while until I checked the catalina.out I've seen a number of thrown Java Eceptions errors like:

Okt 01, 2015 10:48:46 AM org.springframework.web.context.ContextLoader initWebApplicationContext

Schwerwiegend: Context initialization failed

org.springframework.beans.factory.BeanCreationException: Error creating bean with name 'com.sun.xml.ws.transport.http.servlet.SpringBinding#2' defined in ServletContex

t resource [/WEB-INF/pp-server-beans.xml]: Cannot create inner bean ‘(inner bean)’ of type [org.jvnet.jax_ws_commons.spring.SpringService] while setting bean property

'service'; nested exception is org.springframework.beans.factory.BeanCreationException: Error creating bean with name '(inner bean)#33': FactoryBean threw exception on

 object creation; nested exception is java.lang.OutOfMemoryError: PermGen space

I've googled a bit about the error:

"FAIL – Application at context path /application-name could not be started"

and come across this Stackoverflow thread and followed suggested solution to fix web.xml tag closing error but it seems there was no such error in my case, I then also tried solution suggested by this thread (e.g. adding in logging.properties) file:
 

org.apache.catalina.core.ContainerBase.[Catalina].level = INFO
org.apache.catalina.core.ContainerBase.[Catalina].handlers = java.util.logging.ConsoleHandler

unfortunately this helped neither to solve the error when it is tried to be started from tomcat manager.

After asking for help a colleague Kostadin, he pointed me to take a closer look in the error (which is a clear indication) that the reserved space is not enough (see below err):
 

java.lang.OutOfMemoryError: PermGen space

And he pointed me then to Solution (which is to modify the present tomcat setenv.sh) settings which looked like this:

# Heap size settings

export JAVA_OPTS="-Xms2048M -Xmx2048M"


# SSCO test page parameter

export JAVA_OPTS="$JAVA_OPTS -DTS1A_TESTSEITE_CONFIG_PATH=test-myapplication.com"

# Default garbage collector settings

export JAVA_OPTS="$JAVA_OPTS -XX:MaxPermSize=128M"


# Aggressive garbage collector settings.

# Do not use! For testing purposes only!

#export JAVA_OPTS="$JAVA_OPTS -Xss128k -XX:ParallelGCThreads=20 -XX:+UseConcMarkSweepGC -XX:+UseParNewGC -XX:SurvivorRatio=8 -XX:TargetSurvivorRatio=90 -XX:MaxTenuringThreshold=31 -XX:+AggressiveOpts -XX:MaxPermSize=128M"


####### DO NOT CHANGE BELOW HERE #######

# Disable X11 usage

unset DISPLAY

export JAVA_OPTS="$JAVA_OPTS -Djava.awt.headless=true"


# Garbage collection log settings

export JAVA_OPTS="$JAVA_OPTS -verbose:gc -XX:+PrintGCTimeStamps -XX:+PrintGCDetails -Xloggc:/web/tomcat/current/logs/gc.log -XX:-TraceClassUnloading"


# Enable JMX console

export JAVA_OPTS="$JAVA_OPTS -Dcom.sun.management.jmxremote"


The solution is to to add following two options to export JAVA_OPTS (above options):

-XX:PermSize=512m -XX:MaxPermSize=512m


After modifications, my new line within setenv.sh looked like so:


JAVA_OPTS="-Xms2048M -Xmx2048M -XX:PermSize=512m -XX:MaxPermSize=512m"


Finally to make new JAVA_OPTS settings, I've restarted Tomcat with:


cd /web/tomcat/bin/
./shutdown.sh
sleep 5; ./startup.sh


And hooray it works fine thanks God! 🙂

How to Turn Off, Suppress PHP Notices and Warnings – PHP error handling levels via php.ini and PHP source code

Friday, April 25th, 2014

php-logo-disable-warnings-and-notices-in-php-through-htaccess-php-ini-and-php-code

PHP Notices are common to occur after PHP version upgrades or where an obsolete PHP code is moved from Old version PHP to new version. This is common error in web software using Frameworks which have been abandoned by developers.

Having PHP Notices to appear on a webpage is pretty ugly and give a lot of information which might be used by malicious crackers to try to break your site thus it is always a good idea to disable PHP Notices. There are plenty of ways to disable PHP Notices

The easiest way to disable it is globally in all Webserver PHP library via php.ini (/etc/php.ini) open it and make sure display_errors is disabled:

display_errors = 0

or

display_errors = Off

Note that that some claim in PHP 5.3 setting display_errors to Off will not work as expected. Anyways to make sure where your loaded PHP Version display_errors is ON or OFF use phpinfo();

It is also possible to disable PHP Notices and error reporting straight from PHP code you need code like:


<?php
// Turn off all error reporting
error_reporting(0);
?>


or through code:


ini_set('display_errors',0);


PHP has different levels of error reporting, here is complete list of possible error handling variables:


<?php
// Report simple running errors

error_reporting(E_ERROR | E_WARNING | E_PARSE);

// Reporting E_NOTICE can be good too (to report uninitialized
// variables or catch variable name misspellings …)

error_reporting(E_ERROR | E_WARNING | E_PARSE | E_NOTICE);

// Report all errors except E_NOTICE
// This is the default value set in php.ini

error_reporting(E_ALL ^ E_NOTICE);
// Report all PHP errors (see changelog)

error_reporting(E_ALL);
// Report all PHP errors error_reporting(-1);
// Same as error_reporting(E_ALL);

ini_set('error_reporting', E_ALL); ?>

The level of logging could be tuned on Debian Linux via /etc/php5/apache2/php.ini or if necessary to set PHP log level in PHP CLI through /etc/php5/cli/php.ini with:

error_reporting = E_ALL & ~E_NOTICE


If you need to remove to remove exact warning or notices from PHP without changing the way  PHPLib behaves is to set @ infront of variable or function that is causing NOTICES or WARNING:
For example:
 

@yourFunctionHere();
@var = …;


Its also possible to Disable PHP Notices and Warnings using .htaccess file (useful in shared hosting where you don't have access to global php.ini), here is how:

# PHP error handling for development servers
php_flag display_startup_errors off
php_flag display_errors off
php_flag html_errors off
php_flag log_errors on
php_flag ignore_repeated_errors off
php_flag ignore_repeated_source off
php_flag report_memleaks on
php_flag track_errors on
php_value docref_root 0
php_value docref_ext 0
php_value error_log /home/path/public_html/domain/php_errors.log
php_value error_reporting -1
php_value log_errors_max_len 0

This way though PHP Notices and Warnings will be suppressed errors will get logged into php_error.log

Shutdown tomcat server node in case of memory depletion – Avoiding Tomcat Out of memory

Friday, June 6th, 2014

fix-avoid-tomcat-out-of-memory-logo

Out Of Memory Errors, or OOMEs, are one of the most common problems faced by Apache Tomcat users. Tomcat cluster behind Apache unreachable (causing customer downtimes). OOME errors occur on production servers that are experiencing an unusually high spike of traffic.

Out of memory errors are usually a problem of application and not of Tomcat server. OMEs have become such a persistent topic of discussion in the Apache Tomcat community cause its so difficult to trace to their root cause. Usually 'incorrect' web app code causing Tomcat to run out of memory is usually technically correct.

Most common reasons for Out of Memory errors in application code are:
 

  •     the heap size being too small
  •     running out of file descriptors
  •     more open threads than the host OS allows
  •     code with high amounts of recursion
  •     code that loads a very large file into memory
  •     code that retaining references to objects or classloaders
  •     a large number of web apps and a small PermGen


The following java option -XX:OnOutOfMemoryError= could be added to any of tomcat java application servers in setenv.sh in  JAVA_OPTS= variable in case of regular Out of Memory errors occur making an application unstable.

-XX:OnOutOfMemoryError=<path_to_tomcat_shutdown_script.sh>

Where < path_to tomcat_shutdown_script.sh > is shutdown script(which performs kill <tomcat_pid> if normal shutdown fails) for the tomcat instance.

With this setup if any tomcat instance run out of memory it will be shutdown (shutdown script invoked) – as result the Apache proxy infront of Tomcats should not pass any further requests to this instance and application will visualize / work properly for end customers.

Usually a tomcat_shutdown_script.sh to invoke in case of OOM would initiate a Tomcat server restart something like:

for i in `ps -ef |grep tomcat |grep /my_path_to_my_instance | awk '{print $2}'`
do
kill -9 "$i"
#path and script to start tomcat
done

To prevent blank pages returned to customer because of shutdown_script.sh starting stopping Tomcat you can set in Reverse Apache Proxy something like:
 

<Proxy balancer://mycluster>
   BalancerMember ajp://10.16.166.48:11010/ route=delivery1 timeout=30 retry=1
   BalancerMember ajp://10.16.166.70:11010/ route=delivery2 timeout=30 retry=1
</Proxy>

Where in above example I assume, there are only two tomcat nodes, for more just add respective ones.

Note that if the deployed application along all servers is having some code making it crash all tomcat nodes can get shutdown all time and you can get in a client havoc 🙂

Linux: basic system CPU, Disk and Network resource monitoring via phpsysinfo lightweight script

Wednesday, June 18th, 2014

phpsysinfo-logo-simple-way-to-web-monitor-windows-linux-server-cpu-disk-network-resources

There are plenty of GNU / Linux softwares to monitor server performance (hard disk space, network and CPU load) and general hardware health both text based for SSH console) and from web.

Just to name a few for console precious tools, such are:

And for web based Linux / Windows server monitoring my favourite tools are:

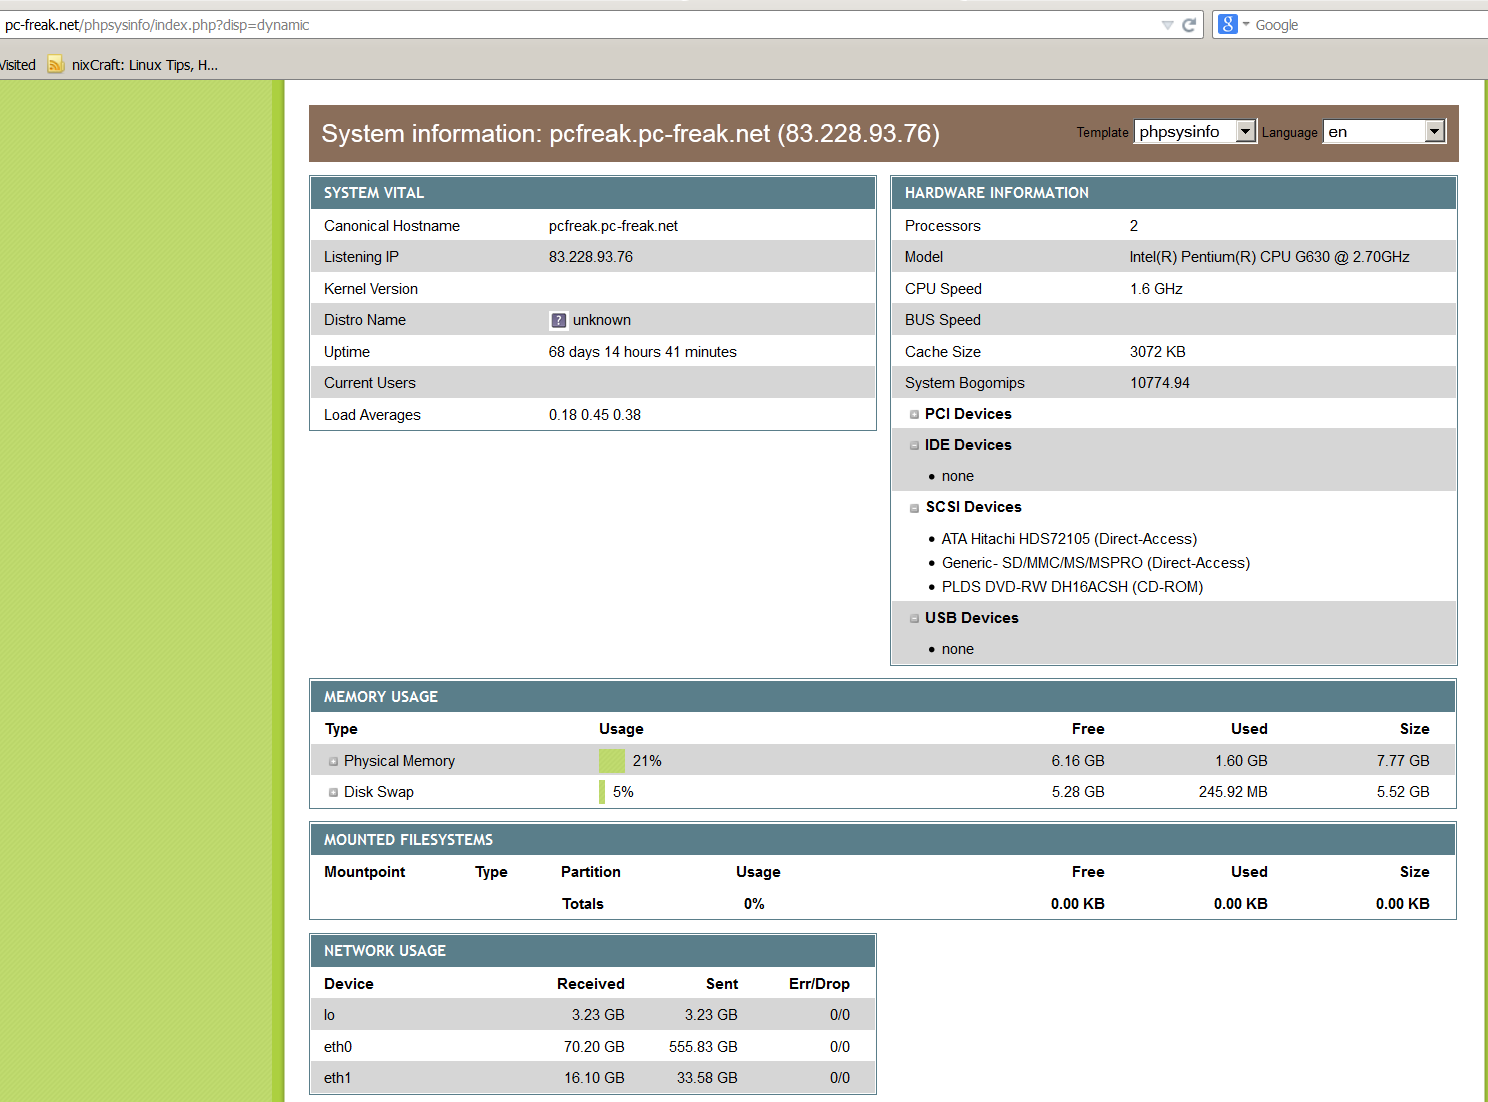
phpsysinfo is yet another web based Linux monitoring software for small companies or home router use it is perfect for people who don't want to spend time learning how to configure complicated and robust multiple server monitoring software like Nagios or Icanga.

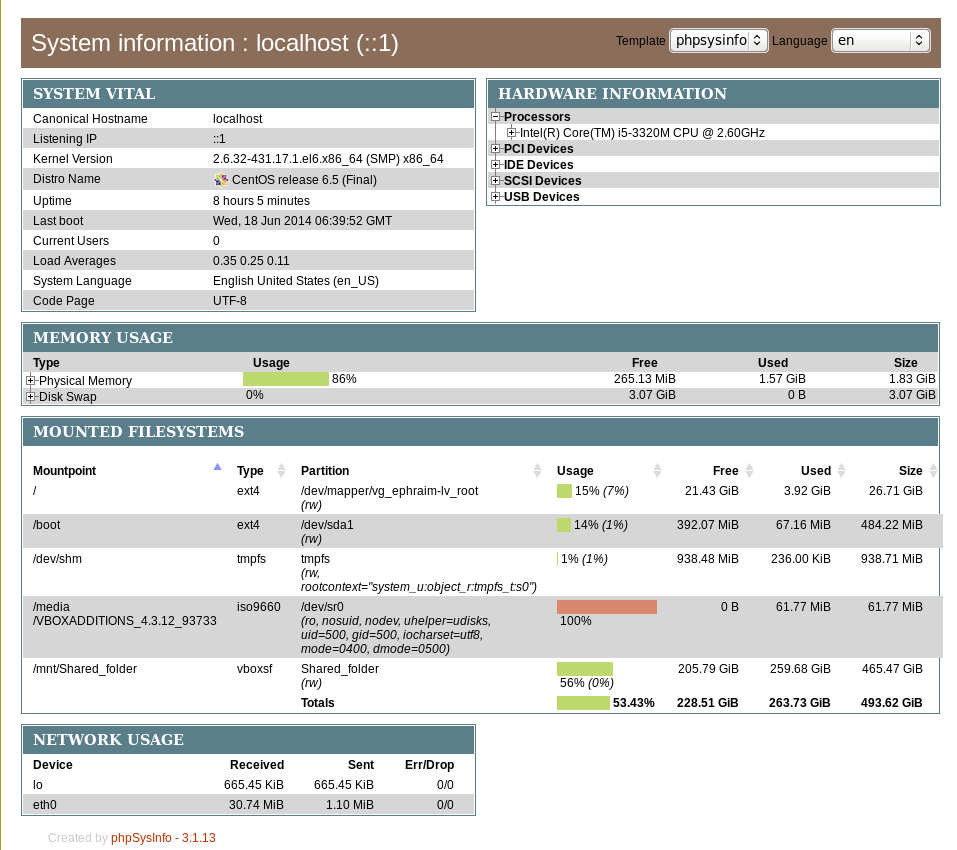
phpsysinfo is quick and dirty way to monitor system uptime, network, disk and memory usage, get information on CPU model, attached IDEs, SCSI devices and PCIs from the web and is perfect for Linux servers already running Apache and PHP.

1. Installing PHPSysInfo on Debian, Ubuntu and deb derivative Linux-es

PHPSysInfo is very convenient and could be prefered instead of above tools for the reason it is available by default in Debian and Ubuntu package repositories and installable via apt-get and it doesn't require any further configuration, to roll it you install you place a config and you forget it.
 

 # apt-cache show phpsysinfo |grep -i desc -A 2

Description: PHP based host information
 phpSysInfo is a PHP script that displays information about the
 host being accessed.


Installation is a piece of cake:

# apt-get install --yes phpsysinfo

Add phpsysinfo directives to /etc/apache2/conf.d/phpsysinfo.conf to make it accessible via default set Apache vhost domain under /phpsysinfo

Paste in root console:
 

cat > /etc/apache2/conf.d/phpsysinfo.conf <<-EOF
Alias /phpsysinfo /usr/share/phpsysinfo
<Location /phpsysinfo>
 Options None
 Order deny,allow
 Deny from all
 #Allow from localhost
 #Allow from 192.168.56.2
 Allow from all
</Location>
EOF


Above config will allow access to /phpsysinfo from any IP on the Internet, this could be a security hole, thus it is always better to either protect it with access .htaccess password login or allow it only from certain IPs, from which you will access it with something like:

Allow from 192.168.2.100

Then restart Apache server:

# /etc/init.d/apache2 restart


To access phpsysinfo monitoring gathered statistics, access it in a browser http://defaultdomain.com/phpsysinfo/

phpsysinfo_on_debian_ubuntu_linux-screenshot-quick-and-dirty-web-monitoring-for-windows-and-linux-os

2. Installing PHPSysinfo on CentOS, Fedora and RHEL Linux
 

Download and untar

# cd /var/www/html
# wget https://github.com/phpsysinfo/phpsysinfo/archive/v3.1.13.tar.gz
# tar -zxvf phpsysinfo-3.1.13.tar.gz
# ln -sf phpsysinfo-3.1.13 phpsysinfo
# mv phpsysinfo.ini.new phpsysinfo.ini


Install php php-xml and php-mbstring RPM packages
 

yum -y install php php-xml php-mbstring
...

Start Apache web service

[root@ephraim html]# /etc/init.d/httpd restart

[root@ephraim html]# ps ax |grep -i http
 8816 ?        Ss     0:00 /usr/sbin/httpd
 8819 ?        S      0:00 /usr/sbin/httpd

phpsysinfo-install-on-centos-rhel-fedora-linux-simple-monitoring

As PhpSysInfo is written in PHP it is also possible to install phpsysinfo on Windows.

phpsysinfo is not the only available simple monitoring server performance remotely tool, if you're looking for a little bit extended information and a better visualization interface alternative to phpsysinfo take a look at linux-dash.

In context of web monitoring other 2 web PHP script tools useful in remote server monitoring are:

OpenStatus – A simple and effective resource and status monitoring script for multiple servers.
LookingGlass – User-friendly PHP Looking Glass (Web interface to use Host (Nslookup), Ping, Mtr – Matt Traceroute)

Run native Internet Explorer 6 on latest Debian / Ubuntu Linux with IEs4Linux

Thursday, July 24th, 2014

Install-internet-explorer-on-debian-linux-IEs4Linux_logo.svg
If you're a GNU / Linux Desktop user like me and you have to administrate hybrid server environments running mixture of MS Windows with Microsoft IIS webserver running active server pages (.ASP) developed application or UNIX / GNU Linux servers web applications using Mono as a server-side language, often you need to have browser which properly supports  Internet Explorer Trident web (layout) renderer (also famous as MSHTML).

Having Internet Explorer on your Linux is very useful for web developers who want to test how their website works under IE.

Of course you can always install Windows in Virtualbox VM and do your testing in the Virtual Machine but this takes time to install and also puts a useless load to a PC ….

IES4 Linux is a Linux free (open source) shell script that lets you run Internet Explorer on your Linux desktop.

ies4linux scripts collection uses emulation with WINE (Wine is Not Emulator) emulator to run the native  Windows Internet Explorer thus before use it you have to install Wine.

There are plenty of tutorials online about ies4Linux, problem is as it is not updated and developed most tutorials doesn't work on Debian Wheezy / Ubuntu and rest of deb based linux distros.
This is why I decided to write just another ies4linux tutorial that actually works!

On Debian / Ubuntu / Mint Linux install via apt-get:

apt-get –yes install wine

Then with a non-root user download ies4linux-latest.tar.gz. Just in case ies4linux-latest.tar.gz disappears in future I've created also a ies4linux-latest.tar.gz mirror for download here

and unarchive tar archive:

wget http://www.tatanka.com.br/ies4linux/downloads/ies4linux-latest.tar.gz
tar -zxvf ies4linux-latest.tar.gz
cd ies4linux-*
./ies4linux

You will get:
 

IEs4Linux 2 is developed to be used with recent Wine versions (0.9.x). It seems that you are using an old version. It's recommended that you update your wine to the latest version (Go to: winehq.com).

You need to install cabextract first!
Download it here: http://www.kyz.uklinux.net/cabextract.php

To fulfill this requirement you will need to also cabetract package which is luckily part of Debian:
 

apt-get install –yes cabextract

On wine version 1.0 and onwards winprefixcreate has been changed to winecfg binary.
To prevent missing wineprefixcreate, errors during ies4linux installer run  its necessery to symlink as a workaround:
 

ln -sv /usr/bin/winecfg /usr/bin/wineprefixcreate


To continue with Internet Explorer ies4Linux installater run again:

./ies4linux
images/internet-explorer-for-linux-debian-gnu-linux-screenshot

/images/internet-explorer-4-linux-installer-debian-gnu-linu-screenshot

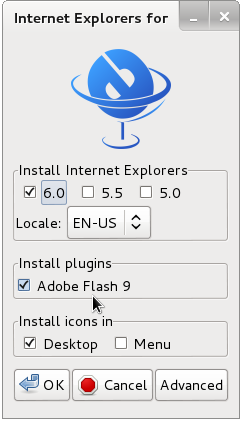
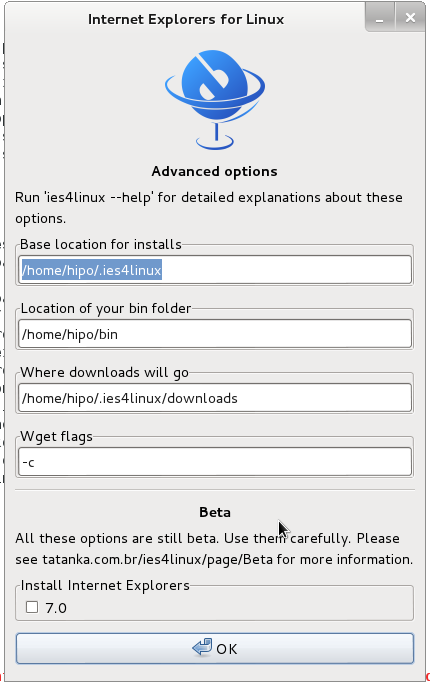
You will get the installer GUI window with selection option which Internet Explorer version you want. Choose between IE 5.0, IE 5.5 and IE 6. It is also possible to install IE 7 which is still considered beta version and is less tested and unstable, will probably lead to crashes. If you want to install also IE 7 check it as an option from Advanced menu.
/images/ies4linux-internet-explorer-installer-debian-gnu-linux-screenshot

If you get permission errors after running ies4Linux gui installer to solve that chown recursively directory to the user with which you will be running it:
 

chown -R hipo:hipo ies4linux-2.99.0.1


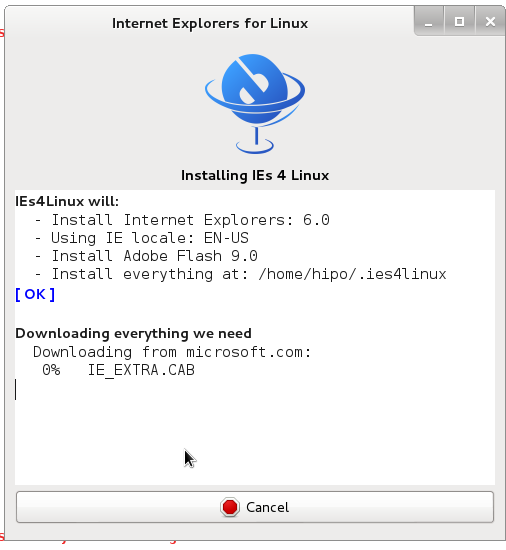
Internet Explorer for Linux downloader, will connect Microsoft.com website and download DCOM, MCF and various IE required .CAB files.

If you get some ies4linux GUI installer unexpected crashes you can try to download all required IE binaries, surrounding files and flash player using no-gui installer with cmd:
 

./ies4linux –no-gui –install-corefonts

IEs4Linux 2 is developed to be used with recent Wine versions (0.9.x). It seems that you are using an old version. It's recommended that you update your wine to the latest version (Go to: winehq.com).

IEs4Linux will:
  – Install Internet Explorers: 6.0
  – Using IE locale: EN-US
  – Install Adobe Flash 9.0
  – Install MS Core Fonts
  – Install everything at: /home/hipo/.ies4linux
[ OK ]

Downloading everything we need
  Downloading from microsoft.com:
   DCOM98.EXE
   mfc42.cab
   249973USA8.exe
   ADVAUTH.CAB
   CRLUPD.CAB
   HHUPD.CAB
   IEDOM.CAB
   IE_EXTRA.CAB
   IE_S1.CAB
   IE_S2.CAB
   IE_S5.CAB
   IE_S4.CAB
   IE_S3.CAB
   IE_S6.CAB
   SETUPW95.CAB
   FONTCORE.CAB
   FONTSUP.CAB
   VGX.CAB
   SCR56EN.CAB

  Downloading from macromedia.com:
   100% swflash.cab

  Downloading from sourceforge.net
   0%   webdin32.exe[ OK ]bdin32.exe

Installing IE 6
  Initializing
  Creating Wine Prefix
Your wine does not have wineprefixcreate installed. Maybe you are running an old Wine version. Try to update it to the latest version.

To fix the error:

Your wine does not have wineprefixcreate installed. Maybe you are running an old Wine version. Try to update it to the latest version.

vim lib/functiions.sh

Go to line 36 (Type :36 in vim)

Line:

wine –version 2>&1 | grep -q "0.9." || warning $MSG_WARNING_OLDWINE

Has to be changed to:

wine –version 2>&1 | egrep -q "0.9.|-1." || warning $MSG_WARNING_OLDWINE


Also you need to substitute wineprefixcreate to wineboot (if you haven't already symlinked wineprefixcreate to winecfg – as pointed earlier in article.

To do so make following substitution in lib/install.sh and in lib/functions.sh

cp -rpf lib/install.sh lib/install.sh.bak; cat lib/install.sh |sed -e 's#wineprefixcreate#wineboot#g' > lib/install_new.sh; mv lib/install_new.sh lib/install.sh

cp -rpf lib/install.sh lib/functions.sh.bak; cat lib/functions.sh |sed -e 's#wineprefixcreate#wineboot#g' > lib/functions_new.sh; mv lib/functions_new.sh lib/functions.sh


Also it is necessery to change default corefonts download url which points to sourceforge but is failing. I've made mirror of corefonts files here
 

cp -rpf lib/install.sh lib/install.sh.bak; cat lib/install.sh |sed -e 's#http://internap.dl.sourceforge.net/sourceforge/corefonts/#www.pc-freak.net/files/corefonts/#g' > lib/install_new.sh; mv lib/install_new.sh lib/install.sh

Re-run the ies4linux console installer:
 

 ./ies4linux –no-gui –install-corefonts

….
Es4Linux installations finished!

On installation success you should get output like this
Hopefully you will see no errors like in my case, if you get the corefonts download error again re-run the installer and it should succesully download the files.

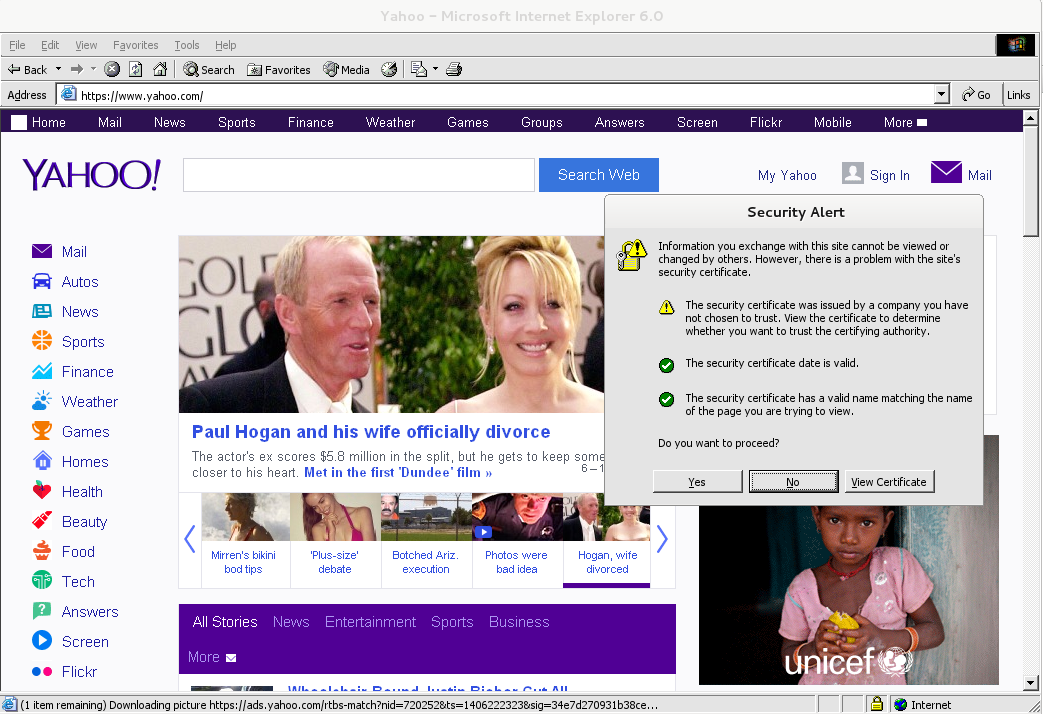
To then run ies4linux:

~/bin/ie6

internet-explorer-ies4linx-running-on-debian-gnu-linux-screenshot
Though Ies 4 Linux is good for basic testing it is not psosible to use the browser for normal browsing because its a bit buggy and slow.

By default Internet Explorer 6 behavior is to prompt security alert on various actions, though this might be useful for debugging it is really annoying so I personally disabled those by decreasing from:

Tools -> Internet Options -> Security -> (Security Level)
I've decreased it from Medium to Medium-Low

ies4Linux was not developed since 2008 and as of time of writting ies4linux official project website seems abandoned.

 

Tracking graphically MySQL, Apache and Network performance in web with Munin on Debian Linux

Saturday, March 19th, 2011

munin_monitor_cpu_network_hard_drive_apache_mysql_performance-in-web-on-linux_logo

Munin is great software for surveillance software for your MySQL, Apache, Qmail, Postfix and many other of the classical daemon services which most of the Linux, BSD servers online are running on.

1. Munin on Debian Linux is really easy to be installed and comes to executing:

debian:~# apt-get install munin munin-node munin-plugins-extra

2. Link /var/www/munin/ to some VirtualHost or ServerHost
For instance if your munin is to be placed on the domain www.pc-freak.net.net which has the DocumentRoot of /var/www

debian:~# cd /var/www
debian:/var/www# ln -sf /var/www/munin munin

3. Add some extra MySQL related plugins

To check whole list of pmunin plugins you can enable check in /etc/munin/plugins directory

Lets say our Munin will be providing statistics mainly for MySQL, enable this bunch of plugins:

cd /etc/munin/plugins
ln -s /usr/share/munin/plugins/mysql_ mysql_
ln -s /usr/share/munin/plugins/mysql_bytes mysql_bytes
ln -s /usr/share/munin/plugins/mysql_innodb mysql_innodb
ln -s /usr/share/munin/plugins/mysql_isam_space_ mysql_isam_space_
ln -s /usr/share/munin/plugins/mysql_queries mysql_queries
ln -s /usr/share/munin/plugins/mysql_slowqueries mysql_slowqueries
ln -s /usr/share/munin/plugins/mysql_threads mysql_threads


Though above command would enable mysql monitoring it will be not working out of the box. You will find in munin logs error like:

Missing dependency Cache::Cache at /usr/share/munin/plugins/mysql_ line 716."

To fix this install libcache-perl and libcache-cache-perl

apt-get install --yes libcache-perl libcache-cache-perl
 

Then regenerate munin plugin configuration issue cmd:

munin-node-configure --suggest --shell | sh

and restart Munin-node server

service munin-node restart
 

Munin Node should be able login to the MySQL server using the Debian System Maintenance user however if you should need to create a custom user you can add the following configuration to:
 

/etc/munin/plugin-conf.d/munin-node


[mysql*]
    user root
    env.mysqluser muninmonitor
    env.mysqlpassword Your-Secret-Password

4. Edit Munin config

Make sure you have at least the following variables enabled in /etc/munin/munin.conf
 

 dbdir  /var/lib/munin
 htmldir /var/cache/munin/www
 logdir /var/log/munin
 rundir  /var/run/munin

 tmpldir    /etc/munin/templates

includedir /etc/munin/munin-conf.d

[localhost.localdomain]
    address 127.0.0.1
    use_node_name yes


5. Add Munin Alias or Virtualhost

To make Munin Accessible from Webserver you need to at least add an alias create a file
/etc/apache2/conf.d/munin with following content:

vim /etc/apache2/conf.d/munin

Alias /munin /var/cache/munin/www

<Directory /var/cache/munin/www>
        Order allow,deny
        #Allow from localhost 127.0.0.0/8 ::1
        Allow from all
        Options None
        php_value engine off

    <IfModule mod_expires.c>
        ExpiresActive On
        ExpiresDefault M310
    </IfModule>

</Directory>


If you want to access Munin from Apache subdomain create it lets say you want to access it via stats.www.pc-freak.net, use following config file:

vi /etc/apache2/sites-enabled/stats.www.pc-freak.net
 

<VirtualHost *>
   ServerAdmin hipo@www.pc-freak.net
   ServerName stats.www.pc-freak.net
   DocumentRoot /var/cache/munin/www
   <Directory />
       Options FollowSymLinks
       #AllowOverride All
       php_value engine off
   </Directory>
   LogLevel debug
   CustomLog /var/log/apache2/munin/access.log combined
   ErrorLog /var/log/apache2/munin/error.log
   ServerSignature On
<Directory /var/cache/munin/www>
        Order allow,deny
        #Allow from localhost 127.0.0.0/8 ::1
        Allow from all
        Options FollowSymlinks
        #AllowOverride All
        php_value engine off

</Directory>

</VirtualHost>


6. Restart Apache;

debian:~# /etc/init.d/apache2 restart

Now to access the newly installed munin point your favorite browser to (either the subdirectory configured for access or the Virtualhost subdomain):

https://www.pc-freak.net/munin/
or
http://munin.www.pc-freak.net

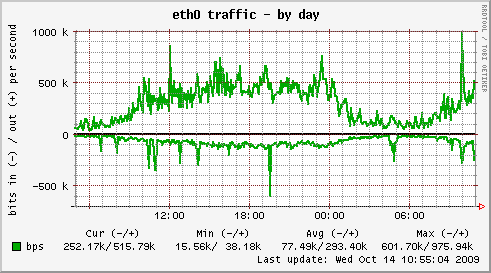
eth0-network-traffic-munin-server-statistics

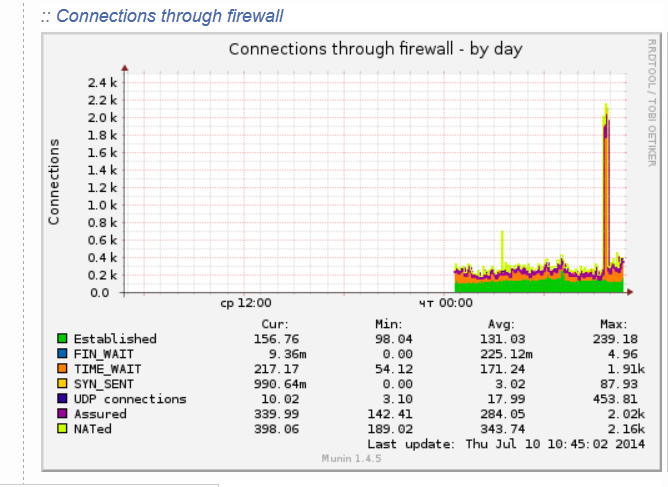
connections_through_firewall-statistics-munin-debian-linux
7. Protecting Munin with a password

As it could be a security leak to expose statistics regarding your server (Disk I/O, Memory, Load Avarage, Apache, MySQL Postfix) operations it is good security practice to protect munin with a password.

I've earlied blogged on how to protect your server munin web-statistics wtih an htaccess password (read it here)


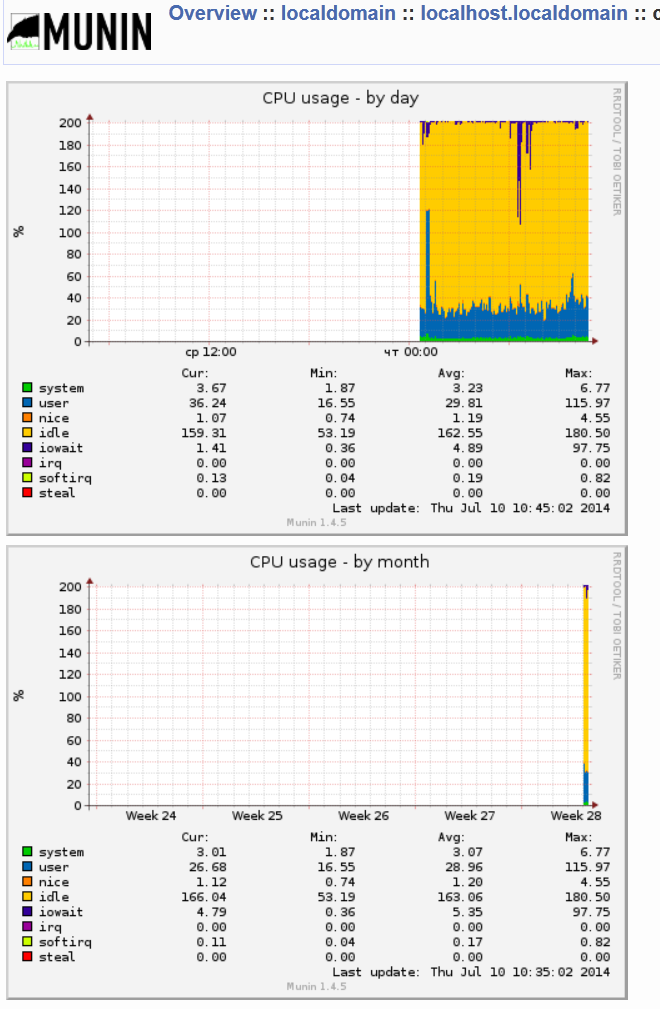
munin-cup-statistics-by-day-and-by-month-screenshot

Happy Monitoring

Httpwatch a must have web developer and web hosting sysadmin Firefox / Internet Explorer / IPad / IPhone add-on

Monday, December 16th, 2013


Today a colleague of mine referred me to a wonderful Mozilla Firefox (Windows / Mac) plugin called HttpWatch.

HttpWatch is an HTTP sniffer for IE, Firefox, iPhone & iPad
that provides new insights into how your website loads and performs.
The plugin is quite simple it shows you all requests from your Browser to remote server with plenty of Debug information (on the fly). You can see exactly the Commands sent over the HTTP protocol as well as returned request status responce from Web Server (i.e. 200, 300, 400). By knowing the status returned by webserver you can debug odd problems with website authentication as well as oddities caused by proxies you don't know about. Besides showing responce returned on web requests HttpWatch shows also hand-shake of session ID variables. This makes the plugin  precious for Web developers and System Administrators working in Web & Middleware (Linux / Windows based Web Hosting companies)  etc.

HttpWatch is also a must have plugin for anyone looking to optimize a website for speed or for fixingwebsite responce time bottleneck issues. The size of plugin is quite big as of time of writting about 18.2 Megabytes. HttpWatch comes with separate app installer like any other stand alone Windows application.  Unfortunately Httpwatch does not have a version for GNU / Linux. Linux users could use HTTPFox, Google Chrome Developer tools or
Firebug.

Once you have plugin installed to check what's happening with a website access in (Firefox) select Tools -> HttpWatch. You will get a bottom screen new window with deug info.

httpwatch debugging accessed website information - web browser tool to optimize your website

Here is list of some of the many things for which plugin is useful;

  • Records HTTP
  • Decrypts HTTPS Traffic
  • Integrates with Internet Explorer & Firefox
  • Supports the SPDY Protocol in Firefox
  • Standalone Log File Viewer
  • Summary of Recorded Traffic
  • Grouping of Requests by Page
  • Collect Log Files From Your Customers
  • Request Level Time Charts
  • Real-Time Page Level Time Charts
  • Page Events
  • Detects Potential Problems
  • Customizable Data Columns
  • Data Tips
  • Automation Support
  • Advanced Filtering
  • Millisecond Level Timing
  • HTTP Compression
  • Network Level Performance Data
  • Extended Cookie Information
  • Shows Interaction with Browser Cache
  • Raw HTTP Streams
  • Export Data to CSV, HAR and XML
  • Import HAR files
  • Customizable CSV Export
  • Keyboard Accelerators
  • Access to Cached and Downloaded Content
  • Accurately Records Requests and Responses
  • Automatic Recording and Saving

Finally HttpWatch is a plugin to have next to Yahoo's YSlow, FasterfoxFireBug and Firefox's Web Developer plugin

How to list Files in a directory and generate web URLS with PHP

Tuesday, April 10th, 2012

I needed a short PHP script that reads all, my .html files in a directory and then generates html a hrefs links pointing to each of the html files stored in the directory.

Here is the short code I come up:

$directory_to_open=”my-dir/”;
$max_files=100;
$i=0;
if ($handle = opendir(“$directory_to_open”)) {
while (false !== ($file = readdir($handle)) && $i <= $max_files)
{
$i=$i+1;
if ($file != “.” && $file != “..”)
{
$thelist .= ‘| ‘.str_replace(“.html”,””,$file).’ |’;
echo “$thelist”; }
}
closedir($handle);
}

In my case the directories with html were planned to contain, less than 100 files a directory, so in order to show links to only the first 100 files in the directory, I used the $max_files=100 and a check if value is reached in the while loop. For anyone who want to build html you see in above while if $max_files is reached then the while loop exits.

Because by default the files returned contained the naming format file_name.html, whether I wanted to show only the file name without the .html extensions used str_replace(); to get rid of file extensions string.