Posts Tagged ‘Reboot’

CentOS 8 / Redhat 8 insert additional guests additions to VM to enable Fullscreen, Copy / Paste and Shared Folder from host OS

Monday, January 10th, 2022

virtualbox-guest-additions-install-on-centos-8.3-linux-oracle-logo

My experience with enabling virtualbox additions guest tools on many of the separate Linux distributions throughout time is pretty bad as it always is a pain in the ass to enable fully functional full screen and copy paste for Virtualbox…
 
For those who installed it for a first time vbox guest addition tools for Virtualbox are additional software components added so the Emulated Operating system
could allow better screen resolution and better mouse integration support.

So far I've installed virtualbox additions tools to CentOS 7 and Debian Linux various releases and faced complications there as well.
Few days ago my colleague Georgi Stoyanov have installed CentOS 8.3 with current version of VirtualBox 6.1 (vesrsion from beginning of 2022) and he has also shared had issues with enabling the CentOS 8.3 Linux to work with guestadditions but eventually found a resolution.

Thus he has shared with me the solution and I share it with you, so hopefully someone else could enable Guesttools on his CentOS 8.3 with less digging online.
The error received is:

# ./VBoxLinuxAdditions.run

Trying to install Guest Additions in RHEL 8.3.

VirtualBox Guest Additions: Starting.
VirtualBox Guest Additions: Building the VirtualBox Guest Additions kernel
modules. This may take a while.
VirtualBox Guest Additions: To build modules for other installed kernels, run
VirtualBox Guest Additions: /sbin/rcvboxadd quicksetup
VirtualBox Guest Additions: or
VirtualBox Guest Additions: /sbin/rcvboxadd quicksetup all
VirtualBox Guest Additions: Building the modules for kernel
4.18.0-193.el8.x86_64.

VirtualBox Guest Additions: Look at /var/log/vboxadd-setup.log to find out what
went wrong
ValueError: File context for /opt/VBoxGuestAdditions-6.0.20/other/mount.vboxsf already defined
VirtualBox Guest Additions: Running kernel modules will not be replaced until
the system is restarted
Press Return to close this window…

No idea what to do next. Been trying for sometime.


To enable guestaddtions in CentOS 8.3, e.g. get arount the error you have to:


1. Install all necessery dependncies RPMs required by GuestAddition tools


# dnf install tar bzip2 kernel-devel-$(uname -r) kernel-headers perl gcc make elfutils-libelf-devel

# dnf -y install gcc automake make kernel-headers dkms bzip2 libxcrypt-compat kernel-devel perl

2.  Run below semanage and restorecon commands


# semanage fcontext -d /opt/VBoxGuestAdditions-/other/mount.vboxsf
# restorecon /opt/VBoxGuestAdditions-/other/mount.vboxsf


3.  Insert Virtualbox guest additions ISO and Run it


centos-insert-guest-additions-linux-virtualbox-screenshot
 

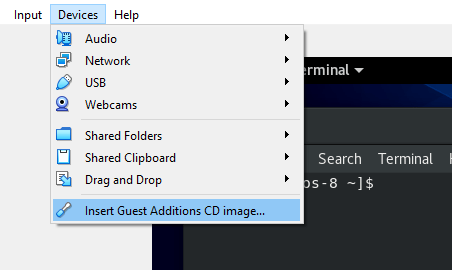
Devices -> Insert Guest Additions CD Image


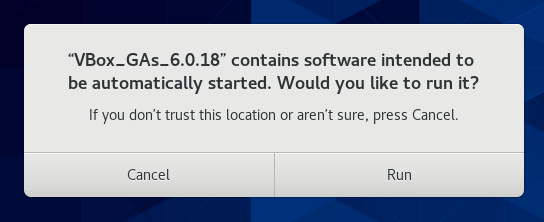
Click Run button to exec Vbox_GAs_6.0.18 script or run it manually

Run-Guest-Additions-screenshot-virtualbox-centos-8

or mount it manually with mount command and execute the VBoxLinuxAdditions.run to do so:


$ cd /run/media/`whoami`/VB*
$ su
# ./VBoxLinuxAdditions.run
Installing additional modules …
VirtualBox Guest Additions: Building the VirtualBox Guest Additions kernel modules.  This may take a while.
VirtualBox Guest Additions: Running kernel modules will not be replaced until the system is restarted
VirtualBox Guest Additions: Starting.


4. Reboot the VM
 

# reboot

5. Check and Confirm Virtualbox guest additions are properly installed and running
 

# lsmod | grep vbox


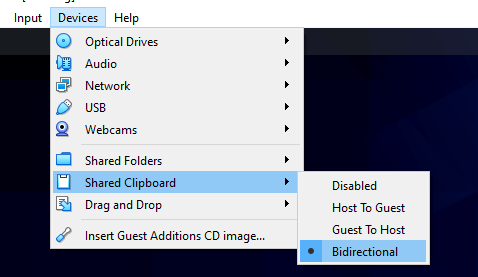
6. Enable Copy / Paste from to Virttual Machine e.g. Shared Clipboard / Shared Folder etc.


Share-Clipboard-in-Virtualbox-screenshot-centos-8


The three options most useful besides the support for FullScreen OS emulation by Virtualbox to enable right after
guesttools is on are:


1. Devices -> Shared Clipboard -> Bidirectional
2. Devices -> Drag and Drop -> Bidirectional
3. Devices -> Shared Folders -> Shared Folder Settings


How to test RAM Memory for errors in Linux / UNIX OS servers. Find broken memory RAM banks

Friday, December 3rd, 2021

test-ram-memory-for-errors-linux-unix-find-broken-memory-logo


1. Testing the memory with motherboard integrated tools
 

Memory testing has been integral part of Computers for the last 50 years. In the dawn of computers those older perhaps remember memory testing was part of the computer initialization boot. And this memory testing was delaying the boot with some seconds and the user could see the memory numbers being counted up to the amount of memory. With the increased memory modern computers started to have and the annoyance to wait for a memory check program to check the computer hardware memory on modern computers this check has been mitigated or completely removed on some hardware.
Thus under some circumstances sysadmins or advanced computer users might need to check the memory, especially if there is some suspicion for memory damages or if for example a home PC starts crashing with Blue screens of Death on Windows without reason or simply the PC or some old arcane Linux / UNIX servers gets restarted every now and then for now apparent reason. When such circumstances occur it is an idea to start debugging the hardware issue with a simple memory check.

There are multiple ways to test installed memory banks on a server laptop or local home PC both integrated and using external programs.
On servers that is usually easily done from ILO or IPMI or IDRAC access (usually web) interface of the vendor, on laptops and home usage from BIOS or UEFI (Unified Extensible Firmware Interface) acces interface on system boot that is possible as well.
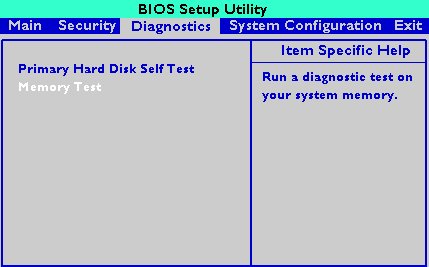
memtest-hp
HP BIOS Setup

An old but gold TIP, more younger people might not know is the


Prolonged SHIFT key press which once held with the user instructs the machine to initiate a memory test before the computer starts reading what is written in the boot loader.

So before anything else from below article it might be a good idea to just try HOLD SHIFT for 15-20 seconds after a complete Shut and ON from the POWER button.

If this test does not triggered or it is triggered and you end up with some corrupted memory but you're not sure which exact Memory bank is really crashing and want to know more on what memory Bank and segments are breaking up you might want to do a more thorough testing. In below article I'll try to explain shortly how this can be done.


2. Test the memory using a boot USB Flash Drive / DVD / CD 
 

Say hello to memtest86+. It is a Linux GRUB boot loader bootable utility that tests physical memory by writing various patterns to it and reading them back. Since memtest86+ runs directly off the hardware it does not require any operating system support for execution. Perhaps it is important to mention that memtest86 (is PassMark memtest86)and memtest86+ (An Advanced Memory diagnostic tool) are different tools, the first is freeware and second one is FOSS software.

To use it all you'll need is some version of Linux. If you don't already have some burned in somewhere at your closet, you might want to burn one.
For Linux / Mac users this is as downloading a Linux distribution ISO file and burning it with

# dd if=/path/to/iso of=/dev/sdbX bs=80M status=progress


Windows users can burn a Live USB with whatever Linux distro or download and burn the latest versionof memtest86+ from https://www.memtest.org/  on Windows Desktop with some proggie like lets say UnetBootIn.
 

2.1. Run memtest86+ on Ubuntu

Many Linux distributions such as Ubuntu 20.0 comes together with memtest86+, which can be easily invoked from GRUB / GRUB2 Kernel boot loader.
Ubuntu has a separate menu pointer for a Memtest.
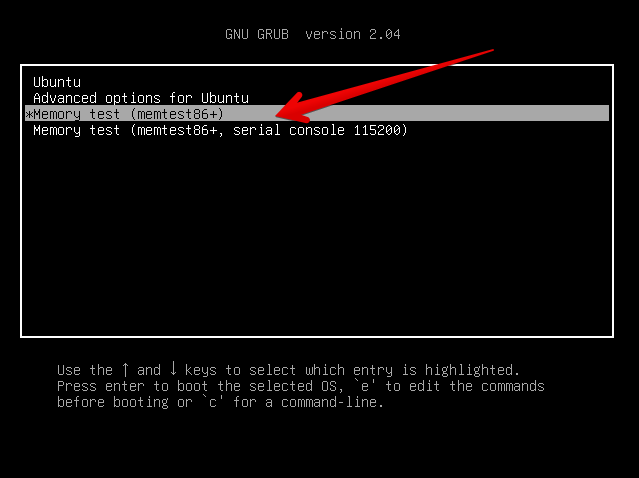
ubuntu-grub-2-04-boot-loader-memtest86-menu-screenshot

Other distributions RPM based distributions such as CentOS, Fedora Linux, Redhat things differ.

2.2. memtest86+ on Fedora


Fedora used to have the memtest86+ menu at the GRUB boot selection prompt, but for some reason removed it and in newest Fedora releases as of time such as Fedora 35 memtest86+ is preinstalled and available but not visible, to start on  already and to start a memtest memory test tool:

  •   Boot a Fedora installation or Rescue CD / USB. At the prompt, type "memtest86".

boot: memtest86

2.3 memtest86+ on RHEL Linux

The memtest86+tool is available as an RPM package from Red Hat Network (RHN) as well as a boot option from the Red Hat Enterprise Linux rescue disk.
And nowadays Red Hat Enterprise Linux ships by default with the tool.

Prior redhat (now legacy) releases such as on RHEL 5.0 it has to be installed and configure it with below 3 commands.

[root@rhel ~]# yum install memtest86+
[root@rhel ~]# memtest-setup
[root@rhel ~]# grub2-mkconfig -o /boot/grub2/grub.cfg


    Again as with CentOS to boot memtest86+ from the rescue disk, you will need to boot your system from CD 1 of the Red Hat Enterprise Linux installation media, and type the following at the boot prompt (before the Linux kernel is started):

boot: memtest86
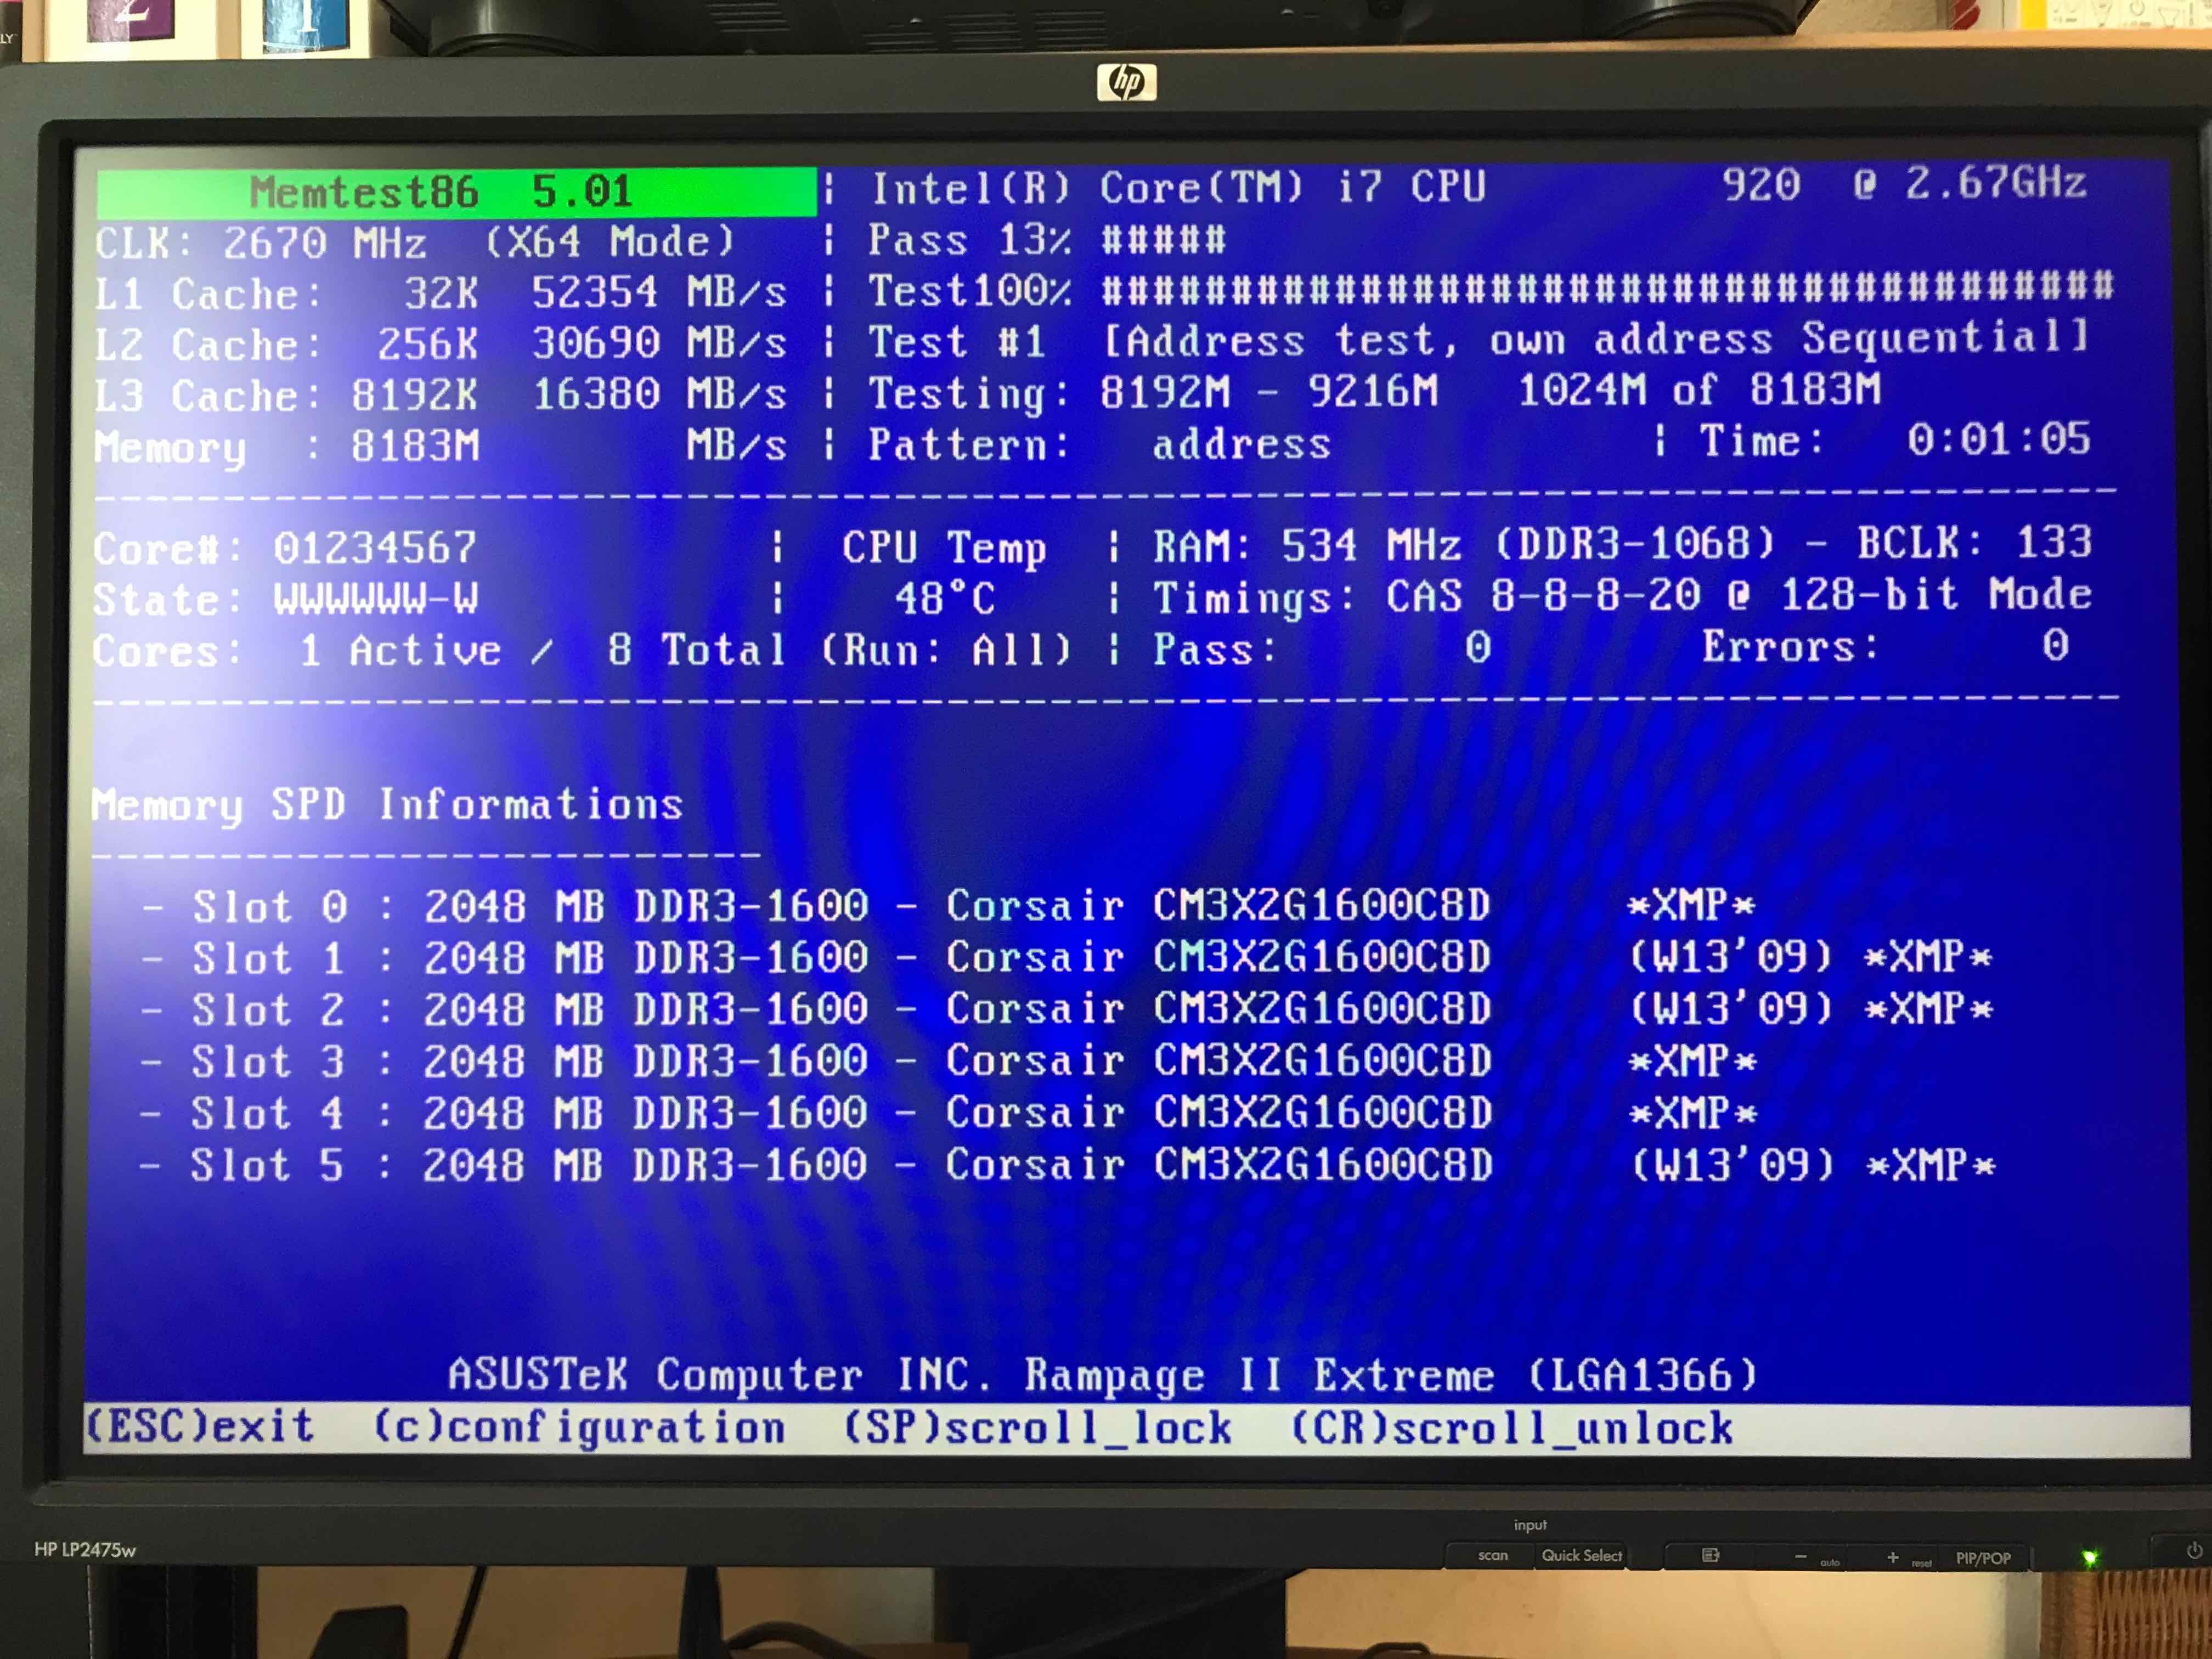
memtestx86-8gigabytes-of-memory-boot-screenshot
memtest86+ testing 5 memory slots

As you see all on above screenshot the Memory banks are listed as Slots. There are a number of Tests to be completed until
it can be said for sure memory does not have any faulty cells. 
The

Pass: 0
Errors: 0 

Indicates no errors, so in the end if memtest86 does not find anything this values should stay at zero.
memtest86+ is also usable to detecting issues with temperature of CPU. Just recently I've tested a PC thinking that some memory has defects but it turned out the issue on the Computer was at the CPU's temperature which was topping up at 80 – 82 Celsius.

If you're unfortunate and happen to get some corrupted memory segments you will get some red fields with the memory addresses found to have corrupted on Read / Write test operations:
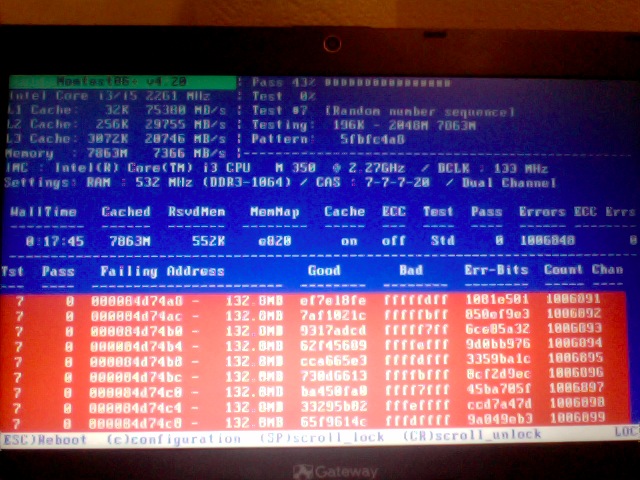
memtest86-returning-memory-address-errors-screenshot


2.4. Install and use memtest and memtest86+ on Debian / Mint Linux

You can install either memtest86+ or just for the fun put both of them and play around with both of them as they have a .deb package provided out of debian non-free /etc/apt/sources.list repositories.


root@jeremiah:/home/hipo# apt-cache show memtest86 memtest86+
Package: memtest86
Version: 4.3.7-3
Installed-Size: 302
Maintainer: Yann Dirson <dirson@debian.org>
Architecture: amd64
Depends: debconf (>= 0.5) | debconf-2.0
Recommends: memtest86+
Suggests: hwtools, memtester, kernel-patch-badram, grub2 (>= 1.96+20090523-1) | grub (>= 0.95+cvs20040624), mtools
Description-en: thorough real-mode memory tester
 Memtest86 scans your RAM for errors.
 .
 This tester runs independently of any OS – it is run at computer
 boot-up, so that it can test *all* of your memory.  You may want to
 look at `memtester', which allows testing your memory within Linux,
 but this one won't be able to test your whole RAM.
 .
 It can output a list of bad RAM regions usable by the BadRAM kernel
 patch, so that you can still use you old RAM with one or two bad bits.
 .
 This is the last DFSG-compliant version of this software, upstream
 has opted for a proprietary development model starting with 5.0.  You
 may want to consider using memtest86+, which has been forked from an
 earlier version of memtest86, and provides a different set of
 features.  It is available in the memtest86+ package.
 .
 A convenience script is also provided to make a grub-legacy-based
 floppy or image.

Description-md5: 0ad381a54d59a7d7f012972f613d7759
Homepage: http://www.memtest86.com/
Section: misc
Priority: optional
Filename: pool/main/m/memtest86/memtest86_4.3.7-3_amd64.deb
Size: 45470
MD5sum: 8dd2a4c52910498d711fbf6b5753bca9
SHA256: 09178eca21f8fd562806ccaa759d0261a2d3bb23190aaebc8cd99071d431aeb6

Package: memtest86+
Version: 5.01-3
Installed-Size: 2391
Maintainer: Yann Dirson <dirson@debian.org>
Architecture: amd64
Depends: debconf (>= 0.5) | debconf-2.0
Suggests: hwtools, memtester, kernel-patch-badram, memtest86, grub-pc | grub-legacy, mtools
Description-en: thorough real-mode memory tester
 Memtest86+ scans your RAM for errors.
 .
 This tester runs independently of any OS – it is run at computer
 boot-up, so that it can test *all* of your memory.  You may want to
 look at `memtester', which allows to test your memory within Linux,
 but this one won't be able to test your whole RAM.
 .
 It can output a list of bad RAM regions usable by the BadRAM kernel
 patch, so that you can still use your old RAM with one or two bad bits.
 .
 Memtest86+ is based on memtest86 3.0, and adds support for recent
 hardware, as well as a number of general-purpose improvements,
 including many patches to memtest86 available from various sources.
 .
 Both memtest86 and memtest86+ are being worked on in parallel.
Description-md5: aa685f84801773ef97fdaba8eb26436a
Homepage: http://www.memtest.org/

Tag: admin::benchmarking, admin::boot, hardware::storage:floppy,
 interface::text-mode, role::program, scope::utility, use::checking
Section: misc
Priority: optional
Filename: pool/main/m/memtest86+/memtest86+_5.01-3_amd64.deb
Size: 75142
MD5sum: 4f06523532ddfca0222ba6c55a80c433
SHA256: ad42816e0b17e882713cc6f699b988e73e580e38876cebe975891f5904828005


root@jeremiah:/home/hipo# apt-get install –yes memtest86+

root@jeremiah:/home/hipo# apt-get install –yes memtest86

Reading package lists… Done
Building dependency tree       
Reading state information… Done
Suggested packages:
  hwtools kernel-patch-badram grub2 | grub
The following NEW packages will be installed:
  memtest86
0 upgraded, 1 newly installed, 0 to remove and 21 not upgraded.
Need to get 45.5 kB of archives.
After this operation, 309 kB of additional disk space will be used.
Get:1 http://ftp.de.debian.org/debian buster/main amd64 memtest86 amd64 4.3.7-3 [45.5 kB]
Fetched 45.5 kB in 0s (181 kB/s)     
Preconfiguring packages …
Selecting previously unselected package memtest86.
(Reading database … 519985 files and directories currently installed.)
Preparing to unpack …/memtest86_4.3.7-3_amd64.deb …
Unpacking memtest86 (4.3.7-3) …
Setting up memtest86 (4.3.7-3) …
Generating grub configuration file …
Found background image: saint-John-of-Rila-grub.jpg
Found linux image: /boot/vmlinuz-4.19.0-18-amd64
Found initrd image: /boot/initrd.img-4.19.0-18-amd64
Found linux image: /boot/vmlinuz-4.19.0-17-amd64
Found initrd image: /boot/initrd.img-4.19.0-17-amd64
Found linux image: /boot/vmlinuz-4.19.0-8-amd64
Found initrd image: /boot/initrd.img-4.19.0-8-amd64
Found linux image: /boot/vmlinuz-4.19.0-6-amd64
Found initrd image: /boot/initrd.img-4.19.0-6-amd64
Found linux image: /boot/vmlinuz-4.19.0-5-amd64
Found initrd image: /boot/initrd.img-4.19.0-5-amd64
Found linux image: /boot/vmlinuz-4.9.0-8-amd64
Found initrd image: /boot/initrd.img-4.9.0-8-amd64
Found memtest86 image: /boot/memtest86.bin
Found memtest86+ image: /boot/memtest86+.bin
Found memtest86+ multiboot image: /boot/memtest86+_multiboot.bin
File descriptor 3 (pipe:[66049]) leaked on lvs invocation. Parent PID 22581: /bin/sh
done
Processing triggers for man-db (2.8.5-2) …


After this both memory testers memtest86+ and memtest86 will appear next to the option of booting a different version kernels and the Advanced recovery kernels, that you usually get in the GRUB boot prompt.

2.5. Use memtest embedded tool on any Linux by adding a kernel variable
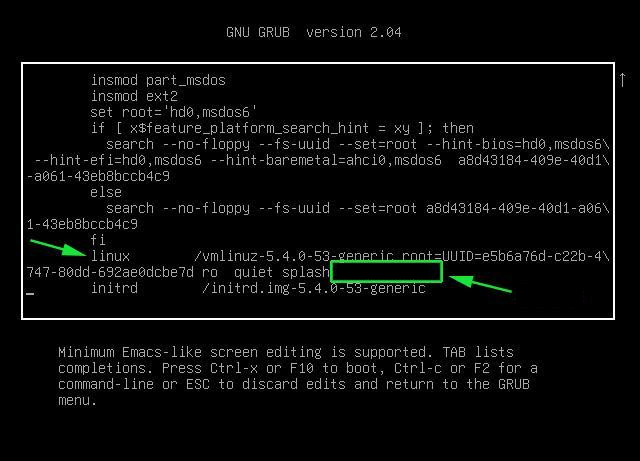
Edit-Grub-Parameters-add-memtest-4-to-kernel-boot

2.4.1. Reboot your computer

# reboot

2.4.2. At the GRUB boot screen (with UEFI, press Esc).

2.4.3 For 4 passes add temporarily the memtest=4 kernel parameter.
 

memtest=        [KNL,X86,ARM,PPC,RISCV] Enable memtest
                Format: <integer>
                default : 0 <disable>
                Specifies the number of memtest passes to be
                performed. Each pass selects another test
                pattern from a given set of patterns. Memtest
                fills the memory with this pattern, validates
                memory contents and reserves bad memory
                regions that are detected.


3. Install and use memtester Linux tool
 

At some condition, memory is the one of the suspcious part, or you just want have a quick test. memtester  is an effective userspace tester for stress-testing the memory subsystem.  It is very effective at finding intermittent and non-deterministic faults.

The advantage of memtester "live system check tool is", you can check your system for errors while it's still running. No need for a restart, just run that application, the downside is that some segments of memory cannot be thoroughfully tested as you already have much preloaded data in it to have the Operating Sytstem running, thus always when possible try to stick to rule to test the memory using memtest86+  from OS Boot Loader, after a clean Machine restart in order to clean up whole memory heap.

Anyhow for a general memory test on a Critical Legacy Server  (if you lets say don't have access to Remote Console Board, or don't trust the ILO / IPMI Hardware reported integrity statistics), running memtester from already booted is still a good idea.


3.1. Install memtester on any Linux distribution from source

wget http://pyropus.ca/software/memtester/old-versions/memtester-4.2.2.tar.gz
# tar zxvf memtester-4.2.2.tar.gz
# cd memtester-4.2.2
# make && make install

3.2 Install on RPM based distros


On Fedora memtester is available from repositories however on many other RPM based distros it is not so you have to install it from source.

[root@fedora ]# yum install -y memtester


3.3. Install memtester on Deb based Linux distributions from source
 

To install it on Debian / Ubuntu / Mint etc. , open a terminal and type:
 

root@linux:/ #  apt install –yes memtester

The general run syntax is:

memtester [-p PHYSADDR] [ITERATIONS]


You can hence use it like so:

hipo@linux:/ $ sudo memtester 1024 5

This should allocate 1024MB of memory, and repeat the test 5 times. The more repeats you run the better, but as a memtester run places a great overall load on the system you either don't increment the runs too much or at least run it with  lowered process importance e.g. by nicing the PID:

hipo@linux:/ $ nice -n 15 sudo memtester 1024 5


  • If you have more RAM like 4GB or 8GB, it is upto you how much memory you want to allocate for testing.
  • As your operating system, current running process might take some amount of RAM, Please check available Free RAM and assign that too memtester.
  • If you are using a 32 Bit System, you cant test more than 4 GB even though you have more RAM( 32 bit systems doesnt support more than 3.5 GB RAM as you all know).
  • If your system is very busy and you still assigned higher than available amount of RAM, then the test might get your system into a deadlock, leads to system to halt, be aware of this.
  • Run the memtester as root user, so that memtester process can malloc the memory, once its gets hold on that memory it will try to apply lock. if specified memory is not available, it will try to reduce required RAM automatically and try to lock it with mlock.
  • if you run it as a regular user, it cant auto reduce the required amount of RAM, so it cant lock it, so it tries to get hold on that specified memory and starts exhausting all system resources.


If you have 8 Gigas of RAM plugged into the PC motherboard you have to multiple 1024*8 this is easily done with bc (An arbitrary precision calculator language) tool:

root@linux:/ # bc -l
bc 1.07.1
Copyright 1991-1994, 1997, 1998, 2000, 2004, 2006, 2008, 2012-2017 Free Software Foundation, Inc.
This is free software with ABSOLUTELY NO WARRANTY.
For details type `warranty'. 
8*1024
8192


 for example you should run:

root@linux:/ # memtester 8192 5

memtester version 4.3.0 (64-bit)
Copyright (C) 2001-2012 Charles Cazabon.
Licensed under the GNU General Public License version 2 (only).

pagesize is 4096
pagesizemask is 0xfffffffffffff000
want 8192MB (2083520512 bytes)
got  8192MB (2083520512 bytes), trying mlock …Loop 1/1:
  Stuck Address       : ok        
  Random Value        : ok
  Compare XOR         : ok
  Compare SUB         : ok
  Compare MUL         : ok
  Compare DIV         : ok
  Compare OR          : ok
  Compare AND         : ok
  Sequential Increment: ok
  Solid Bits          : ok        
  Block Sequential    : ok        
  Checkerboard        : ok        
  Bit Spread          : ok        
  Bit Flip            : ok        
  Walking Ones        : ok        
  Walking Zeroes      : ok        
  8-bit Writes        : ok
  16-bit Writes       : ok

Done.


4. Shell Script to test server memory for corruptions
 

If for some reason the machine you want to run a memory test doesn't have connection to the external network such as the internet and therefore you cannot configure a package repository server and install memtester, the other approach is to use a simple memory test script such as memtestlinux.sh
 

#!/bin/bash
# Downloaded from https://www.srv24x7.com/memtest-linux/
echo "ByteOnSite Memory Test"
cpus=`cat /proc/cpuinfo | grep processor | wc -l`
if [ $cpus -lt 6 ]; then
threads=2
else
threads=$(($cpus / 2))
fi
echo "Detected $cpus CPUs, using $threads threads.."
memory=`free | grep 'Mem:' | awk {'print $2'}`
memoryper=$(($memory / $threads))
echo "Detected ${memory}K of RAM ($memoryper per thread).."
freespace=`df -B1024 . | tail -n1 | awk {'print $4'}`
if [ $freespace -le $memory ]; then
echo You do not have enough free space on the current partition. Minimum: $memory bytes
exit 1
fi
echo "Clearing RAM Cache.."
sync; echo 3 > /proc/sys/vm/drop_cachesfile
echo > dump.memtest.img
echo "Writing to dump file (dump.memtest.img).."
for i in `seq 1 $threads`;
do
# 1044 is used in place of 1024 to ensure full RAM usage (2% over allocation)
dd if=/dev/urandom bs=$memoryper count=1044 >> dump.memtest.img 2>/dev/null &
pids[$i]=$!
echo $i
done
for pid in "${pids[@]}"
do
wait $pid
done

echo "Reading and analyzing dump file…"
echo "Pass 1.."
md51=`md5sum dump.memtest.img | awk {'print $1'}`
echo "Pass 2.."
md52=`md5sum dump.memtest.img | awk {'print $1'}`
echo "Pass 3.."
md53=`md5sum dump.memtest.img | awk {'print $1'}`
if [ “$md51” != “$md52” ]; then
fail=1
elif [ “$md51” != “$md53” ]; then
fail=1
elif [ “$md52” != “$md53” ]; then
fail=1
else
fail=0
fi
if [ $fail -eq 0 ]; then
echo "Memory test PASSED."
else
echo "Memory test FAILED. Bad memory detected."
fi
rm -f dump.memtest.img
exit $fail

Nota Bene !: Again consider the restults might not always be 100% trustable if possible restart the server and test with memtest86+

Consider also its important to make sure prior to script run,  you''ll have enough disk space to produce the dump.memtest.img file – file is created as a test bed for the memory tests and if not scaled properly you might end up with a full ( / ) root directory!


4.1 Other memory test script with dd and md5sum checksum

I found this solution on the well known sysadmin site nixCraft cyberciti.biz, I think it makes sense and quicker.

First find out memory site using free command.
 

# free
             total       used       free     shared    buffers     cached
Mem:      32867436   32574160     293276          0      16652   31194340
-/+ buffers/cache:    1363168   31504268
Swap:            0          0          0


It shows that this server has 32GB memory,
 

# dd if=/dev/urandom bs=32867436 count=1050 of=/home/memtest


free reports by k and use 1050 is to make sure file memtest is bigger than physical memory.  To get better performance, use proper bs size, for example 2048 or 4096, depends on your local disk i/o,  the rule is to make bs * count > 32 GB.
run

# md5sum /home/memtest; md5sum /home/memtest; md5sum /home/memtest


If you see md5sum mismatch in different run, you have faulty memory guaranteed.
The theory is simple, the file /home/memtest will cache data in memory by filling up all available memory during read operation. Using md5sum command you are reading same data from memory.


5. Other ways to test memory / do a machine stress test

Other good tools you might want to check for memory testing is mprime – ftp://mersenne.org/gimps/ 
(https://www.mersenne.org/ftp_root/gimps/)

  •  (mprime can also be used to stress test your CPU)

Alternatively, use the package stress-ng to run all kind of stress tests (including memory test) on your machine.
Perhaps there are other interesting tools for a diagnosis of memory if you know other ones I miss, let me know in the comment section.

Procedure Instructions to safe upgrade CentOS / RHEL Linux 7 Core to latest release

Thursday, February 13th, 2020

safe-upgrade-CentOS-and_Redhat_Enterprise_Linux_RHEL-7-to-latest-stable-release

Generally upgrading both RHEL and CentOS can be done straight with yum tool just we're pretty aware and mostly anyone could do the update, but it is good idea to do some
steps in advance to make backup of any old basic files that might help us to debug what is wrong in case if the Operating System fails to boot after the routine Machine OS restart
after the upgrade that is usually a good idea to make sure that machine is still bootable after the upgrade.

This procedure can be shortened or maybe extended depending on the needs of the custom case but the general framework should be useful anyways to someone that's why
I decided to post this.

Before you go lets prepare a small status script which we'll use to report status of  sysctl installed and enabled services as well as the netstat connections state and
configured IP addresses and routing on the system.

The script show_running_services_netstat_ips_route.sh to be used during our different upgrade stages:
 

# script status ###
echo "STARTED: $(date '+%Y-%m-%d_%H-%M-%S'):" | tee /root/logs/yumcheckupdate-$(hostname)-$(date '+%Y-%m-%d_%H-%M-%S').out
systemctl list-unit-files –type=service | grep enabled
systemctl | grep ".service" | grep "running"
netstat -tulpn
netstat -r
ip a s
/sbin/route -n
echo "ENDED $(date '+%Y-%m-%d_%H-%M-%S'):" | tee /root/logs/yumcheckupdate-$(hostname)-$(date '+%Y-%m-%d_%H-%M-%S').out
####


– Save the script in any file like /root/status.sh

– Make the /root/logs directoriy.
 

[root@redhat: ~ ]# mkdir /root/logs
[root@redhat: ~ ]# vim /root/status.sh
[root@redhat: ~ ]# chmod +x /root/status.sh


1. Get a dump of CentOS installed version release and grub-mkconfig generated os_probe


[root@redhat: ~ ]# cat /etc/redhat-release  > /root/logs/redhat-release-vorher-$(hostname)-$(date '+%Y-%m-%d_%H-%M-%S').out
[root@redhat: ~ ]# cat /etc/grub.d/30_os-prober > /root/logs/grub2-efi-vorher-$(hostname)-$(date '+%Y-%m-%d_%H-%M-%S').out


2. Clear old versionlock marked RPM packages (if there are such)


On servers maintained by multitude of system administrators just like the case is inside a Global Corporations and generally in the corporate world , where people do access the systems via LDAP and more than a single person
has superuser privileges. It is a good prevention measure to use yum package management  functionality to RPM based Linux distributions called  versionlock.
versionlock for those who hear it for a first time is locking the versions of the installed RPM packages so if someone by mistake or on purpose decides to do something like :

[root@redhat: ~ ]# yum install packageversion

Having the versionlock set will prevent the updated package to be installed with a different branch package version.

Also it will prevent a playful unknowing person who just wants to upgrade the system without any deep knowledge to be able to
run

[root@redhat: ~ ]# yum upgrade

update and leave the system in unbootable state, that will be only revealed during the next system reboot.

If you haven't used versionlock before and you want to use it you can do it with:

[root@redhat: ~ ]# yum install yum-plugin-versionlock

To add all the packages for compiling C code and all the interdependend packages, you can do something like:


[root@redhat: ~ ]# yum versionlock gcc-*

If you want to clear up the versionlock, once it is in use run:

[root@redhat: ~ ]#  yum versionlock clear
[root@redhat: ~ ]#  yum versionlock list


3.  Check RPC enabled / disabled


This step is not necessery but it is a good idea to check whether it running on the system, because sometimes after upgrade rpcbind gets automatically started after package upgrade and reboot. 
If we find it running we'll need to stop and mask the service.


# check if rpc enabled
[root@redhat: ~ ]# systemctl list-unit-files|grep -i rpc
var-lib-nfs-rpc_pipefs.mount                                      static
auth-rpcgss-module.service                                        static
rpc-gssd.service                                                  static
rpc-rquotad.service                                               disabled
rpc-statd-notify.service                                          static
rpc-statd.service                                                 static
rpcbind.service                                                   disabled
rpcgssd.service                                                   static
rpcidmapd.service                                                 static
rpcbind.socket                                                    disabled
rpc_pipefs.target                                                 static
rpcbind.target                                                    static

[root@redhat: ~ ]# systemctl status rpcbind.service
● rpcbind.service – RPC bind service
   Loaded: loaded (/usr/lib/systemd/system/rpcbind.service; disabled; vendor preset: enabled)
   Active: inactive (dead)


[root@redhat: ~ ]# systemctl status rpcbind.socket
● rpcbind.socket – RPCbind Server Activation Socket
   Loaded: loaded (/usr/lib/systemd/system/rpcbind.socket; disabled; vendor preset: enabled)
   Active: inactive (dead)
   Listen: /var/run/rpcbind.sock (Stream)
           0.0.0.0:111 (Stream)
           0.0.0.0:111 (Datagram)
           [::]:111 (Stream)
           [::]:111 (Datagram)


4. Check any previously existing downloaded / installed RPMs (check yum cache)


yum install package-name / yum upgrade keeps downloaded packages via its operations inside its cache directory structures in /var/cache/yum/*.
Hence it is good idea to check what were the previously installed packages and their count.


[root@redhat: ~ ]# cd /var/cache/yum/x86_64/;
[root@redhat: ~ ]# find . -iname '*.rpm'|wc -l


5. List RPM repositories set on the server


 [root@redhat: ~ ]# yum repolist
Loaded plugins: fastestmirror, versionlock
Repodata is over 2 weeks old. Install yum-cron? Or run: yum makecache fast
Determining fastest mirrors
repo id                                                                                 repo name                                                                                                            status
!atos-ac/7/x86_64                                                                       Atos Repository                                                                                                       3,128
!base/7/x86_64                                                                          CentOS-7 – Base                                                                                                      10,019
!cr/7/x86_64                                                                            CentOS-7 – CR                                                                                                         2,686
!epel/x86_64                                                                            Extra Packages for Enterprise Linux 7 – x86_64                                                                          165
!extras/7/x86_64                                                                        CentOS-7 – Extras                                                                                                       435
!updates/7/x86_64                                                                       CentOS-7 – Updates                                                                                                    2,500


This step is mandatory to make sure you're upgrading to latest packages from the right repositories for more concretics check what is inside in confs /etc/yum.repos.d/ ,  /etc/yum.conf 
 

6. Clean up any old rpm yum cache packages


This step is again mandatory but a good to follow just to have some more clearness on what packages is our upgrade downloading (not to mix up the old upgrades / installs with our newest one).
For documentation purposes all deleted packages list if such is to be kept under /root/logs/yumclean-install*.out file

[root@redhat: ~ ]# yum clean all |tee /root/logs/yumcleanall-$(hostname)-$(date '+%Y-%m-%d_%H-%M-%S').out


7. List the upgradeable packages's latest repository provided versions


[root@redhat: ~ ]# yum check-update |tee /root/logs/yumcheckupdate-$(hostname)-$(date '+%Y-%m-%d_%H-%M-%S').out


Then to be aware how many packages we'll be updating:


[root@redhat: ~ ]#  yum check-update | wc -l


8. Apply the actual uplisted RPM packages to be upgraded


[root@redhat: ~ ]# yum update |tee /root/logs/yumupdate-$(hostname)-$(date '+%Y-%m-%d_%H-%M-%S').out


Again output is logged to /root/logs/yumcheckupate-*.out 


9. Monitor downloaded packages count real time


To make sure yum upgrade is not in some hanging state and just get some general idea in which state of the upgrade is it e.g. Download / Pre-Update / Install  / Upgrade/ Post-Update etc.
in mean time when yum upgrade is running to monitor,  how many packages has the yum upgrade downloaded from remote RPM set repositories:


[root@redhat: ~ ]#  watch "ls -al /var/cache/yum/x86_64/7Server/…OS-repository…/packages/|wc -l"


10. Run status script to get the status again


[root@redhat: ~ ]# sh /root/status.sh |tee /root/logs/status-before-$(hostname)-$(date '+%Y-%m-%d_%H-%M-%S').out


11. Add back versionlock for all RPM packs


Set all RPM packages installed on the RHEL / CentOS versionlock for all packages.


#==if needed
# yum versionlock \*


12. Get whether old software configuration is not messed up during the Package upgrade (Lookup the logs for .rpmsave and .rpmnew)


During the upgrade old RPM configuration is probably changed and yum did automatically save .rpmsave / .rpmnew saves of it thus it is a good idea to grep the prepared logs for any matches of this 2 strings :
 

[root@redhat: ~ ]#   grep -i ".rpm" /root/logs/yumupdate-server-host-2020-01-20_14-30-41.out
[root@redhat: ~ ]#  grep -i ".rpmsave" /root/logs/yumupdate-server-host-2020-01-20_14-30-41.out
[root@redhat: ~ ]#  grep -i ".rpmnew" /root/logs/yumupdate-server-host-2020-01-20_14-30-41.out


If above commands returns output usually it is fine if there is is .rpmnew output but, if you get grep output of .rpmsave it is a good idea to review the files compare with the original files that were .rpmsaved with the 
substituted config file and atune the differences with the changes manually made for some program functionality.

What are the .rpmsave / .rpmnew files ?
This files are coded files that got triggered by the RPM install / upgrade due to prewritten procedures on time of RPM build.


If a file was installed as part of a rpm, it is a config file (i.e. marked with the %config tag), you've edited the file afterwards and you now update the rpm then the new config file (from the newer rpm) will replace your old config file (i.e. become the active file).
The latter will be renamed with the .rpmsave suffix.

If a file was installed as part of a rpm, it is a noreplace-config file (i.e. marked with the %config(noreplace) tag), you've edited the file afterwards and you now update the rpm then your old config file will stay in place (i.e. stay active) and the new config file (from the newer rpm) will be copied to disk with the .rpmnew suffix.
See e.g. this table for all the details. 

In both cases you or some program has edited the config file(s) and that's why you see the .rpmsave / .rpmnew files after the upgrade because rpm will upgrade config files silently and without backup files if the local file is untouched.

After a system upgrade it is a good idea to scan your filesystem for these files and make sure that correct config files are active and maybe merge the new contents from the .rpmnew files into the production files. You can remove the .rpmsave and .rpmnew files when you're done.


If you need to get a list of all .rpmnew .rpmsave files on the server do:

[root@redhat: ~ ]#  find / -print | egrep "rpmnew$|rpmsave$


13. Reboot the system 

To check whether on next hang up or power outage the system will boot normally after the upgrade, reboot to test it.


you can :


[root@redhat: ~ ]#  reboot


either

[root@redhat: ~ ]#  shutdown -r now


or if on newer Linux with systemd in ues below systemctl reboot.target.

[root@redhat: ~ ]#  systemctl start reboot.target


14. Get again the system status with our status script after reboot

[root@redhat: ~ ]#  sh /root/status.sh |tee /root/logs/status-after-$(hostname)-$(date '+%Y-%m-%d_%H-%M-%S').out


15. Clean up any versionlocks if earlier set


[root@redhat: ~ ]# yum versionlock clear
[root@redhat: ~ ]# yum versionlock list


16. Check services and logs for problems


After the reboot Check closely all running services on system make sure every process / listening ports and services on the system are running fine, just like before the upgrade.
If the sytem had firewall,  check whether firewall rules are not broken, e.g. some NAT is not missing or anything earlier configured to automatically start via /etc/rc.local or some other
custom scripts were run and have done what was expected. 
Go through all the logs in /var/log that are most essential /var/log/boot.log , /var/log/messages … yum.log etc. that could reveal any issues after the boot. In case if running some application server or mail server check /var/log/mail.log or whenever it is configured to log.
If the system runs apache closely check the logs /var/log/httpd/error.log or php_errors.log for any strange errors that occured due to some issues caused by the newer installed packages.
Usually most of the cases all this should be flawless but a multiple check over your work is a stake for good results.
 

Upgrade Debian Linux 9 to 10 Stretch to Buster and Disable graphical service load boot on Debian 10 Linux / Debian Buster is out

Tuesday, July 9th, 2019

howto-upgrade-debian-linux-debian-stretch-to-buster-debian-10-buster

I've just took a time to upgrade my Debian 9 Stretch Linux to Debian Buster on my old school Laptop (that turned 11 years old) Lenovo Thinkpad R61 . The upgrade went more or less without severe issues except few things.

The overall procedure followed is described n a few websites out there already and comes up to;


0. Set the proper repository location in /etc/apt/sources.list


Before update the sources.list used are:
 

deb [arch=amd64,i386] http://ftp.bg.debian.org/debian/ buster main contrib non-free
deb-src [arch=amd64,i386] http://ftp.bg.debian.org/debian/ buster main contrib non-free


deb [arch=amd64,i386] http://security.debian.org/ buster/updates main contrib non-free
deb-src [arch=amd64,i386] http://security.debian.org/ buster/updates main contrib non-free

deb [arch=amd64,i386] http://ftp.bg.debian.org/debian/ buster-updates main contrib non-free
deb-src [arch=amd64,i386] http://ftp.bg.debian.org/debian/ buster-updates main contrib non-free

deb http://ftp.debian.org/debian buster-backports main


For people that had stretch defined in /etc/apt/sources.list you should change them to buster or stable, easiest and quickest way to omit editting with vim / nano etc. is run as root or via sudo:
 

sed -i 's/stretch/buster/g' /etc/apt/sources.list
sed -i 's/stretch/buster/g' /etc/apt/sources.list.d/*.list

The minimum of config in sources.list after the modification should be
 

deb http://deb.debian.org/debian buster main
deb http://deb.debian.org/debian buster-updates main
deb http://security.debian.org/debian-security buster/updates main

Or if you want to always be with latest stable packages (which is my practice for notebooks):

deb http://deb.debian.org/debian stable main
deb http://deb.debian.org/debian stable-updates main
deb http://security.debian.org/debian-security stable/updates main


1. Getting list of hold packages if such exist and unholding them, e.g.


apt-mark showhold


Same could also be done via dpkg

dpkg –get-selections | grep hold


To unhold a package if such is found:

echo "package_name install"|sudo dpkg –set-selections

For those who don't know what hold package is this is usually package you want to keep at certain version all the time even though after running apt-get upgrade to get the latest package versions.
 

2. Use df -h and assure you have at least 5 – 10 GB free space on root directory / before proceed

df -h /

3. Update packages list to set new set repos as default

apt update


4. apt upgrade
 

apt upgrade

Here some 10 – 15 times you have to confirm what you want to do with configuration that has changed if you're unsure about the config (and it is not critical service) you're aware as such as Apache / MySQL / SMTP etc. it is best to install the latest maintainer version.

Hopefully here you will not get fatal errors that will interrupt it.

P.S. It is best to run apt-update either in VTTY (Virtual console session) with screen or tmux or via a physical tty (if this is not a remote server) as during the updates your GUI access to the gnome-terminal or konsole / xterm whatever console used might get cut. Thus it is best to do it with command:
 

screen apt upgrade


5. Run dist-upgrade to finalize the upgrade from Stertch to Buster


Once all is completed of the new installed packages, you will need to finally do, once again it is best to run via screen, if you don't have installed screen install it:


if [ $(which screen) ]; then echo 'Installed'; else apt-get install –yes screen ; fi

screen apt dist-upgrade


Here once again you should set whether old configuration to some e services has to stay or the new Debian maintainer package shipped one will overwrite the old and locally modified (due to some reason), here do wisely whatever you will otherwise some configured services might not boot as expected on next boot.


6. What if you get packages failed on update


If you get a certain package failed to configure after installed due to some reason, if it is a systemd service use:


journalctl -xe |head -n 50


or fully observer output of journalctl -xe and decide on yourself.

In most cases

dpkg-reconfigure failed-package-name


should do the trick or at least give you more hints on how to solve it.


Also if a package seems to be in inconsistent or broken state after upgrade  and simple dpkg-reconfigure doesn't help, a good command
that can help you is


dpkg-reconfigure -f package_name


or you can try to workaround a failed package setup with:
 

dpkg –configure -a

 
If dpkg-reconfigure doesn't help either as I experienced in prior of Debian from Debian 6 -> 7 an Debian 7 ->8 updates on some Computers, then a very useful thing to try is:
 

apt-get update –fix-missing 

apt-get install -f


At certain cases the only work around to be able to complete the package upgrade is to to remove the package with apt remove but due to config errors even that is not possible to work around this as final resort run:
 

dpkg –remove –force-remove-reinstreq


7. Clean up ununeeded packages


Some packages are left over due to package dependencies from Stretch and not needed in buster anymore to remove them.
 

apt autoremove


8. Reboot system once all upgrade is over


/sbin/reboot


9. Verify your just upgraded Debian is in a good state


root@noah:~# uname -a;
Linux noah 4.19.0-5-rt-amd64 #1 SMP PREEMPT RT Debian 4.19.37-5 (2019-06-19) x86_64 GNU/Linux


root@noah:~# cat /etc/issue.net
Debian GNU/Linux 10


root@noah:~# lsb_release -a
No LSB modules are available.
Distributor ID:    Debian
Description:    Debian GNU/Linux 10 (buster)
Release:    10
Codename:    buster


root@noah:~# hostnamectl
   Static hostname: noah
         Icon name: computer-laptop
           Chassis: laptop
        Machine ID: 4759d9c2f20265938692146351a07929
           Boot ID: 256eb64ffa5e413b8f959f7ef43d919f
  Operating System: Debian GNU/Linux 10 (buster)
            Kernel: Linux 4.19.0-5-rt-amd64
      Architecture: x86-64


10. Remove annoying picture short animation with debian logo looping


plymouth-debian-graphical-boot-services

By default Debian 10 boots up with annoying screen hiding all the status of loaded services state .e.g. you cannot see the services that shows in [ FAILED ] state and  which do show as [ OK ] to revert back the old behavior I'm used to for historical reasons and as it shows a lot of good Boot time debugging info, in previous Debian distributions this was possible  by setting the right configuration options in /etc/default/grub

which so far in my config was like so

GRUB_CMDLINE_LINUX_DEFAULT="quiet splash scsi_mod.use_blk_mq=y dm_mod.use_blk_mq=y zswap.enabled=1 text"


Note that zswap.enabled=1 passed option is because my notebook is pretty old machine from 2008 with 4GB of memory and zswap does accelerate performance when working with swap – especially helpful on Older PCs for more you can read more about zswap on ArchLinux wiki
After modifying this configuration to load the new config into grub the cmd is:
 

/usr/sbin/update-grub

 
As this was not working and tried number of reboots finally I found that annoying animated gif like picture shown up is caused by plymouth below is excerpts from Plymouth's manual page:


       "The plymouth sends commands to a running plymouthd. This is used during the boot process to control the display of the graphical boot splash."

Plymouth has a set of themes one can set:


# plymouth-set-default-theme -l
futureprototype
details
futureprototype
joy
lines
moonlight
softwaves
spacefun
text
tribar


I tried to change that theme to make the boot process as text boot as I'm used to historically with cmd:
 

update-alternatives –config text.plymouth

 
As after reboot I hoped the PC will start booting in text but this does not happened so the final fix to turn back to textmode service boot was to completely remove plymouth
 

apt-get remove –yes plymouth

Umounting Linux drive if it doesn’t want to unmount “umount: /media/cdrom: device is busy”

Thursday, September 26th, 2013

If you use Linux as Desktop or even on some servers you might end up in situation where mounted filesystem is refusing to unmount with an error:
 

umount: /media/cdrom: device is busy

That's pretty annoying and many people (especially) desktop users would force a system reboot in order to have the fs unmounted.

If this happened to you, there is no need for that anymore. umount cmd has a handy option – (Lazy Unmount) for situations like this. Here is -l description from umount manual:

 -l     Lazy unmount. Detach the filesystem from the filesystem hierarchy now, and cleanup all references to the filesystem as soon
              as it is not busy anymore.  (Requires kernel 2.4.11 or later.)

So next time you hit "umount device is busy" do:

# umount -l /media/cdrom

Enjoy 😉

Blah Blah

Tuesday, February 27th, 2007

It was really steressing day. All started with a lot of calls to NetInfo’s Office then to our Office in Varna to explain what is happening to one of our servers design-bg.net. In the end after 2 hours of stress and even more everything come on it’s place Praise the LORD for this he helped me. Right after design-bg.net was up mail.design.bg almost freeze with God’s help everything came to normal after a simple reboot. In 12:00 to 12:40 I drunk coffee with some friends, after that spent some time in the library. In 14:15 the management test seemed to be in a small room and I was able to copy stuff from my collegues on the test:] Yeash CopyCat :]. Mitko and Habib was my guests today and we ate spinach’s soup with green salad and plant yellow cheese. Thanks to the Lord for being merciful over my sins. Yesterday I got drunk I drunk 200 gr. of ROM and 1 beer. After that I went home singing and listening to Metallica’s songs simultaneously, there was odd movement red eyes and head banging for almost an hour :]. I spend so many things for absolutely useless things, I am ashamed of myself. I acted like an animal. I really wonder why the world still exists If it’s such an awful place to be. I really doubt about the meaning of my life. Things seems to go in a bad way for me and a lot of ppl around me. I really hope the Lord will interfere and everything will come to place but who knows the Paths the Creator has created for us? END—–

Solve ALSA audio and mic issues on Lenovo Thinkpads on Debian and Ubuntu Linux

Wednesday, January 11th, 2012

Since I've blogged about my recent skype issues. I've played a lot with pulseaudio, alsa, alsa-oss to experimented a lot until I figured out why Skype was failing to properly delivery sound and record via my embedded laptop mic.

Anyways, while researching on the cause of my Thinkpad r61 mic issues, I've red a bunch of blog posts by people experiencing microphone oddities with Lenovo Thinkpads

Throughout the search I come across one very good article, which explained that in many cases the Thinkpad sound problems are caused by the snd-hda-intel alsa kernel module. snd-hda-intel fails to automatically set proper sb model type argument during Linux install when the soundcard is initialized with some argument like options snd-hda-intel model=auto

Hence, the suggested fix which should resolve this on many Thinkpad notebooks is up to passing the right module argument:

To fix its neceessery to edit /etc/modprobe.d/alsa-base.conf .

debian:~# vim /etc/modprobe.d/alsa-base.conf

Find the line in the file starting with:
options snd-hda-intel model=

and substitute with:

options snd-hda-intel model=thinkpad

Finally a restart of Advaned Linux Sound Architecture (alsa) is required:

debian:~# /etc/init.d/alsa restart
...

At most cases just restarting the alsa via its init script is not enough, since the ssnd-hda-intel kernel module is already in use by some program or something, so its best to do a reboot to make sure the module is loaded with the new model=thinkpad argument.

My exact laptop sound card model is:

debian:~# lspci |grep -i audio
00:1b.0 Audio device: Intel Corporation 82801H (ICH8 Family) HD Audio Controller (rev 03)

After changing the module and using alsamixer and aumix to make sure mic is unmuted and its volume is high enough, mic sound rec works fine.

Reboot Safely a frozen (hanged up) Linux Server with Magic SysRQ Key combination

Monday, June 20th, 2011

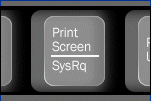
Linux Magic SysRQ Key picture

Being a remote system administrator for many years from now, I’ve experienced many times sudden Linux crashes, mostly caused by system hardware overloads.

This is a common thing especially on busy Web Servers with (Apache/MySQL). Situations like this are really messy and many times in order to bringt the server back online, one has to either physically go to the Data Center or contact the Technical support to request a server reboot.

In this terrible times, data loss might occur if the Server reset button is used to cold reboot it.

Happily in 99% of the cases the data loss which might occur could be prevented with Linux’s kernel capability to support the Magic SysRQ key !

Having the Magic SysRQ key functionality being supported in Linux in past times wasn’t that common, thanksfully these days this has changed andlmost every Linux distrubution supports this handy feature.

Now you might wonder what is the magic with those Magic SysRQ key ?

Let me explain, Magic SysRQ is a kernel level functionality which supports even completely crashed Linux systems with the horrifying:

Kernel Panic
message to be properly shutdown.

Using Magic SysRQ instead of the mostly used indiced cold reboots is really advantageous, as all the opened files by programs on the crashed server which hanged will be properly saved and closed and thus possible data loss caused by the sudden server crash will be minimized.

One other good thing about the Magic SysRQ Key keyboard combination is that initiating the Magic SysRQ could be made blindly (no need for server monitor or display to present any error messages on the failed server).

Now to check if the magic sysrq is enabled on a server one should issue the command:

Here are some Magic SysRQ keyboard combinations one can use in case of server failure:

ALT+SYSRQ+M to dump memory info;
ALT+SYSRQ+P to dump processes states;
ALT+SYSRQ+S to sync disks;
ALT+SYSRQ+U to unmount all mounted filesystems;
ALT+SYSRQ+E to terminate processes;
ALT+SYSRQ+I to kill all processes
ALT+SYSRQ+U to try to unmount once again;
ALT+SYSRQ+B to reboot.

I would skip to explain what each of the keyboard combinations will do as I believe the above description explains it well.

One classics of combinations one might want to issue on a failed Linux server supporting the Magic SysRQ would be:

ALT+SYSRQ+R
ALT+SYSRQ+E
ALT+SYSRQ+I
ALT+SYSRQ+S
ALT+SYSRQ+U
ALT+SYSRQ+B

The ALT+SYSRQ+REISUB key combination is very popular among system administrators.
Also Magic SysRQ is heavily used by kernel developers as it includes many handy debugging options.

If you try the Magic SysRQ key on older servers and you realize it doesn’t react you will have to recompile the linux kernel and enable the CONFIG_MAGIC_SYSRQ kernel time compilation option.

The Magic SysRQ can also be initiated remotely on a properly running server 😉 by initiating:

server:~# echo b > /proc/sysrq-trigger

This command would be useful if you want to just have fun and test that magic sysrq works on your system for sure 😉

To sum it up using the Magic SysRQ will guarantee your locked up, server a Safe Reboot and will hopefully save you a lot of time for backups recovery.