Posts Tagged ‘amp’
Friday, October 7th, 2011 
RarCrack is able to crack rar and 7z archive files protected by password on Linux.
The program is currently at release version 0.2, so its far from perfection, but at least it can break rars.
RarCrack is currently installable on most Linux distributions only from source, to install on a random Linux distro, download and make && make install . RarCrack’s official site is here, I’ve mirrored the current version of RarCrack for download here . To install rarcrack from source using the mirrored version:
linux:~# wget https://www.pc-freak.net/files/rarcrack-0.2.tar.bz2

...

linux:~# tar -jxvvf rarcrack-0.2.tar.bz2

linux:~# cd rarcrack-0.2

linux:~/rarcrack-0.2# make

...

linux:~/rarcrack-0.2# make install

...
On FreeBSD, rarcrack is available and installable via the ports tree, to install on FreeBSD:
freebsd# cd /usr/ports/security/rarcrack

freebsd# make && make install

...
To use RarCrack to crack rar, zip or 7z archive file:
freebsd% rarcrack rar_file_protected_with_password.rar --type rar
The argument –type rar is optional, in most archives RarCrack should detect the archive automatically. The –type option could also take the arguments of rar and 7z .
I’ve created a sample rar file protected with password linux_then_and_now.png.rar . The archive linux_then_and_now.png contains a graphic file illustrating the linux growth in use in computers, mobiles and servers. linux_then_and_now.png.rar is protected with the sample password parola
RarCrack also supports threads (a simultaneous instance spawned copies of the program). Using threads speeds up the process of cracking and thus using the –threads is generally a good idea. Hence a good way to use rarcrack with the –threads option is:
freebsd% rarcrack linux_then_and_now.png.rar --threads 8 --type rar

RarCrack! 0.2 by David Zoltan Kedves (kedazo@gmail.com)

INFO: the specified archive type: rar

INFO: cracking linux_then_and_now.png.rar, status file: linux_then_and_now.png.rar.xml

Probing: '0i' [24 pwds/sec]

Probing: '1v' [25 pwds/sec]
RarCrack‘s source archive also comes with three sample archive files (rar, 7z and zip) protected with passwords for the sake of testing the tool.
One downside of RarCrack is its extremely slow in breaking the passwords on my Lenovo notebook – dual core 1.8ghz with 2g ram it was able to brute force only 20-25 passwords per second.
This means cracking a normal password of 6 symbols will take at least 5 hours.
RarCrack is also said to support cracking zip passwords, but my tests to crack password protected zip file did not bring good results and even one of the tests ended with a segmentation fault.
To test how rarcrack performs with password protected zip files and hence compare if it is superior or inferior to fcrackzip, I used the fcrackzip’s sample pass protected zip noradi.zip
hipo@noah:~$ rarcrack --threads 8 noradi.zip --type zip

2 by David Zoltan Kedves (kedazo@gmail.com)

INFO: the specified archive type: zip

INFO: cracking noradi.zip, status file: noradi.zip.xml

Probing: 'hP' [386 pwds/sec]

Probing: 'At' [385 pwds/sec]

Probing: 'ST' [380 pwds/sec]
As you can see in above’s command output, the zip password cracking rate of approximately 380 passwords per second is a bit quicker, but still slower than fcrackzip.
RarCrack seg faults if cracking a pass protected zip is passed on without specifying the –type zip command arguments:
linux:~$ rarcrack --threads 8 noradi.zip

RarCrack! 0.2 by David Zoltan Kedves (kedazo@gmail.com)

Segmentation fault
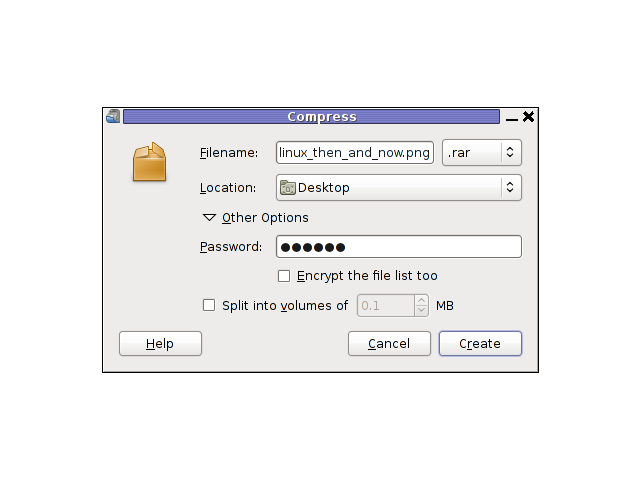
While talking about cracking protected rar and zip archives with password, its worthy to mention creating a password protected archive with Gnome Desktop on Linux and FreeBSD is very easy.
To create the password protected archive in Gnome graphic environment:
a. Point the cursor to the file you want to archive with password
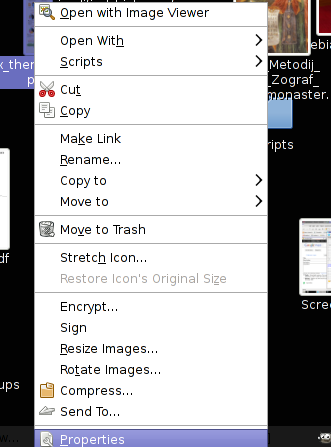
b. Press on Other Options and fill in the password in the pwd dialog
I think as of time of writting, no GUI frontend interface for neither RarCrack or FcrackZip is available. Lets hope some good guy from the community will take the time to write extension for Gnome to allow us to crack rar and zip from a nice GUI interface.
Tags: amp, archive type, argument, argument type, bz2 linux, com, current version, download, fcrackzip, file, freak, Gmail, Gnome, gnu linux, instance, Linux, linux cd, linux growth, linux tar, most linux distributions, option, password, png, ports, random linux, rar, rarcrackfreebsd, rarINFO, second, segmentation, status, tar bz2, time, tool, tree, type, type option, usr, version linux, wget, xml, zoltan
Posted in Computer Security, System Administration, Various | 3 Comments »
Monday, April 19th, 2010 1. First it’s necessery to have the mrtg debian package installed.
If it’s not installed then we have to install it:
debian-server:~# apt-get install mrtg
2. Second download the qmailmrtg source binary
To download the latest current source release of qmailmrtg execute:
debian-server:~# wget http://www.inter7.com/qmailmrtg7/qmailmrtg7-4.2.tar.gz
It’s a pity qmailmrtg is not available for download via debian repositories.
3. Third download the qmail.mrtg.cfg configuration file
debian-server~# wget https://www.pc-freak.net/files/qmail.mrtg.cfg
Now you have to put the file somewhere, usually it’s best to put it in the /etc/ directory.
Make sure the file is existing in /etc/qmail.mrtg.cfg
4. Untar compile and install qmailmrtg binary
debian-server:~# tar -xzvvf qmailmrtg7-4.2.tar.gz

...

debian-server:~# make && make install
strip qmailmrtg7
cp qmailmrtg7 /usr/local/bin
rm -rf *.o qmailmrtg7 checkq core
cc checkq.c -o checkq
./checkq
cc -s -O qmailmrtg7.c -o qmailmrtg7
qmailmrtg7.c: In function ‘main’:
qmailmrtg7.c:69: warning: incompatible implicit declaration of
built-in function ‘exit’
qmailmrtg7.c:93: warning: incompatible implicit declaration of
built-in function ‘exit’
qmailmrtg7.c:131: warning: incompatible implicit declaration of
built-in function ‘exit’
qmailmrtg7.c:137: warning: incompatible implicit declaration of
built-in function ‘exit’
5. Set proper file permissions according to the user you indent to execute qmailmrtg as
I personally execute it as root user, if you intend to do so as well set a permissions to
/etc/qmail.mrtg.cfg of 700.
In order to do that issue the command:
debian-server:~# chmod 700 /etc/qmail.mrtg.cfg
6. You will now need to modify the qmail.mrtg.cfg according to your needs
There you have to set a proper location where the qmailmrtg shall generate it’s html data files.
I use the /var/www/qmailmrtg qmailmrtg log file location. If you will do so as wellyou have to create the directory.
7. Create qmailmrtg html log files directory
debian-server:~# mkdir /var/log/qmailmrtg
8. Now all left is to set a proper cron line to periodically invoke qmailmrtg in order to generate qmail activity statistics.
Before we add the desired root’s crontab instructions we have to open the crontab for edit, using the command.
debian-server:~# crontab -u root -e
I personally use and recommend the following line as a line to be added to root’s crontab.
0-55/5 * * * * env LANG=C /usr/bin/mrtg /etc/qmail.mrtg.cfg > /dev/null
9. Copy index.html from qmailmrtg source directory to /var/log/qmailmrtg
debian-server:/usr/local/src/qmailmrtg7-4.2# cp -rpf index.html /var/log/qmailmrtg
10. Last step is to make sure Apache’s configuration contains lines that will enable you to access the qmail activity statistics.
The quickest way to do that in Debian running Apache 2.2 is to edit /etc/apache2/apache2.conf and add a directory Alias as follows
Alias /qmailmrtg/ "/var/www/qmailmrtg/"
Now after Apache restart
/etc/init.d/apache2 restart
You should be now able to access the qmail mrtg qmail log statistics through your Apache’s default configured host.
For instance, assuming your default configured Apache host is domain.com. You’ll be able to reach the qmailmrtg statistics through an url like:
http://domain.com/qmailmrtg/
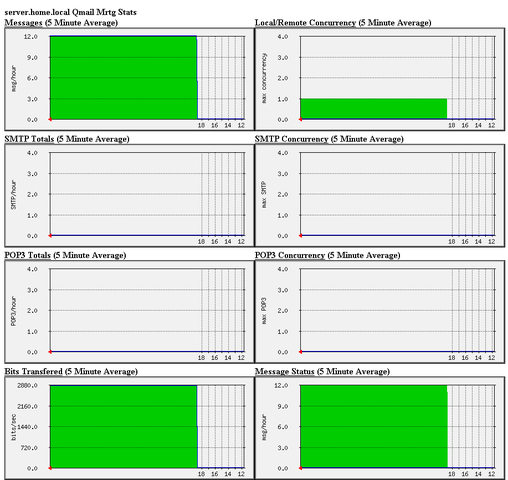
After I verified and ensured myself qmail mrtg is working correctly after all the above explained steps partook I wasn’t happy with some headlines in the index.html and the html tile of qmailmrtg,
so as a last step I manually edited the /var/www/qmailmrtg/index.html to attune it to my likings.
Here is a screenshot of the qmailmrtg web statistics in action.
Tags: amp, checkq, configuration file, cron, current source, debian package, debian repositories, declaration, default, download, exit, file, file permissions, freak, function, graph, host, html data, implicit declaration, indent, index, Installing qmailmrtg (qmail graph statistics on qmail activity) on Debian Lenny, loc, location, log, mrtg, necessery, package, proper location, rf, root, root user, Set, source release, statistics, strip, untar, wget
Posted in System Administration | 6 Comments »
Tuesday, August 2nd, 2011 I needed to install support for mbstring, as it was required by a client hosted on one of the servers running on CentOS 5.5.
Installation is quite straight forward as php-mbstring rpm package is available, here is how to install mbstring:
[root@centos [~]#yum install php-mbstring

...
Further on a restart of Apache or Litespeed and the mbstring support is loaded in php.
On some OpenVZ CentOS virtual servers enabling the php-mbstring might require also a complete php recompile if php is not build with the –enable-mbstring
If thus the mbstring has to be enabled on an OpenVZ server with php precompile, this can be easily done with cpeeasyapache , like so
server: ~# cd /home/cpeasyapache/src/php-5.2.9

server: php-5.2.9# cat config.nice |head -n $(($(cat config.nice |wc -l) - 1)) >> config.nice.new;

server: php-5.2.9# echo "'--enable-mbstring' \" >> config.nice.new; echo '"$@"' >> config.nice.new

server: php-5.2.9# mv config.nice config.nice.orig; mv config.nice.new config.nice
After that follow the normal way with make, make install and make install modules , e.g.:
server: php-5.2.9# make && make install && make install modules
Next the php-mbstring is enabled enjoy 😉
Tags: amp, apache, CentOS, client, config, installation, litespeed, Module, modulesNext, mv, newserver, openvz, orig, package, php, root, rpm, server, server php, support, virtual servers, way, yum
Posted in Linux, System Administration | 4 Comments »
Friday, July 22nd, 2011 
Lately, I’m basicly using htop‘s nice colourful advanced Linux top command frontend in almost every server I manage, therefore I’ve almost abondoned top usage these days and in that reason I wanted to have htop installed on few of the OpenVZ CentOS 5.5 Linux servers at work.
I looked online but unfortunately I couldn’t find any rpm pre-built binary packages. The source rpm package I tried to build from dag wieers repository failed as well, so finally I went further and decided to install htop from source
Here is how I did it:
1. Install gcc and glibc-devel prerequired rpm packages
[root@centos ~]# yum install gcc glibc-devel
2. Download htop and compile from source
[root@centos src]# cd /usr/local/src

[root@centos src]# wget "http://sourceforge.net/projects/htop/files/htop/0.9/htop-0.9.tar.gz/download"

Connecting to heanet.dl.sourceforge.net|193.1.193.66|:80... connected.

HTTP request sent, awaiting response... 200 OK

Length: 418767 (409K) [application/x-gzip]

Saving to: "download"
100%[======================================>] 418,767 417K/s in 1.0s
2011-07-22 13:30:28 (417 KB/s) – “download” saved [418767/418767]
[root@centos src]# mv download htop.tar.gz
[root@centos src]# tar -zxf htop.tar.gz
[root@centos src]# cd htop-0.9
[root@centos htop-0.9]# ./configure && make && make install
make install should install htop to /usr/local/bin/htop
That’s all folks! , now my OpenVZ CentOS server is equipped with the nifty htop tool 😉
Tags: amp, CentOS, colourful, command, dag wieers, devel, frontend, heanet, htop, HTTP, Install, Installing, Linux, linux servers, mv, OKLength, online, openvz, package, reason, repository, request, response, root, rpm, src, tar gz, tar zxf, tool, wget, yum, zxf
Posted in Linux, System Administration | No Comments »
Saturday, July 16th, 2011 
It was necessery to clean up some squid cache for some proxy users on a Debian host. Until now I’ve used to run only custom build Squid server on Slackware Linux.
Thus I was curious if Debian guys were smart enough to implement a proxy cache cleaning option as an option to be passed on to squid’s init script.
Honestly I was quite suprised squid clear cache option is not there;
squid-cache:~# /etc/init.d/squid3

Usage: /etc/init.d/squid3 {start|stop|reload|force-reload|restart}

squid-cache:/#
As it was not embedded into init script I still hoped, there might be some Debian way to do the proxy cache clearing, so I spend some 10 minutes checking online as well as checked in squid3‘s manual just to find there is no specific command or Debian accepted way to clean squid’s cache.
Since I couldn’t find any Debian specific, way I did it the old fashioned way 😉 (deleted directory/file structures in /var/spool/squid3/* and used squid’s -z option, to recreate the swap directories.
Here is how:
squid-cache:~# /etc/init.d/squid3 stop;

squid-cache:~# rm -Rf /var/spool/squid3/*;

squid-cache:~# squid3 -z; /etc/init.d/squid3 start
Finally I was quite amazed to realize, there was not even a crontab script to periodically clear and re-create proxy cache.
My previous experience with maintaning an office Squid proxy cache has prooved, that periodic cache clean ups are very helpful, especially to resolve issues with cached unreslovable DNS entries in the server.
Clearing up squid cache every week or something, guarantees that failure to resolve certain hosts at certain times would not stay unresolvable like forever 😉
In that manner of thougths, I decided to put the following crontab which will twice a month clear up proxy’s cache, to possibly solve some failed squid DNS issues.
squid-cache:~# crontab -u root -l > file;

echo '00 04 12,26 * * /etc/init.d/squid3 stop; rm -Rf /var/spool/squid3/*; squid3 -z; /etc/init.d/squid3 start >/dev/null 2>&1'

>> file; crontab file
By the way, implementing the squid clear cache in Debian and Ubuntu ‘s init scripts and putting a periodic proxy clear up cron, seems like a feature worthy to be proposed to the distro developers and hopefully be embbed in some of the upcoming distro releases 😉
Tags: amp, cache option, clear cache, clearing, command, cron, crontab script, dev, DNS, dns entries, experience, failure, feature, fi, fil, file, file structures, guarantees, Honestly, hosts, init script, Linux, necessery, online, option, proxy, proxy cache, proxy users, rf, root, something, specific, spool, squid, squid cache, Stop, thougths, Ubuntu, ups, Usage, var, way
Posted in Linux, System Administration | No Comments »
Saturday, April 30th, 2011 If you’re building (compiling) a new qmail server on some Linux host and after properly installing the qmail binaries and daemontools, suddenly you notice in readproctitle service errors: or somewhere in in qmail logs for instance in/var/log/qmail/current the error:
/usr/local/bin/tcpserver: error while loading shared libraries:

libc.so.6: failed to map segment from shared object: Cannot allocate memory
then you have hit a bug caused by insufficient memory assigned for tcpserver in your /var/qmail/supervise/qmail-smtpd/run daemontools qmail-smtpd initialize script:
This kind of issue is quite common especially on hardware architectures that are 64 bit and on Linux installations that are amd65 (x86_64) e.g. run 64 bit version of Linux.
It relates to the 64 bit architecture different memory distribution and thus as I said to solve requires increase in memory softlimit specified in the run script an example good qmail-smtpd run script configuration which fixed the libc.so.6: failed to map segment from shared object: Cannot allocate memory I use currently is as follows:
#!/bin/shQMAILDUID=`id -u vpopmail`NOFILESGID=`id -g vpopmail`MAXSMTPD=`cat /var/qmail/control/concurrencyincoming`# softlimit changed from 8000000exec /usr/local/bin/softlimit -m 32000000 /usr/local/bin/tcpserver -v -H -R -l 0 -x /home/vpopmail/etc/tcp.smtp.cdb -c "$MAXSMTPD"

-u "$QMAILDUID" -g "$NOFILESGID" 0 smtp

/var/qmail/bin/qmail-smtpd

/home/vpopmail/bin/vchkpw /bin/true 2>&1
The default value which was for softlimit was:
exec /usr/local/bin/softlimit -m 8000000
A good softlimit raise up values which in most cases were solving the issue for me are:
exec /usr/local/bin/softlimit -m 3000000
or
exec /usr/local/bin/softlimit -m 4000000
The above example run configuration fixed the issue on a amd64 debian 5.0 lenny install, the server hardware was:
CPU: Intel(R) Core(TM)2 Duo CPU @ 2.93GHz

System Memory: 4GB

HDD Disk space: 240GB
The softlimit configuration which I had to setup on another server with system parameters:
Intel(R) Core(TM) i7 CPU (8 CPUS) @ 2.80GHz

System Memory: 8GB

HDD Disk Space: 1.4Terabytes
is as follows:
#!/bin/sh

QMAILDUID=`id -u vpopmail`

NOFILESGID=`id -g vpopmail`

MAXSMTPD=`cat /var/qmail/control/concurrencyincoming`

exec /usr/bin/softlimit -m 64000000

/usr/local/bin/tcpserver -v -H -R -l 0

-x /home/vpopmail/etc/tcp.smtp.cdb -c "$MAXSMTPD"

-u "$QMAILDUID" -g "$NOFILESGID" 0 smtp

/var/qmail/bin/qmail-smtpd

/home/vpopmail/bin/vchkpw /bin/true 2>&1
If none of the two configurations pointed out in the post works, for you just try to manually set up the exec /usr/bin/softlimit -m to some high value.
To assure that the newly set value is not producing the same error you will have to, reload completely the daemontools proc monitor system.
To do so open /etc/inittab comment out the line:
SV:123456:respawn:/command/svscanboot
to
#SV:123456:respawn:/command/svscanboot
Save again /etc/inittab and issue te cmd:
linux:~# init q
Now again open /etc/inittab and uncomment the commented line:
#SV:123456:respawn:/command/svscanboot
to
SV:123456:respawn:/command/svscanboot
Lastly reload the inittab script once again with command:
linux:~# init q
To check if the error has disappeared check the readproctitle process, like so:
linux:~# ps ax|grep -i readproctitle
The command output should produce something like:
3070 ? S 0:00 readproctitle service errors: .......................................
Hope that helps.
Tags: amd64, amp, binaries, bit, bit architecture, Cannot, cdb, control, cpu intel, Disk, error while loading shared libraries, exec, hardware architectures, host, init, inittab, instance, insufficient memory, intel, libc, Linux, linux host, linux installations, loading, log, logs, QMAILDUID, script, segment, server hardware, shQMAILDUID, smtp, system, tcp, value, vpopmail
Posted in Linux, System Administration | 1 Comment »
Monday, April 4th, 2011 I’ve recently upgraded my FreeBSD Apache server from port www/apache20 I had some issues before I tune up and recompile also the php5 port but eventually it worked out, however the Eaccelerator content caching module failed to load as it was outdated.
That’s a common inconvenient with eaccelerator that every system administrator out there has faced once or twice, especially on systems that has custom compiled Apache servers and does not use a specific precompiled version of the eaccelerator.
To solve the situation as you can expect I jumped on in the /usr/ports/www/eaccelerator and removed the current installed version of eaccelerator in order to compile and install the latest port version.:
To do that I first attempted to upgrade the eaccelerator port with portmaster but as there were some problems caused by autoconf initialization etc., I finally decided to abandon the idea of using portmaster and did it manually with the good old well known trivial commands:
freebsd# cd /usr/ports/www/eaccelerator

freebsd# make deinstall

freebsd# make install && make clean
I’ve continued further and restarted my Apache server to load the new eaccelerator version and made a small phpinfo php script to test if the eaccelerator is properly loaded, yet with zero success.
After checking out in my /var/log/httpd-error.log , I’ve determined the following error:
Failed loading /usr/local/lib/php/20060613/eaccelerator.so: Cannot open "/usr/local/lib/php/20060613/eaccelerator.so"
The error is quite obvious, to solve it I’ve opened my php configuration file /usr/local/etc/php.ini and placed in it:
and substituted the line:
zend_extension="/usr/local/lib/php/20060613/eaccelerator.so:"
with:
zend_extension="/usr/local/lib/php/20090626/eaccelerator.so"
Further on I gave Apache another restart with:
freebsd# /usr/local/etc/rc.d/apache2 restart

Performing sanity check on apache2 configuration:

Syntax OK

Stopping apache2.

Waiting for PIDS: 71140.

Performing sanity check on apache2 configuration:

Syntax OK

Starting apache2.
followed by another test if the eaccelerator is loaded with the
phpinfo();
script.
Now even though the Failed loading /usr/local/lib/php/20060613/eaccelerator.so: Cannot open “/usr/local/lib/php/20060613/eaccelerator.so” was no more, the Eaccelerator was yet not loaded.
Another consult with /var/log/httpd-error.log now revealed me another eaccelerator error you read below:
eAccelerator requires Zend Engine API version 220060519.

The Zend Engine API version 220090626 which is installed, is newer.

Contact eAccelerator at http://eaccelerator.net for a later version of eAccelerator.
I did about 20 minutes of investigation on the internet looking for a possible fix which gave me some idea what might be the cause for error message, though it was finally my try/fail methodology that helped me solve the issue.
The solution to the issue appeared to be easy thanks God, to solve the error all you need to do is one more make clean right before installing the eaccelerator port.:
Here are the commands necessary to issue to solve the error and make the eaccelerator load properly:
freebsd# cd /usr/ports/www/eaccelerator

freebsd# make clean &&

freebsd# make install clean
Now after restarting the Apache server once again eaccelerator has properly been loaded once again.
Tags: amp, apache server, apache servers, Cannot, cause, cleanI, configuration file, content, custom, deinstallfreebsd, eaccelerator, eacceleratorfreebsd, file, freebsd apache, ini, initialization, installed version, investigation, lib, loading, log, php, phpinfo, portmaster, ports, sanity, script, system, system administrator, test, Waiting, Zend, zend engine
Posted in FreeBSD, System Administration | 2 Comments »


