Posts Tagged ‘sbin’
Tuesday, June 3rd, 2014 
If you're configuring a new Webserver or adding a new VirtualHost to an existing Apache configuration you will need to restart Apache with or without graceful option once Apache is restarted to assure Apache is continuously running on server (depending on Linux distribution) issue:
1. On Debian Linux / Ubuntu servers
# ps axuwf|grep -i apache|grep -v grep
root 23280 0.0 0.2 388744 16812 ? Ss May29 0:13 /usr/sbin/apache2 -k start
www-data 10815 0.0 0.0 559560 3616 ? S May30 2:25 _ /usr/sbin/apache2 -k start
www-data 10829 0.0 0.0 561340 3600 ? S May30 2:31 _ /usr/sbin/apache2 -k start
www-data 10906 0.0 0.0 554256 3580 ? S May30 0:20 _ /usr/sbin/apache2 -k start
www-data 10913 0.0 0.0 562488 3612 ? S May30 2:32 _ /usr/sbin/apache2 -k start
www-data 10915 0.0 0.0 555524 3588 ? S May30 0:19 _ /usr/sbin/apache2 -k start
www-data 10935 0.0 0.0 553760 3588 ? S May30 0:29 _ /usr/sbin/apache2 -k start
…
2. On CentOS, Fedora, RHEL and SuSE Linux and FreeBSD
ps ax | grep httpd | grep -v grep
7661 ? Ss 0:00 /usr/sbin/httpd
7664 ? S 0:00 /usr/sbin/httpd
7665 ? S 0:00 /usr/sbin/httpd
7666 ? S 0:00 /usr/sbin/httpd
7667 ? S 0:00 /usr/sbin/httpd
7668 ? S 0:00 /usr/sbin/httpd
7669 ? S 0:00 /usr/sbin/httpd
7670 ? S 0:00 /usr/sbin/httpd
7671 ? S 0:00 /usr/sbin/httpd
Whether a new Apache IP Based VirtualHosts are added to already existing Apache and you have added new
Listen 1.1.1.1:80
Listen 1.1.1.1:443
directives, after Apache is restarted to check whether Apache is listening on port :80 and :443
netstat -ln | grep -E ':80|443'
tcp 0 0 0.0.0.0:80 0.0.0.0:* LISTEN
tcp 0 0 0.0.0.0:443 0.0.0.0:* LISTEN
Meaning of 0.0.0.0 is that Apache is configured to Listen on Any Virtualhost IPs and interfaces. This output is usually returned whether in Apache config httpd.conf / apache2.conf webserver is configured with directive.
Listen *:80
If in netstat output there is some IP poping up for example "192.168.1.1:http", this means that only connections to the "192.168.1.1" IP address will be accepted by Apache.
Another way to look for Apache in netstat (in case Apache is configured to listen on some non-standard port number) is with:
netstat -l |grep -E 'http|www'
tcp 0 0 *:www *:* LISTEN
As sometimes it might be possible that Apache is listening but its processes are in in defunct (Zommbie) state it is always a good idea, also to check if pages server by Apache are opening in browser (check it with elinks, lynx or curl)
To get more thorough information on Apache listened ports, protocol, user with which Apache is running nomatter of Linux distribution use lsof command:
/usr/bin/lsof -i|grep -E 'httpd|http|www'
httpd 6982 nobody 3u IPv4 29388359 0t0 TCP www.pc-freak.net:https (LISTEN)
httpd 18071 nobody 3u IPv4 702790659 0t0 TCP www.pc-freak.net:http (LISTEN)
httpd 18071 nobody 4u IPv4 702790661 0t0 TCP www.pc-freak.net.net:https (LISTEN)
…
If Apache is not showing up even though restarted check what is going wrong in the error logs:
– on Debian standard error log is /var/log/apache2/error.log
– On RHEL, CentOS, SuSE std. error log is in /var/log/httpd/error.log
– on FeeBSD /var/log/httpd-error.log
Tags: check, configured, grep, httpd, Linux, log, need, nobody, option, port, ports, rhel, running, sbin, Ss May29, tcp, usr, var
Posted in Everyday Life, Linux, System Administration, Web and CMS | No Comments »
Wednesday, June 11th, 2014 
I want to do test MySQL Cluster following MySQL Cluster Install Guide for that purpose, I've installed 2 version of CentOS 6.5 inside Virtualbox and I wanted to make the 2 Linux hosts reachable inside a local LAN network, I consulted some colleagues who adviced me to configure two Linux hosts to use Bridget Adapter Virtualbox networking (Network configuration in Virtualbox is done on a Virtual Machine basis from):
Devices -> Network Settings
(Attached to: Bridged Adapter)
Note!: that by default Cable Connected (tick) is not selected so when imposing changes on Network – tick should be set)
After Specifying Attached to be Bridged Adapter to make CentOS linux refresh network settings run in gnome-terminal:
[root@centos ~]# dhclient eth0
However CentOS failed to grab itself DHCP IP address.
Thus I tried to assign manually IP addresses with ifconfig, hoping that at least this would work, e.g.:
on CentOS VM 1:
/sbin/ifconfig eth0 192.168.10.1 netmask 255.255.255.0
on CentOS VM 2:
/sbin/ifconfig eth1 192.168.10.2 netmask 255.255.255.0
To test whether there is connection between the 2 VM hosts tried ping-ing 192.168.10.2 (from 192.168.10.1) and tested with telnet if I can access remotely SSH (protocol), from CentOS VM2 1 to CentOS VM2 and vice versa, i.e.:
[root@centos ~]# telnet 192.168.10.2 22
Trying 192.168.10.2…
telnet: connect to address 192.168.10.2: No route to host
Then after checking other options and already knowing by using VBox NAT network option I had access to the internet, I tried to attach a standard local IP addresses to both Linux-es as Virtual interfaces (e.g eth0:1), .e.g:
On Linux VM 1:
/sbin/ifconfig eth0:0 192.168.10.1 netmask 255.255.255.0
On Linux VM 2:
/sbin/ifconfig eth1:0 192.168.10.2 netmask 255.255.255.0
Then to test again used telnet
[root@centos ~]# telnet 192.168.10.2 22
…
Then I found Virtualbox has a special Internal Networking support
to choose in Attached to drop down menu. According to Internal Networking Virtualbox instructions to put two Virtual Machine hosts inside an Internal network they should be both set in Internal network with identical name.
P. S. It is explicitly stated that using Internal Network will enable access between Guest Virtual Machines OS, but hosts will not have access to the Internet (which in my case doesn't really mattered as I needed the two Linux VMs just as a testbed)
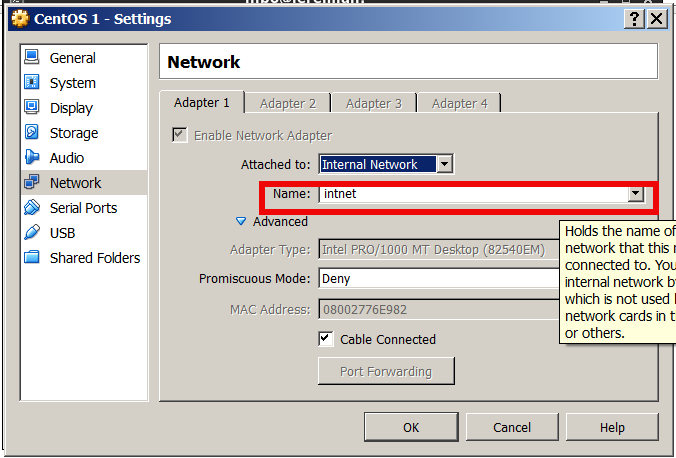
I tried this option but it doesn't work for me for some reason, after some time of research online on how to create local LAN network between 2 Virtual Machines luckily I decided to test all available Virtualbox Networking choices and noticed Host-only adapter.
Selecting Host-only Adapter and using terminal to re-fetch IP address over dhcp:
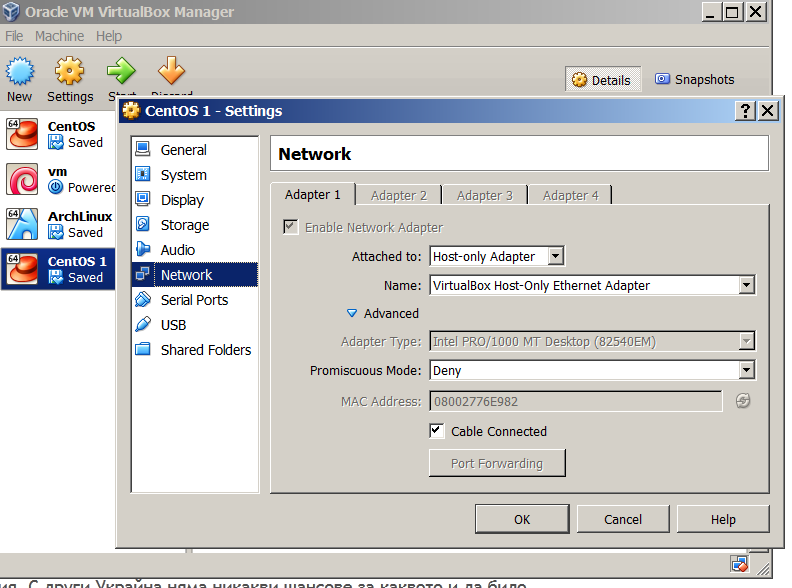
On CentOS VM1
dhclient eht0
On CentOS VM2
dhclient eth1
assigned me two adjoining IPs – (192.168.56.101 and 192.168.56.102).
Connection between the 2 IPs 192.168.56.101 and 192.168.56.102 on TCP and UDP and ICMP protocol works, now all left is to install MySQL cluster on both nodes.
Tags: connection, dhclient, doesn, ifconfig eth0, Internal Networking Virtualbox, ip, lan, Linux Virtual Machines, network, ping, sbin, test
Posted in Everyday Life, System Administration, Various, Virtual Machines | 1 Comment »
Saturday, August 20th, 2011 I’ve recently had to build a Linux server with some other servers behind the router with NAT.
One of the hosts behind the Linux router was running a Window GRE encrypted tunnel service. Which had to be accessed with the Internet ip address of the server.
In order < б>to make the GRE tunnel accessible, a bit more than just adding a normal POSTROUTING DNAT rule and iptables FORWARD is necessery.
As far as I’ve read online, there is quite of a confusion on the topic of how to properly configure the GRE tunnel accessibility on Linux , thus in this very quick tiny tutorial I’ll explain how I did it.
1. Load the ip_nat_pptp and ip_conntrack_pptp kernel module
linux-router:~# modprobe ip_nat_pptp

linux-router:~# modprobe ip_conntrack_pptp
These two modules are an absolutely necessery to be loaded before the remote GRE tunnel is able to be properly accessed, I’ve seen many people complaining online that they can’t make the GRE tunnel to work and I suppose in many of the cases the reason not to be succeed is omitting to load this two kernel modules.
2. Make the ip_nat_pptp and ip_nat_pptp modules to load on system boot time
linux-router:~# echo 'ip_nat_pptp' >> /etc/modules

linux-router:~# echo 'ip_conntrack_pptp' >> /etc/modules
3. Insert necessery iptables PREROUTING rules to make the GRE tunnel traffic flow
linux-router:~# /sbin/iptables -A PREROUTING -d 111.222.223.224/32 -p tcp -m tcp --dport 1723 -j DNAT --to-destination 192.168.1.3:1723

linux-router:~# /sbin/iptables -A PREROUTING -p gre -j DNAT --to-destination 192.168.1.3
In the above example rules its necessery to substitute the 111.222.223.224 ip address withe the external internet (real IP) address of the router.
Also the IP address of 192.168.1.3 is the internal IP address of the host where the GRE host tunnel is located.
Next it’s necessery to;
4. Add iptables rule to forward tcp/ip traffic to the GRE tunnel
linux-router:~# /sbin/iptables -A FORWARD -p gre -j ACCEPT
Finally it’s necessery to make the above iptable rules to be permanent by saving the current firewall with iptables-save or add them inside the script which loads the iptables firewall host rules.
Another possible way is to add them from /etc/rc.local , though this kind of way is not recommended as rules would add only after succesful bootup after all the rest of init scripts and stuff in /etc/rc.local is loaded without errors.
Afterwards access to the GRE tunnel to the local IP 192.168.1.3 using the port 1723 and host IP 111.222.223.224 is possible.
Hope this is helpful. Cheers 😉
Tags: bootup, Cheers, configure, confusion, dport, encrypted tunnel, external internet, flow, Forward, GRE, gre tunnel, Hope, host, hosts, How to, init, init scripts, Insert, internal ip address, internet ip address, ip nat, iptables, iptables firewall, kernel module, kernel modules, linux router, linux server, Load, make, modprobe, module linux, necessery, POSTROUTING, pptp, reason, redirect, sbin, system boot, tcp, topic, traffic flow, tutorial, window
Posted in Linux, System Administration | 6 Comments »
Wednesday, August 17th, 2011 One server recently installed with Qmail + Vpopmail and Squirrelmail had just been reported to me that the webmail is failing to properly login existent users on the server via the IMAP protocol.
I’ve checked on port 143 to see if couriertpcd process is properly listening with netstat -tlnp as well as used telnet to check if I can normally connect with telnet to the imap port and it seemed there is no issue with IMAP
Further on I checked /var/log/mail.log and there I found the following error message popping up:
Aug 17 08:56:27 mail-serv imapd: LOGIN FAILED, user=hipo@mail-serv.com, ip=[::ffff:127.0.0.1]

Aug 17 08:56:27 mail-serv imapd: authentication error: Connection refused

Aug 17 08:56:29 mail-serv imapd: Connection, ip=[::ffff:127.0.0.1]

Aug 17 08:56:29 mail-serv imapd: authdaemon: s_connect() failed: Connection refused

Aug 17 08:56:29 mail-serv imapd: [Hint: perhaps authdaemond is not running?]
The error was shown each time I do get a failure in Squirrelmail in my browser to connect to IMAP with the error:
ERROR: Connection dropped by IMAP server.
As the log revealed the courier-authdaemond was not up and running on the system. I thus launched it :
qmail:~# /usr/local/sbin/authdaemond stop

qmail:~# /usr/local/sbin/authdaemond start

qmail:~# /etc/init.d/imap start
I’ve later on figured out the strange, was caused because of a server reboot, during boot process authdaemond did not properly load up, therefore to prevent future problems like this one, I’ve put authdaemond and /etc/init.d/imap scripts to load up via /etc/rc.local :
qmail:~# echo '/usr/local/sbin/authdaemond stop' >> /etc/rc.local

qmail:~# echo '/usr/local/sbin/authdaemond start' >> /etc/rc.local

qmail:~# echo '/etc/init.d/imap start' >> /etc/rc.local
Tags: authdaemon, authentication error, boot, boot process, browser, com, connection, connection ip, ERROR, error error, error message, failure, ffff, imap port, imap protocol, IMAPFurther, issue, localqmail, login, mail, mail log, nbsp, port, port 143, Protocol, Qmail, Reboot, sbin, scripts, squirrelmail, startI, startqmail, Stop, time, usr, var, vpopmail
Posted in Linux, Qmail, System Administration | No Comments »
Thursday, December 8th, 2011 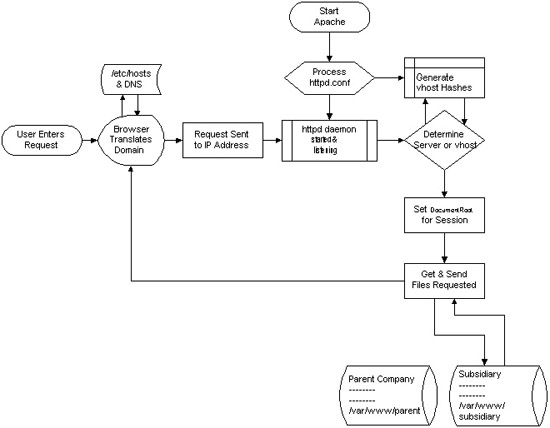
I decided to start this post with this picture I found on onlamp.com article called “Simplify Your Life with Apache VirtualHosts .I put it here because I thing it illustrates quite well Apache’s webserver internal processes. The picture gives also a good clue when Virtual Hosts gets loaded, anways I’ll go back to the main topic of this article, hoping the above picture gives some more insight on how Apache works.;
Here is how to list all the enabled virtualhosts in Apache on Debian GNU / Linux serving pages:
server:~# /usr/sbin/ apache2ctl -S

VirtualHost configuration:

wildcard NameVirtualHosts and _default_ servers:

*:* is a NameVirtualHost

default server exampleserver1.com (/etc/apache2/sites-enabled/000-default:2)

port * namevhost exampleserver2.com (/etc/apache2/sites-enabled/000-default

port * namevhost exampleserver3.com (/etc/apache2/sites-enabled/exampleserver3.com:1)

port * namevhost exampleserver4.com (/etc/apache2/sites-enabled/exampleserver4.com:1)

...

Syntax OK
The line *:* is a NameVirtualHost, means the Apache VirtualHosts module will be able to use Virtualhosts listening on any IP address (configured on the host), on any port configured for the respective Virtualhost to listen on.
The next output line:
port * namevhost exampleserver2.com (/etc/apache2/sites-enabled/000-default
Shows requests to the domain on any port will be accepted (port *) by the webserver as well as indicates the <VirtualHost> in the file /etc/apache2/sites-enabled/000-default:2 is defined on line 2 (e.g. :2).
To see the same all enabled VirtualHosts on FreeBSD the command to be issued is:
freebsd# pcfreak# /usr/local/sbin/httpd -S VirtualHost configuration:

wildcard NameVirtualHosts and _default_ servers:

*:80 is a NameVirtualHost

default server www.pc-freak.net (/usr/local/etc/apache2/httpd.conf:1218)

port 80 namevhost www.pc-freak.net (/usr/local/etc/apache2/httpd.conf:1218)

port 80 namevhost pcfreak.afraid.org (/usr/local/etc/apache2/httpd.conf:1353)

...

Syntax OK
On Fedora and the other Redhat Linux distributions, the apache2ctl -S should be displaying the enabled Virtualhosts.
One might wonder, what might be the reason for someone to want to check the VirtualHosts which are loaded by the Apache server, since this could be also checked if one reviews Apache / Apache2’s config file. Well the main advantage is that checking directly into the file might sometimes take more time, especially if the file contains thousands of similar named virtual host domains. Another time using the -S option is better would be if some enabled VirtualHost in a config file seems to not be accessible. Checking directly if Apache has properly loaded the VirtualHost directives ensures, there is no problem with loading the VirtualHost. Another scenario is if there are multiple Apache config files / installs located on the system and you’re unsure which one to check for the exact list of Virtual domains loaded.
Tags: apache, apache2, clue, com, config, configured, ctl, debian gnu, default port, default server, exampleserver, file, freak, freebsd, gnu linux, host, hosts, insight, ip address, life, Linux, lt, namevhost, NameVirtualHosts, onlamp, option, pcfreak, quot, reason, sbin, server pc, servers, someone, syntax, time, topic, Virtual, virtual hosts, Virtualhost, virtualhost configuration, VirtualHosts
Posted in Linux, System Administration | No Comments »
Wednesday, February 1st, 2012 Earlier I've blogged on How to Work Around periodically occuring TrackPoint Thinkpad R61 issues on GNU / Linux . Actually I thought the fix I suggested there is working but I was wrong as the problems with the trackpoint reappeared at twice or thrice a day.
My suggested fix was the use of one script that does periodically change the trackpoint speed and sensitivity to certain numbers.
The fix script to the trackpoint hanging issue is here
Originally I wrote the script has to be set to execute through crontab on a periods like:
0,30 * * * * /usr/sbin/restart_trackpoint.sh >/dev/null 2>&1
Actually the correct values for the crontab if you use my restart_trackpoint.sh script are:
0,5,10,15,20,25,30,35,40,45,50,55,58 * * * * /usr/sbin/restart_trackpoint.sh >/dev/null 2>&3
ig it has to be set the script is issued every 5 minutes to minimize the possibility for the Thinkpad trackpoint hang up issue.
One other thing that helps if trackpoint stucks is setting in /etc/rc.local is psmouse module to load with resetafter= parameter:
echo '/sbin/rmmod psmouse; /sbin/modprobe psmouse resetafter=30' >> /etc/rc.local
Tags: amp, blogged, change, correct values, crontab, dev, fix, gnu linux, hang ups, ig, issue, issue one, Linux, modprobe, Module, mouse, mouse pointer, nbsp, null, parameter, periods, psmouse, resetafter, rmmod, sbin, sensitivity, speed, stucks, thinkpad, thrice, trackpoint, ups, use, usr
Posted in Linux, Linux and FreeBSD Desktop, Linux Audio & Video | 1 Comment »
Thursday, September 10th, 2009 While playing with my installed programs on my recently updated Debian I stepped into a problem with /usr/lib32/alsa-lib/libasound_module_pcm_pulse.so. It seems the library was linked to two non-existing libraries: /emul/ia32-linux/lib/libwrap.so.0 as well as /emul/ia32-linux/usr/lib/libgdbm.so.3. A temporary solution to the issue is pointed out in Debian of the Debian Bug reports . As the report reads to solve that it’s required to:
1. Download libwrap0_7.6.q-18_i386.deb and libgdbm3_1.8.3-6+b1_i386.deb.
2. Extract the packages:dpkg -X libwrap0_7.6.q-18_i386.deb /emul/ia32-linux/dpkg -X libgdbm3_1.8.3-6+b1_i386.deb /emul/ia32-linux/
3. echo /emul/ia32-linux/lib >> /etc/ld.so.conf.d/ia32.conf
4. Execute /sbin/ldconfig
5. Check if all is properly linkedExecute ldd /usr/lib32/alsa-lib/libasound_module_pcm_pulse.so|grep -i “not found”Hopefully all should be fixed now.
Tags: b1, bug reports, conf, deb, Debian, debian bug, download, dpkg, emul, grep, issue, ld, ldquo, lib, libasound, libgdbm, libraries, linkedExecute, Linux, Module, pulse, report, rsquo, sbin, sid, solution, squeeze, temporary solution, Unstable, usr
Posted in Linux and FreeBSD Desktop, Linux Audio & Video, Skype on Linux, System Administration | No Comments »
Friday, December 30th, 2011 Earlier I've blogged about how to prevent brute force attacks with fail2ban, denohosts and blockhosts , however there is easier way to secure against basic brute force attacks by not installing or configuring any external programs.
The way I'm talking about uses simple iptables rules to filter out brute force attacks.
Here is a small script to stop ssh and FTP invaders which try to initiate more than 3 consequential connections in 5 minutes time to port 22 or port 23:
SERVER_MAIN_IP='AAA.BBB.CCC.DDD';/sbin/iptables -N SSH_WHITELIST

/sbin/iptables -A INPUT -p tcp --dport 22 --syn -m recent --name sshbr --set

/sbin/iptables -A INPUT -p tcp --dport 22 --syn -j SSH_WHITELIST

/sbin/iptables -A INPUT -p tcp --dport 22 --syn -m recent --name sshbr \

--update --rttl --hitcount 3 --seconds 300 -j REJECT --reject-with tcp-reset

/sbin/iptables -A SSH_WHITELIST -s $SERVER_MAIN_IP -p tcp --dport 22 --syn -m recent --rttl --remove
The only thinIf the rules are matched iptables filter rules will be added to the iptables CHAIN SSH_WHITELIST
In case if you want to add some more truested IPs add some more iptables rules, like:
ALLOW_IP='BBB.CCC.DDD.EEE';

/sbin/iptables -A SSH_WHITELIST -s $ALLOW_IP -p tcp --dport 22 --syn -m recent --rttl --remove
Each filtered IP that matches the rules will be filtered for 5 minutes, if 5 minutes is enough, the 300 value has to be increased.
Tags: ALLOW, BBB, blogged, brute force, CCC, ddd, dport, EEE, filter rules, INPUT, ips, iptables, Linux, Main, name, nbsp, port, port 22, port 23, removeEach, sbin, server, ssh, sshbr, SYN, time, value, way, whitelist
Posted in Computer Security, Linux, System Administration | 2 Comments »
Thursday, July 7th, 2011 Every now and then I had to tamper routing tables in Linux and every time I had to do it I forgot how I did it last time so finally I decided to put it on my blog and find how I can delete from Linux routing table easier
Deleting a record from a wrong routing table on Linux is a piece of cake basicly, here is an example:
linux:~# route -n

Kernel IP routing table

Destination Gateway Genmask Flags Metric Ref Use Iface

192.168.0.1 0.0.0.0 255.255.255.0 U 0 0 0 eth0

169.254.0.0 0.0.0.0 255.255.0.0 U 0 0 0 eth0

0.0.0.0 192.168.0.1 0.0.0.0 UG 0 0 0 eth0
Let’s say this is the routing table and it’s incorrect as the routing through the node 169.254.0.0 should not be there.
Here is how the routing through 169.254.0.0 can be deleted:
linux:~# /sbin/route del -net 169.254.0.0 netmask 255.255.0.0
Now here is the difference after deletion:
linux:~# route -n

Kernel IP routing table

Destination Gateway Genmask Flags Metric Ref Use Iface

192.168.0.1 0.0.0.0 255.255.255.0 U 0 0 0 eth0

0.0.0.0 192.168.0.1 0.0.0.0 UG 0 0 0 eth0
If you want to delete the default gateway just use 0.0.0.0, e.g. -net 0.0.0.0 .. in above cmd example.
This would delete default gateway record from routing table which by the way in routing tables is marked with the UG flag.
Cheers 😉
Tags: basicly, blog, cake, Cheers, default gateway, deletion, difference, eth, flags, Genmask, Iface, last time, Linux, Metric, Netmask, nKernel, piece, piece of cake, Ref, routing, routing table, sbin, TABLE, tableDestination, time, way
Posted in Linux, System Administration | No Comments »
Monday, May 23rd, 2011 One of the Qmail server installations I’m taking care of’s clamd antivirus process started loading the system heavily.
After a bit of log reading and investigation I’ve found the following error in my /var/log/clamd/current
@400000004dda1e1815cf03f4 ERROR: LOCAL: Socket file /tmp/clamd.socket is in use by another process.
I’ve noticed in my process list that actually I do have two processes clamd :
11608 ? Sl 0:05 /usr/local/sbin/clamd

11632 ? S 0:00 /usr/bin/multilog t /var/log/clamd

16013 ? Sl 0:06 /usr/local/sbin/clamd
It appeared that for some weird reason one of the clamd process was failing to connect constantly to the clam server socket /tmp/clamd.socket and each time it tried to connect and failed to connect to the socket the system gets about 5% of extra load …
Resolving the issues was a piece of cake, all I had to do is stop the clamd server delete the /tmp/clamd.socket and relaunch the clamd server.
Here is exactly the commands I issued:
debian:~# cd /service/

debian:/service# svc -a clamd

debian:/service# svc -h clamd

debian:/service# svc -d clamd

debian:/service# rm -f /tmp/clamd.socket

debian:/service# svc -u clamd
Afterwards the clamd extra load went out and in /var/log/clamd/current I can see clamd loads fine without errors, e.g.:
Listening daemon: PID: 16013

MaxQueue set to: 150

No stats for Database check - forcing reload

Reading databases from /usr/local/share/clamav

Database correctly reloaded (966822 signatures)

SelfCheck: Database status OK.

...
Tags: antivirus, care, cd service, clam, clamddebian, Database, database check, database status, databases, dda, debian cd, ERROR, file tmp, investigation, LOCAL, multilog, PID, piece of cake, Qmail, reading, reason, rm, sbin, SelfCheck, server installations, server socket, share, signatures, Socket, socketdebian, time, tmp, use, var, weird reason
Posted in Linux, System Administration | 1 Comment »


