I hate facebook, from the deepness of my guts! However, unfortunately in one of the companies I'm employed, occasionally I have to use it as an advertisement media to improve the Search Engine visibility for their websites (gather them some more likes). As a not big lover of facebook, I'm also not a facebook-pro, anyways with this circumstances, I'm starting to learn basic tips on, making a facebook page / profile more user friendly and hence more attracting to facebook users.
From what, i"ve read there are plenty of factors that can affect on how attractive a facebook page / company profile , anyways some of the factors are more important to tamper than others. Such two factors of top importance are:
Let me evaluate a bit on each of the three aforementioned fb marketing weight factors.
1. Using Page likes for popularization.
– Lets say that you would like to make marketing to a company websites which is involved in Financial or Investment market. Enter with the company created page or profile and facebook and think for and search for as many keywords related to the company business as possible. Check each of the results if the Page / Group is liked by hundred thousands of other people, then just give it a like too. By doing so for a couple of seconds all this (hundred thousands or millions) of people who has also liked it will see for a second (or less), what hangs on your Facebook profile 😉 The chance someone gets interested into what is your profile saying here is high especially if this pops up to a some 100 000+ of logged people who previously liked a fb page 🙂
2. Joining groups as a way to drive more visitors to a facebook profile
Joining big groups consisting ot thousands or millions's logic is the same like with the page likes. The only difference is some groups are kept private the so called (Closed Group). Finding a number of similar (Open Groups) to your company activities and joining them will possibly display your company facebook profile to as many profiles as the group has. Most of the groups are not too active therefore joing groups as a way to drive attention of facebook users to a desired profile is not so efficient as with Page Likes Adjusting a profile picture logo dimensions to a wide skyscraper.
It might seem strange but actually the size of profile picture set to pages or profiles in facebook matters, different profiles dimensions could have impact on Page Likes 🙂 The reason for the fb picture profile having influence on the marketing is very simple. If you have a wider picture you can graphically include more data visible for the user that is always stuck to the page and hence seen by the user.
I've realized this after, I've red few articles online on the same topic along with that I've noticed many big brand pages on Facebook like for instance BMW (Cars) with over 8 000 000 of likes, Adidas and Nike – with over 6 000 000 likes, have set up this wide skyscraper dimensions logos.
Here is a crop taken displaying the wide skyscraper profile picture set by BMW cars.The profile picture used by BWM (cars) has an image dimensions of: 180×500 heigh x widthAdidas's profile logo has a size of 180×489.
Nike uses a bit of unstandard 390×720 (but while uploaded facebook website automatically crops the image to a size which is fittable for a wide skyscraper) with dimensions like (200×400)Another franchising company with big likes base, I've seen is McDonald's with 19 900 000+ likes! again with a banner logo consisting of wide scraper with picture dimenions (180×439 – height / width )There are some comparatively big user base facebook pages, like Ubuntu's non-profit organization with 555 000+ thousands of likes, and their logo has dimensions of 180×181 pixels.
Not all of the highly liked (visited) facebook pages however use a wide skyscraper as a profile logo and still has enormous number of likes. One contra-example showing that there is no clear relation between facebook profile picture dimensions and page popularity (number of likes) is Metallica (Musician/Band) fan page – (http://www.facebook.com/Metallica), which as of the time of writting this article has the UNIQUE HIGH NUMBER of 23,725,897 LIKES! 🙂
As far as, I've further red on many blogs, there are two general facebook standard banner profile picture recommendations:
1. One is facebook square like profile picture
– (this is the classics), if you just place a picture that is not too wide automatically facebook upload scripts will tailer the picture to have dimensions like: 180×180 pixels
The other recommended facebook pictures size is the wide wide-scraper and it should possess an image dimensions size similar to: width x height -180×500 pixels
This is pretty much the few basics I so far, know of can help to easily gather a custom fb company Page Likes. As facebook is really HUGE nowdays fb marketing has advanced tremendously.
I'll be glad to hear some cool tips & tricks you know?which can help a facebook page / profile popularity rise up. Looking forward to hear for your good or bad facebook experiences 🙂
Likes of pages, which are liked by thousands of hundreds or millions of people
Belongings to groups / Membering to big groups (consisting of thousands) which hold similar interest or business activity
These days, I'm playing with The GIMP. I've been a GNU / Linux, FreeBSD user for already 11 years now but as I'm doing mostly system administration and I don't have much expertise in Panting or Computer Graphical Design, I've never put much time to learn more in the interesting area of graphical design. Hence until just recently, Just until now, I've never spend time with the GIMP (GNU Image Manipulation Program) and never realized how powerful this great program is. The more I learn about GIMP functionalities and how it works the more it makes me determined to learn some basic web design 🙂
The functionality which The GIMP offers in a basic install is quite rich, however by default on most Debian and Ubuntu installations many of the great plugins which easifies the way to edit pictures is missing.
Example for a very valuable functionality which is not present with standard gimp package installed on Debian and Ubuntu are:
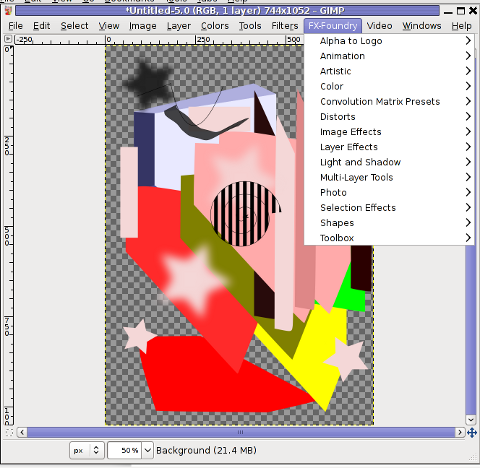
GIMP FX-Foundry is a thoroughful collection of GIMP scripts (addon plugins), that automates many of the operations which requires a professional web design skills and gives an easy intuitive interface through which very robust "high level" graphic design can be accomplished. This additional GIMP extensions helps to create very unique design in just few simple steps, as well as gives multiple tools for the sake of easy pro design creation. For anyone looking for quick edit of images with GIMP FX-Foundry is a must have GIMP plugins extension. The script pack is located on http://gimpfx-foundry.sourceforge.net/
To install FX-Foundry scripts collection on Debian / Ubuntu / Linux Mint and other based Linux distributions:
gimp-plugin-registry package name is based on GIMP Plugin registry's website . Gimp plugin registry contains many helpful design goodies 🙂
Once installed you will notice GIMP with a new menu on the main menus bar reading FX-Foundry :
GIMP FX Foundry extensionos package contains 124 scripts for additional graphics manipulation. The collection contains less scripts than the ones provided by gimp-plugin-registry. package has 156 scripts inside.
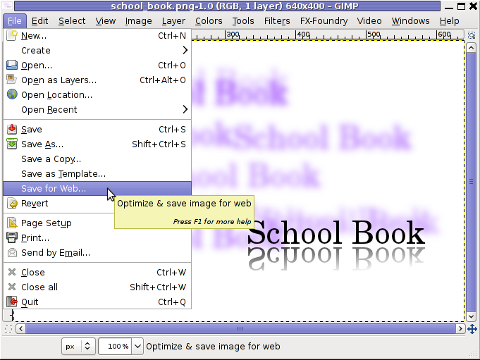
One of the most helpful GIMP addition from the package is the inclusion of Save for Web button under:
File -> Save for Web
Another very helpful .deb package which adds up to GIMP's design possibilities is gimp-data-extras .
gimp-data-extras adds 111 new GIMP Fill in Patterns , which can be used through the Blend Tool to Fill selected areas with color gradients.
Generally once installed this package will add to GIMP – an extra set of brushes, palettes, and gradients for The GIMP as you can read in the package description.
I was also quite stunned to find out the good old GIMP is capable of basic Video editting!!
On Debian and Ubuntu there is a package called gimp-gap which once installed adds an extra Video menu.
I've not tested the GIMP video editting capabilities yet, however I intend to learn something about it immediately when I have some free time left. You see the enormous list of Video editting possibilities GIMP obtaines with gimp-gap which btw stands for (The GIMP Animation Package).
To install gimp-gap:
debian:~# apt-get install --yes gimp-gap
I've noticed also the following list of others useful GIMP additions (mainly helpful in Web, Brochure and Logo Graphic Design) to install them:
Here is the package description of the packages above command will install:
gimp-cbmplugs – plugins for The GIMP to import/export Commodore 64 files
gimp-data-extras – An extra set of brushes, palettes, and gradients for The GIMP
gimp-dcraw – GIMP plug-in for loading RAW digital photos
gimp-dds – DDS (DirectDraw Surface) plugin for the gimp
gimp-dimage-color – GIMP plugin to convert Minolta DiMAGE pictures to sRGB colour space
gimp-gap – The GIMP Animation Package
gimp-gluas – Lua environment plug-in for GIMP
gimp-gmic – GIMP plugin for GREYC's Magic Image Converter
gimp-gutenprint – print plugin for the GIMP
gimp-lensfun – Gimp plugin to correct lens distortion using the lensfun library
gimp-normalmap – Normal map plugin for GIMP
gimp-plugin-registry – repository of optional extensions for GIMP
gimp-resynthesizer – Gimp plugin for texture synthesis
gimp-texturize – generates large textures from a small sample
gimp-ufraw – gimp importer for raw camera images
flegita-gimp – Gnome Gimp scan plugin.
gtkam-gimp – gtkam gimp plugin to open digital camera pictures
mrwtoppm-gimp – GIMP-plugin to support Minolta DiMAGE 5/7/7i RAW images
Now after installing all this plugins and seeing all GIMP's power, I'm starting to wonder why are still people ranting Adobe PhotoShop is feature rich. That's all, enjoy the great new GIMP features. Happy picture editting 😉
I’ve recently had to mount an MDF (.mdf) image file on my Debian Linux . I never used .MDF file extension before and therefore I had no clue what is this file extension, so I did a quick research in Google to educate myself what is the MDF file format?
What I found was one article on ehow.com titled What is MDF & MDS and one article in Wikipedia MDF and MDS file pair In short MDF is a CD9660 like ISO format produced by some CD burning and image creation software like Alcohol 120% An MDS file accompanies the .MDF file. The .MDS is an optional metadata descriptor file which explains what is contained in the .MDF (iso like file). MDF is not so standartized format like the usual ISO‘s we use to snapshot optical CD or DVDs but still is produced by some programs.
The MDF and MDS file pairs are typically created by two famous MS Windows programs:
Alcohol 120%
Daemon Tools
Both of the softwares are non-free programs, with the little exception – Daemon Tools is at least a freeware. This is the reason why MDF format is far from popular across GNU / Linux and BSD* users and mostly used across Microsoft Windows platforms.
On Windows there are plenty of program capable of reading and opening .MDF extension files; The two aforementioned programs + MagicISO is few of the many programs which support mounting / (Create virtual drive) for MDF files.
On Free Opearting Systems, (Linux / BSD) there are two GUI programs, that are capable of mounting MDF files;:
Furiusisomount
AcetoneISO
I’ve tried both of them, for the sake of testing. With FuriosIsoMount however mounting the MDF failed. I tried to mount with FuriousIsoMount by launching the program with both non-root and root privileges. The program was capable of detect the .MDF file, I can browse the file and even it appeared like it is mounting the MDF fine when pressing on Mount button, however the mount point directory stays empty.
With AcetoneISO program mounting the MDF directly was possible, but only when the program was run with root privileges. With non-root privileges I got the error:
Error, could not mount image.
There is also alternative way command way to mount an MDF image by;
1. Using  mdf2iso  to convert the MDF image file to ISO
2. Use the regular Linux mount command to mount the converted ISO9660  file
On Debian there mdf2iso is avaialable as a deb package. To install it:
linux:~# apt-get install --yes mdf2iso
1. Convert MDF to ISO with mdf2iso
To convert the MDF image to ISO with mdf2iso cmd I used:
hipo@linux:~/mdf-iso$ mdf2iso my-mdf-iso-file.mdf
mdf2iso v0.3.1 by Salvatore Santagati
Licensed under GPL v2 or later
47% [:           >=========:]
2. Mount the newly converted ISO file with mount cmd
In my last article, I've explained How to create PNG, JPG, GIF pictures from one single PDF document Convertion of PDF to images is useful, however as PNG and JPEG graphic formats are raster graphics the image quality gets crappy if the picture is zoomed to lets say 300%. This means convertion to PNG / GIF etc. is not a good practice especially if image quality is targetted.
I myself am not a quality freak but it was interesting to find out if it is possible to convert the PDF pages to SVG (Scalable Vector Graphics) graphics format.
The traditional source way compile and install is described on the homepage. For Debian users pdf2svg has already existing a deb package.
To install pdf2svg on Debian use:
debian:~# apt-get install --yes pdf2svg

...
Once installed usage of pdf2svg to convert PDF to multiple SVG files is analogous to imagemagick's convert . To convert the 44 pages Projects.pdf to multiple SVG pages – (each PDF page to a separate SVG file) issue:
debian:~/project-pdf-to-images$ for i in $(seq 1 44); do \

pdf2svg Projects.pdf Projects-$i.SVG $i; \

done
This little loop tells each page number from the 44 PDF document to be stored in separate SVG vector graphics file:
debian:~/project-pdf-to-images$ ls -1 *.svg|wc -l

44
For BSD users and in particular FreeBSD ones png2svg has a bsd port in:
/usr/ports/graphics/pdf2svg
Installing on BSD is possible directly via the port and convertion of PDF to SVG on FreeBSD, should be working in the same manner. The only requirement is that bash shell is used for the above little bash loop, as by default FreeBSD runs the csh. On FreeBSD launch /usr/local/bin/bash, before following the Linux instructions if you're not already in bash.
Now the output SVG files are perfect for editting with Inkscape or Scribus and the picture quality is way superior to old rasterized (JPEG, PNG) images
I've received a PDF file with a plan for development of a bundle of projects, My task was to evaluate this plan and give feeback on the 44 pages PDF document.
Since don't know of program to directly be able edit PDF files on GNU / Linux ?, my initial idea was to open and convert the PDF to ODT / DOC with OpenOffice (Libre Office) and then edit the ODT file. Unfortunately Open Officeoowrite program was unable to open / visualize the PDF file. My assumption is OO failure to open the PDF is because the PDF was generated on Microsoft Windows with Adobe illustrator or smth.
The idea that came to my mind as alternative, way to edit the PDF file was to convert it in pictures edit and then convert the pictures to PDF. In other words to follow these 3 steps: 1. Convert the PDF document to multiple images
2. Edit each of the images with GIMP or Inkscape
3. Convert back all images to a single PDF file
. This prior article was exactly describing how to complete Step 3.Therefore all left was to find a way to convert the PDF file to multiple JPEG / PNG / GIF images.
convert command to convert PDF document to multiple pictures which you can take from my earlier article is:
$ convert *.jpg outputpdffile.pdf
Actually in Step 1 I was aiming to do the opposite of what I've previously done.
Hence, in order to convert the singe Project.PDF file to multiple PNG images, I just switched convert IN / OUT arguments order.
I've done the PDF to pictures conversion on my notebook running Debian Squeeze (6.0.2) GNU / Linux.Convertion of the PDF file to 44 images, took 25 seconds on my dual core 1.8 Ghz / 2GB RAM Thinkpad r61. Afterwards, I've had at hand 44 PNG files generated, e.g.:
hipo@noah:~/project-pdf-to-images$ ls -al Project-*.png |wc -l

44
convert was also smart enough to produce correct file naming. The output file names were: Project-1.png Project-2.png etc.
Nicely each number (-1.png) was corresponding to the respective PDF page. For instance Project-10.png was corresponding to page 10 of the Projects.PDF file
Rather ironically, after convertion of the PDF to pictures, while opening the Project-1.png, I've noticed The GIMP – (The GNU Image Manipulation Program) is capable of directly reading PDF files. GIMP has both the option to open files in layers or separate images 😉 Anyways even if GIMP is used to modify the different PDF pages as layers, once completed GIMP doesn't have the ability to save the file as PDF and therefore once saved the file if merging of layers is done the resulting picture becomes ONE BIG MESS. Therefore it seems my the 3 steps way e.g.:
1. convertion PDF to pictures

2. picture edit with GIMP or Inkscape

3. convertion of pictures back to PDF
is still the only way to "modify PDF" in Linux or BSDs. I will be glad to hear if someone has come up with a better solution?
There two main reasons which cause incorrect clock settings on Slackware Linux. One common reason for incorrectly set time is improper clock and timezone settings during Slackware install.
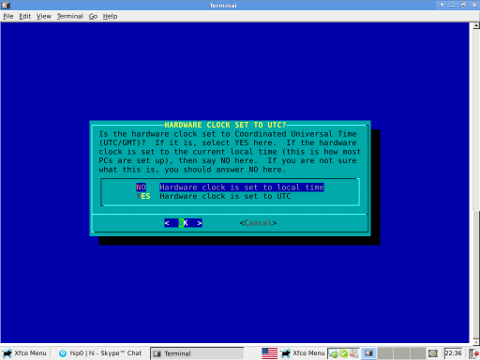
On install, one of the ncruses install menus asks an ambigious dialog question reading
HARDWARE CLOCK SET TO UTC?

Is the hardware clock set to Coordinated Universal Time (UTC/GMT)?
Some newbie Slackware users make the mistake to choose YES here, resulting in incorrectly set clock.
Second possibility for improper time is incorrect time on BIOS level. This is not so common among laptop and modern desktop PCs. However in the past impoper system BIOS hardware clock was usual. In any case it is a good practice to check the system PC BIOS clock settings.
To check BIOS battery hardware clock from command line use:
bash-4.1# hwclock --show

Fri 24 Feb 2012 01:24:18 AM EET -0.469279 seconds
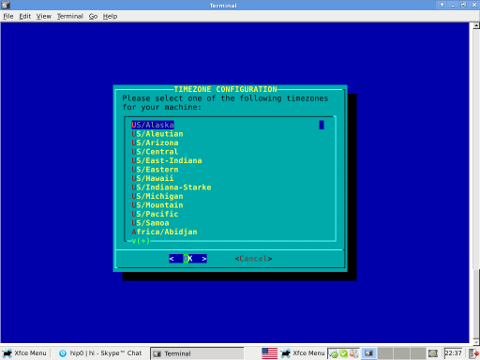
The system clock on Slackware is set via a script called timeconfig. To fix slack's incorrect host time run:
bash-4.1# timeconfig
Running timeconfig once should configure a proper timezone to be set on next system reboot, however the system time will probably still be not ok. To manually set time to right time, use date command. To set manually the system wide time to 12:00:00 with date:
bash-4.1# date -s "12:00:00"
Anyways for time accuracy the ntpdate should be used to feth time from NTP internet time server:
bash-4.1# ntpdate time.nist.gov

...
Finally to make the new set right time permanent also for the BIOS battery clock issue:
bash-4.1# hwclock --systohc
By the way its curious fact Slackware Linux is the oldest still existent GNU / Linux based distribution. Its up and running since the very day GNU and Linux came to merge at one Free OS 😉
By the way, I haven't used slackware for a long time so in the mean time since Slackware 13, the default slackware packages format .tgz is now substituted with the newer .txz (better compressed .txz). The old .tgz was simply a tar archive with DEFLATE gzip. The newer .txz packages bundled with newer slackware releases are using the LZMA2 (XZ) chain algorithm for compression. LZMA implies higher compression than even bzip2 and this is the reason why Patrick Volkerding – the one man army man behind Slackware decided to use it. The reason Vollerding choose using .txz is slackware network distribution will load up less the networks and will take less time for downloading extra slackware packages via the internet. The .txz also reduces slackware main CD size so more packages can be contained in the same 700MB sized slack install CD.
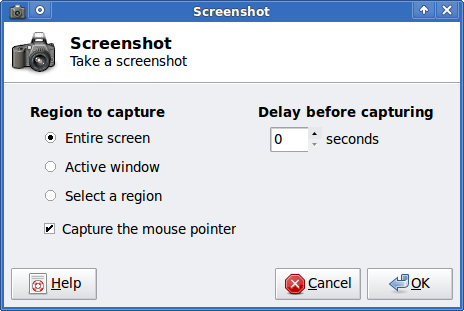
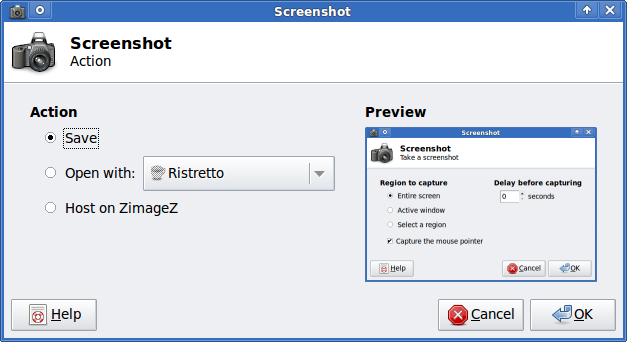
Anyways now back to the installation of xfce-screenshooter.
Once installed to runit use the Xfce menus:
Xfce Menu -> Accesories -> Screenshot
Next you will see the xfce-screenshooter program to pop-up:
Everyone who used Linux is probably familiar with wget or has used this handy download console tools at least thousand of times. Not so many Desktop GNU / Linux users like Ubuntu and Fedora Linux users had tried using wget to do something more than single files download. Actually wget is not so popular as it used to be in earlier linux days. I've noticed the tendency for newer Linux users to prefer using curl (I don't know why).
With all said I'm sure there is plenty of Linux users curious on how a website mirror can be made through wget. This article will briefly suggest few ways to do website mirroring on linux / bsd as wget is both available on those two free operating systems.
1. Most Simple exact mirror copy of website
The most basic use of wget's mirror capabilities is by using wget's -mirror argument:
Creating a mirror like this is not a very good practice, as the links of the mirrored pages will still link to external URLs. In other words link URL will not pointing to your local copy and therefore if you're not connected to the internet and try to browse random links of the webpage you will end up with many links which are not opening because you don't have internet connection.
2. Mirroring with rewritting links to point to localhost and in between download page delay
Making mirror with wget can put an heavy load on the remote server as it fetches the files as quick as the bandwidth allows it. On heavy servers rapid downloads with wget can significantly reduce the download server responce time. Even on a some high-loaded servers it can cause the server to hang completely. Hence mirroring pages with wget without explicity setting delay in between each page download, could be considered by remote server as a kind of DoS – (denial of service) attack. Even some site administrators have already set firewall rules or web server modules configured like Apache mod_security which filter requests to IPs which are doing too frequent HTTP GET /POST requests to the web server. To make wget delay with a 10 seconds download between mirrored pages use:
The -mk stands for -m/-mirror and -k / shortcut argument for –convert-links (make links point locally), –random-wait tells wget to make random waits between o and 10 seconds between each page download request.
Some websites has a robots.txt which restricts content download with clients like wget, curl or even prohibits, crawlers to download their website pages completely.
/robots.txt restrictions are not a problem as wget has an option to disable robots.txt checking when downloading. Getting around the robots.txt restrictions with wget is possible through -e robots=off option. For instance if you want to make a local mirror copy of the whole sub-directory with all links and do it with a delay of 10 seconds between each consequential page request without reading at all the robots.txt allow/forbid rules:
4. Mirror website which is prohibiting Download managers like flashget, getright, go!zilla etc.
Sometimes when try to use wget to make a mirror copy of an entire site domain subdirectory or the root site domain, you get an error similar to:
Sorry, but the download manager you are using to view this site is not supported. We do not support use of such download managers as flashget, go!zilla, or getright
This message is produced by the site dynamic generation language PHP / ASP / JSP etc. used, as the website code is written to check on the browser UserAgent sent. wget's default sent UserAgent to the remote webserver is: Wget/1.11.4
As this is not a common desktop browser useragent many webmasters configure their websites to only accept well known established desktop browser useragents sent by client browsers. Here are few typical user agents which identify a desktop browser:
Mozilla/5.0 (Windows NT 6.1; rv:6.0) Gecko/20110814 Firefox/6.0
Mozilla/5.0 (X11; Linux i686; rv:6.0) Gecko/20100101 Firefox/6.0
Mozilla/6.0 (Macintosh; I; Intel Mac OS X 11_7_9; de-LI; rv:1.9b4) Gecko/2012010317 Firefox/10.0a4
Mozilla/5.0 (Windows NT 6.1; Win64; x64; rv:2.2a1pre) Gecko/20110324 Firefox/4.2a1pre
etc. etc.
If you're trying to mirror a website which has implied some kind of useragent restriction based on some "valid" useragent, wget has the -U option enabling you to fake the useragent.
If you get the Sorry but the download manager you are using to view this site is not supported , fake / change wget's UserAgent with cmd:
For the sake of some wget anonimity – to make wget permanently hide its user agent and pretend like a Mozilla Firefox running on MS Windows XP use .wgetrc like this in home directory.
5. Make a complete mirror of a website under a domain name
To retrieve complete working copy of a site with wget a good way is like so:
Where the arguments meaning is: -r – Retrieve recursively -k – Convert the links in documents to make them suitable for local viewing -p – Download everything (inline images, sounds and referenced stylesheets etc.) -N – Turn on time-stamping -l5 – Specify recursion maximum depth level of 5
6. Make a dynamic pages static site mirror, by converting CGI, ASP, PHP etc. to HTML for offline browsing
It is often websites pages are ending in a .php / .asp / .cgi … extensions. An example of what I mean is for instance the URL http://php.net/manual/en/tutorial.php. You see the url page is tutorial.php once mirrored with wget the local copy will also end up in .php and therefore will not be suitable for local browsing as .php extension is not understood how to interpret by the local browser. Therefore to copy website with a non-html extension and make it offline browsable in HTML there is the –html-extension option e.g.:
A good practice in mirror making is to set a download limit rate. Setting such rate is both good for UP and DOWN side (the local host where downloading and remote server). download-limit is also useful when mirroring websites consisting of many enormous files (documental movies, some music etc.). To set a download limit to add –limit-rate= option. Passing by to wget –limit-rate=200K would limit download speed to 200KB.
Other useful thing to assure wget has made an accurate mirror is wget logging. To use it pass -o ./my_mirror.log to wget.
Did you ever needed to count, how many files in a directory are there? Having the concrete number of files in a directory is not a seldom task but still very useful especially for scripts or simply for the sake of learning
The quickest and maybe the easiest way to count all files in a directory in Linux is with a combination of find and wc commands:
Here is how;
linux:~# cd ascii

linux:~/ascii# find . -type f -iname '*' -print |wc -l

407
This will find and list all matched files in any directory and subdirectories, print them out and count them with wc command. The -type f argument instructs find to look only for files.
Other helpful variance of finding and listing all files in a directory and subdirectories is to list and count all the files with a certain file extension under a directory. For example, lets list all text files (.txt) contained in a directory and all level sub-directories:
If you need to check the number of files in a directory for multiple directories on a server and you're aiming at doing it efficienly, issung above find .. | wc code will definitely be not a good choice. If used it will generate heavy load for the system and along with that will complete the execution in ages if issued on a large number of files containing dirs.
Thanksfully if efficiency is targetted, there is a command written in C called tree which is more efficient than find. To count the number of files in dir but using tree :
linux:~# cd ascii

linux:/ascii# tree | tail -n 1

32 directories, 407 files
By default tree prints info for both the number of found files and directories. To print out only the files matched, awk comes handy, e.g.:
linux:/ascii# tree |tail -n 1| awk '{ print $3 }'407
To list only the number of files in a directory without its existing sub-directories ls + wc use is also possible:
linux:~/ascii# ls -l | grep ^- | wc -l68
This result the above command would produce is +1 more than the real number of files, as it counts the directory ".." as one file (in UNIX / LINUX everything is file).
A short one liner script that can calculate all files correctly by substracting 1 is and hence present correct result on number of files is like so:
ls can be used to calculate the number of 1-st level sub-directories under certain directory for instance:
linux:~/ascii# ls -l |grep ^d|wc -l

25
You see the ascii directory has 25 subdirectories in its 1st level.
To check symlinks under a directory with ls the command would be:
linux:~/ascii# ls -l | grep ^l | wc -l

0
Note above 3 ls | grep … examples, will not work properly if the directory contains files with SUID or some special properties set. Hence to get the same 3 results for active files, directories and symbolic links, a one liner similar to the one below can be used instead:
linux:~/ascii# for t in files links directories; do echo `find . -type ${t:0:1} | wc -l` $t; done 2> /dev/null

407 files

0 links

33 directories
This will show statistics about all files, links and directories for all directory sub-levels. Just in case if there is need to only count files, links and directories without directory recursion enabled, use:
linux:~/ascii# for t in files links directories; do echo `find . -maxdepth 1 -type ${t:0:1} | wc -l` $t; done 2> /dev/null

68 files

0 links

26 directories
Anyways the above bash loop will be slow, for directories containing thousands of files. For better performance the equivallent of above bash loop rewritten in perl would be:
linux:~/ascii# ls -l |perl -e 'while(<>){$h{substr($_,0,1)}+=1;} END {foreach(keys %h) {print "$_ $h{$_}\n";}}'

- 68

d 25

t 1

linux:~/ascii#
In any case the most preferrable and efficient way to count files en directories is by using tree command. In my view using always tree command instead of code "hacks" is smart idea.
In Slackware tree command is part of the base install, on Debian and CentOS Linux, tree cmd is not part of the base system and requires install via apt / yum e.g.:
Many people are using ThePiratebay to get all kind of data and share Movies, Games, Programs etc.)
ThePirateBay has become like a standard media for file sharing and still not many people are aware of who is behind ThePirateBay. This is why I thought, by posting this article I can "rant" on the existence of the Swedish Pirate Party The Pirate Party – Is a party fighting on behalf of information sharing freedom (or in other words a party fighting for our freedom as individuals in the digital era).
Pirate Party (Sweden) party official mascot
The Pirate party are swedish political party established in 2006, its members are activists lobbying on freedom of information as well as pointing at threats to our human freedoms imposed by new legislations and anti-freedom agreements like the recent ACTA treaty.
Since there creation in 2006, they have grown from a local Swedish party to an international party, locally existing in 33 countries arount the world.The ideology behind the Swedish PirateParty as well as the rest of existing Pirate Parties international is as I prior said Freedom of Information on the internet. PP is a party phenomenon, as they are neither a left or a right oriented party (on the traditional left-right scale). PP are independent bloc pursuing their political agenda colabborating with all mainstream parties, which stand behind the ideologies the party fights for.
After last European Parliament elections, PP received 7% of all Swedish votes for a country EU representative. As of today according to Wikipedia , the party holds 2 EU deputee seats in EU parliament.
I've a friend who is taking membership in the Pirate Party and from him I know the PP party are big supporters of Free Software.
One major key figure part of Pirate Party is the swedish Peter Sunde. He is a front person who is behind ThePirateBay project as well as holds a very interesting revolutionary ideas. Many of his ideas are close to "the father of all free software" – Richard Mathew Stallman (RMS). Therefore the PP would be probably of interest to anyone who is interested in Free Software. Here is an interview with Peter Sunde's taken in Cebit 2011:
As long as I know the Pirate Party are along the only few organizations in the whole world, who are trying to fight on behalf of human freedom.I'll be glad to hear if someone know about other ornigazations apart from Pirate Party the Free Software Foundation – (FSF) lobbying on present worsening conditions of invidual human freedom.
Here is few curious facts proving how BIG and important thepiratebay.org is, the text below is again quote from Wikipedia
Currently ThePirateBay.org is ranked as the 80th most visited website in the world and 20th in Sweden by Alexa Internet, has over 5.5 million registered users and, as of February 2012, hosts more than 4 million torrent files.
According to the Los Angeles Times, The Pirate Bay is "one of the world's largest facilitators of illegal downloading" and "the most visible member of a burgeoning international anti-copyright or pro-piracy movement"