Posts Tagged ‘support’
Saturday, May 19th, 2012 I'm a guy fascinated by ASCII art, since the very early days I saw a piece of this awesome digital art.
As time passed and computers went to be used mostly graphics resolution, ASCII art loose its huge popularity from the early DOS and BBS (internet primordial days).
However, this kind of art is still higly valued by true computer geeks.
In that manner of thoughts, lately I'm researching widely on ASCII art tools and ASCII art open source tools available for Linux.
Last time I check what is available for 'ASCII job' was before 5 years time. Recently I decided to review once again and see if there are new software for doing ascii manipulations on Linux and this is how this article got born.
My attention was caught by aewan (ASCII-art Editor Without A Name), while searching for ASCII keyword description packages with:
apt-cache search ascii
Aewan project official website is on sourceforge check it out here
Here is the complete description of the Debian package:
hipo@noah:~$ apt-cache show aewan|grep -i description -A 5

Description: ASCII-art Editor Without A Name

aewan is an ASCII art editor with support for multiple layers that can be

edited individually, colors, rectangular copy and paste, and intelligent

horizontal and vertical flipping (converts '\' to '/', etc). It produces

both stand-alone art files and an easy-to-parse format for integration

into your terminal applications.
I installed it to give it a try:
noah:~# apt-get --yes install aewan

Selecting previously deselected package aewan.

(Reading database ... 388522 files and directories currently installed.)

Unpacking aewan (from .../aewan_1.0.01-3_amd64.deb) ...

Processing triggers for man-db ...

Setting up aewan (1.0.01-3) ...
aewan package provides three executable binaries:
noah:~# dpkg -L aewan|grep -i /bin/ /usr/bin/aecat

/usr/bin/aewan

/usr/bin/aemakeflic
1. aewan binary is the ascii-art editor itself
2. aecat is utility to display an aewan documents (aewan format saved files)3. aemakeflic – tool to produce an animation from an aewan document
Next I ran it in plain console tty to check how it is like:
hipo@noah:~$ aewan
Below are screenshots to give you an idea how powerful aewan ASCII art editor is:
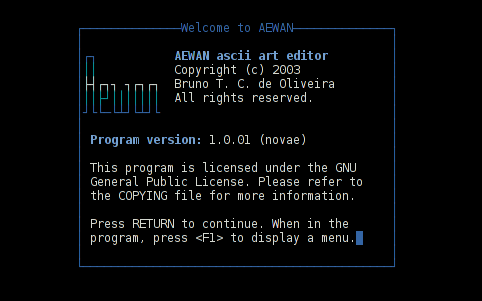
Aewan immediate entry screen after start up
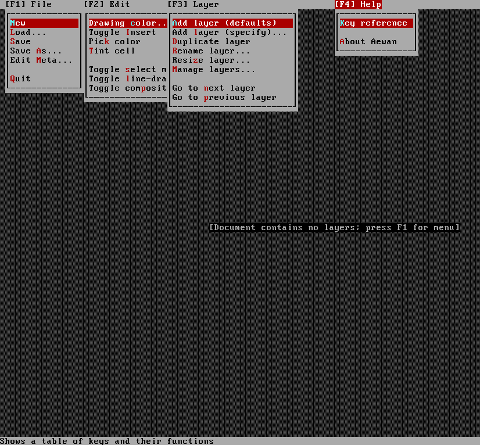
Aewan ASCII art editor – all of the supported tool functions
As you can see from the shot the editor is very feature rich. I was stunned to find out it even supports layers (in ASCII!!) (w0w!).
It even has a Layers Manager (like GIMP) 🙂
To create my first ASCII art I used the:
New
menu.
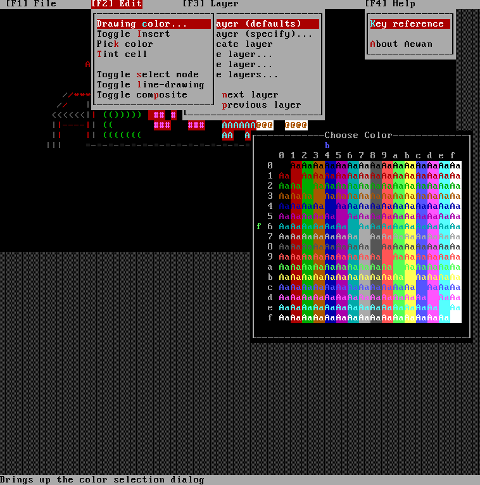
This however didn't immediately show the prompt, where I can type the ascii characters to draw my picture. In order to be able to draw inside the editor, its necessary to open at least one layer, through using the menu:
Add Layer (defaults)
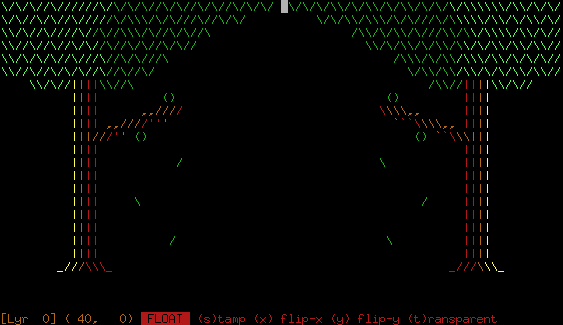
then the interactive ASCII art editor appeared.
While an ASCII art is created with the editor you can select the color of the input characters by using Drawing Color menu seen in the above screenshot.
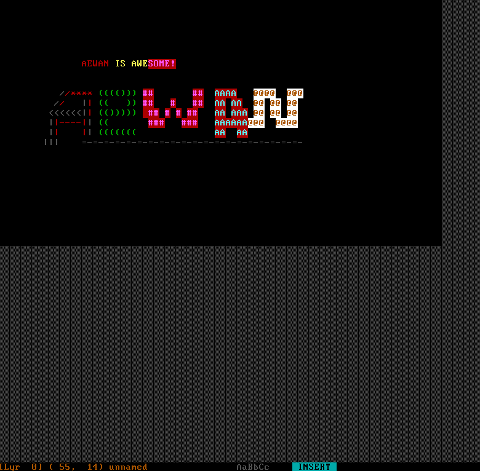
I've played few minutes and created a sample ascii art, just to test the color and editor "look & feel", my conclusions are the editor chars drawing is awesome.
All the commands available via menus are also accessible via a shortcut key combinations:
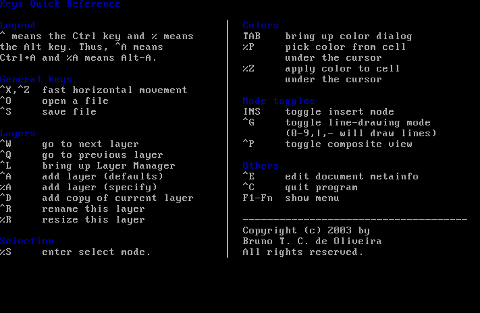
aewan controls are just great and definitely over-shadows every other text editor I used to draw an ASCII art so far.
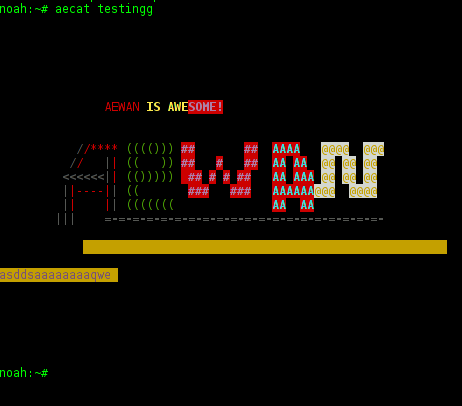
Once saved the ASCII art, are by default saved in a plain gzipped ascii text. You can therefore simply zcat the the saves;
Don't expect zcat to show you the ascii as they're displayed in aewan, zcat-ing it will instead display just the stored meta data; the meta data is interpreted and displayed properly only with aecat command.
I've checked online for rpm builds too and such are available, so installing on Fedora, CentOS, SuSE etc. is up to downloading the right distro / hardware architecture rpm package and running:
# rpm -ivh aewan*.rpm
On the official website, there are also instructions to compile from source, Slackware users and users of other distros which doesn't have a package build should compile manually with the usual:
$ tar -zxf aewan-1.0.01.tar.gz

$ cd aewan-1.0.01

$ ./configure

$ make

$ su -c "make install"
For those inrested to make animations with aemakeflic you need to first save a multiple layers of pictures. The idea of creating ASCII art video is pretty much like the old school way to make animation "draw every scene" and movie it. Once all different scene layers of the ASCII art animation are prepared one could use aemakeflic to export all the ASCII layers as common video.
aemakeflic has the ability to export the ASCII animation in a runnable shell script to display the animation. The other way aemakeflic can be used is to produce a picture in kind of text format showing the video whether seen with less cmd.
Making ASCII animation takes a lot of time and effort. Since i'm too lazy and I lack the time I haven't tested this functionality. Anyways I've seen some ascii videos on telnet to remote hosts (some past time); therefore I guess they were made using aewan and later animated with aemakeflic.
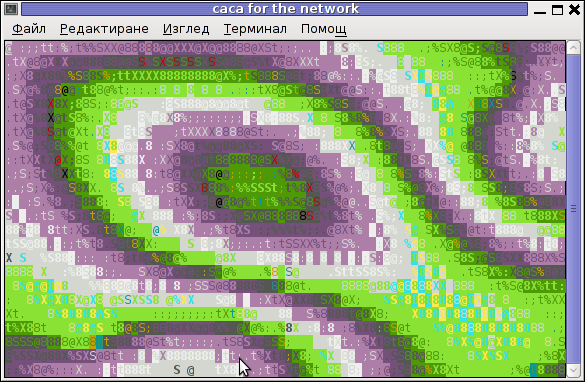
I will close this post with a nice colorful ASCII art, made with aewan (picture is taken from the project page):
Tags: aecat, animation, ars, art, art editor, art files, art tools, ascii art, ascii keyword, Auto, BBS, bbs internet, computer geeks, converts, copy, copy and paste, deb, debian linux, debian package, description, documenti, dos days, dpkg, Draft, executable binaries, hipo, keyword description, manipulations, menu, nbsp, new software, noah, open source tools, package, piece, quot, reading database, related tools, revolution, rpm, Search, show, software, support, terminal, terminal applications, text, time, tool, true computer, zcat
Posted in Entertainment, Everyday Life, Various | No Comments »
Thursday, May 17th, 2012 
Probably, many don't know that it is possible to view normal graphical pictures (JPG, PNG, GIF, BMP) etc. in plain console tty.
Being able to view pictures in ASCII is something really nice especially for console geeks like me.
The images produced sometimes are a bit unreadable, if compared to the original graphics, but anyways most of the pictures looks pretty decent 🙂
Viewing in console / terminal images on GNU / Linux is possible thanks to a library called libcaca, caca labs libcaca project official website here.
Below is a shot description of libcaca:
hipo@noah:~$ apt-cache show libcaca0|grep 'Description' -A 4

Description: colour ASCII art library

libcaca is the Colour AsCii Art library. It provides high level functions

for colour text drawing, simple primitives for line, polygon and ellipse

drawing, as well as powerful image to text conversion routines.
In Debian, Ubuntu and other deb Linux distros viewing GUI images with no need for Xserver or any kind of window manager in plain ASCII is possible with cacaview.
cacaview is part of a package called caca-utils. caca-utils is providing few other great utilities for ASCII freaks 🙂 along with cacaview console ascii viewer prog.
The package> is available for Debian distributins since many years, so even on a very old Debians like Debian – (Potato, Woody, Sarge) the package is available in default free package repositories ready to install via apt
To install apt-get it as usual:
noah:~# apt-get --yes install caca-utils
Here is a list of the binaries the package provides:
hipo@noah:~$ dpkg -L caca-utils|grep -i /usr/bin/

/usr/bin/cacaserver

/usr/bin/cacaplay

/usr/bin/cacafire

/usr/bin/cacademo

/usr/bin/cacaview

/usr/bin/img2txt
1. cacaserver a tiny program allowing network streaming of applications written in caca
Belkow is a chop, from man cacaserver
cacaserver reads libcaca animation files in its standard input and
serves them as ANSI art on network port 51914. These animations can be
created by any libcaca program by setting the CACA_DRIVER environment
variable to raw and piping the program's standard output to cacaserver.
Clients can then connect to port 51914 using telnet or netcat to see
the output.
The example section of the manual points 1 example use of cacaserver to stream the console output from cacademo.
cacademo binary is a short presentation ASCII DEMO in the spirit of the old school assembly demos (demoscene) .
To run it to bind on port 51914 one has to type in bash shell:
hipo@noah:~$ CACA_DRIVER=raw cacademo | cacaserver

initialised network, listening on port 51914
Then to check out how the demo looks, open telnet connection to the cacaserver host; In my case the cacaserver is binded and streamed over IP 192.168.0.2:
hipo@debian:~$ telnet 192.168.0.2 51914
Immediately you got the demo shining; Below are two screenshots of the demo played after succesful telnet connection:
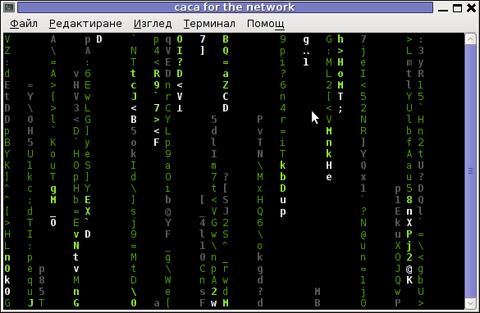
cacademo running over telnet network connection – Matrix
Blur spots cacademo shot of cacademo streamed via network
You see the demo looks quite awesome 🙂
2. Running cacafire to stream over network
Another possible example use of cacaserver is in conjunction with cacafire libcaca test application:
noah:~# CACA_DRIVER=raw cacafire | cacaserver

initialised network, listening on port 51914
cacafire is a short application written to render ASCII via libcaca and is just displaying a screen with ASCII (moving) burning fire.
It is quite spectacular if you, ask an unexpecting friend to connect to your host to 51914 🙂
Besides that bored sys admins, could run cacafire in console to hypnotize themselves watching dumb the burning fire screen for few hoursor just use it as a screensaver 😉
3. cacaview a program to display a graphic images in console using ASCII art
cacaview takes just one argument – the picture to be displayed.
Below is a screenshot of cacaview ran from my gnome-terminal displaying a ASCII text version of the MySQL server logo
hipo@noah:~$ cd /disk/pictures

hipo@noah:/disk/pictures$ cacaview mysql_logo.png
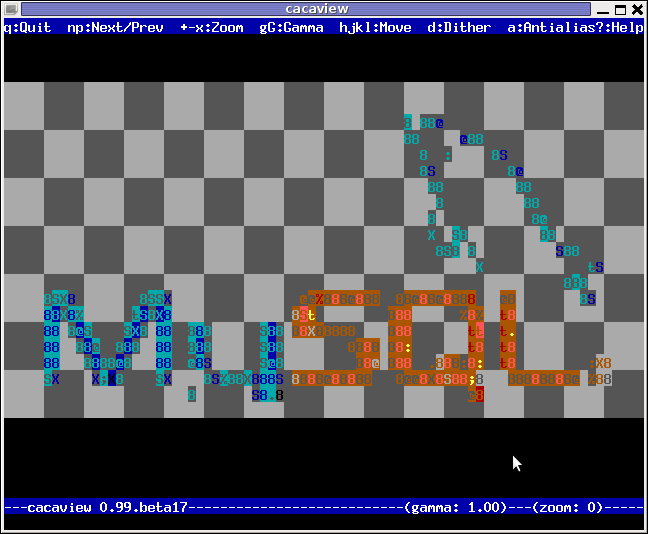
Whether cacaview is invoked in GUI, the libcaca X support is used, so the text image is visualized in new window with graphics, if however it is invoked in plain let's say tty1 libcaca displays the graphics pictures drawing it with only text characters.
Here is also a screenshot, I've made while viewing a GIF website logo in ASCII in plain tty console:
hipo@noah:~$ cacaview /disk/pictures/logo.gif
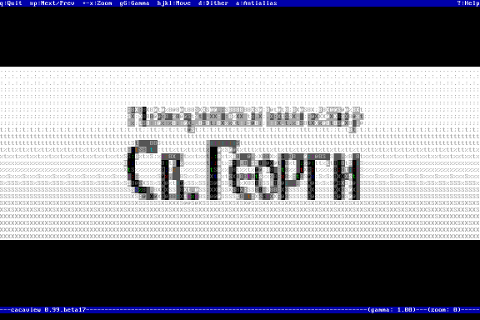
The logo is in cyrillic, so for latin speaking people some of the characters in the two words seen will be unreadable 🙂
cacaview even supports viewing, the next and previous picture in line, like in any modern graphics image viewer program.
To view a bunch of graphic pictures in ASCII with cacaview pass it *.*:
hipo@noah:~$ cacaview /disk/pictures/*.*
For simplicity the common unix * is also supported, so I find it quicker to do:
hipo@noah:~$ cacaview /disk/pictures/*
Showing pictures forward and backward (Previous / Next) picture is done with n and p kbd keys, whether;
 n - next;

p - previous
cacaview doesn't crash or stop but skip unknown file formats – if for instance encounters filenames which are not images; lets say you have *.rar archive files along with other pictures.
The complete list of keys cacaview supports are:
br />
KEYS
? show the help screen
n, p switch to next image, previous image
Left, Right, Up, Down or h, l, k, j
scroll the image around
+, – zoom in and out
z reset the zoom level to normal
f switch fullscreen mode (hide/show menu and status bars)
d toggle the dithering mode (no dithering, 4×4 ordered dithering, 8×8 ordered dithering and random dithering)
q exit the program
4. Converting graphics images to ASCII art like (plain text pictures)
The tool that does "the trick" is img2txt. img2txt has a bit more options while compared to the rest of the aforementioned tools.The following list of arguments are recognized:
- the size (font, height)
- brightness
- contrast
- gamma and dither
- format type of out the output pic
Anyways I found that the basic just in / out arguments passed are enough to produce pretty good results:
hipo@noah:~$ img2txt hipo_avatar.gif >hipo_avatar_pic.txt
The original hipo_avatar.gif file looks like so:

After above img2txt command is run and hipo_avatar_pic.txt to see the colorful output ASCII art img2txt produces, cat it:
hipo@noah:~$ cat hipo_avatar_pic.txt
The image result if screenshot looks quite beautiful and even, can be considered or used as an ART effect image (filter) 🙂

The picture colors are plain ANSI color, so in order to display properly the picture with colors on another computers or Operating System you will need at least basic support for ANSI colors.
Plenty of output file formats are supported by img2txt
Here is the complete list of supported output formats:
ansi : coloured ANSI
caca : internal libcaca format
utf8 : UTF8 with CR
utf8 : UTF8 with CRLF (MS Windows)
html : HTML with CSS and DIV support
html3 : Pure HTML3 with tables
irc : IRC with ctrl-k codes
bbfr : BBCode (French)
ps : Postscript
svg : Scalable Vector Graphics
tga : Targa Image
libcaca is available for FreeBSD too, but the caca-utils is not available as a port yet, though probably the deb or rpm packages can easily be ported to BSD.
Well that's all, Enjoy.
Tags: animation files, art, ascii art library, Auto, caca, colour, colour text, connection, conversion routines, demo, description, Disk, dpkg, Draft, ellipse, gnu linux, graphics utilities, gui images, hipo, host, JPG, level, level functions, libcaca, linux distros, nbsp, noah, original graphics, package, plain ascii, png, polygon, primitives, screen, screenshot, shot, shot description, show, something, support, terminal, text, text conversion, text mode, tiny program, xserver
Posted in Everyday Life, Linux, System Administration, Various | 1 Comment »
Tuesday, May 15th, 2012 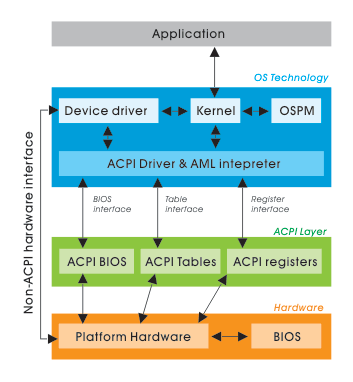
On FreeBSD the default kernel is compiled to support ACPI. Most of the modern PCs has already embedded support for ACPI power saving instructions.
Therefore a default installed FreeBSD is trying to take advantage of this at cases and is trying to save energy.
This is not too useful on servers, because saving energy could have at times a bad impact on server performance if the server is heavy loaded at times and not so loaded at other times of the day.
Besides that on servers saving energy shouldn't be the main motivator but server stability and productivity is. Therefore in my personal view on FreeBSD used on servers it is better to disable complete the ACPI in order to disable CPU fan control to change rotation speeds all the time from low to high rotation cycles and vice versa at times of low / high server load.
Another benefit of removing the ACPI support on a server is this would probably increase the CPU fan life span and possibly prevent the CPU to be severely heated at times.
Moreover, some piece of hardware might have troubles in properly supporting ACPI specifications and thus ACPI could be a reason for unexpected machine hang ups.
With all said I would recommend to anyone willing to use BSD for a server to disable the ACPI (Advanced Configuration and Power Interface), just like I did.
Here is how;
1. Quick review on how ACPI is handled on FreeBSD
acpi support is being handled on FreeBSD by a number of loadable kernel modules, here is a complete list of all the kernel modules dealins with acpi:
freebsd# cd /boot

freebsd# find . -iname '*acpi*.ko'

./kernel/acpi.ko

./kernel/acpi_aiboost.ko

./kernel/acpi_asus.ko

./kernel/acpi_fujitsu.ko

./kernel/acpi_ibm.ko

./kernel/acpi_panasonic.ko

./kernel/acpi_sony.ko

./kernel/acpi_toshiba.ko

./kernel/acpi_video.ko

./kernel/acpi_dock.ko
By default on FreeBSD, if hardware has some support for ACPI the acpi gets activated by acpi.ko kernel module. The specific type of vendors specific ACPI like IBM, ASUS, Fujitsu are controlled by the respective kernel module from the list …
Hence, to control if ACPI is loaded or not on a FreeBSD system with no need to reboot one can use kldload, kldunload module management BSD cmds.
a) Check if acpi is loaded on a BSD
freebsd# kldstatkldstat | grep -i acpi

9 1 0xc9260000 57000 acpi.ko
b) unload kernel enabled ACPI support
freebsd# kldunload acpi
c) Load acpi support (not the case with me but someone might need it, if for instance BSD is running on laptop)
freebsd# kldload acpi
2. Disabling ACPI to load on bootup on BSD
a) In /boot/loader.conf add the following variables:
hint.acpi.0.disabled="1"

hint.p4tcc.0.disabled=1

hint.acpi_throttle.0.disabled=1
b) in /boot/device.hints add:
hint.acpi.0.disabled="1"
c) in /boot/defaults/loader.conf make sure:
##############################################################
### ACPI settings ##########################################
##############################################################
acpi_dsdt_load="NO" # DSDT Overriding
acpi_dsdt_type="acpi_dsdt" # Don't change this
acpi_dsdt_name="/boot/acpi_dsdt.aml"
# Override DSDT in BIOS by this file
acpi_video_load="NO" # Load the ACPI video extension driver
d) disable ACPI thermal monitoring
It is generally a good idea to disable the ACPI thermal monitoring, as many machines hardware does not support it.
To do so in /boot/loader.conf add
debug.acpi.disabled="thermal"
If you want to learn more on on how ACPI is being handled on BDSs check out:
freebsd# man acpi
Other alternative method to permanently wipe out ACPI support is by not compiling ACPI support in the kernel.
If that's the case in /usr/obj/usr/src/sys/GENERIC make sure device acpi is commented, e.g.:
##device acpi
Tags: acpi specifications, acpi support, advanced configuration and power interface, aiboost, Auto, benefit, boot time, BSD, cd boot, control, cpu fan, default kernel, Draft, fan control, fan life, FreeBSDacpi, Fujitsu, ibm, impact, iname, kernel module, kldload, life span, loadable kernel modules, loader, Monitoring, motivator, number, personal view, piece, power, quot, reason, rotation, rotation speeds, saving energy, server load, server performance, server stability, shouldn, support, time, type, ups, video
Posted in FreeBSD, System Administration | No Comments »
Friday, May 11th, 2012 
A friend of mine bring home a Seagate External Hard Disk Drive using USB 3 as a communication media. I needed to attach the hard disk to my FreeBSD router to transfer him some data, the External HDD is formatted to use NTFS as a main file partition and hence to make the file transfers I had to somehow mount the NTFS partition on the HDD.
FreeBSD and other BSDs, just like Linux does not have embedded NTFS file system mount support.
In order to add an external write support for the plugged hdd NTFS I looked in the ports tree:
freebsd# cd /usr/ports

freebsd# make search name='ntfs'

Port: fusefs-ntfs-2010.10.2

Path: /usr/ports/sysutils/fusefs-ntfs

Info: Mount NTFS partitions (read/write) and disk images

Maint: ports@FreeBSD.org

B-deps: fusefs-libs-2.7.4 libiconv-1.13.1_1 libtool-2.4 libublio-20070103 pkg-config-0.25_1

R-deps: fusefs-kmod-0.3.9.p1.20080208_7 fusefs-libs-2.7.4 libiconv-1.13.1_1 libublio-20070103 pkg-config-0.25_1

WWW: http://www.tuxera.com/community/
Port: ntfsprogs-2.0.0_1
Path: /usr/ports/sysutils/ntfsprogs
Info: Utilities and library to manipulate NTFS partitions
Maint: ports@FreeBSD.org
B-deps: fusefs-libs-2.7.4 libiconv-1.13.1_1 libublio-20070103 pkg-config-0.25_1
R-deps: libublio-20070103 pkg-config-0.25_1
WWW: http://www.linux-ntfs.org/
freebs# cd sysutils/fusefs-ntfs/
freebsd# ls
Makefile distinfo files/ pkg-descr pkg-plist
freebsd# cat pkg-descr
The ntfs-3g driver is an open source, freely available read/write NTFS
driver, which provides safe and fast handling of the Windows XP, Windows
Server 2003 and Windows 2000 filesystems. Almost the full POSIX filesystem
functionality is supported, the major exceptions are changing the file
ownerships and the access rights.
WWW: http://www.tuxera.com/community/
Using ntfs-3g I managed to succeed mounting the NTFS on my old PC running FreeBSD ver. 7_2
1. Installing fuserfs-ntfs support on BSD
Before I can use ntfs-3g, to mount the paritition, I had to install fuserfs-ntfs bsd port, with:
freebsd# cd /usr/ports/sysutils/fusefs-ntfs

freebsd# make install clean

.....
I was curious if ntfsprogs provides other utilities to do the ntfs mount but whilst trying to install it I realized it is already installed as a dependency package to fusefs-ntfs.
fusefs-ntfs package provides a number of utilities for creating, mounting, fixing and doing various manipulations with Microsoft NTFS filesystems.
Here is a list of all the executable utilities helpful in NTFS fs management:
freebsd# pkg_info -L fusefs-ntfs\* | grep -E "/bin/|/sbin|README"

/usr/local/bin/lowntfs-3g

/usr/local/bin/ntfs-3g

/usr/local/bin/ntfs-3g.probe

/usr/local/bin/ntfs-3g.secaudit

/usr/local/bin/ntfs-3g.usermap

/usr/local/bin/ntfscat

/usr/local/bin/ntfscluster

/usr/local/bin/ntfscmp

/usr/local/bin/ntfsfix

/usr/local/bin/ntfsinfo

/usr/local/bin/ntfsls

/usr/local/sbin/mkntfs

/usr/local/sbin/ntfsclone

/usr/local/sbin/ntfscp

/usr/local/sbin/ntfslabel

/usr/local/sbin/ntfsresize

/usr/local/sbin/ntfsundelete

/usr/local/share/doc/ntfs-3g/README

/usr/local/share/doc/ntfs-3g/README.FreeBSD
The README and README.FreeBSD are wonderful, reading for those who want to get more in depth knowledge on using the up-listed utilities.
One utility, worthy to mention, I have used in the past is ntfsfix. ntfsfix resolve issues with NTFS partitions which were not unmounted on system shutdown (electricity outage), system hang up etc.
2. Start fusefs (ntfs) and configure it to auto load on system boot
Once fuserfs-ntfs is installed, if its necessery ntfs fs mounts to be permanently supported on the BSD system add fusefs_enable="YES" to /etc/rc.conf – (the FreeBSD services auto load conf).
freebsd# echo 'fusefs_enable="YES"' >> /etc/rc.conf
One note to make here is that you need to have also dbus_enable="YES" and hald_enable="YES" in /etc/rc.conf, not having this two in rc.conf will prevent fusefs to start properly. Do a quick grep to make sure this two variables are enabled:
Afterwards fsusefs load up script should be run:
freebsd# /usr/local/etc/rc.d/fusefs start

Starting fusefs.
Another alternative way to load ntfs support on the BSD host is to directly load fuse.ko kernel module:
freebsd# /sbin/kldload fuse.ko
3. Mounting the NTFS partition
In my case, the Seagate hard drive was detected as da0, where the NTFS partition was detected as s1 (da0s1):
freebsd# dmesg|grep -i da0

da0 at umass-sim0 bus 0 target 0 lun 0

da0:  Fixed Direct Access SCSI-4 device

da0: 40.000MB/s transfers

da0: 953869MB (1953525164 512 byte sectors: 255H 63S/T 121601C)br />GEOM_LABEL: Label for provider da0s1 is ntfs/Expansion Drive.

GEOM_LABEL: Label for provider da0s1 is ntfs/Expansion Drive.
Therefore further to mount it one can use mount_ntfs (to quickly mount in read only mode) or ntfs-3g for (read / write mode):
If you need to just quickly mount a disk drive to copy some data and umount it with no need for writting to the NTFS partition do;
freebsd# /sbin/mount_ntfs /dev/ad0s1 /mnt/disk
Note that mount_ntfs command is a native BSD command and have nothing to do with ntfs-3g. Therefore using it to mount NTFS is not the same as mounting it via ntfs-3g cmd
freebsd# /usr/local/bin/ntfs-3g -o rw /dev/da0s1 /mnt/disk/
Something, I've noticed while using ntfs-3g is, it fails to properly exit even when the ntfs-3g shell execution is over:
freebsd# ps ax |grep -i ntfs|grep -v grep

18892 ?? Is 0:00.00 /usr/local/bin/ntfs-3g -o rw /dev/da0s1 /mnt/disk/
I dunno if this is some kind of ntfs-3g bug or feature specific to all versions of FreeBSD or it is something local to FBSD 7.2
Thought ntfs-3g, keeps appearing in process list, praise God as of time of writting NTFS support on FreeBSD prooved to be stable.
Read / Write disk operations to the NTFS I tested it with works great. Just about 5 years ago I still remember write mode was still experimental. Now it seems NTFS mounts can be used with no hassle even on production machines.
4. Auto mounting NTFS partition on FreeBSD system boot
There are two approaches towards 'the problem' I can think of.
The better way to auto mount on boot (in my view) is through /etc/fstab use
If /etc/fstab + ntfs-3g is to be used, you will however change the default /sbin/mount_ntfs command to point to /usr/local/bin/ntfs-3g, i.e.:
freebsd# mv /sbin/mount_ntfs /sbin/mount_ntfs.orig

freebsd# ln -s /usr/local/bin/ntfs-3g /sbin/mount_ntfs
Then to mount /dev/da0s1 via /etc/fstab add line:
/dev/ad0s1 /mnt/disk ntfs rw,late 0 0
To not bother with text editor run:
freebsd# echo '/dev/ad0s1 /mnt/disk ntfs rw,late 0 0' >> /etc/fstab
I've red in posts in freebsd forums, there is also a way to use ntfs-3g for mounting partitions, without substituting the original bsd /sbin/mount_ntfs, the exact commands suggested to be used with no need to prior mv /sbin/mount_ntfs to /sbin/mount_ntfs.orig and link it to ntfs is:
/dev/ad0s1 /disk ntfs rw,mountprog=/usr/local/bin/ntfs-3g,late 0 0
For any other NTFS partitions, for instance /dev/ad0s2, /dev/ad2s1 etc. simply change the parititon name and mount points.
The second alternative to adding the NTFS to auto mount is through /etc/rc.local. /etc/rc.local content will be executed very late in system boot. :
echo '/usr/local/bin/ntfs-3g -o rw /dev/da0s1' >> /etc/rc.local
One disadvanage of using /etc/rc.local for mounting the partition is the hanging ntfs-3g in proc list:
freebsd# ps ax |grep -i ntfs|grep -v grep

18892 ?? Is 0:00.00 /usr/local/bin/ntfs-3g -o rw /dev/da0s1 /mnt/disk/
Though, I haven't tested it yet. Using the same methodology should be perfectly working on PC-BSD, DragonFlyBSD, NetBSD and OpenBSD.
I will be glad if someone who runs any of the other BSDs can confirm, following this instructions works fine on these BSDs too.
Tags: Auto, BSDs, communication media, deps, Disk, disk images, Draft, drive, external hard disk, external hard disk drive, external hdd, file, file transfers, filesystem, filesystems, freebsd router, fuse, GEOM, hard disk drive, hdd, imagesMaint, kmod, libs, linux ntfs, Maint, NetBSD, ntfs partition, OpenBSD, ownerships, package, partition, Path, pkg, portsfreebsd, posix, quot, README, seagate external hard disk, Search, support, tree, Utilities, windows server, www linux, YES
Posted in Everyday Life, FreeBSD, System Administration | 1 Comment »
Tuesday, May 8th, 2012 I'm starting to learn some video editing, as I need it sometimes for building client websites.
As a Linux user I needed to have some kind of software for amateur video editing.
For Microsoft Windows OS, there are tons of video editor programs both free and proprietary (paid).
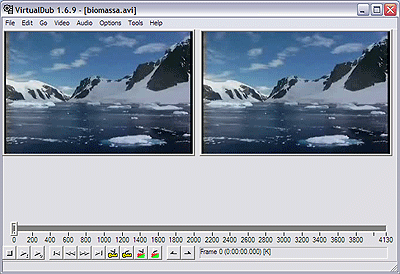
Windows users can for instance use the free software program VirtualDub (licensed under GPL license) to easily cut movie scenes from a video.
Unfortunately VirtualDub didn't have a Linux or BSD version so in my case I had to look for another soft.
I consulted a friend of mine who recommended a video editor program called LiVES.
If you haven't done any video editing previously on Linux (like my case was), you will certainly be happy to try LiVES
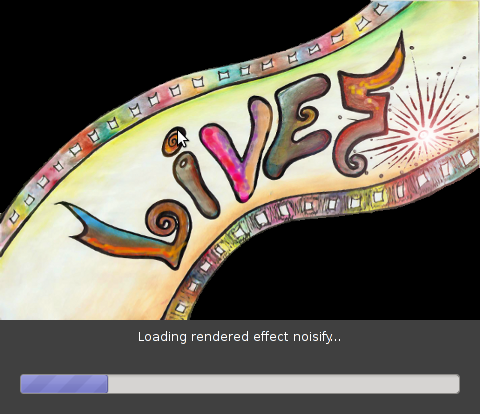
LiVES can extract only sound from videos, cut selected parts (frames) from videos and do plenty of other nice stuff. It is just great piece of software for anyone, who needs to do simply (newbie) video editting.
With LiVES even an amateur video editor like me could, immediately learn how to chop a movie scenes …

To master the basics and edit one video in FLV format it took me about 1 hour of time, as in the beginning it was confusing to get confortable with the program scenes selector.
One downside of LiVES it failure to open a FLV file I wanted to edit.
In order to be able to edit the flv movie hence I first had to convert the FLV to AVI or MPEG, as this two (video multimedia formats) are supported by LiVES video editor.
After completing my video scenes chopping to the AVI file I had to convert back to FLV.
In order to complete the convertion between FLV to AVI format on my Debian Linux, I used a program called avidemux
Avidemux has a nice GUI interface and also like Lives has support for video editting, though I have never succesfully done any video edits with it.
Avidemux IMHO is user (completely intuitive). To convert the FLV to AVI, all I had to do was simply open the file FLV file, press (CTRL+S) select my FLV video file format and select the output file extension format to be AVI.
Further on, used LiVES to cut my desired parts from my video of choice. Once the cuts were complete I saved the new cutted version of video to AVI.
Then I needed the video again in FLV to upload it in Joomla, so used ffmpeg – command line tool to do the AVI to FLV file converstion, like so:
hipo@noah:~$ /usr/bin/ffmpeg -i my_media_file.avi my_video_file.flv
Hope this article helps someone aiming to do basic video editting on Linux with LiVES and just like needed FLV to AVI and AVI to FLV convertions.
Tags: Auto, avi, avi file, avi format, avidemux, BSD, client, client websites, convertion, debian linux, downside, Draft, editing, editor, failure, file, flv file, format, free software program, gui interface, how to convert flv to avi, IMHO, instance, Linux, linux user, Microsoft, microsoft windows os, multimedia formats, nice stuff, piece, selector, simple, software, support, time, video, video editing, video editor, video editting, video multimedia, video scenes, Videos, windows users
Posted in Entertainment, Everyday Life, Linux and FreeBSD Desktop | No Comments »
Friday, April 27th, 2012 The last days, I'm starting to think the GUI use is making me brainless so I'm getting back to my old habits of using console.
I still remember with a grain of nostalgy how much more efficient I used to be when the way to interact with my computer was primary in text mode console.
Actually, I'm starting to get this idea the more new a software is the more inefficient it makes your use of computer, not to mention the hardware resources required by newer software is constantly increasing.
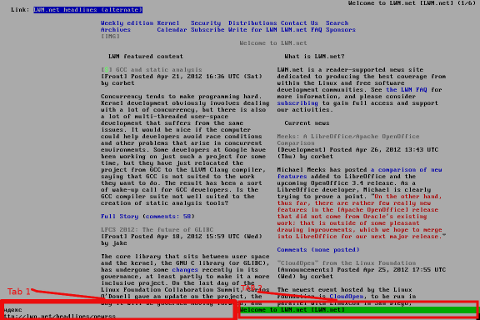
With this said, I started occasionally browsing again like in the old days by using links text browser.
In the old days I mostly used lynx and its more advanced "brother" text browser links.
The main difference between lynx and links is that lynx does not have any support for the terrible "javascript", whether links supports most of the Javascript ver 2.
Also links and has a midnight commander like pull down menus on the screen top, – handy for people who prefer some more interactivity.
In the past I remember I used also to browse graphically in normal consoles (ttys) with a hacked version of links calledTThere is also a variation of links – xlinks suitable for people who would like to have graphical browser in console (ttys).
I used xlinks quite heavily in the past, when I have slower computer P166Mhz with 64MB of memory 2.5 GB HDD (What a times boy what a times) .
Maybe when I have time I will install it on my PC and start using it again like in the old days to boost my computer use efficiency…
I remember the only major xlinks downside was it doesn't included support for Adobe flash (though this is due to the bad non-free software nature of Adobe lack of proper support for free software and not a failure of xlinks developers. Anyways for me this wasn't a big trouble since, ex Macromedia (Adobe) Flash support is not something essential for most of my work…
links2 is actually the naming of links version 2. elinks emerged later (if I remember correctly, as fork project of links).
elinks difference with links constitutes in this it supports tabbed browsing as well as colors (links browser displays results monochrome).
Having a tabbed browsing support in tty console is a great thing…
I personally belive text browsing if properly used can in many ways outbeat, graphic browsing in terms of performance and time spend to obtain data. I'm convinced text browsing is superior for two reasons:
1. with text there is way less elements to obstruct your attention.
– No graphical annoying flash banners, no annoying taking the attention pictures
2. Navigating in web pages using the keyboard is more efficient than mouse
– Using keyboard shorcuts is always quicker than mouse, generally keboard has always been a quicker way to access computer commands.
Another reason to use text browsing is, it is mostly the text part of a page that matters, most of the pages that provide images to better explain a topic are bloated (this is my personal view though, i'm sure designer guys will argue me :D).
Here is a screenshot of a my links text browser in action, I'm sorry the image is a bit unreadable, but after taking a screenshot of the console and resizing it with GIMP this is what I got …
For all those new to Linux who didn't tried text browsing yet and for those interested in computer history, I suggest you install and give a try to following text browsers:
- lynx
(Supports colorful text console text browsing)
- links

- elinks
(Supports colors filled text browsing and tabs)

- w3m
By the way having the 4 text browsers is very useful for debugging purposes for system administrators too, so in any case I think this 4 web browsers are absoutely required software for newly installed GNU / Linux or BSD* based servers.
For Debian and the derivatives Linux distributions, the 4 browsers are available as deb packages, so install them with following apt 1 liner:
debian:~# apt-get –yes install w3m elinks links lynx
….
FreeBSD users can install the browsers using, cmd:
freebsd# cd /usr/ports/www/w3mfreebsd# make install clean
….
freebsd# cd /usr/ports/www/elinksfreebsd# make install clean
….
freebsd# cd /usr/ports/www/linksfreebsd# make install clean
….
freebsd# cd /usr/ports/www/lynxfreebsd# make install clean
….
In links using the tabs functionality appeared, somewhere near the 2001 or 2000 (at least that was the first time I saw links with tabbed browsing enabled). My first time to saw links support opening multiple pages within the same screen under tabs was on Redhat Linux 9
Opening multiple pages in tabs in the text browser is done by pressing the t key and typing in the desired URL to open isnide.
For more than 2 tabs, again t has to be pressed and same procedure goes on and on.
It was pretty hard for me to figure out how I can do a text browsing with tabs, though I found a way to open new tabs it took me some 10 minutes in pondering how to switch between the new opened links browser tabs.
Hence, I thought it would be helpful to mention here how tabs can be switched in links text browser. Actually it turned it is pretty easy to Switch tabs tabs back and foward.
1 tab to move backwards is done with < (key), wheter switching one tab forward is done with the > key.
On UK and US qwerty keyboards alignment the movement a tab backward and forward is done with holding shift and pressing < onwards holding both keys simultaneously and analogously with pressing shift + >
Tags: Auto, big trouble, calledTThere, computer use, doesn, downside, Draft, elinks, flash support, freebsd servers, gb hdd, graphical browser, hardware resources, hdd, HTTP, interactivity, Javascript, Lack, last days, Lynx, Midnight, midnight commander, nature, nbsp, nostalgy, old habits, pull, pull down menus, quot, screen, screenshot, slower computer, software, software nature, support, Supports, text browser, text browsers, text mode, time, variation, xlinks
Posted in FreeBSD, Linux, System Administration, Web and CMS | 5 Comments »
Wednesday, December 29th, 2010 One of the websites based on Joomla, that I’m managing, had to have the option to show a Visitors Counter on the page bottom.
I did some research online to check for some Joomla plugins that are capable of aiming my Joomla installation with the Visitor Counter feature.
There are a couple of plugins available out there that are able to provide a Joomla installation with a Web Counter, however I’ll just mention the few which I have tested myself.
The ones I’ve tested myself are;
1. VCNT
2. Count your Visitors
3. Cool Hits Counter
and finally the one that I really liked the most:
4. VINAORA
All the prior 3 aforementioned VCNT, Count your Visitors and Cool Hits Counter, are actually working right after installation. I haven’t had the time to test them thoroughfully but from a first look they appear to be counting the visitors.
The Count your visitors – joomla plugin’s download main page was in German with no option to revert to English, so that wasn’t nice.
Though the plugin seems to work fine after just downloaded and installed and configured from
Extensions -> Module Manager
The configuration options for Count your visitors are quite obscure but if you’re a looking for a really simple way to count your Joomla based website visitors it might be a good choice. The plugin is based on the initial Joomla module called Statistics.
By the way I’ve read some reports online that actually Joomla 1.5 also includes some kind of minimal integrated web counter embedded in itself throughout the Joomla Statistics module .
However I personally couldn’t really follow the methods describe to take advantage of the Joomla install integrated Statistics module, however if somebody has already succeeded in using the Statistics default joomla module I’ll be glad, if he shares with me.
I’ve found the VCNT visitor statistics plugin a handy one, but this module had this major problem that the VCNT 1.5 text which was appearing as a heading before the statistics was hard to wipe out of my web page, so eventually I got pissed of and thought and tested the Cool Hits Counter.
The Cool Hits Counter is actually a simplistic module which presents a counter about visitors on the web site in numeric digit numbers.
These module uses the integrated Joomla 1.5 module mod_stats the only difference is the support for numeric digit numbers.
As I’ve said none of the above modules wasn’t flexible enough and therefore wasn’t what I was looking for, thus I decided to use my installed VINAORA Joomla web(users) counter plugin.
The VINAORA is actually quite straight foward to configure, right after installation to start with the configuration I had to navigate to:
Extension -> Module Manager -> Vinaora Visitors Counter -> Module Parameters
Since I wanted just a simple counter without any external statistics I personally prefered using Vinaora’s counter with the optionsDisplay Mode: Simple as well as the Zero-Statistics turned on to (Yes)
Some of the other options I found to be best matching my desires for the Visitors Counter was:
Show Title: No and Position: Left
Now I had this shiny visitors statistics in my Joomla installation but there was the annoying Link in my Visitors Counter appearing on the page, thus in order to remove the default link Visitors Counter which was pointing to the VINAORA’s web page, I had to edit the file:
modules/mod_vvisit_counter/tmpl/default.php located in my Joomla Document Root directory.
First I’ve edited the code on line 21 where I’ve removed out the Vinaora string since I didn’t wanted any reference to Vinaora to occur in my Joomla HTML code.
In line 162 in the code:
$html .= ….
By removing it I’ve completed scraped out the annoying references to VINAORA and their link to http://vinaora.com website and thus made the Visitors counter a look a bit more professional.
Now the counter is working with a graphical numeric digits and everything is just fine with my Web counter Joomla counter thanks to VINAORA 🙂
Tags: configuration options, configure, count your visitors, download, Extension, feature, file, How to add visitor/visitors counter in Joomla based website using the VINAORA joomla plugin, installation, mod, Module, none, option, optionsDisplay, page, page bottom, Parameters, plugin, right, show, statistics, support, text, time, vcnt, visitor counter, website visitors, Zero
Posted in Joomla, Linux, System Administration, Various | 3 Comments »
Wednesday, April 25th, 2012 Debian has a package language-env. I haven't used my Linux console for a long time. So I couldn't exactly remember how I used to be making the Linux console to support cyrillic language (CP1251, bg_BG.UTF-8) etc.
I've figured out for the language-env existence in Debian Book on hosted on OpenFMI – Bulgarian Faculty of Mathematics and Informatics website.
The package info with apt-cache show displays like that:
hipo@noah:~/Desktop$ apt-cache show language-env|grep -i -A 3 description

Description: simple configuration tool for native language environment

This tool adds basic settings for natural language environment such as

LANG variable, font specifications, input methods, and so on into

user's several dot-files such as .bashrc and .emacs.
What is really strange, is the package maintainer is not Bulgarian, Russian or Ukrainian but Japanese.
As you see the developer is weirdly not Bulgarian but Japanese Kenshi Muto. What is even more interesting is that it is another japanese that has actually written the script set-language-env contained within the package. Checking the script in the header one can see him, Tomohiro KUBOTA
Before I've found about the language-env existence, I knew I needed to have the respective locales installed on the system with:
# dpkg-reconfigure locales
So I run dpkg-reconfigure to check I have existing the locales for adding the Bulgarian language support.
Checking if the bulgarian locale is installed is also possible with /bin/ls:
# ls -al /usr/share/i18n/locales/*|grep -i bg

-rw-r--r-- 1 root root 8614 Feb 12 21:10 /usr/share/i18n/locales/bg_BG
The language-env contains a perl script called set-language-env which is doing the actual Debian Bulgarization / cyrillization. The set-language-env author is another Japanese and again not Slavonic person.
Actually set-language-env script is not doing the Bulgariazation but is a wrapper script that uses a number of "hacks" to make the console support cyrillic.
Further on to make the console support cyrillic, execute:
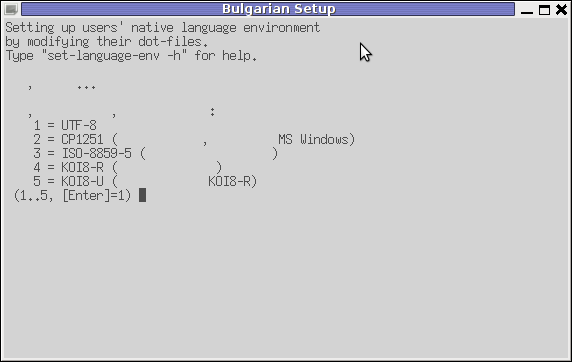
hipo@noah:~$ set-language-env
Setting up users' native language environment
by modifying their dot-files.
Type "set-language-env -h" for help.
1 : be (Bielaruskaja,Belarusian)
2 : bg (Bulgarian)
3 : ca (Catala,Catalan)
4 : da (Dansk,Danish)
5 : de (Deutsch,German)
6 : es (Espanol,Spanish)
7 : fr (Francais,French)
8 : ja (Nihongo,Japanese)
9 : ko (Hangul,Korean)
10 : lt (Lietuviu,Lithuanian)
11 : mk (Makedonski,Macedonian)
12 : pl (Polski,Polish)
13 : ru (Russkii,Russian)
14 : sr (Srpski,Serbian)
15 : th (Thai)
16 : tr (Turkce,Turkish)
17 : uk (Ukrajins'ka,Ukrainian)
Input number > 2
There are many questions in cyrillic list necessery to be answered to exactly define if you need cyrillic language support for GNOME, pine, mutt, console etcetera.
The script will create or append commands to a number of files on the system like ~/.bash_profile
The script uses the cyr command part of the Debian console-cyrillic package for the actual Bulgarian Linux localization.
As said it was supposed to also do a localization in the past of many Graphical environment programs, as well as include Bulgarian support for GNOME desktop environment. Since GNOME nowdays is already almost completely translated through its native language files, its preferrable that localization to be done on Linux install time by selecting a country language instead of later doing it with set-language-env. If you failed to set the GNOME language during Linux install, then using set-language-env will still work. I've tested it and even though a lot of time passed since set-language-env was heavily used for bulgarization still the GUI env bulgarization works.
If set-language-env is run in gnome-terminal the result, the whole set of question dialogs will pop-up in new xterm and due to a bug, questions imposed will be unreadable as you can see in below screenshot:
If you want to remove the bulgarization, later at certain point, lets you don't want to have the cyrillic console or programs support use:
# set-language-env -r

Setting up users native language environment'
For anyone who wish to know more in depth, how set-language-env works check the README files in /usr/share/doc/language-env/ one readme written by the author of the Bulgarian localization part of the package Anton Zinoviev is /usr/share/doc/language-env/README.be-bg-mk-sr-uk
Tags: Auto, bashrc, bulgarian language, configuration tool, consol, debian gnu, description, description description, Desktop, dot files, Draft, existence, Faculty, font, font specifications, Gnome, hipo, info, Informatics, input methods, language support, localization, muto, native language, natural language environment, noah, OpenFMI, package, package maintainer, perl script, quot, root, root root, Russian, russian language, set language, show, show displays, support, time, Tomohiro, tool, UTF, utf 8, wrapper script
Posted in System Administration | 4 Comments »
Tuesday, April 3rd, 2012 One of the companies, where I'm doing a part time job, as an IT Consultant, System Administrator and Web developer, a e-marketing specialist and business consultant (the list goes on ;)) … planned to integrate a Newsletter support in their WordPress based websites.
As this fits my "job description" ,I took the task and implemented a simple but functional Newsletter support to their 4 WP based sites. In this article I will in short describe, my experience with placing the Newsletter subscription.:
Earlier I've done something similar as, I've added a subscipriotion (form) box to WordPress to use Google Feedburner RSS . What I needed this time, however was a bit different. The company required the newsletter to be a separate one and don't relay on Google Feedburner (RSS) to deal with the subscriptions .
It took me a while until I came with a working version of a Newsletter and I actually tested all in all 4 newsletter wordpress plugins before, I had a well working one. Here in short, In this article I will shortly take a look at the 4 WP newsletter plugins:
1. A wordpress plugin called simply Newsletter
As of time of writting this is the most popular wordpress plugin, when I looked through:
- http://wordpress.org/extend/plugins/
Wordpress Newsletter plugin can be obtained via http://wordpress.org/extend/plugins/newsletter/
Its really Advanced, probably the best free newsletter for WP available as of time of writting. The plugin supports email subscriber user confirmation (double opt-in), as well as can be accustomized to work with single opt-in.
For all those who don't know Double Opt-In is the technical term for a once requested user email (single opt-in), for subscription which is later confirmed by following an email box sent link pointing to confirmation URL.
Double Opt-In is almost a standard and "must" as otherwise, many spam bots will fill in randomly email addresses and your subscribers list will be mostly containing spammer email addresses.
1. Install WordPress Newsletter Plugin To install Newsletter plugin;
a) download and put into wp-content/plugins/ and unzip
server:~# cd /var/www/blog/wp-content/plugins

server:/var/www/blog/wp-content/plugins# wget -q http://downloads.wordpress.org/plugin/newsletter.zip

server:/var/www/blog/wp-content/plugins# unzip newsletter.zip
b) Enable in Plugins:
Plugins -> Newsletter (Activate)
c) Configure Newsletter
A new menu will appear in the left WP control panel, like you see in below screenshot:
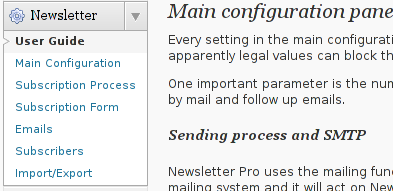
Newsletter plugin is very configurable but it takes a bit of longer time until it is confingured to work well. So be patient with it.
d) Make Newsletter field appear on a wordpress home page.
In order to enable just configure Newsletter plugin (text and subscription form) to appear on the wordpress pages, you need to add the plugin as a widget. To do so go to:
Appearance -> Widgets
Drag and drop the Newsletter plugin widget to the widget right pane. Put it on the exact place you would like it to appear.
Once the widget is placed, you will see it appear to the respective location on WP pages, you should have something like:

If while you enable the plugin and put the Newsletter widget doesn't appear on WordPress, this is probably due to some Cache left from some enabled WP caching pugin like W3 Total Cache
In any case if Newsletter form subscription, is not appearing on your pages, delete the cache/ directory:
# rm -rf /var/www/wordpress-site/wp-content/cache/
I've experienced, this caching problems and it was quite a riddle, until I found out that the Newsletter plugin is not appearing on the WP pages because of the old cache. I've checked bacicly everything (error.log , apache php_error.log) etc.. Therein, there was no error or anything, so after a long 1 hour or so poundering I figured out this kind of caching done by W3 Cache.
My guess is, the same newsletter "not working" issue is probably observable also on WP installs with other caching plugins like WP Hyper Cache or WP Db Cache
2. ALO EasyMail Newsletter WordPress plugin
I don't know, why but this plugin didn't work properly on the wordpress install, I've tested it. Its true the wordpress version where I give it a try was not running, the latest stable wordpress so I assume this might be the reason for the empty pages returned when I enabled the plugin.
According to wordpress's plugin – http://wordpress.org/extend/plugins/alo-easymail/, the plugin is marked as Works, however in my case it didn't.
3. Adding WordPress Newsletter through Email newsletter
This plugin was a real piece of cake, compared to all of the rest, tested this one was the easiest one to install and configure on WordPress.
Just like with Newsletter and ALO EasyMail Newsletter once the user is subscribed, from the admin there is possibility to sent crafted messages to all subscribers.
The plugin is a great, choice for anyone who is looking for quick install of Newsletter on WordPress without extra "config" complications.
Below is a quote describing email newsletter, taken from the plugin author webpage;
Advantage of this plugin
- Simple no coding required.
- Easy installation .
- Using this plug-in we can send email to all registered folks.
- Using this plug-in we can send email to all comment posted folks.
- Email subscribe box for front end
- Check box option available to select/unselect emails from the send mail list.
- Integrated the email newsletter plugin & simple contact form plugin
– Enabling the plugin is done via admin menus:
Plugins -> Inactive -> Email Newsletter (enable)
Afterwards, the plugin requires a quick configuration from wp-admin:
Email Newsletter -> Subscriber form setting

You see in the screenshot, the config where to place the plugin is trivial.
To make Email Newsletter appear on the pages, you will have to add the Email Newsletter widget from:
Appearance -> Widgets
The widget looks like the one in below screenshot:
Drag and drop the widget to the widgets pane. Onwards on the wordpress pages, should appear an email subsciption box:

Though Email Newsletter is great, it has one serious drawback, as it doesn't support Double Opt-In. Therefore people subscribing through it are not mailed with a request to confirm their email subscription request.
As a result, its very likely many spam-bots submit fake emails in the newsletter subscribe form and in 1 year time your newsletter email list might get full with tens of thousands unexistent emails. If you end up with this bad scenario, once newsletter emails are sent to (regular) exitent subscribers, many of the bulk emails in the list will never reach their senders, but will just fill-up the mail server queue and take up server resources for nothing for one week or so (depending on the email configuration keep undelivered mail setting).
Anyways, since the basis of this plugin works fine, I'm sure if the author modifies it to include a simple Captcha instead of double-opt functionality, the plugin can become top plugin.
Tags: administrator, ALO, Auto, bit, blog, business consultant, Cache, confirmation, confirmation url, description, download, Draft, e mail, email addresses, Feedburner, form, free newsletter, google, Install, job, job description, mail newsletter, marketing, newsletter, newsletter subscription, newsletter support, NewsletterAs, Opt, part time job, plugin, Plugins, quot, relay, something, spammer, specialist, subscriber, subscribers, subscriptions, support, system administrator, time, web developer, Wordpress, wp newsletter, writting
Posted in System Administration, Web and CMS, Wordpress | 3 Comments »
Friday, March 30th, 2012 While browsing I stumbled upon a nice blog article
Dumping HTTP headers
The arcitle, points at few ways to DUMP the HTTP headers obtained from user browser.
As I'm not proficient with Ruby, Java and AOL Server what catched my attention is a tiny php for loop, which loops through all the HTTP_* browser set variables and prints them out. Here is the PHP script code:
<?php<br />
foreach($_SERVER as $h=>$v)<br />
if(ereg('HTTP_(.+)',$h,$hp))<br />
echo "<li>$h = $v</li>\n";<br />
header('Content-type: text/html');<br />
?>
The script is pretty easy to use, just place it in a directory on a WebServer capable of executing php and save it under a name like:
show_HTTP_headers.php
If you don't want to bother copy pasting above code, you can also download the dump_HTTP_headers.php script here , rename the dump_HTTP_headers.php.txt to dump_HTTP_headers.php and you're ready to go.
Follow to the respective url to exec the script. I've installed the script on my webserver, so if you are curious of the output the script will be returning check your own browser HTTP set values by clicking here.
PHP will produce output like the one in the screenshot you see below, the shot is taken from my Opera browser:

Another sample of the text output the script produce whilst invoked in my Epiphany GNOME browser is:
HTTP_HOST = www.pc-freak.net
HTTP_USER_AGENT = Mozilla/5.0 (X11; U; Linux x86_64; en-us) AppleWebKit/531.2+ (KHTML, like Gecko) Version/5.0 Safari/531.2+ Debian/squeeze (2.30.6-1) Epiphany/2.30.6
HTTP_ACCEPT = application/xml,application/xhtml+xml,text/html;q=0.9,text/plain;q=0.8,image/png,*/*;q=0.5
HTTP_ACCEPT_ENCODING = gzip
HTTP_ACCEPT_LANGUAGE = en-us, en;q=0.90
HTTP_COOKIE = __qca=P0-2141911651-1294433424320;
__utma_a2a=8614995036.1305562814.1274005888.1319809825.1320152237.2021;wooMeta=MzMxJjMyOCY1NTcmODU1MDMmMTMwODQyNDA1MDUyNCYxMzI4MjcwNjk0ODc0JiYxMDAmJjImJiYm; 3ec0a0ded7adebfeauth=22770a75911b9fb92360ec8b9cf586c9;
__unam=56cea60-12ed86f16c4-3ee02a99-3019;
__utma=238407297.1677217909.1260789806.1333014220.1333023753.1606;
__utmb=238407297.1.10.1333023754; __utmc=238407297;
__utmz=238407297.1332444980.1586.413.utmcsr=www.pc-freak.net|utmccn=(referral)|utmcmd=referral|utmcct=/blog/
You see the script returns, plenty of useful information for debugging purposes:
HTTP_HOST – Virtual Host Webserver name
HTTP_USER_AGENT – The browser exact type useragent returnedHTTP_ACCEPT – the type of MIME applications accepted by the WebServerHTTP_ACCEPT_LANGUAGE – The language types the browser has support for
HTTP_ACCEPT_ENCODING – This PHP variable is usually set to gzip or deflate by the browser if the browser has support for webserver returned content gzipping.
If HTTP_ACCEPT_ENCODING is there, then this means remote webserver is configured to return its HTML and static files in gzipped form.
HTTP_COOKIE – Information about browser cookies, this info can be used for XSS attacks etc. 🙂
HTTP_COOKIE also contains the referrar which in the above case is:
__utmz=238407297.1332444980.1586.413.utmcsr=www.pc-freak.net|utmccn=(referral)
The Cookie information HTTP var also contains information of the exact link referrar:
|utmcmd=referral|utmcct=/blog/
For the sake of comparison show_HTTP_headers.php script output from elinks text browser is like so:
 * HTTP_HOST = www.pc-freak.net

* HTTP_USER_AGENT = Links (2.3pre1; Linux 2.6.32-5-amd64 x86_64; 143x42)

* HTTP_ACCEPT = */*

* HTTP_ACCEPT_ENCODING = gzip,deflate * HTTP_ACCEPT_CHARSET = us-ascii, ISO-8859-1, ISO-8859-2, ISO-8859-3, ISO-8859-4, ISO-8859-5, ISO-8859-6, ISO-8859-7, ISO-8859-8, ISO-8859-9, ISO-8859-10, ISO-8859-13, ISO-8859-14, ISO-8859-15, ISO-8859-16, windows-1250, windows-1251, windows-1252, windows-1256,

windows-1257, cp437, cp737, cp850, cp852, cp866, x-cp866-u, x-mac, x-mac-ce, x-kam-cs, koi8-r, koi8-u, koi8-ru, TCVN-5712, VISCII,utf-8 * HTTP_ACCEPT_LANGUAGE = en,*;q=0.1

* HTTP_CONNECTION = keep-alive
One good reason, why it is good to give this script a run is cause it can help you reveal problems with HTTP headers impoperly set cookies, language encoding problems, security holes etc. Also the script is a good example, for starters in learning PHP programming.
Tags: AOL, arcitle, article, attention, Auto, blog, browser, code, code lt, content type, copy, debugging, download, Draft, dump, Dumping, ENCODING, ereg, freak, gecko, Gnome, gzip, host, host www, HTTP, image png, information, Java, khtml, linux x86, loop, nbsp, opera browser, php, php script, php txt, place, prints, quot, ruby, Safari, screenshot, script, script code, server, set variables, shot, show, squeeze, support, text, Tiny, type, unam, User, utmb, utmcsr, xml
Posted in Programming, System Administration | No Comments »


