The day started a bit normal. I did my morning excercise, then I prayed. I spoke with Dzemil (A macedonian colleague of mine) and we set up a meeting for 12:30, I ate. I received few calls from the office with requests to do few little things. At 12:30 I met Dzemil at the College restaurant. We spend some time talking with him and another turkish colleague. Then we went to speak with Bozhidar Bozhkov about the applications for Holland, what is the procedure of transfering from the college here to Arnhem Business School etc. Laters I went home and did some work on the servers and red and did my fourth cisco test. I went to my cousin and after that went to Javor, we went out with Ina and Javor for a coffee to Kukla. Afterwards I went home and played with Dynamips. For all that wonder what the hack Dynamips is. Well Dynamics is a Cisco emulator just like VMWare is an OS emulator with the exception that Dynamics is builded to run only Cisco’s IOS. I found that nice Video tutorial Cisco Router Emulation Software Dynamips Video Tutorial, check it out here Here . Since I needed a Cisco IOS image and I’m not a Cisco customer I used torrents to download a collection of Cisco ISO’s and used one of the isos to make it work on my Windows Vista. I have problems running it because of lack of permissions, caused by the famous UAC ( User Access Control ). The solution for me was to use a privileged command prompt and start, both the Dynamips sever and my custom configured simple1.net which connected to the server and loaded the cisco image. There is also a very nice and extended tutorial on the topic of Dynamips it’s located Here . Alto today tested the previously installed Wireshark. Wireshark is a very nice substitute for iptraf for windows it has a nice and easy to use graphical interface, supports capturing and has lot of traffic analysis possibilities I strongly recommend it to anyone coming from a Linux/BSD background like me and searching for a nice Windows substitute for iptraf. Check out wireshark on the following URL . Now I’m going to change the topic and say a few words for my spiritual state. Today it was a hard day. I was tempted by the devil to think bad thoughts and did sinned for which I search forgiveness. Life it so hard I realize it more and more day by day. Very often old spirits which tormented me for a long time are trying to come back. I haven’t smoked today also and again thanks for that should fly to God who delived me from this terrible vice. As a conclusion I should say that for everything I should thanks to God and pray for him to forgive my unfaithfulness. END—–
Posts Tagged ‘test’
The day, Today
Tuesday, May 20th, 2008How to fix upside-down / inverted web camera laptop Asus K51AC issue on Ubuntu Linux and Debian GNU / Linux
Monday, February 13th, 2012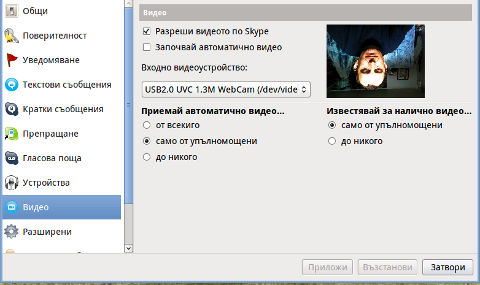
Does your camera show video correctly in cheese but shows captured video upside-down (inverted) in skype ?
This is an issue a friend of mine experienced on his Asus K51AC-SX037D laptop on both Ubuntu and Debian Linux.
As you can see in the picture above it is funny as with this bug the person looks like a batman 😉
As the webcam upside-down issue was present on both latest Ubuntu 11.10 and latest stable Debian Squeeze 6.02, my guess was other GNU / Linux rpm based distro like Fedora might have applied a fix to this weird Skype inverted video (bat human like) issue.
Unfortunately testing the webcam with Skype on latest both Fedora 16 and Linux Mint 12 appeared to produce the same webcam bug.
A bit of research for the issue online and try outs of a number of suggested methods to resolve the issue led finally to a work around, thanks to this post
Here is few steps to follow to make the webcam show video like it should:
1. Install libv4l-0 package
root@linux:~# apt-get --yes install libv4-0

...
Onwards to start skype directly from terminal and test the camera type:
hipo@linux:~$ LD_PRELOAD=/usr/lib/libv4l/v4l1compat.so skype
This is the work around for 32 bit Linux install, most people however will probably have installed 64 bit Linux, for 64bit Linux installs the above command should be little different:
hipo@linux:~$ LD_PRELOAD=/usr/lib32/libv4l/v4l1compat.so skype
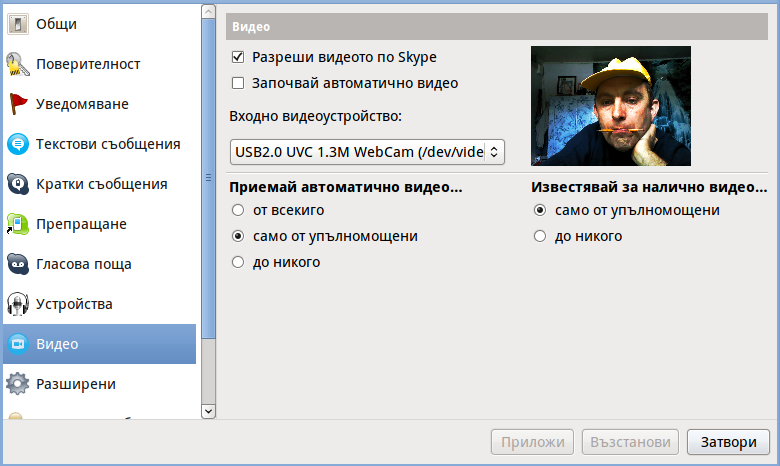
Once skype is launched test the camera and see if the camera capture is now uninverted, through menus:
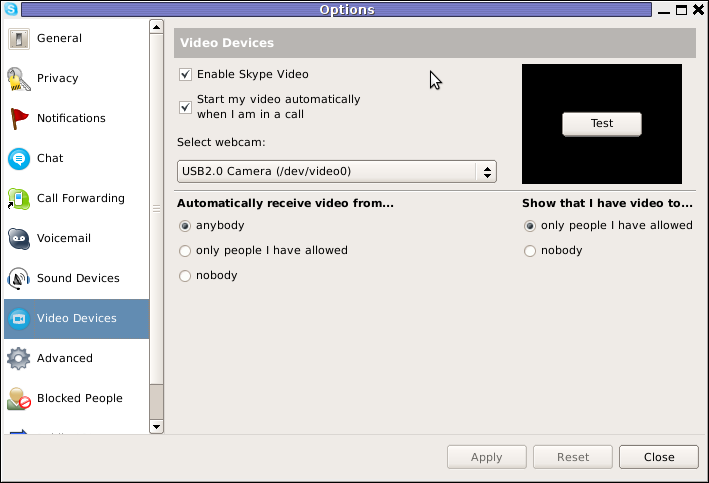
S -> Options -> Video Devices -> Test
2. Create a skype Wrapper script Launcher
To make skype launch everytime with exported shell variable:
LD_PRELOAD=/usr/lib32/libv4l/v4l1compat.so
A new skype wrapper bash shell script should be created in /usr/local/bin/skype , the file should contain:
#!/bin/sh

LD_PRELOAD=/usr/lib32/libv4l/v4l1compat.so

/usr/bin/skype
To create the script with echo in a root terminal issue;
root@linux:~# echo '#!/bin/sh' >> /usr/local/bin/skype

root@linux:~# echo 'LD_PRELOAD=/usr/lib32/libv4l/v4l1compat.so' >> /usr/local/bin/skype

root@linux:~# echo '/usr/bin/skype' >> /usr/local/bin/skype

root@linux:~# chmod +x /usr/local/bin/skype
3. Edit the Skype gnome menu to substitute /usr/bin/skype Skype Launcher with /usr/local/bin/skype
Gnome 2 has a handy menu launcher, allowing to edit and add new menus and submenus (menus and items) to the Application menu, to launch the editor one has to click over Applications with last mouse button (right button) and choose Edit Menus

The menu editor like the one in the below screenshot will appear:

In the preceeding Launcher properties window, Command: skype has to be substituted with:
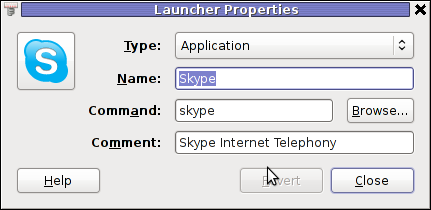
Command: /usr/local/bin/skype
For console freaks who doesn't want to bother in editting Skype Launcher via GUI /usr/share/applications/skype.desktop file can be editted in terminal. Inside skype.desktop substitute:
Exec=skype
with
Exec=/usr/local/bin/skype
As one can imagine the upside-down video image in Skype is not a problem because of Linux, but rather another bug in Skype (non-free) software program.
By the way everyone, who is using his computer with Free Software operating system FreeBSD, Linux etc. knows pretty well by experience, that Skype is a very problematic software; It is often a cause for system unexpected increased system loads, problems with (microphone not capturing), camera issues, issues with pulseaudio, problem with audio playbacks … Besides the long list of bugs there are unexpected display bugs in skype tray icon, bugs in skype messanger windows and at some rare occasions the program completely hangs and had to be killed with kill command and re-launched again.
Another worrying fact is Skype's versions available for GNU / Linux and BSD is completely out of date with its "competitor" operating systems MS Windows, MacOS X etc.
For people like me and my friend who want to use free operating system the latest available skype version is not even stable … current version fod download from skype's website is (Skype 2.2Beta)!
On FreeBSD the skype situation is even worser, freebsd have only option to run Skype ver 1.3 or v. 2.0 at best, as far as I know skype 2.2 and 2.2beta is not there.
Just as matter of comparison the latest Skype version on Windows is 5.x. Windows release is ages ahead its Linux and BSD ver. From a functional point of view the difference between Linux's 2.x and Windows 5.x is not that much different, what makes difference is is the amount of bugs which Linux and BSD skype versions contain…
Skype was about 6 months ago bought by Microsoft, therefore the prognosis for Skype Linux support in future is probably even darker. Microsoft will not probably bother to release new version of Skype for their competitor free as in freedom OSes.
I would like to thank my friend and brother in Christ Stelian for supplying me with the Skype screenshots, as well as for being kind to share how he fixed his camera with me.
How to install OpenNTPD NTP server to synchronize system clock on FreeBSD for better security
Sunday, February 12th, 2012![]()
Lately I've been researching on ntpd and wrote a two articles on how to install ntpd on CentOS, Fedora and how to install ntpd on FreeBSD and during my research on ntpd, I've come across OpenNTPD and decided to give it a go on my FreeBSD home router.
OpenBSD project is well known for it is high security standards and historically has passed the test of time for being a extraordinary secure UNIX like free operating system.
OpenBSD is developed in parallel with FreeBSD, however the development model of the two free operating systems are way different.
As a part of the OpenBSD to be independant in its basis of software from other free operating systems like GNU / Linux and FreeBSD. They develop the all around free software realm known OpenSSH. Along with OpenSSH, one interesting project developed for the main purpose of OpenBSD is OpenNTPD.
Here is how openntpd.org describes OpenNTPD:
"a FREE, easy to use implementation of the Network Time Protocol. It provides the ability to sync the local clock to remote NTP servers and can act as NTP server itself, redistributing the local clock."
OpenNTPD's accent just like OpenBSD's accent is security and hence for FreeBSD installs which targets security openntpd might be a good choice. Besides that the so popular classical ntpd has been well known for being historically "insecure", remote exploits for it has been released already at numerous times.
Another reason for someone to choose run openntpd instead of ntpd is its great simplicity. openntpd configuration is super simple.
Here are the steps I followed to have openntpd time server synchronize clock on my system using other public accessible openntpd servers on the internet.
1. Install openntpd through pkg_add -vr openntpd or via ports tree
a) For binar install with pkg_add issue:
freebsd# pkg_add -vr openntpd

...
b) if you prefer to compile it from source
freebsd# cd /usr/ports/net/openntpd

freebsd# make install clean

...
2. Enable OpenNTPD to start on system boot:
freebsd# echo 'openntpd_enable="YES"' >> /etc/rc.conf
3. Create openntpd ntpd.conf configuration file
There is a default sample ntpd.conf configuration which can be straight use as a conf basis:
freebsd# cp -rpf /usr/local/share/examples/openntpd/ntpd.conf /usr/local/etc/ntpd.conf
Default ntpd.conf works just fine without any modifications, if however there is a requirement the openntpd server to listen and accept time synchronization requests from only certain hosts add to conf something like:
listen on 192.168.1.2

listen on 192.168.1.3

listen on 2607:f0d0:3001:0009:0000:0000:0000:0001

listen on 127.0.0.1
This configuration will enable only 192.168.1.2 and 192.168.1.3 IPv4 addresses as well as the IPv6 2607:f0d0:3001:0009:0000:0000:0000:0001 IP to communicate with openntpd.
4. Start OpenNTPD service
freebsd# /usr/local/etc/rc.d/openntpd
5. Verify if openntpd is up and running
freebsd# ps axuww|grep -i ntp

root 31695 0.0 0.1 3188 1060 ?? Ss 11:26PM 0:00.00 ntpd: [priv] (ntpd)

_ntp 31696 0.0 0.1 3188 1140 ?? S 11:26PM 0:00.00 ntpd: ntp engine (ntpd)

_ntp 31697 0.0 0.1 3188 1088 ?? S 11:26PM 0:00.00 ntpd: dns engine (ntpd)

root 31700 0.0 0.1 3336 1192 p2 S+ 11:26PM 0:00.00 grep -i ntp
Its also good idea to check if openntpd has succesfully established connection with its peer remote openntpd time servers. This is necessery to make sure pf / ipfw firewall rules are not preventing connection to remote 123 UDP port:
freebsd# sockstat -4 -p 123

USER COMMAND PID FD PROTO LOCAL ADDRESS FOREIGN ADDRESS

_ntp ntpd 31696 4 udp4 83.228.93.76:54555 212.70.148.15:123

_ntp ntpd 31696 6 udp4 83.228.93.76:56666 195.69.120.36:123

_ntp ntpd 31696 8 udp4 83.228.93.76:49976 217.75.140.188:123
By default openntpd is also listening to IPv6 if IPv6 support is enabled in freebsd kernel.
6. Resolve openntpd firewall filtering issues
If there is a pf firewall blocking UDP requests to in/out port 123 within /etc/pf.conf rule like:
block in log on $EXT_NIC proto udp all
Before the blocking rule you will have to add pf rules:
# Ipv4 Open outgoing port TCP 123 (NTP)

pass out on $EXT_NIC proto tcp to any port ntp

# Ipv6 Open outgoing port TCP 123 (NTP)

pass out on $EXT_NIC inet6 proto tcp to any port ntp

# Ipv4 Open outgoing port UDP 123 (NTP)

pass out on $EXT_NIC proto udp to any port ntp

# Ipv6 Open outgoing port UDP 123 (NTP)

pass out on $EXT_NIC inet6 proto udp to any port ntp
where $EXT_NIC is defined to be equal to the external lan NIC interface, for example:
EXT_NIC="ml0"
Afterwards to load the new pf.conf rules firewall has to be flushed and reloaded:
freebsd# /sbin/pfctl -f /etc/pf.conf -d

...

freebsd# /sbin/pfctl -f /etc/pf.conf -e

...
In conclusion openntpd should be more secure than regular ntpd and in many cases is probably a better choice.
Anyhow bear in mind on FreeBSD openntpd is not part of the freebsd world and therefore security updates will not be issued directly by the freebsd dev team, but you will have to regularly update with the latest version provided from the bsd ports to make sure openntpd is 100% secure.
For anyone looking for more precise system clock synchronization and not so focused on security ntpd might be still a better choice. The OpenNTPD's official page states it is designed to reach reasonable time accuracy, but is not after the last microseconds.
Test your web browser compatability with Acid3 test
Wednesday, January 25th, 2012Acid3 Test is a group of browser compitability tests. Acid3 test is a good indicator on how Web ready is your browser.
Acidtest is part of the web standards project. Latest Firefox 9.0.1 passes the test on 100% (100/100).
I've tried it with Epiphany and it scored only 67/100, still I'm using Epiphany on daily basis and I'm quite happy with it.

The tests involved are testing browser for:
- DOM
- DOM2
- Checks on HTML tables and forms browser rendering
- SVG compitability testing
- DOM1 and DOM2 compitability
- Various ECMA Script Javascript compitability tests
- Unicode (UTF-16 and UTF-8) browser compitability
- XHML, SMIL, CSS, HTML compitability
- Content-type image/png, text plain etc.

The Acid3 test is written itself in Javascript. It consists of 6 testing "stages" (buckets) upon which the browser tested is evaluated.
Each of the test is represented visually by a rectangle. If the a test stage is passed you see a new rectangle appearing in the tested browser.
In wikipedia, there is a thorough list with web browsers by type and engine and the level of support for the Acid3 test.
The test is of great use if you're web developer.
Problems with Skype microphone on Thinkpad R61i with Debian Linux again and fix
Tuesday, January 10th, 2012Once again, I experienced Skype microphone issues!!! Its getting really annoying, since almost randomly I get issues. Skype is a terrible program and depending on a proprietary thing like Skype is a real pain in the ass.
This time it was totally strange as there was no way to record any voice inside Skype Call while testing with (Echo / Sound Test Service)
After a lot of puzzling and getting a bit angry I found this time the issues are caused by some settings which somehow changed in GNOME Sound Preferences microphone to mute:


You see on above screeshot that somehow the stupid thing get mutted 😐

After unmuting and restarting Skype, the microphone started working in Skype again …
How to encrypt files with GPG and OpenSSL on GNU / Linux
Friday, November 25th, 2011![]()
I have just recently found out that it is possible to use openssl to encrypt files to tighten your security.
Why would I want to encrypt files? Well very simple, I have plain text files where I write down my passwords for servers or account logins for services I use on the internet.
Before this very day I use gpg to encrypt and decrypt my sensitive information files and archives. The way to encrypt files with GPG is very simple, here is an example:
server:~# ls -al test.txt

-rw-r--r-- 1 root root 12 Nov 25 16:50 test.txt

server:~# gpg -c test.txt > test.txt.gpg

Enter passphrase:

Repeat passphrase:
Typing twice the same password produces the encrypted file test.txt.gpg . In order to later decrypt the gpg password protected file I use cmd:
server:~# gpg -d test.txt.gpg >test.txt

Enter passphrase:

Repeat passphrase:

gpg: CAST5 encrypted data

gpg: encrypted with 1 passphrase

gpg: WARNING: message was not integrity protected
As one can see from above output by default gpg uses the CAST5 algorithm to encrypt the data. For all those curious on what kind of encryption does CAST5 provide and where the CAST5 origins are, in short CAST5 is a GNU invented cryptographic algorithm, the short description of the algorithm is as follows:
“…a DES-like Substitution-Permutation Network (SPN) cryptosystem which appears to have good resistance to differential cryptanalysis, linear cryptanalysis, and related-key cryptanalysis. This cipher also possesses a number of other desirable cryptographic properties, including avalanche, Strict Avalanche Criterion (SAC), Bit Independence Criterion (BIC), no complementation property, and an absence of weak and semi-weak keys.”
Anyways, for all those who trust more the DES128 encryption as an encryption algorithm to keep your data secret, the openssl command tool provides another mean to encrypt sensitive data.
To encrypt a file using the openssl’s DES encryption capabilities:
server:~# openssl des -salt -in test.txt -out test.txt.des

enter des-cbc encryption password:

Verifying - enter des-cbc encryption password:
As you can see to encrypt with the DES-CBC its necessery to type twice the secret password “salt” keyword which will be used as an encryption key.
To decrypt later on the DES encrypted file the cmd is:
server:~# openssl des -d -salt -in file.des -out file
In order to encrypt a whole directory earlier compressed with tar zip:
server:~# tar -czf - directory | openssl des -salt -out directory.tar.gz.des
Where directory is the name of directory which will be tarred and crypted.
To later decrypt with openssl the above encrypted tar.gz.des file:
server:~# openssl des -d -salt -in directory.tar.gzdes | tar -x
Monitoring Windows hosts with Nagios on Debian GNU/Linux
Tuesday, August 30th, 2011![]()
In this article in short, I’ll explain how I configured Nagios on a Debian GNU/Linux release (Squeeze 6) to monitor a couple of Windows hosts running inside a local network. Now let’s start.
1. Install necessery nagios debian packages
apt-get install nagios-images nagios-nrpe-plugin nagios-nrpe-server nagios-plugins nagios-plugins-basic nagios-plugins-standard

nagios3 nagios3-cgi nagios3-common nagios3-core
2. Edit /etc/nagios-plugins/config/nt.cfg
In the File substitute:
define command { command_name check_nt command_line /usr/lib/nagios/plugins/check_nt -H '$HOSTADDRESS$' -v '$ARG1$' }
With:
define command {

command_name check_nt

command_line /usr/lib/nagios/plugins/check_nt -H '$HOSTADDRESS$' -p 12489 -v $ARG1$ $ARG2$

}
3. Modify nrpe.cfg to put in allowd hoss to connect to the Nagions nrpe server
vim /etc/nagios/nrpe.cfg
Lookup inside for nagios’s configuration directive:
allowed_hosts=127.0.0.1
In order to allow more hosts to report to the nagios nrpe daemon, change the value to let’s say:
allowed_hosts=127.0.0.1,192.168.1.4,192.168.1.5,192.168.1.6
This config allows the three IPs 192.168.1.4-6 to be able to report for nrpe.
For the changes to nrpe server to take effect, it has to be restrarted.
debian:~# /etc/init.d/nagios-nrpe-server restart
Further on some configurations needs to be properly done on the nrpe agent Windows hosts in this case 192.168.1.4,192.168.1.5,192.168.1.6
4. Install the nsclient++ on all Windows hosts which CPU, Disk, Temperature and services has to be monitored
Download the agent from http://sourceforge.net/projects/nscplus and launch the installer, click twice on it and follow the installation screens. Its necessery that during installation the agent has the NRPE protocol enabled. After the installation is complete one needs to modify the NSC.ini
By default many of nsclient++ tracking modules are not enabled in NSC.ini, thus its necessery that the following DLLs get activated in the conf:
FileLogger.dll

CheckSystem.dll

CheckDisk.dll

NSClientListener.dll

SysTray.dll

CheckEventLog.dll

CheckHelpers.dll
Another requirement is to instruct the nsclient++ angent to have access to the Linux installed nagios server again with adding it to the allowed_hosts config variable:
allowed_hosts=192.168.1.1
In my case the Nagios runs on Debian Lenny (Squeeze) 6 and possess the IP address of 192.168.1.1
To test the intalled windows nsclient++ agents are properly installed a simple telnet connection from the Linux host is enough:
5. Create necessery configuration for the nagios Linux server to include all the Windows hosts which will be monitored
There is a window.cfg template file located in /usr/share/doc/nagios3-common/examples/template-object/windows.cfg on Debian.
The file is a good start point for creating a conf file to be understand by nagios and used to periodically refresh information about the status of the Windows hosts.
Thus it’s a good idea to copy the file to nagios3 config directory:
debian:~# mkdir /etc/nagios3/objects

debian:~# cp -rpf /usr/share/doc/nagios3-common/examples/template-object/windows.cfg /etc/nagios3/objects/windows.cfg
A sample windows.cfg content, (which works for me fine) and monitor a couple of Windows nodes running MS-SQL service and IIS and makes sure the services are up and running are:
define host{
The above config, can easily be extended for more hosts, or if necessery easily setup to track more services in nagios web frontend.
use windows-server ; Inherit default values from a template
host_name Windows1 ; The name we're giving to this host
alias Iready Server ; A longer name associated with the host
address 192.168.1.4 ; IP address of the host
}
define host{
use windows-server ; Inherit default values from a template
host_name Windows2 ; The name we're giving to this host
alias Iready Server ; A longer name associated with the host
address 192.168.1.4 ; IP address of the host
}
define hostgroup{
hostgroup_name windows-servers ; The name of the hostgroup
alias Windows Servers ; Long name of the group
}
define hostgroup{
hostgroup_name IIS
alias IIS Servers
members Windows1,Windows2
}
define hostgroup{
hostgroup_name MSSQL
alias MSSQL Servers
members Windows1,Windows2
}
define service{
use generic-service
host_name Windows1
service_description NSClient++ Version
check_command check_nt!CLIENTVERSION
}
define service{ use generic-service
host_name Windows1
service_description Uptime
check_command check_nt!UPTIME
}
define service{ use generic-service
host_name Windows1
service_description CPU Load
check_command check_nt!CPULOAD!-l 5,80,90
}
define service{
use generic-service
host_name Windows1
service_description Memory Usage
check_command check_nt!MEMUSE!-w 80 -c 90
define service{
use generic-service
host_name Windows1
service_description C: Drive Space
check_command check_nt!USEDDISKSPACE!-l c -w 80 -c 90
}
define service{
use generic-service
host_name Windows1
service_description W3SVC
check_command check_nt!SERVICESTATE!-d SHOWALL -l W3SVC
}
define service{
use generic-service
host_name Windows1
service_description Explorer
check_command check_nt!PROCSTATE!-d SHOWALL -l Explorer.exe
}
define service{
use generic-service
host_name Windows2
service_description NSClient++ Version
check_command check_nt!CLIENTVERSION
}
define service{ use generic-service
host_name Windows2
service_description Uptime
check_command check_nt!UPTIME
}
define service{ use generic-service
host_name Windows2
service_description CPU Load
check_command check_nt!CPULOAD!-l 5,80,90
}
define service{
use generic-service
host_name Windows2
service_description Memory Usage
check_command check_nt!MEMUSE!-w 80 -c 90
define service{
use generic-service
host_name Windows2
service_description C: Drive Space
check_command check_nt!USEDDISKSPACE!-l c -w 80 -c 90
}
define service{
use generic-service
host_name Windows2
service_description W3SVC
check_command check_nt!SERVICESTATE!-d SHOWALL -l W3SVC
}
define service{
use generic-service
host_name Windows2
service_description Explorer
check_command check_nt!PROCSTATE!-d SHOWALL -l Explorer.exe
}
define service{ use generic-service
host_name Windows1
service_description SQL port Check
check_command check_tcp!1433
}
define service{
use generic-service
host_name Windows2
service_description SQL port Check
check_command check_tcp!1433
}
6. Test if connectivity to the nsclient++ agent port is available from the Linux server
debian:~# telnet 192.168.58.6 12489

Trying 192.168.58.6...

Connected to 192.168.58.6.

Escape character is '^]'.

asd

ERROR: Invalid password.
Another good idea is to launch on the Windows host the NSClient++ (system tray) , e.g.:
Start, All Programs, NSClient++, Start NSClient++ (system tray).
Test Nagios configuration from the Linux host running nagios and nrpe daemons to check if the check_nt, can succesfully authenticate and retrieve data generated from the nsclient++ on the Windows host:
debian:~# /usr/lib/nagios/plugins/check_nt -H 192.168.1.5 -p 12489 -v CPULOAD -w 80 -c 90 -l 5,80,90,10,80,90
If everything is okay and the remote Windows system 192.168.1.5 has properly configured and running NSClient++ the above command should return an output like:
CPU Load 1% (5 min average) 1% (10 min average) | '5 min avg Load'=1%;80;90;0;100 '10 min avg Load'=1%;80;90;0;100
In case of the command returns:
could not fetch information from server
instead this means that probably there is some kind of problem with authentication or handshake of the Linux host’s nagios check_nt to the Windows server’s running on 12489.
This is sometimes caused by misconfigured NSC.ini file, however in other occasions this error is caused by misconfigured Windows Firewall or because the NSClient++ is not running with Administrator user.
By the way important note to make about Windows 2008r2 is that if NSClient++ is running there it’s absolutely required to Login with Windows Administrator and run the NSClient++ /start , if it’s run through the Run As Adminsitrator with an admin privileged user the aforementioned error might appear, so be careful.
I’ve experienced this error myself and it took me about 40 minutes to find that I have to run it directly with Administrator user after logging as Administrator.
7. Create nagios web iface Apache configuration
nagios debian pachage is shipped with a config which is suitable to be set
debian:~# cp -rpf /usr/share/doc/nagios3-common/examples/apache2.conf /etc/apache2/sites-avalable/nagios

debian:~# ln -sf /etc/apache2/sites-available/nagios /etc/apache2/sites-enabled/nagios
The /etc/apache2/sites-available/nagios can easily be configured to work on Virtualhost, to do so the above copied file need to be wrapped inside a VirtualHost directive. For that put in the beginning of the file;
<VirtualHost *:80>
and in the end of the file:
<VirtualHost *:80>
8. Restart nagios server and Apache for the new settings to take effect
debian:~# /etc/init.d/apache2 restart

...

debian:~# /etc/init.d/nagios3 restart
If some custom configuration about tracking the Debian Linux nagios host running services needs to be made, its also helpful for one to check in /etc/nagios3/conf.d
Well that’s mostly what I had to do to make the Nagios3 server to keep track of a small Windows network on Debian GNU/Linux Squeeze 6, hope this small article helps. Cheers 😉
rkhunter, chkrootkit and unhide three Linux handy tools to find out if a Linux server is compromised
Wednesday, August 17th, 2011
I’ve been hired, just recently by a company to make them a quick security audit analysis as they complain of having severe Denial of Service problems against an online e-store.
As a mean of securing the local network of the company, the old Linux server had to be replaced with a freshly installed one, which I had to configure to run smooth firewall and create DMZ zone.
The company System Administrator has installed Debian Linux and brought up sshd to allow me to futher take the lead and secure the server
After few hours, I’ve noticed unusual activities. For example processes like:
./a 207
as well as processes like ./ssh 212
debian:~# ps axu|grep -i ./ssh|wc -l

216
On the server and after checking in /etc/shadow I found that users like admin, test had a password string assigned , interestingly even system users like postgresql and man was enabled and ready for login and had a password hash assigned in /etc/shadow
I’ve seen the ./ssh shit before and I know pretty well this is a famous romanian script kiddies tools which circulates in the wild for at least 5 years already.
A quick look up in the usual places, where script kiddies store their files, like: /var/tmp, /tmp, /proc, /sys and /var/run has helped me find the ssh brute forcer the kiddie has issues on the machine in my case it was located in /var/run/2012 inside I found of course the usual sk bad stuff:
root@debian:/var/run/2012# ls1 3 5 a data.conf find internet.txt pass_file screen ssh stricat.txt vuln.txt

2 4 64.37.find.22 atack derbedeu.txt full mfu.txt ronet13.txt ss start tefac.txt x
As well as an archive in /var/run/2012.tgz which was obviously quickly extracted and the brute force ssh tool was started to lookup for some more targets.
As I like keeping script kiddie stuff to expose and share with people, to help them get a better understanding what they can expect on their servers I made a copy of the 2012.tgz brute forcer tool, download the romanian ssh brute forcer shit is here if somebody wants to take a look, though I suggest to be very careful with it as some files might contain rootkits and other unwanted tool.
If someone wants to give it a try be sure not to launch it as root.
Anyways, after finding the abuser I quickly removed all the active users, which were not supposed to be existent on the newly installed system from /etc/shadow changed the server root password, give a reinstall the openssh-server and openssh-client (as I was not if they had not been substituted with some rootkited version), e.g.:
debian:~# apt-get install --reinstall openssh-client openssh-server
Consequentially I killed all the active ./ssh and ./a processes to assure the script kiddie ssh brute forcer is no longer running on the server as well killed all connections to the ssh server manually with kill cmd to the unknown IPs.
Finally to make sure, the server is not rootkited or not backdoored I run some tests with chkrootkit, rkhunter and unhide :
On Debian the 3 tools are available as packages, so this saved me time and I proceeded installing like so:
debian:~# apt-get install rkhunter unhide chkrootkit

...
In few seconds the tools were installed so I used them to check if the server is irreversably damaged or root kitted by the kiddie.
1. unhide
First I used unhide to make sure there are no hidden backdoor processes listening on the server:
for i in $(echo proc sys brute); do unhide $i; done

Unhide 20100201

http://www.security-projects.com/?Unhide

[*]Searching for Hidden processes through /proc scanning

Unhide 20100201

http://www.security-projects.com/?Unhide

[*]Searching for Hidden processes through kill(..,0) scanning

[*]Searching for Hidden processes through comparison of results of system calls

[*]Searching for Hidden processes through getpriority() scanning

[*]Searching for Hidden processes through getpgid() scanning

[*]Searching for Hidden processes through getsid() scanning

[*]Searching for Hidden processes through sched_getaffinity() scanning

[*]Searching for Hidden processes through sched_getparam() scanning

[*]Searching for Hidden processes through sched_getscheduler() scanning

[*]Searching for Hidden processes through sched_rr_get_interval() scanning

[*]Searching for Hidden processes through sysinfo() scanning

HIDDEN Processes Found: 1

Unhide 20100201

http://www.security-projects.com/?Unhide

[*]Starting scanning using brute force against PIDS with fork()

[*]Starting scanning using brute force against PIDS with Threads
The above command checks with unhide in /proc and /sys for hidden processes as well as next uses brute option to try to brute force all PIDs on the server attempting to locate listening backdoors processes.
There are 2 more unhide binaries that can be used to check for hidden backdoors, unhide-posix and unhide-tcp
For some reason unhide-posix sys detected the /usr/sbin/rsyslogd -c4 process as some kind of hidden process, which is most probably a false positive, though I can’t be one hundred sure until I try to scan completely the server remotely after mounting the filesystem via ssh and scan it with clamav chkrootkit and rkhunter and even maybe with drweb .
I assume the HIDDEN Processes Found: 1 bells the alarm, however even though I did profound look up on the server with lsof, netstat and fuser cmds I cannot find nothing suspicious any more.
2. chkrootkit scan
Next I used chkrootkit to check if some common rootkit is not installed on the server:
debian:~# chkrootkit

ROOTDIR is `/'

Checking `amd'... not found

Checking `basename'... not infected

Checking `biff'... not found

Checking `chfn'... not infected

Checking `chsh'... not infected

Checking `cron'... not infected

Checking `crontab'... not infected

Checking `date'... not infected

...
The chkrootkit output displayed thanksfully failed to detect that the system is rootkitted.
3. rkhunter
Finally, tested with rkhunter to assure chkrootkit to expand the range of rootkits the system is scanned for:
debian:~# rkhunter --check

[ Rootkit Hunter version 1.3.6 ]
Checking system commands…
Performing ‘strings’ command checks
Checking ‘strings’ command [ OK ]
Performing ‘shared libraries’ checks
Checking for preloading variables [ None found ]
Checking for preloaded libraries [ None found ]
Checking LD_LIBRARY_PATH variable [ Not found ]
…
After a long screen of consequential rootkit tests, each of which requires the user to press enter rkhunter was unable to detect any rootkits installed on host as well.
Finally to make sure for one more time there are no some backdoors left or some unwanted users still connected to the server I used netstat:
debian:~# netstat -tanp

Active Internet connections (servers and established)

Proto Recv-Q Send-Q Local Address Foreign Address State PID/Program name

tcp 0 0 0.0.0.0:22 0.0.0.0:* LISTEN 7269/sshd

tcp 0 0 192.168.0.1:22 83.228.93.76:54913 ESTABLISHED 24545/1

tcp 0 0 192.168.0.1:22 83.228.93.76:50240 ESTABLISHED 7059/0

tcp6 0 0 :::22 :::* LISTEN 7269/sshd
As the output shows, I coulnd’t find anything suspiciou, still I can’t be 100% percent sure the system is clean and there is no something left from the cracker, probably the Debian server will be re-installed as it doesn’t matter since it’s newly installed Debian machine.
What is amazing is that the server was compromised immediately after it was installed. This means that either the very easy default root password the admin who installed the server was cracked, or his whole network has been compromised by the script kiddie.
Tomorrow will have to investigate further to assure the security breach is closed hopefully once and for all.
How to check Host is up with Nagios for servers with disabled ICMP (ping) protocol
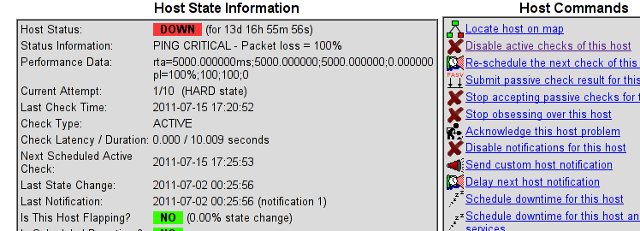
Friday, July 15th, 2011At the company where I administrate some servers, they’re running Nagios to keep track of the servers status and instantly report if problems with connectivity to certain servers occurs.
Now one of the servers which had configured UP host checks is up, but because of heavy ICMP denial of service attacks to the servers the ICMP protocol ping is completely disabled.
In Nagios this host was constantly showing as DOWN in the usual red color, so nagios reported issue even though all services on the client are running fine.
As this is quite annoying, I checked if Nagios supports host checking without doing the ICMP ping test. It appeared it does through something called in nagios Submit passive check result for host
Enabling the “Submit passive check result for this host” could be done straight from Nagios’s web interface (so I don’t even have to edit configurations! ;).
Here is how I did it. In Nagios I had to navigate to:
Hosts -> Click over my host (hosting1) which showed in red as down

You see my down host which I clicked over showing in red in above pic.
On next Nagios screen I had to select, Disable active checks of this host
and press on the Commit button.
Next following text appears on browser:
Your command request was successfully submitted to Nagios for processing.
Note: It may take a while before the command is actually processed.
Afterwards I had to click on Submit passive check result for this host and in:
Check Output to type in:
check_tcp -p 80
Here is the Screenshot of the Command Options dialog:
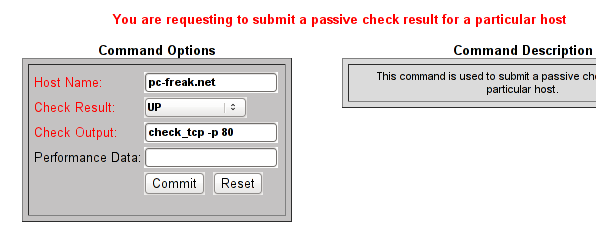
That’s all now Nagious should start checking the down host by doing a query if the webserver on port 80 is up and running instead of pinging it.
As well as the server is no longer shown in the Nagio’s Down host list.


