Posts Tagged ‘debian gnu’
Saturday, February 4th, 2012 If you're using Debian GNU/Linux wheezy/sid, you have already figured out GNOME3 settings to start GNOME in Classic mode (like in GNOME 2), starts gnome in a mode where the desktop is not showing the usual Computer, Home, Trash etc.
Besides that in that strange back-compitability Classic GNOME mode its impossible to add any program as a link in desktop like in the good old GNOME 2.
Thanksfully this abusive behaviour of the backwards compitability mode is easily fixable by two simple steps, here they are:
1. Install gnome-tweak-tool – (Tool to adjust advanced configuration settings for GNOME
root@debian:~# apt-get install gnome-tweak-tool
2. Start gnome-tweak tool
Press ALT+F2 and run gnome-tweak-tool or run it via xterm / gnome-terminal:
moonman@Moon:~$ gnome-tweak-tool
Change in Desktop, Have file manager handle the desktop the settings to ON
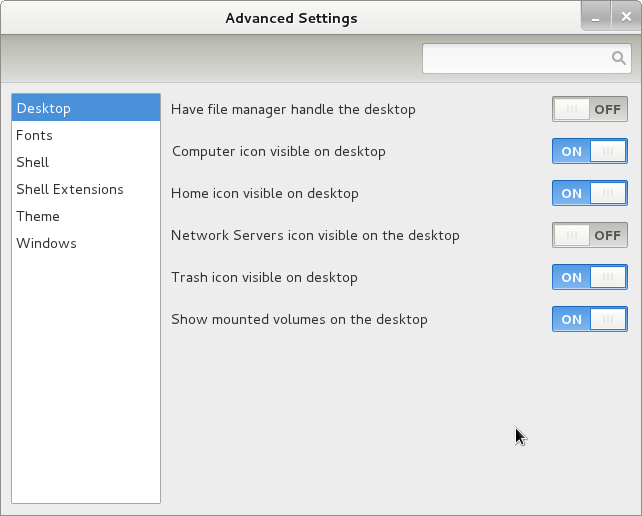
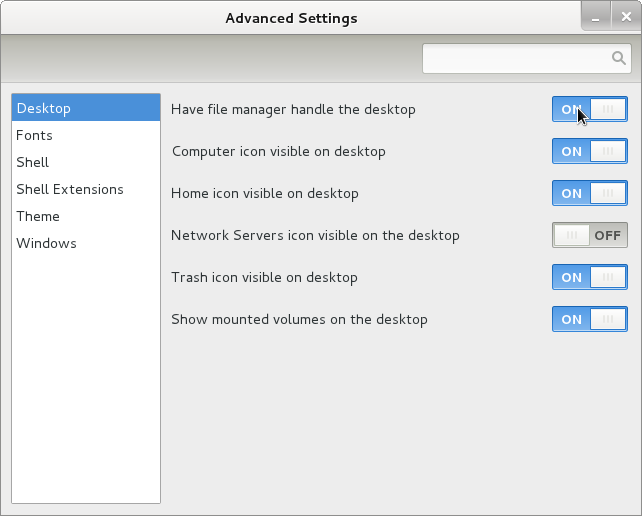
Once the Screenshot Handle Desktop is set to ON, further drag and dropping any application to the Desktop will be working.
Something really irritating is that launching applications in GNOME 3 does not work properly if you just press ALT+F2 and type in lets say gnome-terminal , to work around this weirdity you will have to install gnome-shell package.
Tags: Auto, behaviour, classic mode, compitability, configuration settings, debian gnu, desktop icons, Draft, f2, Gnome, gnu linux, Handle, Install, link, Linux, manager, Mode, moon, moonman, package, Press, root, shell package, sid, simple steps, something, Start, Thanksfully, tool, tool 2, tool change, tool tool, trash, type, weirdity, wheezy, xterm
Posted in Gnome, Linux, Linux and FreeBSD Desktop | 1 Comment »
Monday, February 13th, 2012 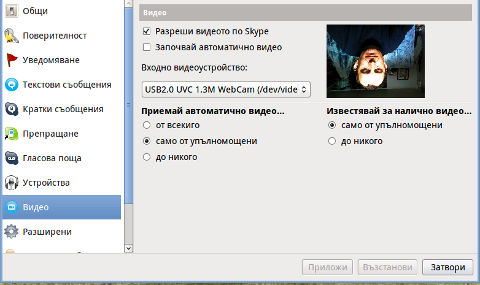
Does your camera show video correctly in cheese but shows captured video upside-down (inverted) in skype ?
This is an issue a friend of mine experienced on his Asus K51AC-SX037D laptop on both Ubuntu and Debian Linux.
As you can see in the picture above it is funny as with this bug the person looks like a batman 😉
As the webcam upside-down issue was present on both latest Ubuntu 11.10 and latest stable Debian Squeeze 6.02, my guess was other GNU / Linux rpm based distro like Fedora might have applied a fix to this weird Skype inverted video (bat human like) issue.
Unfortunately testing the webcam with Skype on latest both Fedora 16 and Linux Mint 12 appeared to produce the same webcam bug.
A bit of research for the issue online and try outs of a number of suggested methods to resolve the issue led finally to a work around, thanks to this post
Here is few steps to follow to make the webcam show video like it should:
1. Install libv4l-0 package
root@linux:~# apt-get --yes install libv4-0

...
Onwards to start skype directly from terminal and test the camera type:
hipo@linux:~$ LD_PRELOAD=/usr/lib/libv4l/v4l1compat.so skype
This is the work around for 32 bit Linux install, most people however will probably have installed 64 bit Linux, for 64bit Linux installs the above command should be little different:
hipo@linux:~$ LD_PRELOAD=/usr/lib32/libv4l/v4l1compat.so skype
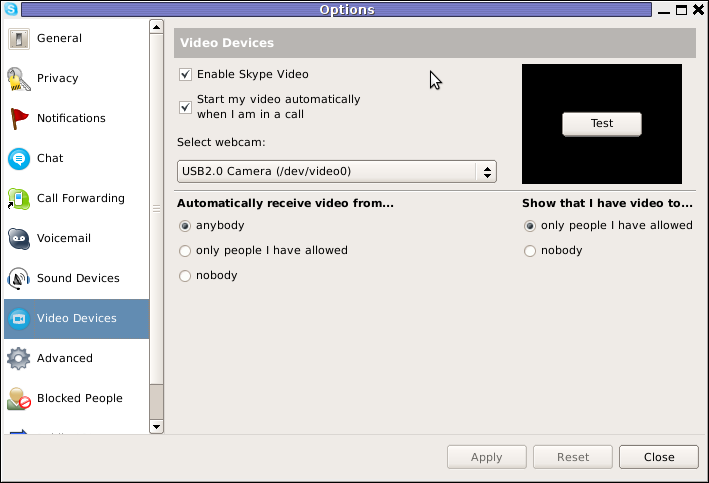
Once skype is launched test the camera and see if the camera capture is now uninverted, through menus:
S -> Options -> Video Devices -> Test
2. Create a skype Wrapper script Launcher
To make skype launch everytime with exported shell variable:
LD_PRELOAD=/usr/lib32/libv4l/v4l1compat.so
A new skype wrapper bash shell script should be created in /usr/local/bin/skype , the file should contain:
#!/bin/sh

LD_PRELOAD=/usr/lib32/libv4l/v4l1compat.so

/usr/bin/skype
To create the script with echo in a root terminal issue;
root@linux:~# echo '#!/bin/sh' >> /usr/local/bin/skype

root@linux:~# echo 'LD_PRELOAD=/usr/lib32/libv4l/v4l1compat.so' >> /usr/local/bin/skype

root@linux:~# echo '/usr/bin/skype' >> /usr/local/bin/skype

root@linux:~# chmod +x /usr/local/bin/skype
3. Edit the Skype gnome menu to substitute /usr/bin/skype Skype Launcher with /usr/local/bin/skype
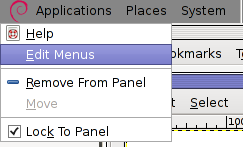
Gnome 2 has a handy menu launcher, allowing to edit and add new menus and submenus (menus and items) to the Application menu, to launch the editor one has to click over Applications with last mouse button (right button) and choose Edit Menus
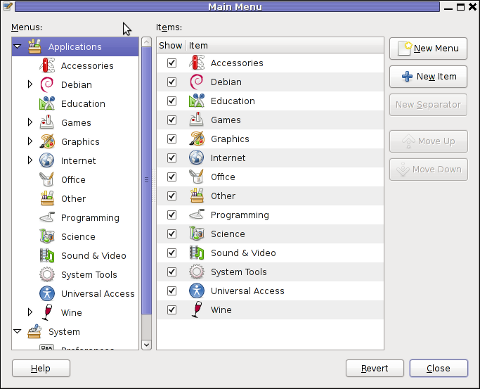
The menu editor like the one in the below screenshot will appear:
In the preceeding Launcher properties window, Command: skype has to be substituted with:
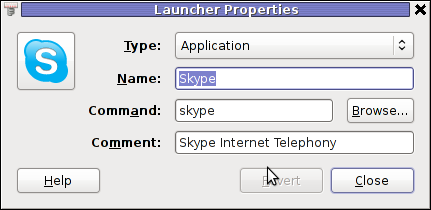
Command: /usr/local/bin/skype
For console freaks who doesn't want to bother in editting Skype Launcher via GUI /usr/share/applications/skype.desktop file can be editted in terminal. Inside skype.desktop substitute:
Exec=skype
with
Exec=/usr/local/bin/skype
As one can imagine the upside-down video image in Skype is not a problem because of Linux, but rather another bug in Skype (non-free) software program.
By the way everyone, who is using his computer with Free Software operating system FreeBSD, Linux etc. knows pretty well by experience, that Skype is a very problematic software; It is often a cause for system unexpected increased system loads, problems with (microphone not capturing), camera issues, issues with pulseaudio, problem with audio playbacks … Besides the long list of bugs there are unexpected display bugs in skype tray icon, bugs in skype messanger windows and at some rare occasions the program completely hangs and had to be killed with kill command and re-launched again.
Another worrying fact is Skype's versions available for GNU / Linux and BSD is completely out of date with its "competitor" operating systems MS Windows, MacOS X etc.
For people like me and my friend who want to use free operating system the latest available skype version is not even stable … current version fod download from skype's website is (Skype 2.2Beta)!
On FreeBSD the skype situation is even worser, freebsd have only option to run Skype ver 1.3 or v. 2.0 at best, as far as I know skype 2.2 and 2.2beta is not there.
Just as matter of comparison the latest Skype version on Windows is 5.x. Windows release is ages ahead its Linux and BSD ver. From a functional point of view the difference between Linux's 2.x and Windows 5.x is not that much different, what makes difference is is the amount of bugs which Linux and BSD skype versions contain…
Skype was about 6 months ago bought by Microsoft, therefore the prognosis for Skype Linux support in future is probably even darker. Microsoft will not probably bother to release new version of Skype for their competitor free as in freedom OSes.
I would like to thank my friend and brother in Christ Stelian for supplying me with the Skype screenshots, as well as for being kind to share how he fixed his camera with me.
Tags: Asus, Auto, bash shell script, batman, BSD, Button, camera capture, camera show, camera type, debian gnu, Desktop, distro, Draft, exec, fedora, file, gnu linux, gt options, hipo, laptop, launcher, ld, linux rpm, menu, Microsoft, person, PRELOAD, quot, root, root linux, rpm, Shell, show, Skype, software, squeeze, terminal, test, Ubuntu, ubuntu linux, video, video devices, web camera, webcam, work, wrapper script
Posted in Linux, Linux and FreeBSD Desktop, Skype on Linux | 29 Comments »
Tuesday, January 10th, 2012 I've experienced plenty of problems with Pulseaudio and Skype output sound hell crappy. This stupid proprietary program Skype is a total crap … Anyways again thanks to ArchLinux's wiki, I've used the two mentioned steps to fix all this Skype in / out problems …
1. Fix problems with Glitches, voice skips and crackling In file /etc/pulse/default.pa its necessery to substitute the line;
load-module module-udev-detect
with
load-module module-udev-detect tsched=0
2. Resolve Choppy sound in (Pulseaudio) -> Skype
In /etc/pulse/daemon.conf two lines has to be also substituted:
; default-sample-rate = 44100
Should become;
default-sample-rate = 48000
3. Change /etc/default/pulseaudio to allow dynamic module loading
It is a good idea to the default settings from DISALLOW_MODULE_LOADING=1 to DISALLOW_MODULE_LOADING=0 .This step is not required and I'm not sure if it has some influence on solving sound in / out problems with Skype but I believe it can be helpful in some cases..
So in /etc/default/pulseaudio Substitute:
DISALLOW_MODULE_LOADING=1
to;
DISALLOW_MODULE_LOADING=0
4. Restart PulseAudio server
After the line is changed and substituted a restart of PulseAudio is required. For PulseAudio server restart a gnome session logout is necessery. Just LogOff logged Gnome user and issue cmd:
debian:~# pkill pulseaudio
This will kill any left pulseaudio server previous instances.
Tags: ArchLinux, Auto, Choppy, choppy sound, conf, crackling, crap, crappy, debian gnu, default settings, Draft, file, Glitches, Gnome, gnome user, hell, idea, influence, instances, issue, line, Linux, loading, logout, Module, nbsp, necessery, pkill, plenty, proprietary program, pulse, resolve, Skype, sound glitches, substitute, udev, voice, wiki
Posted in Linux and FreeBSD Desktop, Linux Audio & Video, Skype on Linux | 18 Comments »
Saturday, January 7th, 2012 I always love so much to go back to the times, when games were games and people had still valued words like moral and respect.
In that great days of old school computing, we used to play the awesome old schools Tyrian and the Nintendo 1941 game (hopefully some still remember).
For all who don't Tyrian is one of the best Spaceship Arcades of all times!, and especially for DOS operating system the best I've personally seen.
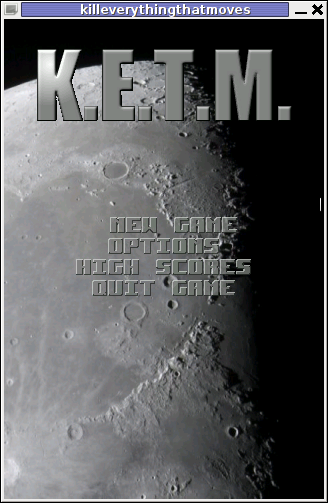
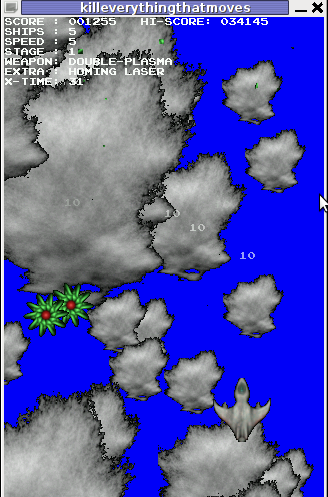
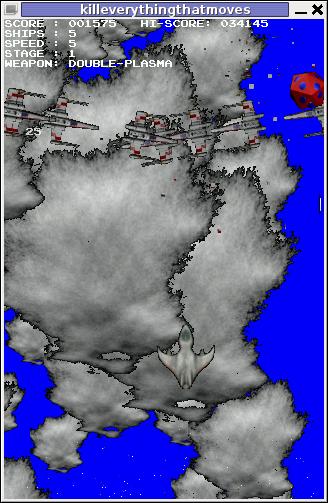
Recently I was checking the arcade games available for install on my Debian GNU / Linux and happily come across a game called KETM.
KETM acronym stands for the memorizable KILL EVERYTHING THAT MOVES and is free software distributed game under GPL.
The original creation idea was probably to resemble the so famous in the '90s spaceshooter games.
KETM is pretty addictive just like tyrian and has santimental meaning for me since it brings me memories for my arcade gaming years 😉
The game is easy to play and has a feeling of "diversity" especially in type of weapons your ship can obtain and use against enemies.
The powerups you get is quite plenty compared to the enemy ship types you should destroy 😉 In overall the game is quite easy to play, this however is also a good thing, as you can play more smoothly without dying every few secs like it is in so many arcade games…
The game has only 4 game levels and on each level end there is a big spaceship "the boss" which is the last in line to destroy in the tradition of the 2d arcade games.
Kill Everything That Moves is available for Debian and Ubuntu as a deb installable with apt. To install the game on Debian and Ubuntu
debian:~# apt-get install ketm

...
ketm's official latest available source and binary of time of writting this article is at version 0.6 and as far as I checked it unfortunately seems like the game development is stucked and the code seems a unmaintained.
I'm sure ketm has a lot of potential en hope somebody will adopt the code and will push further its development.
The game runs by default in the annoying windowed mode, I don't like this so I always run it fullscreen:
debian:~# ketm -f
KETM also reminds a bit on GEKI 2 / 3, which I have previously blogged about but I found KETM to be more enjoyable than gekis.
I've seen KETM has RPM ports as well so installing the game on fedora will be probably as easy as downloading the respective RPMs fulfilling the RPM package requirements and installing with rpm -i. I would be glad to hear from people who had succesfully run the game on Fedora and other RPM based Linux distributions?
The only thing that prevents the game to feel a bit more awesome (in my view) is the missing sound & music … Even though in the game settings inside the main menu there is an option for Sound On / Off the game runs by default without any sound or music (at least on my Debian).
I hope you will have some fun with KETM just I like I did! 😉
Also if you haven't played Tyrian yet, then I strongly advice you download Tyrian from here and try it out with dosbox – (a dos gnu linux / bsd game emulator)
Interesting fact to mention here, while looking for the native tyrian game info , I found tyrian has an open source version under development called – OpenTyrian . I'll check the game and write on it when I have time.
Tags: acronym, arcade gaming, arcades, Auto, bit, code, computing, deb, debian gnu, diversity, dos operating system, Draft, enemies, enemy ship, everything, fullscreen, game development, game levels, Geki, GNU, gnu linux, kill, last, level, Linux, linux game, Nintendo, official, old school, quot, rpm, secs, ship types, software, Sound, spaceship, spaceshooter, time, type, Ubuntu
Posted in Entertainment, Games Linux, Linux | No Comments »
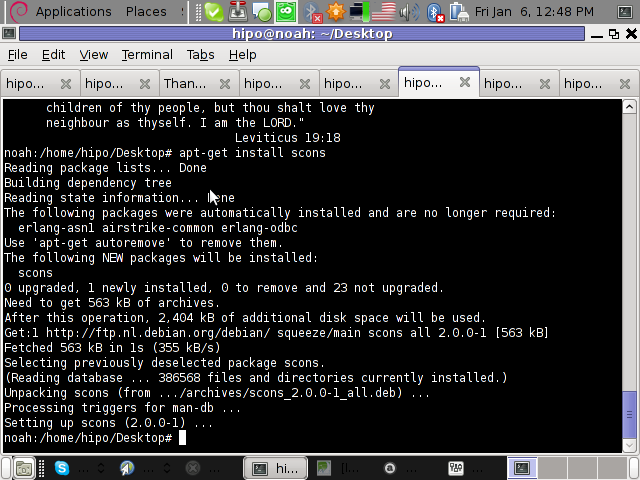
Friday, January 6th, 2012 I'm testing some old school arcade games, available from Debian's package repositories and quitting one of the games ended me up with a GNOME Screen Resolution of 640×480 pixels.
I wanted to revert back to the Classics resolution, so what I would normally do to do that is use >GNOME menus:
System -> Preferences -> Monitors
In that huge screen resolution on my 14 inch lenovo notebook screen, however the System menu cannot fit in 640×480 resolution. You can see the non-screen fitting System on the screenshot below:
Having this situation, I needed a way to change back to my normal daily used 1024x768px screen resolution to continue my daily work by some other way.
One possible solution I thought of was Logging Off Gnome and logging again. Loggig off and log on again would usually restart the initiated GNOME session and therefore will reset the screen resolution to my default 1024×768 / 32 bit color.
Having the unobservable System gnome panel menu on my screen however made using the usual Log off procedure via System -> Log Out myusername impossible…
Another possible way to actually restart my screen and hence revert back to my original resolution is achiavable using the classical restart X server key switch CTRL + ALT + backspace (bckspc) . Though this was a possible approach to the situation, I had a bunch of programs already running on my desktop and I did not wanted to interrupt my desktop session, what I was looking for is simply change the screen resolution size .
With all said I had to look up for alternative way (preferably easy) way, to revert back my screen resolution to my desired 1024×768.
As a console guy, I was interested if there is some kind of possibility to change my GNOME resolution directly using xterm or gnome-terminal , after a bit of check up online, I've found few threads started by people who were looking just like me for a way to change GNOME / KDE screen resolution size on various distributions Linux desktops as well on Free/Net/Open/BSDs. The answer to the question on few places was the command xrandr which I had used some few years ago to initiate remote X server connections via SSH
xrandr is actually a great tool part of the x11-xserver-utils
Actually xrandr is capable of doing a few things besides setting the screen resolution size, just to name a few it supports change the screen orientation, reflection of the output of the screen, adjust brightness, set color gamma etc. etc.
It is good to mention that xrandr changes the resolution not on a GNOME level but on Xorg server level.
Using xrandr to change the screen resolution appeared to be very easy.
1. First I issued xrandr to check all the supported xrandr resolutions by my X server
hipo@noah:~/Desktop$ xrandr Screen 0: minimum 320 x 200, current 1024 x 768, maximum 8192 x 8192VGA1 disconnected (normal left inverted right x axis y axis)LVDS1 connected 1024x768+0+0 (normal left inverted right x axis y axis) 304mm x 228mm 1024x768 60.0*+ 50.0 800x600 60.3 56.2 640x480 60.0 59.9 TV1 disconnected (normal left inverted right x axis y axis)hipo@noah:~/Desktop$
From the output you can see I have 3 basic resolutions configured in my Xorg, I can switch between.
2. To switch to my previous default screen resolution
hipo@noah:~/Desktop$ xrandr -s 1024x768
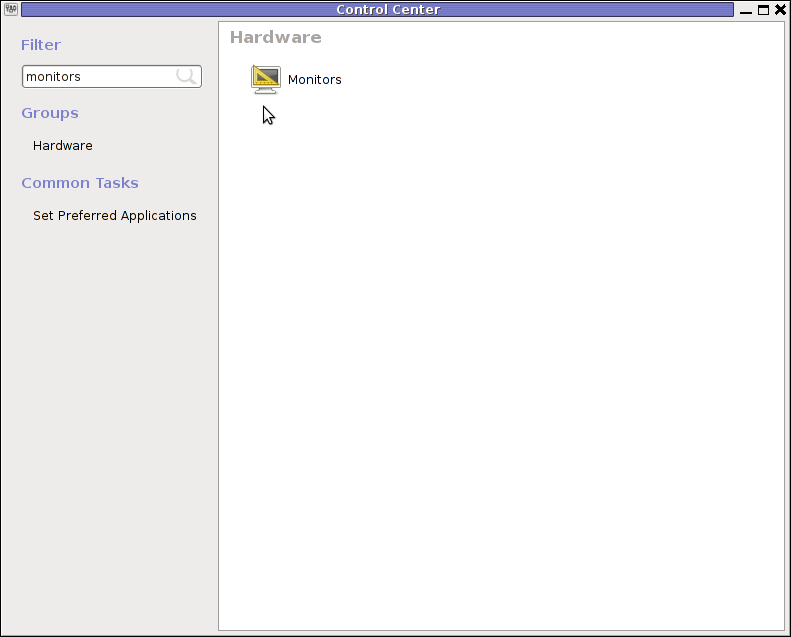
After using xrandr command to revert back to my default screen size, I realized there is two other (partially command line partially gui) way to change to 1024×768 pixels.3. Through launching gnome Control Center and searching for Monitors menu.
If one prefers this way he can;
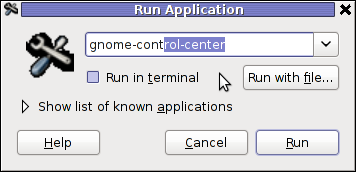
i) press ALT+F2 to invoke Gnome's Run Application dialog
ii) issue gnome-control-center command:
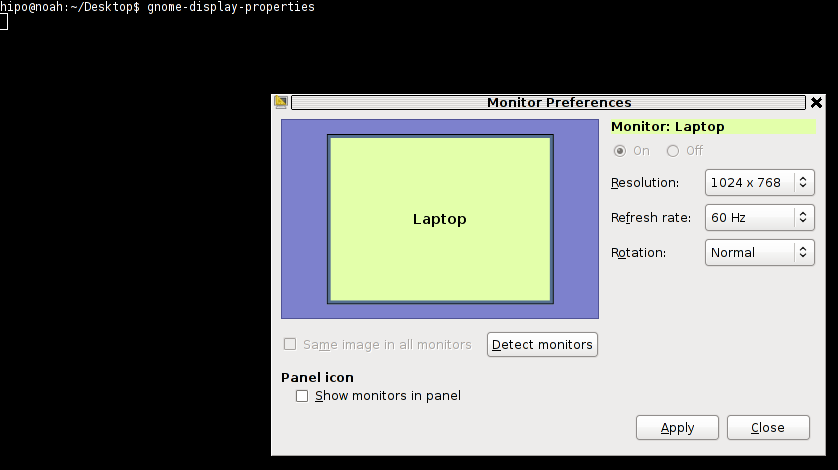
4. By invoking gnome's Control Panel -> Monitors settings window by a command
hipo@noah:~/Desktop$ gnome-display-properties
Tags: Alt, arcade games, Auto, bckspc, change, debian gnu, Desktop, Draft, freebsd, Gnome, gnome panel, gnome resolution, gnu linux, hipo, key switch, level, Linux, menu, menus, Monitors, noah, notebook, old school, package, panel menu, possibility, possible solution, repositories, resolution size, right, screen, screenshot, size, system menu, terminal, threads, work, x server, Xorg, xterm
Posted in FreeBSD, Linux and FreeBSD Desktop | 2 Comments »
Saturday, December 31st, 2011 
Though, I'm GNU / Linux user for many years now. I have to say, everything is not so perfect as many people present it.
Configuring even simple things related to multimedia on Linux is often a complete nightmare.
An example, today I've decided to upgrade my 32 bit Skype version 2.0 beta for Linux to 64 bit Skype 2.2 beta .
The reason I was motivated to upgrade skype was basicly 2.
a) My Skype run through 32 bit binary emulation with /usr/bin/linux32
b) I had issues with my skype if someone give me a Skype Call, while I have a flash video or some other stream in Browser (let's say Youtube).
Actually being unable to receive a skype call or initiate one while I have some kind of music running in the background or just some kind of Youtube video paused was really annoying. Hence until now, everytime I wanted to speak over skype I had to close all Browser windows or tabs that are using my sound card and then restart my Skype program ….
Just imagine how ridiculous is that especially for a modern Multimedia supporting OS as Linux is. Of course the problems, I've experienced wasn't directly a problem of Linux. The problems are caused by the fact I have to use the not well working proprietary software version of Skype on my Debian GNU / Linux.
I would love to actually boycott Skype as RMS recommends, but unfortunately until now I can't, since many of my friends as well as employers use Skype to connect with me on daily basis.
So in a way I had to migrate to newer version of skype in order to make my Linux experience a bit more desktop like …
Back to the my skype 2.0 to 2.2. beta upgrade story, the overall Skype upgrade procedure was easy and went smootlhy, setting correct capturing later on however was a crazy task ….
Here is the step by step to follow to make my upgraded skype and internal notebook mic play nice together:
1. Download 64 bit Skype for Debian from skype.com
For the sake of preservation in case it disappears in future, I've made a mirror of skype for debian you can download here
My upgrade example below uses directly the 64 bit Skype 2.2beta binary mirror:
Here are the cmds once can issue if he has to upgrade to 2.2beta straight using my mirrored skype:
debian:~# wget https://www.pc-freak.net/files/skype-debian_2.2.0.35-1_amd64.deb

...
2. Remove the old version of skype
In my case I have made my previous skype installation using .tar.bz2 archive and not a debian package, however for some testing I also had a version of skype 2.0beta installed as a deb so for the sake of clarity I removed the existing skype deb install:
debian:~# dpkg -r skype

...
3. Install skype-debian_2.2.0.35-1_amd64.deb downloaded deb
debian:~# dpkg -i skype-debian_2.2.0.35-1_amd64.deb

...
After installing skype, I installed pavucontrol – A volume control for the PulseAudio sound server
4. Install pavucontrol
debian:~# apt-get install pavucontrol
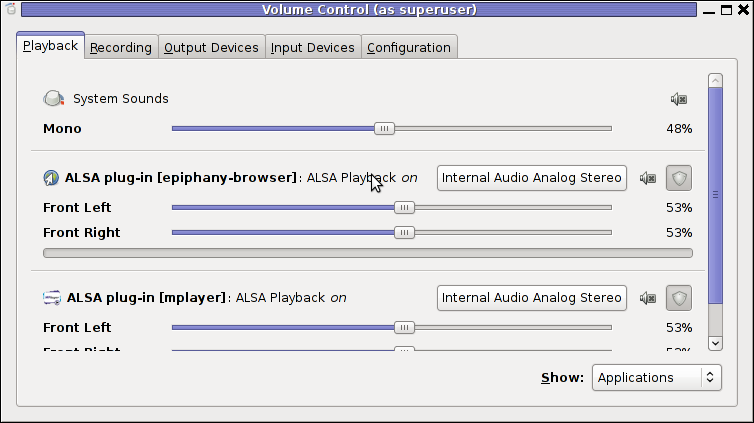
Pavucontrol has plenty of sound configurations and enables the user to change many additional settings which cannot be tuned in alsamixer
pavucontrol was necessery to play with until I managed to make my microphone able to record.
5. Build and install latest Debian (Testing) distribution alsa driver
debian:~# aptitude install module-assistant

debian:~# m-a prepare

debian:~# aptitude -t testing install alsa-source

debian:~# m-a build alsa

debian:~# m-a install alsa

debian:~# rmmod snd_hda_intel snd_pcm snd_timer snd soundcore snd_page_alloc

debian:~# modprobe snd_hda_intel

debian:~# echo 'options snd-hda-intel model=auto' >> /etc/modprobe.d/alsa-base.conf
In my case removing the sound drivers and loading them once again did not worked, so I had to reboot my system before the new compiled alsa sound modules gets loaded …
The last line echo 'options snd-hda-intel model=auto' … was necessery for my Thinkpard r61 Intel audio to work out. For some clarity my exact sb model is:
debian:~$ lspci |grep -i audio

00:1b.0 Audio device: Intel Corporation 82801H (ICH8 Family) HD Audio Controller (rev 03)
For other notebooks with different sound drivers echo 'options snd-hda-intel model=auto' … should be omitted.
6. Tune microphone and sound settings in alsamixer
debian:~$ alsamixer
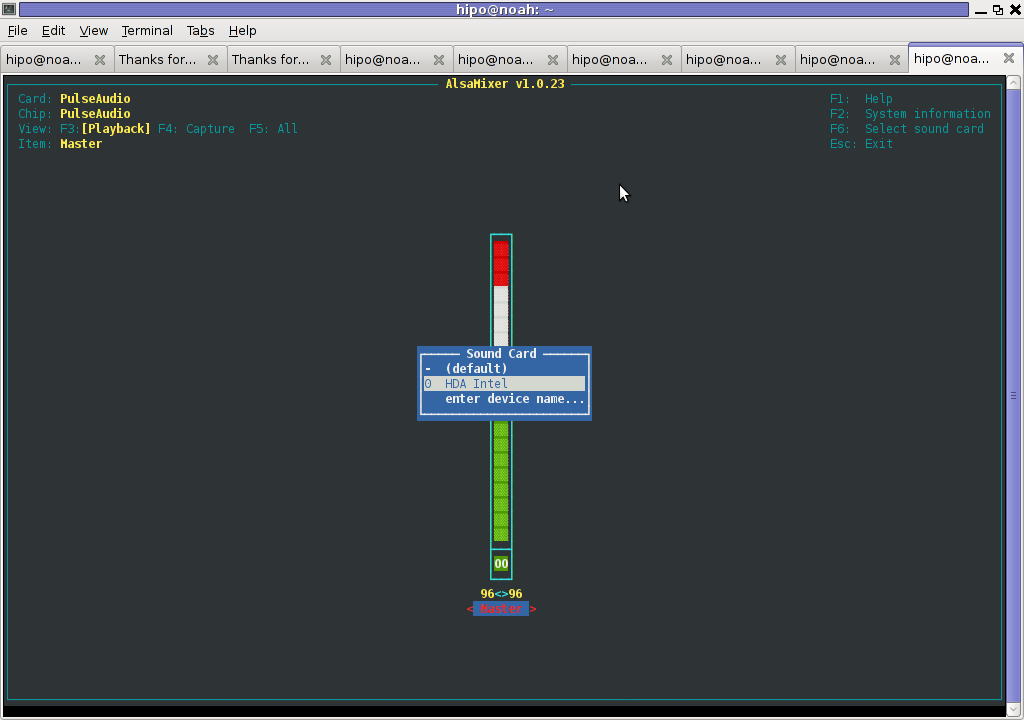
Right after launching alsamixer I had to press F6: Select Sound Card and choose my sound card (0 HDA Intel).
Following my choice I unmuted all the microphones and enabled Microphone Boost as well as did some adjustments to the MIC volume level.
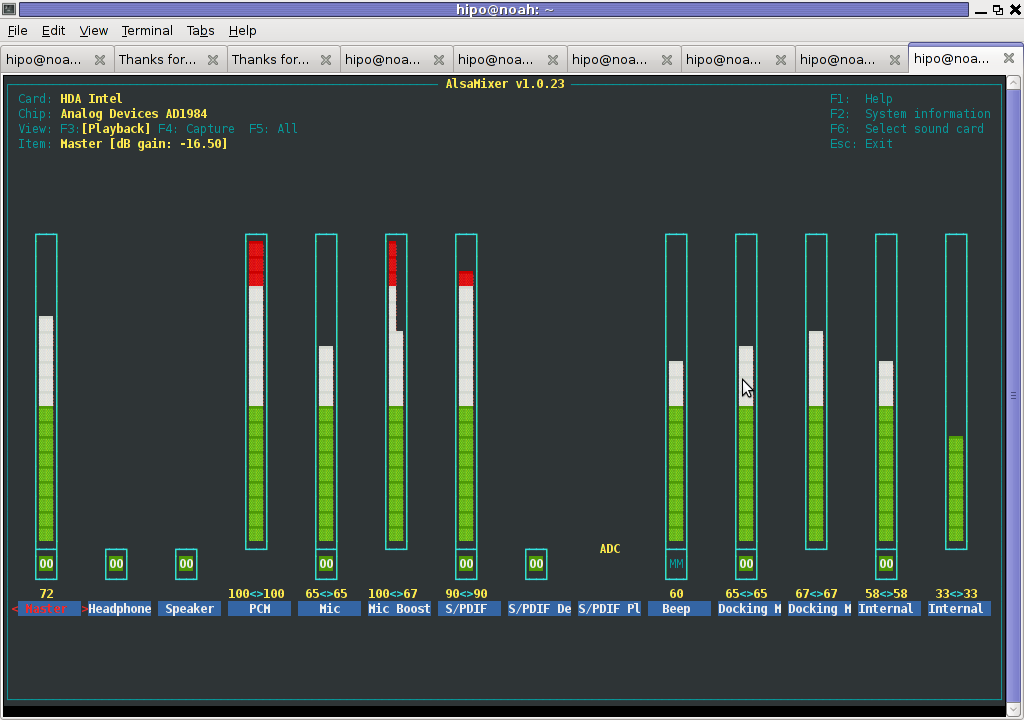
Setting proper MIC Volume levels is absolutely necessery, otherwise there is a constant noise getting out of the speakers …
7. Use aumix to set some other sound settings
For some unclear reasons, besides alsamixer , I often had to fix stuff in aumix . Honestly I don't understand where exactly aumix fits in the picture with Alsa and my loaded alsa sound blaster module?? If someone can explain I'll be thankful.
Launch aumix to further adjust some sound settings …
debian:~$ aumix
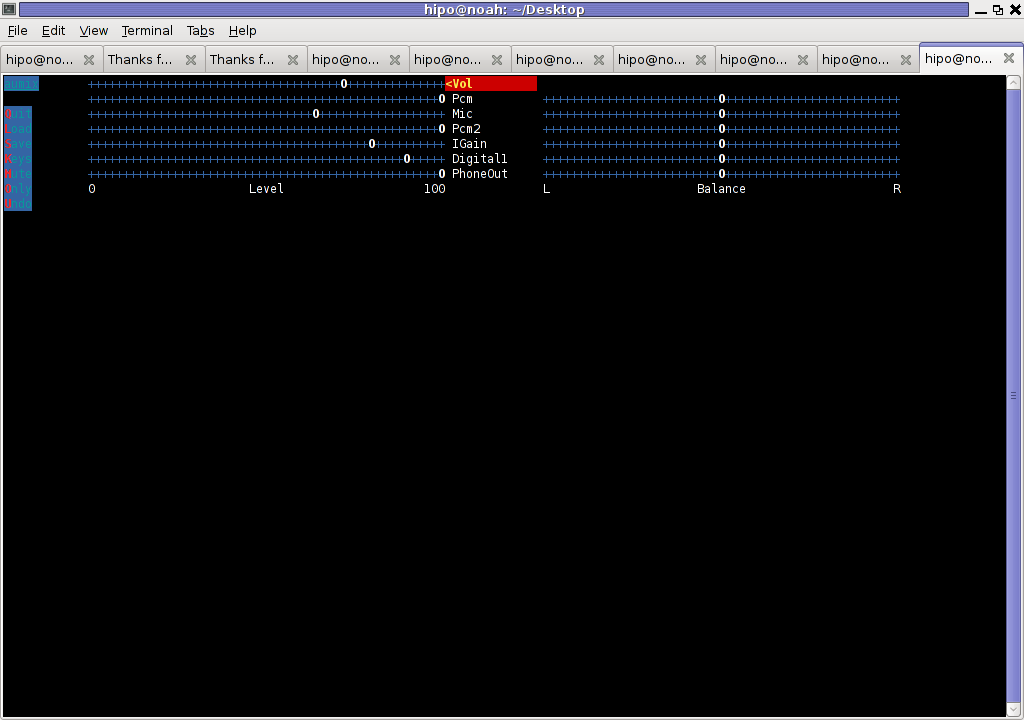
In above screenshot you see, my current aumix settings which works okay with mic and audio output.
9. Test Microphone the mic is capturing sounds correctly
Set ~/.asoundrc configuration for Skype
Edit ~/.asoundrc and put in:
pcm.pulse {

type pulse

}

ctl.pulse {

type pulse

}

pcm.!default {

type pulse

}

ctl.!default {

type pulse

}

pcm.card0 {

type hw

card 0

}

ctl.card0 {

type hw

card 0

}

pcm.dsp0 { type plug slave.pcm "hw:0,0" }

pcm.dmixout {

# Just pass this on to the system dmix

type plug

slave {

pcm "dmix"

}

}

pcm.skype {

type asym

playback.pcm "skypeout"

capture.pcm "skypein"

}

pcm.skypein {

# Convert from 8-bit unsigned mono (default format set by aoss when

# /dev/dsp is opened) to 16-bit signed stereo (expected by dsnoop)

#

# We cannot just use a "plug" plugin because although the open will

# succeed, the buffer sizes will be wrong and we will hear no sound at

# all.

type route

slave {

pcm "skypedsnoop"

format S16_LE

}

ttable {

0 {0 0.5}

1 {0 0.5}

}

}

pcm.skypeout {

# Just pass this on to the system dmix

type plug

slave {

pcm "dmix"

}

}

pcm.skypedsnoop {

type dsnoop

ipc_key 1133

slave {

# "Magic" buffer values to get skype audio to work

# If these are not set, opening /dev/dsp succeeds but no sound

# will be heard. According to the ALSA developers this is due

# to skype abusing the OSS API.

pcm "hw:0,0"

period_size 256

periods 16

buffer_size 16384

}

bindings {

0 0

}

}
I'm not 100% percent if putting those .asoundrc configurations are necessery. I've seen them on archlinux's wiki as a perscribed fix to multiple issues with Skype sound in / out.
Onwardds, for the sake of test if my sound settings set in pavucontrol enables the internal mic to capture sound I used two programs:
1. gnome-sound-recorder

2. arecord
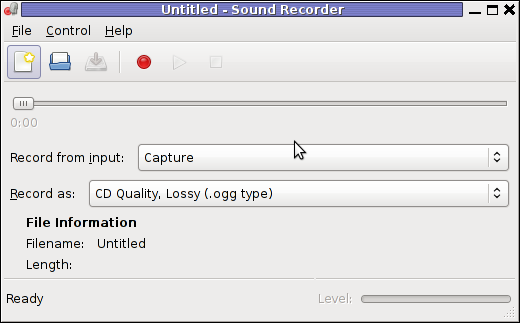
gnome-sound-recorder
gnome-sound-recorder is probably used by most GNOME users, though I'm sure Linux noviced did not play with it yet.
arecord is just a simple console based app to capture sound from the microphone. To test if the microphone works I captured a chunk of sounds with cmd:
debian:~$ arecord cow.wav

Recording WAVE 'cow.wav' : Unsigned 8 bit, Rate 8000 Hz, Mono
Later on I played the file with aplay (part of alsa-utils package in Debian), to check if I'll hear if mic succesfully captured my voice, e.g.:
debian:~$ play cow.wav

cow.wav:

File Size: 22.0k Bit Rate: 64.1k

Encoding: Unsigned PCM

Channels: 1 @ 8-bit

Samplerate: 8000Hz

Replaygain: off

Duration: 00:00:02.75

In:100% 00:00:02.75 [00:00:00.00] Out:22.0k [-=====|=====-] Clip:0

Done.
By the way, the aplay ASCII text equailizer is really awesome 😉 aplay is also capable of playing (Ogg Vorbis .ogg) free sound format.
Further on, I launched the new installed version of skype and tested Skype Calls (Mic capturing), with Skype Echo / Sound Test Service
I'll be glad to hear if this small article, helped anybody to fix any skype Linux related issues ?. I would be happy to hear also from people who had similar issues with a different fixes for skype on Linux.
Its also interesting to hear from Ubuntu and other distributions users if following this tutorial had somehow helped in resolving issues with Skype mic.
Tags: alsa, aptitude, beta, bit, browser windows, Call, card, daily basis, debian gnu, dpkg, emulation, everything, everytime, Flash, GNU, gnu linux, hell, Install, kind of music, Linux, linux experience, linux user, microphone, modern multimedia, modprobe, necessery, nightmare, notebook, proprietary software, reason, rms, sake, Skype, software version, someone, sound card, tabs, upgrade, video
Posted in Linux, Linux and FreeBSD Desktop, Linux Audio & Video, Skype on Linux, Various | No Comments »
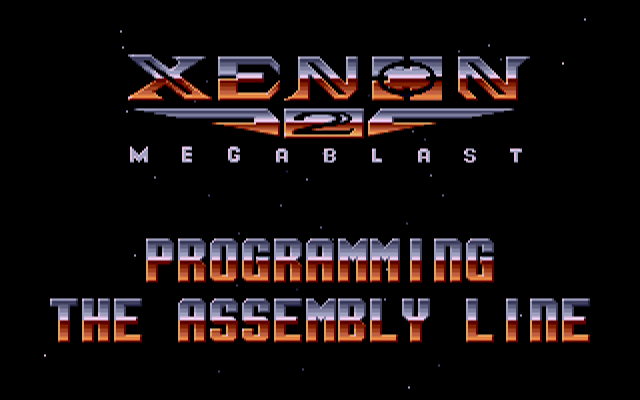
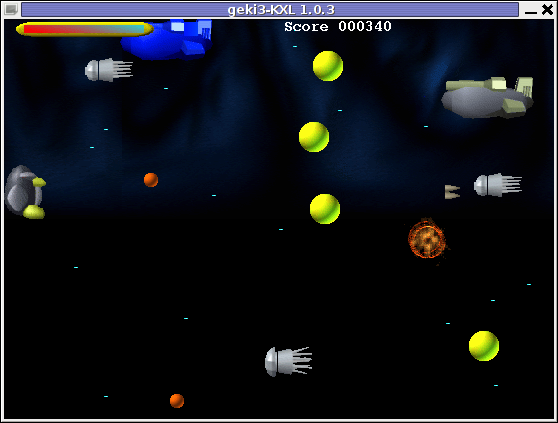
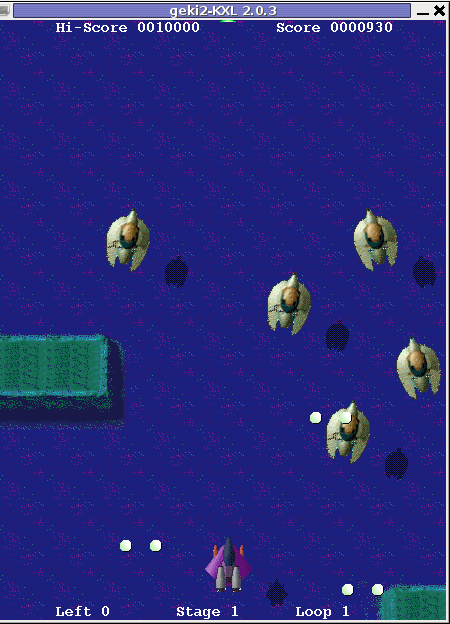
Thursday, December 22nd, 2011 Do you remember the old arcade spaceship shooter Xenon 2 Megablast? I do 😉 For all those who are too young to remember, here are two screenshots:
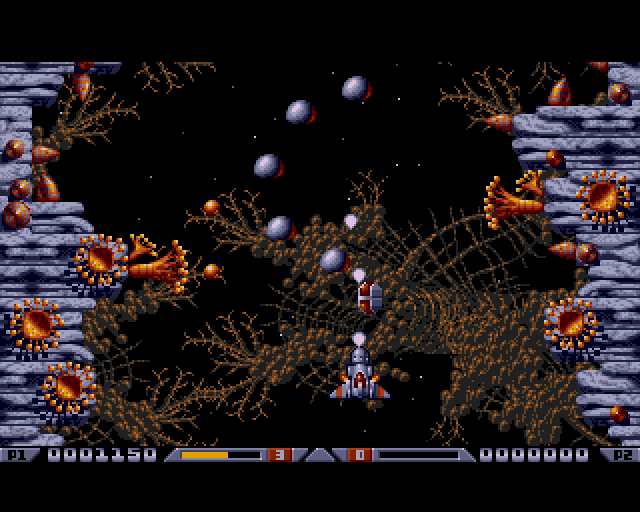
Even though Xenon 2 Megablast original can now be played using dosbox DOS emulator. Its interesting to mention I've found two Linux games that more or less can be qualitified to resemble Xenon 2.
The games are Native Free Software games and existing in package repositories of most Linux distributions and *BSD port trees.
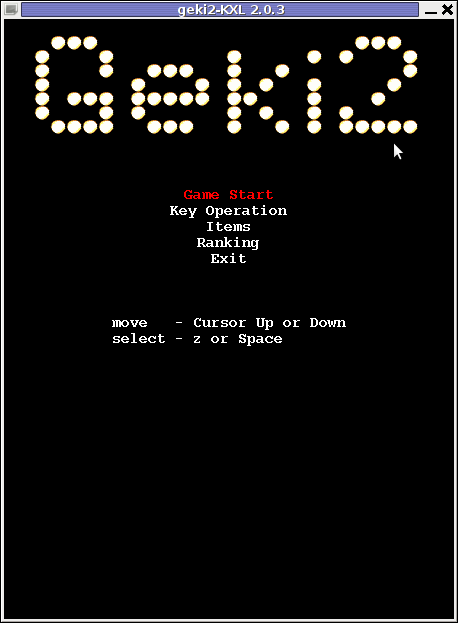
Geki 2 and Geki 3 are of a less quality to Xenon but still, the game experience is nice and is among the Arcade shooter games to bring you fun in the boring days if you're on GNU / Linux or FreeBSD Free OS platforms.
Installing Geki2 and Geki3 on Debian and Ubuntu Linux is standard with apt:
debian:~# apt-get install geki2 geki3

...
On Debian GNU / Linux , after installed the games would not create GNOME Applications -> Games -> game startup shortcuts, however the game startups will get added in GNOME Applications Menu under:
Applications -> Debian -> Games -> Action -> Geki 2

and

Applications -> Debian -> Games -> Action -> Geki 3
The games can be launched also manually with commands:
geki2
or
geki3
Geki 2 is a way closer to Xenon 2 as it has similar look and feel and the same vertical direction the spaceship is navigated.
In Geki 3 still the shoot 'em' up spaceship like arcade is present, however instead of penguin you have to fly a flying penguin, as well as the spaceship move direction is horizontal.
Both the games have the same sound and music effects. The game music and effects are not of top quality but are not bad. In general the games surely gives some of the arcade atmosphere.
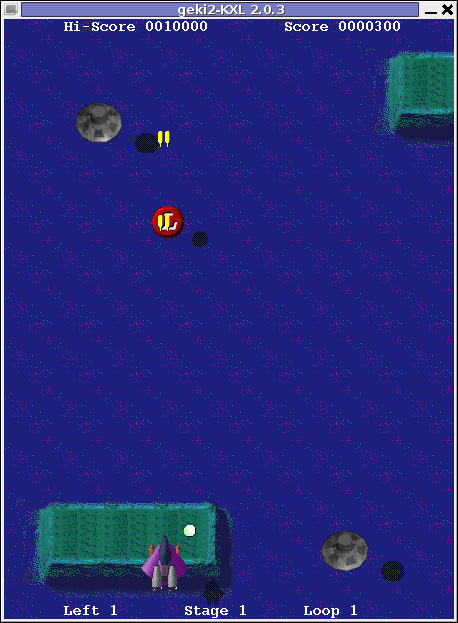
Geki 2 Xenon 2 Megablast like on Debian Linux
In the tradition of the arcade games at the end of each level in both games you face the Level Boss Enemy, you should destroy.
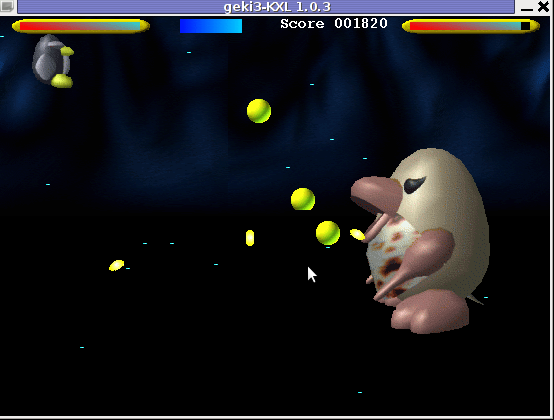
As you can see in below's screenshot the overall graphics of GEKI 3 is poorer while compared to GEKI 2
still GEKI 2 gampley is fun and addictive and I would say not less enjoyable than GEKI 2.
At times I even think that Geki 3 is more fun because it is more dynamic.
Maybe other reason, why I enjoyed more Geki 3 is also the fact that Geki 2 is a way harder to play. Dying only 3 times in the game you get GAME OVER and the next game you're started from the beginning of the same level you died in …
Something really annoying that affects both the games; there is no option to play them in Fullscreen mode! ARGH!
Game controls for Geki2 and Geki3 are identical as follows:
Up - Arrow up key

Down - Down arrow key

Right - Right arrow key

left - Left arrow key

Shoot - z or Space

Pause - s
Geki2 and Geki3 are fun and can kill some time, but definitely aren't that (professional) as other spaceship shoot'em'up arcades for Linux and BSD. Games like Starfighter , Critical Mass or powermanga .
Lest that they are two worthy to install and play on your Free Software OS.
Tags: action gt, arcade shooter, atmosphere, boring days, BSD, debian gnu, Dying, Free, free software games, fun, game experience, game music, game startup, Geki, Gnome, gnome applications, gnu linux, gt games, key, level, linux games, megablast, menu, most linux distributions, move, music effects, nbsp, option, os platforms, package, penguin, reason, screenshot, shooter, shooter games, software, something, Space, spaceship, startup, time, Ubuntu, ubuntu linux, vertical direction, xenon 2
Posted in Entertainment, Games Linux, Linux, Linux and FreeBSD Desktop | 1 Comment »
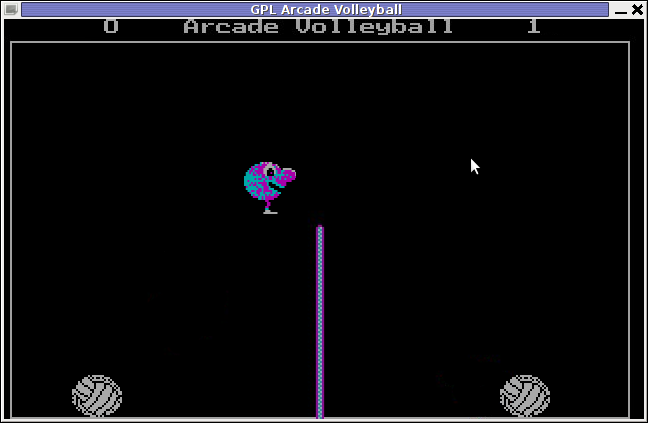
Wednesday, December 21st, 2011 Do you remember that oldschool Arcade VolleyBall game which was so popular on 16 bit (8086 XT) computers.
I remember this game from the years I was 12 years old, back in the days where we the gamers distributed all the DOS games on 360 KB 5.25" diskettes
I was looking over the games available to install on my Debian GNU / Linux today just to be happily suprised to find GPL Arcade Volleyball an identical game remake of the old Arcade Volleyball 8086 classic freeware game.
I remember we spend many hours with friends playing on the old Manifactured in Bulgaria Pravetz 16! computers
During communism and post communism Pravetz was the only computer brand we could buy from the market, as there was limitations on the exported and imported tech equipment within the USSR union.
Pravetz computers are a literal remake of 16 bit IBM 8086 computers and the computer design and integrals was stolen from IBM 16 bit 8086 / 8088 PC architecture
Arcade Volleyball has set a mark on my generation and I believe many people will remember the times this game was a hit with a bit of Nostalgia 😉
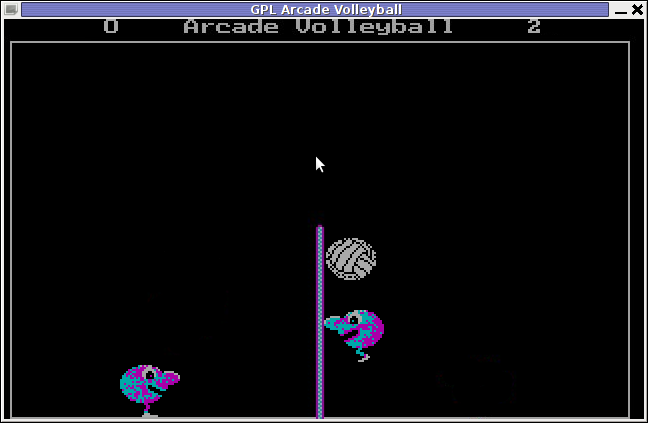
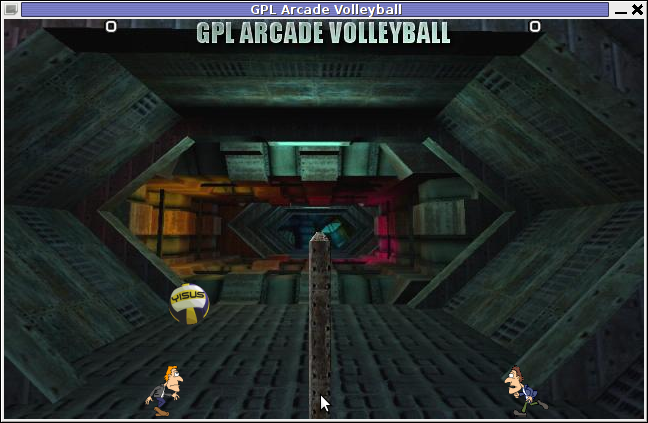
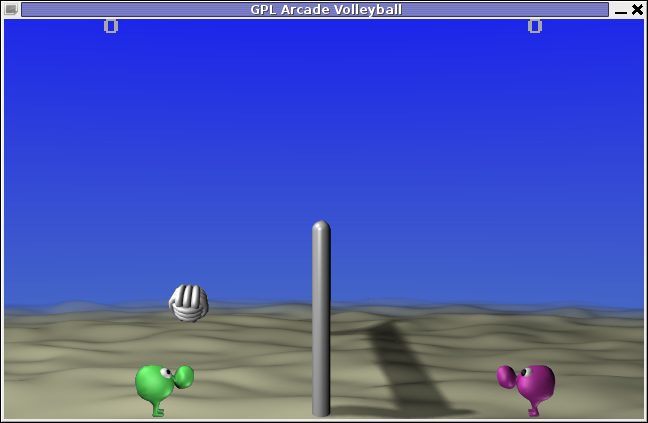
Besides being an identical remake of PC Arcade Volleyball , GPL Arcade Volleyball is even expanded as it includes extra features which the original game lacked. Game includes:
- Network Volleyball client / server Game (up to 4 players)
- 6 Game Themes which completely change the game look & feel to be modernistic
Here are few GAV screenshots of the different existing game Themes:
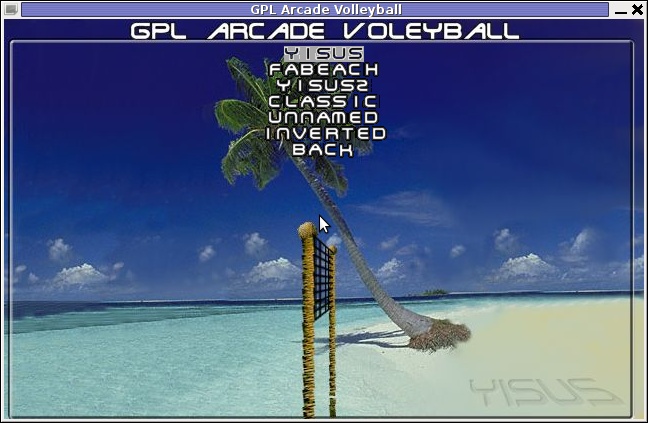
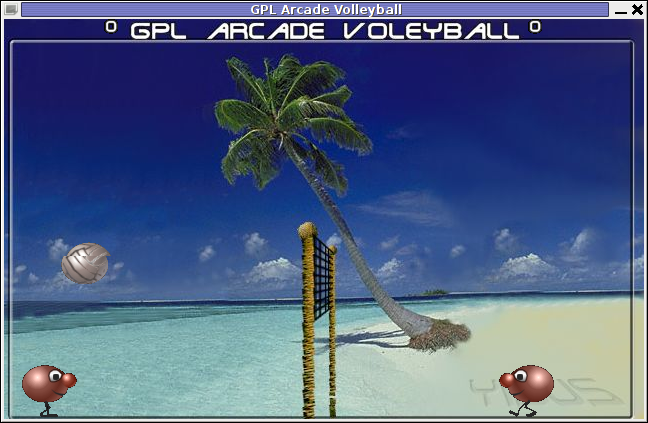
Yisus GAV Theme gameplay screenshot
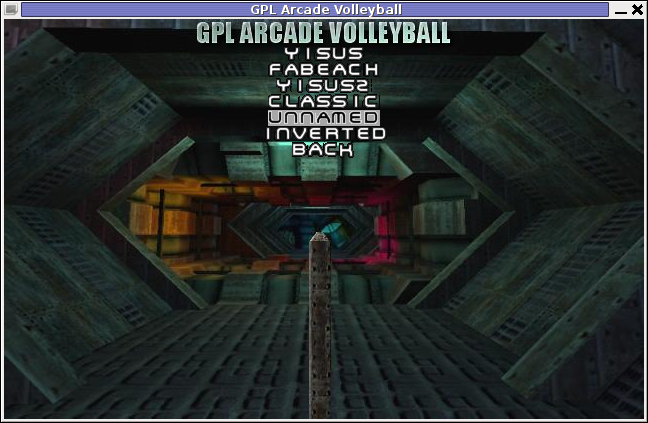
GAV – Unnamed Theme Gameplay
GAV – FaBeach Theme Gameplay
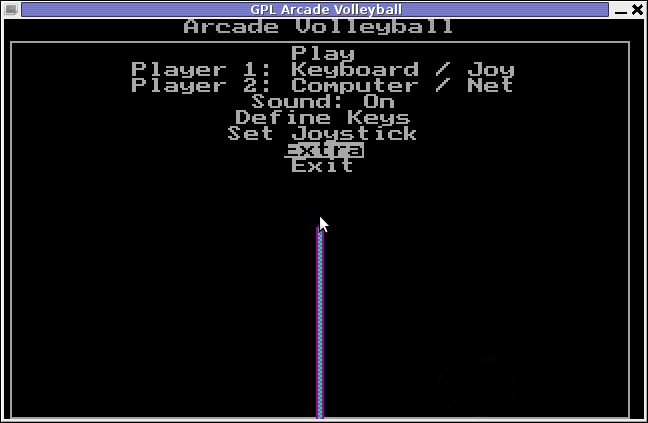
GAV supports both Window and fullscreen modes. To enable Fullscreen mode, while inside the game use:
Extra -> Fullscreen (Yes)
Saving preferences is also something which I if I recall correctly the original game lacked. This is done by navigating to:
Extra -> Save Preferences
GAV is said to support Joystick in resemblance to the original DOS game, though I've never tested it with a joy.
One of the greatest GAV game (hacks) is the Inverted Theme. Selecting it inverts the order in the game, where the game player becomes the volleyball ball and the ball becomes the player 😉
GAV does not yet not have a Free / Open / Net BSD port as far as I currently see, anyways since the game is Free Software probably soon a port will be available for BSDs as well.
The default GAV game controls are a bit untraditional. By default the one player game starts you play Volleyball game player positioned on the left.
For left player the default control keys are:
- z – move player left
- c – move player right
- left shift – jump
Right player controls are:
- Left – left (arrow key)
- right – right (arrow key)
- jump – up cursor key
GAV supports also a shortcut key for switching between windowed and full screen game mode by pressing F10
Installing the game on Debian and Ubuntu Linuces is done with:
linux:~# apt-get --yes install gav
Unfortunately gav does not have a definition to be added to GNOME or KDE Applications menus, thus to start the game after installed one has to do it manually by typing either in gnome RUN (Alt+F2) or on command line:
linux:~$ gav
Happy playing 😉
Tags: amp, architecture, arrow, bulgaria, change, client, client server, communism, computer brand, computer design, debian gnu, dos game, dos games, equipment, EXTRA, Free, freeware, freeware game, fullscreen, game themes, Gameplay, generation, Gnome, integrals, joystick, Manifactured, mark, modes, move, nbsp, nev, nostalgia, pc arcade, pc architecture, player, Pravetz, quot, resemblance, right, screenshot, server game, something, ussr, volleyball game, window, Yisus
Posted in Entertainment, Games Linux, Linux Audio & Video | No Comments »
Wednesday, December 14th, 2011 
UNetbootin is a nice easy to use Free Software Universal mutli OS program that makes creation of Bootable USB Stick Linux, FreeBSD, NetBSD and other free operating systems a piece of cake
UNetbootin support the three major operating system architectures Windows, Mac OS X and GNU / Linux .
In Debian and Ubuntu based distributions Unetbootin is available as a deb binary package:
debian:~$ dpkg -l |grep -i 'usb' |grep -i 'install'

ii unetbootin 471-2

installer of Linux/BSD distributions to a partition or USB drive
To install it with apt:
debian:~# apt-get install unetbootin

...
debian:~# unetbootin
Alternatively for all those who prefer to run it via the GNOME Application menu follow to the menu path:
Applications -> System Tools -> Unetbootin
If the program is launched with non privileged account (like via GNOME Application menu), in order to to properly tamper with any connected USB Flash drive you will be asked about the super user password.
The shipped uniboot version in current Debian stable version Squeeze is 471-2 is a bit outdated. For everyone eager to use the latest version which as of time of writting is 565 check out UnetBootin’s Official Homepage on SourceForge
Installing the distributed binary of unetbootin downloadable from its website is a trivial one. Simply download the file from the Download (for Linux) link and run the binary unetbootin-linux-565:
debian:~$ ./unetbootin-linux-565
There is one annoying thing about the latest downloadable (static compiled) unetbootin version, it was built to run using KDE’s QT library and therefore the interface that poped up while trying it was KDE like, pitily did not take advantage of my native GNOME GTK2 library :
 Though this little note, unetbootin developers has done a truly great job! I tried unetbootin and was more than pleasently surprised that it prepares bootable USB sticks with only 4 mouse clicks!!! 😉
The program worked out of the box without any external or additional hacks like many of the programs I daily use it just worked 😉
UNetbootin has a thoroughful list of Free Software operating system distributions in the distributions list. Many of the offered Open Source & Free Software distributions has even possibility of installing a multiple versions of the respective distro.
Here is a complete list of all the Free & Open Source Operating Systems, unetbootin program can burn and make bootable on USB stick.
- 1. Ubuntu
- 2. Debian
- 3. Fedora
- 4. PCLinuxOS
- 5. Linux Mint
- 6. Sabayon Linux
- 7. Gentoo
- 8. OpenSUSE
- 9. MEPIS
- 10. Zenwalk
- 11. Arch Linux
- 12. Slax
- 13. Dream Linux
- 14. Damn Small Linux
- 15. SliTaz
- 16. Elive
- 17. CentOS
- 18. Puppy Linux
- 19. Mandriva
- 20. FreeBSD
- 21. LinuxConsole
- 22. Frugalware Linux
- 23. NetBSD
- 24. xPUD
- 25. gNewSense
- 26. GeeXboX
- 27. Gujin
- 28. Kaspersky Rescue Disc
- 29. NimbleX
- 30. Sabayon Linux
- 31. Puppy Linux
- 32. Mandriva
- 33. SuperOS
- 34. Xubuntu
- 35. Parted Magic
- 36. Super Grub Disk
- 37. Smart Boot Manager
- 38. 0phcrack
- 40. FreeNAS
- 41. NetBootCD
- 42. FreeDOS
- 43. Dr. Web Antivirus
- 44. CloneZilla
- 45. Kubutun
- 46. BackTrack
To burn and make bootable on the USB flash drive any of the listed distributions, choose the distribution name and version number as well as the Drive: (which usually will be selected by default to the first sticked USB drive let’s say /dev/sdb1).
Afterwards press on the OK button and that’s it, lay down your back and wait until the distribution is downloaded from the Internet, burned into the USB pendrive and made bootable.
I’ve tested Unetbootin with two distributions;
1. Xubuntu 10_04_live and;
2. Fedora 13
Both of the distributions got burned properly to the USB drive usng the CD images and booted fine on a Packard Bell notebook on.
Having an USB drive with LiveCD GNU / Linux or BSD everywhere with you is hand and is a sort of substitute to the old linux boot floopy disk of Tomsrtbt linux distribution, I used to keep everywhere with me . Now I can move to any PC installed with Windows and use my preferred Free Software OS using an USB Stick.
Besides that, there are laptops whose CD-ROM / DVD-ROM drive is broken and therefore if one wants to re-install an improperly working Windows XP / Vista / 7 and substitute with Free operating system this task is only possible using USB Flash Disk or NetBoot Install.
Installing using USB has its advantageous as you don’t depend on the network as well as the installation from USB is in most of the cases few times faster.
There are plenty of other USB Linux installer programs, most of them however are only available with a Windows version.
Here are few prgrams which can be used to burn a number of Linux and *BSD installations using Microsoft Windows to create Linux / BSD liveUSB:
- Universal USB Installer – http://live.learnfree.eu/download
- YUMI – Your Universal Multiboot Installer – http://www.pendrivelinux.com/yumi-multiboot-usb-creator/
- xBOOT – http://sites.google.com/site/shamurxboot/
I was happy to find out ’bout the existence of Universal USB Installer (this proggie written in Python) is made by a Bulgarian mate! Proud to be Bulgarian 😉 Universal USB Installer is actually multiplatform since written in Python and therefore can be used to burn a LiveUSB on GNU / Linux and (possibly on FreeBSD?)I would be glad to get feedback from other people who had experience with programs to prepare LiveUSB bootable sticks on Free Software OSes. Does anybody tried that on who *BSDs? Cheers 😉
Tags: annoying thing, application menu, binary package, BSD, bsd distributions, cake, debian gnu, Disk, distribution, dpkg, drive, drive memory, Free, free operating systems, Gnome, gnome application, gnu linux, liveUSB, mac os x, menu, menu path, nbsp, NetBSD, number, Open, os program, package, package debian, partition, password, piece, privileged account, qt library, software, sourceforge, stable version, substitute, support, system architectures, Ubuntu, UnetbootinIf, uniboot, Universal, usb flash drive
Posted in FreeBSD, Linux, Linux and FreeBSD Desktop, Linux Audio & Video, System Administration, Various | 2 Comments »
Thursday, December 8th, 2011 The usual way that one is supposed to check a certain partition let’s say /dev/sda1 disk UUID (Universal Unique Identifier) label is through a command:
vol_id /dev/sda1
For reason however Debian does not include vol_id command. To check the UUID assigned disk labels on Debian one should use another command called blkid (part of util-linux deb package).
blkid will list all block device attributes so it doesn’t specifically, passing any partition as argument.
Here is an example output of blkid :
server:/root# blkid

/dev/sda1: UUID="cdb1836e-b7a2-4cc7-b666-8d2aa31b2da4" SEC_TYPE="ext2" TYPE="ext3"

/dev/sda5: UUID="c67d6d43-a48f-43ff-9d65-7c707a57dfe6" TYPE="swap"

/dev/sdb1: UUID="e324ec28-cf04-4e2e-8953-b6a8e6482425" TYPE="ext2"

/dev/sdb5: UUID="1DWe0F-Of9d-Sl1J-8pXW-PLpy-Wf9s-SsyZfQ" TYPE="LVM2_member"

/dev/mapper/computer-root: UUID="fbdfc19e-6ec8-4000-af8a-cde62926e395" TYPE="ext3"

/dev/mapper/computer-swap_1: UUID="e69100ab-9ef4-45df-a6aa-886a981e5f26" TYPE="swap"

/dev/mapper/computer-home: UUID="2fe446da-242d-4cca-8b2c-d23c76fa27ec" TYPE="ext3"
Tags: cca, command, computer swap, deb, deb package, debian gnu, dev, Disk, disk labels, doesn, DWe, ext, ff, gnu linux, Linux, linux deb, LVM, mapper, package, partition, partition disk, quot dev, reason, root, sda, sdb, sec type, server root, Unique, UUID, vol, way
Posted in Linux, System Administration, Various | No Comments »


