Posts Tagged ‘gnu linux’

Finally TeamViewer 7 release for GNU / Linux is available

Thursday, March 29th, 2012


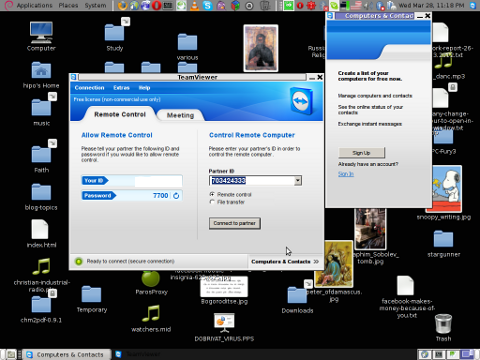
TeamViewer 7 Debian GNU / Linux released, my desktop screenshot

After a long time of inavailability, finally TeamViewer 7 for GNU / Linux is out!

Here is the short TeamViewer 7 Linux release note :

In our TeamViewer download area you will now find TeamViewer 7 for Linux.
The final version includes a selection of new features for Linux, e. g. an integrated screenshot feature and the possibility of saving individual connection settings per computer.
You can now establish cross platform connections with other computers running version 7 and hold online meetings and presentations with up to 25 participants.

We wish you best continued success with TeamViewer!

Well, guys it was about time, even later than that… Until now I've so many times experienced troubles with Windows machines which I had to administrate remotely and they only had a TeamViewer 7 installed (a real, real pain in the ass).

The issue comes cause TeamViewer 6 is incompatible with 7 and just until very recently only TV 6 for Linux was available, so trying to access a 7 install directly from Linux was impossible.
Hence to access TeamViewer 7 Windows install, I had to use either a fresh Windows copy with TeamViewer 7 installed or a Virtual Machine like (Qemu, VirtualBox) with Windows version installed in it.
Often back then, when I had to fix remotely a Windows machine behind a firewall, I had to instruct the machine owners to replace the TeamViewer 7 with TeamViewer 6 in order to be able to easily access the remote host from my Debian Linux.

I still remember, it was quite a stuggle to find a link to a Windows .exe install file for TeamViewer 6.

Now thanksfully, TeamViewer guys are starting to make it easier for the user who would for some reason want to stick to older TV version.
I've noticed on TeamViewer's website there is already a new TeamViewer download page offering for download all the old teamviewer version – 1.x, 2.x, 3.x, 4.x, 5.x, 6.x

One example, where old teamviewer release is useful is if you want to run teamviewer on older hardware or old OS (MS Windows 98 or old Linux distro).

I've made a mirror of teamviewer 6 for Debian / Ubuntu amd 32 and 64 bit versions along with all the OS available TeamViewer version 6 and 7, for the sake of preserving it if one day link to old versions of Teamviewer disappear from their website.

Here are the TeamViewer mirrored files:

Below you see a screenshot of teamviewer 7 running on my Debian Squeeze 🙂

TeamViewer 7 Debian GNU / Linux released, my desktop screenshot

It is great teamviewer produced a Linux working application, however if you run it you realize just like the previous releases TeamViewer is not natively supposed (compiled) to run on GNU / Linux OS but uses wine (windows emulator) to launch through…
Instead of porting the application to be natively for the Linux distros once again with this new release, teamviewer developers just "hacked" it to run on top of windows emulation. Though this is working its performance, is probably a bit degraded and it depends on having install on the Linux host a bunch of useless packages which wine depends on.
Besides that even if it "works" on Linux , TeamViewer has still non-free software essense. I still use it because unfortunately, I don't know of a better remote access program capable to connect to servers behind NAT / machines located behind a tight firewalled routers.
If only (I knew of?) a TeamViewer free software / open source equivalent
I will be glad to hear if someone know a (free software / open source) TeamViewer like program able to access remote hosts with no a real (public inet) IP address?P.S.: By similar TV program I don't mean VNC, UltraVNC and this kind of other VNC derivative programs but mean close TeamViewer alternative.

How to digital watermark to a picture – Protect pic with copyright image or text with composite, convert and Phatch on GNU / Linux

Friday, March 23rd, 2012

Watermarking is a technique to identify a physical or non-physical object with its owner (creator). First watermarks in history originates from very ancient times.

There are two basic types of Watermark types:

I. Physical Watermarks (classical)

II. Digital Watermarks

Historically Classical Watermarks, were mostly important. As we tend to use more and more visible and we switch to use of more invisible stuff, nowdays the importance and use of digital watermarks is steadily raising.

You have most likely already seen pictures from websites which contain a copyright holder message stamp or website logo on it.
As you could imagine the picture watermark is placed in order to prevent pictures from being re-used in another internet space ,without the picture copyright holder explicit permission…

Watermarks have entered most if not all areas of our life, but we often don't recognize they're there / rarely think about them.
Few of the many "physical watermarks" we use daily are:
 

  • paper money watermark (to protect against anti money forgery)
  • bank debit / credit cards stamps near the card chip
  • postcards paper stamps

There are too many different kind of "physical watermarks" and since this is not the accent of this article, I will continue straight to explaiin a bit on Digital (picture) watermarks and how to watermark images with ImageMagick image editting command line suit.

Just like with physical watermarks, there are different kinds of digital watermarks. There are:
 

  • Picture (Images) digital watermarks
  • – Steganography

  • Video watermarks
  • Audio stream digital watermarks
  • Visual digital watermarks
  • – Visible area of text or picture over another text picture or video

  • Invisible digital watermarks
  • – digital information (files) metadata with watermark content etc.

The topic of watermarking is quite wide, so I will stop here and focus on the main idea of this article – to show how to place digital watermark on graphic image or collection of pictures.

The most straightway non-interactive way to do picture watermarking is with ImageMagick's composite command line tool. This little handy tool is capable of creating watermarks in single and multiple pictures.

If you prefer to have a simple text as a watermark, then you should use imagick's convert cmd.

1. Putting a watermark of picture in the right bottom corner

$ composite -gravity southeast -dissolve 100 \
watermark_picture.png image-to-watermark.png \
output-watermarked-image.png

Snoopy Writting pc freak watermark picture text watermark on the right bottom corner with composite

2. Placing watermark to picture in the bottom right corner

$ composite -gravity northeast -dissolve 80 \
watermark_picture.png image-to-watermark.png \
output-watermarked-image.png

Snoopy Writting pc freak picture text watermark on the right bottom corner with composite

3. Watermarking picture in the bottom left corner

$ composite -gravity southwest -dissolve 90 \
watermark_picture.png image-to-watermark.png \
output-watermarked-image.png

Snoopy writting watermarking picture on the bottom left corner imagemagick (composite)

4. Watermarking picture in the top left corner

$ composite -gravity northwest -dissolve 100 \
watermark_picture.png image-to-watermark.jpg \
output-watermarked-image.jpg

As you see from above example, composite even accept mixing up input / output between PNG and JPEG pictures 🙂

Output Watermarked Image picture on top left corner with pc-freak logo image Imagick composite

5. Put a watermark in the image center

$ composite -gravity center -dissolve 100 \
watermark_picture.png image-to-watermark.png \
output-watermarked-image.png

position watermark on the picture middle (center) composite output picture

6. Sealing image with custom text / Text Watermarking a picture

a) Writting text watermark to an image centered in "footer"

$ convert image-to-watermark.png -pointsize 20 \
-draw "gravity south fill black text 0,12 \
'hip0s Watermark'" output-watermarked-image.jpg

This will place a watermark in position 0,12, meaning the text will be added in the bottom center of the watermarked image.

Watermarking a picture sealing with custom text image imagick composite pic

-pointsize 20 defines the text font size. hip0s Watermark is the actual text that will be stamped.

b) Writting image watermark with font type customization (Arial Tahoma etc.):

To list all available fonts ready to be used by convert, type:

$ convert -list font
$ convert -list font |grep -i arial
Font: Arial-Black-Regular
family: Arial Black
glyphs: /usr/share/fonts/truetype/msttcorefonts/Arial_Black.ttf
Font: Arial-Bold
family: Arial
glyphs: /usr/share/fonts/truetype/msttcorefonts/Arial_Bold.ttf
Font: Arial-Bold-Italic
family: Arial
glyphs: /usr/share/fonts/truetype/msttcorefonts/arialbi.ttf
Font: Arial-Italic
family: Arial
glyphs: /usr/share/fonts/truetype/msttcorefonts/ariali.ttf
Font: Arial-Regular
family: Arial
glyphs: /usr/share/fonts/truetype/msttcorefonts/Arial.ttf

$ convert -list type
Bilevel
ColorSeparation
ColorSeparationMatte
Grayscale
GrayscaleMatte
Optimize
Palette
PaletteBilevelMatte
PaletteMatte
TrueColorMatte
TrueColor

On my system, I have 392 of fonts installed, to check the number of installed fonts ready for use by convert I used:

$ convert -list font|grep -i 'font:'|wc -l
392

To only check exact fonts names usable in convert:

$ convert -list font|grep -i 'font:'

To use the red marked Arial-Regular for font of the text picture timestamp issue;

$ convert watermark_picture.jpg -font Arial-Regular \
-pointsize 20 -draw "gravity south fill black text 0,12 'hip0s Watermark'" \
output-watermarked-image.jpg

Watermark and with Arial-Regular font image magick convert screenshot dog type writter

c) Using external font with convert to place image text watermark

Lets say you would like to use an external font (arhangai.ttf) not listed in convert -font list usable fonts:

$ convert image-to-watermark.png -pointsize 20 \
-font /usr/share/fonts/truetype/arhangai/arhangai.ttf \
-draw "gravity south fill black text 0,12 \
'hip0s Watermark'" output-watermarked-image_7.png

Talking about fonts, if you would like to add some external, nice free-fonts (ttf) files to your current logged in user, exec:

hipo@noah:~$ cd ~/fonts
hipo@noah:/fonts$ for i in \
$(lynx -dump http://www.webpagepublicity.com/free-fonts.html|grep -i .ttf|grep -i http|awk '{ print $2 }'); \
do wget -r -l2 -nd -Nc $i;
done

This will add 85 new nice looking fonts. Putting fonts in .fonts/ directory, are red while fonts are looked up by applications installed on respective the server or desktop GNU / Linux systems. Any font put there is ready to be used across all ImageMagick command line tools, as well as will be added across the list of possible fonts to use in GIMP and the rest of gui editors installed on the system.

According to the (watermark) texts font size passed to convert on some pictures the text written will exceed the picture dimensions and only partially some of the text intended as watermark will be visible.
If you encounter the exceed picture text problem, take few minutes and play with fonts sizes until you have a good font size to fit the approximate dimensions of the (expected minimum / maximum – horizontal and vertical) stamped picture dimensions.

For the sake of clarity, here is a list with arguments used in above, composite and convert examples.
 

  • composite — The ImageMagick command that combines two images.
  • -dissolve 80 — The number after the option determines the brightness of the watermark.  100 is full strength.
  • -gravity southeast — Determines the placement of watermark.
    Possible options are; north, west, south, east, northwest, northeast, southeast, southwest, center
  • watermark_picture.png — The watermark image is the first argument.
  • image-to-watermark.jpg — The second argument is the original image to be watermarked.
  • output-watermarked-image.jpg — The third argument is the new composite image to be created.
    N. B. !  If you don't specify a new file, be careful, the original file will be overwritten.

As ImageMagick is cross platform graphic editting suit – it runs on both *nix (Linux,BSD) and Windows. I have tested it on Linux, only but on FreeBSD and other BSDs it should work without any problem.
The composite and convert above examples should be easily rewritten to run on achieve watarmarking on MS Windows too.

7. Watermarking multiple pictures in a directory

To watermark multiple pictures within a directory use, a short bash loop in combination with either convert or composite could be used:

$ cd your-directory/
$ for i in *; do
convert $i -pointsize 20 -draw "gravity south fill black text 0,12 'hip0s Watermark'" output-watermarked-image.jpg
done

convert and composite also support wildcards like '*.JPG, *.PNG', but I'm not sure if this syntax can be used for mass picture marking?

8. Adding watermark and doing other various advanced Image Edit, Convert and Compose stuff with Phatch GUI program

Another program that is capable to put watermarks on pictures and besides that doing a number of routine graphic manipulation operations achievable with expert Image manipulation programs like GIMP / Inkscape is PHATCH = PHOTO & BATCH

Phatch is swiss army knife for doing web design or or graphics design on Linux.

Phatch is really great and easy to use program. Tt makes putting basic designer effects on pictures with no requirement for any design skills.
With Phatch you can become a designer for a day literally 😉

If you haven't used it yet, make sure you try it!
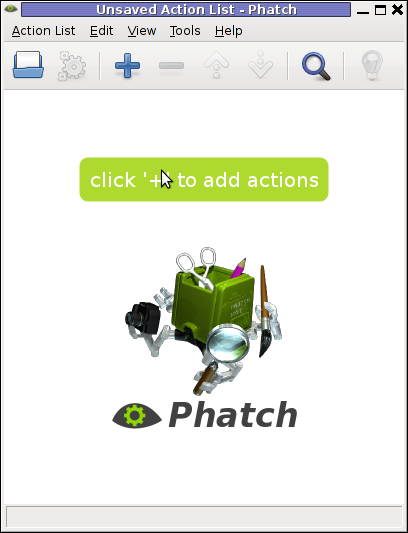
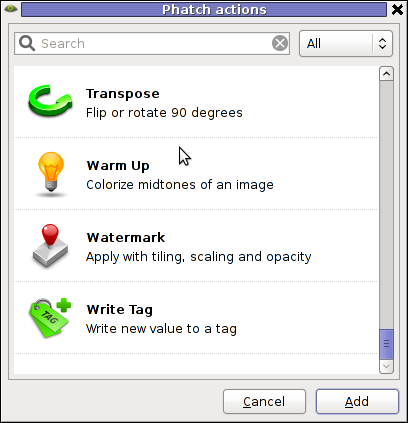
Below, are two screenshots of Phatch running on my Debian G* / Linux

Phatch Linux Debian Squeeze Screenshot

Phatch Linux Debian Squeeze Screenshot Watermark effect

Phatch is installable via apt on Debian and Ubuntu Linux. It has also a phatch-cli tools, which are a possible substitute to ImageMagick's composite / convert tools.

On deb based distros install Phatch with:

noah:~# apt-get --yes install phatch phatch-cli

In Phatch it is also possible, to create a combination of filters to be later applied to an image file or a group of image files all in a directory. The program capabilities are really outstanding, it is pure joy to work with it.

Using Phatch GUI interface is hard to comprehend in the beginning, I needed few minutes until I can get the idea how to use it. Anyhow once you know the basics, its very easy to use onwards.

Phatch currently can perform the following actions:
 

  • Auto Contrast – Maximize image contrast
  • Border – Crop or add border to all sides
  • Brightness – Adjust brightness from black to white
  • Canvas – Crop the image or enlarge canvas without resizing the image
  • Colorize – Colorize grayscale image
  • Common – Copies the most common pixel value
  • Contrast – Adjust from grey to black & white
  • Convert Mode – Convert the color mode of an image (grayscale, RGB, RGBA or CMYK)
  • Effect – Blur, Sharpen, Emboss, Smooth, ..
  • Equalize – Equalize the image histogram
  • Fit – Downsize and crop image with fixed ratio
  • Grayscale – Fade all colours to gray
  • Invert – Invert the colors of the image (negative)
  • Maximum – Copies the maximum pixel value
  • Median – Copies the median pixel value
  • Minimum – Copies the minimum pixel value
  • Offset – Offset by distance and wrap around
  • Posterize – Reduce the number of bits of colour channel
  • Rank – Copies the rank'th pixel value
  • Rotate – Rotate with random angle
  • Round – Round or crossed corners with variable radius and corners
  • Saturation – Adjust saturation from grayscale to high
  • Save – Save an image with variable compression in different types
  • Scale – Scale an image with different resample filters.
  • Shadow – Drop a blurred shadow under a photo with variable position, blur and color
  • Solarize – Invert all pixel values above threshold
  • Text – Write text at a given position
  • Transpose – Flip or rotate an image by 90 degrees
  • Watermark – Apply a watermark image with variable placement (offset, scaling, tiling) and opacity

Most of the function / effects Phatch in the up list works fine as I tested them to get to know the program.
The only effect that didn't worked for me is Blender effect.
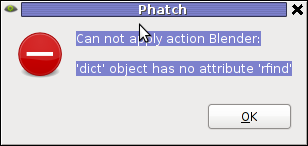
Trying to apply the Blending effect I got error:

Can not apply action Blender:
'dict' object has no attribute 'rfind'

dict object has not attribiture rfind error screenshot my linux

Its really a pity blender filter don't work. I've seen on Phatch's website some pictures showing the blender effect in action and it looks really awesome.

In attempt to work around the err, I tried downloading Phatch's latest release and running it with python interpreter but it didn't work out …
I tried also to install some packages to the system that somehow seemed to be related to blenderversatile 3D modeller/renderer program but this worked neither.
I suspect Phatch blender effect is not working on Ubuntu too as I've red complains in some Ubuntu forums.
If someone succeeding making blend effect work please let me know how?

Interesting feature of Phatch is the program support for applying its predefined filters using a cli interface.
The syntax for phatch cli, should be something like:

phatch -console action_list.phatch

Where action_list.phatch is a Phatch predefined filter. Anyways I didn't manage to figure out how to use the program CLI. I'll be glad to hear if someone succeeded in using the program console, if so please share with me how?

9. Adding Watermark to pictures with GIMP

To add a watermark text or picture in GIMP, there are plenty of ways but is more time consuming by both Phatch or convert, composite..
There is a script in gimp plugin registry site – watermark.scm which adds watermarking capability to GIMP

On my system this script was installed with the deb package gimp-data-extras. To apply the plugin on a pic, I used GIMP menus:

Filters -> Eg -> Copyright Placer

GIMP Copyright Holder plugin Watermark Screenshot

If someone knows about better or quicker ways to do watermarking, please share 🙂

Recommended logrorate practices on heavy loaded (busy) Apache Linux servers

Wednesday, March 7th, 2012

Apache logrotate Debian good configuration for heavy loaded servers

If you are sys admin of Apache Webserver running on Debian Linux relying on logrorate to rorate logs, you might want to change the default way logroration is done.

Little changes in the way Apache log files are served on busy servers can have positive outcomes on the overall way the server CPU units burden. A good logrotation strategy can also prevent your server from occasional extra overheads or downtimes.

The way Debian GNU / Linux process logs is well planned for small servers, however the default logroration Apache routine doesn't fit well for servers which process millions of client requests each day.

I happen to administrate, few servers which are constantly under a heavy load and have occasionally overload troubles because of Debian's logrorate default mechanism.

To cope with the situation I have made few modifications to /etc/logrorate.d/apache2 and decided to share it here hoping, this might help you too.

1. Rotate Apache acccess.log log file daily instead of weekly

On Debian Apache's logrorate script is in /etc/logrotate.d/apache2

The default file content will be like so like so:

debian:~# cat /etc/logrotate.d/apache2
/var/log/apache2/*.log {
weekly
missingok
rotate 52
size 1G
compress
delaycompress
notifempty
create 640 root adm
sharedscripts
postrotate
if [ -f "`. /etc/apache2/envvars ; echo ${APACHE_PID_FILE:-/var/run/apache2.pid}`" ]; then
/etc/init.d/apache2 reload > /dev/null
fi
endscript
}

To change the rotation from weekly to daily change:

weekly

to

#weekly

2. Disable access.log log file gzip compression

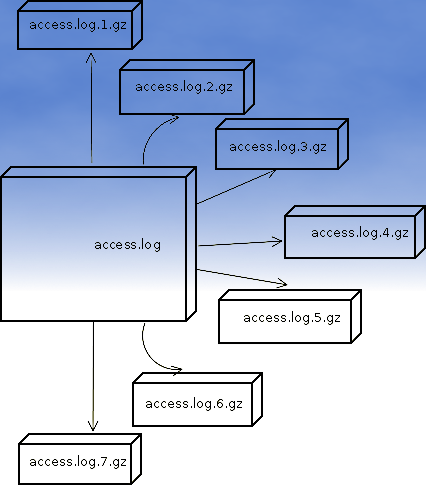
By default apache2 logrotate script is tuned ot make compression of rotated file (exmpl: copy access.log to access.log.1 and gzip it, copy access.log to access.log.2 and gzip it etc.). On servers where logs are many gigabytes, once logrotate initiates its scheduled work it will have to compress an enormous log record of apache requests. On very busy Apache servers from my experience, just for a day the log could grow up to approximately 8 / 10 Gigabytes.
I'm sure there are more busy servers out there, which log files are growing to over 100GB for just a single day.
Gzipping a 100GB file piece takes an enormous load on the CPU, as well as often takes long time. When this logrotation gzipping occurs at a moment where the servers CPU cores are already heavy loaded from Apache serving HTTP requests, Apache server becomes inaccessible to most of the clients.
Then for end clients various oddities are experienced, for example Apache dropped connection errors, webserver returning empty pages, or simply inability to respond to the client browser.
Sometimes as a result of the overload, even secure shell connection to SSHD to the server is impossible …

To prevent your server from this roration overloads remove logrorate's default access.log gzipping by commenting:

compress

to

#comment

3. Change maximum log roration by logrorate to be up to 30

By default logrorate is configured to create and keep up to 52 rotated and gzipped access.log files, changing this to a lower number is a good practice (in my view), in cases where log files grow daily to 10 or more GBs. Doing so will save a lot of disk space and reduce the chance the hard disk gets filled in because of the multiple rorated ungzipped enormous access.log files.

To tune the default keep max rorated logs to 30, change:

rotate 52

to rotate 30

The way logrorate's apache log processing on RHEL / CentOS Linux is working better on high load servers, by default on CentOS logrorate is not configured to do log gzipping at all.

Here is the default /etc/logrorate.d/httpd script for
CentOS release 5.6 (Final)

[hipo@centos httpd]$ cat /etc/logrotate.d/httpd /var/log/httpd/*log {
missingok
notifempty
sharedscripts
postrotate
/bin/kill -HUP `cat /var/run/httpd.pid 2>/dev/null` 2> /dev/null || true
endscript
}


What happened during the last week

Tuesday, November 21st, 2006

I’ve decided to use my blog in the end. The Last week we were with Habib for some time. He is a nice company we speaked about his Grand Father who did some miracles through the power of 2 Gins.

A lot of people with various diseases were cured with the help of 2 Jins he has power over. P.S. In the Quran Jins are spirits created from fire after God created the Angels due to the quran Jins are spirits which are with free will just like us humans and they could go for good or bad,

From Christian perspective so far as I’m Christian the Christians think Jins for Demons but are they Demons or not only God knows, because his Grand Father did a lot of nice things for the people was praying and fasting a lot and was trying to love everybody, well he was a muslim but I guess God can save everybody through Christ Jesus in his own way.

Then We talked about what the bible the life. Habib explained something very interesting of what the muslim myth says about why people do cough. Myth says that when God created in the beginning everything he put (soul/spirit) when breading to the body of soil, before that the soul was happily living with God in Heaven and the soul is not being conforted by living in a dying body because you know it can hurt, you feel cold stuff like that, so often when a born to human being is being given an Angel from God comes and puts the soul in the body through the nose then locks the entrance to be sure the soul won’t try to go out, and because the soul tries to get out we cough :]].

In Friday night or the Saturdays I can’t exactly we went to mino with Mitko we saw Gosho/Geni there he was drunk this time he did not repeat “on my head” like a parrot, this time the saying was “baba yaga”;]. I’m thinking again about stopping the cigars but we’ll see.

Yesterday I was in Mitko and we was able to run WarCraft 3 under GNU/Linux Fedora Core 6. His brother was extraordinary happy he will be able to play WC3 :]. During the day there was tons of work for me. There were problems with one of our mail servers mail.design.bg.

One of the ValueWeb’s Caching DNSes was down the other was resolving hosts awfully slow. So I read some about djbdns as a caching DNS and installed it on two of the servers on (backup-serv1.design.bg and backup-server2.design.bg). then switched all the NSes our servers in USA use to my new djb caching dnses, I was amazed djbdns is really a nice bit of soft it’s really a fast caching NS. I use it for first time and I really like it from the beginning. I experienced some problems before starting daemontools properly on two of the machines because of the errorno-patch that redhats and fedoras should apply to compile successfully daemontools. I thought our problems with the mail server was mainly because of the slow DNS resolves, but after setting up the new djbdns and configured all the servers to use them still the response of the mail server when there are connects to port 25 was very slow. I was able to isolate the problem in the evening I spoke with a guy (greycat) in irc.freenode.net in #qmail. About my problem and he pointed me to the RBLs I use at my qmail-smtpd run. So using the method of exclusion. Removing all the RBLs and started putting them one by one I discovered one of the RBL Hosts I used was lagging dnsbl.antispam.or.id (maybe due to slow DNS resolves). If you’re using it my advice is not to. When Removed it from my run file all started working perfectly. The last days I’m doing a lot of stuff around the qmail. I loaded some custom spam rules from SARE (SA Rules Emposium) to reduce spam and wrote some my own custom rules due to the spam I receive in my Mailbox.

More and more I realize how hard is to be a good mail server administrator. Oh yes I almost forgot I ran my own qmailmrtg two days ago it graphs nicely lot of very precious info about the mail server’s load, queue, pop3 concurrency etc. etc. and I also ran qsstats nice qmail-scanner statistics grapher program. Because of all the work I missed shool yesterday. I need to read now about this business plan and know more about it I can’t even imagine how I’ll graduate ever :].

How to list enabled VirtualHosts in Apache on GNU / Linux and FreeBSD

Thursday, December 8th, 2011

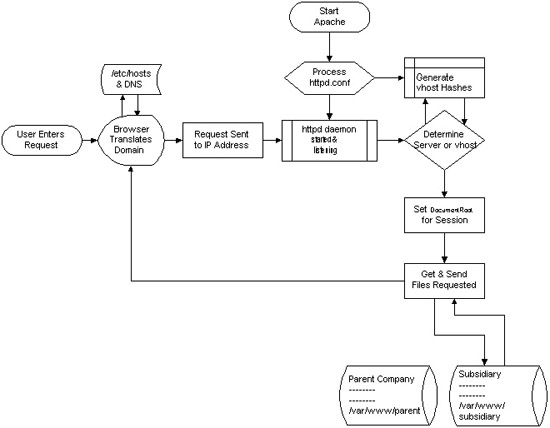
How Apache process vhost requests picture, how to list Apache virtualhosts on Linux and FreeBSD

I decided to start this post with this picture I found on onlamp.com article called “Simplify Your Life with Apache VirtualHosts .I put it here because I thing it illustrates quite well Apache’s webserver internal processes. The picture gives also a good clue when Virtual Hosts gets loaded, anways I’ll go back to the main topic of this article, hoping the above picture gives some more insight on how Apache works.;
Here is how to list all the enabled virtualhosts in Apache on Debian GNU / Linux serving pages:

server:~# /usr/sbin/ apache2ctl -S
VirtualHost configuration:
wildcard NameVirtualHosts and _default_ servers:
*:* is a NameVirtualHost
default server exampleserver1.com (/etc/apache2/sites-enabled/000-default:2)
port * namevhost exampleserver2.com (/etc/apache2/sites-enabled/000-default
port * namevhost exampleserver3.com (/etc/apache2/sites-enabled/exampleserver3.com:1)
port * namevhost exampleserver4.com (/etc/apache2/sites-enabled/exampleserver4.com:1)
...
Syntax OK

The line *:* is a NameVirtualHost, means the Apache VirtualHosts module will be able to use Virtualhosts listening on any IP address (configured on the host), on any port configured for the respective Virtualhost to listen on.

The next output line:
port * namevhost exampleserver2.com (/etc/apache2/sites-enabled/000-default Shows requests to the domain on any port will be accepted (port *) by the webserver as well as indicates the <VirtualHost> in the file /etc/apache2/sites-enabled/000-default:2 is defined on line 2 (e.g. :2).

To see the same all enabled VirtualHosts on FreeBSD the command to be issued is:

freebsd# pcfreak# /usr/local/sbin/httpd -S VirtualHost configuration:
wildcard NameVirtualHosts and _default_ servers:
*:80 is a NameVirtualHost
default server www.pc-freak.net (/usr/local/etc/apache2/httpd.conf:1218)
port 80 namevhost www.pc-freak.net (/usr/local/etc/apache2/httpd.conf:1218)
port 80 namevhost pcfreak.afraid.org (/usr/local/etc/apache2/httpd.conf:1353)
...
Syntax OK

On Fedora and the other Redhat Linux distributions, the apache2ctl -S should be displaying the enabled Virtualhosts.

One might wonder, what might be the reason for someone to want to check the VirtualHosts which are loaded by the Apache server, since this could be also checked if one reviews Apache / Apache2’s config file. Well the main advantage is that checking directly into the file might sometimes take more time, especially if the file contains thousands of similar named virtual host domains. Another time using the -S option is better would be if some enabled VirtualHost in a config file seems to not be accessible. Checking directly if Apache has properly loaded the VirtualHost directives ensures, there is no problem with loading the VirtualHost. Another scenario is if there are multiple Apache config files / installs located on the system and you’re unsure which one to check for the exact list of Virtual domains loaded.

How to exclude files on copy (cp) on GNU / Linux / Linux copy and exclude files and directories (cp -r) exclusion

Saturday, March 3rd, 2012

I've recently had to make a copy of one /usr/local/nginx directory under /usr/local/nginx-bak, in order to have a working copy of nginx, just in case if during my nginx update to new version from source mess ups.

I did not check the size of /usr/local/nginx , so just run the usual:

nginx:~# cp -rpf /usr/local/nginx /usr/local/nginx-bak
...

Execution took more than 20 seconds, so I check the size and figured out /usr/local/nginx/logs has grown to 120 gigabytes.

I didn't wanted to extra load the production server with copying thousands of gigabytes so I asked myself if this is possible with normal Linux copy (cp) command?. I checked cp manual e.g. man cp, but there is no argument like –exclude or something.

Even though the cp command exclude feature is not implemented by default there are a couple of ways to copy a directory with exclusion of subdirectories of files on G / Linux.

Here are the 3 major ones:

1. Copy directory recursively and exclude sub-directories or files with GNU tar

Maybe the quickest way to copy and exclude directories is through a littke 'hack' with GNU tar nginx:~# mkdir /usr/local/nginx-new;
nginx:~# cd /usr/local/nginx#
nginx:/usr/local/nginx# tar cvf - \. --exclude=/usr/local/nginx/logs/* \
| (cd /usr/local/nginx-new; tar -xvf - )

Copying that way however is slow, in my case it fits me perfectly but for copying large chunks of data it is better not to use pipe and instead use regular tar operation + mv

# cd /source_directory
# tar cvf test.tar --exclude=dir_to_exclude/*\--exclude=dir_to_exclude1/* . \
# mv test.tar /destination_directory
# cd /destination# tar xvf test.tar

2. Copy folder recursively excluding some directories with rsync

P>eople who has experience with rsync , already know how invaluable this tool is. Rsync can completely be used as for substitute=de.a# rsync -av –exclude='path1/to/exclude' –exclude='path2/to/exclude' source destination

This example, can also be used as a solution to my copy nginx and exclude logs directory casus like so:

nginx:~# rsync -av --exclude='/usr/local/nginx/logs/' /usr/local/nginx/ /usr/local/nginx-new

As you can see for yourself, this is a way more readable for the tar, however it will not work on servers, where rsync is not installed and it is unusable if you have to do operations as a regular users on such for that case surely the GNU tar hack is more 'portable' across systems.
rsync has also Windows version and therefore, the same methodology should be working on MS Windows and good for batch scripting.
I've not tested it myself, yet as I've never used rsync on Windows, if someone has tried and it works pls drop me a short msg in comments.
3. Copy directory and exclude sub directories and files with find

Find in collaboration with cp can also be used to exclude certain directories while copying. Actually this method is better than the GNU tar hack and surely more efficient. For machines, where rsync is not installed it is just a perfect way to copy files from location to location, while excluding some directories, here is an example use of find and cp, for the above nginx case:

nginx:~# cd /usr/local/nginx
nginx:~# mkdir /usr/local/nginx
nginx:/usr/local/nginx# find . -type d \( ! -name logs \) -print -exec cp -rpf '{}' /usr/local/nginx-bak \;

This will find all directories inside /usr/local/nginx with find command print them on the screen, then execute recursive copy over each found directory and copy to /usr/local/nginx-bak

This example will work fine in the nginx case because /usr/local/nginx does not contain any files but only sub-directories. In other occwhere the directory does contain some files besides sub-directories the files had to also be copied e.g.:

# for i in $(ls -l | egrep -v '^d'); do\
cp -rpf $i /destination/directory

This will copy the files from source directory (for instance /usr/local/nginx/my_file.txt, /usr/local/nginx/my_file1.txt etc.), which doesn't belong to a subdirectory.

The cmd expression:

# ls -l | egrep -v '^d'

Lists only the files while excluding all the directories and in a for loop each of the files is copied to /destination/directory

If someone has better ideas, please share with me 🙂

How to mount MDF images in Debian GNU / Linux – What is the MDF and MDS file

Monday, February 27th, 2012

I’ve recently had to mount an MDF (.mdf) image file on my Debian Linux . I never used .MDF file extension before and therefore I had no clue what is this file extension, so I did a quick research in Google to educate myself what is the MDF file format?

What I found was one article on ehow.com titled What is MDF & MDS and one article in Wikipedia MDF and MDS file pair
In short MDF is a CD9660 like ISO format produced by some CD burning and image creation software like Alcohol 120%
An MDS file accompanies the .MDF file. The .MDS is an optional metadata descriptor file which explains what is contained in the .MDF (iso like file).
MDF is not so standartized format like the usual ISO‘s we use to snapshot optical CD or DVDs but still is produced by some programs.

The MDF and MDS file pairs are typically created by two famous MS Windows programs:

  • Alcohol 120%
  • Daemon Tools

Both of the softwares are non-free programs, with the little exception – Daemon Tools is at least a freeware.
This is the reason why MDF format is far from popular across GNU / Linux and BSD* users and mostly used across Microsoft Windows platforms.

On Windows there are plenty of program capable of reading and opening .MDF extension files; The two aforementioned programs + MagicISO is few of the many programs which support mounting / (Create virtual drive) for MDF files.

On Free Opearting Systems, (Linux / BSD) there are two GUI programs, that are capable of mounting MDF files;:

  • Furiusisomount
  • AcetoneISO

I’ve tried both of them, for the sake of testing. With FuriosIsoMount however mounting the MDF failed. I tried to mount with FuriousIsoMount by launching the program with both non-root and root privileges. The program was capable of detect the .MDF file, I can browse the file and even it appeared like it is mounting the MDF fine when pressing on Mount button, however the mount point directory stays empty.

With AcetoneISO program mounting the MDF directly was possible, but only when the program was run with root privileges. With non-root privileges I got the error:

Error, could not mount image.

AcetoneISO can't open MDF error message Debian GNU / Linux

There is also alternative way command way to mount an MDF image by;

1. Using mdf2iso to convert the MDF image file to ISO
2. Use the regular Linux mount command to mount the converted ISO9660 file

On Debian there mdf2iso is avaialable as a deb package.
To install it:

linux:~# apt-get install --yes mdf2iso

1. Convert MDF to ISO with mdf2iso

To convert the MDF image to ISO with mdf2iso cmd I used:

hipo@linux:~/mdf-iso$ mdf2iso my-mdf-iso-file.mdf
mdf2iso v0.3.1 by Salvatore Santagati
Licensed under GPL v2 or later
47% [: >=========:]

2. Mount the newly converted ISO file with mount cmd

linux:~# mkdir /mnt/ISO
hipo@linux:~/mdf-iso$ mount -t iso9660 -o loop my-mdf-iso-file.iso /mnt/ISO

Now your MDF will be mounted in /mnt/ISO 🙂

Convert single PDF pages to multiple SVG files on Debian Linux with pdf2svg

Sunday, February 26th, 2012

In my last article, I've explained How to create PNG, JPG, GIF pictures from one single PDF document
Convertion of PDF to images is useful, however as PNG and JPEG graphic formats are raster graphics the image quality gets crappy if the picture is zoomed to lets say 300%.
This means convertion to PNG / GIF etc. is not a good practice especially if image quality is targetted.

I myself am not a quality freak but it was interesting to find out if it is possible to convert the PDF pages to SVG (Scalable Vector Graphics) graphics format.

Converting PDF to SVG is very easy as for GNU / Linux there is a command line tool called pdf2svg
pdf2svg's official page is here

The traditional source way compile and install is described on the homepage. For Debian users pdf2svg has already existing a deb package.

To install pdf2svg on Debian use:

debian:~# apt-get install --yes pdf2svg
...

Once installed usage of pdf2svg to convert PDF to multiple SVG files is analogous to imagemagick's convert .
To convert the 44 pages Projects.pdf to multiple SVG pages – (each PDF page to a separate SVG file) issue:

debian:~/project-pdf-to-images$ for i in $(seq 1 44); do \
pdf2svg Projects.pdf Projects-$i.SVG $i; \
done

This little loop tells each page number from the 44 PDF document to be stored in separate SVG vector graphics file:

debian:~/project-pdf-to-images$ ls -1 *.svg|wc -l
44

For BSD users and in particular FreeBSD ones png2svg has a bsd port in:

/usr/ports/graphics/pdf2svg

Installing on BSD is possible directly via the port and convertion of PDF to SVG on FreeBSD, should be working in the same manner. The only requirement is that bash shell is used for the above little bash loop, as by default FreeBSD runs the csh. 
On FreeBSD launch /usr/local/bin/bash, before following the Linux instructions if you're not already in bash.

Now the output SVG files are perfect for editting with Inkscape or Scribus and the picture quality is way superior to old rasterized (JPEG, PNG) images