Posts Tagged ‘necessery’

How to manually disable Windows Genuine Advantage on Windows XP SP2

Wednesday, May 25th, 2011

WGA Notification message popup message

I have a pirate version of Windows XP Pro 2 installer CD which does automatically turn on Windows Genuine Advantage

This is kind of annoying as the computer gets really slow and the hard disk drive activite gets intensive as well as an annoying popup message that the Windows XP copy is not genuine does appear periodically

In order to get rid of the message I had to do the following steps:

1. Get into Windows Safe Mode without Networking

As most of the people knows this is achieved by pressing F8 keyboard key right before the Windows bootup screen appears.

After in Safe mode it’s necessery to,

2. Run Windows Command Line (cmd.exe)

To do so follow, the menus:

Windows (Start Menu) -> Run -> cmd.exe

3. In the command prompt window issue the commands:

C:Documents and SettingsUser> cd WindowsSystem32
C:WindowsSystem32> taskkill -IM wgatray.exe
C:WindowsSystem32> del wgatray.exe
C:WindowsSystem32> move wgalogon.dll wgalogon.dll.old
C:WindowsSystem32> del wgalogon.dll.old

Something to mention is you have to be really quick, with deleting wgalogon.dll, cause wgatray.exe is scheduled to run every 1 / 2 seconds 🙂 It is a bit of situation of type “be quick or be dead” as Maiden used to sing 🙂
A Windows system restart and Hooray the Windows Genuine message is gone 🙂

How to fix postfix mail server error ‘relay access denied’ on FreeBSD

Wednesday, January 30th, 2013

If you're running a newly configured Postfix SMTP server and you get in /var/log/maillog errors like:

Relay access denied

i.e. in log whenever you try to deliver a mail to the mail server you get something like:

Jan 29 10:05:04 600h postfix/smtpd[4624]: NOQUEUE: reject: RCPT from mxtb-pws3.mxtoolbox.com[64.20.227.133]: 554 5.7.1 <test@example.com>: Relay access denied; from=<supertool@mxtoolbox.com> to=<test@example.com> proto=ESMTP helo=<please-read-policy.mxtoolbox.com>

This is to because the virtualdomain to which postfix is trying to deliver is not added among the domains for which relaying is allowed.

To fix it edit /etc/postfix/main.cf ; find line

relay_domains = $mydestination

and add all domains, for which relaying should be allowed. Let's say you have virtual domains example.com and example1.com to enable relaying, add to conf:

relay_domains = $mydestination example.com example1.com

Also whether, virtual domain names are read from a separate configured hashed .db file like /etc/postfix/virtual.db

Usually done via /etc/postfix/main.cf via vars:

virtual_mailbox_maps = hash:/etc/postfix/virtual
virtual_alias_maps = hash:/etc/postfix/virtual

Its necessery to run cmd;

postmap virtual
# ls -al /etc/postfix/virtual*
-rwxrwxrwx  1 root  wheel      45 Jan 29 05:27 /etc/postfix/virtual
-rwxrwxrwx  1 root  wheel  131072 Jan 29 10:58 /etc/postfix/virtual.db

This command re-builds virtual.db including all newly input domains in /etc/postfix/virtual

Finally to load new configs its necessary to restart postfix;

This particular Postfix is running on FreeBSD so to restart it;

# /etc/rc.d/postfix restart
....


How to configure Exim to relay mail to remote SMTP server on Debian and Ubuntu

Wednesday, August 24th, 2011

I’m required to do some mail relaying on a Debian Linux host which should use a remote mail server to relay its mails.
Until so far I’ve had not much experience with exim as I prefer using qmail, whever a mail server is needed. However since now only a relaying was necessery and exim is the default installed MTA on Debian, I’ve decided to use exim to take care of the SMTP mail relaying.
After a bit of reading it happened configuring exim to relay via remote SMTP server is more than easy!

All I had to do is run the command:

debian-relay:~# dpkg-reconfigure exim4-config

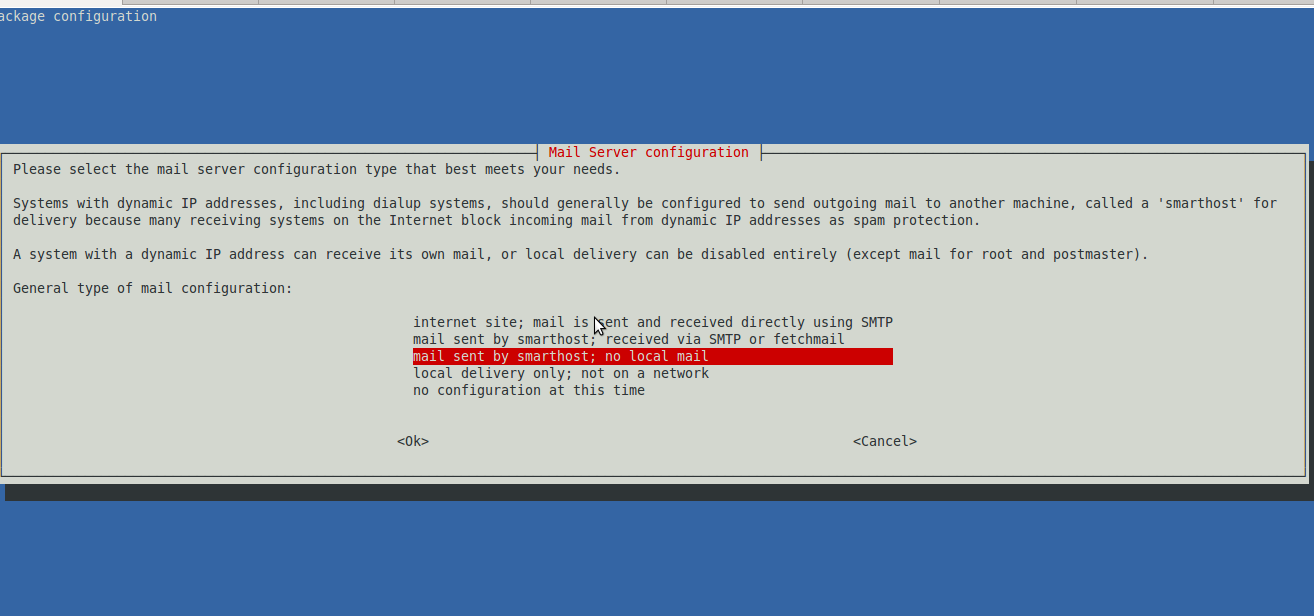
Next in the Ncruses interface to appear:

Debian Exim relay smtp config screenshot

I had to choose the option:

mail sent by smarthost; no local mail

Next a dialog appears asking for:
System mail name:
Therein it’s necessery to type in the hostname of the remote SMTP to be used for mail relay.
Next dialog asks for:
IP-addresses to listen on for incoming SMTP connections:
and I left it with 127.0.0.1 however if exim is supposed to be visible from external network one might decide to put in real IP address there.

Pressing OK leads to the next dialog:
 Other destinations for which mail is accepted: 
I decided to leave this blank as I don’t want to accept mail for any destinations.
Next pane reads:
Visible domain name for local users:
I’ve typed inside my smtp relay server e.g.:
smtp.myrelaymail.com

Further comes:
IP address or host name of the outgoing smarthost:
There once again I typed my mail relay host smtp.relaymail.com

The next config screen is:
Keep number of DNS-queries minimal (Dial-on-Demand)?
On any modern Linux host the default answer of No is fine.
Following prompt asked if I want to:
Split configuration into small files?
I’ve decided not to tamper with it and choosed No
Afterwards mail relaying works like a charm thx God 😉

WordPress blog MySQL data maintainance valuable plugin WP-OPTIMIZE

Tuesday, April 12th, 2011

The more my blog is growing the slower it becomes, this is a tendency I’ve noticed since a couple of weeks.

Very fortunately while reading some random articles online I’ve came across a super valuable wordpress plugin called WP-OPTIMIZE

I think it’s best if I present instead of taking the time to explain what the WP-optimize does for a wordpress powered blog:

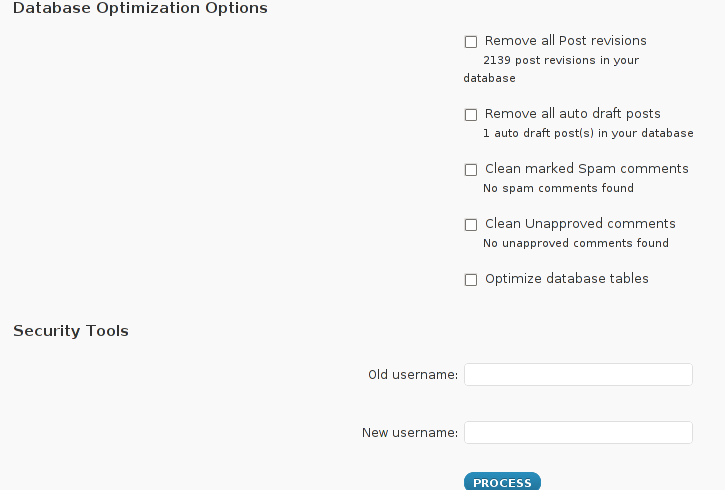
WP-Optimize is a WordPress 2.9++ database cleanup and optimization tool. It doesn’t require PhpMyAdmin to optimize your database tables. It allows you to remove post revisions, comments in the spam queue, un-approved comments within few clicks.

Additionally you can rename any username to another username too.

For example: If you want to rename default ‘admin’ username to ‘someothername’; just put ‘admin’ (without quotes) to the Old username field and the new username to the New username field, then click “PROCESS”)

Now in short to rephrase above text, during MySQL database requests a lot of database starts needing the so called MySQL optimization , this operation becomes necessery especially for databases which are very actively used and is related to the basic design of the mysql server.

Very often many tables starts having a lot of garbage (repetitive) data and therefore read and writes from the SQL server gets slower and slower day by day.

Thus the MySQL server has it’s famous OPTIMIZE TABLE command which does wipe out all the garbage unnecessery data stored in a tables/s and hence seriously impacts the later read/write table operations.

Now to go back to wordpress the same optimization issues, very often are a cause for a performance bottleneck and some smart guy has came with the great idea to create a specific wordpress plugin to fix such an optimize table issues

The WP-Optimize plugin has 5 major options which somehow could have a positive impact on blog’s performance, these are:
 

  • Remove all Post revisions
  • Remove all auto draft posts
  • Clean marked Spam comments
  • lean Unapproved comments
  • Optimize database tables

Apart from the nice performance boost applicaiton the wp-optimize plugin has one super valuable function, it could change the default wordpress blog administrator user admin to some other desired username, for example rename the default blog administrator username “admin” user to “john”.

From a security perspective this is another must have feature in every wordpress blog as it can kill many of the possible brute force attacks with some web brute force softwares like Hydra

Installing and using wp-optimize is a real piece of cake, here is a very quick few command lines to install it:

host:~# cd /var/www/blog/wp-content/plugins/
host:/var/www/blog/wp-content/plugins:# wget https://www.pc-freak.net/files/wp-optimize.0.9.2.zip
host:/var/www/blog/wp-content/plugins:# unzip wp-optimize.0.9.2.zip
...

To launch WP-OPTIMIZE and fix many speed bottlenecks caused by unoptimized tables, or just hanging around in database old spam comments, go and login with your adminsitrator to wordpress.

In the left pane menu starting up with Dashboard somewhere near the end of the vertical menu you will notice a button reading WP-Optimize .
Click over the Wp-Optimize button and a screen like the one in below’s screenshot will appear in your browser screen:

wp optimize plugin database optimization options screen

I have personally decided to use just 2 of all the 5 available primary plugin options, I decided to select only:
 

  • Clean marked Spam comments
  • Optimize database tables

Scrolling below the PROCEED button I could also notice a number of tables which were missing optimization and hence required an optimize table to be executed on each one of them.
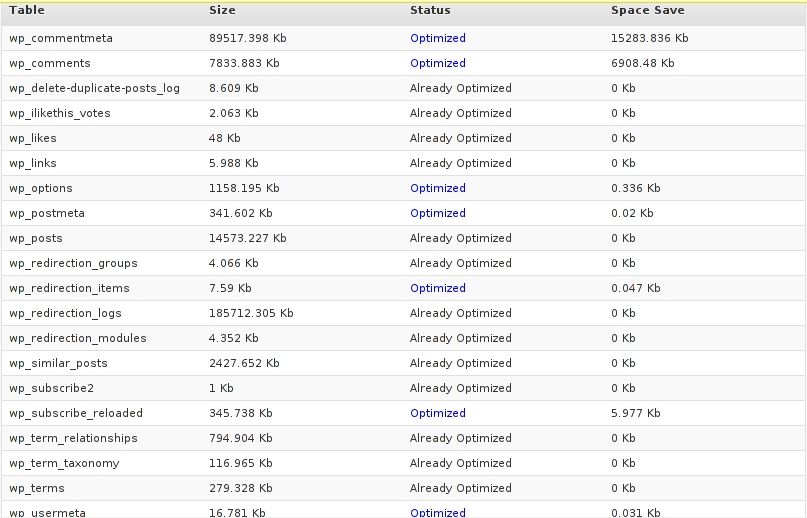
Further on I pressed the PROCESS button and after a couple of minutes (2, 3 minutes) of waiting the wp-optimize plugin was done it’s selected tasks:

In the screenshot below, you see all my blog tables which were optimized by the plugin:
WP-Optimize optimized blog tables screenshot

It’s interesting to say few words about the Remove All Posts revisions plugin option, as many might be wondering what this plugin option really means.

When writting posts, wordpress has an option to restore to a certain point of the write out and makes a sort of different versions in time of each of it’s written posts.

Therefore later restoration if something gots deleted by mistake is facilitated, this is actually the all meaning of Remove All Posts revisions

With time and the increase wp posts the amount of Posts Revisions is growing on and on and just taking space and possibly making the access to the database entries slower, thus it might be a good idea to also remove them as, it’s absolutely rare to use the wp post restoration function.
However I’ve personally decided to not wipe out the old posts revisions as someday i might need it and I’m a bit scared that it might cause me some database issues.

I’ll be glad if somebody has tried the Posts Revisions wp-Optimize funciton and is happy with the results.

How to tune MySQL Server to increase MySQL performance using mysqltuner.pl and Tuning-primer.sh

Tuesday, August 9th, 2011

MySQL Easy performance tuning with mysqltuner.pl and Tuning-primer.sh scripts

Improving MySQL performance is crucial for improving a website responce times, reduce server load and improve overall work efficiency of a mysql database server.

I’ve seen however many Linux System administrators who does belittle or completely miss the significance of tuning a newly installed MySQL server installation.
The reason behind that is probably caused by fact that many people think MySQL config variables, would not significantly improve performance and does not pay back for optimization efforts. Moreover there are a bunch of system admins who has to take care for numerous services so they don’t have time to get good knowledge to optimize MySQL servers.
Thus many admins and webmasters nowdays, think optimizations depend mostly on the side of the website programmers.
It’s also sometimes falsely believed that optimizing a MySQL server could reduce the overall server stability.

With the boom of Internet website building and internet marketing, many webmasters emerged and almost anybody with almost no knowledge on GNU/Linux or minimal or no knowledge on PHP can start his Online store, open a blog or create a website powered by some CMS like joomla.
Thus nowdays many servers even doesn’t have a hired system administrators but are managed by people whose knowledge on *Nix is almost next to zero, this is another reason why dozens of MySQL installations online are a default ones and are not taking a good advantage of the server hardware.

The incrase of website visitors leads people servers expectations for hardware also to grow, thus many companies simply buy a new hardware instead of taking the few time to investigate on how current server hardware can be utilized better.
In that manner of thought I though it will be a good idea to write this small article on Tuning mysql servers with two scripts Tuning-primer.sh and mysqltuner.pl.
The scripts are ultra easy to use and does not require only a minimal knowledge on MySQL, Linux or (*BSD *nix if sql is running on BSD).
Tuning-primer.sh and mysqltuner.pl are therefore suitable for a quick MySQL server optimizations to even people who are no computer experts.

I use this two scripts for MySQL server optimizations on almost every new configured GNU/Linux with a MySQL backend.
Use of the script comes to simply download with wget, lynx, curl or some other web client and execute it on the server host which is already running the MySQL server.

Here is an example of how simple it is to run the scripts to Optimize MySQL:

debian:~# perl mysqltuner.pl
>> MySQLTuner 1.2.0 - Major Hayden >major@mhtx.net<
>> Bug reports, feature requests, and downloads at http://mysqltuner.com/
>> Run with '--help' for additional options and output filtering

——– General Statistics ————————————————–
[–] Skipped version check for MySQLTuner script
[OK] Currently running supported MySQL version 5.1.49-3
[OK] Operating on 64-bit architecture

——– Storage Engine Statistics ——————————————-
[–] Status: +Archive -BDB -Federated +InnoDB -ISAM -NDBCluster
[–] Data in MyISAM tables: 6G (Tables: 952)
[!!] InnoDB is enabled but isn’t being used
[!!] Total fragmented tables: 12

——– Security Recommendations ——————————————-
[OK] All database users have passwords assigned

——– Performance Metrics ————————————————-
[–] Up for: 1d 2h 3m 35s (68M q [732.193 qps], 610K conn, TX: 49B, RX: 11B)
[–] Reads / Writes: 76% / 24%
[–] Total buffers: 512.0M global + 2.8M per thread (2000 max threads)
[OK] Maximum possible memory usage: 6.0G (25% of installed RAM)
[OK] Slow queries: 0% (3K/68M)
[OK] Highest usage of available connections: 7% (159/2000)
[OK] Key buffer size / total MyISAM indexes: 230.0M/1.7G
[OK] Key buffer hit rate: 97.8% (11B cached / 257M reads)
[OK] Query cache efficiency: 76.6% (46M cached / 61M selects)
[!!] Query cache prunes per day: 1822075
[OK] Sorts requiring temporary tables: 0% (1K temp sorts / 2M sorts)
[!!] Joins performed without indexes: 63635
[OK] Temporary tables created on disk: 1% (26K on disk / 2M total)
[OK] Thread cache hit rate: 99% (159 created / 610K connections)
[!!] Table cache hit rate: 4% (1K open / 43K opened)
[OK] Open file limit used: 17% (2K/16K)
[OK] Table locks acquired immediately: 99% (36M immediate / 36M locks)

——– Recommendations —————————————————–
General recommendations:
Add skip-innodb to MySQL configuration to disable InnoDB
Run OPTIMIZE TABLE to defragment tables for better performance
Enable the slow query log to troubleshoot bad queries
Increasing the query_cache size over 128M may reduce performance
Adjust your join queries to always utilize indexes
Increase table_cache gradually to avoid file descriptor limits
Variables to adjust:
query_cache_size (> 256M) [see warning above] join_buffer_size (> 256.0K, or always use indexes with joins) table_cache (> 7200)

You see there are plenty of things, the script reports, for the unexperienced most of the information can be happily skipped without need to know the cryptic output, the section of importance here is Recommendations for some clarity, I’ve made this section to show up bold.

The most imporant things from the Recommendations script output is actually the lines who give suggestions for incrase of certain variables for MySQL.In this example case this are the last three variables:
query_cache_size,
join_buffer_size and
table_cache

All of these variables are tuned from /etc/mysql/my.cnf (on Debian) and derivatives distros and from /etc/my.cnf on RHEL, CentOS, Fedora and the other RPM based Linux distributions.

On some custom server installs my.cnf is also located in /usr/local/mysql/etc/ or some other a bit more unstandard location 😉

Anyways now having the Recommendation from the script, it’s necessery to edit my.cnf and try to double the values for the suggested variables.

First, I check if all the suggested variables are existent in my config with grep , if they’re not then I’ll simply add the variable with doubled size of the suggested values.
P.S: One note here is sometimes some values which are configured, are the default value for the MySQL server and does not have a record in my.cnf

debian:~# grep -E 'query_cache_size|join_buffer_size|table_cache' /etc/mysql/my.cnf table_cache = 7200
query_cache_size = 256M
join_buffer_size = 262144

All of my variables are in the config so, now edit my.cnf and set values to:
table_cache = 14400
query_cache_size = 512M
join_buffer_size = 524288

I always, however preserve the old variable’s value, because sometimes raising the value might create problem and the MySql server might be unable to restart properly.
Thus before going with adding the new values make sure the old ones are commented with # , e.g.:
#table_cache = 7200
#query_cache_size = 256M
#join_buffer_size = 262144

I would recommend vim as editor of choice while editing my.cnf as vim completely rox 😉 If you’re not acquainted to vim use nano or mcedit or your editor of choice 😉 :

debian:~# vim /etc/mysql/my.cnf
...

Assuming that the changes are made, it’s time to restart MySQL to make sure the new values are read by the SQL server.

debian:~# /etc/init.d/mysql restart
* Stopping MySQL database server mysqld [ OK ]
* Starting MySQL database server mysqld [ OK ]
Checking for tables which need an upgrade, are corrupt or were not closed cleanly.

If mysql server fails, however to restart, make sure immediately you reverse back the changed variables to the commented values and restart once again via mysql init script to make server load.

Afterwards start adding the values one by one until find out which one is causing the mysqld to fail.

Now the second script (Tuning-primer.sh) is also really nice for MySQL performance optimizations are necessery. However it’s less portable (as it’s written in bash scripting language).
Consider running this script among different GNU/Linux distributious (especially the newer ones) might produce errors.
Tuning-primer.sh requires some minor code changes to be able to run on FreeBSD, NetBSD and OpenBSD *nices.

The way Tuning-primer.sh works is precisely like mysqltuner.pl , one runs it it gives some info about current running MySQL server and based on certain factors gives suggestions on how increasing or decresing certain my.cnf variables could reduce sql query bottlenecks, solve table locking issues as well as generally improve INSERT, UPDATE query times.

Here is an example output from tuning-primer.sh run on another server:

server:~# wget https://www.pc-freak.net/files/Tuning-primer.sh
...
server:~# sh Tuning-primer.sh
-- MYSQL PERFORMANCE TUNING PRIMER --
- By: Matthew Montgomery -

MySQL Version 5.0.51a-24+lenny5 x86_64

Uptime = 8 days 10 hrs 19 min 8 sec
Avg. qps = 179
Total Questions = 130851322
Threads Connected = 1

Server has been running for over 48hrs.
It should be safe to follow these recommendations

To find out more information on how each of these
runtime variables effects performance visit:
http://dev.mysql.com/doc/refman/5.0/en/server-system-variables.html

SLOW QUERIES
Current long_query_time = 1 sec.
You have 16498 out of 130851322 that take longer than 1 sec. to complete
The slow query log is NOT enabled.
Your long_query_time seems to be fine

MAX CONNECTIONS
Current max_connections = 2000
Current threads_connected = 1
Historic max_used_connections = 85
The number of used connections is 4% of the configured maximum.
Your max_connections variable seems to be fine.

WORKER THREADS
Current thread_cache_size = 128
Current threads_cached = 84
Current threads_per_sec = 0
Historic threads_per_sec = 0
Your thread_cache_size is fine

MEMORY USAGE
Tuning-primer.sh: line 994: let: expression expected
Max Memory Ever Allocated : 741 M
Configured Max Memory Limit : 5049 M
Total System Memory : 23640 M

KEY BUFFER
Current MyISAM index space = 1646 M
Current key_buffer_size = 476 M
Key cache miss rate is 1 / 56
Key buffer fill ratio = 90.00 %
You could increase key_buffer_size
It is safe to raise this up to 1/4 of total system memory;
assuming this is a dedicated database server.

QUERY CACHE
Query cache is enabled
Current query_cache_size = 64 M
Current query_cache_used = 38 M
Current Query cache fill ratio = 59.90 %

SORT OPERATIONS
Current sort_buffer_size = 2 M
Current record/read_rnd_buffer_size = 256.00 K
Sort buffer seems to be fine

JOINS
Current join_buffer_size = 128.00 K
You have had 111560 queries where a join could not use an index properly
You have had 91 joins without keys that check for key usage after each row
You should enable “log-queries-not-using-indexes”
Then look for non indexed joins in the slow query log.
If you are unable to optimize your queries you may want to increase your
join_buffer_size to accommodate larger joins in one pass.

TABLE CACHE
Current table_cache value = 3600 tables
You have a total of 798 tables
You have 1904 open tables.
The table_cache value seems to be fine

TEMP TABLES
Current tmp_table_size = 128 M
1% of tmp tables created were disk based
Created disk tmp tables ratio seems fine

TABLE SCANS
Current read_buffer_size = 128.00 K
Current table scan ratio = 797 : 1
read_buffer_size seems to be fine

TABLE LOCKING
Current Lock Wait ratio = 1 : 1782
You may benefit from selective use of InnoDB.

As seen from script output, there are certain variables which might be increased a bit for better SQL performance, one such variable as suggested is key_buffer_size(You could increase key_buffer_size)

Now the steps to make the tunings to my.cnf are precisely the same as with mysqltuner.pl, e.g.:
1. Preserve old config variables which will be changed by commenting them
2. Double value of current variables in my.cnf suggested by script
3. Restart Mysql server via /etc/init.d/mysql restart cmd.
4. If mysql runs fine monitor mysql performance with mtop or mytop for at least 15 mins / half an hour.

if all is fine run once again the tuning scripts to see if there are no further improvement suggestions, if there are more follow the 4 steps described procedure once again.

It’s also a good idea that these scripts are periodically re-run on the server like once per few months as changes in SQL queries amounts and types will require changes in MySQL operational variables.
The authors of these nice scripts has done great job and have saved us a tons of nerves time, downtimes and money spend on meaningless hardware. So big thanks for the awesome scripts guys 😉
Finally after hopefully succesful deployment of changes, enjoy the incresed SQL server performance 😉

Fixing MySQL server start up “ERROR 1045 (28000): Access denied for user ‘debian-sys-maint’@’localhost’ (using password: YES)”

Friday, September 7th, 2012

I'm still busy configuring the new Lenovo (Le-novo) 🙂 ThinkCenter server necessery for migration of old machines. I've done a lot yesterday but really moving all this stuff takes time …

I moved the SQL databases from the old MySQL server host to the new Debian Linux host.

In order to move databsaes, I did the usual SQL dump from current working host with:

mysql:~# mysqldump --opt --allow-keywords --add-drop-table --all-databases -u root > dump.sql

After that did the standard move of dump.sql to the new host with sftp

mysql-new:~# sftp root@mysql-host
Connected to mysql-host.
sftp> get dump.sql
....
sftp> exit

and imported dump:

mysql-new:~# mysql -u root -p < dump.sql
Enter password:

Databases dump grow really a lot (7GB)!, so I had to wait for dump.sql to import about 20 minutes – (the host configuration is Dual core 6Ghz 3MB Cache CPU, 4GB DDR3 RAM, 7200 500 GB Hitachi ExcelStor Techno V32O HDD).

The dumps migration was between identical release Debian Linux – (Squeeze 6.0.5) servers running identical versions of MySQL.

mysql-new:~# mysql --version
mysql Ver 14.14 Distrib 5.1.63, for debian-linux-gnu (i486) using readline 6.1

Because of that the whole db import worked like a charm.

Once moved the SQL started re-started normally but there was an on screen warning:

ERROR 1045 (28000): Access denied for user
'debian-sys-maint'@'localhost' (using password: YES)"

The cause of this warning error is because of way /etc/init.d/mysql script is written and in particular the custom MySQL (Debian specific start-up philosophy).

/etc/init.d/mysql is written in a way that on every restart a check of Database consistency is done. There in the script the user debian-sys-maint (a user with mysql administrator root privileges) is used to do the quick consistency check. The debian-sys-maint password which is used on start-up is stored in /etc/mysql/debian.cnf:

mysql-new:~# less /etc/mysql/debian.cnf
# Automatically generated for Debian scripts. DO NOT TOUCH!
[client]
host = localhost
user = debian-sys-maint
password = pQFM9RetOHFjewwn
socket = /var/run/mysqld/mysqld.sock
[mysql_upgrade]
host = localhost
user = debian-sys-maint
password = pQFM9RetOHFjewwn
socket = /var/run/mysqld/mysqld.sock
basedir = /usr

The whole problem is that during, the old SQL import the password set for user debian-sys-maint is different and once SQL starts the init script reads this pass and fails to login to SQL server.

The warning (error):

ERROR 1045 (28000): Access denied for user
'debian-sys-maint'@'localhost' (using password: YES)
hence appears on every SQL start (including on every system boot). The err is generally harmless and SQL seems to work fine with or without it. However since the consistency check is not done at start up, if there are some CORRUPT tables not initiating the start up check is not a good idea.

There are two options to get rid of the warning one and better one is to check in /etc/mysql/debian.cnf for password string and change the pwd with mysql cli e.g.:

new-mysql:~# grep -i pass /etc/mysql/debian.cnf | uniq
password = pQFM9RetOHFjewwn

GRANT SELECT on `mysql`.`user` to 'debian-sys-maint'@'localhost' identified by 'pQFM9RetOHFjewwn';
Query OK, 1 row affected (0.01 sec)
GRANT SELECT ON mysql.user TO 'debian-sys-main'@'localhost';Query OK, 0 rows affected (0.00 sec)
mysql> flush privileges;
Query OK, 0 rows affected (0.00 sec)

Second option (not recommended in terms of security) is to set user/pass to root values in /etc/mysql/debian.cnf.

That's all. N-joy 🙂

How to convert OGG Vorbis .ogg to MP3 on GNU / Linux and FreeBSD

Friday, July 27th, 2012

I’ve used K3B just recently to RIP an Audio CD with music to MP3. K3b has done a great job ripping the tracks, the only problem was By default k3b RIPs songs in OGG Vorbis (.ogg) and not mp3. I personally prefer OGG Vorbis as it is a free freedom respecting audio format, however the problem was the .ogg-s cannot be read on many of the audio players and it could be a problem reading the RIPped oggs on Windows. I’ve done the RIP not for myself but for a Belarusian gfriend of mine and she is completely computer illiterate and if I pass her the songs in .OGG, there is no chance she succed in listening the oggs. I’ve seen later k3b has an option to choose to convert directly to MP3 Using linux mp3 lame library this however is time consuming and I have to wait another 10 minutes or so for the songs to be ripped to shorten the time I decided to directly convert the existing .ogg files to .mp3 on my (Debian Linux). There are probably many ways to convert .ogg to mp3 on linux and likely many GUI frontends (like SoundConverter) to use in graphic env.

SoundConverter Debian GNU Linux graphic GUI environment program for convertion of ogg to mp3 and mp3 to ogg, convert multiple sound formats on GNU / Linux.

I however am a console freak so I preferred doing it from terminal. I’ve done quick research on the net and figured out the good old ffmpeg is capable of converting .oggs to .mp3s. To convert all mp3s just ripped in the separate directory I had to run ffmpeg in a tiny bash loop.

A short bash shell script 1 liner combined with ffmpeg does it, e.g.;

for f in *.ogg; do ffmpeg -i "$f" "`basename "$f" .ogg`.mp3"; done.....

The loop example is in bash so in order to make the code work on FreeBSD it is necessery it is run in a bash shell and not in BSDs so common csh or tcsh.

Well, that’s all oggs are in mp3; Hip-hip Hooray 😉

Enabling talkd (Console Chat) between logged in users on FreeBSD and other BSDs

Sunday, June 10th, 2012

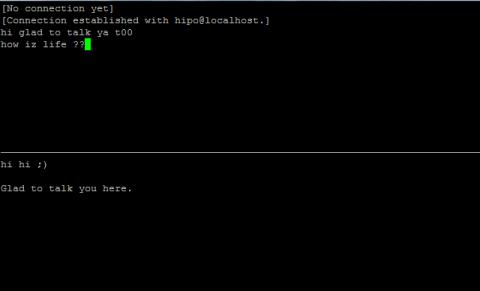
Talk between two useres on FreeBSD 7.2 screenshot, console peer to peer interactive talk program UNIX, Linux, BSD

Those who are in familiar with older UNIXes, UNIX BSD derivatives and GNU Linux should certainly remember the times, when we hackers used to talk to each other using talk service.

Those who don't know what talk command is it is a simple console / ssh utility to talk to another logged in users.

Talk is very similar to write and mesg one liner messasing utilities available for *nixes, the difference is it is intendted to provide interactive chat between the two logged in users. People who came to know UNIX or free software in older times most likely don't know talk, however I still remember how precious this tool was for communication back in the day.

I believe still it can be useful so I dediced to install ot on one FreeBSD host.

In order to have the talk service running on BSD it is necessery to have /usr/libexec/ntalkd installed on the system this however is installed by default with standard BSD OS installs, so no need for any external ports install to run it.

talk doesn't have it's own init script to start is not written to run as it own service but in order to run it is is necessery to enable it via inetd

Enabling it is done by;;;

1 — Editting /etc/inetd.conf

Inside the conf the line::

#ntalk dgram udp wait tty:tty /usr/libexec/ntalkd ntalkd

should be uncommented e.g, become ;;;

ntalk dgram udp wait tty:tty /usr/libexec/ntalkd ntalkd

2 — Restart inetd

freebsd# /etc/rc.d/inetd restart
Stopping inetd.
Starting inetd.

talk is planned to be used for peer to peer conversations over SSH so in a way it is the GRANDFATHER 🙂 of IRC, ICQ and Skype;;;

Here is an example on how talk is used ,, Let's say there are three logged in users

pcfreak# w
12:39PM up 3 days, 16:25, 3 users, load averages: 1.12, 0.91, 0.71
USER TTY FROM LOGIN@ IDLE WHAT
testuser p0 192.168.0.7 10:50AM - bash
hipo p3 192.168.0.8 12:23PM - w
root p4 :ttyp2:S.0 12:24PM - vim /usr/local/www/dat

I'm logged in with my username hipo and I would like to talk to testuser ;;;;

pcfreak% tty
/dev/ttyp3

You see I'm logged in on /dev/ttyp3 (this is the specific naming on BSDs) on Linux equivalent is /dev/tty3So to talk the other user testuser;;;;;-

$ talk testuser ttyp0
[No connection yet]
[Waiting for your party to respond]

The testuser logged in via SSH will then get a message ||;

Message from Talk_Daemon@pcfreak at 12:44 on 2012/06/10 ...
talk: connection requested by hipo@localhost
talk: respond with: talk hipo@localhost

To enter a talk session then the logged in testuser has to type:

$ talk hipo@localhost


Barcodes are dangerous for human freedom! Technology not trustable!

Monday, April 23rd, 2012

This post will be short as I'm starting to think long posts are mostly non-sense. Have you people all wondered of barcoding?
All world stores around the world have now barcoding. Barcode numbers regulations are being orchestrated by certain bodies, we people have no control over. Barcoding makes us dependent on technology as only technology can be used to read and store barcodes. It is technology that issues the barcodes. We have come to a point, where we humans trust more technology than our physical fellows. Trusting technology more than the close people to us is very dangerous. What if technology is not working as we expect it to?
What if there are hidden ways to control technology that we're not aware of?

Technology concepts are getting more and more crazy and abstract.
Thinks about the virtualization for a while. Virtualuzation is being praised loudly these days and everyone is turnning to it thinking it is cheap and realiable? The facts I've seen and the little of experience I had with it were way less than convicable.
Who came with this stupid idea, oh yes I remember IBM came with this insane idea some about 40 years ago … We had sanity for a while not massively adopting IBM's virtualization bulk ideas and now people got crazy again to use a number of virtualization technologies.
If you think for a while Virtualization is unreality (unexistence) of matter over another unreality. The programs that makes computers "runs" are not existent in practice, they only exist in some electricity form. Its just a sort of electric field if you think on it on a conceptual level …
As we trust all our lives nowdays on technology, how do we know this technological stored information is not altered by other fields, how we can be sure it always acts as we think it does and should? Was it tested for at least 40 years before adoption as any new advancement should be.
Well Of course not! Everything new is just placed in our society without too much thinking. Someone gives the money for production, someone else buys it and installs it and its ready to go. Or at least that's how the consumers thinks and we have become all consumers. This is a big LIE we're constantly being convinced in!
It is not ready to work, it is not tested and we don't know what the consequence of it will be!
Technology and Genetically Modified Food are not so different in this that they both can produce unexpected results in our lives. And they're already producing the bad fruits as you should have surely seen.
You can see more and more people are getting sick, more people go to doctor more people have to live daily with medication to live a miserable dishealthy I wouldn't say live but "poor" existence …
Next time they tell you new technology is good for you and will make your life better, Don't believe them! This is not necessery true.
Though todays technology can do you good, In my view the harm seriously exceeds the good.

How to copy / clone installed packages from one Debian server to another

Friday, April 13th, 2012

1. Dump all installed server packages from Debian Linux server1

First it is necessery to dump a list of all installed packages on the server from which the intalled deb packages 'selection' will be replicated.

debian-server1:~# dpkg --get-selections \* > packages.txt

The format of the produced packages.txt file will have only two columns, in column1 there will be the package (name) installed and in column 2, the status of the package e.g.: install or deinstall

Note that you can only use the –get-selections as root superuser, trying to run it with non-privileged user I got:

hipo@server1:~$ dpkg --set-selections > packages.txt
dpkg: operation requires read/write access to dpkg status area

2. Copy packages.txt file containing the installed deb packages from server1 to server2

There is many way to copy the packages.txt package description file, one can use ftp, sftp, scp, rsync … lftp or even copy it via wget if placed in some Apache directory on server1.

A quick and convenient way to copy the file from Debian server1 to server2 is with scp as it can also be used easily for an automated script to do the packages.txt file copying (if for instance you have to implement package cloning on multiple Debian Linux servers).

root@debian-server1:~# scp ./packages.txt hipo@server-hostname2:~/packages.txt
The authenticity of host '83.170.97.153 (83.170.97.153)' can't be established. RSA key fingerprint is 38:da:2a:79:ad:38:5b:64:9e:8b:b4:81:09:cd:94:d4. Are you sure you want to continue connecting (yes/no)? yes Warning: Permanently added '83.170.97.153' (RSA) to the list of known hosts. hipo@83.170.97.153's password:
packages.txt

As this is the first time I make connection to server2 from server1, I'm prompted to accept the host RSA unique fingerprint.

3. Install the copied selection from server1 on server2 with apt-get or dselect

debian-server2:/home/hipo# apt-get update
...
debian-server2:/home/hipo# apt-get upgrade
Reading package lists... Done
Building dependency tree
Reading state information... Done
debian-server2:/home/hipo# dpkg --set-selections < packages.txt
debian-server2:/home/hipo# apt-get -u dselect-upgrade --yes

The first apt-get update command assures the server will have the latest version of the packages currently installed, this will save you from running an outdated versions of the installed packages on debian-server2

Bear in mind that using apt-get sometimes, might create dependency issues. This is depending on the exact package names, being replicated in between the servers

Therefore it is better to use another approach with bash for loop to "replicate" installed packages between two servers, like so:

debian-server2:/home/hipo# for i in $(cat packages.txt |awk '{ print $1 }'); do aptitude install $i; done

If you want to automate the questioning about aptitude operations pass on the -y

debian-server2:/home/hipo# for i in $(cat packages.txt |awk '{ print $1 }'); do aptitude -y install $i; done

Be cautious if the -y is passed as sometimes some packages might be removed from the server to resolve dependency issues, if you need this packages you will have to again install them manually.

4. Mirroring package selection from server1 to server2 using one liner

A quick one liner, that does replicate a set of preselected packages from server1 to server2 is also possible with either a combination of apt, ssh, awk and dpkg or with ssh + dpkg + dselect :

a) One-liner code with apt-get unifying the installed packages between 2 or more servers

debian-server2:~# apt-get --yes install `ssh root@debian-server1 "dpkg -l | grep -E ^ii" | awk '{print $2}'`
...

If it is necessery to install on more than just debian-server2, copy paste the above code to all servers you want to have identical installed packages as with debian-server1 or use a shor for loop to run the commands for each and every host of multiple servers group.

In some cases it might be better to use dselect instead as in some situations using apt-get might not correctly solve the package dependencies, if encountering problems with dependencies better run:

debian-server2:/home/hipo# ssh root@debian-server1 'dpkg --get-selections' | dpkg --set-selections && dselect install

As you can see using this second dselect installed "package" mirroring is also way easier to read and understand than the prior "cryptic" method with apt-get, hence I personally think using dselect method is a better.

Well that's basically it. If you need to synchronize also configurations, either an rsync/scp shell script, should be used with all defined server1 config files or in case if a cloning of packages between identical server machines is necessery dd or some other tool like Norton Ghost could be used.
Hope this helps, someone.