Posts Tagged ‘script’
Friday, August 8th, 2014 
If're a Linux user and you need to script certain page extraction from PDF files, crypt protect with password a PDF file or decrypt (remote password protection from PDF) or do some kind of structural transformation of existing PDF file you can use a QPDF command line utility. qpdf is in active development and very convenient tool for Website developers (PHP / Perl / Python), as often on websites its necessery to write code to cut / tailer / restructure PDFs.
1. Install QPDF from deb / rpm package
qpdf is instalalble by default in deb repositories on Debian / Ubuntu GNU / (deb derivative) Linux-es to install it apt-get it
apt-get install –yes qpdf
On RPM based distribution CentOS / SuSE / RHEL / Fedora Linux to install qpdf, fetch the respective distribution binary from rpmfind.net or to install latest version of qpdf build it from source code.
2. Install QPDF from source
To build latest qpdf from source
- on RPM based distributions install with yum fullowing packages:
yum -y install zlib-devel pcre-devel gcc gcc-c++
- on Deb based Linuces, you will need to install
apt-get install –yes build-essential gcc dpkg-dev g++ zlib1g-dev
Then to build gather latest qpdf source from here
cd /usr/local/src
wget -q https://www.pc-freak.net/files/qpdf-5.1.2.tar.gz
tar -zxvf qpdf-5.1.2.tar.gz
cd qpdf-5.1.2/
./configure
make
make install
Once it is installed, if you get error on qpdf runtime:
/usr/local/bin/qpdf: error while loading shared libraries: libqpdf.so.13: cannot open shared object file: No such file or directory
To solve the error find in your compile directory libqpdf.so.13 and copy it to /usr/lib or /usr/local/lib
cp -rpf ./libqpdf/build/.libs/libqpdf.so.13 /usr/local/lib
3. Decrypt password encrypted (protected) PDF file
if you have time and you like reading be sure to check the extensive qpdf-manual.
To remove password from a PDF file protected with a password with qpdf
qpdf –password=SECRET-PASSWORD –decrypt input-file.pdf output-file.pdf
QPDF has a vast range of split and merge features. It can combine all the files in a folder (*.pdf), you can use it to try to recover damaged pdf files, extract individual pages from PDF, dump and reverse page range, make new created PDF with old PDF's reversed pages (pages 1,2,3,4 to become in order 4,3,2,1), apply some single pdf file metadata to multiple files.
4. Try to Recover damaged PDF file
To try to recover some damaged file with qpdf:
qpdf file-to-repair.pdf repaired-file.pdf
5. Extract certain pages or page range from PDF
It is recommended to use the version built from source to extract certain page range from PDF
/usr/local/bin/qpdf –empty –pages input-file.pdf 1-5 — outfile-file.pdf
If you wanted to take pages 1–5 from file1.pdf and pages 11–15 from file2.pdf in reverse, you would run
qpdf file1.pdf –pages file1.pdf 1-5 file2.pdf 15-11 — outfile.pdf
Tags: command, error while loading shared libraries, Extracting, kind, make, need, page, password, protection, QPDF, range, rpm, script, source code, use, usr, utility
Posted in Everyday Life, System Administration, Various, Web and CMS | 1 Comment »
Sunday, October 30th, 2011 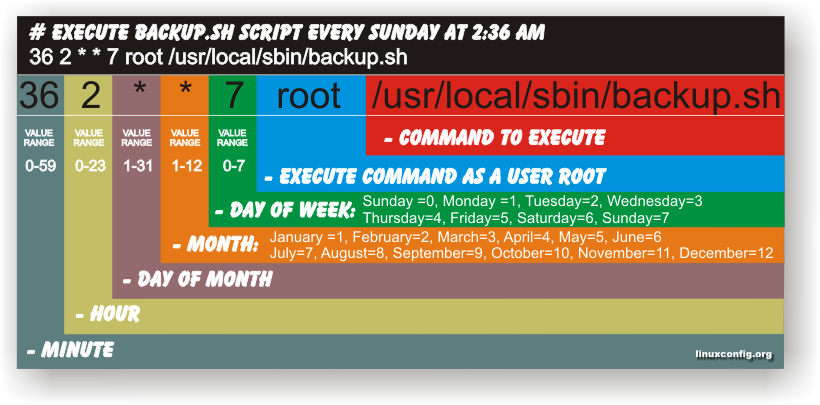
Have you ever been in need to execute some commands scheduled via a crontab, every let’s say 5 seconds?, naturally this is not possible with crontab, however adding a small shell script to loop and execute a command or commands every 5 seconds and setting it up to execute once in a minute through crontab makes this possible.
Here is an example shell script that does execute commands every 5 seconds:
#!/bin/bash
command1_to_exec='/bin/ls';

command2_to_exec='/bin/pwd';

for i in $(echo 1 2 3 4 5 6 7 8 9 10 11); do

sleep 5;

$command1_to_exec; $command2_to_exec;

done
This script will issue a sleep every 5 seconds and execute the two commands defined as $command1_to_exec and $command2_to_exec
Copy paste the script to a file or fetch exec_every_5_secs_cmds.sh from here
The script can easily be modified to execute on any seconds interval delay, the record to put on cron to use with this script should look something like:
# echo '* * * * * /path/to/exec_every_5_secs_cmds.sh' | crontab -
Where of course /path/to/exec_every_5_secs_cmds.sh needs to be modified to a proper script name and path location.
Another way to do the on a number of seconds program / command schedule without using cron at all is setting up an endless loop to run/refresh via /etc/inittab with a number of predefined commands inside. An example endless loop script to run via inittab would look something like:
while [ 1 ]; do

/bin/ls

sleep 5;

done
To run the above sample never ending script using inittab, one needs to add to the end of inittab, some line like:
mine:234:respawn:/path/to/script_name.sh
A quick way to add the line from consone would be with echo:
echo 'mine:234:respawn:/path/to/script' >> /etc/inittab
Of course the proper paths, should be put in:
Then to load up the newly added inittab line, inittab needs to be reloaded with cmd:
# init q
I've also red, some other methods suggested to run programs on a periodic seconds basis using just cron, what I found in stackoverflow.com's as a thread proposed as a solution is:
* * * * * /foo/bar/your_script

* * * * * sleep 15; /foo/bar/your_script

* * * * * sleep 30; /foo/bar/your_script

* * * * * sleep 45; /foo/bar/your_script
One guy, even suggested a shorted way with cron:
0/15 * * * * * /path/to/my/script
Tags: bashcommand, basis, com, command, command2, copy, copy paste, course, cron, crontab, echo 1, echo echo, endless loop, exec, file, foo, foo bar, freebsd, gnu linux, How to, init, inittab, interval, line, Linux, location, loop, mine, minute, name, nbsp, number, Path, predefined commands, pwd, record, refresh, respawn, run, script, script name, secs, SHA, Shell, shell script, sleep, something, stackoverflow, thread, time, time interval, way
Posted in Linux, Linux and FreeBSD Desktop, System Administration, Various | 1 Comment »
Wednesday, January 15th, 2014 
Recently I've been asked How to make communication to MySQL database encrypted. The question was raised by a fellow developer who works on developing a Desktop standalone application in Delphi Programming Language with DevArt an (SQL Connection Component capable to connect Delphi applications to multiple databases like MySQL, Oracle, PostgreSQL, Interbase, Firebird etc.
Communicating in Secured form to MySQL database is not common task to do, as MySQL usually communicates to applications hosted on same server or applications to communicate to MySQL are in secured DMZ or administrated via phpMyAdmin web interface.
MySQL supports encrypted connections to itself using Secure Socket Layer (SSL) encryption. Setting up MySQL db to be communicated encrypted is a must for standalone Desktop applications which has to extract / insert data via remote SQL.
Configuring SQL to support communicated queries encrpytion is supported by default and easily configured on most standard Linux version distributions (Debian, RHEL, Fedora) with no need to recompile it.
1. Generate SSL Certificates
$ mkdir /etc/mysql-ssl && cd mysql-ssl
# Create CA certificate
$ openssl genrsa 2048 > ca-key.pem
$ openssl req -new -x509 -nodes -days 3600 \
-key ca-key.pem -out ca-cert.pem
Create server certificate, remove passphrase, and sign it
server-cert.pem is public key, server-key.pem is private key
$ openssl req -newkey rsa:2048 -days 3600 \
-nodes -keyout server-key.pem -out server-req.pem
$ openssl rsa -in server-key.pem -out server-key.pem
$ openssl x509 -req -in server-req.pem -days 3600 \
-CA ca-cert.pem -CAkey ca-key.pem -set_serial 01 -out server-cert.pem
Create client certificate, remove passphrase, and sign it
client-cert.pem is public key and client-key.pem is private key
$ openssl req -newkey rsa:2048 -days 3600 \
-nodes -keyout client-key.pem -out client-req.pem
$ openssl rsa -in client-key.pem -out client-key.pem
$ openssl x509 -req -in client-req.pem -days 3600 \
-CA ca-cert.pem -CAkey ca-key.pem -set_serial 01 -out client-cert.pem
After generating the certificates, verify them:
$ openssl verify -CAfile ca-cert.pem server-cert.pem client-cert.pem
2. Add SSL support variables to my.cnf
Once SSL key pair files are generated in order to active SSL encryption support in MySQL server, add to (/etc/my.cnf, /etc/mysql/my.cnf, /usr/local/etc/my.cnf … ) or wherever config is depending on distro …
# SSL

ssl-ca=/etc/mysql-ssl/ca-cert.pem

ssl-cert=/etc/mysql-ssl/server-cert.pem

ssl-key=/etc/mysql-ssl/server-key.pem
3. Restart MySQL server
 /etc/init.d/mysqld restart

...
4. Create SQL user to require SSL login
Create new user with access to database;
GRANT ALL ON Sql_User_DB.* TO Sql_User@localhost;

FLUSH PRIVILEGES;
To create administrator privileges user:
 GRANT ALL PRIVILEGES ON *.* TO ‘ssluser’@'%’ IDENTIFIED BY ‘pass’ REQUIRE SSL;

FLUSH PRIVILEGES;
5. Test SSL Connection with MySQL CLI client or with few lines of PHP
To use mysql cli for testing whether SSL connection works:
$ mysql -u ssluser -p'pass' –ssl-ca /etc/mysql-ssl/client-cert.pem –ssl-cert /etc/mysql-ssl/client-key.pem
Once connected to MySQL to verify SSL connection works fine:
 mysql> SHOW STATUS LIKE 'Ssl_Cipher';

 +---------------+--------------------+

| Variable_name | Value              |

 +---------------+--------------------+

| Ssl_cipher    | DHE-RSA-AES256-SHA |

+---------------+--------------------+
If you get this output this means MySQL SSL Connection is working as should.
Alternative way is to use test-mysqli-ssl.php script to test availability to mysql over SSL.
$conn=mysqli_init();

mysqli_ssl_set($conn, '/etc/mysql-ssl/client-key.pem', '/etc/mysql-ssl/client-cert.pem', NULL, NULL, NULL);

if (!mysqli_real_connect($conn, '127.0.0.1', 'ssluser', 'pass')) { die(); }

$res = mysqli_query($conn, 'SHOW STATUS like "Ssl_cipher"');

print_r(mysqli_fetch_row($res));

mysqli_close($conn);
Note: Change username password according to your user / pass before using the script
That's all now you have mysql communicating queries data over SSL
Tags: administrator, application, change, cnf, common, data, databases, Debian, Delphi Programming Language, Desktop, DMZ, fellow, How to, make, multiple, null, openssl, password, pem, php, queries, rhel, script, setting, SSL, testing, username, variables
Posted in MySQL, System Administration, Web and CMS | No Comments »
Tuesday, February 21st, 2012 
Did you ever needed to count, how many files in a directory are there?
Having the concrete number of files in a directory is not a seldom task but still very useful especially for scripts or simply for the sake of learning
The quickest and maybe the easiest way to count all files in a directory in Linux is with a combination of find and wc commands:
Here is how;
linux:~# cd ascii

linux:~/ascii# find . -type f -iname '*' -print |wc -l

407
This will find and list all matched files in any directory and subdirectories, print them out and count them with wc command.
The -type f argument instructs find to look only for files.
Other helpful variance of finding and listing all files in a directory and subdirectories is to list and count all the files with a certain file extension under a directory. For example, lets list all text files (.txt) contained in a directory and all level sub-directories:
linux:~/ascii# find . -type f -iname '*.txt' -print |wc -l

401
If you need to check the number of files in a directory for multiple directories on a server and you're aiming at doing it efficienly, issung above find .. | wc code will definitely be not a good choice. If used it will generate heavy load for the system and along with that will complete the execution in ages if issued on a large number of files containing dirs.
Thanksfully if efficiency is targetted, there is a command written in C called tree which is more efficient than find.
To count the number of files in dir but using tree :
linux:~# cd ascii

linux:/ascii# tree | tail -n 1

32 directories, 407 files
By default tree prints info for both the number of found files and directories.
To print out only the files matched, awk comes handy, e.g.:
linux:/ascii# tree |tail -n 1| awk '{ print $3 }'407
To list only the number of files in a directory without its existing sub-directories ls + wc use is also possible:
linux:~/ascii# ls -l | grep ^- | wc -l68
This result the above command would produce is +1 more than the real number of files, as it counts the directory ".." as one file (in UNIX / LINUX everything is file).
A short one liner script that can calculate all files correctly by substracting 1 is and hence present correct result on number of files is like so:
linux:~/ascii# var=$(ls -l | grep ^- | wc -l); var=$(($var - 1)); echo $var
ls can be used to calculate the number of 1-st level sub-directories under certain directory for instance:
linux:~/ascii# ls -l |grep ^d|wc -l

25
You see the ascii directory has 25 subdirectories in its 1st level.
To check symlinks under a directory with ls the command would be:
linux:~/ascii# ls -l | grep ^l | wc -l

0
Note above 3 ls | grep … examples, will not work properly if the directory contains files with SUID or some special properties set.
Hence to get the same 3 results for active files, directories and symbolic links, a one liner similar to the one below can be used instead:
linux:~/ascii# for t in files links directories; do echo `find . -type ${t:0:1} | wc -l` $t; done 2> /dev/null

407 files

0 links

33 directories
This will show statistics about all files, links and directories for all directory sub-levels.
Just in case if there is need to only count files, links and directories without directory recursion enabled, use:
linux:~/ascii# for t in files links directories; do echo `find . -maxdepth 1 -type ${t:0:1} | wc -l` $t; done 2> /dev/null

68 files

0 links

26 directories
Anyways the above bash loop will be slow, for directories containing thousands of files. For better performance the equivallent of above bash loop rewritten in perl would be:
linux:~/ascii# ls -l |perl -e 'while(<>){$h{substr($_,0,1)}+=1;} END {foreach(keys %h) {print "$_ $h{$_}\n";}}'

- 68

d 25

t 1

linux:~/ascii#
In any case the most preferrable and efficient way to count files en directories is by using tree command.
In my view using always tree command instead of code "hacks" is smart idea.
In Slackware tree command is part of the base install, on Debian and CentOS Linux, tree cmd is not part of the base system and requires install via apt / yum e.g.:
debian:~# apt-get --yes install tree

...
[root@centos:~ ]# yum --yes install tree
Happy counting 😉
Tags: are, argument, Ascii, asciilinux, Auto, code, default tree, Draft, efficiency, everything, execution, exi, file, file extension, filesBy, grep, heavy load, iname, info, instance, level, Linux, linux cd, maxdepth, number, prints, quot, recursion, sake, script, scripts, SUID, tail, text, tree, type, variance, yum
Posted in Linux, System Administration | No Comments »
Friday, April 8th, 2011 I needed to convert a bunch of files from WAV to MP3 format on my Linux desktop.
I’ve placed all my wav files to the directory /home/hipo/wav
And then I issued the small one liner script to convert the .wav files to .mp3 using the niftly lame linux mp3 convertor.
Here is how I did it:
linux-desktop:~$ cd wav

linux-desktop:/home/hipo/wav$ for i in *.wav; do

new_name=$(echo $i |sed -e 's#wav#mp3#g');

lame -V0 -h -b 160 --vbr-new "$i" "$new_name";

done
After executing the little script you might go and have a coffee, if you have thousands of files, each file convertion takes about 10-15 seconds of time (speed depends on your CPU).
Here is some output from a lame convertion to mp3 taking place:
Encoding as 8 kHz single-ch MPEG-2.5 Layer III VBR(q=0)

Frame | CPU time/estim | REAL time/estim | play/CPU | ETA

27237/27237 (100%)| 0:12/ 0:12| 0:12/ 0:12| 155.89x| 0:00

64 [27237] ***************************************************************

----------------------------------------------

kbps mono % long switch short %

64.0 100.0 84.1 8.9 7.0
If you want to save my convertion quickly for a later, download my Convert WAV to mp3 from a directory with lame shell script here
Actually there are plenty of other ways to convert wav to mp3 on Linux through mplayer, ffmpeg even with mpg123.
There are also some GUI programs that could do the convertion like winff , however for some weird reason after installing WinFF on my debian it was not able to complete convertion to mp3?!
But it doesn’t matter, the good news is I did what I wanted to via the simple lame program and the above script, hope it helps somebody out there.
Tags: coffee, Convert, convertion, convertor, cpu time, Desktop, desktop cd, download, estim, eta, ffmpeg, file, format, Frame, gui programs, hipo, linux desktop, linux mp3, mpg, mpg123, place, real time, reason, script, Shell, shell script, time, time speed, v0, VBR, WAV, wav files, wav mp3, weird reason, WinFF
Posted in Linux and FreeBSD Desktop, Linux Audio & Video | 8 Comments »
Tuesday, May 3rd, 2011 Every now and then my FreeBSD router dmesg ( /var/log/dmesg.today ) logs, gets filled with error messages like:
pid 86369 (httpd), uid 80, was killed: out of swap space

swap_pager_getswapspace(14): failed

swap_pager_getswapspace(16): failed

swap_pager_getswapspace(11): failed

swap_pager_getswapspace(12): failed

swap_pager_getswapspace(16): failed

swap_pager_getswapspace(16): failed

swap_pager_getswapspace(16): failed

swap_pager_getswapspace(16): failed

swap_pager_getswapspace(14): failed

swap_pager_getswapspace(16): failed

swap_pager_getswapspace(8): failed
Using swapinfo during the swap_pager_getswapspace(16): failed messages were logged in, I figured out that definitely the swap memory over-use is the bottleneck for the troubles, to find this I used the command:
freebsd# swapinfo

Device 1K-blocks Used Avail Capacity Type

/dev/ad0s1b 49712 45920 3792 92% Interleaved
After some investigation, I’ve figured out that the MySQL server is causing the kernel exceeded swap troubles.
My current MySQL server version is installed from the ports tree, whether I’m using the bsd port /usr/ports/databases/mysql51-server/ and it appears to work just fine.
However I have noticed that the mysql-server is missing a my.cnf file!, which means the mysql server is running under a mode with some kind of default configurations.
Strangely in the system process list it appeared it is using a default my.cnf file located in /var/db/mysql/my.cnf
Below you see the paste from the ps command:
ps axuww
freebsd# ps axuww | grep -i my.cnf | grep -v grep

mysql 7557 0.0 0.1 3464 1268 p1 I 12:03PM 0:00.01 /bin/sh /usr/local/bin/mysqld_safe --defaults-extra-file=/var/db/mysql/my.cnf --user=mysql --datadir=/var/db/mysql --pid-file=/var/db/mysql/pcfreak.pidmysql 7589 0.0 5.1 93284 52852 p1 I 12:03PM 0:59.01 /usr/local/libexec/mysqld --defaults-extra-file=/var/db/mysql/my.cnf --basedir=/usr/local --datadir=/var/db/mysql --user=mysql --pid-file=/var/db/mysql/pcfreak.pid --port=3306 --socket=/tmp/mysql.sock
Nevertheless it appeared the sql server is running the file /var/db/mysql/my.cnf conf was not existing! This was really weird for me as I’m used to have the default my.cnf from my previous experience with Linux servers!
Thus the next logical thing I did was to create my.cnf conf file in order to be able to have a proper limiting configuration for the sql server.
The FreeBSD my.cnf skele files are found in /usr/local/share/mysql/, here are the 4 files one can use as a starting basis for further configuration of the mysql-server.
freebsd# ls -al /usr/local/share/mysql/my-*.cnf

-r--r--r-- 1 root wheel 4948 Aug 12 2009 /usr/local/share/mysql/my-huge.cnf

-r--r--r-- 1 root wheel 20949 Aug 12 2009 /usr/local/share/mysql/my-innodb-heavy-4G.cnf

-r--r--r-- 1 root wheel 4924 Aug 12 2009 /usr/local/share/mysql/my-large.cnf

-r--r--r-- 1 root wheel 4931 Aug 12 2009 /usr/local/share/mysql/my-medium.cnf

-r--r--r-- 1 root wheel 2502 Aug 12 2009 /usr/local/share/mysql/my-small.cnf
I have chosen to use the my-medium.cnf as a skele to tune up, as my server is not high iron one e.g. the host I run the mysql is a (simple dual core 1.2Ghz system).
Further on I copied the /usr/local/share/mysql/my-medium.cnf to /var/db/mysql/my.cnf e.g.:
freebsd# cp -rpf /usr/local/share/mysql/my-medium.cnf /var/db/mysql/my.cnf
As a next step to properly tune up the default values of the newly copied my.cnf to my specific server I used the Tuning-Primer MySQL tuning script
Using tuning-primer.sh is really easy as all I did is download, launch it and follow the script suggestions to correct some of the values already in my.cnf
I have finally ended up with the following my.cnf after using tuning-primer.sh to optimize mysql server to work with my bsd host
Now I really hope the shitty swap_pager_getswapspace: failed errors would not haunt me once again by crashing my server and causing mem overheads.
Still I wonder why the port developer Alex Dupre – ale@FreeBSD.org choose not to provide the default mysql51-server conf with some kind of my.cnf file? I hope he had a good reason.
Tags: Aug, Avail, avail capacity, bottleneck, cause and solution, cnf, command ps, databases, default, default configurations, dmesg, error messages, failedswap, file, freebsd router, getswapspace, host, Interleaved, investigation, kernel, log, logs, memory, mysql server, mysqld, pcfreak, ports, ps command, root, script, server version, Strangely, swapinfo, system, tree, uid
Posted in FreeBSD, MySQL, System Administration | 2 Comments »
Saturday, April 28th, 2012 When a server hard disk scape gets filled its common that Apache returns empty (no content) pages…
This just happened in one server I administer. To restore the normal server operation I freed some space by deleting old obsolete backups.
Actually the whole reasons for this mess was an enormous backup files, which on the last monthly backup overfilled the disk empty space.
Though, I freed about 400GB of space on the the root filesystem and on a first glimpse the system had plenty of free hard drive space, still restarting the MySQL server refused to start up properly and spit error:
Incorrect key file for table '/tmp/#sql_9315.MYI'; try to repair it" mysql start up error
Besides that there have been corrupted (crashed) tables, which reported next to above error.
Checking in /tmp/#sql_9315.MYI, I couldn't see any MYI – (MyISAM) format file. A quick google look up revealed that this error is caused by not enough disk space. This was puzzling as I can see both /var and / partitions had plenty of space so this shouldn't be a problem. Also manally creating the file /tmp/#sql_9315.MYI with:
server:~# touch /tmp/#sql_9315.MYI
Didn't help it, though the file created fine. Anyways a bit of a closer examination I've noticed a /tmp filesystem mounted besides with the other file system mounts ????
You can guess my great amazement to find this 1 Megabyte only /tmp filesystem hanging on the server mounted on the server.
I didn't mounted this 1 Megabyte filesystem, so it was either an intruder or some kind of "weird" bug…
I digged in Googling to see, if I can find more on the error and found actually the whole mess with this 1 mb mounted /tmp partition is caused by, just recently introduced Debian init script /etc/init.d/mountoverflowtmp.
It seems this script was introduced in Debian newer releases. mountoverflowtmp is some kind of emergency script, which is triggered in case if the root filesystem/ space gets filled.
The script has only two options:
# /etc/init.d/mountoverflowtmp

Usage: mountoverflowtmp [start|stop]
Once started what it does it remounts the /tmp to be 1 megabyte in size and stops its execution like it never run. Well maybe, the developers had something in mind with introducing this script I will not argue. What I should complain though is the script design is completely broken. Once the script gets "activated" and does its job. This 1MB mount stays like this, even if hard disk space is freed on the root partition – / ….
Hence to cope with this unhandy situation, once I had freed disk space on the root partition for some reason mountoverflowtmp stop option was not working,
So I had to initiate "hard" unmount:
server:~# mount -l /tmp
Also as I had a bunch of crashed tables and to fix them, also issued on each of the broken tables reported on /etc/init.d/mysql start start-up.
server:~# mysql -u root -p

mysql> use Database_Name;

mysql> repair table Table_Name extended;

....
Then to finally solve the stupid Incorrect key file for table '/tmp/#sql_XXYYZZ33444.MYI'; try to repair it error, I had to restart once again the SQL server:
Stopping MySQL database server: mysqld.

Starting MySQL database server: mysqld.

Checking for corrupt, not cleanly closed and upgrade needing tables..

root@server:/etc/init.d#
Tadadadadam!, SQL now loads and works back as before!
Tags: amazement, apache, Auto, backup files, backups, Disk, disk space, Draft, drive, emergency, empty space, file, file tmp, first glimpse, format, free hard drive, free hard drive space, google, googling, hard disk, help, Incorrect, init, intruder, key file, mess, MYI, MyISAM, mysql server, mysqld, operation, partition, quot, root, root filesystem, script, server operation, shouldn, size, something, TABLE, tmp, weird bug
Posted in MySQL, System Administration, Web and CMS | 2 Comments »
Friday, November 23rd, 2012

If you get thousand of messages:
[Wed Nov 21 16:28:49 2012] [error] [client 89.136.100.192] client sent HTTP/1.1 request without hostname (see RFC2616 section 14.23): /w00tw00t.at.ISC.SANS.DFind:)
in /var/log/apache2/error.log It is due to a script kiddie port scanner, usually such requests originate from Turkia, Romania ,Russia.. Usually, for servers getting in Apache error.log GET
/w00tw00t.at.ISC.SANS.DFind:)
once in a while, it is not an issue however if you get too many of this messages it is sometimes useful to filter them with a simple iptables rule
debian:~# /sbin/iptables -A INPUT -p tcp -m tcp --dport 80 -m string --string "GET /w00tw00t.at.ISC.SANS." --algo bm --to 70 -j DROP
What above command does is it greps the 1st 70 bytes and checks, whether it contains string '/w00tw00t.at.ISC.SANS.DFind:)' , whether string is matched it jumps to DROP rule filtering the IP. Of course on busy servers checking each incoming IP client TCP/IP request for a certain string might not be very efficient and even can be a possible bottleneck. So I don't know whether filtering /w00tw00t.at.ISC.SANS.DFind:) is good or bad practice. Anyways generally it is wise to filter IPs doing the request anyways since, they could try a various script kiddie cracking tools, port scanners and even some of them might be hosts attempting DoS or DDoS.
Also it is useful to store for later the rule with:
debian:~# /sbin/iptables-save > /root/iptables_rules.txt
Then you can load up /root/iptables_rules.txt with:
debian:~# /sbin/iptables-restore < /root/iptables_rules.txt
Some common way to keep the iptables rule loaded on system boot is by adding /iptables-restore to /etc/rc.local
Some alternative methods to filter IPs issuing GET /w00tw00t.at.ISC.SANS.DFind:) to Apache is through fail2ban, denyhosts or blockhosts or Apache mod security filters.
You can read further Information on what DFind hacktool does here
To keep an eye on all DROPped and REJECT-ed traffic (in bytes) it is useful to use:
 debian:~# /sbin/iptables -L INPUT -nvx|grep -i -E 'drop|reject'

       0        0 REJECT     tcp  --  *      *       0.0.0.0/0            0.0.0.0/0           tcp dpt:3306 reject-with icmp-port-unreachable

       0        0 DROP       icmp --  *      *       0.0.0.0/0            0.0.0.0/0           icmp type 17

       0        0 DROP       icmp --  *      *       0.0.0.0/0            0.0.0.0/0           icmp type 13

       0        0 DROP       tcp  --  *      *       0.0.0.0/0            0.0.0.0/0           tcp flags:0x03/0x03

       0        0 DROP       tcp  --  *      *       0.0.0.0/0            0.0.0.0/0           tcp flags:0x06/0x06

    1526    77004 REJECT     tcp  --  *      *       0.0.0.0/0            0.0.0.0/0           tcp reject-with icmp-host-prohibited


For filtering
Tags: apache, dfind, ERROR, filtering, script, w00tw00t
Posted in Computer Security, Linux, System Administration | No Comments »
Friday, July 27th, 2012 I’ve used K3B just recently to RIP an Audio CD with music to MP3. K3b has done a great job ripping the tracks, the only problem was By default k3b RIPs songs in OGG Vorbis (.ogg) and not mp3. I personally prefer OGG Vorbis as it is a free freedom respecting audio format, however the problem was the .ogg-s cannot be read on many of the audio players and it could be a problem reading the RIPped oggs on Windows. I’ve done the RIP not for myself but for a Belarusian gfriend of mine and she is completely computer illiterate and if I pass her the songs in .OGG, there is no chance she succed in listening the oggs. I’ve seen later k3b has an option to choose to convert directly to MP3 Using linux mp3 lame library this however is time consuming and I have to wait another 10 minutes or so for the songs to be ripped to shorten the time I decided to directly convert the existing .ogg files to .mp3 on my (Debian Linux). There are probably many ways to convert .ogg to mp3 on linux and likely many GUI frontends (like SoundConverter) to use in graphic env.
I however am a console freak so I preferred doing it from terminal. I’ve done quick research on the net and figured out the good old ffmpeg is capable of converting .oggs to .mp3s. To convert all mp3s just ripped in the separate directory I had to run ffmpeg in a tiny bash loop.
A short bash shell script 1 liner combined with ffmpeg does it, e.g.;
for f in *.ogg; do ffmpeg -i "$f" "`basename "$f" .ogg`.mp3"; done.....
The loop example is in bash so in order to make the code work on FreeBSD it is necessery it is run in a bash shell and not in BSDs so common csh or tcsh.
Well, that’s all oggs are in mp3; Hip-hip Hooray 😉
Tags: audio cd, Auto, basename, bash shell script, BSDs, chance, code, consuming, csh, debian linux, Draft, ffmpeg, format, freak, freebsd, freedom, frontends, GNU, gnu linux, job, k3b, Linux, necessery, Ogg, ogg files, oggs, option, RIPs, script, Shell, soundconverter, terminal, time, time consuming, vorbis ogg, work
Posted in Everyday Life, FreeBSD, Linux and FreeBSD Desktop, Linux Audio & Video | No Comments »
Wednesday, July 18th, 2012 
At security critical hosts running Apache + PHP based sites it is recommended functions like:
system();

exec();shell_exec();.....
to be disabled. The reason is to mainly harden against script kiddies who might exploit your site/s and upload some shitty SK tool like PHP WebShell, PHP Shell and the probably thousands of “hacker” variations that exist nowdays.
In latest Debian stable Squeeze, suhosin – advanced protection module for php5 is being installed and enabled in Apache (by default).
Simply disabling a number of functions using suhosin, could prevent multiple of future headaches and hours of pondering on who 0wn3d your server ….
Disabling the basic PHP system(); and other similar functions which allows shell spawn is not always possible, since some websites or CMS platforms depends on them for proper runnig, anyways whether it is possible disabling ’em is a must.
There are two ways to disable system(); functions; One is through using /etc/php5/apache2/conf.d/suhosin.ini and 2nd by adding a list of functions that has to be disabled directly in Website Virtualhost file or in apache2.conf (/etc/apache2/apache2.conf;
For people hosting multiple virtualhost websites on the same server using the custom domain Virtualhost method is probably better, since on a global scale the functions could be enabled if some of the websites hosted on the server requires exec(); to work OK. In any case using /etc/php5/apache2/conf.d/suhosin.ini to disable system(); functions in PHP is less messy …
1. Disabling PHP system(); fuctions through /etc/apache2/apache2.conf and custom site Vhosts
Place somewhere (I prefer near the end of config);;;
php_admin_flag safe_mode on

php_admin_value disable_functions "system, exec, shell_exec, passthru , ini_alter, dl, pfsockopen, openlog, syslog, readlink, symlink, link, leak, fsockopen, popen, escapeshellcmd, apache_child_terminate apache_get_modules, apache_get_version, apache_getenv, apache_note,apache_setenv,virtual"
Disabling it for custom virtualhost is done by simply adding above Apache directvies (before the closing tag in /etc/apache2/sites-enabled/custom-vhost.com
2. Disabling PHP system();, exec(); shell spawn with suhosin.ini
In /etc/php5/apache2/conf.d/suhosin.ini add;;
suhosin.executor.func.blacklist =system, exec, shell_exec, passthru, ini_alter, dl,

pfsockopen, openlog, syslog, readlink, symlink, link, leak, fsockopen, popen,

escapeshellcmd, apache_child_terminate apache_get_modules, apache_get_version,

apache_getenv, apache_note,apache_setenv,virtual
To do it directly via shell issue;;;
server: conf.d/# cd /etc/php5/apache2/conf.d/

server: conf.d# echo 'suhosin.executor.func.blacklist =system, exec, shell_exec, passthru, ini_alter, dl,' >> suhosin.ini

server: conf.d# echo 'pfsockopen, openlog, syslog, readlink, symlink, link, leak, fsockopen, popen,' >> suhosin.ini

server: conf.d# echo escapeshellcmd, apache_child_terminate apache_get_modules, apache_get_version,' >> suhosin.ini

server: conf.d# echo 'apache_getenv, apache_note,apache_setenv,virtual' >> suhosin.ini
Then to re-load the memory loaded Apache libphp library an Apache restart is necessary;
server: conf.d# /etc/init.d/apache2 restart

Restarting web server: apache2 ... waiting .

server: conf.d#
Tadam, this should be quite a good security against annoying automated script attacks. Cheers 😉
Tags: apache security, apache2, Auto, custom, custom domain, debian gnu, Draft, escapeshellcmd, exec, func, global scale, GNU, gnu linux, harden, headaches, ini, Linux, number, passthru, php admin, php5, popen, protection, reason, runnig, safe mode, script, script kiddies, Shell, squeeze, suhosin, symlink, syslog, system, system functions, tool, two ways, VhostsPlace, Virtualhost, WebShell
Posted in Computer Security, System Administration, Web and CMS | 3 Comments »


