I hate facebook, from the deepness of my guts! However, unfortunately in one of the companies I'm employed, occasionally I have to use it as an advertisement media to improve the Search Engine visibility for their websites (gather them some more likes). As a not big lover of facebook, I'm also not a facebook-pro, anyways with this circumstances, I'm starting to learn basic tips on, making a facebook page / profile more user friendly and hence more attracting to facebook users.
From what, i"ve read there are plenty of factors that can affect on how attractive a facebook page / company profile , anyways some of the factors are more important to tamper than others. Such two factors of top importance are:
Let me evaluate a bit on each of the three aforementioned fb marketing weight factors.
1. Using Page likes for popularization.
– Lets say that you would like to make marketing to a company websites which is involved in Financial or Investment market. Enter with the company created page or profile and facebook and think for and search for as many keywords related to the company business as possible. Check each of the results if the Page / Group is liked by hundred thousands of other people, then just give it a like too. By doing so for a couple of seconds all this (hundred thousands or millions) of people who has also liked it will see for a second (or less), what hangs on your Facebook profile 😉 The chance someone gets interested into what is your profile saying here is high especially if this pops up to a some 100 000+ of logged people who previously liked a fb page 🙂
2. Joining groups as a way to drive more visitors to a facebook profile
Joining big groups consisting ot thousands or millions's logic is the same like with the page likes. The only difference is some groups are kept private the so called (Closed Group). Finding a number of similar (Open Groups) to your company activities and joining them will possibly display your company facebook profile to as many profiles as the group has. Most of the groups are not too active therefore joing groups as a way to drive attention of facebook users to a desired profile is not so efficient as with Page Likes Adjusting a profile picture logo dimensions to a wide skyscraper.
It might seem strange but actually the size of profile picture set to pages or profiles in facebook matters, different profiles dimensions could have impact on Page Likes 🙂 The reason for the fb picture profile having influence on the marketing is very simple. If you have a wider picture you can graphically include more data visible for the user that is always stuck to the page and hence seen by the user.
I've realized this after, I've red few articles online on the same topic along with that I've noticed many big brand pages on Facebook like for instance BMW (Cars) with over 8 000 000 of likes, Adidas and Nike – with over 6 000 000 likes, have set up this wide skyscraper dimensions logos.
Here is a crop taken displaying the wide skyscraper profile picture set by BMW cars.The profile picture used by BWM (cars) has an image dimensions of: 180×500 heigh x widthAdidas's profile logo has a size of 180×489.
Nike uses a bit of unstandard 390×720 (but while uploaded facebook website automatically crops the image to a size which is fittable for a wide skyscraper) with dimensions like (200×400)Another franchising company with big likes base, I've seen is McDonald's with 19 900 000+ likes! again with a banner logo consisting of wide scraper with picture dimenions (180×439 – height / width )There are some comparatively big user base facebook pages, like Ubuntu's non-profit organization with 555 000+ thousands of likes, and their logo has dimensions of 180×181 pixels.
Not all of the highly liked (visited) facebook pages however use a wide skyscraper as a profile logo and still has enormous number of likes. One contra-example showing that there is no clear relation between facebook profile picture dimensions and page popularity (number of likes) is Metallica (Musician/Band) fan page – (http://www.facebook.com/Metallica), which as of the time of writting this article has the UNIQUE HIGH NUMBER of 23,725,897 LIKES! 🙂
As far as, I've further red on many blogs, there are two general facebook standard banner profile picture recommendations:
1. One is facebook square like profile picture
– (this is the classics), if you just place a picture that is not too wide automatically facebook upload scripts will tailer the picture to have dimensions like: 180×180 pixels
The other recommended facebook pictures size is the wide wide-scraper and it should possess an image dimensions size similar to: width x height -180×500 pixels
This is pretty much the few basics I so far, know of can help to easily gather a custom fb company Page Likes. As facebook is really HUGE nowdays fb marketing has advanced tremendously.
I'll be glad to hear some cool tips & tricks you know?which can help a facebook page / profile popularity rise up. Looking forward to hear for your good or bad facebook experiences 🙂
Likes of pages, which are liked by thousands of hundreds or millions of people
Belongings to groups / Membering to big groups (consisting of thousands) which hold similar interest or business activity
Many people are using ThePiratebay to get all kind of data and share Movies, Games, Programs etc.)
ThePirateBay has become like a standard media for file sharing and still not many people are aware of who is behind ThePirateBay. This is why I thought, by posting this article I can "rant" on the existence of the Swedish Pirate Party The Pirate Party – Is a party fighting on behalf of information sharing freedom (or in other words a party fighting for our freedom as individuals in the digital era).
Pirate Party (Sweden) party official mascot
The Pirate party are swedish political party established in 2006, its members are activists lobbying on freedom of information as well as pointing at threats to our human freedoms imposed by new legislations and anti-freedom agreements like the recent ACTA treaty.
Since there creation in 2006, they have grown from a local Swedish party to an international party, locally existing in 33 countries arount the world.The ideology behind the Swedish PirateParty as well as the rest of existing Pirate Parties international is as I prior said Freedom of Information on the internet. PP is a party phenomenon, as they are neither a left or a right oriented party (on the traditional left-right scale). PP are independent bloc pursuing their political agenda colabborating with all mainstream parties, which stand behind the ideologies the party fights for.
After last European Parliament elections, PP received 7% of all Swedish votes for a country EU representative. As of today according to Wikipedia , the party holds 2 EU deputee seats in EU parliament.
I've a friend who is taking membership in the Pirate Party and from him I know the PP party are big supporters of Free Software.
One major key figure part of Pirate Party is the swedish Peter Sunde. He is a front person who is behind ThePirateBay project as well as holds a very interesting revolutionary ideas. Many of his ideas are close to "the father of all free software" – Richard Mathew Stallman (RMS). Therefore the PP would be probably of interest to anyone who is interested in Free Software. Here is an interview with Peter Sunde's taken in Cebit 2011:
As long as I know the Pirate Party are along the only few organizations in the whole world, who are trying to fight on behalf of human freedom.I'll be glad to hear if someone know about other ornigazations apart from Pirate Party the Free Software Foundation – (FSF) lobbying on present worsening conditions of invidual human freedom.
Here is few curious facts proving how BIG and important thepiratebay.org is, the text below is again quote from Wikipedia
Currently ThePirateBay.org is ranked as the 80th most visited website in the world and 20th in Sweden by Alexa Internet, has over 5.5 million registered users and, as of February 2012, hosts more than 4 million torrent files.
According to the Los Angeles Times, The Pirate Bay is "one of the world's largest facilitators of illegal downloading" and "the most visible member of a burgeoning international anti-copyright or pro-piracy movement"
Mounting ISO files in Linux is easy with mount cmd, however remembering the exact command one has to issue is a hard task because mounting ISO files is not a common task.
Mounting ISO files directly by clicking on the ISO file is very nice, especially for lazy people uninitiated with the command line 😉
Besides that I'm sure many Windows users are curious if there is an equivallent program to DaemonTools for Linux / BSD*?
The answer to this question is YES! There are two major programs which can be used as a DaemonTools substitute on Linux:
These are FuriousISOMount and AcetoneISO AcetoneISO is more known and I've used it some long time ago and if I'm correct it used to be one of the first ISO Mount GUI programs for Linux. There is a project called GMount-ISO / (GMountISO) which of the time of writting this article seems to be dead (at least I couldn't find the source code).
Luckily FuriousISOMount and AcetoneISO are pretty easy to install and either one of the two is nowdays existing in most Linux distributions. Probably the programs can also be easily run on BSD platform also quite easily using bsd linux emulation. If someone has tried something to mount GUIs in Free/Net/OpenBSD, I'll be interesting to hear how?
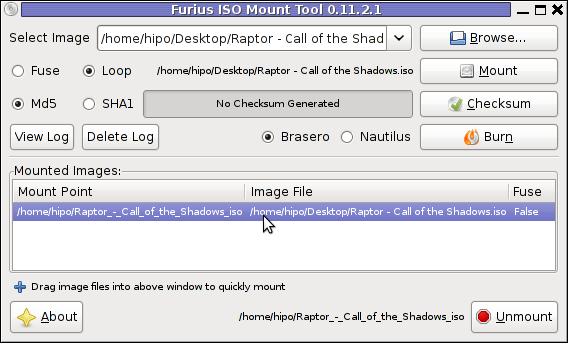
1. Mount ISO files GUI in GNOME with Furius ISO Mount
FuriousISOMount is a simple Gtk+ interface to mount -t iso9660 -o loop command.
To start using the program on Debian / Ubuntu install with apt;
debian:~# apt-get install furiusisomount

The following extra packages will be installed:

fuseiso fuseiso9660 libumlib0

The following NEW packages will be installed:

furiusisomount fuseiso fuseiso9660 libumlib0
…
To access the program in GNOME after install use;
Applications -> Accessories -> Furious ISO Mount
When mounting it is important to choose Loop option to mount the iso instead of Fuse
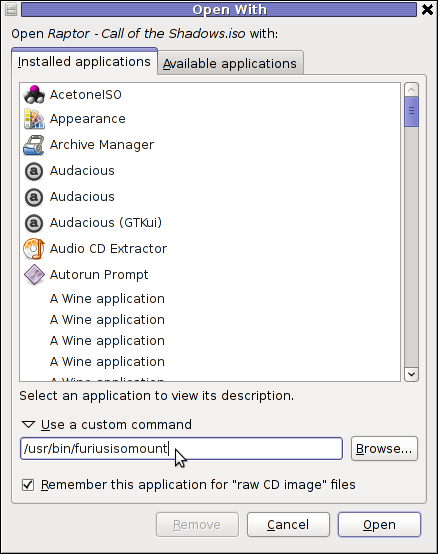
After the program is installed to associate the (.iso) ISO files, to permanently be opened with furiusisomount roll over the .iso file and choose Open With -> Other Application -> (Use a custom command) -> furiusisomount
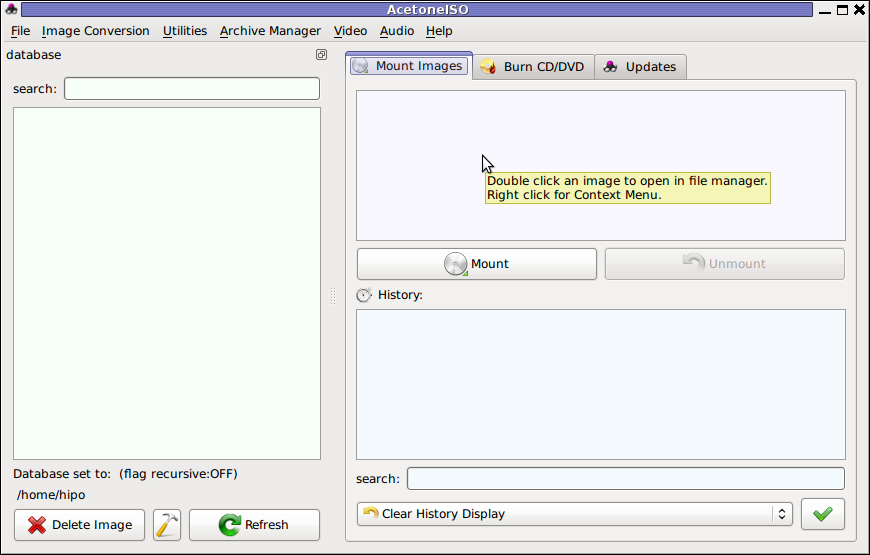
2. Mount ISO Files in KDE Graphical Environment with AcetoneISO
AcetoneISO is build on top of KDE's QT library and isway more feature rich than furiousisomount. Installing AcetoneISO Ubuntu and Debian is done with:
debian:~# apt-get install acetoneiso

The following NEW packages will be installed:

acetoneiso gnupg-agent gnupg2 libksba8 pinentry-gtk2 pinentry-qt4

0 upgraded, 6 newly installed, 0 to remove and 35 not upgraded.

Need to get 3,963 kB of archives.

After this operation, 8,974 kB of additional disk space will be used.

...
AcetoneISO supports:
conversion between different ISO formats
burn images to disc
split ISO image volumes
encrypt images
extract password protected files
Complete list of the rich functionality AcetoneISO offers is to be found on http://www.acetoneteam.org/viewpage.php?page_id=6 To start the program via the GNOME menus use;
Applications -> Accessories -> Sound & Video -> AcetoneISO
I personally don't like AcetoneISO as I'm not a KDE user and I see the functionality this program offers as to rich and mostly unnecessery for the simple purpose of mounting an ISO.
3. Mount ISO image files using the mount command
If you're a console guy and still prefer mounting ISO with the mount command instead of using fancy gui stuff use:
# mount -t iso9660 -o loop /home/binary/someiso.iso /home/username/Iso_Directory_Name
I’ve recently realized that the Easy Adsenser plugin which I used to place google adsense advertisements on my blog, is probably stealing some portion of my clicks.
There were some fraud reports on wordpress.org by people who have found out the author of Easy Adsenser rips clicks, by showing sometimes his own ad code even if the plugin is configured to not grant any clicks as a donation to the plugin author. I don’t know how true this story is and I don’t have the time to observe the whole plugin code to say for sure if the rumors about clicks stealing are true.
However as I’m paying my internet access (that guarantees) by blog to stay online with some adsense advertisements and the adsense revenues are either equal to my internet tax or a bit higher (depending on the month), it’s quite unpleasent to hear someone is stealing from the ads clicks which still generate very low revenue.
Thus I took the time to read some blog posts online which gave me some hints on how can I directly place the google adsense advertisement code into the theme template files
My goal was to place one google adsense ad to appear right after the title of each article and one to appear as a vertical bar in the end of my sidebar.
In this article in short I’ll explain how I achieved this banner placement via the default wordpress template which obviously I use on my blog.
Let’s start:
1. Add adsense to the index page of the blog
Edit your blog/wp-content/themes/default/index.php file
and right after this line put the following php code:
<?php

$postnum = 1;

$showadsense1 = 1;

?>
This code is necessery to assure the adsense code only appears on the first blog post from the blog index page
2. Find the code:
<small><?php the_time('F jS, Y') ?> <!-- by
Immediately after the code place the php code:
<?php if ($postnum == $showadsense1) {

echo '<div class="adsense" style="float:right;margin:12px;">;paste here your adsense code ...</div>';

} ?>
<?php $postnum++; ?>
Now with this changes, 1 adsense advertisements should start appearing right after your first and only on your blog post, next step is to place manually one more vertical adsense banner.
2. Place adsense vertical bannre in wordpress blog sidebar
Login with admin user to wordpress and navigate to:
Appearance -> Widgets
Among the available widgets you will notice the widget called Text click over: Add to add this widget to the list of widgets to appear on your blog sidebar.
Afterwards look up over the Sidebar list of widgets find the newly added Text widget and click over Edit to modify it’s content.
Further on put a Title for the widget or choose to leave the title field as blank if you don’t want a name to appear. On the next textbox just paste your adsense code and you’re done. A simple refresh of your wordpress blog index page should show you a vertical banner with your adsense code. ! Note that if you have recently issued the adsense code it will take about 10-20 minutes until the banner starts showing up.
Until now wordpress is configured to show adsense adverts on the blog main page, as a next step we need to place the same adsense adverts to appear whether a single blog post is reviewed (opened).
Place an adsense advertisements to single posts opened
For that purpose it’s necessery to edit the file single.php it’s again located in blog/wp-content/themes/default
Once again you will first need to find the code:
if (have_posts())
Put the code after the end of the line on a new line:
<?php

// below code is for adsense

$postnum = 1;

$showadsense1 = 1;

?>
Next lookup in the file for the code:
<h2><?php the_title(); ?></h2>
On a new line after it place:
<?php if ($postnum == $showadsense1) { echo '<div class="adsense" style="float:right;margin:12px;"><script type="text/javascript"> place here your adsense code </div>';

} ?>
<?php $postnum++; ?>
That’s all now the adsense advertisements will be also showing on the single blog posts reviews found via some search engine (google, yahoo etc.).
Hope this article will be helpful to somebody, if so drop me a thanks line in comments 😉
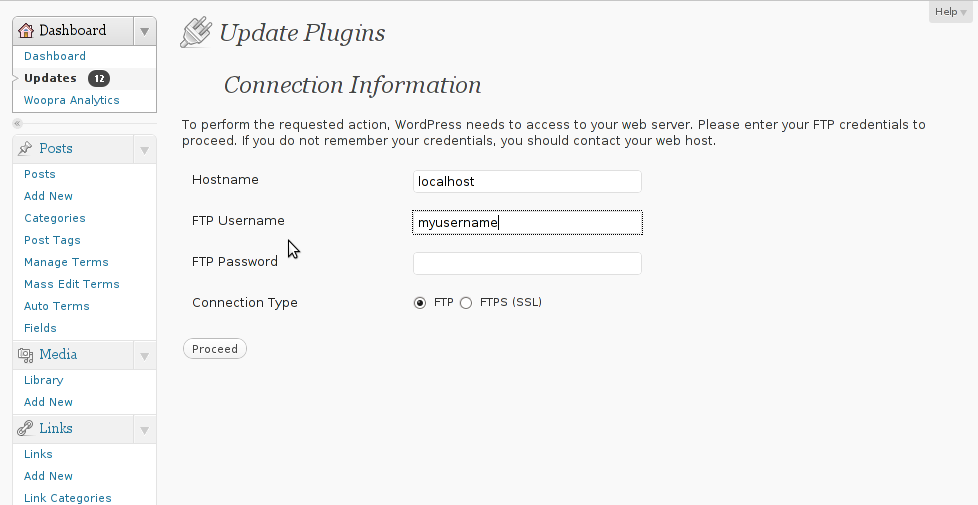
I'm managing few wordpress installations which requires me to type in: Hostname , FTP Username and FTP Password , every single time a plugin update is issued and I want to upgrade to the new version. Below is a screenshot of this annoying behaviour:
As you can see in the above screenshot, there is no way through Update Plugins web interface to store the password permanently. Hence the only option to store it permanently is to manually edit wp-config.php (file located in wordpress docroot, e.g. /path/to/wordpress/wp-config.php , inside the file find the line:
Change the above defines: path/to/wordpress/ – with your wordpress location directory. Username and Password – with your respective FTP username and password. The localhost
That's all, from now onwards the User/Password prompt will not appear anymore. Consider there is a security downside of storing the FTP User/Pass in wp-config.php , if someone is able to intrude the wordpress install and access the documentroot of the wordpress install he we'll be able to obtain the ftp user/pass and log in the server directly via FTP protocol.
I've not played audio CD for ages. Anyways I had to set up one computer with Linux just recently and one of the requirements was to be able to play audiocds. I was surprised that actually a was having issue with such as simple tasks. Here is how i come with this article.
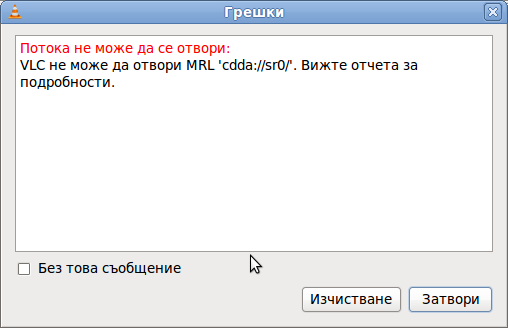
If you encounter errors playing Audio CDs on any Linux distro in VLC or other players, you might need to apply the following fix.
I'm not sure if this packages are required, anyways having them installed is a good idea especially on computers which will have to support as much multimedia as possible.
Trying to play a CD with VLC the result was not nice, you see in the picture above the error that poped up while trying it with VLC:
Due to wrong configuration of the play device VLC will be looking to read the audio cd from.
To succesfully play the audiocd invoke VLC command with a cdda///dev/sr0 argument like so:
hipo@xubuntu-desktop:~$ vlc cdda:///dev/sr0

...
To permanently fix the error you will have to edit ~/.config/vlc/vlcrc :
Inside ~/.config/vlc/vlcrc find the lines:
dvd=/dev/cdrom
Substitute the above line with:
dvd=/dev/sr0
Next find the line:
vcd=/dev/cdrom
Change the above line with:
vcd=/dev/sr0
Due to a bug in generating vlcrc , the dvd= might be set also to other messy unreadable characters (different from /dev/cdrom). This can also be the reason why it fails to properly read the disc.
If dvd= and vcd is set to a different unreadable characters delete them and substitute with /dev/sr0 .I've experienced this on Xubuntu Linux with a Bulgarian localization (probably the bug can be seen in other Linuxes when GNOME is installed in Russian, Chineese and other UTF-8 languages.
The strange error can be observed also in other players when the localization is set to someone's native language … Alternative solution is to install and use rhythmbox instead of VLC. Other program to play audio CDs called workman , you will have to get used to the interface which uses gtk1 and therefore obsolete. Putting aside the ugly interface it works 😉
Though, I'm GNU / Linux user for many years now. I have to say, everything is not so perfect as many people present it. Configuring even simple things related to multimedia on Linux is often a complete nightmare. An example, today I've decided to upgrade my 32 bit Skype version 2.0 beta for Linux to 64 bit Skype 2.2 beta . The reason I was motivated to upgrade skype was basicly 2.
a) My Skype run through 32 bit binary emulation with /usr/bin/linux32
b) I had issues with my skype if someone give me a Skype Call, while I have a flash video or some other stream in Browser (let's say Youtube). Actually being unable to receive a skype call or initiate one while I have some kind of music running in the background or just some kind of Youtube video paused was really annoying. Hence until now, everytime I wanted to speak over skype I had to close all Browser windows or tabs that are using my sound card and then restart my Skype program ….
Just imagine how ridiculous is that especially for a modern Multimedia supporting OS as Linux is. Of course the problems, I've experienced wasn't directly a problem of Linux. The problems are caused by the fact I have to use the not well working proprietary software version of Skype on my Debian GNU / Linux. I would love to actually boycott Skype as RMS recommends, but unfortunately until now I can't, since many of my friends as well as employers use Skype to connect with me on daily basis. So in a way I had to migrate to newer version of skype in order to make my Linux experience a bit more desktop like …
Back to the my skype 2.0 to 2.2. beta upgrade story, the overall Skype upgrade procedure was easy and went smootlhy, setting correct capturing later on however was a crazy task …. Here is the step by step to follow to make my upgraded skype and internal notebook mic play nice together:
1. Download 64 bit Skype for Debian from skype.com
For the sake of preservation in case it disappears in future, I've made a mirror of skype for debian you can download here My upgrade example below uses directly the 64 bit Skype 2.2beta binary mirror:
Here are the cmds once can issue if he has to upgrade to 2.2beta straight using my mirrored skype:
In my case I have made my previous skype installation using .tar.bz2 archive and not a debian package, however for some testing I also had a version of skype 2.0beta installed as a deb so for the sake of clarity I removed the existing skype deb install:
debian:~# dpkg -r skype

...
3. Install skype-debian_2.2.0.35-1_amd64.deb downloaded deb
In my case removing the sound drivers and loading them once again did not worked, so I had to reboot my system before the new compiled alsa sound modules gets loaded … The last line echo 'options snd-hda-intel model=auto' … was necessery for my Thinkpard r61 Intel audio to work out. For some clarity my exact sb model is:
For other notebooks with different sound drivers echo 'options snd-hda-intel model=auto' … should be omitted.
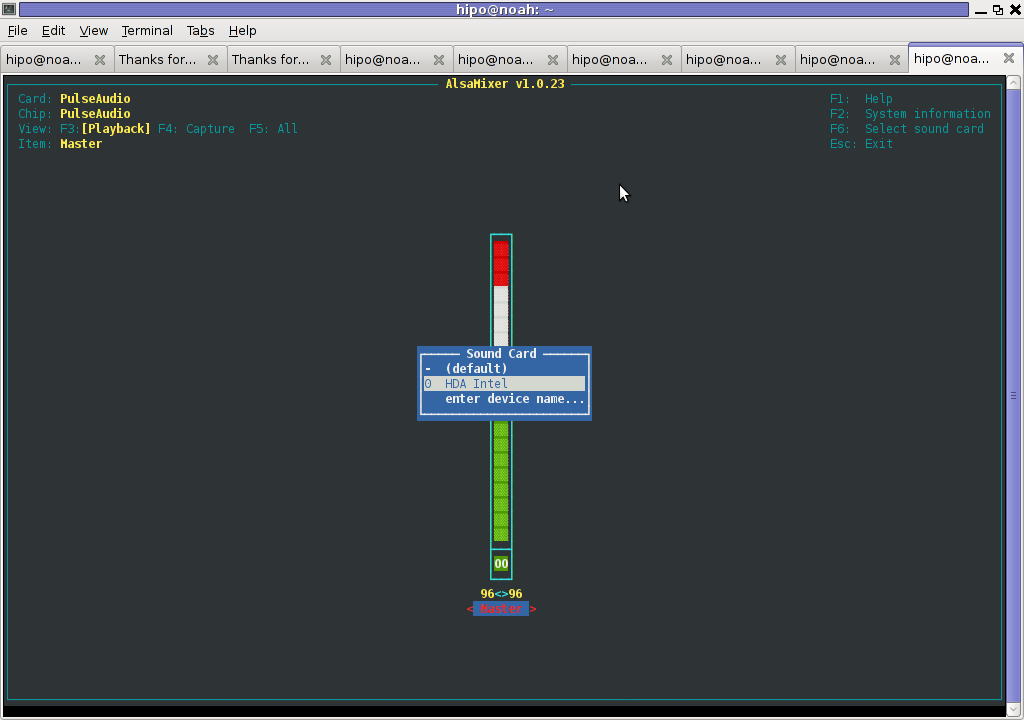
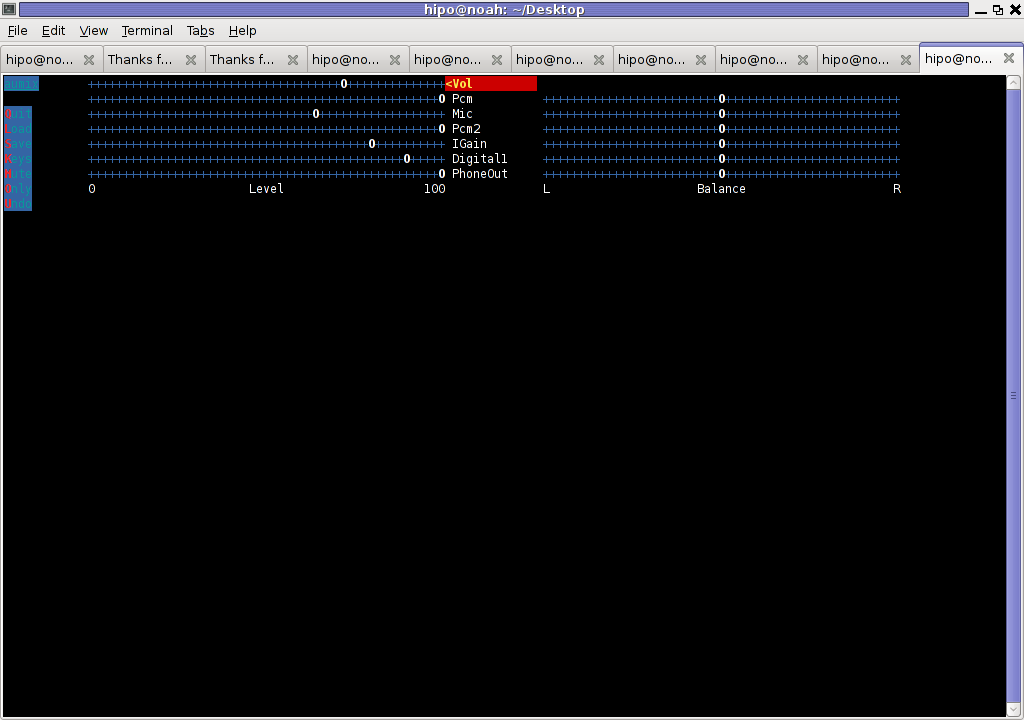
6. Tune microphone and sound settings in alsamixer
debian:~$ alsamixer
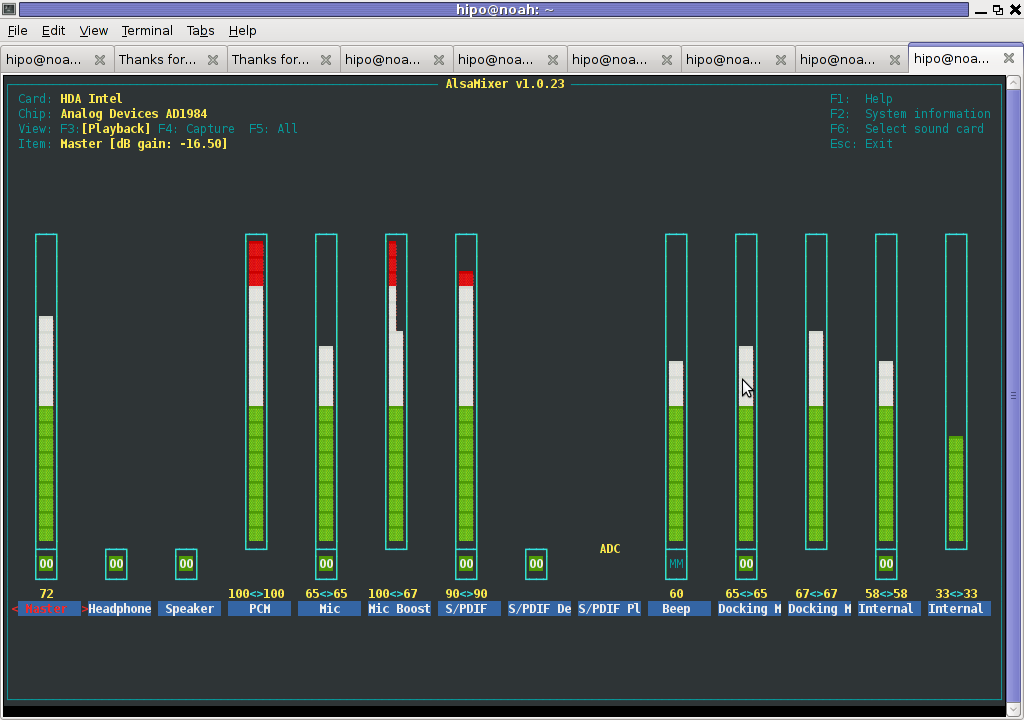
Right after launching alsamixer I had to press F6: Select Sound Card and choose my sound card (0 HDA Intel).
Following my choice I unmuted all the microphones and enabled Microphone Boost as well as did some adjustments to the MIC volume level.
Setting proper MIC Volume levels is absolutely necessery, otherwise there is a constant noise getting out of the speakers …
7. Use aumix to set some other sound settings
For some unclear reasons, besides alsamixer , I often had to fix stuff in aumix . Honestly I don't understand where exactly aumix fits in the picture with Alsa and my loaded alsa sound blaster module?? If someone can explain I'll be thankful.
Launch aumix to further adjust some sound settings …
debian:~$ aumix
In above screenshot you see, my current aumix settings which works okay with mic and audio output.
9. Test Microphone the mic is capturing sounds correctly
Set ~/.asoundrc configuration for Skype
Edit ~/.asoundrc and put in:
pcm.pulse {

type pulse

}

ctl.pulse {

type pulse

}

pcm.!default {

type pulse

}

ctl.!default {

type pulse

}

pcm.card0 {

type hw

card 0

}

ctl.card0 {

type hw

card 0

}

pcm.dsp0 { type plug slave.pcm "hw:0,0" }

pcm.dmixout {

# Just pass this on to the system dmix

type plug

slave {

pcm "dmix"

}

}

pcm.skype {

type asym

playback.pcm "skypeout"

capture.pcm "skypein"

}

pcm.skypein {

# Convert from 8-bit unsigned mono (default format set by aoss when

# /dev/dsp is opened) to 16-bit signed stereo (expected by dsnoop)

#

# We cannot just use a "plug" plugin because although the open will

# succeed, the buffer sizes will be wrong and we will hear no sound at

# all.

type route

slave {

pcm "skypedsnoop"

format S16_LE

}

ttable {

0 {0 0.5}

1 {0 0.5}

}

}

pcm.skypeout {

# Just pass this on to the system dmix

type plug

slave {

pcm "dmix"

}

}

pcm.skypedsnoop {

type dsnoop

ipc_key 1133

slave {

# "Magic" buffer values to get skype audio to work

# If these are not set, opening /dev/dsp succeeds but no sound

# will be heard. According to the ALSA developers this is due

# to skype abusing the OSS API.

pcm "hw:0,0"

period_size 256

periods 16

buffer_size 16384

}

bindings {

0 0

}

}
I'm not 100% percent if putting those .asoundrc configurations are necessery. I've seen them on archlinux's wiki as a perscribed fix to multiple issues with Skype sound in / out.
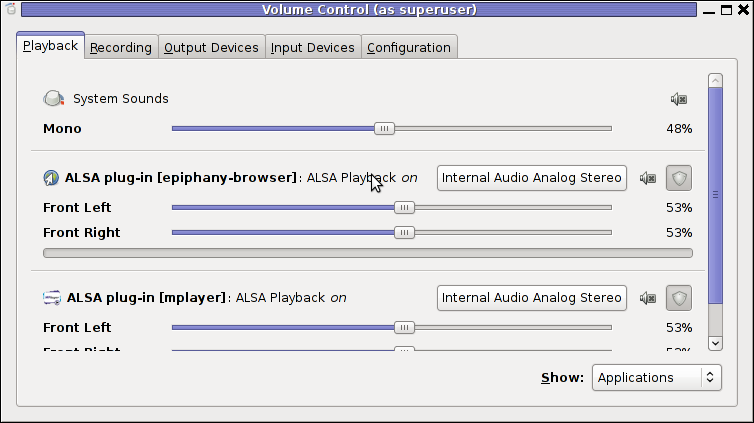
Onwardds, for the sake of test if my sound settings set in pavucontrol enables the internal mic to capture sound I used two programs:
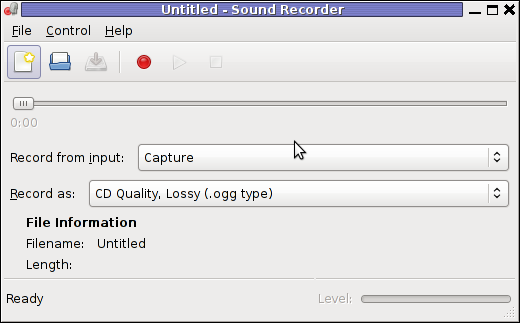
1. gnome-sound-recorder

2. arecord
gnome-sound-recorder
gnome-sound-recorder is probably used by most GNOME users, though I'm sure Linux noviced did not play with it yet.
arecord is just a simple console based app to capture sound from the microphone. To test if the microphone works I captured a chunk of sounds with cmd:
Later on I played the file with aplay (part of alsa-utils package in Debian), to check if I'll hear if mic succesfully captured my voice, e.g.:
debian:~$ play cow.wav

cow.wav:

File Size: 22.0k Bit Rate: 64.1k

Encoding: Unsigned PCM

Channels: 1 @ 8-bit

Samplerate: 8000Hz

Replaygain: off

Duration: 00:00:02.75

In:100% 00:00:02.75 [00:00:00.00] Out:22.0k [-=====|=====-] Clip:0

Done.
By the way, the aplay ASCII text equailizer is really awesome 😉 aplay is also capable of playing (Ogg Vorbis .ogg) free sound format.
Further on, I launched the new installed version of skype and tested Skype Calls (Mic capturing), with Skype Echo / Sound Test Service I'll be glad to hear if this small article, helped anybody to fix any skype Linux related issues ?. I would be happy to hear also from people who had similar issues with a different fixes for skype on Linux. Its also interesting to hear from Ubuntu and other distributions users if following this tutorial had somehow helped in resolving issues with Skype mic.
The classical way to keep a process running in background after log out of a shell is using screen Anyways using screen is not the only way to detach a running process , GNU / Linux and BSDs (Free, Open, Net BSDs) had a command nohup which aim is to run a command immune to hangups, with output to a non-tty
Let’s say one wants to keep track (log) constantly ICMP traffic to a certain host with ping command on a UNIX server / desktop which doesn’t have the screen manager … terminal emulation program installed. Achieving this task is possible with nohup cmd by backgrounding the ping process, like so:
guoi@host:~$ nohup ping google.com >ping.log &[1] 45931hipo@host:~$ nohup: ignoring input and redirecting stderr to stdout
Afterwards even after closing up the opened ssh session or console (tty) / terminal (pts) on which the ping process is background nohup prevents the ping to be sent kill SIGNAL so the process continues running in the background.
Later on to check in real time the statistics of the continuous ICMP ping requests tail, less, or cat can be used for example watching the tail:
hipo@host:~$ tail -f ping.log

64 bytes from fx-in-f106.1e100.net (74.125.39.106): icmp_req=562 ttl=51 time=44.0 ms

64 bytes from fx-in-f106.1e100.net (74.125.39.106): icmp_req=563 ttl=51 time=43.8 ms

64 bytes from fx-in-f106.1e100.net (74.125.39.106): icmp_req=564 ttl=51 time=43.3 ms

64 bytes from fx-in-f106.1e100.net (74.125.39.106): icmp_req=565 ttl=51 time=43.1 ms

64 bytes from fx-in-f106.1e100.net (74.125.39.106): icmp_req=566 ttl=51 time=43.4 ms

64 bytes from fx-in-f106.1e100.net (74.125.39.106): icmp_req=567 ttl=51 time=43.6 ms
I’m using Linux / BSD for quite a lot of time and never before put in use the nohup cmd I guess there are more ppl who never heard of this handy UNIX basic command. Hope I’m not the only one who never heard about it and its useful knowledge to someone out. Cheers 😉
It took me like 1 hour of search on the Internet and looking through forum threads and sites to properly install all the hardware. In hope to help someone out there looking to install the hardware Window drivers on ATI RAdeon HD 2600 XT, I’ve made a small archive of all the drivers necessery to make the Video card , Sound Card and Ethernet be properly installed and operating.
Installation of the drivers on Windows is pretty straight forward download the ATI Radeon HD 2600 XT archive extract and install each one of the files contained in the archive. A few restarts will also be necessery after some of the installed drivers to make the drivers work.
ATI Catalyst (included in the archive) will install the Video drivers for the Radeon XT 2600, whether AD1988AB_Audio_V6585_XpVistaWin7 and 11-11_xp32-64_hdmiaudio will install the Audio drivers. Attansic_L1_Lan_V1737907_V10560011159 contained in the archive needs to be extracted and installed to make the Attensic L1 Gigabit ethernet to show up as installed hardware in Windows device manager.
Hope this post will save some time to ppl looking to install the same drivers on XP 😉 Cheers 😉
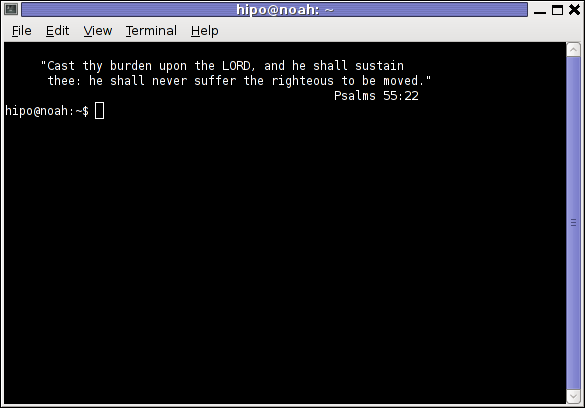
Every now and then I have to screenshot particular windows positioned on the screen on my GNOME Desktop envronment Recently I was happy to find there is a very easy way to do this with the default Screenshotting program that is bundled with gnome gnome-screenshot
To screenshot a particular window using gnome-screenshot , its quite easy all one has to do is point the mouse cursor to the window he wants to snapshot and press:
Alt + PrtScr (Print Screen)
Here is a screenshot, I’ve taken of my gnome-terminal using the above command:
One can do it also via the command line using the /usr/bin/gnome-screenshot , by pressing Alt + F2 to invoke the run application and type in:
/usr/bin/gnome-screenshot -w
I was quite happy to find out that this is possible on Linux inside gnome without bothering to run GIMP or use any external programs for the cause. Hope this helps someone 😉