Posts Tagged ‘number’
Wednesday, April 23rd, 2014 
Disk Benchmarking is very useful for people involved in Graphic Design, 3D modelling, system admins and anyone willing to squeeze maximum of his PC hardware.
If you want to do some benchmarking on newly built Windows server targetting Hard Disk performance, just bought a new hard SSD (Solid State Drives) and you want to test how well Hard Drive I/O operations behave or you want to see a regular HDD benchmarking of group of MS Windows PCs and plan hardware optiomization, check out ATTO Disk Benchmark.
So why exactly ATTO Benchmark? – Cause it is one of the best Windows Free Benchmark tools on the internet.
ATTO is a widely-accepted Disk Benchmark freeware utility to help measure storage system performance. ATTO though being freeware is among top tools utilized in industry. It is very useful in comparing different Hard Disk vendors speed, measure Windows storage systems performance with various transfer sizes and test lengths for reads and writes.
ATTO Disk Benchmark is used by manufacturers of Hardware RAID controllers, its precious tool to test Windows storage controllers, host bus adapters (HBAs).
Here is ATTO Benchmark tool specifications (quote from their webstie):
- Transfer sizes from 512KB to 8MB
- Transfer lengths from 64KB to 2GB
- Support for overlapped I/O
- Supports a variety of queue depths
- I/O comparisons with various test patterns
- Timed mode allows continuous testing
- Non-destructive performance measurement on formatted drives
- Transfer sizes from 512KB to 8MB
- Transfer lengths from 64KB to 2GB
- Support for overlapped I/O
- Supports a variety of queue depths
- I/O comparisons with various test patterns
- Timed mode allows continuous testing
- Non-destructive performance measurement on formatted drives
- – See more at: http://www.attotech.com/disk-benchmark/#sthash.rRlgSTOE.dpuf
Here is mirrored latest version of ATTO Disk for Download. Once you get your HDD statistics you will probably want to compare to other people results. On TomsHardware's world famous Hardware geek site there are plenty of Hard Drives performance Charts
Of course there are other GUI alternatives to ATTO Benchmark one historically famous is NBench
NBench
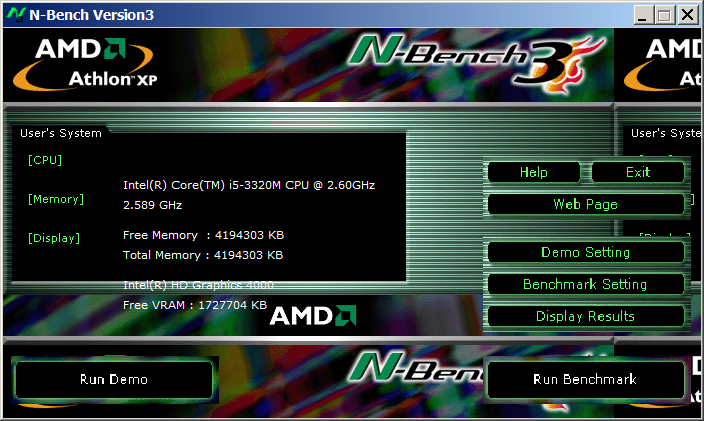
Nbench is nice little benchmarking program for Windows NT. Nbench reports the following components of performance:
CPU speed: integer and floating operations/sec
L1 and L2 cache speeds: MB/sec
main memory speed: MB/sec
disk read and write speeds: MB/sec
SMP systems and multi-tasking OS efficiency can be tested using up to 20 separate threads of execution.
For Console Geeks or Windows server admins there are also some ports of famous *NIX Hard Disk Benchmarking tools:
NTiogen
NTiogen benchmark was written by Symbios Logic, It's Windows NT port of their popular UNIX benchmark IOGEN. NTIOGEN is the parent processes that spawns the specified number of IOGEN processes that actually do the I/O.
The program will display as output the number of processes, the average response time, the number of I/O operations per second, and the number of KBytes per second. You can download mirror copy of Ntiogen here
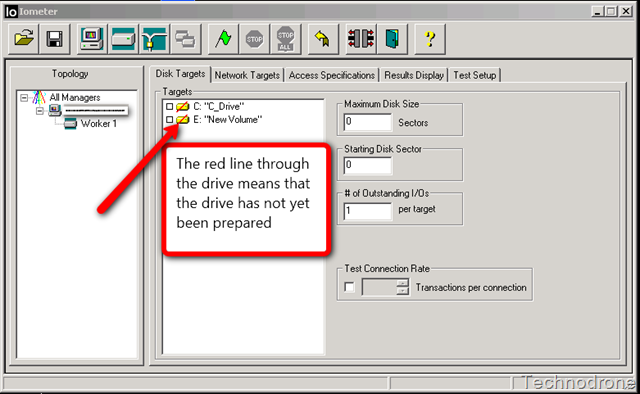
There are plenty of other GUI and Console HDD Benchmarking Win Tools, i.e.:
IOMeter (ex-developed by Intel and now abandoned available as open source available on SourceForge)
Bench32 – Comprehensive benchmark that measures overall system performance under Windows NT or Windows 95, now obsolete not developed anymore abandoned by producer company.
ThreadMark32 – capable of bench (ex developed and supported by ADAPTEC) but also already unsupported
IOZone – filesystem benchmark tool. The benchmark generates and measures a variety of file operations. Iozone has been ported to many machines and runs under many operating systems.
N! B! Important note to make here is above suggested tools will provide you more realistic results than the proprietary vendor tools shipped by your hardware vendor. Using proprietary software produced by a single vendor makes it impossible to analyze and compare different hardwares, above HDD benchmarking tools are for "open systems", e.g. nomatter what the hardware producer is produced results can be checked against each other.
Another thing to consider is even though if you use any of above tools to test and compare two storage devices still results will be partially imaginary, its always best to conduct tests in Real Working Application Environments. If you're planning to launch a new services structure always test it first and don't rely on preliminary returned soft benchmarks.
if you know some other useful benchmarking software i'm missing please share.
Tags: ADAPTEC, ATTO, benchmarking, check, Disk Benchmark, Disk Benchmarking, Flash, freeware, hard disk, hardware, hardware vendor, hdd, host, industry, IOGEN, number, performance, proprietary software, queue, software, speed, storage, Supports, system, test, testing, threads, transfer, utility, Windows
Posted in Everyday Life, System Administration, Windows | No Comments »
Thursday, April 24th, 2014 
Since I've bought ZTE smat phone and I have Android on it, decided to install Viber – iOS, Android and Desktop PC – Free Calls, Text and Picture sharing through the internet app. Viber is used by a lot of my people including many friends already so I installed it as well to be possible to speak for free with close friends …
Why Viber?
What makes this nifty app so great is its capability to make free calls over mobile phones through the Internet Viber.
Viber saves you a lot of money as calls are handled only through the Internet (you need Wifi on your mobile or Mobile 3G Internet access on phone) and you don't need to pay to your mobile operator 0.10 – 0.15 euro / cents per minute. Besides being Free another advantage of Viber is conversations sound quality which is much better than a regular phone call
Viber doesn't need a special registration, but as (login) identificator uses your mobile phone number – you just need to have a working Mobile operator phone num. Once registered under a number even if you change your mobile sim card to other operator (for example moving from country to country) still the Viber account will continue work. Another good reason to use Viber is it makes possible price free calls between different countries (for example if you travel a lot and you want to regularly speak with your wife) – in my case right now I'm in Bulgaria and my wife is in Belarus, so to save money and keep talking daily we use Viber daily.
What Devices and Operating System Viber Supports and what is Viber advantages / disadvantages ?
Another reason why Viber is so great is its multi-platform support it works on iPhone, Blackberry, Windows Phone, Nokia (Symbian), Windows, Mac OS and even (Korean own OS-ed) Bada devices. Some might argue that Viber is inferior to Skype and interms of Voice and Video quality its better because of its enhanced HD voice enhanced codecs, besides that Viber's video is still in Beta. However Viber has one big advantage it makes easy possible to reach people using just their Mobile Phone numbers where in Skype it takes time and effort to register in Skype install application on your Mobile keep yourself logged in in Skype and have all contacts previously added, all this happens automatically in Viber in time of installation of Viber App on your mobile.
Which Is Cheaper Viber or Skype?

Once installed Viber could integrate itself with rest of your Mobile OS Call Manager and in time of call a friend number you have the opportunity to make it free Viber call. Viber are also selling Viber Credits so if you want to use your Viber Voice Over IP you can call external mobile operator numbers on a very very cheap price. Viber Calls to landline or mobile phones could be up to 400% cheaper than Skype! Whether you own a Smartphone it will be nice to give Viber a try.
Viber – How to make Phone calls between Desktop PC and Smarphone Mobile
One not so standard Viber use is to make Viber calls with no smartphone (at hand) from PC to another Viber equipped Mobile and vice versa.
I needed to make Viber calls from my ZTE Android running mobile to my wife's MacBook Air PC because her mobile is an old Nokia running obscure Symbian version which is not supporting Viber + she doesn't have an Internet access tariff switched on her mobile.
Here is what I had to do to make Phone calls between my Mobile Viber App and my wife's MacbookAir Notebook PC:
- Install BlueStacks Web App Player

BlueStacks App Player is a software designed to enable Android applications to run on Windows PC, Apple Macintosh Computers and Windows tablets. BlueStacks is something like (VMware, Qemu) Virtual Machine which allows you to install and run any Android App on your Desktop PC.
Its curious that app was created by Rosen Sharma in 2008 an ex CTO (Chief Technology Officer) of McAfee
- A mobile phone with a working SIM card (Nokia 6310 or any old mobile no need to be a smartphone
- Desktop PC with Windows 7, 8 or PC with Mac OS
Install Bluestacks
BlueStacks is needed in order to emulate a smartphone on your PC, therefore once setupped Bluestacks. Launch it and inside its necessary to login with your Gmail (Google Account) in order to allow access to Google Play Appstore on your PC.
viber with no mobile phone bluestacks
Installing and Verifying Viber
This is the most crucial and tricky part in order to make Viber working on any device you need to receive a special Viber verification code, you need to fill in this code to confirm Viber installation on PC. Here I assume you have BlueStacks running with Viber Application installed.

First will be prompted to Agree with Terms and Conditions and provide Mobile Phone number for verification. Tell the Viber app that you have a smartphone with Viber already when prompted. After receving Viber Verification Code you need to fill in this code into BlueStacks Window (inside Viber should be running), go further to next step and you should be done with Desktop PC Viber number registration.
N.B. ! One brackets to open here is you need to have a working Mobile Phone number where you will receive the verification code as SMS, otherwise you cannot get the verification. On your filled in mobile phone number you will get the verification code as SMS.
Making Viber Calls to (Windows Mac) PC without Smartphone
There is no more further need for BlueStacks so you can uninstall it, however I preferred to keep it as its useful to be able to install Android Applications straight on your Desktop PC. To start using Viber on Desktop, just launch Viber application (not through BlueStacks) but the direct install.
Use Viber dial pad to dial your desired remote Smartphone number with Viber equipped.
Enjoy the free Internet calls ! 🙂
Tags: apps, code, com, conversations, Enjoy, good reason, Installing, Internet, make, Make Viber, minute, Mobile, mobile phone, money, need, number, Pc, phone, phone call, phone number, run, Skype, Skype Whether, time, Viber App, Viber Verification Code, Windows, www
Posted in Everyday Life, Mobile Phone Apps & Games, Various, Windows | 5 Comments »
Wednesday, August 6th, 2014 
I was looking for English Orthodox Bible translation of the Old Testament (Septuagint Version) and found such divided in many pdf files. I wanted to create a common (single) PDF from all the separate Old Testamental Book files in order to put it online as it might be convenient for English native speakers to download and later read offline on their computers the Old Testament Orthodox version Holy Bible.
Before I explain how I did it I will make a short turn to explain few things about Septuagint, as this is probably interesting stuff, you might not know.
Septuagint (also referred as LXX or the Alexandrian Canon) – Is Translation of the Hebrew Bible and some related text in Koine Greek) by legendary 70 Jewish scholars as early as the 2nd century BC. Just for those interested in Christianity it is curious fact that the number of Old Testament books are different among Protestant, Roman Catholic and Orthodox Christians, whether the number of New Testament books are the same in Catholics, Protestant and Orthodox.
So How Many books are in Roman Catholic, Protestant and Orthodox Old Testament Holy Bible?
The Old Testament in Orthodox Holy Bible version has 50 (where Slavonic versions of the bible include also +2 More which are the Edras books), whether protestant Holy Bible includes only 39 books in old testament and Roman Catholics has 46 old testamental books in there bibles. The reason why Protestants choose to have less books (only 39) is some of the books in the Roman Catholic and Orthodox Church are Apocryphal are referred to as the Apocryphal, or Deuterocanonical books this doesn't mean that the extra 8 Books in Orthodox Bibles are not God Inspired, this means, they don't have the historic authenticity as the early Church accepted canonicals.
The Orthodox Church accepted the Septuagint LXX as divinely inspired to be used in Church.
Now back to how I managed to merge (convert) multiple PDF files into single PDF on my Debian Linux home router.
My first attempt was with ImageMagick's convert (in the same manner as I used to generate PDF files from pictures earlier), e.g.:
convert intro.pdf genesis.pdf exodus.pdf leviticus.pdf numbers.pdf deuteronomy.pdf … SINGLE-FILE.PDF
I waited for convertion to complete quite long but it seemed looping so finally after 7 minutes I stopped it and decided to try with something else and, after quick search I found pdftk.
pdftk has plenty of functions and is great for anyone who needs to do Merge / Split Update / Encrypt / Repair corrupted PDFs on Linux:
apt-cache show pdftk |grep -i desc -A 17
Description: tool for manipulating PDF documents
If PDF is electronic paper, then pdftk is an electronic stapler-remover,
hole-punch, binder, secret-decoder-ring, and X-Ray-glasses. Pdftk is a
simple tool for doing everyday things with PDF documents. Keep one in the
top drawer of your desktop and use it to:
– Merge PDF documents
– Split PDF pages into a new document
– Decrypt input as necessary (password required)
– Encrypt output as desired
– Fill PDF Forms with FDF Data and/or Flatten Forms
– Apply a Background Watermark
– Report PDF on metrics, including metadata and bookmarks
– Update PDF Metadata
– Attach Files to PDF Pages or the PDF Document
– Unpack PDF Attachments
– Burst a PDF document into single pages
– Uncompress and re-compress page streams
– Repair corrupted PDF (where possible)
To install pdftk on Debian Linux Lenny / Wheezy:
apt-get install –yes pdftk
…
After installed to convert a number of separate PDF files into single (merged) PDF file:
pdftk file1.pdf file2.pdf file3.pdf cat output single-merged-pdf-file.pdf
pdftk intro.pdf genesis.pdf exodus.pdf leviticus.pdf numbers.pdf deuteronomy.pdf joshua.pdf judges.pdf ruth.pdf kingdoms_1.pdf kingdoms_2.pdf kingdoms_3.pdf kingdoms_4.pdf paraleipomenon_1.pdf paraleipomenon_2.pdf esdras_1.pdf esdras_2.pdf nehemiah.pdf tobit.pdf judith.pdf esther.pdf maccabees_1.pdf maccabees_2.pdf maccabees_3.pdf psalms.pdf job.pdf proverbs_of_solomon.pdf ecclesiastes.pdf song_of_songs.pdf wisdom_of_solomon.pdf wisdom_of_sirach.pdf hosea.pdf amos.pdf micah.pdf joel.pdf obadiah.pdf jonah.pdf nahum.pdf habbakuk.pdf zephaniah.pdf malachi.pdf isaiah.pdf jeremiah.pdf baruch.pdf lamentations_of_jeremiah.pdf an_epistle_of_jeremiah.pdf ezekiel.pdf daniel.pdf maccabees_4.pdf slavonic_appendix.pdf cat output Orthodox-English-translation-of-Old-Testament-Septuagint.pdf
And Hooray! It worked The resulting share Old Testament (Orthodox) English translation from Septuagint PDF is here
pdftk is also ported for Fedora / CentOS / RHEL etc. (RPM distros), so you to install it there:
yum -y install pdftk
Or if missing in repositories grab the respective pdf and
rpm -ivh pdftk-*yourarch.pdf
PDFtk has also Windows and Mac OS version just in case if you need to script Merging of multiple PDFs to single ones for more check out PDftk Server page homepage here
Tags: Alexandrian Canon, attempt, common, file1, holy bible, interesting stuff, number, Old Testament Orthodox English, pdf merge files into single pdf, PDFs, pdftk merge multiple pdfs into one file, plenty, roman catholics, septuagint
Posted in Christianity, Curious Facts, Everyday Life, Linux, Linux and FreeBSD Desktop | 3 Comments »
Monday, October 20th, 2014 
I’m still administrating some old archaic Joomla website built on top of Joomla 1.5. Recently there were some security issues with the website so I first tried using jupgrade (Upgrade Joomla 1.5 to Joomla 2.5) plugin to try to resolve the issues. As there were issues with the upgrade, because of used template was not available for Joomla 2.5, I decided to continue using Joomla 1.5 and applied the Joomla 1.5 Security Patch. I also had to disable a couple of unused joomla components and the contact form in order to prevent spammers of randomly spamming through the joomla … the Joomla Security Scanner was mostly useful in order to fix the Joomla security holes ..
So far so good this Joomla solved security but just recently I was asked to add a new article the Joomla News section – (the news section is configure to serve as a mini site blog as there are only few articles added every few months). For my surprise all of a sudden the new joomla article text started displaying text and pictures partially. The weirdly looking newly added news looked very much like some kind of template or css problem. I tried debugging the html code but unfortunately my knowledge in CSS is not so much, so as a next step I tried to temper some settings from Joomla Administrator in hope that this would resolve the text which was appearing from article used to be cut even though the text I’ve placed in artcle seemed correctly formatted. I finally pissed off trying to solve the news section layout problem so looked online too see if anyone else didn’t stick out to same error and I stumbled on Joomla’s forum explaining the Category Blog Layout Problem
The solution to the Joomla incomplete text showing in article is – To go to Joomla administrator menus:
1. Menus -> Main Menu -> (Click on Menu Item(s) – Edit Menu Item(s)) button
2. Click on News (section)
In Parameters section (on the botton right) of screen you will see #Leading set to some low number for example it will be something like 8 or 9. The whole issue in my case was that I was trying to add more than 8 articles and I had a Leading set to 8 and in order to add more articles and keep proper leading I had to raise it to more. To prevent recent leading errors, I’ve raised the Leading to 100 like shown in below screenshot
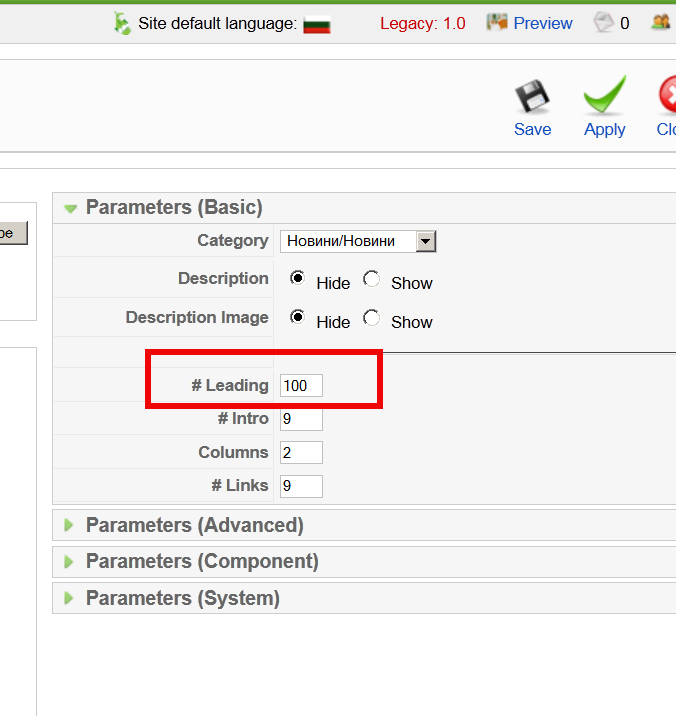
After raising to some high number click Apply and you’re done your problem is solved 🙂
For those curious what the above settings from screenshot mean:
# Leading Articles -> This refers to the number of articles that are to be shown to the full width
# Intro Articles -> This refers to the number of articles that are not to be shown to full width
# Columns -> This refers to the number of columns in which the articles will be shown that are identified as #Intro. If #Intro is zero this setting has no effect
# Links -> Number of articles that are to be shown as links. The number of articles should exceed #leading + #Intro
N.B. Solving this issue took me quite a long time and it caused me a lot of attempts to resolve it. I tried creating the article from scratch, making copy from an old article etc. I even messed few of the news articles one time so badly that I had to recreate them from scratch, before doing any changes to obsolete joomlas always make database and file content backup otherwise you will end up like me in situation loosing 10 hours of your time ..
The bitter experiences once again with Joomla convinced me when I have time I have to migrate this Joomla CMS to WordPress. My so far experience with Joomla prooved to me just for one time the time and nerves spend to learn joomla and built a multi-lingual website with it as well as to administer it with joomla obscure and hard to cryptic interfaces and multiple security issues., makes this CMS completely unworthy to study or use, its hardness to upgrade from release to release, besides its much slow and its less plugins if compared to WordPress makes wordpress much better (and easier to build use platform than Joomla).
So if you happen to be in doubt where to use Joomla or a WordPress to build a new company / community website or a blog my humbe advise is – choose WordPress!
Tags: article, Category Blog Layout Problem, Click, long time, number, order, Parameters, platform, resolve, screenshot, security issues, text, Upgrade Joomla
Posted in Everyday Life, Joomla, Various, Web and CMS | 1 Comment »
Sunday, October 30th, 2011 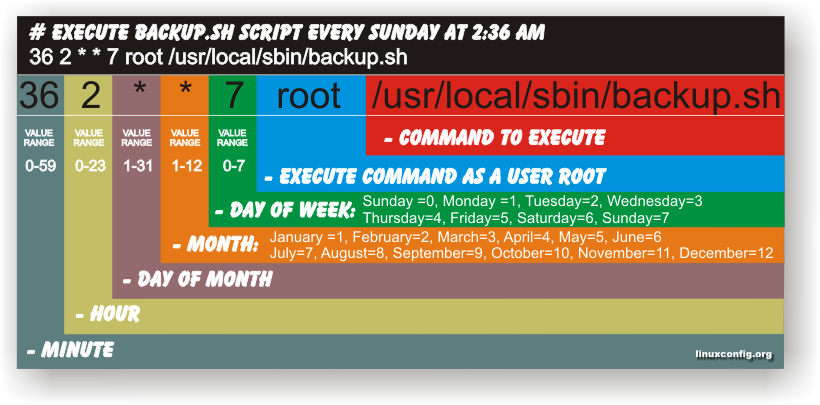
Have you ever been in need to execute some commands scheduled via a crontab, every let’s say 5 seconds?, naturally this is not possible with crontab, however adding a small shell script to loop and execute a command or commands every 5 seconds and setting it up to execute once in a minute through crontab makes this possible.
Here is an example shell script that does execute commands every 5 seconds:
#!/bin/bash
command1_to_exec='/bin/ls';

command2_to_exec='/bin/pwd';

for i in $(echo 1 2 3 4 5 6 7 8 9 10 11); do

sleep 5;

$command1_to_exec; $command2_to_exec;

done
This script will issue a sleep every 5 seconds and execute the two commands defined as $command1_to_exec and $command2_to_exec
Copy paste the script to a file or fetch exec_every_5_secs_cmds.sh from here
The script can easily be modified to execute on any seconds interval delay, the record to put on cron to use with this script should look something like:
# echo '* * * * * /path/to/exec_every_5_secs_cmds.sh' | crontab -
Where of course /path/to/exec_every_5_secs_cmds.sh needs to be modified to a proper script name and path location.
Another way to do the on a number of seconds program / command schedule without using cron at all is setting up an endless loop to run/refresh via /etc/inittab with a number of predefined commands inside. An example endless loop script to run via inittab would look something like:
while [ 1 ]; do

/bin/ls

sleep 5;

done
To run the above sample never ending script using inittab, one needs to add to the end of inittab, some line like:
mine:234:respawn:/path/to/script_name.sh
A quick way to add the line from consone would be with echo:
echo 'mine:234:respawn:/path/to/script' >> /etc/inittab
Of course the proper paths, should be put in:
Then to load up the newly added inittab line, inittab needs to be reloaded with cmd:
# init q
I've also red, some other methods suggested to run programs on a periodic seconds basis using just cron, what I found in stackoverflow.com's as a thread proposed as a solution is:
* * * * * /foo/bar/your_script

* * * * * sleep 15; /foo/bar/your_script

* * * * * sleep 30; /foo/bar/your_script

* * * * * sleep 45; /foo/bar/your_script
One guy, even suggested a shorted way with cron:
0/15 * * * * * /path/to/my/script
Tags: bashcommand, basis, com, command, command2, copy, copy paste, course, cron, crontab, echo 1, echo echo, endless loop, exec, file, foo, foo bar, freebsd, gnu linux, How to, init, inittab, interval, line, Linux, location, loop, mine, minute, name, nbsp, number, Path, predefined commands, pwd, record, refresh, respawn, run, script, script name, secs, SHA, Shell, shell script, sleep, something, stackoverflow, thread, time, time interval, way
Posted in Linux, Linux and FreeBSD Desktop, System Administration, Various | 1 Comment »
Friday, December 9th, 2011 I have few servers, which have automatically enabled IPv6 protocols (IPv6 gets automatically enabled on Debian), as well as on most latest Linux distribituions nowdays.
Disabling IPv6 network protocol on Linux if not used has 2 reasons:
1. Security (It’s well known security practice to disable anything not used on a server)
Besides that IPv6 has been known for few criticil security vulnerabilities, which has historically affected the Linux kernel.
2. Performance (Sometimes disabling IPv6 could have positive impact on IPv4 especially on heavy traffic network servers).
I’ve red people claiming disabling IPv6 improves the DNS performance, however since this is not rumors and did not check it personally I cannot positively confirm this.
Disabling IPv6 on all GNU / Linuces can be achieved by changing the kernel sysctl settings net.ipv6.conf.all.disable_ipv6 by default net.ipv6.conf.all.disable_ipv6 equals 1 which means IPv6 is enabled, hence to disable IPv6 I issued:
server:~# sysctl net.ipv6.conf.all.disable_ipv6=0
To set it permanently on system boot I put the setting also in /etc/sysctl.conf :
server:~# echo 'net.ipv6.conf.all.disable = 1 >> /etc/sysctl.conf
The aforedescribed methods should be working on most Linux kernels version > 2.6.27 in that number it should work 100% on recent versions of Fedora, CentOS, Debian and Ubuntu.
To disable IPv6 protocol on Debian Lenny its necessery to blackist the ipv6 module in /etc/modprobe.d/blacklist by issuing:
echo 'blacklist ipv6' >> /etc/modprobe.d/blacklist
On Fedora / CentOS there is a another universal “Redhat” way disable IPv6.
On them disabling IPv6 is done by editting /etc/sysconfig/network and adding:
NETWORKING_IPV6=no

IPV6INIT=no
I would be happy to hear how people achieved disabling the IPv6, since on earlier and (various by distro) Linuxes the way to disable the IPv6 is probably different.
Alto to stop Iptables IPV6 on CentOS / Fedora and RHEL issue:
# service ip6tables stop
# service ip6tables off
Tags: blackist, boot, Cannot, CentOS, conf, Debian, Disabling, distro, DNS, echo, fedora, gnu linux, heavy traffic, How to, impact, ipv, ipv4, ipv6, kernel, kernel 2, Linux, linux kernel, linux kernels, methodology, modprobe, Module, necessery, net, network, network protocol, network servers, Networking, number, performance, Protocol, protocols, quot, Redhat, security, security practice, security vulnerabilities, sysconfig, sysctl, system boot, traffic network, Ubuntu, version, way, working
Posted in Computer Security, Linux, System Administration, Various | No Comments »
Friday, July 8th, 2011 
Some long time ago I’ve written an article Optimizing Linux tcp/ip networking
In the article I’ve examined a number of Linux kernel sysctl variables, which significantly improve the way TCP/IP networking is handled by a non router Linux based servers.
As the time progresses I’ve been continuing to read materials on blogs and internet sites on various tips and anti Denial of Service rules which one could apply on newly installed hosting (Apache/MySql/Qmail/Proxy) server to improve webserver responce times and tighten the overall security level.
In my quest for sysctl 😉 I found a few more handy sysctl variables apart from the old ones I incorporate on every Linux server I adminstrate.
The sysctl variables improves the overall network handling efficiency and protects about common SYN/ACK Denial of service attacks.
Here are the extra sysctl variables I started incorporating just recently:
############ IPv4 Sysctl Settings ################

#Enable ExecShield protection (randomize virtual assigned space to protect against many exploits)

kernel.randomize_va_space = 1

#Increase the number of PIDs processes could assign this is very needed especially on more powerful servers

kernel.pid_max = 65536

# Prevent against the common 'syn flood attack'

net.ipv4.tcp_syncookies = 1

# Controls the use of TCP syncookies two is generally a better idea, though you might experiment

#net.ipv4.tcp_syncookies = 1

net.ipv4.tcp_synack_retries = 2

##################################################

#

############## IPv6 Sysctl Settings ################

# Number of Router Solicitations to send until assuming no routers are present.

net.ipv6.conf.default.router_solicitations = 0

# Accept Router Preference in RA? Again not necessery if the server is not a router

net.ipv6.conf.default.accept_ra_rtr_pref = 0

# Learn Prefix Information in Router Advertisement (Unnecessery) for non-routers

net.ipv6.conf.default.accept_ra_pinfo = 0

# disable accept of hop limit settings from other routers (could be used for DoS)

net.ipv6.conf.default.accept_ra_defrtr = 0

# disable ipv6 global unicasts server assignments

net.ipv6.conf.default.autoconf = 0

# neighbor solicitations to send out per address (better if disabled)

net.ipv6.conf.default.dad_transmits = 0

# disable assigning more than 1 address per network interface

net.ipv6.conf.default.max_addresses = 1

#####################################################
To use this settings paste the above sysctl variables in /etc/sysctl.conf and ask sysctl command to read and apply the newly added conf settings:
server:~# sysctl -p

...
Hopefully you should not get errors while applying the sysctl settings, if you get some errors, it’s possible some of the variable is differently named (depending on the Linux kernel version) or the Linux distribution on which sysctl’s are implemented.
For some convenience I’ve created unified sysctl variables /etc/sysct.conf containing the newly variables I started implementing to servers with the ones I already exlpained in my previous post Optimizing Linux TCP/IP Networking
Here is the optimized / hardened sysctl.conf file for download
I use this exact sysctl.conf these days on both Linux hosting / VPS / Mail servers etc. as well as on my personal notebook 😉
Here is also the the complete content of above’s sysctl.conf file, just in case if somebody wants to directly copy/paste it in his /etc/sysctl.conf
# Sysctl kernel variables to improve network performance and protect against common Denial of Service attacks

# It's possible that not all of the variables are working on all Linux distributions, test to make sure

# Some of the variables might need a slight modification to match server hardware, however in most cases it should be fine

# variables list compiled by hip0

### https://www.pc-freak.net

#### date 08.07.2011

############ IPv4 Sysctl Kernel Settings ################

net.ipv4.ip_forward = 0

# ( Turn off IP Forwarding )

net.ipv4.conf.default.rp_filter = 1

# ( Control Source route verification )

net.ipv4.conf.default.accept_redirects = 0

# ( Disable ICMP redirects )

net.ipv4.conf.all.accept_redirects = 0

# ( same as above )

net.ipv4.conf.default.accept_source_route = 0

# ( Disable IP source routing )

net.ipv4.conf.all.accept_source_route = 0

# ( - || - )net.ipv4.tcp_fin_timeout = 40

# ( Decrease FIN timeout ) - Useful on busy/high load server

net.ipv4.tcp_keepalive_time = 4000

# ( keepalive tcp timeout )

net.core.rmem_default = 786426

# Receive memory stack size ( a good idea to increase it if your server receives big files )

##net.ipv4.tcp_rmem = "4096 87380 4194304"

net.core.wmem_default = 8388608

#( Reserved Memory per connection )

net.core.wmem_max = 8388608

net.core.optmem_max = 40960

# ( maximum amount of option memory buffers )

# tcp reordering, increase max buckets, increase the amount of backlost

net.ipv4.tcp_max_tw_buckets = 360000

net.ipv4.tcp_reordering = 5

##net.core.hot_list_length = 256

net.core.netdev_max_backlog = 1024

#Enable ExecShield protection (randomize virtual assigned space to protect against many exploits)

kernel.randomize_va_space = 1

#Increase the number of PIDs processes could assign this is very needed especially on more powerful servers

kernel.pid_max = 65536

# Prevent against the common 'syn flood attack'net.ipv4.tcp_syncookies = 1

# Controls the use of TCP syncookies two is generally a better idea, though you might experiment

#net.ipv4.tcp_syncookies = 1

net.ipv4.tcp_synack_retries = 2

###################################################

############## IPv6 Sysctl Settings ################

# Number of Router Solicitations to send until assuming no routers are present.

net.ipv6.conf.default.router_solicitations = 0

# Accept Router Preference in RA? Again not necessery if the server is not a router

net.ipv6.conf.default.accept_ra_rtr_pref = 0

# Learn Prefix Information in Router Advertisement (Unnecessery) for non-routersnet.

ipv6.conf.default.accept_ra_pinfo = 0

# disable accept of hop limit settings from other routers (could be used for DoS)

net.ipv6.conf.default.accept_ra_defrtr = 0

# disable ipv6 global unicasts server assignmentsnet.

ipv6.conf.default.autoconf = 0

# neighbor solicitations to send out per address (better if disabled)

net.ipv6.conf.default.dad_transmits = 0

# disable assigning more than 1 address per network interfacenet.

ipv6.conf.default.max_addresses = 1

#####################################################

# Reboot if kernel panic

kernel.panic = 20
These sysctl settings will tweaken the Linux kernel default network settings performance and you will notice the improvements in website responsiveness immediately in some cases implementing this kernel level goodies will make the server perform better and the system load might decrease even 😉
This optimizations on a kernel level are not only handy for servers, their implementation on Linux Desktop should also have a positive influence on the way the network behaves and could improve significantly the responce times of opening pages in Firefox/Opera/Epiphany Torrent downloads etc.
Hope this kernel tweakenings are helpful to someone.
Cheers 😉
Tags: adminstrate, amount, anti, apache mysql, autoconf, default, default network, default router, Denial, denial of service, denial of service attacks, exploits, file, harden, How to, imprpove, internet sites, ip networking, ipv, ipv4, ipv6, kernel, kernel level, level, Linux, Linux Security, linux server, memory, network efficiency, non, number, protection, proxy server, Qmail, quot, ra, randomize, reordering, responce, responce times, router linux, routers, rtr, security, security level, serverskernel, Service, solicitations, Source, SYN, syn flood attack, sysctl, time, variables, wmem
Posted in Computer Security, Linux, Linux and FreeBSD Desktop, System Administration | 4 Comments »
Wednesday, September 7th, 2011 
One good module that helps in mitigating, very basic Denial of Service attacks against Apache 1.3.x 2.0.x and 2.2.x webserver is mod_evasive
I’ve noticed however many Apache administrators out there does forget to install it on new Apache installations or even some of them haven’t heard about of it.
Therefore I wrote this small article to create some more awareness of the existence of the anti DoS module and hopefully thorugh it help some of my readers to strengthen their server security.
Here is a description on what exactly mod-evasive module does:
debian:~# apt-cache show libapache2-mod-evasive | grep -i description -A 7
Description: evasive module to minimize HTTP DoS or brute force attacks
mod_evasive is an evasive maneuvers module for Apache to provide some
protection in the event of an HTTP DoS or DDoS attack or brute force attack.
.
It is also designed to be a detection tool, and can be easily configured to
talk to ipchains, firewalls, routers, and etcetera.
.
This module only works on Apache 2.x servers
How does mod-evasive anti DoS module works?
Detection is performed by creating an internal dynamic hash table of IP Addresses and URIs, and denying any single IP address which matches the criterias:
- Requesting the same page more than number of times per second
- Making more than N (number) of concurrent requests on the same child per second
- Making requests to Apache during the IP is temporarily blacklisted (in a blocking list – IP blacklist is removed after a time period))
These anti DDoS and DoS attack protection decreases the possibility that Apache gets DoSed by ana amateur DoS attack, however it still opens doors for attacks who has a large bot-nets of zoombie hosts (let’s say 10000) which will simultaneously request a page from the Apache server. The result in a scenario with a infected botnet running a DoS tool in most of the cases will be a quick exhaustion of system resources available (bandwidth, server memory and processor consumption).
Thus mod-evasive just grants a DoS and DDoS security only on a basic, level where someone tries to DoS a webserver with only possessing access to few hosts.
mod-evasive however in many cases mesaure to protect against DoS and does a great job if combined with Apache mod-security module discussed in one of my previous blog posts – Tightening PHP Security on Debian with Apache 2.2 with ModSecurity2
1. Install mod-evasive
Installing mod-evasive on Debian Lenny, Squeeze and even Wheezy is done in identical way straight using apt-get:
deiban:~# apt-get install libapache2-mod-evasive

...
2. Enable mod-evasive in Apache
debian:~# ln -sf /etc/apache2/mods-available/mod-evasive.load /etc/apache2/mods-enabled/mod-evasive.load
3. Configure the way mod-evasive deals with potential DoS attacks
Open /etc/apache2/apache2.conf, go down to the end of the file and paste inside, below three mod-evasive configuration directives:
<IfModule mod_evasive20.c>

DOSHashTableSize 3097DOS

PageCount 30

DOSSiteCount 40

DOSPageInterval 2

DOSSiteInterval 1

DOSBlockingPeriod 120

#DOSEmailNotify hipo@mymailserver.com

</IfModule>
In case of the above configuration criterias are matched, mod-evasive instructs Apache to return a 403 (Forbidden by default) error page which will conserve bandwidth and system resources in case of DoS attack attempt, especially if the DoS attack targets multiple requests to let’s say a large downloadable file or a PHP,Perl,Python script which does a lot of computation and thus consumes large portion of server CPU time.
The meaning of the above three mod-evasive config vars are as follows:
DOSHashTableSize 3097 – Increasing the DoSHashTableSize will increase performance of mod-evasive but will consume more server memory, on a busy webserver this value however should be increased
DOSPageCount 30 – Add IP in evasive temporary blacklist if a request for any IP that hits the same page 30 consequential times.
DOSSiteCount 40 – Add IP to be be blacklisted if 40 requests are made to a one and the same URL location in 1 second time
DOSBlockingPeriod 120 – Instructs the time in seconds for which an IP will get blacklisted (e.g. will get returned the 403 foribden page), this settings instructs mod-evasive to block every intruder which matches DOSPageCount 30 or DOSSiteCount 40 for 2 minutes time.
DOSPageInterval 2 – Interval of 2 seconds for which DOSPageCount can be reached.
DOSSiteInterval 1 – Interval of 1 second in which if DOSSiteCount of 40 is matched the matched IP will be blacklisted for configured period of time.
mod-evasive also supports IP whitelisting with its option DOSWhitelist , handy in cases if for example, you should allow access to a single webpage from office env consisting of hundred computers behind a NAT.
Another handy configuration option is the module capability to notify, if a DoS is originating from a number of IP addresses using the option DOSEmailNotify
Using the DOSSystemCommand in relation with iptables, could be configured to filter out any IP addresses which are found to be matching the configured mod-evasive rules.
The module also supports custom logging, if you want to keep track on IPs which are found to be trying a DoS attack against the server place in above shown configuration DOSLogDir “/var/log/apache2/evasive” and create the /var/log/apache2/evasive directory, with:
debian:~# mkdir /var/log/apache2/evasive
I decided not to log mod-evasive DoS IP matches as this will just add some extra load on the server, however in debugging some mistakenly blacklisted IPs logging is sure a must.
4. Restart Apache to load up mod-evasive
debian:~# /etc/init.d/apache2 restart

...
Finally a very good reading which sheds more light on how exactly mod-evasive works and some extra module configuration options are located in the documentation bundled with the deb package to read it, issue:
debian:~# zless /usr/share/doc/libapache2-mod-evasive/README.gz
Tags: ana amateur, anti, apache 2, apache server, apache2, awareness, bandwidth server, botnet, brute force attack, concurrent requests, configured, criterias, DDoS, debian linux, Denial, denial of service, denial of service attacks, description, dos attack, dos tool, DOSHashTableSize, evasive maneuvers, event, exhaustion, existence, file, grep, hash, hash table, HTTP, IfModule, Installing, libapache, mod, number, option, page, period of time, protection, Secure Apache, server security, Service, show, small article, system resources, time, tool, uris, webpage
Posted in Computer Security, Linux, System Administration, Web and CMS | 1 Comment »
Friday, July 22nd, 2011 There are few commands I usually use to track if my server is possibly under a Denial of Service attack or under Distributed Denial of Service
Sys Admins who still have not experienced the terrible times of being under a DoS attack are happy people for sure …
1. How to Detect a TCP/IP Denial of Service Attack This are the commands I use to find out if a loaded Linux server is under a heavy DoS attack, one of the most essential one is of course netstat.
To check if a server is under a DoS attack with netstat, it’s common to use:
linux:~# netstat -ntu | awk '{print $5}' | cut -d: -f1 | sort | uniq -c | sort -n|wc -l
If the output of below command returns a result like 2000 or 3000 connections!, then obviously it’s very likely the server is under a DoS attack.
To check all the IPS currently connected to the Apache Webserver and get a very brief statistics on the number of times each of the IPs connected to my server, I use the cmd:
linux:~# netstat -ntu | awk '{print $5}' | cut -d: -f1 | sort | uniq -c | sort -n

221 80.143.207.107 233 145.53.103.70 540 82.176.164.36
As you could see from the above command output the IP 80.143.207.107 is either connected 221 times to the server or is in state of connecting or disconnecting to the node.
Another possible way to check, if a Linux or BSD server is under a Distributed DoS is with the list open files command lsof
Here is how lsof can be used to list the approximate number of ESTABLISHED connections to port 80.
linux:~# lsof -i TCP:80

litespeed 241931 nobody 17u IPv4 18372655 TCP server.www.pc-freak.net:http (LISTEN)

litespeed 241931 nobody 25u IPv4 18372659 TCP 85.17.159.89:http (LISTEN)

litespeed 241931 nobody 30u IPv4 29149647 TCP server.www.pc-freak.net:http->83.101.6.41:54565 (ESTABLISHED)

litespeed 241931 nobody 33u IPv4 18372647 TCP 85.17.159.93:http (LISTEN)

litespeed 241931 nobody 34u IPv4 29137514 TCP server.www.pc-freak.net:http->83.101.6.41:50885 (ESTABLISHED)

litespeed 241931 nobody 35u IPv4 29137831 TCP server.www.pc-freak.net:http->83.101.6.41:52312 (ESTABLISHED)

litespeed 241931 nobody 37w IPv4 29132085 TCP server.www.pc-freak.net:http->83.101.6.41:50000 (ESTABLISHED)
Another way to get an approximate number of established connections to let’s say Apache or LiteSpeed webserver with lsof can be achieved like so:
linux:~# lsof -i TCP:80 |wc -l

2100
I find it handy to keep track of above lsof command output every few secs with gnu watch , like so:
linux:~# watch "lsof -i TCP:80"
2. How to Detect if a Linux server is under an ICMP SMURF attack
ICMP attack is still heavily used, even though it’s already old fashioned and there are plenty of other Denial of Service attack types, one of the quickest way to find out if a server is under an ICMP attack is through the command:
server:~# while :; do netstat -s| grep -i icmp | egrep 'received|sent' ; sleep 1; done

120026 ICMP messages received

1769507 ICMP messages sent

120026 ICMP messages received

1769507 ICMP messages sent
As you can see the above one liner in a loop would check for sent and recieved ICMP packets every few seconds, if there are big difference between in the output returned every few secs by above command, then obviously the server is under an ICMP attack and needs to hardened.
3. How to detect a SYN flood with netstat
linux:~# netstat -nap | grep SYN | wc -l

1032
1032 SYNs per second is quite a high number and except if the server is not serving let’s say 5000 user requests per second, therefore as the above output reveals it’s very likely the server is under attack, if however I get results like 100/200 SYNs, then obviously there is no SYN flood targetting the machine 😉
Another two netstat command application, which helps determining if a server is under a Denial of Service attacks are:
server:~# netstat -tuna |wc -l

10012
and
server:~# netstat -tun |wc -l

9606
Of course there also some other ways to check the count the IPs who sent SYN to the webserver, for example:
server:~# netstat -n | grep :80 | grep SYN |wc -l
In many cases of course the top or htop can be useful to find, if many processes of a certain type are hanging around.
4. Checking if UDP Denial of Service is targetting the server
server:~# netstat -nap | grep 'udp' | awk '{print $5}' | cut -d: -f1 | sort |uniq -c |sort -n
The above command will list information concerning possible UDP DoS.
The command can easily be accustomed also to check for both possible TCP and UDP denial of service, like so:
server:~# netstat -nap | grep 'tcp|udp' | awk '{print $5}' | cut -d: -f1 | sort |uniq -c |sort -n

104 109.161.198.86

115 112.197.147.216

129 212.10.160.148

227 201.13.27.137

3148 91.121.85.220
If after getting an IP that has too many connections to the server and is almost certainly a DoS host you would like to filter this IP.
You can use the /sbin/route command to filter it out, using route will probably be a better choice instead of iptables, as iptables would load up the CPU more than simply cutting the route to the server.
Here is how I remove hosts to not be able to route packets to my server:
route add 110.92.0.55 reject
The above command would null route the access of IP 110.92.0.55 to my server.
Later on to look up for a null routed IP to my host, I use:
route -n |grep -i 110.92.0.55
Well hopefully this should be enough to give a brief overview on how, one can dig in his server and find if he is under a Distributed Denial of Service, hope it’s helpful to somebody out there.
Cheers 😉
Tags: apache webserver, approximate number, awk print, BSD, checking, cmd, command, course, Denial, denial of service, denial of service attack, Detect, difference, dos attack, ESTABLISHED, freak, How to, HTTP, ICMP, ips, Linux, linux server, linux webserver, LISTEN, litespeed, netstat, nobody, node, ntu, number, server pc, Service, sleep, statistics, SYN, SYNs, sys admins, tcp, terrible times, Watch
Posted in Linux, System Administration | 5 Comments »
Friday, October 5th, 2012 Debian GNU / Linux's Apache default behavior is to report Apache server name, version and Linux distribution version and codename.
This is shown as a minor security leak in many Security Scanner (audit) software like Nessus. It reveals a vital information which could help malicious attacker later to use exploit if the version number in question is vulnerable.
The quickest way to check, either Apache versioning and distro info is disabled is with telnet:
hipo@noah:~/Desktop$ telnet www.pc-freak.net 80
Trying 83.228.93.76…
Connected to www.pc-freak.net.
Escape character is '^]'.
HEAD / HTTP/1.0
Connection closed by foreign host.
hipo@noah:~/Desktop$ telnet www.pc-freak.net 80
Trying 83.228.93.76…
Connected to www.pc-freak.net.
Escape character is '^]'.
HEAD / HTTP/1.0
HTTP/1.1 200 OK
Date: Fri, 05 Oct 2012 10:48:36 GMT
Server: Apache/2.2.16 (Debian)
X-Powered-By: PHP/5.3.3-7+squeeze14
Vary: Accept-Encoding
Connection: close
Content-Type: text/html
Disabling this Distro version codename and version number reporting on Debian is done by changing in file /etc/apache2/conf.d/security directives:
ServerTokens OS

ServerSignature On
to
ServerSignature Off

ServerTokens ProductOnly
Here important note to make is if you try adding:
ServerSignature Off and ServerTokens Prod straight in Debian general config /etc/apache2/apache2.conf, but did not change the settings set for the vars through /etc/apache2/conf.d/security; settings from /etc/apache2/conf.d/security will overwrite ServerSignature / ServerTokens settings set in /etc/apache2/apache2.conf
I tried this myself (forgotting about /etc/apache2/conf.d/security) and adding both variables straight in apache2.conf. After Apache restart Apache version number and type of distribution continued be returned by the WebServer.
I thought something specific changed in Debian Squeeze – Apache/2.2.16 so this two variables are probably not working so I did a quick research online seing other people complaining also unable to disable Apache ver and Linux distro version and looking for a reason why. Well anyways if you happen to also ponder, why ServerSignature Off and ServerTokens ProductOnly does not take effect keep in mind it is due to overwritten settings via /etc/apache2/conf.d/security, changing the values there and restarting Apache and you're done 🙂
To make sure 100% Apache is no longer returning exact version number and host installed distro type, use telnet again:
hipo@noah:~/Desktop$ telnet www.pc-freak.net 80
Trying 83.228.93.76…
Connected to www.pc-freak.net.
Escape character is '^]'.
HEAD / HTTP/1.0
Connection closed by foreign host.
Tags: apache2, character, config, Desktop, hipo, host, How to, net, number, version
Posted in System Administration, Web and CMS | 1 Comment »


