Posts Tagged ‘Virtual’

How to automate open xen Hypervisor Virtual Machines backups shell script

Tuesday, June 22nd, 2021

openxen-backup-logo As a sysadmin that have my own Open Xen Debian Hypervisor running on a Lenovo ThinkServer few months ago due to a human error I managed to mess up one of my virtual machines and rebuild the Operating System from scratch and restore files service and MySQl data from backup that really pissed me of and this brought the need for having a decent Virtual Machine OpenXen backup solution I can implement on the Debian ( Buster) 10.10 running the free community Open Xen version 4.11.4+107-gef32c7afa2-1. The Hypervisor is a relative small one holding just 7 VM s:

HypervisorHost:~#  xl list
Name                                        ID   Mem VCPUs      State   Time(s)
Domain-0                                     0 11102    24     r—–  214176.4
pcfrxenweb                                  11 12288     4     -b—-  247425.5
pcfrxen                                     12 16384    10     -b—-  1371621.4
windows7                                    20  4096     2     -b—-   97887.2
haproxy2                                    21  4096     2     -b—-   11806.9
jitsi-meet                                  22  2048     2     -b—-   12843.9
zabbix                                      23  2048     2     -b—-   20275.1
centos7                                     24  2040     2     -b—-   10898.2

HypervisorHost:~# xl list|grep -v 'Name ' |grep  -v 'Domain-0'  |wc -l
7


The backup strategy of the script is very simple to shutdown the running VM machine, make a copy with rsync to a backup location the image of each of the Virtual Machines in a bash shell loop for each virtual machine shown in output of xl command and backup to a preset local directory in my case this is /backups/ the backup of each virtual machine is produced within a separate backup directory with a respective timestamp. Backup VM .img files are produced in my case to mounted 2x external attached hard drives each of which is a 4 Terabyte Seagate Plus Backup (Storage). The original version of the script was made to be a slightly different by Zhiqiang Ma whose script I used for a template to come up with my xen VM backup solution. To prevent the Hypervisor's load the script is made to do it with a nice of (nice -n 10) this might be not required or you might want to modify it to better suit your needs. Below is the script itself you can fetch a copy of it /usr/sbin/xen_vm_backups.sh :

#!/bin/bash

# Author: Zhiqiang Ma (http://www.ericzma.com/)
# Modified to work with xl and OpenXen by Georgi Georgiev – https://pc-freak.net
# Original creation dateDec. 27, 2010
# Script takes all defined vms under xen_name_list and prepares backup of each
# after shutting down the machine prepares archive and copies archive in externally attached mounted /backup/disk1 HDD
# Latest update: 08.06.2021 G. Georgiev – hipo@pc-freak.net

mark_file=/backups/disk1/tmp/xen-bak-marker
log_file=/var/log/xen/backups/bak-$(date +%Y_%m_%d).log
err_log_file=/var/log/xen/backups/bak_err-$(date +%H_%M_%Y_%m_%d).log
xen_dir=/xen/domains
xen_vmconfig_dir=/etc/xen/
local_bak_dir=/backups/disk1/tmp
#bak_dir=xenbak@backup_host1:/lhome/xenbak
bak_dir=/backups/disk1/xen-backups/xen_images/$(date +%Y_%m_%d)/xen/domains
#xen_name_list="haproxy2 pcfrxenweb jitsi-meet zabbix windows7 centos7 pcfrxenweb pcfrxen"
xen_name_list="windows7 haproxy2 jitsi-meet zabbix centos7"

if [ ! -d /var/log/xen/backups ]; then
echo mkdir -p /var/log/xen/backups
 mkdir -p /var/log/xen/backups
fi

if [ ! -d $bak_dir ]; then
echo mkdir -p $bak_dir
 mkdir -p $bak_dir

fi


# check whether bak runned last week
if [ -e $mark_file ] ; then
        echo  rm -f $mark_file
 rm -f $mark_file
else
        echo  touch $mark_file
 touch $mark_file
  # exit 0
fi

# set std and stderr to log file
        echo mv $log_file $log_file.old
       mv $log_file $log_file.old
        echo mv $err_log_file $err_log_file.old
       mv $err_log_file $err_log_file.old
        echo "exec 2> $err_log_file"
       exec 2> $err_log_file
        echo "exec > $log_file"
       exec > $log_file


# check whether the VM is running
# We only backup running VMs

echo "*** Check alive VMs"

xen_name_list_tmp=""

for i in $xen_name_list
do
        echo "/usr/sbin/xl list > /tmp/tmp-xen-list"
        /usr/sbin/xl list > /tmp/tmp-xen-list
  grepinlist=`grep $i" " /tmp/tmp-xen-list`;
  if [[ “$grepinlist” == “” ]]
  then
    echo $i is not alive.
  else
    echo $i is alive.
    xen_name_list_tmp=$xen_name_list_tmp" "$i
  fi
done

xen_name_list=$xen_name_list_tmp

echo "Alive VM list:"

for i in $xen_name_list
do
   echo $i
done

echo "End alive VM list."

###############################
date
echo "*** Backup starts"

###############################
date
echo "*** Copy VMs to local disk"

for i in $xen_name_list
do
  date
  echo "Shutdown $i"
        echo  /usr/sbin/xl shutdown $i
        /usr/sbin/xl shutdown $i
        if [ $? != ‘0’ ]; then
                echo 'Not Xen Disk image destroying …';
                /usr/sbin/xl destroy $i
        fi
  sleep 30

  echo "Copy $i"
  echo "Copy to local_bak_dir: $local_bak_dir"
      echo /usr/bin/rsync -avhW –no-compress –progress $xen_dir/$i/{disk.img,swap.img} $local_bak_dir/$i/
     time /usr/bin/rsync -avhW –no-compress –progress $xen_dir/$i/{disk.img,swap.img} $local_bak_dir/$i/
      echo /usr/bin/rsync -avhW –no-compress –progress $xen_vmconfig_dir/$i.cfg $local_bak_dir/$i.cfg
     time /usr/bin/rsync -avhW –no-compress –progress $xen_vmconfig_dir/$i.cfg $local_bak_dir/$i.cfg
  date
  echo "Create $i"
  # with vmmem=1024"
  # /usr/sbin/xm create $xen_dir/vm.run vmid=$i vmmem=1024
          echo /usr/sbin/xl create $xen_vmconfig_dir/$i.cfg
          /usr/sbin/xl create $xen_vmconfig_dir/$i.cfg
## Uncomment if you need to copy with scp somewhere
###       echo scp $log_file $bak_dir/xen-bak-111.log
###      echo  /usr/bin/rsync -avhW –no-compress –progress $log_file $local_bak_dir/xen-bak-111.log
done

####################
date
echo "*** Compress local bak vmdisks"

for i in $xen_name_list
do
  date
  echo "Compress $i"
      echo tar -z -cfv $bak_dir/$i-$(date +%Y_%m_%d).tar.gz $local_bak_dir/$i-$(date +%Y_%m_%d) $local_bak_dir/$i.cfg
     time nice -n 10 tar -z -cvf $bak_dir/$i-$(date +%Y_%m_%d).tar.gz $local_bak_dir/$i/ $local_bak_dir/$i.cfg
    echo rm -vf $local_bak_dir/$i/ $local_bak_dir/$i.cfg
    rm -vrf $local_bak_dir/$i/{disk.img,swap.img}  $local_bak_dir/$i.cfg
done

####################
date
echo "*** Copy local bak vmdisks to remote machines"

copy_remote () {
for i in $xen_name_list
do
  date
  echo "Copy to remote: vm$i"
        echo  scp $local_bak_dir/vmdisk0-$i.tar.gz $bak_dir/vmdisk0-$i.tar.gz
done

#####################
date
echo "Backup finishes"
        echo scp $log_file $bak_dir/bak-111.log

}

date
echo "Backup finished"


Things to configure before start using using the script to prepare backups for you is the xen_name_list variable

#  directory skele where to store already prepared backups
bak_dir=/backups/disk1/xen-backups/xen_images/$(date +%Y_%m_%d)/xen/domains

# The configurations of the running Xen Virtual Machines
xen_vmconfig_dir=/etc/xen/
# a local directory that will be used for backup creation ( I prefer this directory to be on the backup storage location )
local_bak_dir=/backups/disk1/tmp
#bak_dir=xenbak@backup_host1:/lhome/xenbak
# the structure on the backup location where daily .img backups with be produced with rsync and tar archived with bzip2
bak_dir=/backups/disk1/xen-backups/xen_images/$(date +%Y_%m_%d)/xen/domains

# list here all the Virtual Machines you want the script to create backups of
xen_name_list="windows7 haproxy2 jitsi-meet zabbix centos7"

If you need the script to copy the backup of Virtual Machine images to external Backup server via Local Lan or to a remote Internet located encrypted connection with a passwordless ssh authentication (once you have prepared the Machines to automatically login without pass over ssh with specific user), you can uncomment the script commented section to adapt it to copy to remote host.

Once you have placed at place /usr/sbin/xen_vm_backups.sh use a cronjob to prepare backups on a regular basis, for example I use the following cron to produce a working copy of the Virtual Machine backups everyday.
 

# crontab -u root -l 

# create windows7 haproxy2 jitsi-meet centos7 zabbix VMs backup once a month
00 06 1,2,3,4,5,6,7,8,9,10,11,12 * * /usr/sbin/xen_vm_backups.sh 2>&1 >/dev/null


I do clean up virtual machines Images that are older than 95 days with another cron job

# crontab -u root -l

# Delete xen image files older than 95 days to clear up space from backup HDD
45 06 17 * * find /backups/disk1/xen-backups/xen_images* -type f -mtime +95 -exec rm {} \; 2>&1 >/dev/null

#### Delete xen config backups older than 1 year+3 days (368 days)
45 06 17 * * find /backups/disk1/xen-backups/xen_config* -type f -mtime +368 -exec rm {} \; 2>&1 >/dev/null
How to install VirtualBox Virtual Machine to run Windows XP on Ubuntu Linux (11.10)

Tuesday, January 17th, 2012

Enable_VirtualBox_Windows_XP-fullscreen-with-vboxguest-additions-iso
My beloved sister was complaining games were failing to properly be played with wine emulator , therefore I decided to be kind and help her by installing a Windows XP to run inside a Virtual Machine.My previous install experiments with running MS Windows XP on Linux was on Debian using QEMU virtualmachine emulator.
However as Qemu is a bit less interactive and slower virtualmachine for running Windows (though I prefer it for being completely free software), this time I decided to install the Windows OS with Virtualbox.

My hope was using VirtualBox would be a way easier but I was wrong… I've faced few troubles and I thought many people who initially try to install Virtualbox VM to run Windows on Ubuntu and other Debian based Linux distros will probably experience the same problems as mine, so here is how this article was born.

Here is what I did to have a VirtualBox OS emulator to run Windows XP SP2 on Ubuntu 11.10 Linux

1. Install Virtualbox required packages with apt

root@ubuntu:~# apt-get install virtualbox virtualbox-dkms virtualbox-guest-dkms root@ubuntu:~# apt-get install virtualbox-ose-dkms virtualbox-guest-utils virtualbox-guest-x11
...

If you prefer more GUI or lazy to type commands, the Software Package Manager can also be used to straight install the same packages.
virtualbox-dkms virtualbox-guest-dkms packages are the two which are absolutely necessery in order to enable VirtualBox to support installing Microsoft Windows XP. DKMS modules are also necessery to be able to emulate some other proprietary (non-free) operating systems.
The DKMS packages provide a source for building Vbox guest (OS) additional kernel modules. They also require the kernel source to be install otherwise they fail to compile.

Failing to build the DKMS modules will give you error every time you try to create new VirtualMachine container for installing a fresh Windows XP.
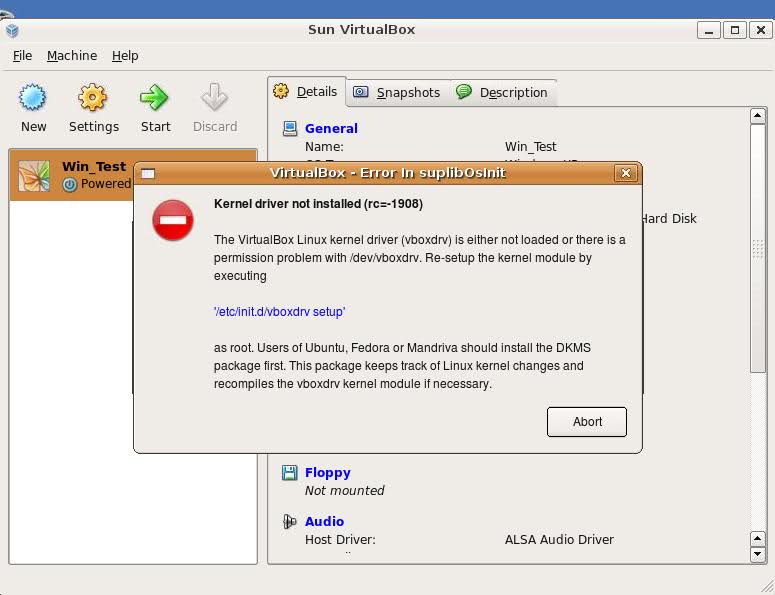
The error happens if the two packages do not properly build the vboxdrv extra Vbox kernel module while the Windows XP installer is loaded from a CD or ISO. The error to pop up is:

Kernel driver not installed (rc=-1908)

The VirtualBox Linux kernel driver (vboxdrv) is either not loaded or there is a permission problem with /dev/vboxdrv. Please reinstall the kernel module by executing

VirtualBox vboxdrv not loaded error Ubuntu Screen

To fix the error:

2. Install latest Kernel source that corresponds to your current kernel version

root@ubuntu:~# apt-get install linux-headers-`uname -r`
...

Next its necessery to rebuild the DKMS modules using dpkg-reconfigure:

3. Rebuild VirtualBox DKMS deb packages

root@ubuntu:~# dpkg-reconfigure virtualbox-dkms
...
root@ubuntu:~# dpkg-reconfigure virtualbox-guest-dkms
...
root@ubuntu:~# dpkg-reconfigure virtualbox-ose-dkms
...

Hopefully the copilation of vboxdrv kernel module should complete succesfully.
To test if all is fine just load the module:

4. Load vboxdrv virtualbox kernel module

root@ubuntu:~# modprobe vboxdrv
root@ubuntu:~#

If you get some error during loading, this means vboxdrv failed to properly compile, try read thoroughfully what the error is and fix it) ;).

As a next step the vboxdrv has to be set to load on every system boot.

5. Set vboxdrv to load on every Ubuntu boot

root@ubuntu:~# echo 'vboxdrv' >> /etc/modules

I am not sure if this step is required, it could be /etc/init.d/virtualbox init script automatically loads the module, anyways putting it to load on boot would do no harm, so better do it.

That's all now, you can launch VirtualBox and use the New button to initiate a new Virtual Machine, I will skip explaining how to do the configurations for a Windows XP as most of the configurations offered by default would simply work without any tampering.

After booting the Windows XP installer I simply followed the usual steps to install Windows and all went smoothly.
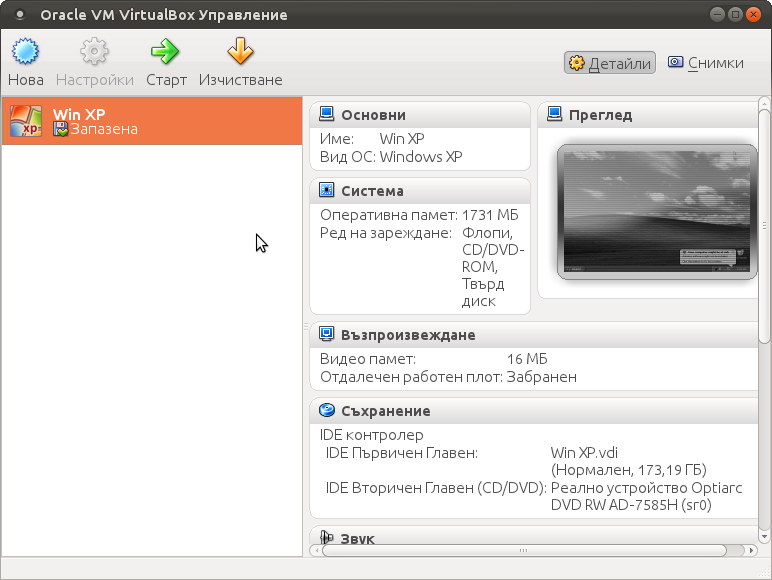
Below you see a screenshot showing the installed Windows XP Virtualbox saved VM session. The screenshot letters are in Bulgarian as my sisters default lanaguage for Ubuntu is bulgarian 😉

VirtualBox installed MS Windows VM screenshot

I hope this article helps someone out there. Please drop me a comment if you experience any troubles with it. Cya 🙂

How to enable VirtualBox Windows XP FullScreen with VboxGuestAdditions.iso on Ubuntu 11.10 Linux

Tuesday, January 17th, 2012

Enable_VirtualBox_Windows_XP-fullscreen-with-vboxguest-additions-iso
Right after installing Windows XP inside VirtualBox, I've found out everything works fine except the screen. Even though pressing (Right CTRL + F) was changing the Windows XP running window to FullScreen the XP screen was taking only a part of the whole screen area, where almost half of the screen was visible as simply staying blank.

A bit of research and I found the issue is caused by missing VirtualBoxGuestAdditions .

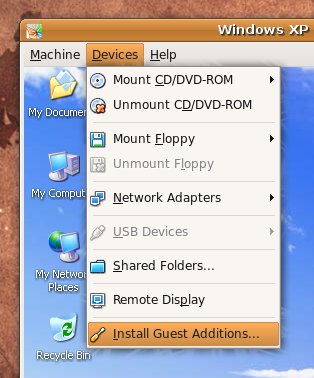
VBoxAdditions is a package which should be installed inside the VirtualBox by navigating to Devices -> Install Guest Additions

Virtualbox offers a download of a VboxGuestAdditions_4.1.2_Ubuntu.iso from url;
http://dlc.sun.edgesuite.net/virtualbox/4.1.2_Ubuntu/VBoxGuestAdditions_4.1.2_Ubuntu.iso, anyways this download fails since the URL is currently unavailable.

To fix this two ways are possible:

1. Download VBoxGuestAdditions.iso from here and put it in directory /usr/share/virtualbox , e.g.:

root@ubuntu:~# cd /usr/share/virtualbox
root@ubuntu:/usr/share/virtualbox# wget https://www.pc-freak.net/files/VBoxGuestAdditions.iso
...

2. Download and install virtualbox-guest-additions-iso_4.1.2-1_all.deb

root@ubuntu:~# wget https://www.pc-freak.net/files/virtualbox-guest-additions-iso_4.1.2-1_all.deb
...
root@ubuntu:~# dpkg -i virtualbox-guest-additions-iso_4.1.2-1_all.deb
...

Next to enable and install guest additions once again use menus:

Devices -> Install Guest Additions

VirtualBox Install Guest Additions Ubuntu Screenshot

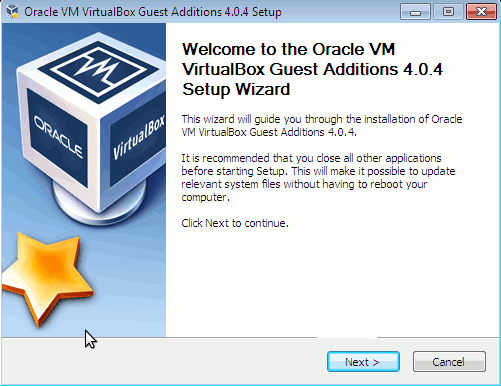
The screen to appear next will be similar to:

VBox guest Additions windows Ubuntu

Further on follow the few dialogs to complete the installations and integration of Guest Additions and restart the Virtual machine and hooray the Windows will appear in Full screen in VirtualBox ! 😉

How to Share virtual terminal SSH between mutliple logged in users with screen / Create multi user sessions with GNU screen

Friday, November 2nd, 2012

How to share bash shell between multiple users with gnu screen - share virtual terminal via ssh through multiple users screen

GNU Screen is great utility with a number of helpful features. Maybe there is no UNIX / (GNU / Linux),  admin which doesn't use screen or some similar terminal emulator prog. daily basis.

Little might know however abut a kewl functionality allowing, a few logged in users via ssh to share one terminal.

Sharing a virtual terminal with another person, is very helpful if you want to teach someone a bit of Linux / UNIX basics, showing him how certain commands works on a system etc. etc.

Shared terminal session is very helpful in case of need for remote system administration or support, whether instead of explaining someone over the phone for 20 minutes or an hour a bunch of commands he has to run to achieve something,  you can login share terminal with screen and do whatever necessary  in front of his eyes.

Shared screen session, can actually in theory allow unlimited people to watch what a certain one is doing in a his virtual terminal. This is very helpful for example in Computer Laboratories for Teachers to teach students FreeBSD, Linux, bash, csh shell scripting, perl or whatever programming language taught.

Allowing two or more logged in users with same user credentialsto use screen can be done pretty easy, one primary user (creating the initial screen terminal session), should just launch GNU screen:

test@noah:~$ screen

The second, third, 4th, 5th and the rest of users should login via SSH session with same user, lets say test and launch screen -x

test@noah:~$ screen -list
There is a screen on:
    20147.pts-5.noah    ( 1.11.2012 18,27,50)    (Attached)
1 Socket in /var/run/screen/S-hipo.


test@noah:~$ screen -x

I'm not sure if screen has some kind of limitation on how many users maximum can connect to a screen session, but I guess it should be high enough for dozen of people –  at least 512 or 1024 people to connect and share one shell simultaneously.

In some Linux distributions (versions) RHEL, CentOS it is possible screen -x not to work out of the box, because screen binary is not set to be SUID.
On latest Debian versions and deb derivatives thanksfully, screen bin is by default installed as SUID so screen -x works fine.

hipo@noah:~$ ls -al /usr/bin/screen
-rwxr-sr-x 1 root utmp 364088 29 юли  2009 /usr/bin/screen

Enabling mutiuser screen login via a running screen session is possible by pressing:

CTRL + a + : and typing in prompt  multiuser on

In case you want to have a system user which by default allows a multiple logged in users to share shell you can use a little 'hack' just change in /etc/passwd the field recordfor user shell (/bin/bash) with (/usr/bin/screen)

Lets say you want to allow the user test support multiple logged in users share one shell the record for test in /etc/passwd should look smth. like:

test:x:1003:1004:,,,:/home/test:/bin/bash

Change it with your favourite text editor to:

test:x:1003:1004:,,,:/home/test:/usr/bin/screen

If you have some problems running screen, check permissions and eventually exec as superuser:

chmod u+s /usr/bin/screen


Finally TeamViewer 7 release for GNU / Linux is available

Thursday, March 29th, 2012


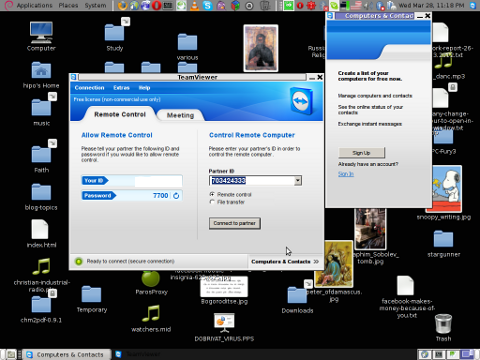
TeamViewer 7 Debian GNU / Linux released, my desktop screenshot

After a long time of inavailability, finally TeamViewer 7 for GNU / Linux is out!

Here is the short TeamViewer 7 Linux release note :

In our TeamViewer download area you will now find TeamViewer 7 for Linux.
The final version includes a selection of new features for Linux, e. g. an integrated screenshot feature and the possibility of saving individual connection settings per computer.
You can now establish cross platform connections with other computers running version 7 and hold online meetings and presentations with up to 25 participants.

We wish you best continued success with TeamViewer!

Well, guys it was about time, even later than that… Until now I've so many times experienced troubles with Windows machines which I had to administrate remotely and they only had a TeamViewer 7 installed (a real, real pain in the ass).

The issue comes cause TeamViewer 6 is incompatible with 7 and just until very recently only TV 6 for Linux was available, so trying to access a 7 install directly from Linux was impossible.
Hence to access TeamViewer 7 Windows install, I had to use either a fresh Windows copy with TeamViewer 7 installed or a Virtual Machine like (Qemu, VirtualBox) with Windows version installed in it.
Often back then, when I had to fix remotely a Windows machine behind a firewall, I had to instruct the machine owners to replace the TeamViewer 7 with TeamViewer 6 in order to be able to easily access the remote host from my Debian Linux.

I still remember, it was quite a stuggle to find a link to a Windows .exe install file for TeamViewer 6.

Now thanksfully, TeamViewer guys are starting to make it easier for the user who would for some reason want to stick to older TV version.
I've noticed on TeamViewer's website there is already a new TeamViewer download page offering for download all the old teamviewer version – 1.x, 2.x, 3.x, 4.x, 5.x, 6.x

One example, where old teamviewer release is useful is if you want to run teamviewer on older hardware or old OS (MS Windows 98 or old Linux distro).

I've made a mirror of teamviewer 6 for Debian / Ubuntu amd 32 and 64 bit versions along with all the OS available TeamViewer version 6 and 7, for the sake of preserving it if one day link to old versions of Teamviewer disappear from their website.

Here are the TeamViewer mirrored files:

Below you see a screenshot of teamviewer 7 running on my Debian Squeeze 🙂

TeamViewer 7 Debian GNU / Linux released, my desktop screenshot

It is great teamviewer produced a Linux working application, however if you run it you realize just like the previous releases TeamViewer is not natively supposed (compiled) to run on GNU / Linux OS but uses wine (windows emulator) to launch through…
Instead of porting the application to be natively for the Linux distros once again with this new release, teamviewer developers just "hacked" it to run on top of windows emulation. Though this is working its performance, is probably a bit degraded and it depends on having install on the Linux host a bunch of useless packages which wine depends on.
Besides that even if it "works" on Linux , TeamViewer has still non-free software essense. I still use it because unfortunately, I don't know of a better remote access program capable to connect to servers behind NAT / machines located behind a tight firewalled routers.
If only (I knew of?) a TeamViewer free software / open source equivalent
I will be glad to hear if someone know a (free software / open source) TeamViewer like program able to access remote hosts with no a real (public inet) IP address?P.S.: By similar TV program I don't mean VNC, UltraVNC and this kind of other VNC derivative programs but mean close TeamViewer alternative.

Check and Restart Apache if it is malfunctioning (not returning HTML content) shell script

Monday, March 19th, 2012

Check and Restart Apache Webserver on Malfunction, Apache feather logo

One of the company Debian Lenny 5.0 Webservers, where I'm working as sys admin sometimes stops to properly server HTTP requests.
Whenever this oddity happens, the Apache server seems to be running okay but it is not failing to return requested content

I can see the webserver listens on port 80 and establishing connections to remote hosts – the apache processes show normally as I can see in netstat …:

apache:~# netstat -enp 80
Active Internet connections (w/o servers)
Proto Recv-Q Send-Q Local Address Foreign Address State User Inode PID/Program name
tcp 0 0 xxx.xxx.xxx.xx:80 46.253.9.36:5665 SYN_RECV 0 0 -
tcp 0 0 xxx.xxx.xxx.xx:80 78.157.26.24:5933 SYN_RECV 0 0 -
...

Also the apache forked child processes show normally in process list:

apache:~# ps axuwwf|grep -i apache
root 46748 0.0 0.0 112300 872 pts/1 S+ 18:07 0:00 \_ grep -i apache
root 42530 0.0 0.1 217392 6636 ? Ss Mar14 0:39 /usr/sbin/apache2 -k start
www-data 42535 0.0 0.0 147876 1488 ? S Mar14 0:01 \_ /usr/sbin/apache2 -k start
root 28747 0.0 0.1 218180 4792 ? Sl Mar14 0:00 \_ /usr/sbin/apache2 -k start
www-data 31787 0.0 0.1 219156 5832 ? S Mar14 0:00 | \_ /usr/sbin/apache2 -k start

In spite of that, in any client browser to any of the Apache (Virtual hosts) websites, there is no HTML content returned…
This weird problem continues until the Apache webserver is retarted.
Once webserver is restarted everything is back to normal.
I use Apache Check Apache shell script set on few remote hosts to regularly check with nmap if port 80 (www) of my server is open and responding, anyways this script just checks if the open and reachable and thus using it was unable to detect Apache wasn't able to return back HTML content.
To work around the malfunctions I wrote tiny script – retart_apache_if_empty_content_is_returned.sh

The scripts idea is very simple;
A request is made a remote defined host with lynx text browser, then the output of lines is counted, if the output returned by lynx -dump http://someurl.com is less than the number returned whether normally invoked, then the script triggers an apache init script restart.

I've set the script to periodically run in a cron job, every 5 minutes each hour.
# check if apache returns empty content with lynx and if yes restart and log it
*/5 * * * * /usr/sbin/restart_apache_if_empty_content.sh >/dev/null 2>&1

This is not perfect as sometimes still, there will be few minutes downtime, but at least the downside will not be few hours until I am informed ssh to the server and restart Apache manually

A quick way to download and set from cron execution my script every 5 minutes use:

apache:~# cd /usr/sbin
apache:/usr/sbin# wget -q https://www.pc-freak.net/bscscr/restart_apache_if_empty_content.sh
apache:/usr/sbin# chmod +x restart_apache_if_empty_content.sh
apache:/usr/sbin# crontab -l > /tmp/file; echo '*/5 * * * *' /usr/sbin/restart_apache_if_empty_content.sh 2>&1 >/dev/null


How to find and kill Abusers on OpenVZ Linux hosted Virtual Machines (Few bash scripts to protect OpenVZ CentOS server from script kiddies and easify the daily admin job)

Friday, July 22nd, 2011

OpenVZ Logo - Anti Denial Of Service shell scripts

These days, I’m managing a number of OpenVZ Virtual Machine host servers. Therefore constantly I’m facing a lot of problems with users who run shit scripts inside their Linux Virtual Machines.

Commonly user Virtual Servers are used as a launchpad to attack hosts do illegal hacking activities or simply DDoS a host..
The virtual machines users (which by the way run on top of the CentOS OpenVZ Linux) are used to launch a Denial service scripts like kaiten.pl, trinoo, shaft, tfn etc.

As a consequence of their malicious activities, oftenly the Data Centers which colocates the servers are either null routing our server IPs until we suspend the Abusive users, or the servers go simply down because of a server overload or a kernel bug hit as a result of the heavy TCP/IP network traffic or CPU/mem overhead.

Therefore to mitigate this abusive attacks, I’ve written few bash shell scripts which, saves us a lot of manual check ups and prevents in most cases abusers to run the common DoS and “hacking” script shits which are now in the wild.

The first script I’ve written is kill_abusers.sh , what the script does is to automatically look up for a number of listed processes and kills them while logging in /var/log/abusers.log about the abusive VM user procs names killed.

I’ve set this script to run 4 times an hour and it currently saves us a lot of nerves and useless ticket communication with Data Centers (DCs), not to mention that reboot requests (about hanged up servers) has reduced significantly.
Therefore though the scripts simplicity it in general makes the servers run a way more stable than before.

Here is OpenVZ kill/suspend Abusers procs script kill_abusers.sh ready for download

Another script which later on, I’ve written is doing something similar and still different, it does scan the server hard disk using locate and find commands and tries to identify users which has script kiddies programs in their Virtual machines and therefore are most probably crackers.
The scripts looks up for abusive network scanners, DoS scripts, metasploit framework, ircds etc.

After it registers through scanning the server hdd, it lists only files which are preliminary set in the script to be dangerous, and therefore there execution inside the user VM should not be.

search_for_abusers.sh then logs in a files it’s activity as well as the OpenVZ virtual machines user IDs who owns hack related files. Right after it uses nail mailing command to send email to a specified admin email and reports the possible abusers whose VM accounts might need to either be deleted or suspended.

search_for_abusers can be download here

Honestly I truly liked my search_for_abusers.sh script as it became quite nice and I coded it quite quickly.
I’m intending now to put the Search for abusers script on a cronjob on the servers to check periodically and report the IDs of OpenVZ VM Users which are trying illegal activities on the servers.

I guess now our beloved Virtual Machine user script kiddies are in a real trouble ;P
 

How to list enabled VirtualHosts in Apache on GNU / Linux and FreeBSD

Thursday, December 8th, 2011

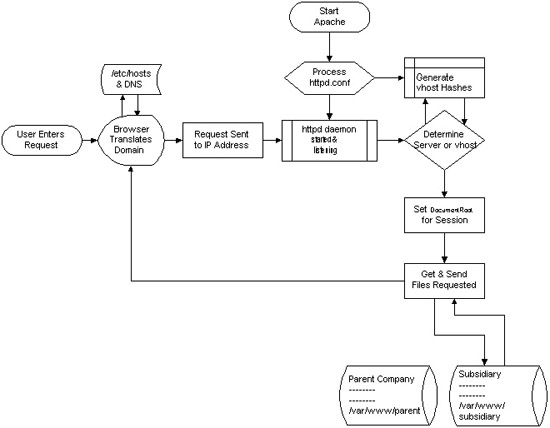
How Apache process vhost requests picture, how to list Apache virtualhosts on Linux and FreeBSD

I decided to start this post with this picture I found on onlamp.com article called “Simplify Your Life with Apache VirtualHosts .I put it here because I thing it illustrates quite well Apache’s webserver internal processes. The picture gives also a good clue when Virtual Hosts gets loaded, anways I’ll go back to the main topic of this article, hoping the above picture gives some more insight on how Apache works.;
Here is how to list all the enabled virtualhosts in Apache on Debian GNU / Linux serving pages:

server:~# /usr/sbin/ apache2ctl -S
VirtualHost configuration:
wildcard NameVirtualHosts and _default_ servers:
*:* is a NameVirtualHost
default server exampleserver1.com (/etc/apache2/sites-enabled/000-default:2)
port * namevhost exampleserver2.com (/etc/apache2/sites-enabled/000-default
port * namevhost exampleserver3.com (/etc/apache2/sites-enabled/exampleserver3.com:1)
port * namevhost exampleserver4.com (/etc/apache2/sites-enabled/exampleserver4.com:1)
...
Syntax OK

The line *:* is a NameVirtualHost, means the Apache VirtualHosts module will be able to use Virtualhosts listening on any IP address (configured on the host), on any port configured for the respective Virtualhost to listen on.

The next output line:
port * namevhost exampleserver2.com (/etc/apache2/sites-enabled/000-default Shows requests to the domain on any port will be accepted (port *) by the webserver as well as indicates the <VirtualHost> in the file /etc/apache2/sites-enabled/000-default:2 is defined on line 2 (e.g. :2).

To see the same all enabled VirtualHosts on FreeBSD the command to be issued is:

freebsd# pcfreak# /usr/local/sbin/httpd -S VirtualHost configuration:
wildcard NameVirtualHosts and _default_ servers:
*:80 is a NameVirtualHost
default server www.pc-freak.net (/usr/local/etc/apache2/httpd.conf:1218)
port 80 namevhost www.pc-freak.net (/usr/local/etc/apache2/httpd.conf:1218)
port 80 namevhost pcfreak.afraid.org (/usr/local/etc/apache2/httpd.conf:1353)
...
Syntax OK

On Fedora and the other Redhat Linux distributions, the apache2ctl -S should be displaying the enabled Virtualhosts.

One might wonder, what might be the reason for someone to want to check the VirtualHosts which are loaded by the Apache server, since this could be also checked if one reviews Apache / Apache2’s config file. Well the main advantage is that checking directly into the file might sometimes take more time, especially if the file contains thousands of similar named virtual host domains. Another time using the -S option is better would be if some enabled VirtualHost in a config file seems to not be accessible. Checking directly if Apache has properly loaded the VirtualHost directives ensures, there is no problem with loading the VirtualHost. Another scenario is if there are multiple Apache config files / installs located on the system and you’re unsure which one to check for the exact list of Virtual domains loaded.

How to install Microsoft Windows XP SP3 on Debian GNU / Linux Squeeze

Thursday, December 1st, 2011

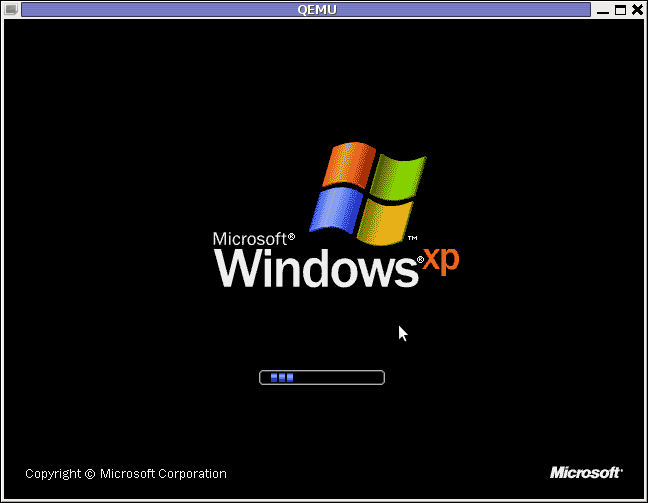
Windows XP Service Pack 3 QEMU Debian Squeeze

I have never did a proper install of Windows XP on Debian before hand. Even though I experimented once long time ago. I had zero success with installing Windows XP Service Pack 2 . The only Windows I can make correctly working before hand on these early days on my Debian powered notebook with qemu virtual machine emulator was Windows 2000 .

I decided to give it another go today as I hoped the qemu has advanced and I’ve seen many reports online of people who were able to correctly make Windows XP SP2 work out.

As I’ve seen many blog posts online of people who succesfully run with qemu Windows XP SP2, in order to escape from repeating the other guys experience and conduct a fresh experiment, I decided to give qemu a try with Microsoft.Windows.XP.Professional.SP3.Integrated.June.2011.Corporate

Before I proceed with using latest qemu I,

1. Installed qemu using the usual:

debian:~# apt-get install --yes qemu qemu-keymaps qemu-system qemu-user qemu-utils uml-utilities
...

Afterwards,

2. Created a new directory where the qemu Windows image will be stored:

debian:~# su hipo
hipo@noah:~$ mkdir windows
hipo@noah:~$ cd windows
hipo@noah:/home/hipo/windows$

As a following step I loaded the tun kernel module which is necessery for Qemu to properly handle the Windows LAN networking.

3. Load and set proper permissions for tun kernel module

In case if /dev/net is not existing first step is to create the proper device, however in most cases /dev/net should be there:

debian:~# mkdir -p /dev/net
debian:~# mknod /dev/net/tun c 10 200

As a next step its necessery to load tun kernel module and set the proper permissions:

debian:~# modprobe tun
debian:~# echo 'tun' >> /etc/modules
debian:~# chgrp users /dev/net/tun
debian:~# chmod g+w /dev/net/tun

Next step is to create an image file with dd or with qemu-img which will be holding the Virtual Machine Windows installation.

4. Create image file for Windows using dd

I decided to create a the image file to be with a size of 5 Gigabytes, this is of course custom so other people might prefer having it less or more the absolute minimum for a proper Windows XP SP3 install is 2000 Megabytes.

debian:~# su hipo -; cd windows;
debian:/home/hipo/windows$ dd of=hd.img bs=1024 seek=5000000 count=0
0+0 records in
0+0 records out
0 bytes (0 B) copied, 1.5505e-05 s, 0.0 kB/s

Notice here that the file dd will create will appear like 0 kb file until the Windows install from a BootCD is run with qemu.

5. Download an image of Microsoft.Windows.XP.Professional.SP3.Integrated.June.2011.Corporate from thepiratebay.org

Microsoft.Windows.XP.Professional.SP3.Integrated.June.2011.Corporate is currently available for download from the thepiratebay.org if in the times to come it is not available it will most likely be available from torrentz.net, isohunt.com etc. so I’ll skip more explanations with this step and let you use your favourite torrent program of choice to download the MS Windows iso. Just to make a note here I used transmission as this is my favourite torrent client. After downloading the iso I used K3B to burn the Image file as Bootable ISO. I’m naturally a GNOME user so to burn it as Image I just open it with K3B by using the GNOME menu and selecting Open with K3B

Next I instructed qemu to boot from the just burnt CD.

6. Boot windows Installation with Qemu from the Boot CD

debian:/home/hipo/windows$ qemu -boot d -cdrom /dev/cdrom -hda hd.img

Notice here that I’m running the qemu virtual machine emulator with a non-privileged reasons. This is important as qemu might have holes in the emulation of Windows Networking stack which if executed as root superuser. Can allow some malicious attacker to remotely compromise your GNU / Linux PC …

Qemu window will pop-up where one installs the Windows as it will install it using an ordinary PC. To switch qemu to fullscreen mode to have the complete feeling like installing Windows on an non-emulated PC ctrl + alt + f can be pressed.

The Windows installation took like 1 hour 20 minutes on my dual core 1.8 Ghz notebook with 2 GB of RAM. But I should say while installing I had multiple applications running; xmms, transmission, epiphany, icedove, evince etc. probably if I just run the Virtual Machine with no other applications to extra load my PC, probably the Windows install would have been done in max 50 minutes time.

After the installation is complete. To

7. Further run the installed Windows debian:/home/hipo/windows$ qemu -hda hd.img -boot c
...

As a next step its necessery to;

8. Bring up the tap0 interface and configure it for the user

I’m running my qemu emulator with my user hipo , so I run cmds:

debian:/home/hipo/windows$ su - root
debian:~# tunctl -u hipo
Set 'tap0' persistent and owned by uid 1000

9. Enable ip_forwarding and arp proxy and for wlan0 and tap0

debian:~# echo 1 > /proc/sys/net/ipv4/conf/wlan0/proxy_arp
debian:~# echo 1 > /proc/sys/net/ipv4/conf/tap0/proxy_arp

10. Install the proper Network Drivers inside Windows

That’s just in case, if they’re not supported by the Windows default existing drivers.
To do so, I downloaded my LAN drivers from the Vendor and put it on USB and sticked the USB drive to my laptop. In order to make the Kingston USB drive I used to transfer my LAN and Video drivers. I had to restart qemu with the parameter -usb -usbdevice host:0951:1625 , where I used lsusb to check and get the correct USB ID 0951:1625, like shown in the command below:

debian:~# lsusb |grep -i kingston
Bus 001 Device 006: ID 0951:1625 Kingston Technology DataTraveler 101 II

After on I booted again the Windows XP with the following command line in order to make qemu detect the USB Drive:

debian:/home/hipo/windows# sudo qemu -boot c -hda hd.img -usb -usbdevice host:0951:1625

One oddity here is that in order for qemu to detect the USB stick, I had to run it via sudo with super user privileges.Don’t ask me why this is the only way it worked …
Next on used the Windows device manager from Control Panel -> System -> Device Manager to point my undetected hardware to the correct Win drivers.

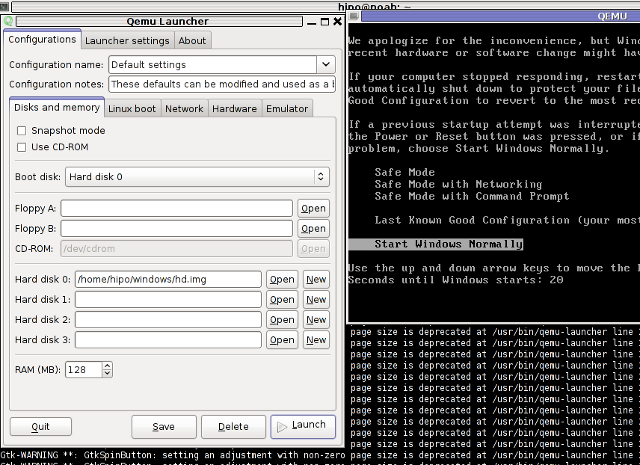
For the GUI preferring user qemu has a nice GNOME GUI interface called qemu-launcher, if you like to use qemu via it instead of scripting the qemu launcher commands, you can install and use via:

debian:~# apt-get install --yes qemu-launcher qemuctl
...
debian:/home/hipo/windows$ qemu-launcher

QEMU-Launcher Debian Squeeze Screenshot

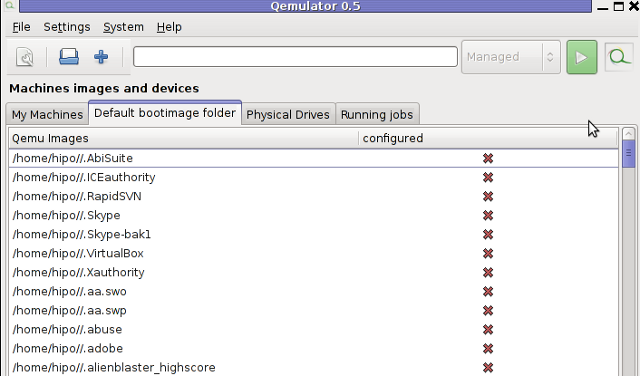
Another GUI alternative to qemu-launcher, which easifys the work with qemu is qemulator; here is a screenshot:

Qemulator 0.5 - Qemu GUI Screenshot Debian Squeeze