Posts Tagged ‘hipo’

How to change Debian GNU / Linux console (tty) language to Bulgarian or Russian Language

Wednesday, April 25th, 2012

Debian has a package language-env. I haven't used my Linux console for a long time. So I couldn't exactly remember how I used to be making the Linux console to support cyrillic language (CP1251, bg_BG.UTF-8) etc.

I've figured out for the language-env existence in Debian Book on hosted on OpenFMIBulgarian Faculty of Mathematics and Informatics website.
The package info with apt-cache show displays like that:

hipo@noah:~/Desktop$ apt-cache show language-env|grep -i -A 3 description
Description: simple configuration tool for native language environment
This tool adds basic settings for natural language environment such as
LANG variable, font specifications, input methods, and so on into
user's several dot-files such as .bashrc and .emacs.

What is really strange, is the package maintainer is not Bulgarian, Russian or Ukrainian but Japanese.
As you see the developer is weirdly not Bulgarian but Japanese Kenshi Muto. What is even more interesting is that it is another japanese that has actually written the script set-language-env contained within the package. Checking the script in the header one can see him, Tomohiro KUBOTA

Before I've found about the language-env existence, I knew I needed to have the respective locales installed on the system with:

# dpkg-reconfigure locales

So I run dpkg-reconfigure to check I have existing the locales for adding the Bulgarian language support.
Checking if the bulgarian locale is installed is also possible with /bin/ls:

# ls -al /usr/share/i18n/locales/*|grep -i bg
-rw-r--r-- 1 root root 8614 Feb 12 21:10 /usr/share/i18n/locales/bg_BG

The language-env contains a perl script called set-language-env which is doing the actual Debian Bulgarization / cyrillization. The set-language-env author is another Japanese and again not Slavonic person.

Actually set-language-env script is not doing the Bulgariazation but is a wrapper script that uses a number of "hacks" to make the console support cyrillic.

Further on to make the console support cyrillic, execute:

hipo@noah:~$ set-language-env
Setting up users' native language environment
by modifying their dot-files.
Type "set-language-env -h" for help.
1 : be (Bielaruskaja,Belarusian)
2 : bg (Bulgarian)
3 : ca (Catala,Catalan)
4 : da (Dansk,Danish)
5 : de (Deutsch,German)
6 : es (Espanol,Spanish)
7 : fr (Francais,French)
8 : ja (Nihongo,Japanese)
9 : ko (Hangul,Korean)
10 : lt (Lietuviu,Lithuanian)
11 : mk (Makedonski,Macedonian)
12 : pl (Polski,Polish)
13 : ru (Russkii,Russian)
14 : sr (Srpski,Serbian)
15 : th (Thai)
16 : tr (Turkce,Turkish)
17 : uk (Ukrajins'ka,Ukrainian)
Input number > 2

There are many questions in cyrillic list necessery to be answered to exactly define if you need cyrillic language support for GNOME, pine, mutt, console etcetera.
The script will create or append commands to a number of files on the system like ~/.bash_profile
The script uses the cyr command part of the Debian console-cyrillic package for the actual Bulgarian Linux localization.

As said it was supposed to also do a localization in the past of many Graphical environment programs, as well as include Bulgarian support for GNOME desktop environment. Since GNOME nowdays is already almost completely translated through its native language files, its preferrable that localization to be done on Linux install time by selecting a country language instead of later doing it with set-language-env. If you failed to set the GNOME language during Linux install, then using set-language-env will still work. I've tested it and even though a lot of time passed since set-language-env was heavily used for bulgarization still the GUI env bulgarization works.

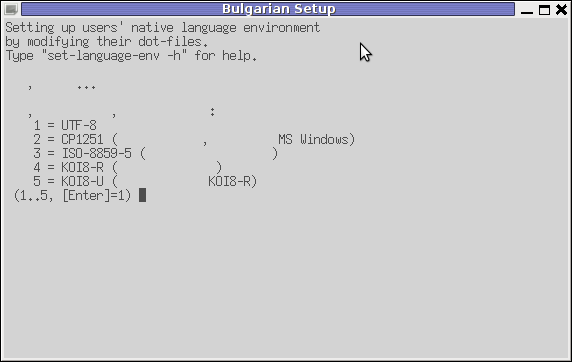
If set-language-env is run in gnome-terminal the result, the whole set of question dialogs will pop-up in new xterm and due to a bug, questions imposed will be unreadable as you can see in below screenshot:

set-language-env command screenshot in Debian GNU / Linux gnome-terminal

If you want to remove the bulgarization, later at certain point, lets you don't want to have the cyrillic console or programs support use:

# set-language-env -r
Setting up users native language environment' 

For anyone who wish to know more in depth, how set-language-env works check the README files in /usr/share/doc/language-env/ one readme written by the author of the Bulgarian localization part of the package Anton Zinoviev is /usr/share/doc/language-env/README.be-bg-mk-sr-uk

Tools for finding files containing a string (recursively) in Graphical Enviroments (GNOME, KDE and XFCE) on GNU linux and FreeBSD

Monday, April 9th, 2012

1. Finding files containing a specific string with GNOME GUI tool gnome-search-tool

Default installation of GNOME version 2.x and 3.x is equipped with a tool called gnome-search-tool. The tool is used by default in the GNOME's file explorer program Nautilus. The quickest way to look for a certain text string across all the files located in a directory and show them is with nautilus's – find manager.

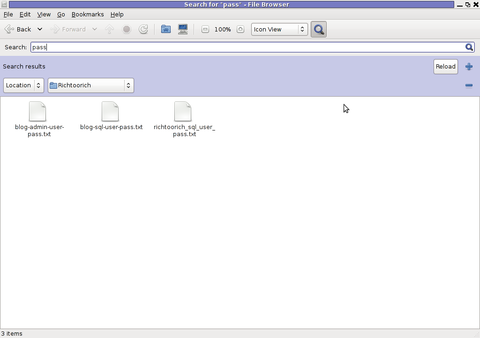
Below is a screenshot showing the gnome-search-tool embedded in nautilus Screenshot Search for pass string in GNOME nautilus File browser

Nautilus find uses gnome-search-tool program for its file search. Below is a screenshot showing the gnome-search-tool embedded in nautilus:

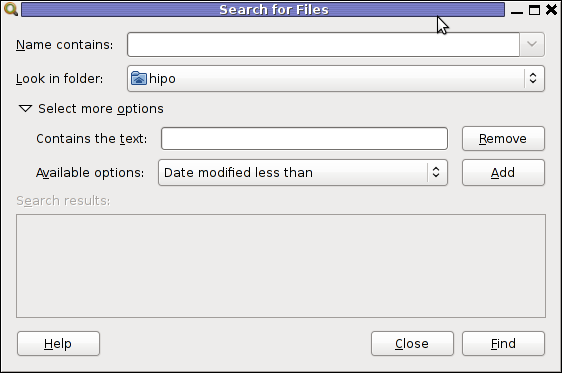
The gnome-search-tool can be also invoked through Gnome Run Application with ALT+F2 or directly run from terminal e.g.:

hipo@noah:~$ gnome-search-tool

gnome-search-tool screenshot find files by content recursively Debian GNU / Linux

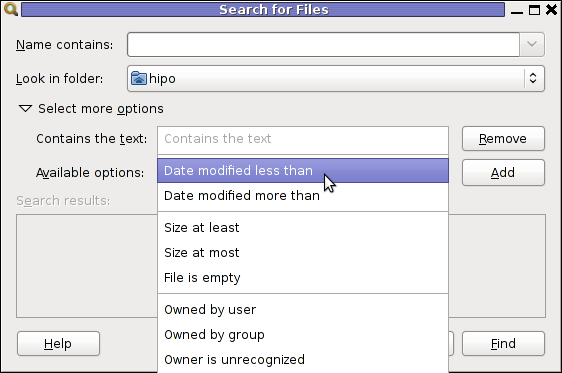
As you can see in below screenshot, gnome-search-tool has many available filter file search criterias.

gnome-search-tool available options screenshot Debian Linux

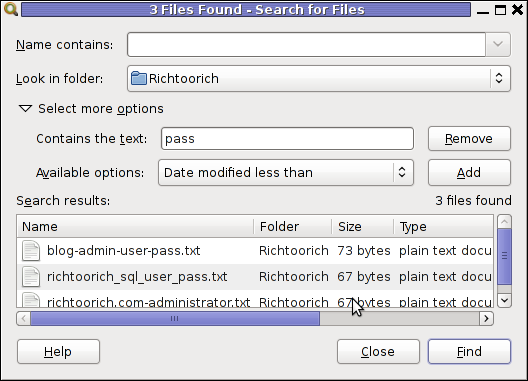
You see I wanted to look for my project passwords so typed in pass in Contains the text: field and pressed enter to simply look for this text in all my files in the look in folder RichtooRich
Screenshot 3 files found gnome search tool Linux screenshot

Actually gnome-search-tool offers plenty of more options than one might look for. With it one can easily make a combination of complex search critea (filters) and hence a very versatile Desktop file saerch tool. From testing it I can say it for sure more powerful program than MS Windows default file searching program called Find It – this is the program with the ( "dumb dog holing a magnifier" 🙂

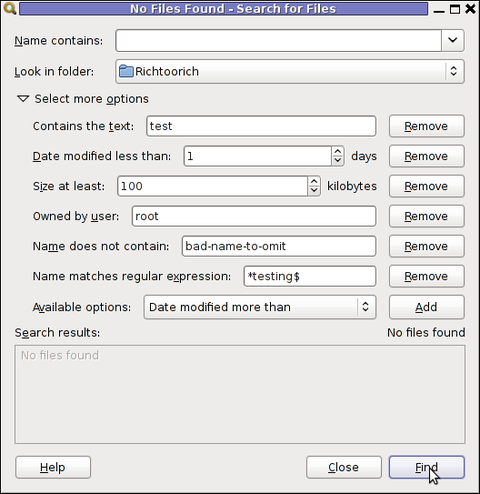
One can use the Add or Remove to Add single or various combination of filter criterias. For the sake of testing it, I've added a number of file search filters as you see in the shot below:

Linux graphical program for recursive file search gnome-search-tool - file search example screenshot

The search critias are not matched and therefore 0 files were found.
In case if you wonder how gnome-search-tool works? It is actually a GUI wrapper to Linux's Linux find command .

I wasn't complete sure if it uses find for the file search, so to check I run a one search and in in console ran:
 

hipo@noah:~$ ps axuwf|grep -i find
hipo 18213 2.0 0.0 25568 1276 ? S 23:55 0:00 find /home/hipo/Richtoorich ( -iname * -o -iname .* ) ! -type p -exec grep -i -I -c test {} ; -mtime -1 ( -size 102400 -o -size +102400 ) -user root ! -iname *bad\-name\-to\-omit* -print

You can see the filters set in gnome-search-tool are passed as command arguments to find.

2. Finding files containing a string recursively in KDE with kfind

For KDE users there is a handy little tool called Kfind. Kfind is less "search customizable" if it is compared to gnome-search-tool but it has advantage that its search options are way more "user friendly" / human readable 🙂

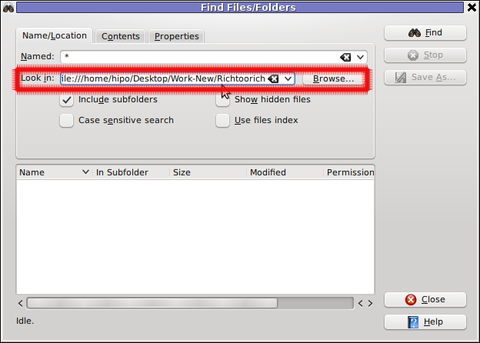
To use the tool to look in all files for explicit string fill in Look in: or browse to set the main directory where it will look for the string.

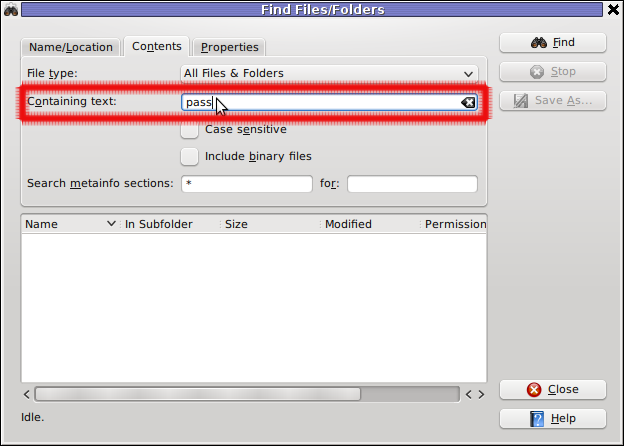
Screenshot find content in multiple files and folders recursively kfind kde programThen in the second Contents (tab) fill in the Containing Text: with the string to be looked for:

Kfind Recursive file search tool for Linux KDE graphic environment, input text field screenshot

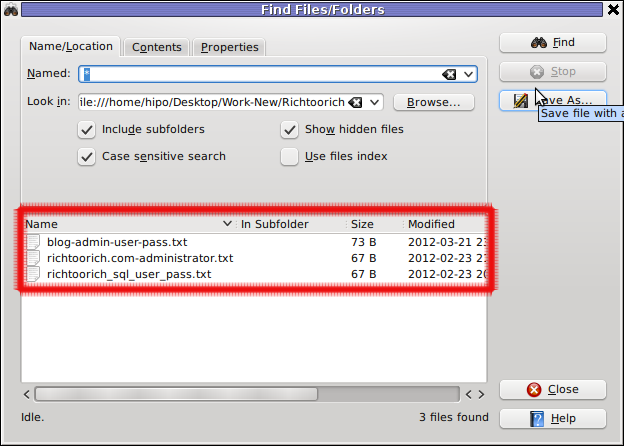
Finally in the Names/Location tab, there are two other helpful search options – Show Hidden Files and Case Sensitive Search

Screenshot find content in multiple files and folders recursively kfind kde gui program

I'll be curious to hear if someone knows some other nice software easy and comprehensive to use for Linux / BSD. If you know a better file searcher for Linux than this kfind or gnome-search-tool please drop a comment.

How to digital watermark to a picture – Protect pic with copyright image or text with composite, convert and Phatch on GNU / Linux

Friday, March 23rd, 2012

Watermarking is a technique to identify a physical or non-physical object with its owner (creator). First watermarks in history originates from very ancient times.

There are two basic types of Watermark types:

I. Physical Watermarks (classical)

II. Digital Watermarks

Historically Classical Watermarks, were mostly important. As we tend to use more and more visible and we switch to use of more invisible stuff, nowdays the importance and use of digital watermarks is steadily raising.

You have most likely already seen pictures from websites which contain a copyright holder message stamp or website logo on it.
As you could imagine the picture watermark is placed in order to prevent pictures from being re-used in another internet space ,without the picture copyright holder explicit permission…

Watermarks have entered most if not all areas of our life, but we often don't recognize they're there / rarely think about them.
Few of the many "physical watermarks" we use daily are:
 

  • paper money watermark (to protect against anti money forgery)
  • bank debit / credit cards stamps near the card chip
  • postcards paper stamps

There are too many different kind of "physical watermarks" and since this is not the accent of this article, I will continue straight to explaiin a bit on Digital (picture) watermarks and how to watermark images with ImageMagick image editting command line suit.

Just like with physical watermarks, there are different kinds of digital watermarks. There are:
 

  • Picture (Images) digital watermarks
  • – Steganography

  • Video watermarks
  • Audio stream digital watermarks
  • Visual digital watermarks
  • – Visible area of text or picture over another text picture or video

  • Invisible digital watermarks
  • – digital information (files) metadata with watermark content etc.

The topic of watermarking is quite wide, so I will stop here and focus on the main idea of this article – to show how to place digital watermark on graphic image or collection of pictures.

The most straightway non-interactive way to do picture watermarking is with ImageMagick's composite command line tool. This little handy tool is capable of creating watermarks in single and multiple pictures.

If you prefer to have a simple text as a watermark, then you should use imagick's convert cmd.

1. Putting a watermark of picture in the right bottom corner

$ composite -gravity southeast -dissolve 100 \
watermark_picture.png image-to-watermark.png \
output-watermarked-image.png

Snoopy Writting pc freak watermark picture text watermark on the right bottom corner with composite

2. Placing watermark to picture in the bottom right corner

$ composite -gravity northeast -dissolve 80 \
watermark_picture.png image-to-watermark.png \
output-watermarked-image.png

Snoopy Writting pc freak picture text watermark on the right bottom corner with composite

3. Watermarking picture in the bottom left corner

$ composite -gravity southwest -dissolve 90 \
watermark_picture.png image-to-watermark.png \
output-watermarked-image.png

Snoopy writting watermarking picture on the bottom left corner imagemagick (composite)

4. Watermarking picture in the top left corner

$ composite -gravity northwest -dissolve 100 \
watermark_picture.png image-to-watermark.jpg \
output-watermarked-image.jpg

As you see from above example, composite even accept mixing up input / output between PNG and JPEG pictures 🙂

Output Watermarked Image picture on top left corner with pc-freak logo image Imagick composite

5. Put a watermark in the image center

$ composite -gravity center -dissolve 100 \
watermark_picture.png image-to-watermark.png \
output-watermarked-image.png

position watermark on the picture middle (center) composite output picture

6. Sealing image with custom text / Text Watermarking a picture

a) Writting text watermark to an image centered in "footer"

$ convert image-to-watermark.png -pointsize 20 \
-draw "gravity south fill black text 0,12 \
'hip0s Watermark'" output-watermarked-image.jpg

This will place a watermark in position 0,12, meaning the text will be added in the bottom center of the watermarked image.

Watermarking a picture sealing with custom text image imagick composite pic

-pointsize 20 defines the text font size. hip0s Watermark is the actual text that will be stamped.

b) Writting image watermark with font type customization (Arial Tahoma etc.):

To list all available fonts ready to be used by convert, type:

$ convert -list font
$ convert -list font |grep -i arial
Font: Arial-Black-Regular
family: Arial Black
glyphs: /usr/share/fonts/truetype/msttcorefonts/Arial_Black.ttf
Font: Arial-Bold
family: Arial
glyphs: /usr/share/fonts/truetype/msttcorefonts/Arial_Bold.ttf
Font: Arial-Bold-Italic
family: Arial
glyphs: /usr/share/fonts/truetype/msttcorefonts/arialbi.ttf
Font: Arial-Italic
family: Arial
glyphs: /usr/share/fonts/truetype/msttcorefonts/ariali.ttf
Font: Arial-Regular
family: Arial
glyphs: /usr/share/fonts/truetype/msttcorefonts/Arial.ttf

$ convert -list type
Bilevel
ColorSeparation
ColorSeparationMatte
Grayscale
GrayscaleMatte
Optimize
Palette
PaletteBilevelMatte
PaletteMatte
TrueColorMatte
TrueColor

On my system, I have 392 of fonts installed, to check the number of installed fonts ready for use by convert I used:

$ convert -list font|grep -i 'font:'|wc -l
392

To only check exact fonts names usable in convert:

$ convert -list font|grep -i 'font:'

To use the red marked Arial-Regular for font of the text picture timestamp issue;

$ convert watermark_picture.jpg -font Arial-Regular \
-pointsize 20 -draw "gravity south fill black text 0,12 'hip0s Watermark'" \
output-watermarked-image.jpg

Watermark and with Arial-Regular font image magick convert screenshot dog type writter

c) Using external font with convert to place image text watermark

Lets say you would like to use an external font (arhangai.ttf) not listed in convert -font list usable fonts:

$ convert image-to-watermark.png -pointsize 20 \
-font /usr/share/fonts/truetype/arhangai/arhangai.ttf \
-draw "gravity south fill black text 0,12 \
'hip0s Watermark'" output-watermarked-image_7.png

Talking about fonts, if you would like to add some external, nice free-fonts (ttf) files to your current logged in user, exec:

hipo@noah:~$ cd ~/fonts
hipo@noah:/fonts$ for i in \
$(lynx -dump http://www.webpagepublicity.com/free-fonts.html|grep -i .ttf|grep -i http|awk '{ print $2 }'); \
do wget -r -l2 -nd -Nc $i;
done

This will add 85 new nice looking fonts. Putting fonts in .fonts/ directory, are red while fonts are looked up by applications installed on respective the server or desktop GNU / Linux systems. Any font put there is ready to be used across all ImageMagick command line tools, as well as will be added across the list of possible fonts to use in GIMP and the rest of gui editors installed on the system.

According to the (watermark) texts font size passed to convert on some pictures the text written will exceed the picture dimensions and only partially some of the text intended as watermark will be visible.
If you encounter the exceed picture text problem, take few minutes and play with fonts sizes until you have a good font size to fit the approximate dimensions of the (expected minimum / maximum – horizontal and vertical) stamped picture dimensions.

For the sake of clarity, here is a list with arguments used in above, composite and convert examples.
 

  • composite — The ImageMagick command that combines two images.
  • -dissolve 80 — The number after the option determines the brightness of the watermark.  100 is full strength.
  • -gravity southeast — Determines the placement of watermark.
    Possible options are; north, west, south, east, northwest, northeast, southeast, southwest, center
  • watermark_picture.png — The watermark image is the first argument.
  • image-to-watermark.jpg — The second argument is the original image to be watermarked.
  • output-watermarked-image.jpg — The third argument is the new composite image to be created.
    N. B. !  If you don't specify a new file, be careful, the original file will be overwritten.

As ImageMagick is cross platform graphic editting suit – it runs on both *nix (Linux,BSD) and Windows. I have tested it on Linux, only but on FreeBSD and other BSDs it should work without any problem.
The composite and convert above examples should be easily rewritten to run on achieve watarmarking on MS Windows too.

7. Watermarking multiple pictures in a directory

To watermark multiple pictures within a directory use, a short bash loop in combination with either convert or composite could be used:

$ cd your-directory/
$ for i in *; do
convert $i -pointsize 20 -draw "gravity south fill black text 0,12 'hip0s Watermark'" output-watermarked-image.jpg
done

convert and composite also support wildcards like '*.JPG, *.PNG', but I'm not sure if this syntax can be used for mass picture marking?

8. Adding watermark and doing other various advanced Image Edit, Convert and Compose stuff with Phatch GUI program

Another program that is capable to put watermarks on pictures and besides that doing a number of routine graphic manipulation operations achievable with expert Image manipulation programs like GIMP / Inkscape is PHATCH = PHOTO & BATCH

Phatch is swiss army knife for doing web design or or graphics design on Linux.

Phatch is really great and easy to use program. Tt makes putting basic designer effects on pictures with no requirement for any design skills.
With Phatch you can become a designer for a day literally 😉

If you haven't used it yet, make sure you try it!
Below, are two screenshots of Phatch running on my Debian G* / Linux
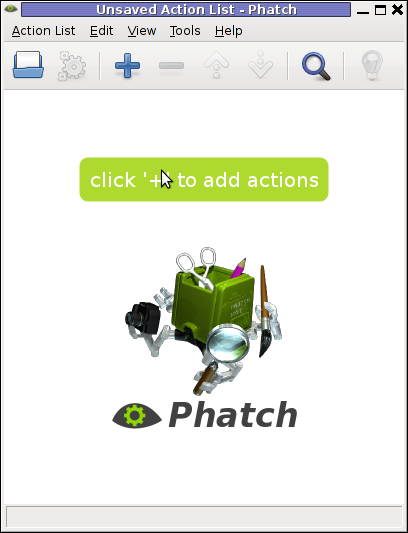
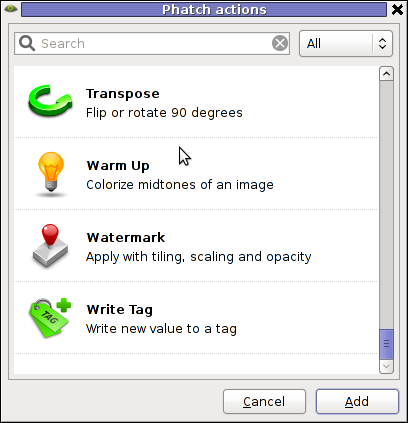
Phatch Linux Debian Squeeze Screenshot

Phatch Linux Debian Squeeze Screenshot Watermark effect

Phatch is installable via apt on Debian and Ubuntu Linux. It has also a phatch-cli tools, which are a possible substitute to ImageMagick's composite / convert tools.

On deb based distros install Phatch with:

noah:~# apt-get --yes install phatch phatch-cli

In Phatch it is also possible, to create a combination of filters to be later applied to an image file or a group of image files all in a directory. The program capabilities are really outstanding, it is pure joy to work with it.

Using Phatch GUI interface is hard to comprehend in the beginning, I needed few minutes until I can get the idea how to use it. Anyhow once you know the basics, its very easy to use onwards.

Phatch currently can perform the following actions:
 

  • Auto Contrast – Maximize image contrast
  • Border – Crop or add border to all sides
  • Brightness – Adjust brightness from black to white
  • Canvas – Crop the image or enlarge canvas without resizing the image
  • Colorize – Colorize grayscale image
  • Common – Copies the most common pixel value
  • Contrast – Adjust from grey to black & white
  • Convert Mode – Convert the color mode of an image (grayscale, RGB, RGBA or CMYK)
  • Effect – Blur, Sharpen, Emboss, Smooth, ..
  • Equalize – Equalize the image histogram
  • Fit – Downsize and crop image with fixed ratio
  • Grayscale – Fade all colours to gray
  • Invert – Invert the colors of the image (negative)
  • Maximum – Copies the maximum pixel value
  • Median – Copies the median pixel value
  • Minimum – Copies the minimum pixel value
  • Offset – Offset by distance and wrap around
  • Posterize – Reduce the number of bits of colour channel
  • Rank – Copies the rank'th pixel value
  • Rotate – Rotate with random angle
  • Round – Round or crossed corners with variable radius and corners
  • Saturation – Adjust saturation from grayscale to high
  • Save – Save an image with variable compression in different types
  • Scale – Scale an image with different resample filters.
  • Shadow – Drop a blurred shadow under a photo with variable position, blur and color
  • Solarize – Invert all pixel values above threshold
  • Text – Write text at a given position
  • Transpose – Flip or rotate an image by 90 degrees
  • Watermark – Apply a watermark image with variable placement (offset, scaling, tiling) and opacity

Most of the function / effects Phatch in the up list works fine as I tested them to get to know the program.
The only effect that didn't worked for me is Blender effect.
Trying to apply the Blending effect I got error:

Can not apply action Blender:
'dict' object has no attribute 'rfind'
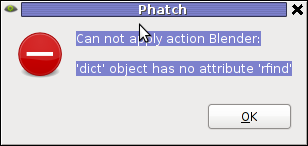
dict object has not attribiture rfind error screenshot my linux

Its really a pity blender filter don't work. I've seen on Phatch's website some pictures showing the blender effect in action and it looks really awesome.

In attempt to work around the err, I tried downloading Phatch's latest release and running it with python interpreter but it didn't work out …
I tried also to install some packages to the system that somehow seemed to be related to blenderversatile 3D modeller/renderer program but this worked neither.
I suspect Phatch blender effect is not working on Ubuntu too as I've red complains in some Ubuntu forums.
If someone succeeding making blend effect work please let me know how?

Interesting feature of Phatch is the program support for applying its predefined filters using a cli interface.
The syntax for phatch cli, should be something like:

phatch -console action_list.phatch

Where action_list.phatch is a Phatch predefined filter. Anyways I didn't manage to figure out how to use the program CLI. I'll be glad to hear if someone succeeded in using the program console, if so please share with me how?

9. Adding Watermark to pictures with GIMP

To add a watermark text or picture in GIMP, there are plenty of ways but is more time consuming by both Phatch or convert, composite..
There is a script in gimp plugin registry site – watermark.scm which adds watermarking capability to GIMP

On my system this script was installed with the deb package gimp-data-extras. To apply the plugin on a pic, I used GIMP menus:

Filters -> Eg -> Copyright Placer

GIMP Copyright Holder plugin Watermark Screenshot

If someone knows about better or quicker ways to do watermarking, please share 🙂
How to delete million of files on busy Linux servers (Work out Argument list too long)

Tuesday, March 20th, 2012

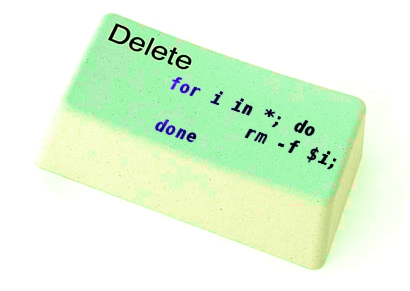
How to Delete million or many thousands of files in the same directory on GNU / Linux and FreeBSD

If you try to delete more than 131072 of files on Linux with rm -f *, where the files are all stored in the same directory, you will get an error:

/bin/rm: Argument list too long.

I've earlier blogged on deleting multiple files on Linux and FreeBSD and this is not my first time facing this error.
Anyways, as time passed, I've found few other new ways to delete large multitudes of files from a server.

In this article, I will explain shortly few approaches to delete few million of obsolete files to clean some space on your server.
Here are 3 methods to use to clean your tons of junk files.

1. Using Linux find command to wipe out millions of files

a.) Finding and deleting files using find's -exec switch:

# find . -type f -exec rm -fv {} \;

This method works fine but it has 1 downside, file deletion is too slow as for each found file external rm command is invoked.

For half a million of files or more, using this method will take "long". However from a server hard disk stressing point of view it is not so bad as, the files deletion is not putting too much strain on the server hard disk.
b.) Finding and deleting big number of files with find's -delete argument:

Luckily, there is a better way to delete the files, by using find's command embedded -delete argument:

# find . -type f -print -delete

c.) Deleting and printing out deleted files with find's -print arg

If you would like to output on your terminal, what files find is deleting in "real time" add -print:

# find . -type f -print -delete

To prevent your server hard disk from being stressed and hence save your self from server normal operation "outages", it is good to combine find command with ionice, e.g.:

# ionice -c 3 find . -type f -print -delete

Just note, that ionice cannot guarantee find's opeartions will not affect severely hard disk i/o requests. On  heavily busy servers with high amounts of disk i/o writes still applying the ionice will not prevent the server from being hanged! Be sure to always keep an eye on the server, while deleting the files nomatter with or without ionice. if throughout find execution, the server gets lagged in serving its ordinary client requests or whatever, stop the execution of the cmd immediately by killing it from another ssh session or tty (if physically on the server).

2. Using a simple bash loop with rm command to delete "tons" of files

An alternative way is to use a bash loop, to print each of the files in the directory and issue /bin/rm on each of the loop elements (files) like so:

for i in *; do
rm -f $i;
done

If you'd like to print what you will be deleting add an echo to the loop:

# for i in $(echo *); do \
echo "Deleting : $i"; rm -f $i; \

The bash loop, worked like a charm in my case so I really warmly recommend this method, whenever you need to delete more than 500 000+ files in a directory.

3. Deleting multiple files with perl

Deleting multiple files with perl is not a bad idea at all.
Here is a perl one liner, to delete all files contained within a directory:

# perl -e 'for(<*>){((stat)[9]<(unlink))}'

If you prefer to use more human readable perl script to delete a multitide of files use delete_multple_files_in_dir_perl.pl

Using perl interpreter to delete thousand of files is quick, really, really quick.
I did not benchmark it on the server, how quick exactly is it, but I guess the delete rate should be similar to find command. Its possible even in some cases the perl loop is  quicker …

4. Using PHP script to delete a multiple files

Using a short php script to delete files file by file in a loop similar to above bash script is another option.
To do deletion  with PHP, use this little PHP script:

<?php
$dir = "/path/to/dir/with/files";
$dh = opendir( $dir);
$i = 0;
while (($file = readdir($dh)) !== false) {
$file = "$dir/$file";
if (is_file( $file)) {
unlink( $file);
if (!(++$i % 1000)) {
echo "$i files removed\n";
}
}
}
?>

As you see the script reads the $dir defined directory and loops through it, opening file by file and doing a delete for each of its loop elements.
You should already know PHP is slow, so this method is only useful if you have to delete many thousands of files on a shared hosting server with no (ssh) shell access.

This php script is taken from Steve Kamerman's blog . I would like also to express my big gratitude to Steve for writting such a wonderful post. His post actually become  inspiration for this article to become reality.

You can also download the php delete million of files script sample here

To use it rename delete_millioon_of_files_in_a_dir.php.txt to delete_millioon_of_files_in_a_dir.php and run it through a browser .

Note that you might need to run it multiple times, cause many shared hosting servers are configured to exit a php script which keeps running for too long.
Alternatively the script can be run through shell with PHP cli:

php -l delete_millioon_of_files_in_a_dir.php.txt.

5. So What is the "best" way to delete million of files on Linux?

In order to find out which method is quicker in terms of execution time I did a home brew benchmarking on my thinkpad notebook.

a) Creating 509072 of sample files.

Again, I used bash loop to create many thousands of files in order to benchmark.
I didn't wanted to put this load on a productive server and hence I used my own notebook to conduct the benchmarks. As my notebook is not a server the benchmarks might be partially incorrect, however I believe still .they're pretty good indicator on which deletion method would be better.

hipo@noah:~$ mkdir /tmp/test
hipo@noah:~$ cd /tmp/test;
hiponoah:/tmp/test$ for i in $(seq 1 509072); do echo aaaa >> $i.txt; done

I had to wait few minutes until I have at hand 509072  of files created. Each of the files as you can read is containing the sample "aaaa" string.

b) Calculating the number of files in the directory

Once the command was completed to make sure all the 509072 were existing, I used a find + wc cmd to calculate the directory contained number of files:

hipo@noah:/tmp/test$ find . -maxdepth 1 -type f |wc -l
509072

real 0m1.886s
user 0m0.440s
sys 0m1.332s

Its intesrsting, using an ls command to calculate the files is less efficient than using find:

hipo@noah:/tmp/test$ time ls -1 |wc -l
509072

real 0m3.355s
user 0m2.696s
sys 0m0.528s

c) benchmarking the different file deleting methods with time

– Testing delete speed of find

hipo@noah:/tmp/test$ time find . -maxdepth 1 -type f -delete
real 15m40.853s
user 0m0.908s
sys 0m22.357s

You see, using find to delete the files is not either too slow nor light quick.

– How fast is perl loop in multitude file deletion ?

hipo@noah:/tmp/test$ time perl -e 'for(<*>){((stat)[9]<(unlink))}'real 6m24.669suser 0m2.980ssys 0m22.673s

Deleting my sample 509072 took 6 mins and 24 secs. This is about 3 times faster than find! GO-GO perl 🙂
As you can see from the results, perl is a great and time saving, way to delete 500 000 files.

– The approximate speed deletion rate of of for + rm bash loop

hipo@noah:/tmp/test$ time for i in *; do rm -f $i; done

real 206m15.081s
user 2m38.954s
sys 195m38.182s

You see the execution took 195m en 38 secs = 3 HOURS and 43 MINUTES!!!! This is extremely slow ! But works like a charm as the running of deletion didn't impacted my normal laptop browsing. While the script was running I was mostly browsing through few not so heavy (non flash) websites and doing some other stuff in gnome-terminal) 🙂

As you can imagine running a bash loop is a bit CPU intensive, but puts less stress on the hard disk read/write operations. Therefore its clear using it is always a good practice when deletion of many files on a dedi servers is required.

b) my production server file deleting experience

On a production server I only tested two of all the listed methods to delete my files. The production server, where I tested is running Debian GNU / Linux Squeeze 6.0.3. There I had a task to delete few million of files.
The tested methods tried on the server were:

– The find . type -f -delete method.

– for i in *; do rm -f $i; done

The results from using find -delete method was quite sad, as the server almost hanged under the heavy hard disk load the command produced.

With the for script all went smoothly. The files were deleted for a long long time (like few hours), but while it was running, the server continued with no interruptions..

While the bash loop was running, the server load avarage kept at steady 4
Taking my experience in mind, If you're running a production, server and you're still wondering which delete method to use to wipe some multitude of files, I would recommend you go  the bash for loop + /bin/rm way. Yes, it is extremely slow, expect it run for some half an hour or so but puts not too much extra load on the server..

Using the PHP script will probably be slow and inefficient, if compared to both find and the a bash loop.. I didn't give it a try yet, but suppose it will be either equal in time or at least few times slower than bash.

If you have tried the php script and you have some observations, please drop some comment to tell me how it performs.

To sum it up;

Even though there are "hacks" to clean up some messy parsing directory full of few million of junk files, having such a directory should never exist on the first place.

Frankly, keeping millions of files within the same directory is very stupid idea.
Doing so will have a severe negative impact on a directory listing performance of your filesystem in the long term.

If you know better (more efficient) ways to delete a multitude of files in a dir please share in comments.

Create PNG, JPG, GIF pictures / images from PDF on Linux

Saturday, February 25th, 2012

I've received a PDF file with a plan for development of a bundle of projects, My task was to evaluate this plan and give feeback on the 44 pages PDF document.

Since don't know of program to directly be able edit PDF files on GNU / Linux ?, my initial idea was to open and convert the PDF to ODT / DOC with OpenOffice (Libre Office) and then edit the ODT file.
Unfortunately Open Office oowrite program was unable to open / visualize the PDF file. My assumption is OO failure to open the PDF is because the PDF was generated on Microsoft Windows with Adobe illustrator or smth.

The idea that came to my mind as alternative, way to edit the PDF file was to convert it in pictures edit and then convert the pictures to PDF.
In other words to follow these 3 steps:
1. Convert the PDF document to multiple images
2. Edit each of the images with GIMP or Inkscape
3. Convert back all images to a single PDF file

Some time ago, I've written an article how to create PDF file from many image files in JPEG, PNG or GIF on Linux

. This prior article was exactly describing how to complete Step 3.Therefore all left was to find a way to convert the PDF file to multiple JPEG / PNG / GIF images.

convert command to convert PDF document to multiple pictures which you can take from my earlier article is:

$ convert *.jpg outputpdffile.pdf
Actually in Step 1 I was aiming to do the opposite of what I've previously done.

Hence, in order to convert the singe Project.PDF file to multiple PNG images, I just switched convert IN / OUT arguments order.

hipo@noah:~/project-pdf-to-images$ convert Project.pdf Project.png
...

I've done the PDF to pictures conversion on my notebook running Debian Squeeze (6.0.2) GNU / Linux.Convertion of the PDF file to 44 images, took 25 seconds on my dual core 1.8 Ghz / 2GB RAM Thinkpad r61.
Afterwards, I've had at hand 44 PNG files generated, e.g.:

hipo@noah:~/project-pdf-to-images$ ls -al Project-*.png |wc -l
44

convert was also smart enough to produce correct file naming. The output file names were:
Project-1.png
Project-2.png
etc.

Nicely each number (-1.png) was corresponding to the respective PDF page. For instance Project-10.png was corresponding to page 10 of the Projects.PDF file

Rather ironically, after convertion of the PDF to pictures, while opening the Project-1.png, I've noticed The GIMP – (The GNU Image Manipulation Program) is capable of directly reading PDF files. GIMP has both the option to open files in layers or separate images 😉
Anyways even if GIMP is used to modify the different PDF pages as layers, once completed GIMP doesn't have the ability to save the file as PDF and therefore once saved the file if merging of layers is done the resulting picture becomes ONE BIG MESS.
Therefore it seems my the 3 steps way e.g.:

1. convertion PDF to pictures
2. picture edit with GIMP or Inkscape
3. convertion of pictures back to PDF

is still the only way to "modify PDF" in Linux or BSDs. I will be glad to hear if someone has come up with a better solution?


Create PDF file from (png, jpg, gif ) images / pictures in Linux

Tuesday, September 14th, 2010

I’ve recently received a number of images in JPEG format as a feedback on a project plan that was constructed by a team I’m participating at the university where I study.

Somebody from my project group has scanned or taken snapshots of each of the hard copy paper feedback and has sent it to my mail.

I’ve received 13 images so I had to open them one by one to get each of the Project Plan to read the feedback on the page this was really unhandy, so I decided to give it a try on how to generate a common PDF file from all my picture files.

Thanksfully it happened to be very easy and trivial using the good old Image Magick

In order to complete the task of generating one PDF from a number of pictures all I did was.1. Switch to the directory where I have saved all my jpeg images

debian:~# cd /home/hipo/Desktop/my_images_directory/

2. Use the convert binary part of imagemagick package to generate the actual PDF file from the group of images

debian:~# convert *.jpg outputpdffile.pdf

If the images are numbered and contain many scanned pages of course you can always pass by all the images to the /usr/bin/convert binary, like for instance:

debian:~# convert 1.jpg 2.jpg 3.jpg 4.jpg 5.jpg outputpdffile.pdf
Even though in my case I had to convert to PDF from multiple JPEG (JPG) pictures, convertion with convert is not restricted to convert only from JPEG, but you can also convert to PDF by using other graphical file formats.

For instance to convert multiple PNG pictures to a single PDF file the command will be absolutely the same except you change the file extension of the graphic files e.g.:

debian:~# convert 1.PNG 2.PNG 3.PNG 4.PNG 5.PNG OUTPUT-PDF-FILE.PDF

I was quite happy eventually to know Linux is so flexible and such a trivial things are able to be completed in such an easy way.

Play Terminal Velocity (Terminal Reality) 3D shooter DOS game on Debian Squeeze GNU / Linux

Wednesday, February 15th, 2012

Terminal Velocity Game title logo dosbox Debian Linux

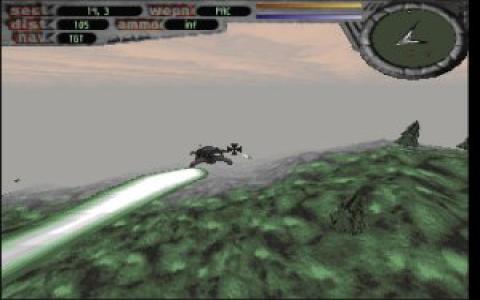
Some of the computer DOS geeks certainly should remember Terminal Velocity / (Terminal Reality Inc. – TRI) DOS 3D Realms (ex Apogee company) game. For those who are younger or for any reason miss to play TV here is a short review. Terminal Velocity is an addictive fast pace 3D Flight Simulator game.
The ship one navigates has a mean to accelerate or down-accelerate flying speed. There is also an AFTER BURNER mode which accelerates the ship movement speed drastically while in use. TRI's AFTER BURNER game feature create unique feeling whilst in game, raising gamers adrenaline and giving feeling of great dynamics 😉
The game graphics are a bit low, the game can be switched between VGA and SVGA from within the internal game menus, anyways for the year 1995 the game graphics looks fine.

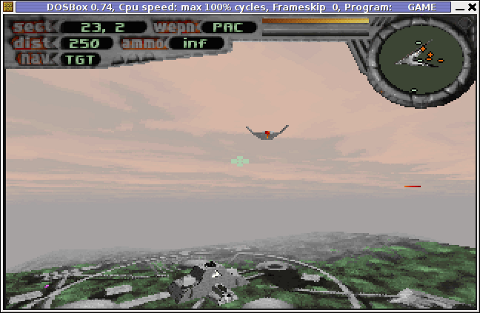
Terminal Velocity TV DOS game screenshot

TV supports network games of up to 8 Network Players and for 1995 is among the few 3D games supporting so high number of network players simultaneously. As most of the games of its time TRI supports modem network game play. I don't know about you, but for me Modem Network game DooM peered plays brings up some nice memories 🙂

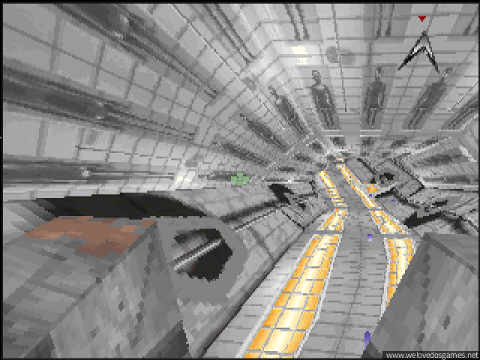
Every now and then in the levels, there are holes (Tunnels) you can enter, the tunnels is one of the most exciting part of the game as it reminds me tracking mods music culture, Future Crew's Second Reality graphics demo and the rest of the old glorious Assembly Demos – if not familiar with the aforementioned be sure to check the link cause you've missed a lot!

The ability to enter Tunnels while in the midst of the game makes TV unique and sets it apart from the rest of the games which were bombarding the 3D game flight simulator market in '95s.
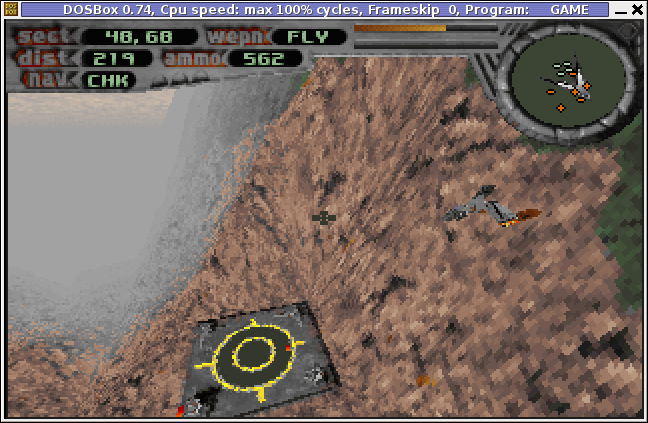
Terminal Velocity DOS Level Tunnels screenshot
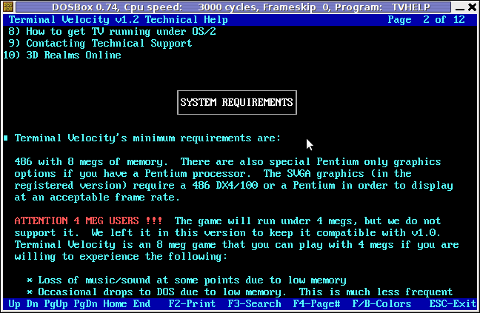
Terminal Velocity MINIMUM HARDWARE REQUIREMENTS are:

486 with 8 megs of memory.
For SVGA graphics (provided only by registered game version) require 486 DX4/100 or Pentium to display at acceptable frame rate.

Terminal Veolocity on Disk technical support manual

This requirements are nothing and even looks funny while compared to today's available hardware. Nowdays an Android ver. 2.2 OS running (PriVileg) mobile "smart" phone runs at at least 400 Mhz CPU and has a giga of memory.
Its quite interesting to see (from historic point of view) how thoroughful the TV Help manual is, and how well organized software documentation used to be in these old DOS days. If you want to take a look at it launch TVHELP.EXE (you will notice it along with other game .EXE files after extracting)

The game soundtrack is amazingly cool and is one of the main things that add to the great gaming experience.

It took me a while to find Terminal Velocity, as the game download link provided on 3drealms.com/downloads is broken and most of the websites with mirror of 3dtv12.zip file was no longer active.

After about half an hour of search!, I've finally found and managed to download 3dtv12.zip.
In order to preserve Terminal Violocity game from disappearing I've made a mirror of 3dtv12.zip you can download from here

Thanks to dosbox DOS Emulator , is playable on both GNU / Linux, FreeBSD, Mac OS and Windows.
I did not have the time to check if the game runs fine on other operating system architectures besides mine – a Debian GNU / Linux codename (Squeeze). On my aptop Thinkpad R61 with hardware configuration (Dual core x 1.8 Ghz with 2 GB of Memory), the game runs smoothly with both good playable graphics frame rate and properly timed sound/music.

For all those who want to play the game in the Linux realm, you will have to have earlier installed dosbox dos emulator. Once dosbox is there you can further proceed download / unzip / run and enjoy Terminal Velocity on your Linux Desktop:

1. Download and unzip 3dtv12.zip

hipo@linux:~$ mkdir TV
hipo@linux:~$ cd TV
hipo@linux:~/TV$ wget https://www.pc-freak.net/files/3dtv12.zip
hipo@linux:~/TV$ unzip 3dtv12.zip
Archive: 3dtv12.zip
� � ������ � � ����� ������ � ������ �����
� � � � � � � � � � �
�� �� �� �� ����� �� �� � �� �� � �� �
�� �� �� � �� � �� �� � �� �� � ��
������ �� ������ �� � �� �� � �� �� � �����

Running VADV 2.10 ���� ���� ������
� � � � � VirtualNet 1801001
4 Telnet nodes ����� ����� ������ FidoNet 1:311/2
VADV-PHP Website �� � �� � �� BattleNet 169:1/120
����� ����� �����

Telnet/web: lightningbbs.com
Alt: lightning-bbs.darktech.org

Full access on the first call. Simple, short and to the point newuser
questionaire. Over 50 door games online, all of them are registered.

Fun RPG games like LORD, Usurper, TEOS, Trade Wars, Clans, and Quest for Nora.

Strategic war games like BRE, FE, Global Wars, ISA, and Colonies.

Adult door games like Strip Poker, Bordello, Studs and Studette.
...

After unzip is complete you will have the following list of files and directories:

hipo@linux:~/TV$ ls -1
FILE_ID.DIZ
INSTALL.EXE
LICENSE.TXT
TV/
TV12S.SHR

As you can read in the unzip notice the .zip file was taken from Telnet/web: lightningbbs.com
I was happy to find out that lightningbbs.com BBS is still up and running in both web and telnet mode! I took the time to telnet to lightningbbs.com and it was charming. lightningbbs.com is a real place of "living computer history"! For people who have never experienced the days of BBS use, I warmly recommend you do telnet lightningbbs.com and check it out. Issue in console/terminal:

hipo@linux:~/TV$ telnet lightningbbs.com
��VADV32 v4.4.110325 - (c) 2004-2011 Aspect Technologies - www.vadvbbs.com
o NetFoss - Revision 5 FOSSIL - Com Eng v1.03 - (c) 2001-2010 pcmicro.com
Connected @ 11520 to Lightning BBS on line 3

Virtual Advanced 2.10 for DOS
Multi-User Multi-Network Graphical Bulletin Board System
Serial #99608791
...
...

2. Run and enjoy Terminal Velocity 😉

The game itself is extracted automatically in TV sub directory. To launch it directly enter TV/ and run GAME.EXE , e.g.

hipo@linux:~/TV$ cd TV/
hipo@linux:~/TV/TV$ dosbox GAME.EXE

Terminal Velocity Screenshot Debian GNU / Linux 6.0 Squeeze Dosbox dos emulator

Terminal Velocity game screenshot dosbox GNU / Linux

Running the game through the game launcher TV.EXE or GAME.EXE worked but the game sound was missing music and sound FX 😐
The no-music and sound issues were however pretty normal and expected. Back in the DOS era setting your exact Sound Card device type was required before the first game launch.
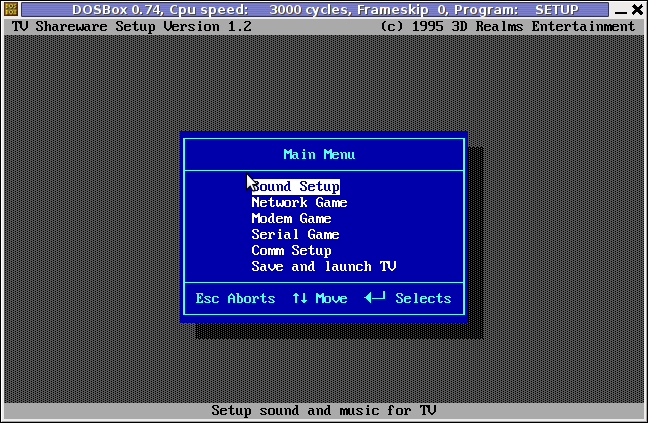
Configuring the exact screen resolution (EGA / VGA / SVGA) and Sound Blaster or PC Speaker type (Sound Blaster 16 / Sound Blaster Pro) in TV is done through running SETUP.EXE .
3D Realms Terminal Velocity Screenshot Level 5 Debian Linux Squeeze dosbox

Actually SETUP.EXE used to be like a standard for almost all DOS games I've encountered.

To make Terminal Velocity sound work I had to choose from SETUP.EXE main menu:
Sound Setup -> Sound Blaster 16
or
Sound Setup -> Sound Blaster Pro

Choosing any of the two SBs produces the same sound / music effects. I guess this is the case becase dosbox emulates a number of sound cards compatible with soudn blaster.
After choosing the SB you should select Save and Launch TV to run the game with sound.
Terminal Velocity TV, dosbox setup.exe sound blaster setup program screenshot

If you quit the game and try to relaunch it with dosbox GAME.EXE unfortunately runs the game without sound fx and music again. Hence the only way to make TRI run properly with music is to everytime configure sound blaster type with SETUP.EXE . TV also supports joystick and it was nice my Genius JoyPad worked like a charm with TV under dosbox emu 😉
To play the game in full screen mode with dosbox press ALT + ENTER simultaneously. 

An interesting fact which is not related to the game is Terminal Velocity is a physics term, here is a quite from Wikipedia:

"In fluid dynamics an object is moving at its terminal velocity if its speed is constant due to the restraining force exerted by the fluid through which it is moving."

On 3drealms.com, I've found also a collection of Terminal velocity mod musictvmods.zip. For the sake of preservation tvmods.zip from disappearance I've made a mirror of tvmods.zip on here

TV has also 20 cheat code words which can be typed in while playing the game for various goodies like Invisinbility, Shield Restore, Power up all weapons, skip level etc. Complete list of Terminal Velocity cheat codes is here
If you're an absolute TV addict and you want to set a TV screenshot on background Check the TV Planet 1024×768 Background resolution

TV has also a game editor, could be valuable if you want to make yourself some custom game levels here is a mirror you can download tvcad10.zip.
I've made also a quick research if someone in the Open Source / Free Software realm is not busy working on a fork of TV, but as of time of writting it seems there is no effort to make an "open source" Terminal Veolocity game. As TV is starting to disappear from the scene and 3DRealms are not existing for so many years now, it would be nice/wise if the company publish some of their prior games source. If they don't, so many great games (like TV)'s source code will be probably lost in max 10 / 15 years time.

We know 3DRealms release some of their source code for Duke Nukem 3D, I think it is now time to release source of TRI and the other old forgotten games.