To prevent tracking and increase anonymity in IPv6 networks the Linux kernel has a variable to change randomly the MAC identifier. This feature will be very useful in terms of security in the short future, when all the IPv4 IP addresses are finished. The UIE (Extended Unified Udentifier) for an ipv6 address can be changed with command:
sysctl -w net.ipv6.conf.all.use_tempaddr=2
Microsoft Windows Vista and Windows 7 has the UIE enabled by default, enabling the random MAC changes automatically for a host cvan be done as usual by adding the net.ipv6.conf.all_use_tempaddr=2 to /etc/sysctl.conf
On an IPv6 network every ifconfig eth0 down and ifconfig eth0 up will instruct the lan card to be set a different MAC address for the ipv6 ip on the interface.
Changing the UIE randomly however also have security downsides if the host gets infected with a Virus or Worm. The security downsides of the enabled UIE affects mainly Windows hosts on IPv6 networks as UIE variable is enabled by default there.I’ve found this great tip in an article in the latest Linux Magazine October 2011. Its the first time I saw a paper Linux Magazine, the magazine contains a lot of helpful info on the latest Linux developments and latest trends in the Linux world. Subscription to receive the magazine via normal post is for the magazine costs 6.65 EUR per month (80 EUR) yearly. The 80 euro yearly includes 12 CDS (each magazine is bundled with a newly launched new version of a Linux distribution). There is also a cheaper subscription for the magazine which costs 64.90 EUR.
Recently has become publicly known for the serious hole found in all Apache webserver versions 1.3.x and 2.0.x and 2.2.x. The info is to be found inside the security CVE-2011-3192 – https://issues.apache.org/bugzilla/show_bug.cgi?id=51714
The DoS script is known in the wild under the name killapache.pl killapache.pl PoC depends on perl ForkManager and thus in order to be properly run on FreeBSD, its necessery to install p5-Parallel-ForkManager bsd port :
freebsd# cd /usr/ports/devel/p5-Parallel-ForkManager

freebsd# make install && make install clean

...
Here is an example of the exploit running against an Apache webserver host.
In about 30 seconds to 1 minute time the DoS attack with only 50 simultaneous connections is capable of overloading any vulnerable Apache server.
It causes the webserver to consume all the machine memory and memory swap and consequently makes the server to crash in most cases. During the Denial of Service attack is in action access the websites hosted on the webserver becomes either hell slow or completely absent.
The DoS attack is quite a shock as it is based on an Apache range problem which started in year 2007.
Today, Debian has issued a new versions of Apache deb package for Debian 5 Lenny and Debian 6, the new packages are said to have fixed the issue.
I assume that Ubuntu and most of the rest Debian distrubtions will have the apache’s range header DoS patched versions either today or in the coming few days. Therefore work around the issue on debian based servers can easily be done with the usual apt-get update && apt-get upgrade
On other Linux systems as well as FreeBSD there are work arounds pointed out, which can be implemented to close temporary the Apache DoS hole.
1. Limiting large number of range requests
The first suggested solution is to limit the lenght of range header requests Apache can serve. To implement this work raround its necessery to put at the end of httpd.conf config:
# Drop the Range header when more than 5 ranges.

# CVE-2011-3192

SetEnvIf Range (?:,.*?){5,5} bad-range=1

RequestHeader unset Range env=bad-range

# We always drop Request-Range; as this is a legacy

# dating back to MSIE3 and Netscape 2 and 3.

RequestHeader unset Request-Range

# optional logging.

CustomLog logs/range-CVE-2011-3192.log common env=bad-range

CustomLog logs/range-CVE-2011-3192.log common env=bad-req-range
2. Reject Range requests for more than 5 ranges in Range: header
Once again to implement this work around paste in Apache config file:
This DoS solution is not recommended (in my view), as it uses mod_rewrite to implement th efix and might be additionally another open window for DoS attack as mod_rewrite is generally CPU consuming.
# Reject request when more than 5 ranges in the Range: header.

# CVE-2011-3192

#

RewriteEngine on

RewriteCond %{HTTP:range} !(bytes=[^,]+(,[^,]+){0,4}$|^$)

# RewriteCond %{HTTP:request-range} !(bytes=[^,]+(?:,[^,]+){0,4}$|^$)

RewriteRule .* - [F]
# We always drop Request-Range; as this is a legacy
# dating back to MSIE3 and Netscape 2 and 3.
RequestHeader unset Request-Range
3. Limit the size of Range request fields to few hundreds To do so put in httpd.conf:
LimitRequestFieldSize 200
4. Dis-allow completely Range headers: via mod_headers Apache module
In httpd.conf put:
RequestHeader unset Range

RequestHeader unset Request-Range
This work around could create problems on some websites, which are made in a way that the Request-Range is used.
5. Deploy a tiny Apache module to count the number of Range Requests and drop connections in case of high number of Range: requests
This solution in my view is the best one, I’ve tested it and I can confirm on FreeBSD works like a charm. To secure FreeBSD host Apache, against the Range Request: DoS using mod_rangecnt, one can literally follow the methodology explained in mod_rangecnt.c header:
freebsd# wget http://people.apache.org/~dirkx/mod_rangecnt.c

..

# compile the mod_rangecnt module

freebsd# /usr/local/sbin/apxs -c mod_rangecnt.c

...

# install mod_rangecnt module to Apache

freebsd# /usr/local/sbin/apxs -i -a mod_rangecnt.la

...
Finally to load the newly installed mod_rangecnt, Apache restart is required:
freebsd#  /usr/local/etc/rc.d/apache2 restart

...
I’ve tested the module on i386 FreeBSD install, so I can’t confirm this steps works fine on 64 bit FreeBSD install, I would be glad if I can hear from someone if mod_rangecnt is properly compiled and installed fine also on 6 bit BSD arch.
Deploying the mod_rangecnt.c Range: Header to prevent against the Apache DoS on 64 bit x86_amd64 CentOS 5.6 Final is also done without any pitfalls.
[root@centos ~]# uname -a;

Linux centos 2.6.18-194.11.3.el5 #1 SMP Mon Aug 30 16:19:16 EDT 2010 x86_64 x86_64 x86_64 GNU/Linux

[root@centos ~]#  /usr/sbin/apxs -c mod_rangecnt.c

...

/usr/lib64/apr-1/build/libtool --silent --mode=link gcc -o mod_rangecnt.la  -rpath /usr/lib64/httpd/modules -module -avoid-version    mod_rangecnt.lo

[root@centos ~]# /usr/sbin/apxs -i -a mod_rangecnt.la

...

Libraries have been installed in:

/usr/lib64/httpd/modules

...

[root@centos ~]# /etc/init.d/httpd configtest

Syntax OK

[root@centos ~]#  /etc/init.d/httpd restart

Stopping httpd:                  [  OK  ]

Starting httpd:                  [  OK  ]
After applying the mod_rangecnt patch if all is fine the memory exhaustion perl DoS script‘s output should be like so:
freebsd# perl httpd_dos.pl www.patched-apache-host.com 50

Host does not seem vulnerable
All of the above pointed work-arounds are only a temporary solution to these Grave Apache DoS byterange vulnerability , a few days after the original vulnerability emerged and some of the up-pointed work arounds were pointed. There was information, that still, there are ways that the vulnerability can be exploited. Hopefully in the coming few weeks Apache dev team should be ready with rock solid work around to the severe problem.
In 2 years duration these is the second serious Apache Denial of Service vulnerability after before a one and a half year the so called Slowloris Denial of Service attack was capable to DoS most of the Apache installations on the Net.
Slowloris, has never received the publicity of the Range Header DoS as it was not that critical as the mod_range, however this is a good indicator that the code quality of Apache is slowly decreasing and might need a serious security evaluation.
Did you have the need to sometimes split an SQL extra large files to few pieces in order to be able to later upload it via phpmyadmin? Did you needed an extra large video or data file to be cut in few pieces in order to transfer it in few pieces over an USB stick? Or just to give you an another scenario where I sometimes need to have an enormous file let’s say 3G split in few pieces, in order to later read it in vim or mcedit . I sometimes need to achieve this on FreeBSD and Linux hosts thus I thought it will be helpful to somebody to give a very quick tutorial on the way large files can be cut in pieces on Linux and BSD hosts.
GNU/Linux and FreeBSD are equipped with the split command. The purpose of this command is exactly the cutting of a file to a number of pieces.
On Linux the split command comes by default install to the system with the coreutils package on most Debian (deb) based and Redhat based (rpm) distributions, theerefore Linux’s version of split is GNU/split since it’s part of the GNU Coreutils package. An interesting fact about Linux split is that one of the two programmers who has coded it is Richard Stallman 😉
On BSD Unix split is the AT&T UNIX (BSD) split
In the past splitting files in pieces was much more needed than today, as people used floppy drives to transfer data, though today with the bloom of Internet and the improve of the data carriers transferring even an extra large files from one place to another is a way more trivial task still at many occasions splitting it in pieces is needed.
Even though today splitting file is very rarely required, still there are times when being able to split a file in X number of parts is very much needed. Maybe the most common use of splitting a file today is necessery when a large SQL file dumps, like let’s say 200 MBytes of info database needs to be moved from ane hosting provider to another one. Many hosting providers does disallow direct access with standard mySQL client programs to the database directly and only allow a user to connect only via phpMyAdmin or some other web interface like Cpanel to improve data into the SQL or PostgreSQL server.
In such times, having knowledge on the Unix split command is a priceless asset.
Even though on Linux and BSD the code for the split command is not identical and GNU/split and BSD/split has some basic differences, the use of split on both of these Unices is identical. The way to split a file in few pieces using on both Linux and BSD OSes is being done with one and the same command, here is how:
The Second argument the split command takes is actually called a prefix, the prefix is used as a basis name for the creation of the newly generated files cut in pieces file based on SQL-Backup-Data.sql.
As I said identical command will split the SQL-Backup-Data.sql files in a couple of parts which of it will be sized 40 megas.
These command will generate few files output like:
freebsd# ls -1 SQL-Backup-Dat*SQL-Backup-Data.sql

SQL-Backup-Dataa

SQL-Backup-Dataab

SQL-Backup-Dataac

SQL-Backup-Dataad

SQL-Backup-Dataae
As you see the SQL-Backup-Data.sql with size 200MB is being split in four files each of which is sized 40mbytes.
After the files are transfered to another Linux or BSD host, they can easily be again united in the original file with the command:
linux:~# for i in $(ls -1 SQL-Backup-Data_split*); echo $i >> SQL-Backup-Data.sql
Alternatively in most Unices also using cat should be enough to collect back the pieces into the original file, like so:
If you have used KVM, before you certainly have faced the requirement asked by many Dedicated Server Provider, for establishment of a PPTP (mppe / mppoe) or the so called Microsoft VPN tunnel to be able to later access via the tunnel through a Private IP address the web based Java Applet giving control to the Physical screen, monitor and mouse on the server.
This is pretty handy as sometimes the server is not booting and one needs a further direct access to the server physical Monitor. Establishing the Microsoft VPN connection on Windows is a pretty trivial task and is easily achieved by navigating to:
However achiving the same task on Linux seemed to be not such a trivial, task and it seems I cannot find anywhere information or precise procedure how to establish the necessery VPN (ptpt) ms encrypted tunnel.
Thanksfully I was able to find a way to do the same tunnel on my Debian Linux, after a bunch of experimentation with the ppp linux command.
To be able to establish the IPMI VPN tunnel, first I had to install a couple of software packages, e.g.:
I’ve also enabled the modules to be loading up during my next Linux boot with /etc/modules to not be bother to load up the same modules after reboot manually:
This command, brings up the ppp interface and makes the tunnel between my IP and the remote VPN target host.
Info about the tunnel could be observed with command:
ifconfig -a ppp

ppp0 Link encap:Point-to-Point Protocol

inet addr:10.20.254.32 P-t-P:10.20.0.1 Mask:255.255.255.255

UP POINTOPOINT RUNNING NOARP MULTICAST MTU:1496 Metric:1

RX packets:7 errors:0 dropped:0 overruns:0 frame:0

TX packets:12 errors:0 dropped:0 overruns:0 carrier:0

collisions:0 txqueuelen:3

RX bytes:70 (70.0 B) TX bytes:672 (672.0 B)
One more thing before I could finally access the IPMI’s web interface via the private IP was to add routing to the private IP address via the tunnel other side IP address:
# 10.20.0.1 P-t-P IP address

ip route add 10.20.1.124/32 dev ppp0
Now logically one would thing the Web interface to login and use the Java Applet to connect to the server would be accessible but no IT wasn’t !
It took me a while to figure out what is the problem and if not the guys in irc.freenode.net ##networking helped me I would never really find out why http://10.20.1.124/ and https://10.20.1.124/ were inaccessible.
Strangely enough both ports 80 and 443 were opened on 10.20.1.124 and it seems like working, however though I can ping both 10.20.1.124 and 10.20.0.1 there was no possible way to access 10.20.1.124 with TCP traffic.
Routing to the Microsoft Tunnel was fine as I’ve double checked all was fine except whether I tried accessing the IPMI web interface the browser was trying to open the URL and keeps opening like forever.
Thanksfully after a long time of futile try outs, a tip was suggested by a good guy in freenode nick named ne2k
To make the TCP connection in the Microsoft Tunnel work and consequently be able to access the webserver on the remote IPMI host, one needs to change the default MTU set for the ppp0 tunnel interface. Here is how:
ip link set ppp0 mtu 1438
And tadam! It’s done now IPKVM is accessible via http://10.20.1.124 or https://10.20.1.124 web interface. Horay ! 🙂
Did you have to regenerate your SSL certificate for your mail server’s IMAP and IMAP SSL service? Did you have to find out if the newly installed certificates are fine after install?
The output returned by this two commands will be the imap and imaps configured certificates as well as extensive info concerning the installed SSL, the last chunk of info to be spit is most crucial to know if certificate is fine. It should be something like:
...

New, TLSv1/SSLv3, Cipher is AES256-SHA

Server public key is 1024 bit

Secure Renegotiation IS supported

Compression: NONE

Expansion: NONE

SSL-Session:

Protocol : TLSv1

Cipher : AES256-SHA

Session-ID: 0B69E91022CB56D64F56CFA08405944D9C4C0069EE4097890B98F1406CF084D5

Session-ID-ctx:

Master-Key: 13745B94E0C5A0604EB7529E7409251961DFD5F4134F3A8F

Key-Arg : None

Start Time: 1309265383

Timeout : 300 (sec)

Verify return code: 18 (self signed certificate)

---

. OK CAPABILITY completed

closed
It’s the first time I’m creating a wildcard ssl certificate. It appeared there is no fundamental difference between generating a normal SSL certificate and generating a wildcard certificate.
The procedure for generating a wildcard SSL certificate is as follows:
1. Generate an SSL key file
server:~# /usr/bin/openssl genrsa -des3 -out domain.com.key 2048 Enter pass phrase for domain.com.key:
Fill in any passphrase you like, the 2048 specifies the encryption level, 2048 is good enough and is the most commonly used as of today. I’ve saw there is also an option to use 4096 bits encryption but I never tried that myself, I would be glad if somebody can share if he has succesfully established an SSL certificate with 4096 encryption.
Further on it’s necessery to fill in some info concerning the newly generated webserver SSL, e.g.:
Enter pass phrase for /home/hipo/domain.com.key:

You are about to be asked to enter information that will be incorporated

into your certificate request.

What you are about to enter is what is called a Distinguished Name or a DN.

There are quite a few fields but you can leave some blank

For some fields there will be a default value,

If you enter '.', the field will be left blank.

-----

Country Name (2 letter code) [AU]:

State or Province Name (full name) [Some-State]:

Locality Name (eg, city) []:

Organization Name (eg, company) [Internet Widgits Pty Ltd]:

Organizational Unit Name (eg, section) []:

Common Name (eg, YOUR name) []:

Email Address []:

Please enter the following 'extra' attributes

to be sent with your certificate request

A challenge password []:

An optional company name []:
Fill all the values according to your requirements, the only vital thing here is to fill in a proper Common Name (eg, YOUR name) []:
The Common Name should always be equal to *.domain.com , if something else is typed in the SSL certificate won’t be considered a valid one when placed on the multiple subdomains.
The newly generated domain.com.csr file should be looking something similar to:
Next on this BEGIN CERTIFICATE REQUEST will have to be filled in to the certificate issuer website, whether it’s requested, let’s say in GlobeSSL.
Based on the certificate request a valid SSL certificate will be issued by the SSL provider. Here one important note to make is that if your domain contians some prohibited keywords like, let’s say bank, finance, poker etc., a keywords which might be considered a fraud or forgery then probably the SSL certificate won’t be issued by the SSL issuer and you will have to further contact the SSL cert provider and send them some more information related to the type of business the new website is going to run. This kind of domain keyword filter, that is implemented by SSL certificate issuer companies is made to protect internet users from possible frauds or scam websites as well as reduce the level of potential dangerous pyramid like businesses that are so modern on the net these days.
Last step before the certificate will be visible in a browser is to set it for a domain name or virtualhost in Apache, lighttpd or whatever webser is used. As I’m personally using it with Apache webserver, below I’ll describe how to set it in Apache version 2.x. 3. Configure the newly configured SSL certificate to run on Apache virtualhost
Open up the virtualhost file which coresponds to the domain name to be secured with SSL, for example /etc/apache/sites-available/www.domain.com Within the <Virtualhost> directives place in a code similar to:
SSLEngine on

# domain.com.crt cointains the wildcard SSL certificate generated and obtained by you from RapidSSL

SSLCertificateFile /etc/apache2/ssl/domain.com.pem
Here the file /etc/apache2/ssl/domain.com.pem should contain both the:
—-BEGIN RSA PRIVATE KEY—– issued earlier in step one with openssl command, as well as:
—–BEGIN CERTIFICATE—– which will be issued by the SSL certificate reseller.
Finally it’s necessery that Apache is restarted to load the new configured certificate:
server:~# /etc/init.d/apache2 restart
The above described steps need to be repeated for all the wildcard subdomains which will use the multiple SSL generated certificate and hopefully if all is well tuned, the certificates should start appearing to all the web domain subdomains immediately.
Being a remote system administrator for many years from now, I’ve experienced many times sudden Linux crashes, mostly caused by system hardware overloads.
This is a common thing especially on busy Web Servers with (Apache/MySQL). Situations like this are really messy and many times in order to bringt the server back online, one has to either physically go to the Data Center or contact the Technical support to request a server reboot.
In this terrible times, data loss might occur if the Server reset button is used to cold reboot it.
Happily in 99% of the cases the data loss which might occur could be prevented with Linux’s kernel capability to support the Magic SysRQ key !
Having the Magic SysRQ key functionality being supported in Linux in past times wasn’t that common, thanksfully these days this has changed andlmost every Linux distrubution supports this handy feature.
Now you might wonder what is the magic with those Magic SysRQ key ?
Let me explain, Magic SysRQ is a kernel level functionality which supports even completely crashed Linux systems with the horrifying:
Kernel Panic message to be properly shutdown.
Using Magic SysRQ instead of the mostly used indiced cold reboots is really advantageous, as all the opened files by programs on the crashed server which hanged will be properly saved and closed and thus possible data loss caused by the sudden server crash will be minimized.
One other good thing about the Magic SysRQ Key keyboard combination is that initiating the Magic SysRQ could be made blindly (no need for server monitor or display to present any error messages on the failed server).
Now to check if the magic sysrq is enabled on a server one should issue the command:
Here are some Magic SysRQ keyboard combinations one can use in case of server failure:
ALT+SYSRQ+M to dump memory info;

ALT+SYSRQ+P to dump processes states;

ALT+SYSRQ+S to sync disks;

ALT+SYSRQ+U to unmount all mounted filesystems;

ALT+SYSRQ+E to terminate processes;

ALT+SYSRQ+I to kill all processes

ALT+SYSRQ+U to try to unmount once again;

ALT+SYSRQ+B to reboot.
I would skip to explain what each of the keyboard combinations will do as I believe the above description explains it well.
One classics of combinations one might want to issue on a failed Linux server supporting the Magic SysRQ would be:
The ALT+SYSRQ+REISUB key combination is very popular among system administrators. Also Magic SysRQ is heavily used by kernel developers as it includes many handy debugging options.
If you try the Magic SysRQ key on older servers and you realize it doesn’t react you will have to recompile the linux kernel and enable the CONFIG_MAGIC_SYSRQ kernel time compilation option.
The Magic SysRQ can also be initiated remotely on a properly running server 😉 by initiating:
server:~# echo b > /proc/sysrq-trigger
This command would be useful if you want to just have fun and test that magic sysrq works on your system for sure 😉
To sum it up using the Magic SysRQ will guarantee your locked up, server a Safe Reboot and will hopefully save you a lot of time for backups recovery.
I remember about Johny Cash’s Hurt song as the nine inch nails cover was a very favourite one to me for quite a few years, in the meantime I reviewed Johny Cash’s musical works and decided to check some biographic info about Johny Cash I was surpirsed to find out Johny Cash used to create a lot of music about the Lord Jesus Christ and shocked by the fact he had a long period in his life in which he was a devoted Christian!
I’m really happy to find out this info as one I’m a christian myself and two he is one of the most influential musicians of the last 150 years, not to say of all times.
His biography is quite a bizarre one full of falling and standings, anyways i would skip the talks now and suggest for my readers to enjoy Johny’s Cash few notable songs:
Johny Cash – Hurt Video
Johny Cash – Ring of Fire Video
Johny Cash – San Quentin (Live From Prison)
Johny Cash – Redemption Video
Johny Cash – I walk the Line Video
Johny Cash – God’s Gonna Cut you Down Awesome music ain’t it ? 🙂
I needed a handy way to recover some old data of an expired domain containing a website, with some really imprtant texts. The domains has expired before one year and it was not renewed for the reason that it’s holder was not aware his website was gone. In the meantime somebody registered this domain as a way to generate ads profit from it the website was receiving about 500 to 1000 visitors per day. Now I have the task to recover this website permanently lost from the internet data. I was not able to retrieve anything from the old domain name be contained via google cache, yahoo cache, bing etc. It appears most of the search engines store a cached version of a crawled website for only 34 months. I’ve found also a search engine gigablast which was claimed to store crawled website data for 1 year, but unfortunately gigablast contained not any version of the website I was looking for.Luckily (thanks God) after a bit of head-banging there I found a website that helped me retrieve at least some parts from the old lost website.
The Wayback Machine , guys keeps website info snapshots of most of the domain names on the internet for a couple of years back, here is how wayback machine website describes its own provided services:
The Internet Archive's Wayback Machine puts the history of the World Wide Web at your fingertips.
Another handy feature wayback machine provides is checking out how certain websites looked like a couple of years before, let’s say you want to go back in the past and see how yahoo’s website looked like 2 years ago.
Just go to web.archive.org and type in yahoo and select a 2 years old website snapshot and enjoy 😉
It’s really funny how ridiculous many websites looked like just few years from now 😉
As I’ve mentioned in my previous post, one of the greatest “evils” which prevents a good internet anonymization whether you surf online is Adobe Flash Player
There are two approaches you might partake to disable the privacy issues which might be related to Adobe Flash cookies saving data about flash banners or websites which stores their cookies to your computer.
To find out if flash websites has already saved their nasty flash cookies on your Linux, issue the commands:
hipo@debian:~$ cd .macromedia

hipo@debian:/home/hipo/.macromedia$ find -iname '*.sol'

./Flash_Player/macromedia.com/support/flashplayer/sys/#s.ytimg.com/settings.sol

./Flash_Player/macromedia.com/support/flashplayer/sys/settings.sol

./Flash_Player/macromedia.com/support/flashplayer/sys/#ip-check.info/settings.sol
The returned output of the above find command clearly reveals the shitty flash has stored already 3 flash cookies on my Linux, 3 cookies which later can be easily requested by other flash banners. The 3 flash cookies are: 1. Saved by Adobe’s Flash Configuration Manager 2. Saved by the website ip-check.info 3. Saved by s.ytimg.com’s website
Now to deal with the situation and get rid of flash cookies, there are possibly two ways of approach that one can take:
1. One is to use some kind of script like the one clear_flash_cookies.tsch the other one is to completely disable flash cookies. Using the clear_flash_cookies.tcsh does get rid of flash cookie problems just temporary as it might be set to be executed either once the browser is starting up, or directly via some kind of cron job entry like:
eHowever clearing up (removing) the flash cookies, still doesn’t completely proihibit saving up of flash cookies and in the time intervals between the clear ups of the flash cookies, still some websites might save information related to their use on your Linux host and expose this information for other external flash websites to read and retrieve information about your previous websites visits.
Therefore it might be a better solution in terms of browser security to;
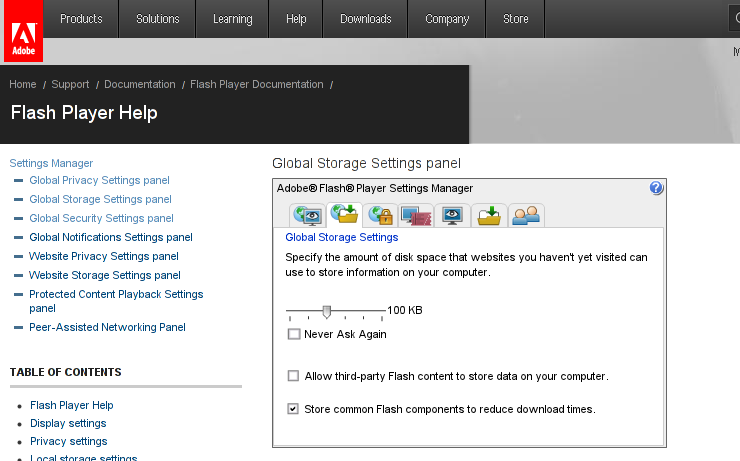
2. completely disable the use of adobe flash cookies on your Linux powered desktop.
Disabling adobe flash cookies is possible by either using the online flash Global Storage Settings (Flash Settings Manager) by navigating to the URL: