Posts Tagged ‘loading’
Thursday, September 10th, 2009 As you have noticed in my previous posts I'm playing a bit with Toshiba Satellite L40 14B updates this days. I've came across an ugly problem with ACPI on Ubuntu Jaunty. It's really a big issue because acpi stalls and keeps loading the system on 100% leaving it with 0% idle all the time. The solution I’ve found is suggested on the following Ubuntu bug launchpad . As it describes the solution comes to this:
1. rm -f /etc/acpi/events/asus-wireless-on
2. rm -f /etc/acpi/events/asus-wireless-2
the next two steps are added by meto prevent some problems caused by acpidupgrades.
3. touch /etc/acpi/events/asus-wireless-2
4. touch /etc/acpi/events/asus-wireless-on
Tags: acpi, bit, issue, loading, solution, system, time, toshiba satellite l40, Ubuntu 9.04 (Jaunty) on Toshiba Satellite L40 14B ACPI problem ACPI loading problem and workaround, Ubuntu Jaunty, workaround
Posted in Linux, Linux on Laptops | No Comments »
Monday, September 7th, 2015 
I've been annoying for quite a long time by the the Clockwise moving backward and Forward Wheel (Ring) on Top of browser Tabs everytime I navigate to a new Internet domain or request a resource on the Net.
I'm aware that seeing the wheel all the time move back and forward is a very bad manipulation technique that is often used in advertisements in old movies and some advertisements in the start of the video . I'm talking about the infamous backward counting technique in a Circle (it was moer commonly used in the dawn of Television) aiming to induce watchers mind into hypnotic state …

Those who have a degree in psychology or have been into marketing or human resources fields or any field involved where you have to influence the masses are already aware of the backward counting methology which has been practiced heavily by hypnosis practisioners such as Sigmund Freud, to induce any kind of hypnotic state the hypnotist always asks the object of hypnotism to watch closely into a moving back and forwards clock, often accompanied by counting backwards …
Well my Theory here is that the same techniques is well aware of those who planned Windows OS in which if you remember the Sand Clock has been substituted in Windows 7 / 8 and Windows 10 with the rotating back and foward Wheel for the reason that this aims to influence people mind to go into Alpha state from Beta state and thus make them feel more relaxed while doing stuff on the PC.
One thing to mention here is Back and Forward wheel is not only into OS level it has been heavily adopted by leading Software as a Service (SAS) UIs such as Google's and probably more importantly Youtube (have you noticed the Cycling Wheel when waiting for a Youtube movie to Load), the Wheel is also heavily incoruprated in most if not all biggest Websites on the Net. Even If you have noticed these days Google's Cycling (Waiting) Wheel is not only Cycling but has the colorful programming incorporated.

Well probably many people who use computers daily did not really realize that the Computer OS and Programs GUI Interface they're using is influencing their mind and some famous psychological methods such as color programming and hypnotic tricks could be used more or less.
In that regard as a Firefox user I decided to change tne Back and Forward Wheel with another one which will not trigger my subconsciousness / mind all the time while browing on the Net into Alpha State. As I'm not a Firefox expert and my quick research on search Engines on how to achieve changing or removing the Browser Tabs all time turning wheel did not led me to nothing positive, I've consulted the experts in irc.freenode.net #firefox.
As always the guys were helpful and pointed me out to UserStyles.org website's Static-Throbbler CSS. I've mirrored the CSS script under a name remove-firefox-tab-wheel-script.css in case if UserSpace.org disappears in future, below is also a paste of the script:
@namespace url(https://www.mozilla.org/keymaster/gatekeeper/there.is.only.xul); @-moz-document url(chrome://browser/content/browser.xul) { .tab-throbber { list-style-image: url('data:image/png;base64,iVBORw0KGgoAAAANSUhEUgAAABAAAAAQCAMAAAAoLQ9TAAAABGdBTUEAALGPC/xhBQAAACBjSFJNAAB6JgAAgIQAAPoAAACA6AAAdTAAAOpgAAA6mAAAF3CculE8AAAB5lBMVEUAAADMzMzr6+v////t7e1paWmYmJiampqPj4+IiIiQkJCgoKCPj49qamqQkJB2dnacnJyAgIBfX19aWlpZWVlgYGB/f399fX2Hh4eFhYWZmZlycnJaWlpjY2Nubm56enp6enptbW1XV1dxcXGbm5uAgIBiYmKenp5ra2taWlpxcXGLi4uXl5eKioqPj4+NjY1wcHBZWVlra2uYmJhiYmKBgYFbW1t1dXWSkpKEhIR6enpsbGyBgYFubm6CgoKZmZlzc3NYWFiPj4+YmJhmZmaLi4uGhoagoKC4uLi0tLSnp6eIiIhmZmafn5+RkZFcXFx1dXWZmZl8fHzt7e3////r6+uUlJRycnJbW1uQkJCHh4d4eHiKioqxsbFubm6NjY15eXlYWFiHh4dXV1d4eHiGhoZycnKvr6+JiYl4eHiGhoaOjo6MjIxxcXHq6uqjo6N5eXmVlZVzc3OcnJxfX1+JiYl7e3tra2upqamIiIiNjY1kZGReXl6YmJiOjo59fX1YWFiSkpKAgIB2dnaYmJh0dHRoaGhqamqSkpKSkpKLi4uWlpaPj49wcHBpaWlhYWGCgoKamppwcHBjY2Nubm57e3tiYmKYmJiZmZl9fX1ZWVl+fn6bm5t1dXWOjo6GhoaNjY3///+wXn5TAAAAoXRSTlMAAAAAAAYLIzM6MiENBgEII0ZzeXtzRgcBByZhe29iWFlhe2ElBwYiY3pgRzMwNkZfemIkBUZ7XzktHyAdICs3X3sMI29KLgkJCApFbSAxe2E2IAQBAzVgeTE7WjUIHTFZejp8WzIiBy5YOzM1IwMKIDVgInRKMSALKUducyINSHw6LRo2XwZjMi0vNUhgYwYHJWFuYVhuJiNGeUUjCDI6MyoACaoAAAABYktHRAMRDEzyAAABFklEQVQY02NgYGBkZWPn4OTk4ubhZWIAAj5+AUEhYRERYVExdnEJZgZGSSlpGVk5eQVFWSVlFVUmBjV1DU0tbR1dXT19A0MjYxMGNlMzcwtLK2sbWzt7B0cxJwZnURdXNxt3D08vaztvH1FfBj//gMAg92DmkFAv27DwiEiGKLPoGJtYZgaGkNi4+ITEJIao5JTUNA+gAHO6dUamYRZDtpl0Tq5XXghzaH5BYZGmH0NxiUtpWXlFuqdXXGVVdU0tQ119g3Rjk5V1c0FlS6uIIBtDm3G7iFZVR2dXd0+vYZ96PwPLhImTlCZPUZg6ZZrIpOmSjAzMEuIzZorOcnScVTN7zlw+kHeZeJ18582fv6CWjZWRgQEA0vJCZaR0FWsAAAAldEVYdGRhdGU6Y3JlYXRlADIwMTMtMDYtMjhUMDc6NDE6NDItMDY6MDC7fUviAAAAJXRFWHRkYXRlOm1vZGlmeQAyMDEzLTA2LTI4VDA3OjQxOjUxLTA2OjAwN2LpXQAAABN0RVh0U29mdHdhcmUASmFwbmcgcjExOSfos2EAAAAASUVORK5CYII=') !important; animation-name: none !important; } .tab-throbber[progress] { list-style-image: url('data:image/png;base64,iVBORw0KGgoAAAANSUhEUgAAABAAAAAQCAMAAAAoLQ9TAAAABGdBTUEAALGPC/xhBQAAACBjSFJNAAB6JgAAgIQAAPoAAACA6AAAdTAAAOpgAAA6mAAAF3CculE8AAABs1BMVEUAAAAAkwAAnwAAmAAAmQAAnQAAiQAAkgAAkAAEnAQHogcHpwcHpgcGogYEmwQAkAAAkQAAiAAAjAAAkQAEnQQMqwwhwiEhxyEiyCIgwiAMrAwEnQQAkQAEnAQauRohyCEdxh0SwRIRvxEPvw8ZxRkjyCMFnQUEnAQVuhUhyCESwRIFuAUBsAEArQABrwEBsAEMuQwRwREjyCMVuRUEnAQNrQ0TwRMBsAEAqwAAqAABsAERwREiyCIQrhAexh4CuAIDtwMbxhsgwiAEmwQGogYjxiMTwhMBrwETwRMhxiEGoQYMqAwhxyEOvg4ArQAArwAPvg8kyCQMpwwnyCcPvg8AqgAArAAOvg4hxyEMqAwGoQYkxyQVwhUBrgEBrwEjxiMGogYEmwQhwiEcxhwMuQwArQAAqwAGuAYexh4gwiAEnAQRrhEjyCMRwREBrwEBrwETwRMixyINrQ0EnAQVuRUjyCMSwRIDuAMBrgEArAAKuAohyCEEmwQFnAUauRoZxRkSwRIRvxERwREcxRwhyCEEnAQAkAAMqwwhxiEixyIgwiAMqwwHpQcHpgcHoQcEmwT////fHmrrAAAAkHRSTlMAAAAAAAAHIzBXbHZ1bFMxJAcNJ1iAo6amooBZJl2Zpp6Ui4mep11WmKWSZygXFylmk6aYWYCRMQkKL5Kngp1iZ52jVG6nkyeUpm53qo0WF4uodqqMExOMqXZwp5UmJKhvVaSfag0MaZ6kWISplC4wk6iCWpqolWklEmanV1+boJeNlqCoXyeDqKmlgnh5blghd7i+AAAAAWJLR0SQeAqODAAAAPRJREFUGNNjYGBgY+fg5OLm4eXjFxBkAAIhYRFRMXEJCXFJKWkZIaC8jKycvIKikrKiiqqcmrAgg4C6hqaWto6unr6BoZGxiQADh6mEmbkFIwMDk6WVtY0tPwOnmJ29BQMYWDo4OjkzuLi6uTNCBJj1PTy9GLx9fP0YoMA/IDCIwTs4JBQmEBYeEckQFR0TywLhs8Z5xCcwJCYlp6RCBNLSMzKzGPizc3LzUkHWpuUXFBbxMwgUl5SWlVeEVsZVKVaX1AgwCArX1uXUN4Q3NjW31LW2sQE9J1PcntnRWdjR1W0iLAQyS1CAP9Grp7evn58dKA8Ayh0xsydWuvQAAAAldEVYdGRhdGU6Y3JlYXRlADIwMTMtMDYtMjhUMDc6NDE6NTEtMDY6MDBGP1HhAAAAJXRFWHRkYXRlOm1vZGlmeQAyMDEzLTA2LTI4VDA3OjQxOjUyLTA2OjAwBorzwAAAABN0RVh0U29mdHdhcmUASmFwbmcgcjExOSfos2EAAAAASUVORK5CYII=') !important; } }
To use the script you will first need to install the Stylish FF plugin, then:
1. Enable Stylish plugin and Restart firefox when prompted
2. Click on Write New Style
3. Paste above CSS script and click on Save button
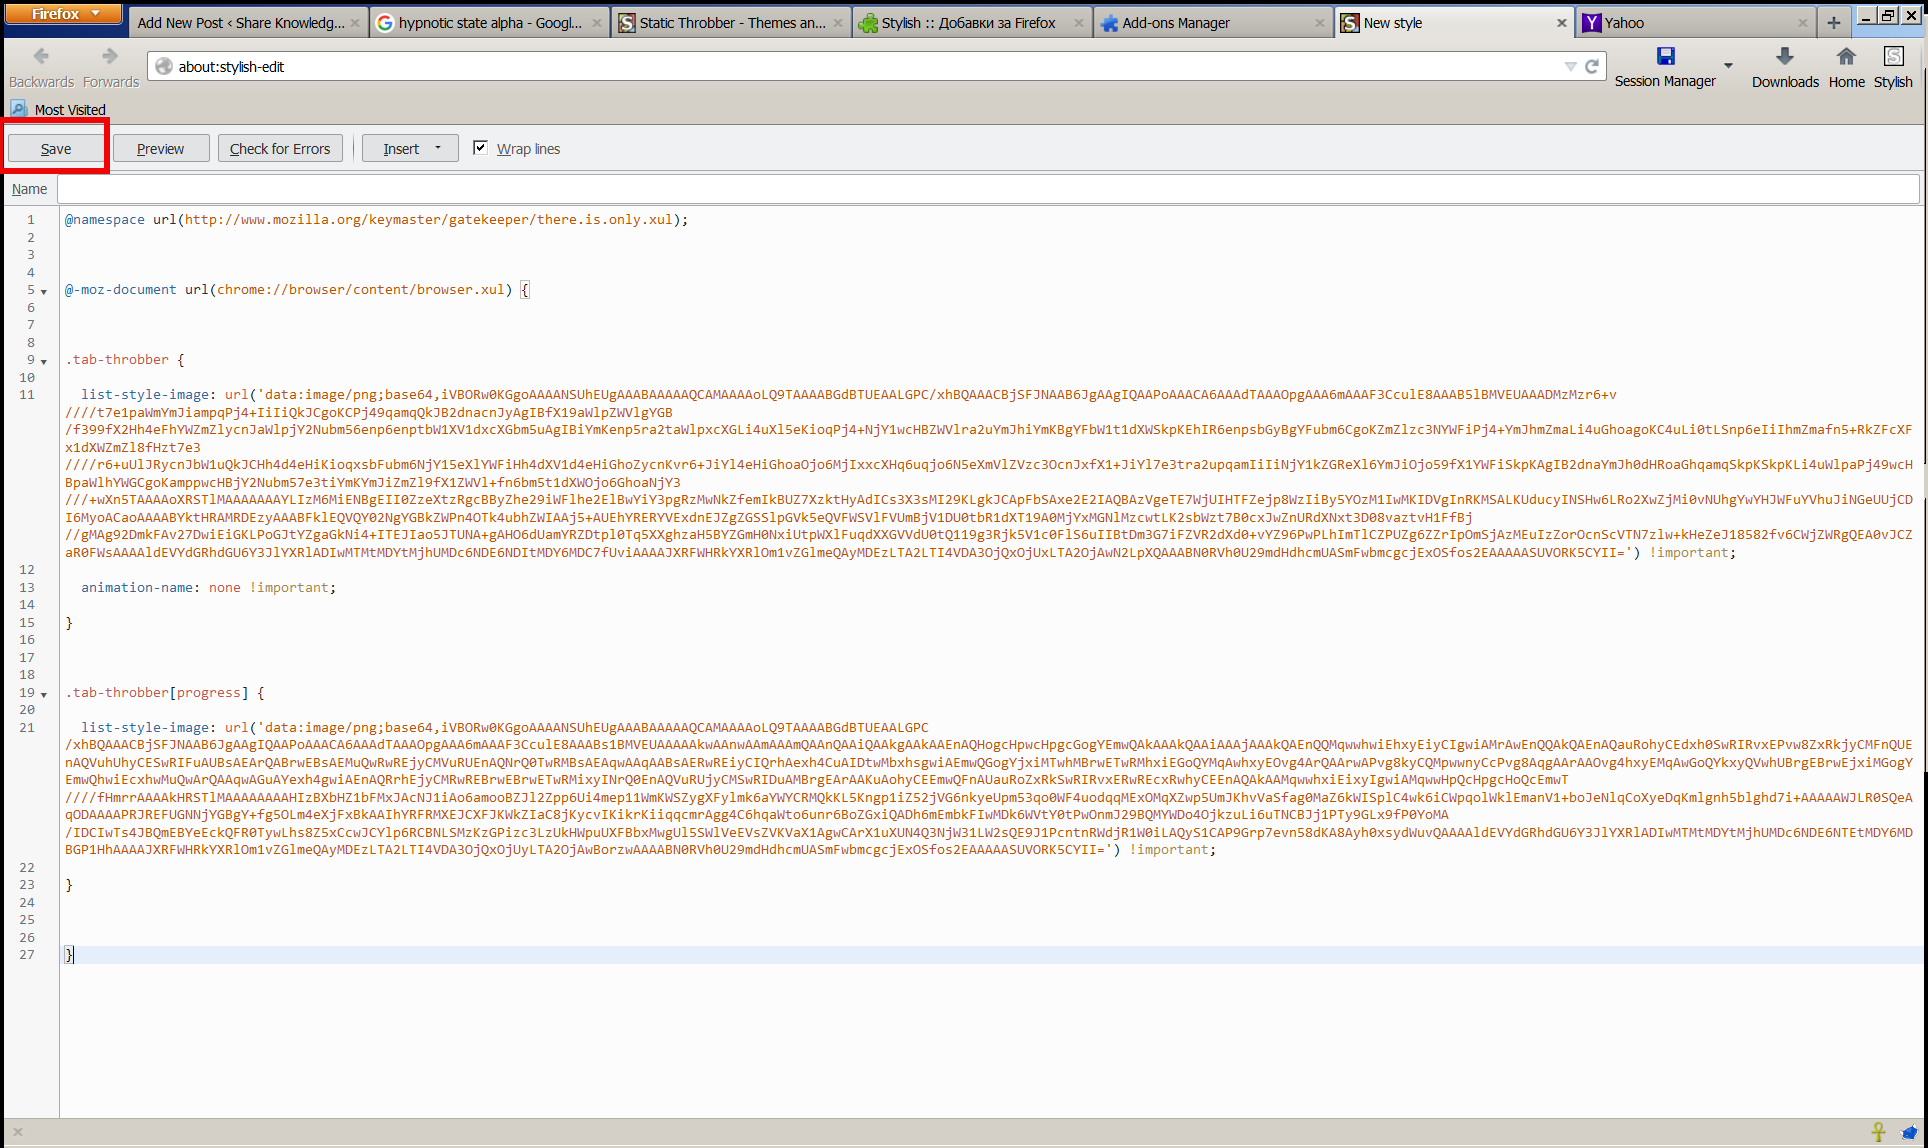
Now instead of the moving wheel you will get just a circle appearing as a static image while the page is loading.
If you want to absolutely remove any circles or images and show nothing when loading, e.g. not have any mean to monitor whether page is loaded or not, but also make it easier for the eye I even finally decided to completely remove the all time moving Wheel from Firefox Tabs even the static picture out using below CSS script with Stylish:
@namespace url(https://www.mozilla.org/keymaster/gatekeeper/there.is.only.xul); @-moz-document url(chrome://browser/content/browser.xul) { .tab-throbber { list-style-image: none !important; animation-name: none !important; } .tab-throbber[progress] { list-style-image: none !important; } }
After all even after removing the FF Tabs wheel, there is the Status being printed down the webpage, showing text based the connection status. I find this kind of page loading status much less agressive and preferrable, than the current verions Firefox 4 onwards ..
One other thing I do to prevent the annoying Windows OS default Theme wheel is to change it to the old fashioned sand clock as well as bring back the theme of Windows 7 / 8 to Classic Theme of Win 2000, as I believe this reduced the level of zoombification the PC imposes on self 🙂
Enjoy!
Tags: advertisements, change, Click, CSS, Cycling Wheel, data, Firefox, image png, influence, loading, long time, make, mind, one thing, org, paste, Pc, technique, url, use, wheel, Windows
Posted in Business Management, Curious Facts, Entertainment, Everyday Life, Firefox, System Administration, Various, Windows | 2 Comments »
Tuesday, January 17th, 2012 
My beloved sister was complaining games were failing to properly be played with wine emulator , therefore I decided to be kind and help her by installing a Windows XP to run inside a Virtual Machine.My previous install experiments with running MS Windows XP on Linux was on Debian using QEMU virtualmachine emulator.
However as Qemu is a bit less interactive and slower virtualmachine for running Windows (though I prefer it for being completely free software), this time I decided to install the Windows OS with Virtualbox.
My hope was using VirtualBox would be a way easier but I was wrong… I've faced few troubles and I thought many people who initially try to install Virtualbox VM to run Windows on Ubuntu and other Debian based Linux distros will probably experience the same problems as mine, so here is how this article was born.
Here is what I did to have a VirtualBox OS emulator to run Windows XP SP2 on Ubuntu 11.10 Linux
1. Install Virtualbox required packages with apt
root@ubuntu:~# apt-get install virtualbox virtualbox-dkms virtualbox-guest-dkms
root@ubuntu:~# apt-get install virtualbox-ose-dkms virtualbox-guest-utils virtualbox-guest-x11

...
If you prefer more GUI or lazy to type commands, the Software Package Manager can also be used to straight install the same packages.
virtualbox-dkms virtualbox-guest-dkms packages are the two which are absolutely necessery in order to enable VirtualBox to support installing Microsoft Windows XP. DKMS modules are also necessery to be able to emulate some other proprietary (non-free) operating systems.
The DKMS packages provide a source for building Vbox guest (OS) additional kernel modules. They also require the kernel source to be install otherwise they fail to compile.
Failing to build the DKMS modules will give you error every time you try to create new VirtualMachine container for installing a fresh Windows XP.
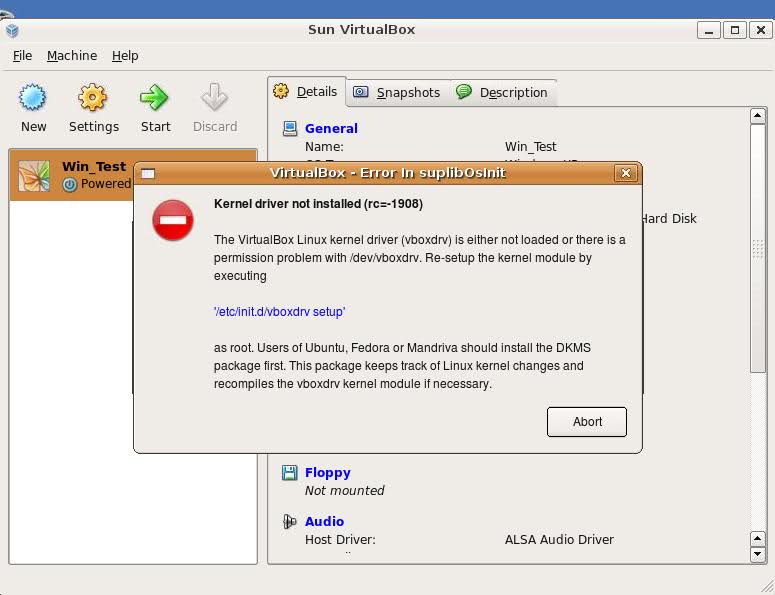
The error happens if the two packages do not properly build the vboxdrv extra Vbox kernel module while the Windows XP installer is loaded from a CD or ISO. The error to pop up is:
Kernel driver not installed (rc=-1908)
The VirtualBox Linux kernel driver (vboxdrv) is either not loaded or there is a permission problem with /dev/vboxdrv. Please reinstall the kernel module by executing
To fix the error:
2. Install latest Kernel source that corresponds to your current kernel version
root@ubuntu:~# apt-get install linux-headers-`uname -r`

...
Next its necessery to rebuild the DKMS modules using dpkg-reconfigure:
3. Rebuild VirtualBox DKMS deb packages
root@ubuntu:~# dpkg-reconfigure virtualbox-dkms

...

root@ubuntu:~# dpkg-reconfigure virtualbox-guest-dkms

...

root@ubuntu:~# dpkg-reconfigure virtualbox-ose-dkms

...
Hopefully the copilation of vboxdrv kernel module should complete succesfully.
To test if all is fine just load the module:
4. Load vboxdrv virtualbox kernel module
root@ubuntu:~# modprobe vboxdrv

root@ubuntu:~#
If you get some error during loading, this means vboxdrv failed to properly compile, try read thoroughfully what the error is and fix it) ;).
As a next step the vboxdrv has to be set to load on every system boot.
5. Set vboxdrv to load on every Ubuntu boot
root@ubuntu:~# echo 'vboxdrv' >> /etc/modules
I am not sure if this step is required, it could be /etc/init.d/virtualbox init script automatically loads the module, anyways putting it to load on boot would do no harm, so better do it.
That's all now, you can launch VirtualBox and use the New button to initiate a new Virtual Machine, I will skip explaining how to do the configurations for a Windows XP as most of the configurations offered by default would simply work without any tampering.
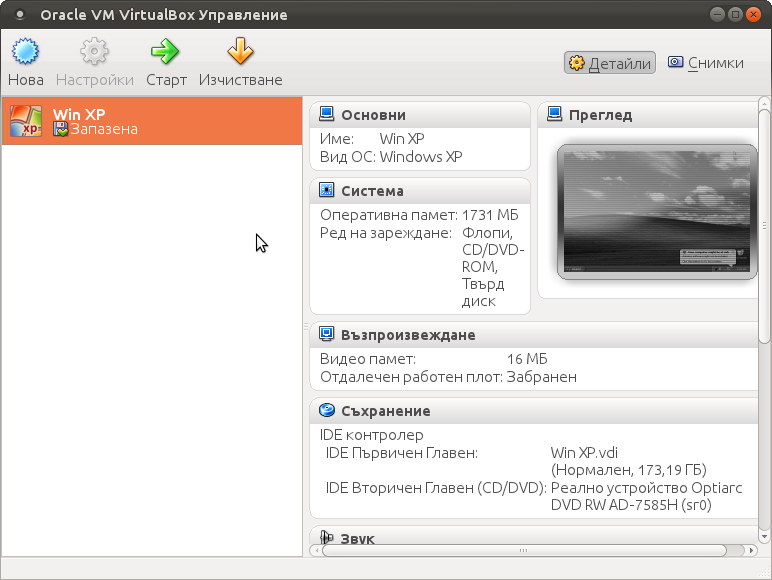
After booting the Windows XP installer I simply followed the usual steps to install Windows and all went smoothly.
Below you see a screenshot showing the installed Windows XP Virtualbox saved VM session. The screenshot letters are in Bulgarian as my sisters default lanaguage for Ubuntu is bulgarian 😉
I hope this article helps someone out there. Please drop me a comment if you experience any troubles with it. Cya 🙂
Tags: Auto, beloved sister, DKMS, Draft, Failing, free operating systems, guest os, How to, init, init script, Install, ISO, kernel modules, kernel source, Linux, loading, Microsoft, microsoft windows, ms windows, necessery, Permission, qemu, root, screenshot, Set, software, software package, system boot, time, type, Ubuntu, uname, vbox, Virtual, virtual machine, VirtualBox, virtualmachine, vm, Windows, windows os, windows xp, windows xp sp2, wine, x11
Posted in Linux, Linux and FreeBSD Desktop, Linux Audio & Video | 1 Comment »
Friday, December 5th, 2014 
Part of our daily life as Web hosting system adminstrators is to constantly strive to better utilize our Linux / Windows hosting servers hardware.
Therefore it is our constant task to look for new better ways to optimize our Apache Sites and Webservers in order to return served application content light fast to keep the Boss and customers happy 🙂
There are things to tune up for better server performance and better CPU / memory utilization on both server Application server side as well as the website programming code backend, html and pictures / images.
Thus it is critically important to not only keep the Webserver / PHP engine optimized but keep hosted sites stored images and source code clean and efficient.
We as admins usually couldn't directly interfere with clearning the source code and often we have to host a crappy written sites with picture upload forms with un-optimized Image files that was produced on old Photo Cameras, "Ancient" Mobile Mobiles, Win XP MS Paint, various versions Photoshop, Gimp etc.).
It is a well known fact that a big part from a Website User Experience is how fast the user loads a page, thus if HTML / CSS loaded images loads slow has a negative impact on user look & feel about website.
Therefore by optimizing the size of hosted sites Images, you Save Network bandwidth and in some cases when Large Gallery sites HDD disk space.
On Linux, there are already a many command line tools to inspect and optimize (compress) the size of PNG, JPEG, GIF, BMP, PNM, Tiff Images, most famous ones are:
- optipng – PNG optimizer that recompresses image files to a smaller size, without losing any information.
- jpegoptim – lossless JPEG optimization (based on optimizing the Huffman tables) and "lossy" optimization based on setting a maximum quality factor.
- pngcrush – Recommended tool to use by Stoyan Stefanov (Yahoo Yslow Developer)
- jpegtran – Recommended to use by Google
- gifsicle – command-line tool for creating, editing, and getting information about GIF images and animations.
It is hence useful to first run manually availale Linux image optimization tools (to get an idea what they do) and later automate them to run as scripts to optimize server stored images size and make pictures load faster on websites and thus improve End Users Experience and speed up Image content delivery to GoogleBot / YahooBot / Bing Crawlers which will make Search Engines to position server hosted sites better (more SEO Friendly).
- How much percents of space (Mega / Gigabytes ) Pictures compress can save you?
If you run it on 500MB image directory, you can probably save about 20 to 50MB of size, so don't expect extraordinary file reduce, however 5% to 10% reduce in size is not bad too. If you host 100 sites each with half gigas of data this would mean saving of 5GB of data and some 5GB from backups 🙂 At extraordinary cases you can expect 20% to 30% of storage reduce. For even better image compression you can try out GIMP's – Save for Web option.
- Installing jpegtran, optpng, jpegoptim, pngcrush gifsicle on Debian / Ubuntu (deb based) Linux
apt-get install –yes libjpeg-progs optipng jpegoptim pngcrush gifsicle
…
- Installing jpegtran, optpng, jpegoptim, pngcrush, gifsicle on Fedora / CentOS / RHEL (RPM based distros)
yum -y install pngcrush libjpeg-turbo-utils opt-jpg opt-png opt-gif
…
gifsicle is not availale by default on Redhacks 🙂 but there is a RPM package for fedora from http://pkgs.repoforge.org/gifsicle/
Some examples of running image compression on GNU / Linux
- optipng and jpegoptim optimize for all files in directory
cd /home/sites/
find . -iname '*.png' -print0 | xargs -0 optipng -o7 -preserve
find . -iname '*.jpg' -print0 |
xargs -0 jpegoptim –max=90 –strip-all –preserve –totals
In jpegoptim command, the option –strip-all will strip any metadata including Exif data from images. For websites JPEG metadata is usually not needed, so usually its ok to strip them.
Above jpegoptim example will decrease slightly JPEG image quality to 90%. quality level of 90 is still high enough and website visitors are unlikely to spot any visible quality reduction / defects in the image.
- pngcrush all files in a directory example
cd /home/sites/
for png in `find $IMG_DIR -iname "*.png"`; do
echo "crushing $png …"
pngcrush -rem alla -reduce -brute "$png" temp.png
# preserve original on error
if [ $? = 0 ]; then
mv -f temp.png $png
else
rm temp.png
fi
done
- Run jpegtran on sites directory
find /home/sites -name "*.jpg" -type f -exec jpegtran -copy none -optimize -outfile {} {} ;
- Set a script to compress / reduce size of Sites Images
Here is a basic optimize_images.sh which I used earlier before and was reducing the overall images size just 5 to 10%, then I found the much improved version of optimize images shell script (useful to clear up EXIF picture data / And Comments from JPG / PNG files). The script execution could take very long time on large image directories and thus could cause a high HDD disk I/O, however if ran once a week at night time its not such a big deal.
To set it to run on your server as a cronjob:
cd /usr/sbin/
wget -q https://www.pc-freak.net/bshscr/optimize_images2.sh
crontab -u root -e
Sample cron job to run once a month on 10th and 27th in 3 o'clock AM:
00 3 10,27 * * /usr/sbin/optimize_images2.sh 2>&1 >/dev/null
Also if you need to further optimize million of tiny sized PNG files Yahoo Smush.it service could be helpful. For compression maniacs its worthy to check out also TinyPNG Service (however be awre that this service compresses files with significant quality loss) making picture quality visibly deteriorated.
Besides optimizing server stored Pictures, here are some other stuff that helps in increasing server utilization / lower webpages loading time.
Starting up with the installation (when site is to use Apache + PHP) for its backend, the first thing to on the freshlyinstalled Linux server is to implement the following list of Apache common Timeout variables that help better scale the webserver for the CMS-es hosted, enable Webserver caching with (mod_deflate), enable eAccelerator tune PHP common php variable etc.
Other thing I sometimes use to speed-up performance of Apache child responce time up to 20-30 is to Include into Virtualhost / httpd.conf Apache configuration any htacces mod_rewrite rules.
On too heavily loaded sites On-line stores / Large Company website portals with more than 60 000 – 100 000 unique IP visitors a day it is useful tip to disable completely Apache logging in access.log / error.log.
Often when old architecture websites are moved from older Linux OS version to a newer one with newer versions of Apache / PHP often sites are working without major code rework, but use many functions which are already obsolete and thus many WARNING messages crap is logged into php_error.log / error.log. Thus to save disk space and decrease hard disk I/O operations it is good to Disable PHP Notices and Warnings messages
Tags: cd home, com, directory, fi, loading, long time, org, png, server performance, setting, size, Tiff Images, Warnings, webserver, www
Posted in Everyday Life, Linux, Linux and FreeBSD Desktop, SEO, Web and CMS | 3 Comments »
Tuesday, March 6th, 2012 
Nowdays WordPress is ran by million of blogs and websites all around the net. I myself run wordpress for this blog in general wordpress behaves quite well in terms of performance. However as with time the visitors tend to increase, on frequently updated websites or blogs. As a consequence, the blog / website performance slowly starts to decrease as result of the MySQL server read / write operations creating I/O and CPU load overheads. Buying a new hardware and migrating the wordpress database is a possible solution, however for many small or middle size wordpress blogs en sites like mine this is not easy task. Getting a dedicated server or simply upgrading your home server hardware is expensive and time consuming process… In my efforts to maximize my hardware utilization and increase my blog decaying performance I've stumbled on the article Optimize WordPress performance with wp-config.php
According to the article there are 4 simple wp-config.php config directvies useful in decreasing a lot of queries to the MySQL server issued with each blog visitor.
define('WP_HOME','http://www.yourblog-or-siteurl.com');

define('WP_SITEURL','http://www.yourblog-or-siteurl.com');

define('TEMPLATEPATH', '/var/www/blog/wp-content/themes/default');

define('STYLESHEETPATH', '/var/www/blog/wp-content/themes/default');
1. WP_HOME and WP_SITEURL wp-config.php directvies
The WP_HOME and WP_SITEURL variables are used to hard-code the address of the wordpress blog or site url, so wordpress doesn't have to check everytime in the database on every user request to know it is own URL address.
2. TEMPLATEPATH and TEMPLATEPATH wp variables
This variables will surely improve performance to Wodpress blogs which doesn't implement caching. On wp install with enabled caching plugins like WordPress Super Cache, Hyper Cache or WordPress Db Cache is used, I don't know if this variables will have performance impact …
So far I have tested the vars on a couple of wordpress based installs with caching enabled and even on them it seems the pages load faster than before, but I cannot say this for sure as I did not check the site loading time in advance before hardcoding the vars.
Anyways even if the suggested variables couldn't make positive impact on performance, having the four variables in wp-config.php is a good practice for blogs or websites which are looking for extra clarity.
For multiple wordpress installations living on the same server, having defined the 4 vars in different wordpress seems like a good idea too.
Tags: Auto, blogs, Cache, config, config variables, consequence, consuming, content themes, cpu load, dedicated server, default, doesn, Draft, everytime, home server, Hyper, impact, Load, loading, lot, mysql server, new hardware, Optimize, performance impact, php, possible solution, queries, request, server hardware, site url, siteurl, size, time, url, Wordpress, wordpress blog, wp, yourblog
Posted in SEO, Various, Web and CMS | 3 Comments »
Thursday, September 22nd, 2011 
A combination of two wordpress caching plugins (Hyper Cache and Db Cachesignificantly improves the access times of a wordpress based blogs and websites.
Installing the two websites has drastically improved my blog opening times, so in my view having the two plugins on every wordpress install out there is a must! 🙂
The plugins installation is straight forward, here is how I installed them.
1. Installing Hyper Cache on WordPress
To install Hyper Cache all I had to do is download and enable the plugin, the plugin doesn’t require any configuration. I always love it when I don’t have to bother with reading configuration options and pondering for some 20 minutes on the plugin features, so in that perspective Hyper Cache in my view is a good alternative to WordPress Super Cache
Besides that WordPress Super Cache was having issues when enabled on few wordpress based websites I manage these days. For comparison Hyper Cache worked just great on all wordpress install I tried the plugin so far.
To install all I had to do is download the plugin unzip and enable it:
a. Download and unzip it
debian:/var/www/blog# wget http://downloads.wordpress.org/plugin/hyper-cache.zip

...

debian:/var/www/blog# cd wp-content/plugins

debian:/var/www/blog/wp-content/plugins# unzip hyper-cache.zip
b. Enable Hyper Cache plugin
To enable the plugin follow to standard plugin location;
Plugins -> Inactive -> Hyper Cache (Enable)
To enable the plugin follow to standard plugin location;
Plugins -> Inactive -> Hyper Cache (Enable)
A mirror of current version of hyper-cache.zip plugin is here
2. Installing Wodpress Db Cache
What Db Cache, does it does caching of last queries made to MySQL for specified time, so if the query has to be refetched again from wordpress’s php frontend the queries results are fetched straight for the memory. This decreases the load towards the MySQL server and increases the webpages loading time.
As the plugin page suggests it’s way faster than other html caching-plugins like WP-Cache or WP Super Cache
However, I think its still slower than using a combination of WP Super Cache’s alternative Hyper Cache and Db Cache . Combining this two could rise the webpage opening times according to some statisticonline at best cases up to 830% !! 😉 Let me proceed with how I did the install of Db Cache .
a. Download and Install Db Cache
debian:/var/www/blog/wp-content/plugins# wget http://downloads.wordpress.org/plugin/db-cache.0.6.zip
...
debian:/var/www/blog/wp-content/plugins# unzip db-cache.0.6.zip
b. Enable the plugin
Plugins -> Inactive -> Db Cache (Enable)
c. Make sure the permissions for Db Cache are correct
On Debian to enable Db Cache, the permissions should be changed for Apache to have a read/write permissions to plugin directory, on Debian to fix the permissions I used the commands:
debian:/var/www/blog# chown www-data:www-data wp-content
debian:/var/www/blog# chown -R www-data:www-data wp-content/plugins/db-cache
On other GNU/Linux distributions the above commands (user and group) www-data:www-data, should be set to whatever user/group Apache is running with, on Slackware this would be nobody:nobody, on CentOS and RHEL it would be apache:apache.
Finally to enable Db Cache go to
Settings -> Db Cache -> (Tick Enable) -> Save
I’ve also made a mirror of Db Cache plugin here
Enjoy the speed boost 😉
Tags: blog, blogs, CacheBesides, Cachesignificantly, CentOS, configuration options, current version, doesn, download, frontend, Inactive, Install, installation, Installing, itdebian, load time, loading, location, mirror, nbsp, nobody, page, perspective, php, plugin, pluginsdebian, queries, server load, Super, time, unzip, var, wget, Wordpress, WP-Cache, www, zipb
Posted in Linux, SEO, Various, Web and CMS, Wordpress | 2 Comments »
Tuesday, January 10th, 2012 I've experienced plenty of problems with Pulseaudio and Skype output sound hell crappy. This stupid proprietary program Skype is a total crap … Anyways again thanks to ArchLinux's wiki, I've used the two mentioned steps to fix all this Skype in / out problems …
1. Fix problems with Glitches, voice skips and crackling In file /etc/pulse/default.pa its necessery to substitute the line;
load-module module-udev-detect
with
load-module module-udev-detect tsched=0
2. Resolve Choppy sound in (Pulseaudio) -> Skype
In /etc/pulse/daemon.conf two lines has to be also substituted:
; default-sample-rate = 44100
Should become;
default-sample-rate = 48000
3. Change /etc/default/pulseaudio to allow dynamic module loading
It is a good idea to the default settings from DISALLOW_MODULE_LOADING=1 to DISALLOW_MODULE_LOADING=0 .This step is not required and I'm not sure if it has some influence on solving sound in / out problems with Skype but I believe it can be helpful in some cases..
So in /etc/default/pulseaudio Substitute:
DISALLOW_MODULE_LOADING=1
to;
DISALLOW_MODULE_LOADING=0
4. Restart PulseAudio server
After the line is changed and substituted a restart of PulseAudio is required. For PulseAudio server restart a gnome session logout is necessery. Just LogOff logged Gnome user and issue cmd:
debian:~# pkill pulseaudio
This will kill any left pulseaudio server previous instances.
Tags: ArchLinux, Auto, Choppy, choppy sound, conf, crackling, crap, crappy, debian gnu, default settings, Draft, file, Glitches, Gnome, gnome user, hell, idea, influence, instances, issue, line, Linux, loading, logout, Module, nbsp, necessery, pkill, plenty, proprietary program, pulse, resolve, Skype, sound glitches, substitute, udev, voice, wiki
Posted in Linux and FreeBSD Desktop, Linux Audio & Video, Skype on Linux | 18 Comments »
Saturday, April 30th, 2011 If you’re building (compiling) a new qmail server on some Linux host and after properly installing the qmail binaries and daemontools, suddenly you notice in readproctitle service errors: or somewhere in in qmail logs for instance in/var/log/qmail/current the error:
/usr/local/bin/tcpserver: error while loading shared libraries:

libc.so.6: failed to map segment from shared object: Cannot allocate memory
then you have hit a bug caused by insufficient memory assigned for tcpserver in your /var/qmail/supervise/qmail-smtpd/run daemontools qmail-smtpd initialize script:
This kind of issue is quite common especially on hardware architectures that are 64 bit and on Linux installations that are amd65 (x86_64) e.g. run 64 bit version of Linux.
It relates to the 64 bit architecture different memory distribution and thus as I said to solve requires increase in memory softlimit specified in the run script an example good qmail-smtpd run script configuration which fixed the libc.so.6: failed to map segment from shared object: Cannot allocate memory I use currently is as follows:
#!/bin/shQMAILDUID=`id -u vpopmail`NOFILESGID=`id -g vpopmail`MAXSMTPD=`cat /var/qmail/control/concurrencyincoming`# softlimit changed from 8000000exec /usr/local/bin/softlimit -m 32000000 /usr/local/bin/tcpserver -v -H -R -l 0 -x /home/vpopmail/etc/tcp.smtp.cdb -c "$MAXSMTPD"

-u "$QMAILDUID" -g "$NOFILESGID" 0 smtp

/var/qmail/bin/qmail-smtpd

/home/vpopmail/bin/vchkpw /bin/true 2>&1
The default value which was for softlimit was:
exec /usr/local/bin/softlimit -m 8000000
A good softlimit raise up values which in most cases were solving the issue for me are:
exec /usr/local/bin/softlimit -m 3000000
or
exec /usr/local/bin/softlimit -m 4000000
The above example run configuration fixed the issue on a amd64 debian 5.0 lenny install, the server hardware was:
CPU: Intel(R) Core(TM)2 Duo CPU @ 2.93GHz

System Memory: 4GB

HDD Disk space: 240GB
The softlimit configuration which I had to setup on another server with system parameters:
Intel(R) Core(TM) i7 CPU (8 CPUS) @ 2.80GHz

System Memory: 8GB

HDD Disk Space: 1.4Terabytes
is as follows:
#!/bin/sh

QMAILDUID=`id -u vpopmail`

NOFILESGID=`id -g vpopmail`

MAXSMTPD=`cat /var/qmail/control/concurrencyincoming`

exec /usr/bin/softlimit -m 64000000

/usr/local/bin/tcpserver -v -H -R -l 0

-x /home/vpopmail/etc/tcp.smtp.cdb -c "$MAXSMTPD"

-u "$QMAILDUID" -g "$NOFILESGID" 0 smtp

/var/qmail/bin/qmail-smtpd

/home/vpopmail/bin/vchkpw /bin/true 2>&1
If none of the two configurations pointed out in the post works, for you just try to manually set up the exec /usr/bin/softlimit -m to some high value.
To assure that the newly set value is not producing the same error you will have to, reload completely the daemontools proc monitor system.
To do so open /etc/inittab comment out the line:
SV:123456:respawn:/command/svscanboot
to
#SV:123456:respawn:/command/svscanboot
Save again /etc/inittab and issue te cmd:
linux:~# init q
Now again open /etc/inittab and uncomment the commented line:
#SV:123456:respawn:/command/svscanboot
to
SV:123456:respawn:/command/svscanboot
Lastly reload the inittab script once again with command:
linux:~# init q
To check if the error has disappeared check the readproctitle process, like so:
linux:~# ps ax|grep -i readproctitle
The command output should produce something like:
3070 ? S 0:00 readproctitle service errors: .......................................
Hope that helps.
Tags: amd64, amp, binaries, bit, bit architecture, Cannot, cdb, control, cpu intel, Disk, error while loading shared libraries, exec, hardware architectures, host, init, inittab, instance, insufficient memory, intel, libc, Linux, linux host, linux installations, loading, log, logs, QMAILDUID, script, segment, server hardware, shQMAILDUID, smtp, system, tcp, value, vpopmail
Posted in Linux, System Administration | 1 Comment »
Monday, April 4th, 2011 I’ve recently upgraded my FreeBSD Apache server from port www/apache20 I had some issues before I tune up and recompile also the php5 port but eventually it worked out, however the Eaccelerator content caching module failed to load as it was outdated.
That’s a common inconvenient with eaccelerator that every system administrator out there has faced once or twice, especially on systems that has custom compiled Apache servers and does not use a specific precompiled version of the eaccelerator.
To solve the situation as you can expect I jumped on in the /usr/ports/www/eaccelerator and removed the current installed version of eaccelerator in order to compile and install the latest port version.:
To do that I first attempted to upgrade the eaccelerator port with portmaster but as there were some problems caused by autoconf initialization etc., I finally decided to abandon the idea of using portmaster and did it manually with the good old well known trivial commands:
freebsd# cd /usr/ports/www/eaccelerator

freebsd# make deinstall

freebsd# make install && make clean
I’ve continued further and restarted my Apache server to load the new eaccelerator version and made a small phpinfo php script to test if the eaccelerator is properly loaded, yet with zero success.
After checking out in my /var/log/httpd-error.log , I’ve determined the following error:
Failed loading /usr/local/lib/php/20060613/eaccelerator.so: Cannot open "/usr/local/lib/php/20060613/eaccelerator.so"
The error is quite obvious, to solve it I’ve opened my php configuration file /usr/local/etc/php.ini and placed in it:
and substituted the line:
zend_extension="/usr/local/lib/php/20060613/eaccelerator.so:"
with:
zend_extension="/usr/local/lib/php/20090626/eaccelerator.so"
Further on I gave Apache another restart with:
freebsd# /usr/local/etc/rc.d/apache2 restart

Performing sanity check on apache2 configuration:

Syntax OK

Stopping apache2.

Waiting for PIDS: 71140.

Performing sanity check on apache2 configuration:

Syntax OK

Starting apache2.
followed by another test if the eaccelerator is loaded with the
phpinfo();
script.
Now even though the Failed loading /usr/local/lib/php/20060613/eaccelerator.so: Cannot open “/usr/local/lib/php/20060613/eaccelerator.so” was no more, the Eaccelerator was yet not loaded.
Another consult with /var/log/httpd-error.log now revealed me another eaccelerator error you read below:
eAccelerator requires Zend Engine API version 220060519.

The Zend Engine API version 220090626 which is installed, is newer.

Contact eAccelerator at http://eaccelerator.net for a later version of eAccelerator.
I did about 20 minutes of investigation on the internet looking for a possible fix which gave me some idea what might be the cause for error message, though it was finally my try/fail methodology that helped me solve the issue.
The solution to the issue appeared to be easy thanks God, to solve the error all you need to do is one more make clean right before installing the eaccelerator port.:
Here are the commands necessary to issue to solve the error and make the eaccelerator load properly:
freebsd# cd /usr/ports/www/eaccelerator

freebsd# make clean &&

freebsd# make install clean
Now after restarting the Apache server once again eaccelerator has properly been loaded once again.
Tags: amp, apache server, apache servers, Cannot, cause, cleanI, configuration file, content, custom, deinstallfreebsd, eaccelerator, eacceleratorfreebsd, file, freebsd apache, ini, initialization, installed version, investigation, lib, loading, log, php, phpinfo, portmaster, ports, sanity, script, system, system administrator, test, Waiting, Zend, zend engine
Posted in FreeBSD, System Administration | 2 Comments »


