Posts Tagged ‘config’

Fixing common WordPress empty page error

Thursday, May 2nd, 2013

A very common error for  wordpress based blog / site  whenever you modified
something inside pluginsis to receive empty page screen on user visit.

This error often is because of any installed WordPress caching plugins like
WP SUPER CACHE

or

W3 TOTAL CACHE.

One way to solve it is to delete from wp-config/plugins/ Folder whatever plugin is
causing the troubles.

If this doesn't fix the error and you need to Debug what is causing the odd
Empty pages.
Open wp-config.php and somewhere near beginning of file include:
 

error_reporting(E_ALL); ini_set('display_errors', 1);
define( 'WP_DEBUG', true);

After saving wp-config.php and refreshing WP size in Browser
(after cleaning browser cache)

if you get an error like:

Fatal error: Allowed memory size of 8388608 bytes exhausted
(tried to allocate 252212 bytes) in
/var/www/blog/wp-includes/cache.php on line 4


This is due to set maximum System Wide memory Limit of PHP Scripts to 8MB.
To solve that raise the PHP Limit to lets say 64M from wp-config.php by adding
in it line:

define('WP_MEMORY_LIMIT', '64M');

That's all WordPress should be working normal again.

Enjoy 🙂

How to configure Exim to relay mail to remote SMTP server on Debian and Ubuntu

Wednesday, August 24th, 2011

I’m required to do some mail relaying on a Debian Linux host which should use a remote mail server to relay its mails.
Until so far I’ve had not much experience with exim as I prefer using qmail, whever a mail server is needed. However since now only a relaying was necessery and exim is the default installed MTA on Debian, I’ve decided to use exim to take care of the SMTP mail relaying.
After a bit of reading it happened configuring exim to relay via remote SMTP server is more than easy!

All I had to do is run the command:

debian-relay:~# dpkg-reconfigure exim4-config

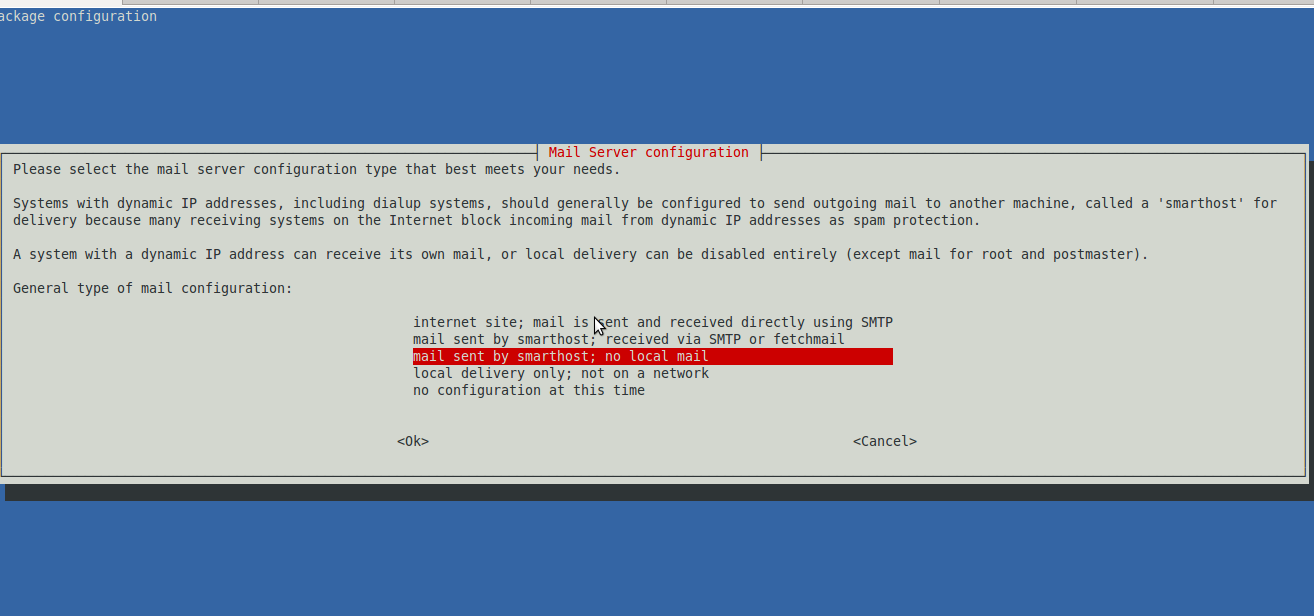
Next in the Ncruses interface to appear:

Debian Exim relay smtp config screenshot

I had to choose the option:

mail sent by smarthost; no local mail

Next a dialog appears asking for:
System mail name:
Therein it’s necessery to type in the hostname of the remote SMTP to be used for mail relay.
Next dialog asks for:
IP-addresses to listen on for incoming SMTP connections:
and I left it with 127.0.0.1 however if exim is supposed to be visible from external network one might decide to put in real IP address there.

Pressing OK leads to the next dialog:
 Other destinations for which mail is accepted: 
I decided to leave this blank as I don’t want to accept mail for any destinations.
Next pane reads:
Visible domain name for local users:
I’ve typed inside my smtp relay server e.g.:
smtp.myrelaymail.com

Further comes:
IP address or host name of the outgoing smarthost:
There once again I typed my mail relay host smtp.relaymail.com

The next config screen is:
Keep number of DNS-queries minimal (Dial-on-Demand)?
On any modern Linux host the default answer of No is fine.
Following prompt asked if I want to:
Split configuration into small files?
I’ve decided not to tamper with it and choosed No
Afterwards mail relaying works like a charm thx God 😉

How to disable ACPI on productive Linux servers to decrease kernel panics and increase CPU fan lifespan

Tuesday, May 15th, 2012

Linux TUX ACPI logo / Tux Hates ACPI logohttps://www.pc-freak.net/images/linux_tux_acpi_logo-tux-hates-acpi.png

Why would anyone disable ACPI support on a server machine??
Well  ACPI support kernel loaded code is just another piece of code constantly being present in the memory,  that makes the probability for a fatal memory mess up leading to  a fatal bug resulting in system crash (kernel panic) more likely.

Many computers ship with buggy or out of specifications ACPI firmware which can cause a severe oddities on a brand new bought piece of comp equipment.

One such oddity related to ACPI motherboard support problems is if you notice your machine randomly powering off or failing to boot with a brand new Linux installed on it.

Another reason to switch off ACPI code will would to be prevent the CPU FAN rotation from being kernel controlled.

If the kernel controls the CPU fan on  high CPU heat up it will instruct the fan to rotate quickly and on low system loads it will bring back the fan to loose speed.
 This frequent switch of FAN from high speed to low speed  increases the probability for a short fan damage due to frequent changes of fan speed. Such a fan damage leads often to  system outage due to fan failure to rotate properly.

Therefore in my view it is better ACPI support is switched off completely on  servers. On some servers ACPI is useful as it can be used to track CPU temperature with embedded motherboard sensors with lm_sensors or any piece of hardwre vendor specific software provided. On many machines, however lm_sensors will not properly recognize the integrated CPU temperature sensors and hence ACPI is mostly useless.

There are 3 ways to disable fully or partially ACPI support.

- One is to disable it straight for BIOS (best way IMHO)
- Disable via GRUB or LILO passing a kernel parameter
- Partial ACPI off-ing - /disabling the software that controls the CPU fan/

1. Disable ACPI in BIOS level

Press DEL, F1, F2, F10 or whatever the enter bios key combination is go through all the different menus (depending on the vios BENDOR) and make sure every occurance of ACPI is set to off / disable whatever it is called.

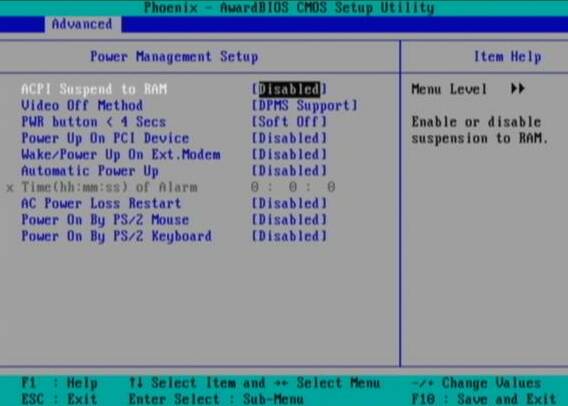
Below is a screenshot of menus with ACPI stuff on a motherboard equipped with Phoenix AwardBIOS:

BIOS ACPI Disable power Off Phoenix BIOS

This is the in my opinon best and safest way to disable ACPI power saving, Unfortunately some newer PCs lack the functionality to disable ACPI; (probably due to the crazy "green" policy the whole world is nowdays mad of).

If that's the case with you, thanksfully there is a "software way" to disable ACPI via passing kernel options via GRUB and LILO boot loaders.

2. Disabling ACPI support on kernel boot level through GRUB boot loader config

There is a tiny difference in command to pass in order to disable  ACPI depending on the Linux installed  GRUB ver. 1.x or GRUB 2.x.

a) In GRUB 0.99 (GRUB version 1)

Edit file /etc/grub/menu.lst or /etc/grub/grub.conf (location differs across Linux distribution). Therein append:

acpi=off

to the end of kernel command line.

Here is an example of a kernel command line with ACPI not disabled (example taken from CentOS server grub.conf):

[root@centos ~]# grep -i title -A 4 /etc/grub/grub.conf
title Red Hat Enterprise Linux Server (2.6.18-36.el5)
root (hd0,0)
kernel /vmlinuz-2.6.18-36.el5 ro root=/dev/VolGroup00/LogVol00 console=ttyS0,115200n8
initrd /initrd-2.6.18-36.el5.img

The edited version of the file with acpi=off included should look like so:

title Red Hat Enterprise Linux Server (2.6.18-36.el5)
root (hd0,0)
kernel /vmlinuz-2.6.18-36.el5 ro root=/dev/VolGroup00/LogVol00 console=ttyS0,115200n8 acpi=off
initrd /initrd-2.6.18-36.el5.img

The kernel option root=/dev/VolGroup00/LogVol00 means the the server is configured to use LVM (Logical Volume Manager).

b) Disabling ACPI on GRUB version 1.99 +

This version is by default installed on newer Ubuntu and Debian Linux-es.

In grub 1.99 on latest Debian Squeeze, the file to edit is located in /boot/grub/grub.cfg. The file is more messy than with its predecessor menu.lst (grub 0.99).
Thanks God there is no need to directly edit the file (though this is possible), but on newer Linuces (as of time of writting the post), there is another simplied grub config file /etc/grub/config

Hence to add the acpi=off to 1.99 open /etc/grub/config find the line reading:

GRUB_CMDLINE_LINUX_DEFAULT="quiet"

and append the "acpi=off" option, e.g. the line has to change to:

GRUB_CMDLINE_LINUX_DEFAULT="quiet acpi=off"

On some servers it might be better to also disable APIC along with ACPI:

Just in case you don't know what is the difference between ACPI and APIC, here is a short explanation:

ACPI = Advanced Configuration and Power Interface

APIC = Advanced Programmable Interrupt Controllers

ACPI is the system that controls your dynamic speed fans, the power button behavior, sleep states, etc.

APIC is the replacement for the old PIC chip that used to come imbedded on motherboards that allowed you to setup interrupts for your soundcard, ide controllers, etc.

Hence on some machines experiencing still problems with even ACPI switched off, it is helpful  to disable the APIC support too, by using:

acpi=off noapic noacpi

Anyways, while doing the changes, be very very cautious or you might end up with un-boot-able server. Don't blame me if this happens :); be sure you have a backup option if server doesn't boot.

To assure faultless kernel boot, GRUB has ability to be configured to automatically load up a second kernel if 1st one fails to boot, if you need that read the grub documentation on that.

To load up the kernel with the new setting, give it a restart:

[root@centos ~]# shutdown -r now
....

3. Disable ACPI support on kernel boot time on Slackware or other Linuxes still booting kernel with LILO

Still, some Linux distros like Slackware, decided to keep the old way and use LILO (LInux LOader) as a default boot loader.

Disabling ACPI support in LILO is done through /etc/lilo.conf

By default in /etc/lilo.conf, there is a line:

append= acpi=on

it should be changed to:

append= acpi=off

Next to load up the new acpi disabled setting, lilo has to be reloaded:

slackware:~# /sbin/lilo -c /etc/lilo.conf
....

Finally a reboot is required:

slackware:~# reboot
....

(If you don't have a physical access or someone near the server you better not 🙂 )

4. Disable ACPI fan control support on a running Linux server without restart

This is the most secure work-around, to disabling the ACPI control over the machine CPU fan, however it has a downside that still the ACPI code will be loaded in the kernel and could cause kernel issues possibly in the long run – lets say the machine has uptime of more than 2 years…

The acpi support on a user level  is controlled by acpid or haldaemon (depending on the Linux distro), hence to disable the fan control on servers this services has to be switched off:

a) disabling ACPI on Debian and deb based Linux-es

As of time of writting on Debian Linux servers acpid (Advanced Configuration and Power Interface event daemon) is there to control how power management will be handled. To disable it stop it as a service (if running):

debian:~# /etc/init.d/acpid stop

To permanently remove acpid from boot up on system boot disable it with update-rc.d:

debian:~# update-rc.d acpid disable 2 3 4 5
update-rc.d: using dependency based boot sequencing
insserv: Script iptables is broken: incomplete LSB comment.
insserv: missing `Required-Start:' entry: please add even if empty.
insserv: warning: current start runlevel(s) (empty) of script `acpid' overwrites defaults (2 3 4 5).
insserv: warning: current stop runlevel(s) (2 3 4 5) of script `acpid' overwrites defaults (empty).
insserv: missing `Required-Start:' entry: please add even if empty.

b) disabling ACPI on RHEL, Fedora and other Redhat-s (also known as RedHacks 🙂 )

I'm not sure if this is safe,as many newer rpm based server system services,  might not work properly with haldaemon disabled.

Anyways you can give it a try if when it is stopped there are issues just bring it up again.

[root@rhel ~]# /etc/init.d/haldaemon stop

If all is fine with the haldaemon switched off (hope so), you can completely disable it to load on start up with:

[root@centos ~]# /sbin/chkconfig --level 2 3 4 5 haldaemon off

Disabling ACPI could increase a bit your server bills, but same time decrease losses from downtimes, so I guess it worths its costs 🙂


How to tune MySQL Server to increase MySQL performance using mysqltuner.pl and Tuning-primer.sh

Tuesday, August 9th, 2011

MySQL Easy performance tuning with mysqltuner.pl and Tuning-primer.sh scripts

Improving MySQL performance is crucial for improving a website responce times, reduce server load and improve overall work efficiency of a mysql database server.

I’ve seen however many Linux System administrators who does belittle or completely miss the significance of tuning a newly installed MySQL server installation.
The reason behind that is probably caused by fact that many people think MySQL config variables, would not significantly improve performance and does not pay back for optimization efforts. Moreover there are a bunch of system admins who has to take care for numerous services so they don’t have time to get good knowledge to optimize MySQL servers.
Thus many admins and webmasters nowdays, think optimizations depend mostly on the side of the website programmers.
It’s also sometimes falsely believed that optimizing a MySQL server could reduce the overall server stability.

With the boom of Internet website building and internet marketing, many webmasters emerged and almost anybody with almost no knowledge on GNU/Linux or minimal or no knowledge on PHP can start his Online store, open a blog or create a website powered by some CMS like joomla.
Thus nowdays many servers even doesn’t have a hired system administrators but are managed by people whose knowledge on *Nix is almost next to zero, this is another reason why dozens of MySQL installations online are a default ones and are not taking a good advantage of the server hardware.

The incrase of website visitors leads people servers expectations for hardware also to grow, thus many companies simply buy a new hardware instead of taking the few time to investigate on how current server hardware can be utilized better.
In that manner of thought I though it will be a good idea to write this small article on Tuning mysql servers with two scripts Tuning-primer.sh and mysqltuner.pl.
The scripts are ultra easy to use and does not require only a minimal knowledge on MySQL, Linux or (*BSD *nix if sql is running on BSD).
Tuning-primer.sh and mysqltuner.pl are therefore suitable for a quick MySQL server optimizations to even people who are no computer experts.

I use this two scripts for MySQL server optimizations on almost every new configured GNU/Linux with a MySQL backend.
Use of the script comes to simply download with wget, lynx, curl or some other web client and execute it on the server host which is already running the MySQL server.

Here is an example of how simple it is to run the scripts to Optimize MySQL:

debian:~# perl mysqltuner.pl
>> MySQLTuner 1.2.0 - Major Hayden >major@mhtx.net<
>> Bug reports, feature requests, and downloads at http://mysqltuner.com/
>> Run with '--help' for additional options and output filtering

——– General Statistics ————————————————–
[–] Skipped version check for MySQLTuner script
[OK] Currently running supported MySQL version 5.1.49-3
[OK] Operating on 64-bit architecture

——– Storage Engine Statistics ——————————————-
[–] Status: +Archive -BDB -Federated +InnoDB -ISAM -NDBCluster
[–] Data in MyISAM tables: 6G (Tables: 952)
[!!] InnoDB is enabled but isn’t being used
[!!] Total fragmented tables: 12

——– Security Recommendations ——————————————-
[OK] All database users have passwords assigned

——– Performance Metrics ————————————————-
[–] Up for: 1d 2h 3m 35s (68M q [732.193 qps], 610K conn, TX: 49B, RX: 11B)
[–] Reads / Writes: 76% / 24%
[–] Total buffers: 512.0M global + 2.8M per thread (2000 max threads)
[OK] Maximum possible memory usage: 6.0G (25% of installed RAM)
[OK] Slow queries: 0% (3K/68M)
[OK] Highest usage of available connections: 7% (159/2000)
[OK] Key buffer size / total MyISAM indexes: 230.0M/1.7G
[OK] Key buffer hit rate: 97.8% (11B cached / 257M reads)
[OK] Query cache efficiency: 76.6% (46M cached / 61M selects)
[!!] Query cache prunes per day: 1822075
[OK] Sorts requiring temporary tables: 0% (1K temp sorts / 2M sorts)
[!!] Joins performed without indexes: 63635
[OK] Temporary tables created on disk: 1% (26K on disk / 2M total)
[OK] Thread cache hit rate: 99% (159 created / 610K connections)
[!!] Table cache hit rate: 4% (1K open / 43K opened)
[OK] Open file limit used: 17% (2K/16K)
[OK] Table locks acquired immediately: 99% (36M immediate / 36M locks)

——– Recommendations —————————————————–
General recommendations:
Add skip-innodb to MySQL configuration to disable InnoDB
Run OPTIMIZE TABLE to defragment tables for better performance
Enable the slow query log to troubleshoot bad queries
Increasing the query_cache size over 128M may reduce performance
Adjust your join queries to always utilize indexes
Increase table_cache gradually to avoid file descriptor limits
Variables to adjust:
query_cache_size (> 256M) [see warning above] join_buffer_size (> 256.0K, or always use indexes with joins) table_cache (> 7200)

You see there are plenty of things, the script reports, for the unexperienced most of the information can be happily skipped without need to know the cryptic output, the section of importance here is Recommendations for some clarity, I’ve made this section to show up bold.

The most imporant things from the Recommendations script output is actually the lines who give suggestions for incrase of certain variables for MySQL.In this example case this are the last three variables:
query_cache_size,
join_buffer_size and
table_cache

All of these variables are tuned from /etc/mysql/my.cnf (on Debian) and derivatives distros and from /etc/my.cnf on RHEL, CentOS, Fedora and the other RPM based Linux distributions.

On some custom server installs my.cnf is also located in /usr/local/mysql/etc/ or some other a bit more unstandard location 😉

Anyways now having the Recommendation from the script, it’s necessery to edit my.cnf and try to double the values for the suggested variables.

First, I check if all the suggested variables are existent in my config with grep , if they’re not then I’ll simply add the variable with doubled size of the suggested values.
P.S: One note here is sometimes some values which are configured, are the default value for the MySQL server and does not have a record in my.cnf

debian:~# grep -E 'query_cache_size|join_buffer_size|table_cache' /etc/mysql/my.cnf table_cache = 7200
query_cache_size = 256M
join_buffer_size = 262144

All of my variables are in the config so, now edit my.cnf and set values to:
table_cache = 14400
query_cache_size = 512M
join_buffer_size = 524288

I always, however preserve the old variable’s value, because sometimes raising the value might create problem and the MySql server might be unable to restart properly.
Thus before going with adding the new values make sure the old ones are commented with # , e.g.:
#table_cache = 7200
#query_cache_size = 256M
#join_buffer_size = 262144

I would recommend vim as editor of choice while editing my.cnf as vim completely rox 😉 If you’re not acquainted to vim use nano or mcedit or your editor of choice 😉 :

debian:~# vim /etc/mysql/my.cnf
...

Assuming that the changes are made, it’s time to restart MySQL to make sure the new values are read by the SQL server.

debian:~# /etc/init.d/mysql restart
* Stopping MySQL database server mysqld [ OK ]
* Starting MySQL database server mysqld [ OK ]
Checking for tables which need an upgrade, are corrupt or were not closed cleanly.

If mysql server fails, however to restart, make sure immediately you reverse back the changed variables to the commented values and restart once again via mysql init script to make server load.

Afterwards start adding the values one by one until find out which one is causing the mysqld to fail.

Now the second script (Tuning-primer.sh) is also really nice for MySQL performance optimizations are necessery. However it’s less portable (as it’s written in bash scripting language).
Consider running this script among different GNU/Linux distributious (especially the newer ones) might produce errors.
Tuning-primer.sh requires some minor code changes to be able to run on FreeBSD, NetBSD and OpenBSD *nices.

The way Tuning-primer.sh works is precisely like mysqltuner.pl , one runs it it gives some info about current running MySQL server and based on certain factors gives suggestions on how increasing or decresing certain my.cnf variables could reduce sql query bottlenecks, solve table locking issues as well as generally improve INSERT, UPDATE query times.

Here is an example output from tuning-primer.sh run on another server:

server:~# wget https://www.pc-freak.net/files/Tuning-primer.sh
...
server:~# sh Tuning-primer.sh
-- MYSQL PERFORMANCE TUNING PRIMER --
- By: Matthew Montgomery -

MySQL Version 5.0.51a-24+lenny5 x86_64

Uptime = 8 days 10 hrs 19 min 8 sec
Avg. qps = 179
Total Questions = 130851322
Threads Connected = 1

Server has been running for over 48hrs.
It should be safe to follow these recommendations

To find out more information on how each of these
runtime variables effects performance visit:
http://dev.mysql.com/doc/refman/5.0/en/server-system-variables.html

SLOW QUERIES
Current long_query_time = 1 sec.
You have 16498 out of 130851322 that take longer than 1 sec. to complete
The slow query log is NOT enabled.
Your long_query_time seems to be fine

MAX CONNECTIONS
Current max_connections = 2000
Current threads_connected = 1
Historic max_used_connections = 85
The number of used connections is 4% of the configured maximum.
Your max_connections variable seems to be fine.

WORKER THREADS
Current thread_cache_size = 128
Current threads_cached = 84
Current threads_per_sec = 0
Historic threads_per_sec = 0
Your thread_cache_size is fine

MEMORY USAGE
Tuning-primer.sh: line 994: let: expression expected
Max Memory Ever Allocated : 741 M
Configured Max Memory Limit : 5049 M
Total System Memory : 23640 M

KEY BUFFER
Current MyISAM index space = 1646 M
Current key_buffer_size = 476 M
Key cache miss rate is 1 / 56
Key buffer fill ratio = 90.00 %
You could increase key_buffer_size
It is safe to raise this up to 1/4 of total system memory;
assuming this is a dedicated database server.

QUERY CACHE
Query cache is enabled
Current query_cache_size = 64 M
Current query_cache_used = 38 M
Current Query cache fill ratio = 59.90 %

SORT OPERATIONS
Current sort_buffer_size = 2 M
Current record/read_rnd_buffer_size = 256.00 K
Sort buffer seems to be fine

JOINS
Current join_buffer_size = 128.00 K
You have had 111560 queries where a join could not use an index properly
You have had 91 joins without keys that check for key usage after each row
You should enable “log-queries-not-using-indexes”
Then look for non indexed joins in the slow query log.
If you are unable to optimize your queries you may want to increase your
join_buffer_size to accommodate larger joins in one pass.

TABLE CACHE
Current table_cache value = 3600 tables
You have a total of 798 tables
You have 1904 open tables.
The table_cache value seems to be fine

TEMP TABLES
Current tmp_table_size = 128 M
1% of tmp tables created were disk based
Created disk tmp tables ratio seems fine

TABLE SCANS
Current read_buffer_size = 128.00 K
Current table scan ratio = 797 : 1
read_buffer_size seems to be fine

TABLE LOCKING
Current Lock Wait ratio = 1 : 1782
You may benefit from selective use of InnoDB.

As seen from script output, there are certain variables which might be increased a bit for better SQL performance, one such variable as suggested is key_buffer_size(You could increase key_buffer_size)

Now the steps to make the tunings to my.cnf are precisely the same as with mysqltuner.pl, e.g.:
1. Preserve old config variables which will be changed by commenting them
2. Double value of current variables in my.cnf suggested by script
3. Restart Mysql server via /etc/init.d/mysql restart cmd.
4. If mysql runs fine monitor mysql performance with mtop or mytop for at least 15 mins / half an hour.

if all is fine run once again the tuning scripts to see if there are no further improvement suggestions, if there are more follow the 4 steps described procedure once again.

It’s also a good idea that these scripts are periodically re-run on the server like once per few months as changes in SQL queries amounts and types will require changes in MySQL operational variables.
The authors of these nice scripts has done great job and have saved us a tons of nerves time, downtimes and money spend on meaningless hardware. So big thanks for the awesome scripts guys 😉
Finally after hopefully succesful deployment of changes, enjoy the incresed SQL server performance 😉

Script to Automatically change current MySQL server in wp-config.php to another MySQL host to minimize WordPress and Joomla downtimes

Friday, July 20th, 2012

I'm running a two servers for a couple of home hosted websites. One of the servers is serving as Apache host1 and has configured MySQL running on it and the second is used just for database host2 – (has another MySQL configured on it).
The MySQL servers are not configured to run as a MySQL MASTER and MySQL SLAVE (no mysql replication), however periodically (daily), I have a tiny shell script that is actualizing the data from the active SQL host2 server to host1.

Sometimes due to electricity problems or CPU overheats the active MySQL host at host2 gets stoned and stops working causing the 2 WordPress based websites and One joomla site inaccessible.
Until I manually get to the machine and restart host2 the 3 sites are down from the net and as you can imagine this has a very negative impact on the existing website indexing (PageRank) in Google.

When I'm at home, this is not a problem as I have physical access to the servers and if somethings gets messy I fix it quickly. The problem comes, whether I'm travelling or in another city far from home and there is no-one at home to give the hanged host hard reboot ….

Lately the problems with hang-ups of host2 happaned 3 times or so for 2 weeks, as a result the websites were inaccessible for hours and since there is nobody to reboot the server for hours; the websites keep hanging until the DB host is restarted ;;;;

To work-around this I came with the idea to write a tiny shell script to check if host2 is ping-able in order to assure the Database host is not down and then if script determines host2 (mysql) host is down it changes wp-config.php (set to use host2) to a wp-config.php (which I have beforehand configured to use) host1.

Using the script is a temporary solution, since I have to actually find the real hang-up causing troubles, but at least it saves me long downtimes. Here is a download link to the script I called change_blog_db.sh .
I've configured the script to be run on the Apache node (host1) via a crontab calling the script every 10 minutes, here is the crontab:
 

*/10 * * * * /usr/sbin/change_blog_db.sh > /dev/null 2>&1

The script is written in a way so if it determins host2 is reachable a copy of wp-config.php and Joomla's configuration.php tuned to use host2 is copied over the file config originals. In order to use the script one has to configured the head variables script section, e.g.:

host_to_ping='192.168.0.2';
blog_dir='/var/www/blog';
blog_dir2='/var/www/blog1';blog_dir3='/var/www/joomla';
notify_mail='hipo@www.pc-freak.net';
wp_config_orig='wp-config.php';
wp_config_localhost='wp-config-localhost.php';
wp_config_other_host='wp-config-192.168.0.2.php';
joomla_config_orig='configuration.php';
joomla_config_other_host='configuration-192.168.0.2.php';

You will have to manually prepare;;;

wp-config-localhost.php, wp-config-192.168.0.2.php ,configuration-192.168.0.2.php, wp-config-localhost.php to be existing files configured to with proper host1 and host2 IP addresses.
Hope the script will be useful to others, experiencing database downtimes with WordPress or Joomla installs.
 

Fixing QMAIL mail server SMTP auto-configure issues in Thunderbird and other mail IMAP / POP3 mobile clients

Friday, July 13th, 2012

One of the QMAIL mail servers, setup-uped on a Debian host has been creating some auto configuration issues. Every-time a new mail user tries to use the embedded Thunderbird client auto configuration, the auto config fails leaving the client unable to use his Mailbox through POP3 or IMAP protocols.

Since about 2 years Thunderbird and many other modern pop3 and imap mail desktop and mobile clients are by default using the auto configuration and hence it was unthinkable to manually change settings for new clients with the QMAIl install; Besides that most of the Office users are always confused, whether they have to manually change SMTP or POP3 host for a server.

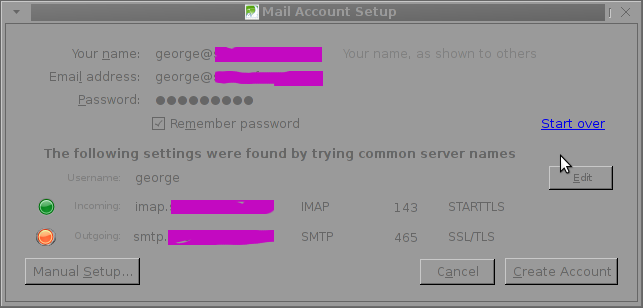
Below is a screenshot displaying the warning during email auto-configuration:

Thunderbird new Mail account setup auto config warning SMTP not OKThe orange color in the button for the newly auto-detected smtp.mail-domain.com indicates, something is not right with the SMTP host.
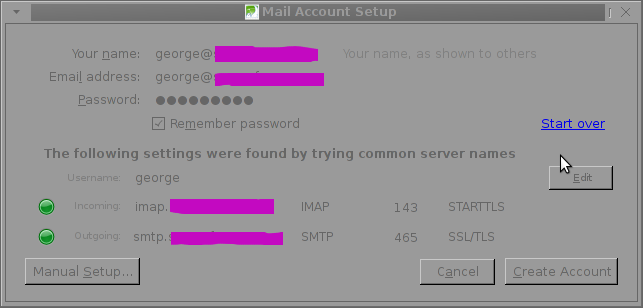
Obviously, something was wrong with smtp.mail-domain.com, hence I checked where smtp.mail.domain.com resolves with host command. What I found was actually smtp.mail-domain.com Active ( A ) DNS records was pointing to an IP address, our company previously used for the mail server. At present time the correct mail server host name is mx.mail-domain.com and the QMAIL installation on mx.soccerfame.com is configured to be the actual SMTP server.

By default Thunderbird and many other POP3, IMAP mail clients, however automatically assume the default SMTP host for a mail server is to be configured under a host name smtp.mail-domain.com. This is really strange, especially when the primary MX record for mail-domain.com domain is pointing to mx.mail-domain.com, e.g.:

qmail:~# host -t MX mail-domain.com
soccerfame.com mail is handled by 10 mx.mail-domain.com.
soccerfame.com mail is handled by 20 mail.mail-domain.com.
soccerfame.com mail is handled by 30 mail-domain.com.

The whole warning was caused due to the fact mx.mail-domain.com was resolving to an IP like xxx.xxx.xxx.xxx, whether smtp.mail-domain.com was resolving to yyy.yyy.yyy.yyy

Both xxx.xxx.xxx.xxx and yyy.yyy.yyy.yyy hosts were configured to have a different qmail SMTP host i.e.:

The server under IP xxx.xxx.xxx.xxx – (mx.mail-domain.com) was configured in /var/qmail/control/me to be mx.mail-domain.com and the other old one yyy.yyy.yyy.yyy – (mail.mail-domain.com) had (mail.mail-domain.com) in /var/qmail/control/me

As smtp.mail-domain.com was actually being still resolved to mail.mail-domain.com, the EMAILs were improperly trying to be sent with a configured DNS hostname of smtp.mail-domain.com, where the actual one on the server was mail.mail-domain

It took, me about an hour of pondering what is causing the oddities until I got the here explained issue. As the DNS recors for the domain the sample mail-domain.com were handled by Godaddy, to fix the mess, I logged in to Godaddy and;

a) deleted – DNS record for smtp.mail-domain.com.
b) Created new CNAME record for smtp.mail-domain.com to be a domain alias for mx.soccerfame.com

A few minutes, afterwards I tried configuring once again the same email account in Thunderbird and this time both imap.mail-domain.com and smtp.mail-domain.com turned green; indicating everything is configured fine.

To be 100% sure all is working fine I first fetched, all email via the IMAP protocol without hassles and onwards sent a test email to my Gmail account; thanksfully the sent email was delivered to Gmail indicating both Get Mail and Send Mail functions worked now fine.

Thunderbird icedove new mail account setup auto config Okay
 

How to Secure Apache on FreeBSD and CentOS against Range: header DoS attack (affecting Apache 1.3/2.x)

Thursday, June 30th, 2011

How to Secure Apache webserver on FreeBSD and CentOS against Range: header Denial of Service attack

Recently has become publicly known for the serious hole found in all Apache webserver versions 1.3.x and 2.0.x and 2.2.x. The info is to be found inside the security CVE-2011-3192 https://issues.apache.org/bugzilla/show_bug.cgi?id=51714

Apache remote denial of service is already publicly cirtuculating, since about a week and is probably to be used even more heavily in the 3 months to come. The exploit can be obtained from exploit-db.com a mirror copy of #Apache httpd Remote Denial of Service (memory exhaustion) is for download here

The DoS script is known in the wild under the name killapache.pl
killapache.pl PoC depends on perl ForkManager and thus in order to be properly run on FreeBSD, its necessery to install p5-Parallel-ForkManager bsd port :

freebsd# cd /usr/ports/devel/p5-Parallel-ForkManager
freebsd# make install && make install clean
...

Here is an example of the exploit running against an Apache webserver host.

freebsd# perl httpd_dos.pl www.targethost.com 50
host seems vuln
ATTACKING www.targethost.com [using 50 forks]
:pPpPpppPpPPppPpppPp
ATTACKING www.targethost.com [using 50 forks]
:pPpPpppPpPPppPpppPp
...

In about 30 seconds to 1 minute time the DoS attack with only 50 simultaneous connections is capable of overloading any vulnerable Apache server.

It causes the webserver to consume all the machine memory and memory swap and consequently makes the server to crash in most cases.
During the Denial of Service attack is in action access the websites hosted on the webserver becomes either hell slow or completely absent.

The DoS attack is quite a shock as it is based on an Apache range problem which started in year 2007.

Today, Debian has issued a new versions of Apache deb package for Debian 5 Lenny and Debian 6, the new packages are said to have fixed the issue.

I assume that Ubuntu and most of the rest Debian distrubtions will have the apache's range header DoS patched versions either today or in the coming few days.
Therefore work around the issue on debian based servers can easily be done with the usual apt-get update && apt-get upgrade

On other Linux systems as well as FreeBSD there are work arounds pointed out, which can be implemented to close temporary the Apache DoS hole.

1. Limiting large number of range requests

The first suggested solution is to limit the lenght of range header requests Apache can serve. To implement this work raround its necessery to put at the end of httpd.conf config:

# Drop the Range header when more than 5 ranges.
# CVE-2011-3192
SetEnvIf Range (?:,.*?){5,5} bad-range=1
RequestHeader unset Range env=bad-range
# We always drop Request-Range; as this is a legacy
# dating back to MSIE3 and Netscape 2 and 3.
RequestHeader unset Request-Range
# optional logging.
CustomLog logs/range-CVE-2011-3192.log common env=bad-range
CustomLog logs/range-CVE-2011-3192.log common env=bad-req-range

2. Reject Range requests for more than 5 ranges in Range: header

Once again to implement this work around paste in Apache config file:

This DoS solution is not recommended (in my view), as it uses mod_rewrite to implement th efix and might be additionally another open window for DoS attack as mod_rewrite is generally CPU consuming.

# Reject request when more than 5 ranges in the Range: header.
# CVE-2011-3192
#
RewriteEngine on
RewriteCond %{HTTP:range} !(bytes=[^,]+(,[^,]+){0,4}$|^$)
# RewriteCond %{HTTP:request-range} !(bytes=[^,]+(?:,[^,]+){0,4}$|^$)
RewriteRule .* - [F]

# We always drop Request-Range; as this is a legacy
# dating back to MSIE3 and Netscape 2 and 3.
RequestHeader unset Request-Range

3. Limit the size of Range request fields to few hundreds
To do so put in httpd.conf:

LimitRequestFieldSize 200

4. Dis-allow completely Range headers: via mod_headers Apache module

In httpd.conf put:

RequestHeader unset Range
RequestHeader unset Request-Range

This work around could create problems on some websites, which are made in a way that the Request-Range is used.

5. Deploy a tiny Apache module to count the number of Range Requests and drop connections in case of high number of Range: requests

This solution in my view is the best one, I've tested it and I can confirm on FreeBSD works like a charm.
To secure FreeBSD host Apache, against the Range Request: DoS using mod_rangecnt, one can literally follow the methodology explained in mod_rangecnt.c header:

freebsd# wget http://people.apache.org/~dirkx/mod_rangecnt.c
..
# compile the mod_rangecnt modulefreebsd# /usr/local/sbin/apxs -c mod_rangecnt.c
...
# install mod_rangecnt module to Apachefreebsd# /usr/local/sbin/apxs -i -a mod_rangecnt.la
...

Finally to load the newly installed mod_rangecnt, Apache restart is required:

freebsd# /usr/local/etc/rc.d/apache2 restart
...

I've tested the module on i386 FreeBSD install, so I can't confirm this steps works fine on 64 bit FreeBSD install, I would be glad if I can hear from someone if mod_rangecnt is properly compiled and installed fine also on 6 bit BSD arch.

Deploying the mod_rangecnt.c Range: Header to prevent against the Apache DoS on 64 bit x86_amd64 CentOS 5.6 Final is also done without any pitfalls.

[root@centos ~]# uname -a;
Linux centos 2.6.18-194.11.3.el5 #1 SMP Mon Aug 30 16:19:16 EDT 2010 x86_64 x86_64 x86_64 GNU/Linux
[root@centos ~]# /usr/sbin/apxs -c mod_rangecnt.c
...
/usr/lib64/apr-1/build/libtool --silent --mode=link gcc -o mod_rangecnt.la -rpath /usr/lib64/httpd/modules -module -avoid-version mod_rangecnt.lo
[root@centos ~]# /usr/sbin/apxs -i -a mod_rangecnt.la
...
Libraries have been installed in: /usr/lib64/httpd/modules
...
[root@centos ~]# /etc/init.d/httpd configtest
Syntax OK
[root@centos ~]# /etc/init.d/httpd restart
Stopping httpd: [ OK ]
Starting httpd: [ OK ]

After applying the mod_rangecnt patch if all is fine the memory exhaustion perl DoS script's output should be like so:

freebsd# perl httpd_dos.pl www.patched-apache-host.com 50
Host does not seem vulnerable

All of the above pointed work-arounds are only a temporary solution to these Grave Apache DoS byterange vulnerability , a few days after the original vulnerability emerged and some of the up-pointed work arounds were pointed. There was information, that still, there are ways that the vulnerability can be exploited.
Hopefully in the coming few weeks Apache dev team should be ready with rock solid work around to the severe problem.

In 2 years duration these is the second serious Apache Denial of Service vulnerability after before a one and a half year the so called Slowloris Denial of Service attack was capable to DoS most of the Apache installations on the Net.

Slowloris, has never received the publicity of the Range Header DoS as it was not that critical as the mod_range, however this is a good indicator that the code quality of Apache is slowly decreasing and might need a serious security evaluation.
 

How to debug mod_rewrite .htaccess problems with RewriteLog / Solve mod_rewrite broken redirects

Friday, September 30th, 2011

Its common thing that CMS systems and many developers custom .htaccess cause issues where websites depending on mod_rewrite fails to work properly. Most common issues are broken redirects or mod_rewrite rules, which behave differently among the different mod_rewrite versions which comes with different versions of Apache.

Everytime there are such problems its necessery that mod_rewrite’s RewriteLog functionality is used.
Even though the RewriteLog mod_rewrite config variable is well described on httpd.apache.org , I decided to drop a little post here as I’m pretty sure many novice admins might not know about RewriteLog config var and might benefit of this small article.
Enabling mod_rewrite requests logging of requests to the webserver and process via mod_rewrite rules is being done either via the specific website .htaccess (located in the site’s root directory) or via httpd.conf, apache2.conf etc. depending on the Linux / BSD linux distribution Apache config file naming is used.

To enable RewriteLog near the end of the Apache configuration file its necessery to place the variables in apache conf:

1. Edit RewriteLog and place following variables:

RewriteLogLevel 9
RewriteLog /var/log/rewrite.log

RewriteLogLevel does define the level of logging that should get logged in /var/log/rewrite.log
The higher the RewriteLogLevel number defined the more debugging related to mod_rewrite requests processing gets logged.
RewriteLogLevel 9 is actually the highest loglevel that can be. Setting the RewriteLogLevel to 0 will instruct mod_rewrite to stop logging. In many cases a RewriteLogLevel of 3 is also enough to debug most of the redirect issues, however I prefer to see more, so almost always I use RewriteLogLevel of 9.

2. Create /var/log/rewrite.log and set writtable permissions

a. Create /var/log/rewrite.log

freebsd# touch /var/log/rewrite.log

b. Set writtable permissons

Either chown the file to the user with which the Apache server is running, or chmod it to permissions of 777.

On FreeBSD, chown permissions to allow webserver to write in file, should be:

freebsd# chown www:www /var/log/rewrite.log

On Debian and alike distros:

debian:~# chown www-data:www-data /var/log/rewrite.log

On CentOS, Fedora etc.:

[root@centos ~]# chown httpd:httpd /var/log/rewrite.log

On any other distribution, you don’t want to bother to check the uid:gid, the permissions can be set with chmod 777, e.g.:

linux# chmod 777 /var/log/rewrite.log

Next after RewriteLog is in conf to make configs active the usual webserver restart is required.

To restart Apache On FreeBSD:

freebsd# /usr/local/etc/rc.d/apache2 restart
...

To restart Apache on Debian and derivatives:

debian:~# /etc/init.d/apache2 restart
...

On Fedora and derivive distros:

[root@fedora ~]# /etc/init.d/httpd restart
...

Its common error to forget to set proper permissions to /var/log/rewrite.log this has puzzled me many times, when enabling RewriteLog’s logging.

Another important note is when debugging for mod_rewrite is enabled, one forgets to disable logging and after a while if the /var/log partition is placed on a small partition or is on an old server with less space often the RewriteLog fills in the disk quickly and might create website downtimes. Hence always make sure RewriteLog is disabled after work rewrite debugging is no longer needed.

The way I use to disable it is by commenting it in conf like so:

#RewriteLogLevel 9
#RewriteLog /var/log/rewrite.log

Finally to check, what the mod_rewrite processor is doing on the fly its handy to use the well known tail -f

linux# tail -f /var/log/rewrite.log

A bunch of time in watching the requests, should be enough to point to the exact problem causing broken redirects or general website malfunction.
Cheers 😉