Posts Tagged ‘config’

How to list enabled VirtualHosts in Apache on GNU / Linux and FreeBSD

Thursday, December 8th, 2011

How Apache process vhost requests picture, how to list Apache virtualhosts on Linux and FreeBSD

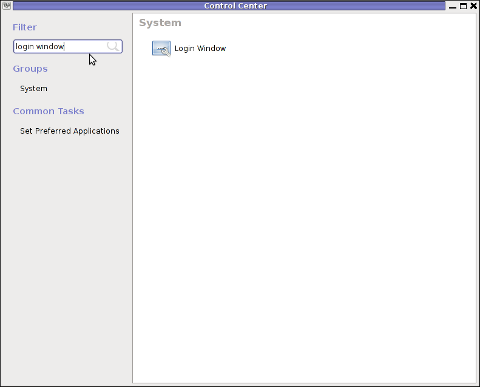
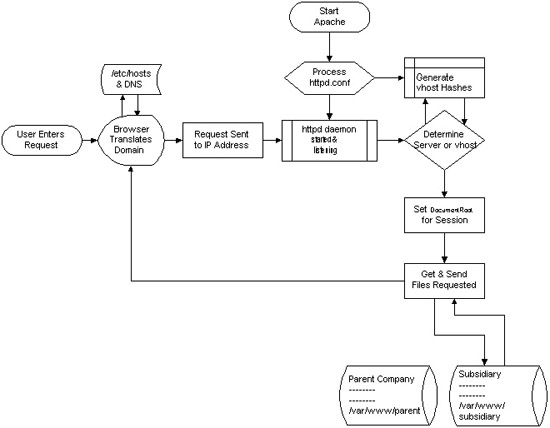
I decided to start this post with this picture I found on onlamp.com article called “Simplify Your Life with Apache VirtualHosts .I put it here because I thing it illustrates quite well Apache’s webserver internal processes. The picture gives also a good clue when Virtual Hosts gets loaded, anways I’ll go back to the main topic of this article, hoping the above picture gives some more insight on how Apache works.;
Here is how to list all the enabled virtualhosts in Apache on Debian GNU / Linux serving pages:

server:~# /usr/sbin/ apache2ctl -S
VirtualHost configuration:
wildcard NameVirtualHosts and _default_ servers:
*:* is a NameVirtualHost
default server exampleserver1.com (/etc/apache2/sites-enabled/000-default:2)
port * namevhost exampleserver2.com (/etc/apache2/sites-enabled/000-default
port * namevhost exampleserver3.com (/etc/apache2/sites-enabled/exampleserver3.com:1)
port * namevhost exampleserver4.com (/etc/apache2/sites-enabled/exampleserver4.com:1)
...
Syntax OK

The line *:* is a NameVirtualHost, means the Apache VirtualHosts module will be able to use Virtualhosts listening on any IP address (configured on the host), on any port configured for the respective Virtualhost to listen on.

The next output line:
port * namevhost exampleserver2.com (/etc/apache2/sites-enabled/000-default Shows requests to the domain on any port will be accepted (port *) by the webserver as well as indicates the <VirtualHost> in the file /etc/apache2/sites-enabled/000-default:2 is defined on line 2 (e.g. :2).

To see the same all enabled VirtualHosts on FreeBSD the command to be issued is:

freebsd# pcfreak# /usr/local/sbin/httpd -S VirtualHost configuration:
wildcard NameVirtualHosts and _default_ servers:
*:80 is a NameVirtualHost
default server www.pc-freak.net (/usr/local/etc/apache2/httpd.conf:1218)
port 80 namevhost www.pc-freak.net (/usr/local/etc/apache2/httpd.conf:1218)
port 80 namevhost pcfreak.afraid.org (/usr/local/etc/apache2/httpd.conf:1353)
...
Syntax OK

On Fedora and the other Redhat Linux distributions, the apache2ctl -S should be displaying the enabled Virtualhosts.

One might wonder, what might be the reason for someone to want to check the VirtualHosts which are loaded by the Apache server, since this could be also checked if one reviews Apache / Apache2’s config file. Well the main advantage is that checking directly into the file might sometimes take more time, especially if the file contains thousands of similar named virtual host domains. Another time using the -S option is better would be if some enabled VirtualHost in a config file seems to not be accessible. Checking directly if Apache has properly loaded the VirtualHost directives ensures, there is no problem with loading the VirtualHost. Another scenario is if there are multiple Apache config files / installs located on the system and you’re unsure which one to check for the exact list of Virtual domains loaded.

Possible way to Improve wordpress performance with wp-config.php 4 config variables

Tuesday, March 6th, 2012

Wordpress improve performance wp-config.php logo chromium effect GIMP

Nowdays WordPress is ran by million of blogs and websites all around the net. I myself run wordpress for this blog in general wordpress behaves quite well in terms of performance. However as with time the visitors tend to increase, on frequently updated websites or blogs. As a consequence, the blog / website performance slowly starts to decrease as result of the MySQL server read / write operations creating I/O and CPU load overheads. Buying a new hardware and migrating the wordpress database is a possible solution, however for many small or middle size wordpress blogs en sites like mine this is not easy task. Getting a dedicated server or simply upgrading your home server hardware is expensive and time consuming process… In my efforts to maximize my hardware utilization and increase my blog decaying performance I've stumbled on the article Optimize WordPress performance with wp-config.php

According to the article there are 4 simple wp-config.php config directvies useful in decreasing a lot of queries to the MySQL server issued with each blog visitor.

define('WP_HOME','http://www.yourblog-or-siteurl.com');
define('WP_SITEURL','http://www.yourblog-or-siteurl.com');
define('TEMPLATEPATH', '/var/www/blog/wp-content/themes/default');
define('STYLESHEETPATH', '/var/www/blog/wp-content/themes/default');

1. WP_HOME and WP_SITEURL wp-config.php directvies

The WP_HOME and WP_SITEURL variables are used to hard-code the address of the wordpress blog or site url, so wordpress doesn't have to check everytime in the database on every user request to know it is own URL address.

2. TEMPLATEPATH and TEMPLATEPATH wp variables

This variables will surely improve performance to Wodpress blogs which doesn't implement caching. On wp install with enabled caching plugins like WordPress Super Cache, Hyper Cache or WordPress Db Cache is used, I don't know if this variables will have performance impact …

So far I have tested the vars on a couple of wordpress based installs with caching enabled and even on them it seems the pages load faster than before, but I cannot say this for sure as I did not check the site loading time in advance before hardcoding the vars.

Anyways even if the suggested variables couldn't make positive impact on performance, having the four variables in wp-config.php is a good practice for blogs or websites which are looking for extra clarity.
For multiple wordpress installations living on the same server, having defined the 4 vars in different wordpress seems like a good idea too.

How to disable nginx static requests access.log logging

Monday, March 5th, 2012

NGINX logo Static Content Serving Stop logging

One of the companies, where I'm employed runs nginx as a CDN (Content Delivery Network) server.
Actually nginx, today has become like a standard for delivering tremendous amounts of static content to clients.
The nginx, server load has recently increased with the number of requests, we have much more site visitors now.
Just recently I've noticed the log files are growing to enormous sizes and in reality this log files are not used at all.
As I've used disabling of web server logging as a way to improve Apache server performance in past time, I thought of implying the same little "trick" to improve the hardware utilization on the nginx server as well.

To disable logging, I proceeded and edit the /usr/local/nginx/conf/nginx.conf file, commenting inside every occurance of:

access_log /usr/local/nginx/logs/access.log main;

to

#access_log /usr/local/nginx/logs/access.log main;

Next, to load the new nginx.conf settings I did a restart:

nginx:~# killall -9 nginx; sleep 1; /etc/init.d/nginx start

I expected, this should be enough to disable completely access.log, browser request logins. Unfortunately /usr/local/nginx/logs/access.log was still displaying growing with:

nginx:~# tail -f /usr/local/nginx/logs/access.log

After a bit thorough reading of nginx.conf config rules, I've noticed there is a config directive:

access_log off;

Therefore to succesfully disable logging I had to edit config occurance of:

access_log /usr/local/nginx/logs/access.log main

to

After a bit thorough reading of nginx.conf config rules, I've noticed there is a config directive:

access_log off;

Therefore to succesfully disable logging I had to edit config occurance of:

access_log /usr/local/nginx/logs/access.log main

to

access_log /usr/local/nginx/logs/access.log main
access_log off;

Finally to load the new settings, which thanksfully this time worked, I did nginx restart:

nginx:~# killall -9 nginx; sleep 1; /etc/init.d/nginx start

And hooray! Thanks God, now nginx logging is disabled!

As a result, as expected the load avarage on the server reduced a bit 🙂

Fix of “Unable to allocate memory for pool.” PHP error messages

Saturday, October 15th, 2011

Since some time, I don’t know exactly where, after some updates of my WordPress running on a small server with FreeBSD 7.2. I’ve started getting a lot of Apache crashes. Often the wordpress scripts stopped working completely and I got only empty pages when trying to process the wordpress blog in a browser.

After a bunch of reading online, I’ve figured out that the cause might be PHP APC stands for Alternative PHP Cache .

I was not sure if the PHP running on the server had an APC configured at all so I used a phpinfo(); script to figure out if I had it loaded. I saw the APC among the loaded to show off in the list of loaded php modules, so this further led me to the idea the APC could be really causing the unexpected troubles.

Thus first I decided to disable the APC on a Virtualhost level for the domain where the crashing wordpress was hosted, to do I placed in the VirtualHost section in the Apache configuration /usr/local/etc/apache2/httpd.conf the following config directive:

php_flag apc.cache_by_default Off

These get me rid of the multiple errors:

PHP Warning: require_once() [function.require-once]: Unable to allocate memory for pool. in /usr/local/www/data-dist/blog/wp-content/plugins/tweet-old-post/top-admin.php on line 6

which constantly were re-occuring in php_error.log:

Further after evaluating all the websites hosted on the server and making sure none of which was really depending on APC , I’ve disabled the APC completely for PHP. To do so I issued:

echo 'apc.enabled = 0' >> /usr/local/etc/php.ini

Similarly on GNU/Linux to disable globally APC from PHP only the correct location to php.ini should be provided on Debian this is /etc/php5/apache2/php.ini .

How to make wordpress Update Plugins prompt to permanently store password / Get rid of annoying updates wordpress prompt

Thursday, February 2nd, 2012

I'm managing few wordpress installations which requires me to type in:
Hostname , FTP Username and FTP Password , every single time a plugin update is issued and I want to upgrade to the new version.
Below is a screenshot of this annoying behaviour:

How to get rid of update plugins wordpress username password prompt

As you can see in the above screenshot, there is no way through Update Plugins web interface to store the password permanently. Hence the only option to store it permanently is to manually edit wp-config.php (file located in wordpress docroot, e.g. /path/to/wordpress/wp-config.php , inside the file find the line:

define ('WPLANG', '');

Right after it put a code similar to:

define('FS_METHOD', 'ftpsockets');
define('FTP_BASE', '/path/to/wordpress/');
define('FTP_CONTENT_DIR', '/path/to/wordpress/wp-content/');
define('FTP_PLUGIN_DIR ', '/path/to/wordpress/wp-content/plugins/');
define('FTP_USER', 'Username');
define('FTP_PASS', 'Password');
define('FTP_HOST', 'localhost');

Change the above defines:
path/to/wordpress/ – with your wordpress location directory.
Username and Password – with your respective FTP username and password. The localhost

That's all, from now onwards the User/Password prompt will not appear anymore. Consider there is a security downside of storing the FTP User/Pass in wp-config.php , if someone is able to intrude the wordpress install and access the documentroot of the wordpress install he we'll be able to obtain the ftp user/pass and log in the server directly via FTP protocol.

How to fix “imapd-ssl: Maximum connection limit reached for ::ffff:xxx.xxx.xxx.xxx” imapd-ssl error

Saturday, May 28th, 2011

One of the mail server clients is running into issues with secured SSL IMAP connections ( he has to use a multiple email accounts on the same computer).
I was informed that part of the email addresses are working correctly, however the newly created ones were failing to authenticate even though all the Outlook Express email configuration was correct as well as the username and password typed in were a real existing credentials on the vpopmail server.

Initially I thought, something is wrong with his newly configured emails but it seems all the settings were perfectly correct!

After a lot of wondering what might be wrong I was dumb enough not to check my imap log files.

After checking in my /var/log/mail.log which is the default log file I’ve configured for vpopmail and some of my qmail server services, I found the following error repeating again and again:

imapd-ssl: Maximum connection limit reached for ::ffff:xxx.xxx.xxx.xxx" imapd-ssl error

where xxx.xxx.xxx.xxx was the email user computer IP address.

This issues was caused by one of my configuration settings in the imapd-ssl and imap config file:

/usr/lib/courier-imap/etc/imapd

In /usr/lib/courier-imap/etc/imapd there is a config segment called
Maximum number of connections to accept from the same IP address

Right below this commented text is the variable:

MAXPERIP=4

As you can see it seems I used some very low value for the maximum number of connections from one and the same IP address.
I suppose my logic to set such a low value was my desire to protect the IMAP server from Denial of Service attacks, however 4 is really too low and causes problem, thus to solve the mail connection issues for the user I raised the MAXPERIP value to 50:

MAXPERIP=50

Now to force the new imapd and imapd-ssl services to reload it’s config I did a restart of the courier-imap, like so:

debian:~# /etc/init.d/courier-imap restart

That’s all now the error is gone and the client could easily configure up to 50 mailbox accounts on his PC 🙂

Fix audioCD play problems with VLC on GNU Linux

Monday, January 23rd, 2012

I've not played audio CD for ages. Anyways I had to set up one computer with Linux just recently and one of the requirements was to be able to play audiocds.
I was surprised that actually a was having issue with such as simple tasks.
Here is how i come with this article.

If you encounter errors playing Audio CDs on any Linux distro in VLC or other players, you might need to apply the following fix.

root@xubuntu-desktop:~# apt-get install xubuntu-restricted-extras
...
root@xubuntu-desktop:~# apt-get install ubuntu-restricted-extras
...

I'm not sure if this packages are required, anyways having them installed is a good idea especially on computers which will have to support as much multimedia as possible.

Trying to play a CD with VLC the result was not nice, you see in the picture above the error that poped up while trying it with VLC:

Due to wrong configuration of the play device VLC will be looking to read the audio cd from.

To succesfully play the audiocd invoke VLC command with a cdda///dev/sr0 argument like so:

hipo@xubuntu-desktop:~$ vlc cdda:///dev/sr0
...

To permanently fix the error you will have to edit ~/.config/vlc/vlcrc :

Inside ~/.config/vlc/vlcrc find the lines:

dvd=/dev/cdrom

Substitute the above line with:

dvd=/dev/sr0

Next find the line:

vcd=/dev/cdrom

Change the above line with:

vcd=/dev/sr0
Due to a bug in generating vlcrc , the dvd= might be set also to other messy unreadable characters (different from /dev/cdrom). This can also be the reason why it fails to properly read the disc.

If dvd= and vcd is set to a different unreadable characters delete them and substitute with /dev/sr0 .I've experienced this on Xubuntu Linux with a Bulgarian localization (probably the bug can be seen in other Linuxes when GNOME is installed in Russian, Chineese and other UTF-8 languages.

The strange error can be observed also in other players when the localization is set to someone's native language …
Alternative solution is to install and use rhythmbox instead of VLC.
Other program to play audio CDs called workman , you will have to get used to the interface which uses gtk1 and therefore obsolete. Putting aside the ugly interface it works 😉

Install jwchat web chat jabber interface to work with Debian ejabberd jabber server

Wednesday, January 4th, 2012

JWChat ejabber jabber Ajax / HTML based client logo
 

I have recently blogged how I've installed & configured ejabberd (jabber server) on Debian .
Today I decided to further extend, my previous jabberd installation by installing JWChat a web chat interface frontend to ejabberd (a good substitute for a desktop app like pidgin which allows you to access a jabber server from anywhere)

Anyways for a base of installing JWChat , I used the previously installed debian deb version of ejabberd from the repositories.

I had a lot of troubles until I actually make it work because of some very minor mistakes in following the official described tutorial ejabberd website jwchat install tutorual

The only way I can make jwchat work was by using the install jwchat with ejabberd's HTTP-Bind and file server method

Actually for quite a long time I was not realizing that, there are two ways to install JWChat , so by mistake I was trying to mix up some install instructions from both jwchat HTTP-Bind file server method and JWchat Apache install method

I've seen many people complaining on the page of Install JWChat using Apache method which seemed to be experiencing a lot of strangle troubles just like the mines when I mixed up the jwchat php scripts install using instructions from both install methods. Therefore my guess is people who had troubles in installing using the Apache method and got the blank page issues while accessing http://jabber.servername.com:5280/http-poll/ as well as various XML Parsing Error: no element found errors on – http://ejabberd.oac.com:5280/http-poll/ is most probably caused by the same install instructions trap I was diluted in.

The steps to make JWChat install using the HTTP-Bind and file server method, if followed should be followed absolutely precisely or otherwise THEY WILL NOT WORK!!!

This are the exact steps I followed to make ejabberd work using the HTTP-Bind file server method :

1. Create directory to store the jwchat Ajax / htmls

debian:~# mkdir /var/lib/ejabberd/www
debian:~# chmod +x /var/lib/ejabberd
debian:~# chmod +x /var/lib/ejabberd/www

2. Modify /etc/ejabberd/ejabberd.cfg and include the following configs

While editting the conf find the section:

{listen,
[


Scrolling down you will fine some commented code marked with %% that will read:

{5269, ejabberd_s2s_in, [
{shaper, s2s_shaper},
{max_stanza_size, 131072}
]},

Right after it leave one new line and place the code:

{5280, ejabberd_http, [
{request_handlers, [
{["web"], mod_http_fileserver}
]},

http_bind,
http_poll,
web_admin
]}
]}.

Scrolling a bit down the file, there is a section which says:

%%% =======
%%% MODULES

%%
%% Modules enabled in all ejabberd virtual hosts.
%%

The section below the comments will look like so:

{modules, [ {mod_adhoc, []},
{mod_announce, [{access, announce}]}, % requires mod_adhoc
{mod_caps, []},
{mod_configure,[]}, % requires mod_adhoc
{mod_ctlextra, []},
{mod_disco, []},
%%{mod_echo, [{host, "echo.localhost"}]},
{mod_irc, []},
{mod_last, []},

After the {mod_last, … the following lines should be added:

{mod_http_bind, []},
{mod_http_fileserver, [
{docroot, "/var/lib/ejabberd/www"},
{accesslog, "/var/log/ejabberd/webaccess.log"}
]},

3. Download and extract latest version of jwchat

Of the time of writting the latest version of jwchat is jwchat-1.0 I have mirrored it on pc-freak for convenience:

debian:~# wget https://www.pc-freak.net/files/jwchat-1.0.tar.gz
….

debian:~# cd /var/lib/ejabberd/www
debian:/var/lib/ejabberd/www# tar -xzvf jwchat-1.0.tar.gz
...
debian:/var/lib/ejabberd/www# mv jwchat-1.0 jwchat
debian:/var/lib/ejabberd/www# cd jwchat

4. Choose the language in which you will prefer jwchat web interface to appear

I prefer english as most people would I suppose:

debian:/var/lib/ejabberd/www/jwchat# for a in $(ls *.en); do b=${a%.en}; cp $a $b; done

For other languages change in the small one liner shell script b=${a%.en} (en) to whatever language you will prefer to make primary.After selecting the correct langauge a rm cmd should be issued to get rid of the .js.* and .html.* in other language files which are no longer needed:

debian:/var/lib/ejabberd/www/jwchat# rm *.html.* *.js.*

5. Configure JWChat config.js

Edit /var/lib/ejabberd/www/jwchat/config.js , its necessery to have inside code definitions like:

/* If your Jabber server is jabber.example.org, set this: */
var SITENAME = "jabber.example.org";

/* If HTTP-Bind works correctly, you may want do remove HTTP-Poll here */
var BACKENDS =
[
{
name:"Native Binding",
description:"Ejabberd's native HTTP Binding backend",
httpbase:"/http-bind/",
type:"binding",
servers_allowed:[SITENAME]
}
];

6. Restart EJabberd server to load the new config settings

debian:~# /etc/init.d/ejabberd restart
Restarting jabber server: ejabberd..

7. Test JWChat HTTP-Bind and file server backend

I used elinksand my beloved Epiphany (default gnome browser) which by the way is the browser I use daily to test that the JWChat works fine with the ejabberd.
To test the newly installed HTTP-Bind ejabberd server backend on port 5280 I used URL:

http://jabber.mydomain.com:5280/web/jwchat/I had quite a struggles with 404 not found errors, which I couldn't explain for half an hour. After a thorough examination, I've figured out the reasons for the 404 errors was my stupidity …
The URL http://jabber.mydomain.com:5280/web/jwchat/ was incorrect because I fogrot to move jwchat-1.0 to jwchat e.g. (mv jwchat-1.0 jwchat) earlier explained in that article was a step I missed. Hence to access the web interface of the ejabberd without the 404 error I had to access it via:

http://jabber.mydomain.com:5280/web/jwchat-1.0

JWChat Ejabber webchat Epiphany Linux screenshot

Finally it is handy to add a small index.php redirect to redirect to http://jabber.mydomain.com:5280/web/jwchat-1.0/

The php should like so:


<?
php
header( 'Location: http://jabber.mydomain.com:5280/web/jwchat-1.0' ) ;
?>