Posts Tagged ‘Install’

How to update macos from terminal / Check and update remotely Mac OS X software from console

Friday, October 23rd, 2015

../files/how-to-update-mac-osx-notebook-from-terminalsoftware-update-command-line-mac-screnshot-1

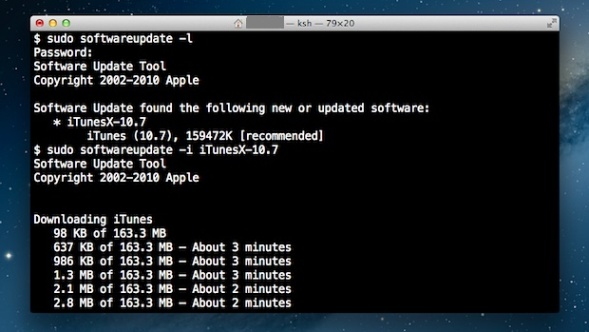
If you happen to have to deal with Mac OS X (Apple) notebook or Desktop PC (Hackintosh) etc. and you’re sysadmin or console freak being pissed off Mac’s GUI App Store update interface and you want to “keep it simple stupid” (KISS) in an Debian Linux like apt-get manner then you can also use Mac’s console application (cli) terminal to do the updates manually from command line with:

softwareupdate

command.

how-to-update-mac-osx-notebook-from-terminalsoftware-update-command-line-mac-screnshot

To get help about softwareupdate pass it on the -h flag:

softwareupdate -h

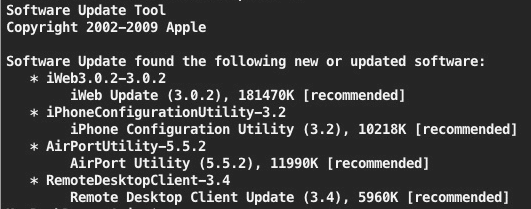
1. Get a list of available Mac OS updates

Though not a very likely scenario of course before installing it is always a wise thing to see what is being updated to make sure you will not upgrade something that you don’t want to.
This is done with:

softwareupdate -l

However in most cases you can simply skip this step as updating directly every package installed on the Mac with a new version from Apple will not affect your PC.
Anyways it is always a good idea to keep a backup image of your OS before proceeding with updates with let’s say Time Machine Mac OS backup app.

2. Install only recommended Updates from Apple store

softwareupdate -irv


Above will download all updates that are critical and thus a must to have in order to keep Mac OS security adequate.
Translated into Debian / Ubuntu Linux language, the command does pretty much the same as Linux’s:

apt-get –yes update

3. Install All Updates available from AppleStore

To install absolutely all updates provided by Apple’s package repositories run:

softwareupdate -iva

One note to make here is that always when you keep updating make sure your notebook is switched on to electricity grid otherwise if due to battery discharge it shutoffs during update your Mac will crash in a very crappy hard to recover state that might even cost you a complete re-install or a need to bring a PC to a Mac Store technical support guy so beware, you’re warned!

4. Installing all updates except Specific Softwares from Terminal

Often if you have a cracked software or a software whose GUI interface changed too much and you don’t want to upgrade it but an update is offered by Apple repos you can add the -i ingnore option:

softwareupdate -i [update_name(s)]

For example:

softwareupdate -i Safari-version-XXXX

5. View Mac OS Software Update History

The quickest way to see the update history is with System Information app, e.g.:

/Applications/Utilities/System Information.app

How to install VirtualBox Virtual Machine to run Windows XP on Ubuntu Linux (11.10)

Tuesday, January 17th, 2012

Enable_VirtualBox_Windows_XP-fullscreen-with-vboxguest-additions-iso
My beloved sister was complaining games were failing to properly be played with wine emulator , therefore I decided to be kind and help her by installing a Windows XP to run inside a Virtual Machine.My previous install experiments with running MS Windows XP on Linux was on Debian using QEMU virtualmachine emulator.
However as Qemu is a bit less interactive and slower virtualmachine for running Windows (though I prefer it for being completely free software), this time I decided to install the Windows OS with Virtualbox.

My hope was using VirtualBox would be a way easier but I was wrong… I've faced few troubles and I thought many people who initially try to install Virtualbox VM to run Windows on Ubuntu and other Debian based Linux distros will probably experience the same problems as mine, so here is how this article was born.

Here is what I did to have a VirtualBox OS emulator to run Windows XP SP2 on Ubuntu 11.10 Linux

1. Install Virtualbox required packages with apt

root@ubuntu:~# apt-get install virtualbox virtualbox-dkms virtualbox-guest-dkms root@ubuntu:~# apt-get install virtualbox-ose-dkms virtualbox-guest-utils virtualbox-guest-x11
...

If you prefer more GUI or lazy to type commands, the Software Package Manager can also be used to straight install the same packages.
virtualbox-dkms virtualbox-guest-dkms packages are the two which are absolutely necessery in order to enable VirtualBox to support installing Microsoft Windows XP. DKMS modules are also necessery to be able to emulate some other proprietary (non-free) operating systems.
The DKMS packages provide a source for building Vbox guest (OS) additional kernel modules. They also require the kernel source to be install otherwise they fail to compile.

Failing to build the DKMS modules will give you error every time you try to create new VirtualMachine container for installing a fresh Windows XP.
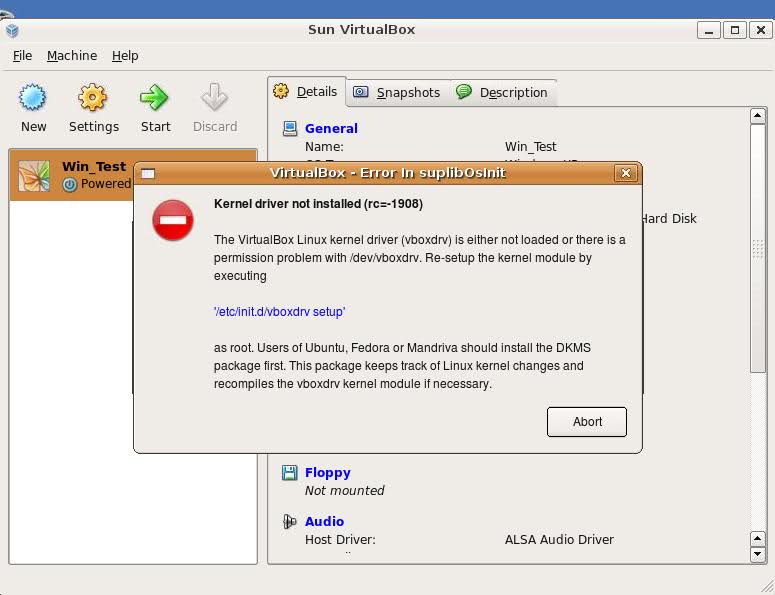
The error happens if the two packages do not properly build the vboxdrv extra Vbox kernel module while the Windows XP installer is loaded from a CD or ISO. The error to pop up is:

Kernel driver not installed (rc=-1908)

The VirtualBox Linux kernel driver (vboxdrv) is either not loaded or there is a permission problem with /dev/vboxdrv. Please reinstall the kernel module by executing

VirtualBox vboxdrv not loaded error Ubuntu Screen

To fix the error:

2. Install latest Kernel source that corresponds to your current kernel version

root@ubuntu:~# apt-get install linux-headers-`uname -r`
...

Next its necessery to rebuild the DKMS modules using dpkg-reconfigure:

3. Rebuild VirtualBox DKMS deb packages

root@ubuntu:~# dpkg-reconfigure virtualbox-dkms
...
root@ubuntu:~# dpkg-reconfigure virtualbox-guest-dkms
...
root@ubuntu:~# dpkg-reconfigure virtualbox-ose-dkms
...

Hopefully the copilation of vboxdrv kernel module should complete succesfully.
To test if all is fine just load the module:

4. Load vboxdrv virtualbox kernel module

root@ubuntu:~# modprobe vboxdrv
root@ubuntu:~#

If you get some error during loading, this means vboxdrv failed to properly compile, try read thoroughfully what the error is and fix it) ;).

As a next step the vboxdrv has to be set to load on every system boot.

5. Set vboxdrv to load on every Ubuntu boot

root@ubuntu:~# echo 'vboxdrv' >> /etc/modules

I am not sure if this step is required, it could be /etc/init.d/virtualbox init script automatically loads the module, anyways putting it to load on boot would do no harm, so better do it.

That's all now, you can launch VirtualBox and use the New button to initiate a new Virtual Machine, I will skip explaining how to do the configurations for a Windows XP as most of the configurations offered by default would simply work without any tampering.

After booting the Windows XP installer I simply followed the usual steps to install Windows and all went smoothly.
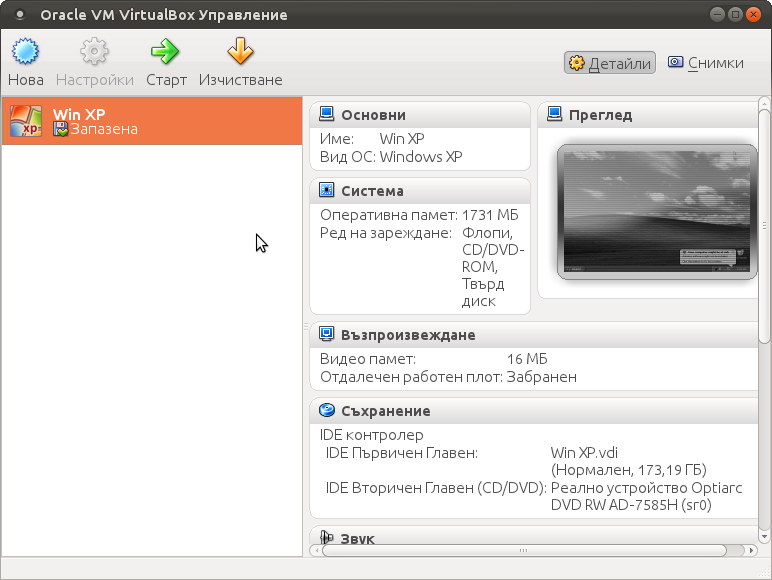
Below you see a screenshot showing the installed Windows XP Virtualbox saved VM session. The screenshot letters are in Bulgarian as my sisters default lanaguage for Ubuntu is bulgarian 😉

VirtualBox installed MS Windows VM screenshot

I hope this article helps someone out there. Please drop me a comment if you experience any troubles with it. Cya 🙂

How to enable VirtualBox Windows XP FullScreen with VboxGuestAdditions.iso on Ubuntu 11.10 Linux

Tuesday, January 17th, 2012

Enable_VirtualBox_Windows_XP-fullscreen-with-vboxguest-additions-iso
Right after installing Windows XP inside VirtualBox, I've found out everything works fine except the screen. Even though pressing (Right CTRL + F) was changing the Windows XP running window to FullScreen the XP screen was taking only a part of the whole screen area, where almost half of the screen was visible as simply staying blank.

A bit of research and I found the issue is caused by missing VirtualBoxGuestAdditions .

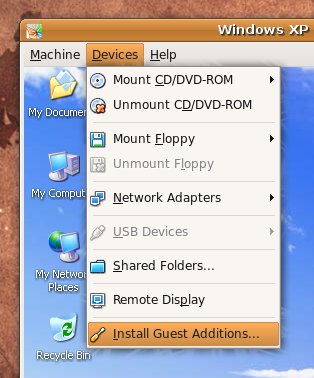
VBoxAdditions is a package which should be installed inside the VirtualBox by navigating to Devices -> Install Guest Additions

Virtualbox offers a download of a VboxGuestAdditions_4.1.2_Ubuntu.iso from url;
http://dlc.sun.edgesuite.net/virtualbox/4.1.2_Ubuntu/VBoxGuestAdditions_4.1.2_Ubuntu.iso, anyways this download fails since the URL is currently unavailable.

To fix this two ways are possible:

1. Download VBoxGuestAdditions.iso from here and put it in directory /usr/share/virtualbox , e.g.:

root@ubuntu:~# cd /usr/share/virtualbox
root@ubuntu:/usr/share/virtualbox# wget https://www.pc-freak.net/files/VBoxGuestAdditions.iso
...

2. Download and install virtualbox-guest-additions-iso_4.1.2-1_all.deb

root@ubuntu:~# wget https://www.pc-freak.net/files/virtualbox-guest-additions-iso_4.1.2-1_all.deb
...
root@ubuntu:~# dpkg -i virtualbox-guest-additions-iso_4.1.2-1_all.deb
...

Next to enable and install guest additions once again use menus:

Devices -> Install Guest Additions

VirtualBox Install Guest Additions Ubuntu Screenshot

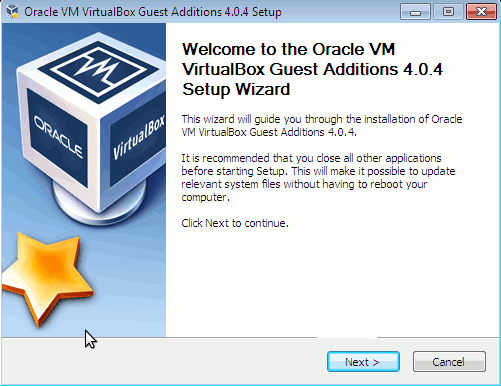
The screen to appear next will be similar to:

VBox guest Additions windows Ubuntu

Further on follow the few dialogs to complete the installations and integration of Guest Additions and restart the Virtual machine and hooray the Windows will appear in Full screen in VirtualBox ! 😉

Non-free packages to install to make Ubuntu Linux Multimedia ready / Post install packages for new Ubuntu installations

Monday, January 23rd, 2012

non-free-packages-to-install-make-ubuntu-linux-multimedia-ready

1. Add Medibuntu package repository

root@ubuntu:~# wget --output-document=/etc/apt/sources.list.d/medibuntu.list \
http://www.medibuntu.org/sources.list.d/$(lsb_release -cs).list \
&& apt-get --quiet update \
&& apt-get --yes --quiet --allow-unauthenticated install medibuntu-keyring \
&& apt-get --quiet update

2. Enable Ubuntu to play Restricted DVD
root@ubuntu:~# apt-get install --yes libdvdread4
...
root@ubuntu:~# /usr/share/doc/libdvdread4/install-css.sh

After that VLC will be ready to play DVDs for some programs which was compiled without DVD, source rebuilt is required.

If DVDs hang you might need to set a Region Code with regionset:

# regionset

3. Install non-free codecs

root@ubuntu:~# apt-get install non-free-codecs

4. Install Chromium ffmpeg nonfree codecs

root@ubuntu:~# apt-get install chromium
root@ubuntu:~# apt-get install chromium-codecs-ffmpeg-nonfree

5. Install w32codecs / w64codecs

Depending on the Ubuntu Linux installation architecture 32/64 bit install w32codecs or w64codecs

For 32 bit (x86) Ubuntu install w32codecs:

root@ubuntu:~# apt-get install w32codecs

For 64 bit arch Ubuntu:

root@ubuntu:~# apt-get install w64codecs

6. Install ubuntu-restricted-extras meta package

root@ubuntu:~# apt-get install ubuntu-restricted-extras

7. Install cheese for webcam picture/video snapshotting

root@ubuntu:~# apt-get install cheese

8. Install GIMP, Inkscape, xsane,sane, shotwell etc.

root@ubuntu:~# apt-get --yes install sane xsane gimp inkscape gimp-data-extras gimp-plugin-registry \
blender gcolor2 showtwell bluefish kompozer

9. Install multimedia Sound & Video utilities

Install Subtitle editor, video editiking , sound editing, mp3 player, iso mounters, DVD/CD Burners

root@ubuntu:~# apt-get install rhythmbox banshee smplayer mplayer \
realplayer audacity brasero jokosher istanbuk gtk-recordMyDesktop \acetoneisohexedit furiusisomount winff fala audacious dvdstyler lives hydrogen
subtitleeditor gnome-subtitles electricsheep k3b

10. Install CD / DVD RIP tools

root@ubuntu:~# apt-get install acidrip sound-juicer ogmrip thoggen
11. Install chat messanger programs, Browsers, mail pop3 clients, torrent, emulators, ftp clients etc.

apt-get install seamonkey thunderbird transmission transmission-gtk gbgoffice kbedic \
pidgin openoffice.org gxine mozilla-plugin-vlc wine dosbox samba filezilla amsn ntp \epiphany-browser ntpdate desktop-webmail alltray chmsee gftp xchat-gnome ghex \gnome-genius bleachbit arista

12. Install Non-Free Flash Player

Unfortunately Gnash is not yet production ready and crashes in many websites …

root@ubuntu:~# apt-get install flashplugin-nonfree flashplugin-nonfree-extrasound swfdec-gnome

13. Install Archive / Unarchive management programs

root@ubuntu:~# apt-get install unace unrar zip unzip p7zip-full p7zip-rar sharutils rar uudeview \
mpack lha arj cabextract file-roller

15. Install VirtualBox and QEmu

root@ubuntu:~# apt-get install qemu-launcher qemu-kvm-extras virtualbox virtualbox-ose \
virtualbox-ose-guest-dkms virtualbox-ose-guest-dkms

This should be enough to use Ubuntu normally for multimedia Desktop just as MS Windows for most of the daily activities.
Am I missing some important program?

How to install and configure djbdns from source as a Cachening Localhost Proxy resolver to increase resolving efficiency on Debian 6 Squeeze

Monday, August 1st, 2011

djbdns-logo-install-configure-djbdns-from-source-on-gnu-linux-to-accelerate-server-dns-resolving
It seems DjbDNS on Debian Squeeze has been not included as a Debian package. There is still possibility to install djbdns from an older deb package or install it from source. I however decided to install it from source as finding the old Debian package for Lenny and Etch takes time, plus I'm running an amd64 version of Debian and this might even more complicate the situation.
Installing it from source is not really a Debian way but at least it works.

In this article I assume that daemontools and ucspi-tcp are preliminary installed, if not one needs to install them with:

debian:~# apt-get install ucspi-tcp daemontools daemontools-run
...

The above two ones are required as DJBDNS is originally made to run through djb's daemontools.

Here is the exact step I took to have it installed as local caching DNS server on a Debian Squeeze server:

1. Download and untar DjbDNS

debian:~# wget -q http://cr.yp.to/djbdns/djbdns-1.05.tar.gz debian:~# tar -zxvvf djbdns-1.05.tar.gz
...

2. Add DjbDNS users to /etc/passwd

Creating the below two users is not arbitrary but it's recommendable.

echo 'dnscache:*:54321:54321:dnscache:/dev/null:/dev/null' >> /etc/passwd
echo 'dnslog:*:54322:54322:dnslog:/dev/null:/dev/null' >> /etc/passwd

3. Compile DJBDNS nameserver

First it's necessery to use the below echo command to work around a common Linux bug:

debian:~# cd djbdns-1.05
debian:/root/djbdns-1.05# echo gcc -O2 -include /usr/include/errno.h > conf-cc

Next let's make it:

debian:/root/djbdns-1.05# make

4. Install the compiled djbdns binaries

debian:/root/djbdns-1.05# make setup check
# here comes some long install related output

If no errors are produced by make setup check this means that the djbdns should have installed itself fine.

As installation is compileted it's a good idea to report about the newly installed DjbDNS server if running a mail server. This info is used by Dan Bernstein to gather statistical data about the number of installations of djbdns servers throughout the world.

5. Do some general configurations to the newly installed DJBDNS

Now let's copy the list of the IP addresses of the global DNS root servers in /etc/.

debian:/root/djbdns-1.05# cp -rpf dnsroots.global /etc/ debian:/root/djbdns-1.05# ./dnscache-conf dnscache dnslog /etc/dnscache 0.0.0.0

dnscache-conf will generate some default configuration files for djbdns in /etc/dnscache

Next allow the networks which should be able to use the just installed djbdns server as a caching server:

debian:/root/djbdns-1.05# cd /etc/dnscache/root/ip
debian:/etc/dnscache/root# touch 192.168.1
debian:/root/djbdns-1.05# touch 123.123

First command will allow all ips in range 192.168.1.* to be able to access the DNS server and the second command will allow all ips from 123.123.1-255.1-255 to be able to query the server.

Some further fine tunning can be done from the files:

/etc/dnscache/env/CACHESIZE and /etc/dnscache/env/DATALIMIT

As a last step, before it's running, we have to link the /etc/dnscache to daemontools like so:

debian:/root/djbdns-1.05# ln -sf /etc/dnscache /etc/service/dnscache

If the daemontools is not linked to be accessible via /etc/service it's also a good to link it there:

debian:~# ln -sf /etc/service /

Now the DJBDNS should be running fine, to test if it's running without errors through daemontools I used:

debian:~# ps ax|grep -i readproc
5358 pts/18 R+ 0:00 grep -i readproc
11824 ? S 0:00 readproctitle service errors: ...........

If no errors are displayed it's configured and running to also test if it's capable of resolving I used the host command:

debian:~# host www.pc-freak.net localhost
Using domain server:
Name: localhost
Address: 127.0.0.1#53
Aliases:

www.pc-freak.net has address 83.228.93.76
www.pc-freak.net mail is handled by 0 mail.www.pc-freak.net.

Now the DJBDNS is properly installed and if you test it for a while with time host somehost.com localhost , you will see how quick it is in resolving.

The advantage of running DJBDNS is it does not require almost no maintance, its rock solid and great just like all other Dan Bernstein's written software.
Enjoy 😉

How to SSH client Login to server with password provided from command line as a script argument – Running same commands to many Linux servers

Friday, March 6th, 2015

ssh-how-to-login-with-password-provided-from-command-line-use-sshpass-to-run-same-command-to-forest-of-linux-servers

Usually admins like me who casuanlly need to administer "forests" (thousands of identicallyconfigured services Linux servers) are generating and using RSA / DSA key authentication for passwordless login, however this is not always possible as some client environments does prohibit the use of RSA / DSA non-pass authentication, thus in such environments to make routine server basic package rpm / deb upgrades or do other maintanance patching its necessery to use normal ssh user / pass login but as ssh client doesn't allow password to be provided from prompt for security reasons and therefore using some custom bash loop to issue single command to many servers (such as explained in my previous article) requires you to copy / paste password on password prompt multiple times. This works its pretty annoying so if you want to run single command on all your 500 servers with specifying the password from password prompt use sshpass tool (for non-interactive ssh password auth).

SSHPASS official site description:
 

sshpass is a utility designed for running ssh using the mode referred to as "keyboard-interactive" password authentication, but in non-interactive mode.


Install sshpass on Debian / Ubuntu (deb based) Linux

sshpass is installable right out of regular repositories so to install run:
 

apt-get install —yes sshpass


Install sshpass on CentOS / Fedora (RPM based) Linux


sshpass is available also across most RPM based distros too so just use yum package manager


yum -y install sshpass


If its not available across standard RPM distro provided repositories, there should be RPM on the net for distro just download latest one and use wget and rpm to install:

 wget -q http://dl.fedoraproject.org/pub/epel/6/x86_64/sshpass-1.05-1.el6.x86_64.rpm

 rpm -ivh sshpass-1.05-1.el6.x86_64.rpm


How Does SshPass Works?


Normally openssh (ssh) client binary uses direct TTY (/dev/tty)= an abbreviation for PhyTeleTYpewriter or (the admin jargon call Physical Console access)  instead of standard remotely defined /dev/ptsVirtual PTY.
To get around this Sshpass runs ssh in a dedicated TTY to emulate the password is indeed issues by interactive keyboard user thus  fooling remote sshd server to thinking password
is provided by interactive user.


SSHPass use

Very basic standard use which allows you to pass the password from command line is like this:
 

sshpass -p 'Your_Password_Goes_here123' ssh username@server.your-server.com


Note that the server you're working is shared with other developers they might be able to steal your username / password by using a simple process list command such as:
 

 ps auxwwef


In my case security is not a hot issue, as I'm the only user on the server (and only concern might be if someone hacks into the server 🙂 


Then assuming that you have a plain text file with all your administered servers, you can easily use sshpass in a Bash Script loop in order to run, lets say a package upgrade across all identical Linux version machines:
 

while read line; do
sshpass -p 'Your_Password_Goes_here123' ssh username@$line "apt-get update && apt-get upgrade && apt-get dist-upgrade" < /dev/null;
done < all_servers_list.txt

Change the command you like to issue across all machines with the string "apt-get …"
Above command can be used to keep up2date all Debian stable server packages. What you will do on servers is up to your imaginations, very common use of above line would be if you want to see uptime /netstat command output across all your network servers.


while read line; do
sshpass -p 'Your_Password_Goes_here123' ssh username@$line "uptime; who; netstat -tunlp; " < /dev/null;
done < all_servers_list.txt


As you can guess SshPass is swiss army knife tool for admins whoneed to automate things with scripts simultaneously across number of servers.
 

Happy SSH-ing 🙂


How to install nginx webserver from source on Debian Linux / Install Latest Nginx on Debian

Wednesday, March 23rd, 2011

Nginx install server logo
If you're running a large website consisting of a mixture of php scripts, images and html. You probably have noticed that using just one Apache server to serve all the content is not that efficient

Each Apache child (I assume you're using Apache mpm prefork consumes approximately (20MB), this means that each client connection would consume 20 mb of your server memory.
This as you can imagine is truly a suicide in terms of memory. Each request for a picture, css or simple html file would ask Apache to fork another process and will consume (20mb of extra memory form your server mem capacity)!.

Taking in consideration all this notes and the need for some efficiency here, the administrator should normally think about dividing the processing of the so called static content from the dynamic content served on the server.

Apache is really a nice webserver software but with all the loaded modules to serve dynamic content, for instance php, cgi, python etc., it's becoming not the best solution for handling a (css, javascript, html, flv, avi, mov etc. files).

Even a plain Apache server installation without (libphp, mod_rewrite mod deflate etc.) is still not dealing efficiently enough with the aforementioned static files content

Here comes the question if Apache is not that quick and efficient in serving static files, what then? The answer is caching webserver! By caching the regular static content files, your website visitors will benefit by experiencing shorter webserver responce files in downloading static contents and therefore will generally hasten your website and improve the end user's experience.

There are plenty of caching servers out there, some are a proprietary software and some are free software.

However the three most popular servers out there for static file content serving are:

  • Squid,
  • Varnish
  • Nginx

In this article as you should have already found out by the article title I'll discuss Nginx

You might ask why exactly Nginx and not some of the other twos, well simply cause Squid is too complicated to configure and on the other hand does provide lower performance than Nginx. On the other hand Varnish is also a good solution for static file webserver, but I believe it is not tested enough. However I should mention that my experience with testing varnish on my own home router is quite good by so far.

If you're further interested into varhisn cache I would suggest you checkout www.varhisn-cache.org .

Now as I have said a few words about squid and varhisn let's proceed to the essence of the article and say few words about nginx

Here is a quote describing nginx in a short and good manner directly extracted from nginx.com

nginx [engine x] is a HTTP and reverse proxy server, as well as a mail proxy server written by Igor Sysoev. It has been running for more than five years on many heavily loaded Russian sites including Rambler (RamblerMedia.com). According to Netcraft nginx served or proxied 4.70% busiest sites in April 2010. Here are some of success stories: FastMail.FM, WordPress.com.

By default nginx is available ready to be installed in Debian via apt-get, however sadly enough the version available for install is pretty much outdated as of time of writting the nginx debian version in lenny's deb package repositories is 0.6.32-3+lenny3

This version was release about 2 years ago and is currently completely outdated, therefore I found it is not a good idea to use this old and probably slower release of nginx and I jumped further to install my nginx from source:
Nginx source installation actually is very simple on Linux platforms.

1. As a first step in order to be able to succeed with the install from source make sure your system you have installed the packages:

debian:~# apt-get install libpcre3 libpcre3-dev libpcrecpp0 libssl-dev zlib1g-dev build-essential

2. Secondly download latest nginx source code tarball

Check out on http://nginx.com/download the latest stable release of nginx and further issue the commands below:

debian:~# cd /usr/local/src
debian:/usr/local/src# wget http://nginx.org/download/nginx-0.9.6.tar.gz

3.Unarchive nginx source code

debian:/usr/local/src#tar -zxvvf nginx-0.9.6.tar.gz
...

The nginx server requirements for me wasn't any special so I proceeded and used the nginx ./configure script which is found in nginx-0.9.6

4. Compline nginx server

debian:/usr/local/src# cd nginx-0.9.6
debian:/usr/local/src/nginx-0.9.6# ./configure && make && make install
+ Linux 2.6.26-2-amd64 x86_64
checking for C compiler ... found
+ using GNU C compiler
+ gcc version: 4.3.2 (Debian 4.3.2-1.1)
checking for gcc -pipe switch ... found
...
...

The last lines printed by the nginx configure script are actually the major interesting ones for administration purposes the default complation options in my case were:

Configuration summary
+ using system PCRE library
+ OpenSSL library is not used
+ md5: using system crypto library
+ sha1 library is not used
+ using system zlib library

nginx path prefix: "/usr/local/nginx"
nginx binary file: "/usr/local/nginx/sbin/nginx"
nginx configuration prefix: "/usr/local/nginx/conf"
nginx configuration file: "/usr/local/nginx/conf/nginx.conf"
nginx pid file: "/usr/local/nginx/logs/nginx.pid"
nginx error log file: "/usr/local/nginx/logs/error.log"
nginx http access log file: "/usr/local/nginx/logs/access.log"
nginx http client request body temporary files: "client_body_temp"
nginx http proxy temporary files: "proxy_temp"
nginx http fastcgi temporary files: "fastcgi_temp"
nginx http uwsgi temporary files: "uwsgi_temp"
nginx http scgi temporary files: "scgi_temp"

If you want to setup nginx server to support ssl (https) and for instance install nginx to a different server path you can use some ./configure configuration options, for instance:

./configure –sbin-path=/usr/local/sbin –with-http_ssl_module

Now before you can start the nginx server, you should also set up the nginx init script;

5. Download and set a ready to use script with cmd:

debian:~# cd /etc/init.d
debian:/etc/init.d# wget https://www.pc-freak.net/files/nginx-init-script
debian:/etc/init.d# mv nginx-init-script nginx
debian:/etc/init.d# chmod +x nginx

6. Configure Nginx

Nginx is a really easy and simple server, just like the Russians, Simple but good!
By the way it's interesting to mention nginx has been coded by a Russian, so it's robust and hard as a rock as all the other Russian creations 🙂
Nginx configuration files in a default install as the one in my case are to be found in /usr/local/nginx/conf

In the nginx/conf directory you're about to find the following list of files which concern nginx server configurations:

deiban:/usr/local/nginx:~# ls -1
fastcgi.conf
fastcgi.conf.default
fastcgi_params
fastcgi_params.default
koi-utf
koi-win
mime.types
mime.types.default
nginx.conf
nginx.conf.default
scgi_params
scgi_params.default
uwsgi_params
uwsgi_params.default
win-utf

The .default files are just a copy of the ones without the .default extension and contain the default respective file directives.

In my case I'm not using fastcgi to serve perl or php scripts via nginx so I don't need to configure the fastcgi.conf and fastcgi_params files, the scgi_params and uwsgi_params conf files are actually files which contain nginx configuration directives concerning the use of nginx to process SSI (Server Side Include) scripts and therefore I skip configuring the SSI conf files.
koi-utf and koi-win are two files which usually you don't need to configure and aims the nginx server to support the UTF-8 character encoding and the mime.types conf is a file which has a number of mime types the nginx server will know how to handle.

Therefore after all being said the only file which needs to configured is nginx.conf

7. Edit /usr/local/nginx/conf/nginx.conf

debian:/usr/local/nginx:# vim /usr/local/nginx/conf/nginx.conf

Therein you will find the following default configuration:

#gzip on;

server {
listen 80;
server_name localhost;

#charset koi8-r;

#access_log logs/host.access.log main;

location / {
root html;
index index.html index.htm;
}
#error_page 404 /404.html;

# redirect server error pages to the static page /50x.html
#
error_page 500 502 503 504 /50x.html;
location = /50x.html {
root html;
}

In the default configuration above you need to modify only the above block of code as follows:

server {
listen 80;
server_name yoursitedomain.com;

#charset koi8-r;

#access_log logs/access.log main;

location / {
root /var/www/yoursitedomain.com/html;
index index.html index.htm;
}

Change the yoursitedomain.com and /var/www/yoursitedomain.com/html with your directory and website destinations.

8. Start nginx server with nginx init script

debian:/usr/local/nginx:# /etc/init.d/nginx start
Starting nginx:

This should bring up the nginx server, if something is miss configured you will notice also some error messages, as you can see in my case in above init script output, thanksfully there are no error messages.
Note that you can also start nginx directly via invoking /usr/local/nginx/sbin/nginx binary

To check if the nginx server has properly started from the command line type:

debian:/usr/local/nginx:~# ps ax|grep -i nginx|grep -v grep
9424 ? Ss 0:00 nginx: master process /usr/local/nginx/sbin/nginx
9425 ? S 0:00 nginx: worker process

Another way to check if the web browser is ready to serve your website file conten,t you can directly access your website by pointing your browser to with http://yoursitedomain.com/, you should get your either your custom index.html file or the default nginx greeting Welcome to nginx

9. Add nginx server to start up during system boot up

debian:/usr/local/nginx:# /usr/sbin/update-rc.d -f nginx defaults

That's all now you have up and running nginx and your static file serving will require you much less system resources, than with Apache.
Hope this article was helpful to somebody, feedback on it is very welcome!
Tightening PHP Security on Apache 2.2 with ModSecurity2 on Debian Lenny Linux

Monday, April 26th, 2010

Tightening-PHP-Security-on-Apache-2.2-2.4-with-Apache-ModSecurity2
In this article you'll learn how I easily installed and configured the ModSecurity 2 on a Debian Lenny system.
First let me give you a few introductionary words to modsecurity, what is it and why it's a good idea to install and use it on your Apache Webserver.

ModSecurity is an Apache module that provides intrusion detection and prevention for web applications. It aims at shielding web applications from known and unknown attacks, such as SQL injection attacks, cross-site scripting, path traversal attacks, etc.

As you can see from ModSecurity’s description it’s a priceless module add on to Apache that is able to protect your PHP Applications and Apache server from a huge number of hacker attacks undertook against your Online Web Application or Webserver.
The only thing I don’t like about this module is that it is actually a 3rd party module (e.g. not officially part of Apache). Some time ago I remember there was even an exploit for one of the versions of the module.
So in some cases the ModSecurity could also pose a security risk, so beware!
However if you know what you'rre doing and you keep a regular track of security news on some major security websites, that shouldn’t be a concern for you.
Now let'ss proceed to the install of the ModSecurity module itself.
The install is a piece of cake on Debian though you'll be required to use the Debian Lenny backports

Here is the install of the module step by step:

1. First add the gpg key of the backports repository to your install

debian-server:~# gpg --keyserver pgp.mit.edu --recv-keys C514AF8E4BA401C3
# another possible way to add the repository as the website describes is through the command
debian-server:~# wget -O - http://backports.org/debian/archive.key | apt-key add -

2. Install the libapache-mod-security package from the backports Debian Lenny repository

debian-server~:~# apt-get -t lenny-backports install libapache2-mod-security2

Now as a last step of the install ModSeccurity install procedure you have to add some configuration directives to Apache and restart the server afterwards.

– Open your /etc/apache2/apache2.conf and place in it the following configurations


<IfModule mod_security2.c>
# Basic configuration options
SecRuleEngine On
SecRequestBodyAccess On
SecResponseBodyAccess Off

# Handling of file uploads
# TODO Choose a folder private to Apache.
# SecUploadDir /opt/apache-frontend/tmp/
SecUploadKeepFiles Off

# Debug log
SecDebugLog /var/log/apache2/modsec_debug.log
SecDebugLogLevel 0

# Serial audit log
SecAuditEngine RelevantOnly
SecAuditLogRelevantStatus ^5
SecAuditLogParts ABIFHZ
SecAuditLogType Serial
SecAuditLog /var/log/apache2/modsec_audit.log

# Maximum request body size we will
# accept for buffering
SecRequestBodyLimit 131072

# Store up to 128 KB in memory SecRequestBodyInMemoryLimit 131072
# Buffer response bodies of up to # 512 KB in length SecResponseBodyLimit 524288
</IfModule>

The ModSecurity2 module would be properly installed and configured as an Apache module.
3.All left is to restart Apache in order the new module and configurations to take effect.

debian-server:~# /etc/init.d/apache restart

Don’t forget to check the apache conf file for errors before restarting the Apache with the above command for that to happen issue the command:
debian-server:~# apache2ctl -t

If all is fine you should get as an output:

Syntax OK

4. Next to find out if the Apache ModSecurity2 module is enabled and already used by Apache as a mean of protection you,
you might want to check if the log files modsec_audit.log and modsec_debug.log files has grown and doesfeed a new content.
If they’re growing and you see messages concerning the operation of the ModSecurity2 Apache module that’s a sure sign all is fine.
5. As we have the Mod Security Apache module configured on our Debian Server, now we will need to apply some ModSecurity Core Rules .
In short ModSecurity Core Rules are some critical protection rules against attacks across almost every web architecture.
Another really neat thing about Core Rules (CRS) for ModSecurity is that they are written with a performance in mind.
So enabling this filter rules won’t be a too heavy load for your Apache server.

Here is how to install the core rules:

6. Download latest ModSecurity Code Rules

Download them from the following Code Rule url
At the time of writting this article the latest code rules are version modsecurity-crs_2.0.6.tar.gz

To download and install this rules issue some commands like:

debian-server:~# wget http://sourceforge.net/projects/mod-security/files/modsecurity-crs/0-CURRENT/modsecurity-crs_2.0.6.tar.gz/download
debian-server:~# cp -rpf ~/modsecurity-crs_2.0.6.tar.gz /etc/apache2/
debian-server:~# cd /etc/apache2/; tar -zxvvf modsecurity-crs_2.0.6.tar.gz

Besides physically storing the unarchived modsecirity-crs in your /etc/apache2 it’s also necessery to add to your Apache Ifmodule mod_security.c block of code the following two lines:

Include /etc/apache2/modsecurity-crs_2.0.6/*.conf
Include /etc/apache2/modsecurity-crs_2.0.6/base_rules/*.conf

Thus ultimately the configuration concerning ModSecurity in your Apache Server configuration should look like the following:

<IfModule mod_security2.c>
# Basic configuration options
SecRuleEngine On
SecRequestBodyAccess On
SecResponseBodyAccess Off

# Handling of file uploads
# TODO Choose a folder private to Apache.
# SecUploadDir /opt/apache-frontend/tmp/
SecUploadKeepFiles Off

# Debug log
SecDebugLog /var/log/apache2/modsec_debug.log
SecDebugLogLevel 0

# Serial audit log
SecAuditEngine RelevantOnly
SecAuditLogRelevantStatus ^5
SecAuditLogParts ABIFHZ
SecAuditLogType Serial
SecAuditLog /var/log/apache2/modsec_audit.log

# Maximum request body size we will
# accept for buffering
SecRequestBodyLimit 131072

# Store up to 128 KB in memory
SecRequestBodyInMemoryLimit 131072

# Buffer response bodies of up to
# 512 KB in length
SecResponseBodyLimit 524288
Include /etc/apache2/modsecurity-crs_2.0.6/*.conf
Include /etc/apache2/modsecurity-crs_2.0.6/base_rules/*.conf
</Ifmodule>

Once again you have to check if everything is fine with Apache configurations with:

debian-server:~# apache2ctl -t

If it’s showing once again an OK status. Then you’re ready to restart the Webserver.
debian-server:~# /etc/init.d/apache2 restart

One example goodness of setting up the ModSecurity + the Core rule sets are that after the above described installationis fully functional.

ModSecurity will be able to track if somebody tries to execute PHP Shell on your server .
ModSecurity will catch, log and block (forbid) requests to r99.txt, r59, safe0ver and possibly other hacked modifications of the php shell script

That’s it! Now Enjoy your tightened Apache Security and Hopefully catch the script kiddie trying to h4x0r yoU 🙂

Play Dune2 on Debian Linux with dosbox – Dune 2 Mother of all Real Time Strategy games

Saturday, March 1st, 2014

medium_1809-dune-ii-the-building-of-a-dynasty_one_of_best_games_ever_linux_windows.gif

Dune II: The Building of a Dynasty (known also as Dune II: Battle for Arrakis in Europe is a game that my generation will never forget. Dune 2 is the "first" computer Real Time Strategy (RTE) game of the genre of the Warcraft I and Warcraft II / III and later Command and Conquer – Red Aleart, Age of Empires I / II and Starcraft …

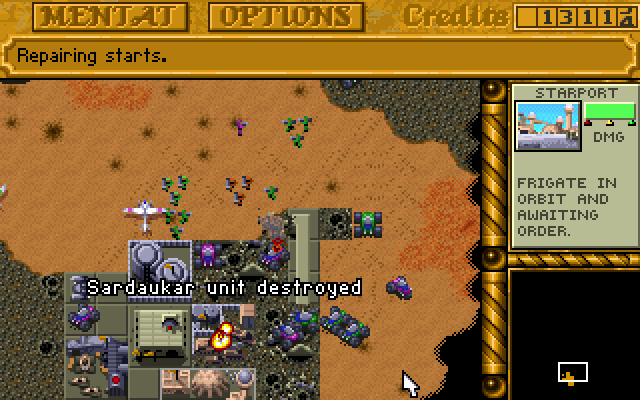
dune2-unit-destroyed

I've grown up with Dune2 and the little computer geek community in my school was absolutely crazy about playing it. Though not historically being the first Real Time Strategy game, this Lucas Inc. 
game give standards that for the whole RTE genre for years and will stay in history of Computer Games as one of best games of all times.

I've spend big part of my teenager years with my best friends playing Dune2 and the possibility nowadays to resurrect the memories of these young careless years is a blessing.  Younger computer enthusiasts and gamers probably never heard of Dune 2 and this is why I decided to place a little post here about this legendary game.

dune-2-tank-vehicle - one of best games computer games ever

Its worthy out of curiosity or for fun to play Dune 2 on modern OS be it Windows or Linux. Since Dune is DOS game, it is necessary to play it via DOS emulator i.e. – (DosBox). 
Here is how I run dune2 on my Debian Linux:

1. Install dosbox DOS emulator

apt-get install --yes dosbox

2. Download Dune2 game executable

You can download my mirror of dune2 here

Note that you will need unzip to uanrchive it, if you don't have it installed do so:

apt-get install --yes unzip

cd ~/Downloads/
wget https://www.pc-freak.net/files/dune-2.zip

3.  Unzip archive and create directory to mount it emulating 'C:\' drive

mkdir -p ~/.dos/Dune2
cd ~/.dos/Dune2

unzip ~/Downloads/dune-2.zip
 

4. Start dosbox and create permanent config for C: drive auto mount


dosbox

To make C:\ virtual drive automatically mounted you have to write a dosbox config from inside dbox console

config -writeconf /home/hipo/.dosbox.conf

My home dir is in /home/hipo, change this with your username /home/username

Then exit dosbox console with 'exit' command

To make dune2 game automatically mapped on Virtual C: drive:

echo "mount c /home/hipo/.dos" >> ~/.dosbox.conf

Further to make dosbox start each time with ~/.dosbox.conf add alias to your ~/.bashrc 

vim ~/.bashrc
echo "alias dosbox='dosbox -conf /home/hipo/.dosbox.conf'" >> ~/.bashrc
source ~/.bashrc

Then to run DUNE2 launch dosbox:

dosbox

and inside console type:

c:
cd Dune2
Dune2.exe

dune2-first-real-time-strategy-game-harkonen-screenshot

For the lazy ones who would like to test dune you can play dune 2 online on this website