Posts Tagged ‘lib’

Mysql: How to disable single database without dropping or renaming it

Wednesday, January 22nd, 2014

mysql rename forbid disable database howto logo, how to disable single database without dropping it
A colleague of mine working on MySQL database asked me How it is possible to disable a MySQL database. He is in situation where the client has 2 databases and application and is not sure which of the two databases the application uses. Therefore the client asked one of the database is disabled and wait for few hours and see if something will break / stop working and in that way determine which of the two database is used by application.

My first guess was to backup both databases and drop one of them, then if it is the wrong one to restore from the SQL dump backup, however this wasn't acceptable solution. So second I though of RENAME of database to another one and then reverting the name, however as it is written in MySQL documentation RENAME database function was removed from MySQL (found to be dangerous) since version 5.1.23 onwards. Anyhow there is a quick hack to rename mysql database using a for loop shell script one below:

mysql -e "CREATE DATABASE \`new_database\`;"
for table in `mysql -B -N -e "SHOW TABLES;" old_database`
do
  mysql -e "RENAME TABLE \`old_database\`.\`$table\` to \`new_database\`.\`$table\`"
  done
  mysql -e "DROP DATABASE \`old_database\`;"

Other possible solution was to change permissions of Application used username, however this was also complicated from mysql cli, hence I thought of installing and using PHPMyAdmin to make modify of db user permissions easier but on this server there wasn't Apache installed and MySQL is behind a firewall and only accessible via java tomcat host.

Finally after some pondering what can be done I came with solution to request to disable mysql database using chmod in /var/lib/mysql/data/, i.e.:

sql-server:~# chmod 0 /var/lib/mysql/databasename

Where databasename is the same as the database is named listable via mysql cli.

After doing it that way with no need to restart MySQL server database stopped to appear in show databases; and client confirmed that disabled database is no longer needed so we proceeded dropping it.

Hope this little article will help someone out there. Cheers :

Windows Explorer (Open directory in command prompt preserving dir PATH) – Add Dos Prompt Here feature via tiny registry tweak

Friday, January 10th, 2014

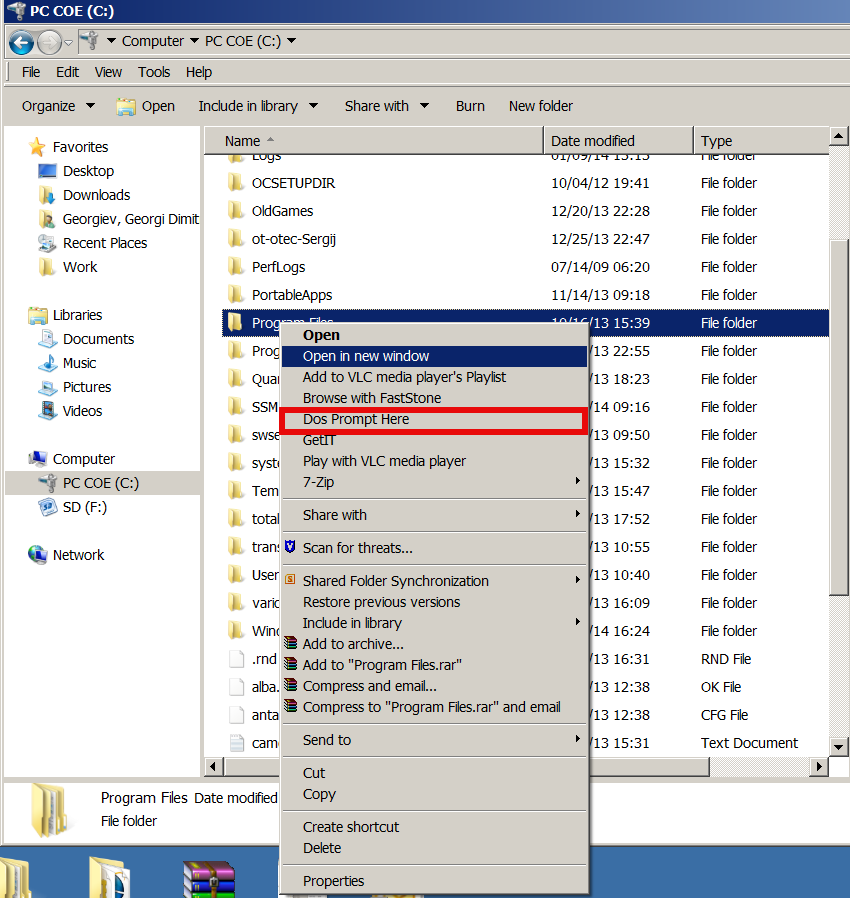
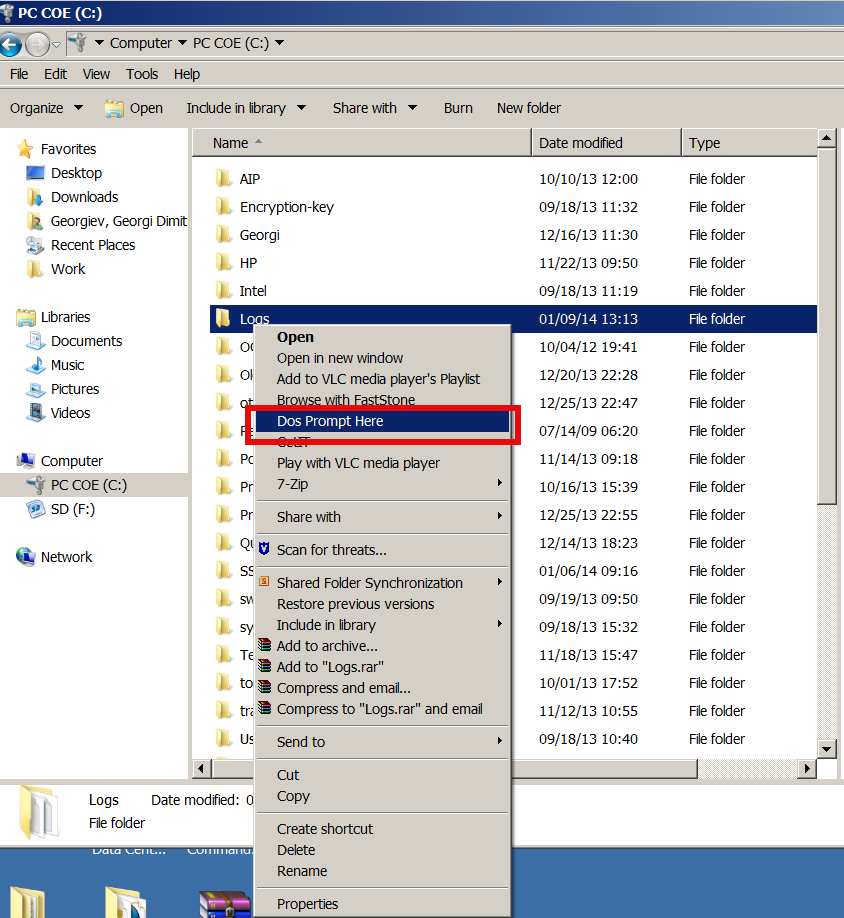
Windows explorer dos prompt here open directory in windows command line

If you have to use Windows on system administration level, you had to use command prompt daily, thus its useful to be able to be able to open Command Line starting from desired directory with no need to copy directory Path by hand and CD to it manually.

By default Command Prompt, cmd.exe always opens itself setting a path to user home directory, reading what is defined by win system variable %USERPROFILE% or %HOMEPATH% – MS Windows equivalent of UNIX's $HOME shell variable.

To add open in  DOS Prompt Here Command Prompt option to Windows Explorer menus its necessary to apply few rules to Windows registry DB
Use above Download link and launch it and from there on clicking with right Mouse button to any directory will enable you to open directory in CMD.EXE.

Here is content of little registry tweak adding the new menu Dos Prompt Here button
Windows Registry Editor Version 5.00

[HKEY_CLASSES_ROOT\Directory\shell\DosHere]
@="Dos &Prompt Here"

[HKEY_CLASSES_ROOT\Directory\shell\DosHere\Command]
@="cmd.exe /k cd %1"

[HKEY_CLASSES_ROOT\Drive\shell\DosHere]
@="Dos &Prompt Here"

[HKEY_CLASSES_ROOT\Drive\shell\DosHere\Command]
@="cmd.exe /k cd %1"

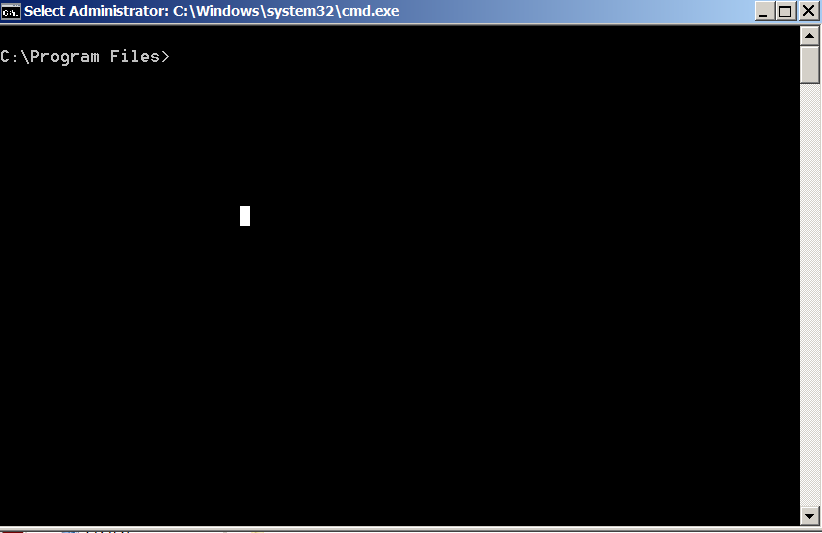
Windows explorer open program files or any specific directory in windows command line

windows opening directory in command line program files screenshot win 7

This little registry code is originally for Windows 2000, anyways it is compatible with all NT technology based Windowses, Add DOS Prompt Here tweak works fine on Windows XP, Windows 7 and Windows 8 (Home, Pro and Business editions).

By Mentioning $HOME its interesting to say Windows equivalent of Linux's as it might be useful to know:

linux:~# echo $HOME
/home/hipo

is

C:\\> echo %USERPROFILE%
C:\\Users\\georgi

To list all Windows Command Prompt environment variable equivalent to Linux's bash shell env / setenv is SET command), here is example output from my Winblows;

C:\Users\georgi> SET
ALLUSERSPROFILE=C:\\ProgramData
APPDATA=C:\\Users\georgi\AppData\Roaming
CLASSPATH=.;C:\\Program Files (x86)\\Java\\jre6\\lib\\ext\\QTJava.zip
CommonProgramFiles=C:\\Program Files\Common Files
CommonProgramFiles(x86)=C:\\Program Files (x86)\\Common Files
CommonProgramW6432=C:\\Program Files\\Common Files
COMPUTERNAME=GEORGI
ComSpec=C:\\Windows\\system32\\cmd.exe
DEFLOGDIR=C:\\ProgramData\\McAfee\\DesktopProtection
FP_NO_HOST_CHECK=NO
HOMEDRIVE=C:
HOMEPATH=\\Users\\georgi
LOCALAPPDATA=C:\\Users\\georgi\\AppData\\Local
NUMBER_OF_PROCESSORS=4
OS=Windows_NT
Path=C:\\Program Files\\RA2HP\\;C:\\Windows\\system32;C:\\Windows;C:\\Windows\\S
Wbem;C:\\Windows\\System32\\WindowsPowerShell\v1.0\;C:\\Program Files\\WIDCOM
oth Software\\;C:\\Program Files\\WIDCOMM\\Bluetooth Software\\syswow64;C:\\Pr
les (x86)\\Hewlett-Packard\\HP ProtectTools Security Manager\\Bin\\;C:\\Progr
\\ActivIdentity\\ActivClient\\;C:\\Program Files (x86)\\ActivIdentity\\ActivCl
\\Program Files (x86)\\QuickTime\\QTSystem\\
PATHEXT=.COM;.EXE;.BAT;.CMD;.VBS;.VBE;.JS;.JSE;.WSF;.WSH;.MSC
PROCESSOR_ARCHITECTURE=AMD64
PROCESSOR_IDENTIFIER=Intel64 Family 6 Model 58 Stepping 9, GenuineIntel
PROCESSOR_LEVEL=6
PROCESSOR_REVISION=3a09
ProgramData=C:\\ProgramData
ProgramFiles=C:\\Program Files
ProgramFiles(x86)=C:\\Program Files (x86)
ProgramW6432=C:\\Program Files
PROMPT=$P$G
PSModulePath=C:\\Windows\\system32\\WindowsPowerShell\\v1.0\Modules\\
PTSMInstallPath_X86=C:\\Program Files (x86)\\Hewlett-Packard\\HP ProtectToo
ity Manager\\
PUBLIC=C:\\Users\\Public
QTJAVA=C:\\Program Files (x86)\\Java\\jre6\\lib\\ext\\QTJava.zip
SESSIONNAME=Console
SystemDrive=C:
SystemRoot=C:\\Windows
TEMP=C:\\Users\\georgi\\AppData\\Local\\Temp
TMP=C:\\Users\\georgi\\AppData\\Local\\Temp
USERDNSDOMAIN=EMEA.CPQCORP.NET
USERDOMAIN=EMEA
USERNAME=georgi
USERPROFILE=C:\\Users\\georgi
VSEDEFLOGDIR=C:\\ProgramData\\McAfee\\DesktopProtection
windir=C:\\Windows
windows_tracing_flags=3
windows_tracing_logfile=C:\\BVTBin\\Tests\\installpackage\\csilogfile.log

Hope this little trick hopes someone out there.
I will be glad to hear of other cool useful windows registry tweaks?


How to solve “[crit] [client xxx.xxx.xxx.xxx] (13)Permission denied: /var/lib/ejabberd/.htaccess pcfg_openfile: unable to check htaccess file, ensure it is readable, referer: http://jabber.mydomain.com/” – Error Cause and Solution

Thursday, January 5th, 2012

While configuring JWchat domain, I've come across around an error:

pcfg_openfile: unable to check htaccess file, ensure it is readable

The exact error I got in /var/log/apache2/error.log looked like so:

[crit] [client xxx.xxx.xxx.xxx] (13)Permission denied: /var/lib/ejabberd/.htaccess pcfg_openfile: unable to check htaccess file, ensure it is readable, referer: http://jabber.mydomain.com/

The error message suggested /var/lib/ejabberd/.htaccess – is missing or not readable, however after checking i've seen .htaccess existed as well as was readable:

debian:~# ls -al /var/lib/ejabberd/.htaccess
-rw-r--r-- 1 www-data www-data 114 2012-01-05 07:44 /var/lib/ejabberd/.htaccess

At first glimpse it seems like the message is misleading and not true, however when I switched to www-data user (the user with which Apache runs on Debian), I've figured out the error meaning of unreadability is exactly correct:

www-data@debian:$ ls -al /var/lib/ejabberd/.htaccess
ls: cannot access /var/lib/ejabberd/.htaccess: Permission denied

This permission denied was quite strange, especially when considering the .htaccess is readable for all users:

debian:~# ls -al /var/lib/ejabberd/.htaccess
-rw-r--r-- 1 www-data www-data 114 2012-01-05 07:44 /var/lib/ejabberd/.htaccess

After a thorough look on what might go wrong, thanksfully I've figured it out. The all issues were caused by wrong permissions of /var/lib/ejabberd/.htaccess .You can see below the executable flag for all users (including apache's www-data) is missing :

debian:/var/lib# ls -ld /var/lib/ejabberd/drw-r--r-- 3 ejabberd ejabberd 4096 2012-01-05 07:45 /var/lib/ejabberd/

Solving the error, hence is as easy as adding +x flag to /var/lib/ejabberd :

debian:/var/lib# chmod +x /var/lib/ejabberd

Another way to fix the error is to chmod to 755 to the directory which holds .htaccess:

From now onwards pcfg_openfile: unable to check htaccess file, ensure it is readable err is no more 😉

How to fix “imapd-ssl: Maximum connection limit reached for ::ffff:xxx.xxx.xxx.xxx” imapd-ssl error

Saturday, May 28th, 2011

One of the mail server clients is running into issues with secured SSL IMAP connections ( he has to use a multiple email accounts on the same computer).
I was informed that part of the email addresses are working correctly, however the newly created ones were failing to authenticate even though all the Outlook Express email configuration was correct as well as the username and password typed in were a real existing credentials on the vpopmail server.

Initially I thought, something is wrong with his newly configured emails but it seems all the settings were perfectly correct!

After a lot of wondering what might be wrong I was dumb enough not to check my imap log files.

After checking in my /var/log/mail.log which is the default log file I’ve configured for vpopmail and some of my qmail server services, I found the following error repeating again and again:

imapd-ssl: Maximum connection limit reached for ::ffff:xxx.xxx.xxx.xxx" imapd-ssl error

where xxx.xxx.xxx.xxx was the email user computer IP address.

This issues was caused by one of my configuration settings in the imapd-ssl and imap config file:

/usr/lib/courier-imap/etc/imapd

In /usr/lib/courier-imap/etc/imapd there is a config segment called
Maximum number of connections to accept from the same IP address

Right below this commented text is the variable:

MAXPERIP=4

As you can see it seems I used some very low value for the maximum number of connections from one and the same IP address.
I suppose my logic to set such a low value was my desire to protect the IMAP server from Denial of Service attacks, however 4 is really too low and causes problem, thus to solve the mail connection issues for the user I raised the MAXPERIP value to 50:

MAXPERIP=50

Now to force the new imapd and imapd-ssl services to reload it’s config I did a restart of the courier-imap, like so:

debian:~# /etc/init.d/courier-imap restart

That’s all now the error is gone and the client could easily configure up to 50 mailbox accounts on his PC 🙂

How to compile latest qmailadmin (qmailadmin 1.2.15) on Debian Squeeze Linux

Thursday, August 11th, 2011

I’ve completed a qmail installation few days ago on a fresh installed Debian Squeeze 64 bit server. All is configured and works fine, except qmailadmin and vqadmin.
As the mail server was missing any kind of web mail administration panel, I needed to make at least one of the two above to make with qmail.

I decided to concentrate on qmailadmin and took the time to make it work. I used the following command lines and got the compile failure during make compilation:

debian:/usr/local/src/qmailadmin-1.2.15# ./configure --enable-cgibindir=/usr/lib/cgi-bin --enable-htmldir=/var/www/qmailadmin/ --enable-modify-quota
...
debian:/usr/local/src/qmailadmin-1.2.15# make
...

The source make failed with the following error:

In file included from template.c:45:
qmailadmin.h:37:1: warning: "MAX_FILE_NAME" redefined
In file included from template.c:28:
/home/vpopmail/include/vpopmail.h:146:1: warning: this is the location of the previous definition
template.c: In function "send_template_now":
template.c:505: error: "VERSION" undeclared (first use in this function)
template.c:505: error: (Each undeclared identifier is reported only once
template.c:505: error: for each function it appears in.)
make[1]: *** [template.o] Error 1
make[1]: Leaving directory `/usr/local/src/qmailadmin-1.2.15'
make: *** [all] Error 2

To workaround these compile issues, I’ve had to modify the C source file belonging to qmailadmin ( template.c ), e.g.:

debian:/usr/local/src/qmailadmin-1.2.15# vim template.c

In the file I had to add besides the line:

#include "util.h"

The code:

#define VERSION ""

Aterwards qmailadmin’s compile and install via make && make install-strip succeeded and now works perfectly fine 😉

Debian (Unstable) Squeeze / Sid /usr/lib32/alsa-lib/libasound_module_pcm_pulse.so linked to missing libraries

Thursday, September 10th, 2009

While playing with my installed programs on my recently updated Debian I stepped into a problem with /usr/lib32/alsa-lib/libasound_module_pcm_pulse.so. It seems the library was linked to two non-existing libraries: /emul/ia32-linux/lib/libwrap.so.0 as well as /emul/ia32-linux/usr/lib/libgdbm.so.3. A temporary solution to the issue is pointed out in Debian of the Debian Bug reports . As the report reads to solve that it’s required to:

1. Download libwrap0_7.6.q-18_i386.deb and libgdbm3_1.8.3-6+b1_i386.deb.

2. Extract the packages:dpkg -X libwrap0_7.6.q-18_i386.deb /emul/ia32-linux/dpkg -X libgdbm3_1.8.3-6+b1_i386.deb /emul/ia32-linux/

3. echo /emul/ia32-linux/lib >> /etc/ld.so.conf.d/ia32.conf

4. Execute /sbin/ldconfig

5. Check if all is properly linkedExecute ldd /usr/lib32/alsa-lib/libasound_module_pcm_pulse.so|grep -i “not found”Hopefully all should be fixed now.

Where does Debian GNU / Linux Apache + PHP stores session files?

Tuesday, November 22nd, 2011

In order to debug some PHP session problems on Debian, I needed to check the count of existing session files.
When PHP is compiled from source usually, by default sessions are stored in /tmp directory, however this is not the case on Debian.

Debian’s PHP session directory is different, there the sessions are stored in the directory:

/var/lib/php5

I’ve discovered the session directory location by reading Debian’s cron shell script, which delete session files on every 30 minutes.

Here is the file content:

debian~# cat /etc/cron.d/php5
# /etc/cron.d/php5: crontab fragment for php5
# This purges session files older than X, where X is defined in seconds
# as the largest value of session.gc_maxlifetime from all your php.ini
# files, or 24 minutes if not defined. See /usr/lib/php5/maxlifetime

# Look for and purge old sessions every 30 minutes
09,39 * * * * root [ -x /usr/lib/php5/maxlifetime ] &&
[ -d /var/lib/php5 ] && find /var/lib/php5/ -type f -cmin +$(/usr/lib/php5/maxlifetime) -delete

To check the amount of existing PHP opened session files:

debian:~# ls -1 /var/lib/php5|wc -l
14049

Fix vnstat error “eth0: Not enough data available yet.” on Debian GNU / Linux

Monday, November 21st, 2011

Vnstat GNU Linux console terminal traffic statistics logo

After installing vnstat to keep an eye on server IN and OUT traffic on a Debian Squeeze server. I used the usual:

debian:~# vnstat -u -i eth0

In order to generate the initial database for the ethernet interface used by vnstat to generate its statistics.

However even though /var/lib/vnstat/eth0 got generated with above command statistics were not further generated and trying to check them with command:

debian:~# vnstat --days

Returned the error message:

eth0: Not enough data available yet.

To solve the eth0: Not enough data available yet. message I tried completely removing vnstat package by purging the package e.g.:

debian:~# apt-get --yes remove vnstat
...
debian:~# dpkg --purge vnstat
...

Even though dpkg –purge was invoked /var/lib/vnstat/ refused to be removed since it contained vnstat’s db file eth0

Therefore I deleted by hand before installing again vnstat:

debian:~# rm -rf /var/lib/vnstat/

Tried installing once again vnstat “from scratch”:

debian:~# apt-get install vnstat
...

After that I tried regenerating the vnstat db file eth0 once again with vnstat -u -i eth0 , hoping this should fix the error but it was no go and after that the error:

debian:~# vnstat --hours
eth0: Not enough data available yet.

persisted.

I checked in Debian bugs mailing lists and I found, some people complaining about the same issue with some suggsetions on how the error can be work arouned, anyways none of the suggestions worked for me.

Being irritated I further removed / purged once again vnstat and decided to give it a try by installing vnstat from source
As of time of writting this article, the latest stable vnstat version is 1.11 .
Therefore to install vnstat from source I issued:

debian:~# cd /usr/local/src
debian:/usr/local/src# wget http://humdi.net/vnstat/vnstat-1.11.tar.gz
...
debian:/usr/local/src# tar -zxvvf vnstat-1.11.tar.gz
debian:/usr/local/src# cd vnstat-1.11
debian:/usr/local/src/vnstat-1.11# make & make all & make install
debian:/usr/local/src/vnstat-1.11# cp examples/vnstat.cron /etc/cron.d/vnstat
debian:/usr/local/src/vnstat-1.11# vnstat -u -i eth0
Error: Unable to read database "/var/lib/vnstat/eth0".
Info: -> A new database has been created.

As a last step I put on root crontab to execute:

debian:~# crontab -u root -e

*/5 * * * * /usr/bin/vnstat -u >/dev/null 2>&1

This line updated vnstat db eth0 database, every 5 minutes. After the manual source install vnstat works, just fine 😉

Monitoring Windows hosts with Nagios on Debian GNU/Linux

Tuesday, August 30th, 2011

Nagios logo install and configure nagios to monitor Windows hosts with on Debian GNU/Linux

In this article in short, I’ll explain how I configured Nagios on a Debian GNU/Linux release (Squeeze 6) to monitor a couple of Windows hosts running inside a local network. Now let’s start.

1. Install necessery nagios debian packages

apt-get install nagios-images nagios-nrpe-plugin nagios-nrpe-server nagios-plugins nagios-plugins-basic nagios-plugins-standard
nagios3 nagios3-cgi nagios3-common nagios3-core

2. Edit /etc/nagios-plugins/config/nt.cfg

In the File substitute:

define command { command_name check_nt command_line /usr/lib/nagios/plugins/check_nt -H '$HOSTADDRESS$' -v '$ARG1$' }

With:

define command {
command_name check_nt
command_line /usr/lib/nagios/plugins/check_nt -H '$HOSTADDRESS$' -p 12489 -v $ARG1$ $ARG2$
}

3. Modify nrpe.cfg to put in allowd hoss to connect to the Nagions nrpe server

vim /etc/nagios/nrpe.cfg

Lookup inside for nagios’s configuration directive:

allowed_hosts=127.0.0.1

In order to allow more hosts to report to the nagios nrpe daemon, change the value to let’s say:

allowed_hosts=127.0.0.1,192.168.1.4,192.168.1.5,192.168.1.6

This config allows the three IPs 192.168.1.4-6 to be able to report for nrpe.

For the changes to nrpe server to take effect, it has to be restrarted.

debian:~# /etc/init.d/nagios-nrpe-server restart

Further on some configurations needs to be properly done on the nrpe agent Windows hosts in this case 192.168.1.4,192.168.1.5,192.168.1.6

4. Install the nsclient++ on all Windows hosts which CPU, Disk, Temperature and services has to be monitored

Download the agent from http://sourceforge.net/projects/nscplus and launch the installer, click twice on it and follow the installation screens. Its necessery that during installation the agent has the NRPE protocol enabled. After the installation is complete one needs to modify the NSC.ini
By default many of nsclient++ tracking modules are not enabled in NSC.ini, thus its necessery that the following DLLs get activated in the conf:

FileLogger.dll
CheckSystem.dll
CheckDisk.dll
NSClientListener.dll
SysTray.dll
CheckEventLog.dll
CheckHelpers.dll

Another requirement is to instruct the nsclient++ angent to have access to the Linux installed nagios server again with adding it to the allowed_hosts config variable:

allowed_hosts=192.168.1.1

In my case the Nagios runs on Debian Lenny (Squeeze) 6 and possess the IP address of 192.168.1.1
To test the intalled windows nsclient++ agents are properly installed a simple telnet connection from the Linux host is enough:

5. Create necessery configuration for the nagios Linux server to include all the Windows hosts which will be monitored

There is a window.cfg template file located in /usr/share/doc/nagios3-common/examples/template-object/windows.cfg on Debian.

The file is a good start point for creating a conf file to be understand by nagios and used to periodically refresh information about the status of the Windows hosts.

Thus it’s a good idea to copy the file to nagios3 config directory:

debian:~# mkdir /etc/nagios3/objects
debian:~# cp -rpf /usr/share/doc/nagios3-common/examples/template-object/windows.cfg /etc/nagios3/objects/windows.cfg

A sample windows.cfg content, (which works for me fine) and monitor a couple of Windows nodes running MS-SQL service and IIS and makes sure the services are up and running are:

define host{
use windows-server ; Inherit default values from a template
host_name Windows1 ; The name we're giving to this host
alias Iready Server ; A longer name associated with the host
address 192.168.1.4 ; IP address of the host
}
define host{
use windows-server ; Inherit default values from a template
host_name Windows2 ; The name we're giving to this host
alias Iready Server ; A longer name associated with the host
address 192.168.1.4 ; IP address of the host
}
define hostgroup{
hostgroup_name windows-servers ; The name of the hostgroup
alias Windows Servers ; Long name of the group
}
define hostgroup{
hostgroup_name IIS
alias IIS Servers
members Windows1,Windows2
}
define hostgroup{
hostgroup_name MSSQL
alias MSSQL Servers
members Windows1,Windows2
}
define service{
use generic-service
host_name Windows1
service_description NSClient++ Version
check_command check_nt!CLIENTVERSION
}
define service{ use generic-service
host_name Windows1
service_description Uptime
check_command check_nt!UPTIME
}
define service{ use generic-service
host_name Windows1
service_description CPU Load
check_command check_nt!CPULOAD!-l 5,80,90
}
define service{
use generic-service
host_name Windows1
service_description Memory Usage
check_command check_nt!MEMUSE!-w 80 -c 90
define service{
use generic-service
host_name Windows1
service_description C: Drive Space
check_command check_nt!USEDDISKSPACE!-l c -w 80 -c 90
}
define service{
use generic-service
host_name Windows1
service_description W3SVC
check_command check_nt!SERVICESTATE!-d SHOWALL -l W3SVC
}
define service{
use generic-service
host_name Windows1
service_description Explorer
check_command check_nt!PROCSTATE!-d SHOWALL -l Explorer.exe
}
define service{
use generic-service
host_name Windows2
service_description NSClient++ Version
check_command check_nt!CLIENTVERSION
}
define service{ use generic-service
host_name Windows2
service_description Uptime
check_command check_nt!UPTIME
}
define service{ use generic-service
host_name Windows2
service_description CPU Load
check_command check_nt!CPULOAD!-l 5,80,90
}
define service{
use generic-service
host_name Windows2
service_description Memory Usage
check_command check_nt!MEMUSE!-w 80 -c 90
define service{
use generic-service
host_name Windows2
service_description C: Drive Space
check_command check_nt!USEDDISKSPACE!-l c -w 80 -c 90
}
define service{
use generic-service
host_name Windows2
service_description W3SVC
check_command check_nt!SERVICESTATE!-d SHOWALL -l W3SVC
}
define service{
use generic-service
host_name Windows2
service_description Explorer
check_command check_nt!PROCSTATE!-d SHOWALL -l Explorer.exe
}
define service{ use generic-service
host_name Windows1
service_description SQL port Check
check_command check_tcp!1433
}
define service{
use generic-service
host_name Windows2
service_description SQL port Check
check_command check_tcp!1433
}
The above config, can easily be extended for more hosts, or if necessery easily setup to track more services in nagios web frontend.
6. Test if connectivity to the nsclient++ agent port is available from the Linux server

debian:~# telnet 192.168.58.6 12489
Trying 192.168.58.6...
Connected to 192.168.58.6.
Escape character is '^]'.
asd
ERROR: Invalid password.

Another good idea is to launch on the Windows host the NSClient++ (system tray) , e.g.:

Start, All Programs, NSClient++, Start NSClient++ (system tray).

Test Nagios configuration from the Linux host running nagios and nrpe daemons to check if the check_nt, can succesfully authenticate and retrieve data generated from the nsclient++ on the Windows host:

debian:~# /usr/lib/nagios/plugins/check_nt -H 192.168.1.5 -p 12489 -v CPULOAD -w 80 -c 90 -l 5,80,90,10,80,90

If everything is okay and the remote Windows system 192.168.1.5 has properly configured and running NSClient++ the above command should return an output like:

CPU Load 1% (5 min average) 1% (10 min average) | '5 min avg Load'=1%;80;90;0;100 '10 min avg Load'=1%;80;90;0;100

In case of the command returns:

could not fetch information from server

instead this means that probably there is some kind of problem with authentication or handshake of the Linux host’s nagios check_nt to the Windows server’s running on 12489.

This is sometimes caused by misconfigured NSC.ini file, however in other occasions this error is caused by misconfigured Windows Firewall or because the NSClient++ is not running with Administrator user.

By the way important note to make about Windows 2008r2 is that if NSClient++ is running there it’s absolutely required to Login with Windows Administrator and run the NSClient++ /start , if it’s run through the Run As Adminsitrator with an admin privileged user the aforementioned error might appear, so be careful.
I’ve experienced this error myself and it took me about 40 minutes to find that I have to run it directly with Administrator user after logging as Administrator.

7. Create nagios web iface Apache configuration

nagios debian pachage is shipped with a config which is suitable to be set debian:~# cp -rpf /usr/share/doc/nagios3-common/examples/apache2.conf /etc/apache2/sites-avalable/nagios
debian:~# ln -sf /etc/apache2/sites-available/nagios /etc/apache2/sites-enabled/nagios

The /etc/apache2/sites-available/nagios can easily be configured to work on Virtualhost, to do so the above copied file need to be wrapped inside a VirtualHost directive. For that put in the beginning of the file;

<VirtualHost *:80>

and in the end of the file:

<VirtualHost *:80>

8. Restart nagios server and Apache for the new settings to take effect

debian:~# /etc/init.d/apache2 restart
...
debian:~# /etc/init.d/nagios3 restart

If some custom configuration about tracking the Debian Linux nagios host running services needs to be made, its also helpful for one to check in /etc/nagios3/conf.d

Well that’s mostly what I had to do to make the Nagios3 server to keep track of a small Windows network on Debian GNU/Linux Squeeze 6, hope this small article helps. Cheers 😉

Fix to Nagios is currently not checking for external commands

Wednesday, August 24th, 2011

While I was deploying a new Nagios install to Monitor some Windows hosts I’ve came across the following error in Nagios’s web interface:

Sorry, but Nagios is currently not checking for external commands, so your command will not be committed!
Read the documentation for information on how to enable external commands...

This error is caused by an option configuration for /etc/nagios/nrpe.cfg (part of the nrpe-nagios-server Debian package.

The config variable in nrpe.cfg causing the error is check_external_command=0 , the fix comes to changing the variable to:

check_external_command=1

As well as restart the /etc/init.d/nagios-nrpe-server and /etc/init.d/nagios3 services:

debian:~# /etc/init.d/nagios3 restart
...
debian:~# /etc/init.d/nagios-nrpe-server
...

This changes has work out the error Sorry, but Nagios is currently not checking for external commands, so your command will not be committed! , however immediately after another kind of error appared in Nagios web interface when I tried to use the send Nagios commands button. The error was:

Error: Could not stat() command file '/var/lib/nagios3/rw/nagios.cmd'!

This error is due to a deb package, which seems to be affecting the current deb versions of Nagios shipped with Debian 6 Squeeze stable, as well as the Latest Ubuntu release 11.04.

Thanksfully there is a work around to the problem I found online, to fix it up I had to execute the commands:

debian:~# /etc/init.d/nagios3 stop debian:~# dpkg-statoverride --update --add nagios www-data 2710 /var/lib/nagios3/rw
debian:~# dpkg-statoverride --update --add nagios nagios 751 /var/lib/nagios3
debian:~# /etc/init.d/nagios3 start

And hooray Thanks God the error is gone 😉