Posts Tagged ‘servers’

Howto debug and remount NFS hangled filesystem on Linux

Monday, August 12th, 2019

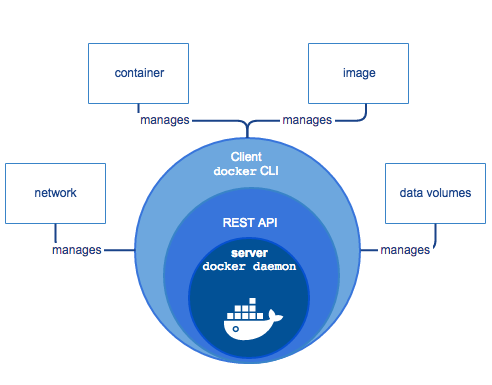
nfsnetwork-file-system-architecture-diagram

If you're using actively NFS remote storage attached to your Linux server it is very useful to get the number of dropped NFS connections and in that way to assure you don't have a remote NFS server issues or Network connectivity drops out due to broken network switch a Cisco hub or other network hop device that is routing the traffic from Source Host (SRC) to Destination Host (DST) thus, at perfect case if NFS storage and mounted Linux Network filesystem should be at (0) zero dropped connectios or their number should be low. Firewall connectivity between Source NFS client host and Destination NFS Server and mount should be there (set up fine) as well as proper permissions assigned on the server, as well as the DST NFS should be not experiencing I/O overheads as well as no DNS issues should be present (if NFS is not accessed directly via IP address).
In below article which is mostly for NFS novice admins is described shortly few of the nuances of working with NFS.
 

1. Check nfsstat and portmap for issues

One indicator that everything is fine with a configured NFS mount is the number of dropped NFS connections
or with a very low count of dropped connections, to check them if you happen to administer NFS

nfsstat


linux:~# nfsstat -o net
Server packet stats:
packets    udp        tcp        tcpconn
0          0          0          0  


nfsstat is useful if you have to debug why occasionally NFS mounts are getting unresponsive.

As NFS is so dependent upon portmap service for mapping the ports, one other point to check in case of Hanged NFSes is the portmap service whether it did not crashed due to some reason.


linux:~# service portmap status
portmap (pid 7428) is running…   [portmap service is started.]


linux:~# ps axu|grep -i rpcbind
_rpc       421  0.0  0.0   6824  3568 ?        Ss   10:30   0:00 /sbin/rpcbind -f -w


A useful commands to debug further rcp caused issues are:

On client side:


rpcdebug -m nfs -c


On server side:


rpcdebug -m nfsd -c


It might be also useful to check whether remote NFS permissions did not changed with the good old showmount cmd

linux:~# showmount -e rem_nfs_server_host


Also it is useful to check whether /etc/exports file was not modified somehow and whether the NFS did not hanged due to attempt of NFS daemon to reload the new configuration from there, another file to check while debugging is /etc/nfs.conf – are there group / permissions issues as well as the usual /var/log/messages and the kernel log with dmesg command for weird produced NFS client / server or network messages.

nfs-utils disabled serving NFS over UDP in version 2.2.1. Arch core updated to 2.3.1 on 21 Dec 2017 (skipping over 2.2.1.) If UDP stopped working then, add udp=y under [nfsd] in /etc/nfs.conf. Then restart nfs-server.service.

If the remote NFS server is running also Linux it is useful to check its /etc/default/nfs-kernel-server configuration

At some stall cases it might be also useful to remount the NFS (but as there might be a process on the Linux server) trying to read / write data from the remote NFS mounted FS it is a good idea to check (whether a process / service) on the server is not doing I/O operations on the NFS and if such is existing to kill the process in question with fuser
 

linux:~# fuser -k [mounted-filesystem]


2. Diagnose the problem interactively with htop


    Htop should be your first port of call. The most obvious symptom will be a maxed-out CPU.
    Press F2, and under "Display options", enable "Detailed CPU time". Press F1 for an explanation of the colours used in the CPU bars. In particular, is the CPU spending most of its time responding to IRQs, or in Wait-IO (wio)?
 

3. Get more extensive Mount info with mountstats


nfs-utils package contains mountstats command which is very useful in debugging further the issues identified

$ mountstats
Stats for example:/tank mounted on /tank:
  NFS mount options: rw,sync,vers=4.2,rsize=524288,wsize=524288,namlen=255,acregmin=3,acregmax=60,acdirmin=30,acdirmax=60,soft,proto=tcp,port=0,timeo=15,retrans=2,sec=sys,clientaddr=xx.yy.zz.tt,local_lock=none
  NFS server capabilities: caps=0xfbffdf,wtmult=512,dtsize=32768,bsize=0,namlen=255
  NFSv4 capability flags: bm0=0xfdffbfff,bm1=0x40f9be3e,bm2=0x803,acl=0x3,sessions,pnfs=notconfigured
  NFS security flavor: 1  pseudoflavor: 0


NFS byte counts:
  applications read 248542089 bytes via read(2)
  applications wrote 0 bytes via write(2)
  applications read 0 bytes via O_DIRECT read(2)
  applications wrote 0 bytes via O_DIRECT write(2)
  client read 171375125 bytes via NFS READ
  client wrote 0 bytes via NFS WRITE

RPC statistics:
  699 RPC requests sent, 699 RPC replies received (0 XIDs not found)
  average backlog queue length: 0

READ:
    338 ops (48%)
    avg bytes sent per op: 216    avg bytes received per op: 507131
    backlog wait: 0.005917     RTT: 548.736686     total execute time: 548.775148 (milliseconds)
GETATTR:
    115 ops (16%)
    avg bytes sent per op: 199    avg bytes received per op: 240
    backlog wait: 0.008696     RTT: 15.756522     total execute time: 15.843478 (milliseconds)
ACCESS:
    93 ops (13%)
    avg bytes sent per op: 203    avg bytes received per op: 168
    backlog wait: 0.010753     RTT: 2.967742     total execute time: 3.032258 (milliseconds)
LOOKUP:
    32 ops (4%)
    avg bytes sent per op: 220    avg bytes received per op: 274
    backlog wait: 0.000000     RTT: 3.906250     total execute time: 3.968750 (milliseconds)
OPEN_NOATTR:
    25 ops (3%)
    avg bytes sent per op: 268    avg bytes received per op: 350
    backlog wait: 0.000000     RTT: 2.320000     total execute time: 2.360000 (milliseconds)
CLOSE:
    24 ops (3%)
    avg bytes sent per op: 224    avg bytes received per op: 176
    backlog wait: 0.000000     RTT: 30.250000     total execute time: 30.291667 (milliseconds)
DELEGRETURN:
    23 ops (3%)
    avg bytes sent per op: 220    avg bytes received per op: 160
    backlog wait: 0.000000     RTT: 6.782609     total execute time: 6.826087 (milliseconds)
READDIR:
    4 ops (0%)
    avg bytes sent per op: 224    avg bytes received per op: 14372
    backlog wait: 0.000000     RTT: 198.000000     total execute time: 198.250000 (milliseconds)
SERVER_CAPS:
    2 ops (0%)
    avg bytes sent per op: 172    avg bytes received per op: 164
    backlog wait: 0.000000     RTT: 1.500000     total execute time: 1.500000 (milliseconds)
FSINFO:
    1 ops (0%)
    avg bytes sent per op: 172    avg bytes received per op: 164
    backlog wait: 0.000000     RTT: 2.000000     total execute time: 2.000000 (milliseconds)
PATHCONF:
    1 ops (0%)
    avg bytes sent per op: 164    avg bytes received per op: 116
    backlog wait: 0.000000     RTT: 1.000000     total execute time: 1.000000 (milliseconds)


nfs-utils disabled serving NFS over UDP in version 2.2.1. Arch core updated to 2.3.1 on 21 Dec 2017 (skipping over 2.2.1.) If UDP stopped working then, add udp=y under [nfsd] in /etc/nfs.conf. Then restart nfs-server.service.
 

4. Check for firewall issues
 

If all fails make sure you don't have any kind of firewall issues. Sometimes firewall changes on remote server or somewhere in the routing servers might lead to stalled NFS mounts.


To use properly NFS as you should know as a minimum you need to have opened as ports is Port 111 (TCP and UDP) and 2049 (TCP and UDP) on the NFS server (side) as well as any traffic inspection routers on the road from SRC (Linux client host) and NFS Storage destination DST server.

There are also ports for Cluster and client status (Port 1110 TCP for the former, and 1110 UDP for the latter) as well as a port for the NFS lock manager (Port 4045 TCP and UDP) but having this opened or not depends on how the NFS is configured. You can further determine which ports you need to allow depending on which services are needed cross-gateway.
 

5. How to Remount a Stalled unresponsive NFS filesystem mount


At many cases situation with remounting stalled NFS filesystem is not so easy but if you're lucky a standard mount and remount should do the trick.

Most simple way to remout the NFS (once you're sure this might not disrupt any service) – don't blame me if you break something is with:
 

umount -l /mnt/NFS_mnt_point
mount /mnt/NFS_mnt_point


Note that the lazy mount (-l) umount opt is provided here as very often this is the only way to unmount a stalled NFS mount.

Sometimes if you have a lot of NFS mounts and all are inacessible it is useful to remount all NFS mounts, if the remote NFS is responsive this should be possible with a simple for bash loop:

for P in $(mount | awk '/type nfs / {print $3;}'); do echo $P; echo "sudo umount $P && sudo mount $P" && echo "ok :)"; done


If you cd /mnt/NFS_mnt_point and try ls and you get

$ ls
.: Stale File Handle


You will need to unmount the FS with forceful mount flag

umount -f /mnt/NFS_mnt_point
 

Sum it up


In this article, I've shown you a few simple ways to debug what is wrong with a Stalled / Hanged NFS filesystem present on a NFS server mounted on a Linux client server.
Above was explained the common issues caused by NFS portmap (rpcbind) dependency, how to its status is fine, some further diagnosis with htop and mountstat was pointed. I've pointed the minimum amount of TCP / UDP ports 2049 and 111 that needs to be opened for the NFS communication to work and finally explained on how to remount a stalled NFS single or all attached mount on a NFS client to restore to normal operations.
As NFS is a whole ocean of things and the number of ways it is used are too extensive this article is just a general info useful for the NFS dummy admin for more robust configs read some good book on NFS such as Managing NFS and NIS, 2nd Edition – O'Reilly Media and for Kernel related NFS debugging make sure you check as a minimum ArchLinux's NFS troubleshooting guide and sourceforge's NFS Troubleshoting and Optimizing NFS Performance guides.

 

Install and use personal Own Cloud on Debian Linux for better shared data security – OwnCloud a Free Software replacement for Google Drive

Thursday, August 23rd, 2018

owncloud-self-hosted-cloud-file-sharing-and-storage-service-for-gnu-linux-howto-install-on-debian

Basicly I am against the use of any Cloud type of service but as nowadays Cloud usage is almost inevitable and most of the times you need some kind of service to store and access remotely your Data from multiple devices such as DropBox, Google Drive, iCloud etc. and using some kind of infrastructure to execute high-performance computing is invitable just like the Private Cloud paid services online are booming nowdays, I decided to give a to research and test what is available as a free software in the field of Clouding (your data) 🙂

Undoubfully, it is really nice fact that there are Free Software / Open Source alternatives to run your Own personal Cloud to store your data from multiple locations on a single point.

The most popular and leading Cloud Collaboration service (which is OpenSource but unfortunately not under GPLv2 / GPV3 – e.g. not fully free software) is OwnCloud.

ownCloud is a flexible self-hosted PHP and Javascript based web application used for data synchronization and file sharing (where its remote file access capabilites are realized by Sabre/Dav an open source WebDav server.
OwnCloud allows end user to easily Store / Manage files, Calendars, Contacts, To-Do lists (user and group administration via OpenID and LDAP), public URLs can be easily, created, the users can interact with browser-based ODF (Open Document Format) word processor , there is a Bookmarking, URL Shortening service integrated, Gallery RSS Feed and Document Viewer tools such as PDF viewer etc. which makes it a great alternative to the popular Google Drive, iCloud, DropBox etc.

The main advantage of using a self-hosted Cloud is that Your data is hosted and managed by you (on your server and your hard drives) and not by some God knows who third party provider such as the upmentioned.
In other words by using OwnCloud you manage your own data and you don't share it ot on demand with the Security Agencies with CIA, MI6, Mussad … (as it is very likely most of publicly offered Cloud storage services keeps track on the data stored on them).

The other disadvantage of Cloud Computing is that the stored data on such is usually stored on multiple servers and you can never know for sure where your data is physically located, which in my opinion is way worse than the option with Self Hosted Cloud where you know where your data belongs and you can do whatever you want with your data keep it secret / delete it or share it on your demand.

OwnCloud has its clients for most popular Mobile (Smart Phone) platforms – an Android client is available in Google Play Store as well as in Apple iTunes besides the clients available for FreeBSD OS, the GNOME desktop integration package and Raspberry Pi.

For those who are looking for additional advanced features an Enterprise version of OwnCloud is also available aiming business use and included software support.

Assuming you have a homebrew server or have hired a dedidacted or VPS server (such as the Ones we provide) ,Installing OwnCloud on GNU / Linux is a relatively easy
task and it will take no more than 15 minutes to 2 hours of your life.
In that article I am going to give you a specific instructions on how to install on Debian GNU / Linux 9 but installing on RPM based distros is similar and straightfoward process.
 

1. Install MySQL / MariaDB database server backend
 

By default OwnCloud does use SQLite as a backend data storage but as SQLite stores its data in a file and is becoming quickly slow, is generally speaking slowre than relational databases such as MariaDB server (or the now almost becoming obsolete MySQL Community server).
Hence in this article I will explain how to install OwnCloud with MariaDB as a backend.

If you don't have it installed already, e.g. it is a new dedicated server install MariaDB with:
 

server:~# apt-get install –yes mariadb-server


Assuming you're install on a (brand new fresh Linux install – you might want to install also the following set of tools / services).


server:~# systemctl start mariadb
server:~# systemctl enable mariadb
server:~# mysql_secure_installation


mysql_secure_installation – is to finalize and secure MariaDB installation and set the root password.
 

2. Create necessery database and users for OwnCloud to the database server
 

linux:~# mysql -u root -p
MariaDB [(none)]> CREATE DATABASE owncloud CHARACTER SET utf8;
MariaDB [(none)]> GRANT ALL PRIVILEGES ON owncloud.* TO 'owncloud'@'localhost' IDENTIFIED BY 'owncloud_passwd';
MariaDB [(none)]> FLUSH PRIVILEGES;
MariaDB [(none)]> \q


3. Install Apache + PHP necessery deb packages
 

As of time of writting the article on Debian 9.0 the required packages for a working Apache + PHP install for OwnCloud are as follows.


server:~# apt-get install –yes apache2 mariadb-server libapache2-mod-php7.0 \
openssl php-imagick php7.0-common php7.0-curl php7.0-gd \
php7.0-imap php7.0-intl php7.0-json php7.0-ldap php7.0-mbstring \
php7.0-mcrypt php7.0-mysql php7.0-pgsql php-smbclient php-ssh2 \
php7.0-sqlite3 php7.0-xml php7.0-zip php-redis php-apcu


4. Install Redis to use as a Memory Cache for accelerated / better performance ownCloud service


Redis is an in-memory kept key-value database that is similar to Memcached so OwnCloud could use it to cache stored data files. To install latest redis-server on Debian 9:
 

server:~# apt-get install –yes redis-server

5. Install ownCloud software packages on the server

Unfortunately, default package repositories on Debian 9 does not provide owncloud server packages but only some owncloud-client packages are provided, that's perhaps the packages issued by owncloud does not match debian packages.

As of time of writting this article, the latest available OwnCloud server  version package for Debian is OC 10.

a) Add necessery GPG keys

The repositories to use are provided by owncloud.org, to use them we need to first add the necessery gpg key to verify the binaries have a legit checksum.
 

server:~# wget -qO- https://download.owncloud.org/download/repositories/stable/Debian_9.0/Release.key | sudo apt-key add –


b) Add owncloud.org repositories in separete sources.list file


server:~# echo 'deb https://download.owncloud.org/download/repositories/stable/Debian_9.0/ /' | sudo tee /etc/apt/sources.list.d/owncloud.list


c) Enable https transports for the apt install tool


server:~# apt-get –yes install apt-transport-https


d) Update Debian apt cache list files and install the pack


server:~# apt-get update


server:~# apt-get install –yes owncloud-files


By default owncloud store file location is /var/www/owncloud but on many servers that location is not really appropriate because /var/www might be situated on a hard drive partition whose size is not big enough, if that's the case just move the folder to another partition and create a symbolic link in /var/www/owncloud pointing to it …


6. Create necessery Apache configurations to make your new self-hosted cloud accessible
 

a) Create Apache config file


server:~# vim /etc/apache2/sites-available/owncloud.conf


Alias /owncloud "/var/www/owncloud/"

<Directory /var/www/owncloud/>
Options +FollowSymlinks
AllowOverride All

<IfModule mod_dav.c>
Dav off
</IfModule>

SetEnv HOME /var/www/owncloud
SetEnv HTTP_HOME /var/www/owncloud

</Directory>

b) Enable Mod_Dav (WebDAV) if it is not enabled yet


server:~# ln -sf ../mods-available/dav_fs.conf
server:~# ln -sf ../mods-available/dav_fs.load
server:~# ln -sf ../mods-available/dav.load
server:~# ln -sf ../mods-available/dav_lock.load

c) Set proper permissions for /var/www/owncloud to make upload work properly


chown -R www-data: /var/www/owncloud/


d) Restart Apache WebServer (to make new configuration affective)


server:~# /etc/init.d/apache2 restart


7. Finalize  OwnCloud Install
 

Access OwnCloud Web Interface to finish the database creation and set the administrator password for the New Self-Hosted cloud
 

http://Your_server_ip_address/owncloud/

By default the Web interface is accessible in unencrypted (insecure) http:// it is a recommended practice (if you already don't have an HTTPS SSL certificate install for the IP or the domain to install one either a self-signed certificate or even better to use LetsEncrypt CertBot to easily create a valid SSL for free for your domain


installing-OwnCloud-Web-Config-User-Pass-interface-Owncloud-10-on-Debian-9-Linux-howto

Just fill in in your desired user / pass and pass on the database user / password / db name (if required you can set also a different location for the data directory from the default one /var/www/owncloud/data.

Click Finish Setup and That's all folks!

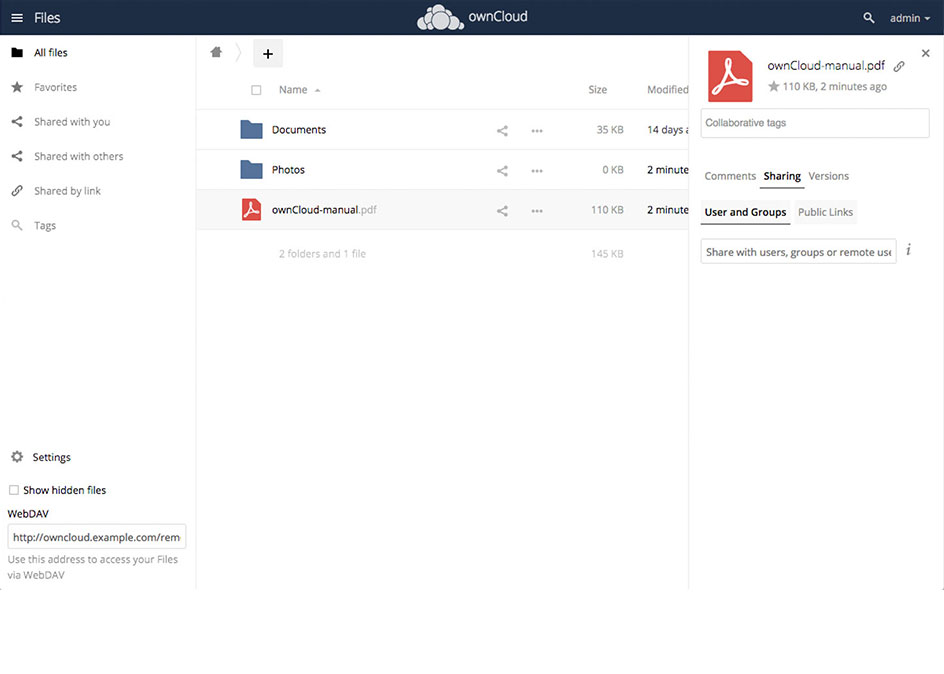
owncloud-server-web-ui-interface

OwnCloud is successfully installed on the server, you can now go and download a Mobile App or Desktop application for whatever OS you're using and start using it as a Dropbox replacement. In a certain moment you might want to consult also the official UserManual documentation as you would probably need further information on how to manage your owncloud.

Enjoy !

How to install and configure torbutton on Debian / Anonymizing Iceweasel, Firefox on Debian GNU/Linux

Thursday, August 5th, 2010

Tor Onion Logo

There is a quite a buzz online recently about the implications breach of personal privacy by simple browing online.
A week ago I've blogged On How to improve your web browser security for better personal identity
Though there is probably a plenty of more things to be done on guaranteeing your anonymous identity online, the article lacked to mention one very one vital project related with anonymity – the tor Anonymity online project
The project offer the user the right to be anonymous online through a complex constantly expanding network of volunteers which voluntary install and grant access to the installed tor server to be used as a proxy from their computers.
A very thorough explanation on what is tor can be red here
Enabling tor on your personal computer would at least guarantee you that every now and then your traffic browser network traffic (request) would flow through a random tor servers located on a different worldly geographic locations.
Usually the traffic to a destination host would pass through 5 tor network nodes. Where the traffic is unecrypted between last node and the 4th node, while in the other four ones it's completely crypted.
This makes your tracking almost impossible if it's based on technologies like for instance Maxmind's Geoip or Geonames's geographical data base because every now and then you'll appear to be coming to the end point referrar web server originating from a different tor node ip address

The tor server is a free software licensed under the GPL and this is also a good assurance because everybody is able to have a look on the code and this is a further guarantee that the software doesn't include a malicious ways for a middle users to sniff on your traffic.

The tor project has even built a pre-bundled browser ready to be worn by yourself on a usb stick, so you can quickly start using the tor anonymous network on any random computer anywhere.
The tor browser page is available here also Tor Browser Bundle for Windows is available here
Tor server is available for both Windows, Mac OS X, Linux and Linux/BSD Unix
Of course tor is not perfect it opens some other possible doors for attackers which are much less likely to occur if you don't use it, however in general it's better off with tor than without it.

One serious reason for not reason for not using Tor might be that it's usually many times slower than normal browser since, it routes traffic through a different tor network nodes.
So if you decide to go on and use it you better be patient and calm 🙂

Since I'm a Debian user and I really do value my privacy I decided to start using Tor.
In order to start using Tor it's usually necessary to configure your browser to use The TorButoon Firefox browserextension

Nevertheless on Debian GNU/Linux if you try to go the straigh way as explained on Tor's website install the TorButton and configure it to work in cooperation with the polipo caching proxy
You will be not able to browse after enabling straight the tor plugin.
If you try the up-mentioned approach you're probably about to come to errors like:
"the proxy server is refusing connections"
,
Proxy error: 502 Disconnected operation and object not in cache
or
504 Connect to superquizgames.com:80 failed: SOCKS error: host unreachableThe following error occurred while trying to access http://yourwebsite.com/:504 Connect to superquizgames.com:80 failed: SOCKS error: host unreachable

In order to properly install configure and enable the TorButton on my Debian GNU/Linux I had to get through the following steps:

1. Install the polipo caching proxy

debian:~# apt-get install polipo

2. Download and overwrite default polipo configuration with the one from torproject.org

This is necessary to configure in order to have polipo adapted to work with tor, so issue the following commands:

debian:~# cd /etc/polipo
debian:~# wget https://svn.torproject.org/svn/torbrowser/trunk/build-scripts/config/polipo.conf
debian:~# mv config config.bak
debian:~# mv polipo.conf config

3. Restart polipo for the new config settings to take affect

debian:~# /etc/init.d/polipo restart

4. Install the iceweasel-torbutton browser extension

debian:~# apt-get install iceweasel-torbutton

The iceweasel-torbutton will also install you the tor package which is evidently required for the torbutton to operate.
Now you should be ready to go, you can enable the tor use from the tor button which should appear in your browser in the bottom right corner of your browser.
It should look something similar to:

Tor Button screenshot in Iceweasel

Tor Enable/Disable Iceweasel browser Button

To test your Tor Configuration you can use the Test Settings button which is straight available from TorButton's preferences

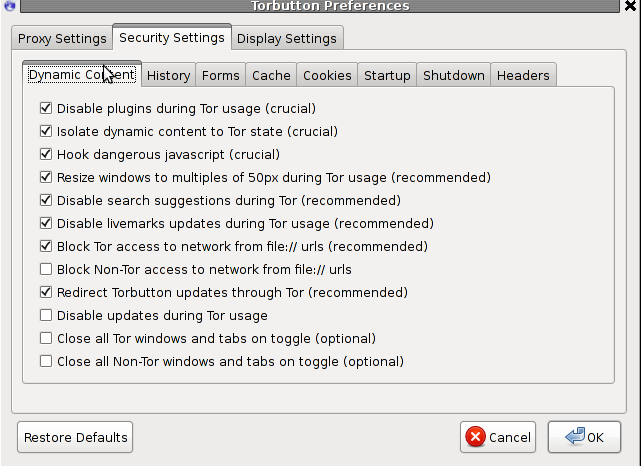
From here after it might be a good idea to play with the TorButton security settings and configure it according to your liking, bear in mind that you should have a solid knowledge on how browsers work and some basic Internet protocols before you start tampering this options.
If tou don't know what you do you better stop and don't tamper with the torbutton security options.
The only one that you will most probably want to untick is The Disable plugins during Tor usage , stopping this option will allow you to have a flash video streaming display properly, otherwise you won't be able to use , Vbox etc.
Below you see a screenshot of the TorButton Security Settings dialog.

TorButton properties Dialog

To open up this dialog you need to navigate to the TorButto and choose preferences with the right mouse buttons 🙂
Hope this article is informative to somebody out there.
User feedback is mostly welcome! Cheers 🙂

How to disable tidy HTML corrector and validator to output error and warning messages

Sunday, March 18th, 2012

I've noticed in /var/log/apache2/error.log on one of the Debian servers I manage a lot of warnings and errors produced by tidy HTML syntax checker and reformatter program.

There were actually quite plenty frequently appearing messages in the the log like:

...
To learn more about HTML Tidy see http://tidy.sourceforge.net
Please fill bug reports and queries using the "tracker" on the Tidy web site.
Additionally, questions can be sent to html-tidy@w3.org
HTML and CSS specifications are available from http://www.w3.org/
Lobby your company to join W3C, see http://www.w3.org/Consortium
line 1 column 1 - Warning: missing <!DOCTYPE> declaration
line 1 column 1 - Warning: plain text isn't allowed in <head> elements
line 1 column 1 - Info: <head> previously mentioned
line 1 column 1 - Warning: inserting implicit <body>
line 1 column 1 - Warning: inserting missing 'title' element
Info: Document content looks like HTML 3.2
4 warnings, 0 errors were found!
...

I did a quick investigation on where from this messages are logged in error.log, and discovered few .php scripts in one of the websites containing the tidy string.
I used Linux find + grep cmds find in all php files the "tidy "string, like so:

server:~# find . -iname '*.php'-exec grep -rli 'tidy' '{}' ;
find . -iname '*.php' -exec grep -rli 'tidy' '{}' ; ./new_design/modules/index.mod.php
./modules/index.mod.php
./modules/index_1.mod.php
./modules/index1.mod.php

Opening the files, with vim to check about how tidy is invoked, revealed tidy calls like:

exec('/usr/bin/tidy -e -ashtml -utf8 '.$tmp_name,$rett);

As you see the PHP programmers who wrote this website, made a bigtidy mess. Instead of using php5's tidy module, they hard coded tidy external command to be invoked via php's exec(); external tidy command invocation.
This is extremely bad practice, since it spawns the command via a pseudo limited apache shell.
I've notified about the issue, but I don't know when, the external tidy calls will be rewritten.

Until the external tidy invocations are rewritten to use the php tidy module, I decided to at least remove the tidy warnings and errors output.

To remove the warning and error messages I've changed:

exec('/usr/bin/tidy -e -ashtml -utf8 '.$tmp_name,$rett);

exec('/usr/bin/tidy --show-warnings no --show-errors no -q -e -ashtml -utf8 '.$tmp_name,$rett);

The extra switches meaning is like so:

q – instructs tidy to produce quiet output
-e – show only errors and warnings
–show warnings no && –show errors no, completely disable warnings and error output

Onwards tidy no longer logs junk messages in error.log Not logging all this useless warnings and errors has positive effect on overall server performance especially, when the scripts, running /usr/bin/tidy are called as frequently as 1000 times per sec. or more

Optimizing Linux TCP/IP Networking to increase Linux Servers Performance

Tuesday, April 8th, 2008

optimize-linux-servers-for-network-performance-to-increase-speed-and-decrease-hardware-costs-_tyan-exhibits-hpc-optimized-server-platforms-featuring-intel-xeon-processor-e7-4800-v3-e5-2600-supercomputing-15_full

Some time ago I thought of ways to optimize my Linux Servers network performance.

Even though there are plenty of nice articles on the topic on how to better optimize Linux server performance by tunning up the kernel sysctl (variables).

Many of the articles I found was not structed in enough understandable way so I decided togoogle around and  found few interesting websites which gives a good overview on how one can speed up a bit and decrease overall server loads by simply tuning few basic kernel sysctl variables.

Below article is a product of my research on the topic on how to increase my GNU / Linux servers performance which are mostly running LAMP (Linux / Apache / MySQL / PHP) together with Qmail mail servers.

The article is focusing on Networking as networking is usual bottleneck for performance.
Below are the variables I found useful for optimizing the Linux kernel Network stack.

Implementing the variables might reduce your server load or if not decrease server load times and CPU utilization, they would at lease increase thoroughput so more users will be able to access your servers with (hopefully) less interruptions.
That of course would save you some Hardware costs and raise up your Servers efficiency.

Here are the variables themselves and some good example:
 

# values.net.ipv4.ip_forward = 0 ( Turn off IP Forwarding )

net.ipv4.conf.default.rp_filter = 1

# ( Control Source route verification )
net.ipv4.conf.default.accept_redirects = 0

# ( Disable ICMP redirects )
net.ipv4.conf.all.accept_redirects = 0 ( same as above )
net.ipv4.conf.default.accept_source_route = 0

# ( Disable IP source routing )
net.ipv4.conf.all.accept_source_route = 0
( - || - )net.ipv4.tcp_fin_timeout = 40

# ( Decrease FIN timeout ) - Useful on busy/high load
serversnet.ipv4.tcp_keepalive_time = 4000 ( keepalive tcp timeout )
net.core.rmem_default = 786426 - Receive memory stack size ( a good idea to increase it if your server receives big files )
net.ipv4.tcp_rmem = "4096 87380 4194304"
net.core.wmem_default = 8388608 ( Reserved Memory per connection )
net.core.wmem_max = 8388608
net.core.optmem_max = 40960
( maximum amount of option memory buffers )

# like a homework investigate by yourself what the variables below stand for :)
net.ipv4.tcp_max_tw_buckets = 360000
net.ipv4.tcp_reordering = 5
net.core.hot_list_length = 256
net.core.netdev_max_backlog = 1024


# Below are newly added experimental
#net.core.rmem_max = 16777216
#net.core.wmem_max = 16777216
##kernel.msgmni = 1024
##kernel.sem = 250 256000 32 1024
##vm.swappiness=0
kernel.sched_migration_cost=5000000


Also a good sysctl.conf file which one might want to substitite or use as a skele for some productive server is ready for download here


Even if you can't reap out great CPU reduction benefits from integrating above values or similar ones, your overall LAMP performance to end customers should increase – at some occasions dramatically, at others little bit but still noticable.

If you're unsure on exact kernel variable values to use check yourself what should be the best values that fits you according to your server Hardware – usually this is done by experimenting and reading the kernel documentation as provided for each one of uplisted variables.

Above sysctl.conf is natively created to run on Debian and on other distributions like CentOS, Fedora Slackware some values might either require slight modifications.

Hope this helps and gives you some idea of how network optimization in Linux is usually done. Happy (hacking) tweakening !

No space left on device with free disk space / Why no space left on device while there is plenty of disk space on drive – Running out of Inodes

Tuesday, November 17th, 2015

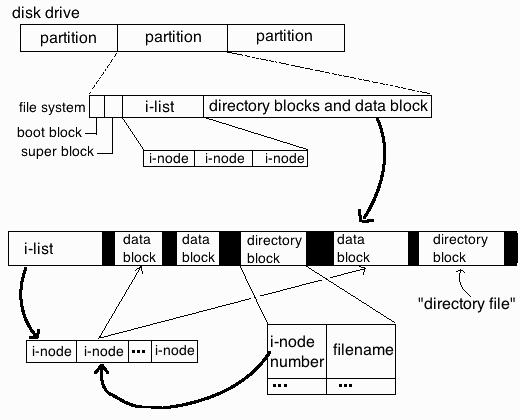
no_space_left-on-device-while-there-is-disk-space-running-out-of-file-inodes-unix_linux_file_system_diagram.gif


On one of the servers, I'm administrating the websites started showing some Mysql database table corrup errors like:


Table './database_name/site_news_list_com' is marked as crashed and last (automatic?) repair failed

The server is using Oracle MySQL server community stable edition on Debian GNU / Linux 6.0, so I first thought during work the server crashed either due to some bug issue in MySQL or it crashed due to some PHP cron job that did something messy. Thus to solve the crashed tables, tried using mysqlcheck tool which helped pretty fine, at many times whether there were database / table corruptions. I've run the following set of mysqlcheck commands with root (superuser) in a bash shell after logging in through SSH:

:

server:~# /usr/bin/mysqlcheck –defaults-extra-file=/etc/mysql/debian.cnf \–check –all-databases -u root -p`grep -i password /root/.my.cnf |sed -e 's#password=##g'`>> /var/log/cronwork.log
server:~# /usr/bin/mysqlcheck –defaults-extra-file=/etc/mysql/debian.cnf –analyze –all-databases -u root -p`grep -i password /root/.my.cnf |sed -e 's#password=##g'`>> /var/log/cronwork.log
server:~# /usr/bin/mysqlcheck –defaults-extra-file=/etc/mysql/debian.cnf \–auto-repair –optimize –all-databases -u root -p`grep -i password /root/.my.cnf |sed -e 's#password=##g'`>> /var/log/cronwork.log
server:~# /usr/bin/mysqlcheck –defaults-extra-file=/etc/mysql/debian.cnf \–optimize –all-databases -u root -p`grep -i password /root/.my.cnf |sed -e 's#password=##g'`>> /var/log/cronwork.log


In order for above commands to work, I've created the /root/.my.cnf containing my root (mysql CLI) mysql username and password, e.g. file has content like below:


[client]
user=root
password=MySecretPassword8821238


Btw a good note here is its generally a good idea (if you want to have consistent mysql databases) to automatically execute via a cron job 2 times a month, I've in root cronjob the following:


crontab -u root -l |grep -i mysqlcheck
04 06 5,10,15,20,25,1 * * /usr/bin/mysqlcheck –defaults-extra-file=/etc/mysql/debian.cnf \–check –all-databases –silent -u root -p`grep -i password /root/.my.cnf |sed -e 's#password=##g'`>> /var/log/cronwork.log 07 06 5,10,15,20,25,1 * * /usr/bin/mysqlcheck –defaults-extra-file=/etc/mysql/debian.cnf –analyze –all-databases –silent -u root -p`grep -i password /root/.my.cnf |sed -e 's#password=##g'`>> /var/log/cronwork.log 12 06 5,10,15,20,25,1 * * /usr/bin/mysqlcheck –defaults-extra-file=/etc/mysql/debian.cnf \–auto-repair –optimize –all-databases –silent -u root -p`grep -i password /root/.my.cnf |sed -e 's#password=##g'`>> /var/log/cronwork.log 17 06 5,10,15,20,25,1 * * /usr/bin/mysqlcheck –defaults-extra-file=/etc/mysql/debian.cnf \–optimize –all-databases –silent -u root -p`grep -i password /root/.my.cnf |sed -e 's#password=##g'`>> /var/log/cronwork.log


Strangely I got a lot of errors that some .MYI / .MYD .frm temp files, necessery for the mysql tables recovery can't be written inside /home/mysql/database_name

That was pretty weird and I thought there might be some issues with permissions, causing the inability to write, due to some bug or something so I went straight and checked /home/mysql/database_name permissions, e.g.::


server:/home/mysql/database_name# ls -ld soccerfame
drwx—— 2 mysql mysql 36864 Nov 17 12:00 soccerfame
server:/home/mysql/database_name# ls -al1|head -n 10
total 1979012
drwx—— 2 mysql mysql 36864 Nov 17 12:00 .
drwx—— 36 mysql mysql 4096 Nov 17 11:12 ..
-rw-rw—- 1 mysql mysql 8712 Nov 17 10:26 1_campaigns_diez.frm
-rw-rw—- 1 mysql mysql 14672 Jul 8 18:57 1_campaigns_diez.MYD
-rw-rw—- 1 mysql mysql 1024 Nov 17 11:38 1_campaigns_diez.MYI
-rw-rw—- 1 mysql mysql 8938 Nov 17 10:26 1_campaigns.frm
-rw-rw—- 1 mysql mysql 8738 Nov 17 10:26 1_campaigns_logs.frm
-rw-rw—- 1 mysql mysql 883404 Nov 16 22:01 1_campaigns_logs.MYD
-rw-rw—- 1 mysql mysql 330752 Nov 17 11:38 1_campaigns_logs.MYI


As seen from above output, all was perfect with permissions, so it should have been something else, so I decided to try to create a random file with touch command inside /home/mysql/database_name directory:


touch /home/mysql/database_name/somefile-to-test-writtability.txt touch: cannot touch ‘/scr1/data/somefile-to-test-writtability.txt‘: No space left on device


Then logically I thought the /home/mysql/ mounted ext4 partition got filled, because of crashed SQL database or a bug thus, checked with disk free command df whether there is enough space on server:

server:~# df -h
Filesystem Size Used Avail Use% Mounted on
/dev/md1 20G 7.6G 11G 42% /
udev 10M 0 10M 0% /dev
tmpfs 13G 1.3G 12G 10% /run
tmpfs 32G 0 32G 0% /dev/shm
tmpfs 5.0M 0 5.0M 0% /run/lock
tmpfs 32G 0 32G 0% /sys/fs/cgroup
/dev/md2 256G 134G 110G 55% /home

Well that's weird? Obviously only 55% of available disk space is used and available 134G which was more than enough so I got totally puzzled why, files can't be written.

Then very logically, I thought it might be that /home directory has remounted as read only, because the SSD memory disk on server is failing and checked for errors in dmesg, i.e.:


server:~# dmesg|grep -i error


Also checked how exactly was partition mounted, to check whether it is (RO) read-only:


server:~# mount -l|grep -i /home
/dev/md2 on /home type ext4 (rw,relatime,discard,data=ordered)


Now everything become even more weirder, as obviously the disk continued to be claiming no space left on device, while in reality there was plenty of disk space.

Then after running a quick research on the internet for the no space left on device with free disk space, I've come across this great superuser.com thread which let me realize the partition run out of inodes and that's why no new file inodes could be assigned and therefore, the linux kernel is refusing to write the file on ext4 partition.

For those who haven't heard of Linux Partition Inodes here is link to Wikipedia and a quick quote:


In a Unix-style file system, the inode is a data structure used to represent a filesystem object, which can be one of various things including a file or a directory. Each inode stores the attributes and disk block location(s) of the filesystem object's data.[1] Filesystem object attributes may include manipulation metadata (e.g. change,[2] access, modify time), as well as owner and permission data (e.g. group-id, user-id, permissions).[3]
Directories are lists of names assigned to inodes. The directory contains an entry for itself, its parent, and each of its children.


Once I understood it is the inodes, I checked how many of them are occupied with cmd:


server:~# df -i /home
Filesystem Inodes IUsed IFree IUse% Mounted on
/dev/md2 17006592 17006592 0 100% /home


You see, there were 0 (zero) free file inodes on server and that was the reason for no space left on device while there was actually free disk space

To clean up (free) some inodes on partition, first thing I did is to delete all old logs which were inside /home and files I positively know not to be necessery, then to find which directories allocating most innodes used:


server:~# find . -xdev -type f | cut -d "/" -f 2 | sort | uniq -c | sort -n


If you're on a regular old fashined IDE Hard Drive and not SSD or you have too much files inside this command will take really long …:

Therefore a better solution might be to frist:

a) Try to find root folders with large inodes count:

for i in /home/*; do echo $i; find $i |wc -l; done
Try to find specific folders:


You should get output like:


/home/new_website
606692
/home/common
73
/home/pcfreak
5661
/home/hipo
33
/home/blog
13570
/home/log
123
/home/lost+found
1

b) Then once you know the directory allocating most inodes, run the command again to see the sub-directories with most files (eating) partition innodes:


for i in /home/webservice/*; do echo $i; find $i |wc -l; done


One usual large folder which could free you some nodes is the linux source headers, but in my case it was simply a lot of tiny old logs being logged on the system for few years in the past without cleaning:

After deleting the log dirs and cache folder in my case /home/new_website/{log,cache}:

server:~# rm -rf /home/new_website/log/*
server:~# rm -rf /home/new_website/cache/*


a) Then, stopping Apache webserver to check prevent Apache to use MySQl databases while running database repair and restaring MySQL:
 

server:~# /etc/init.d/apache2 stop Restarting MySQL server
..
server:~# /etc/init.d/mysql restart
..


b) And re-issuing MySQL Check / Repair / Optimize database commands:


mysqlcheck –defaults-extra-file=/etc/mysql/debian.cnf \–check –all-databases -u root -p`grep -i password /root/.my.cnf |sed -e 's#password=##g'`>> /var/log/cronwork.log

mysqlcheck –defaults-extra-file=/etc/mysql/debian.cnf –analyze –all-databases -u root -p`grep -i password /root/.my.cnf |sed -e 's#password=##g'`>> /var/log/cronwork.log

mysqlcheck –defaults-extra-file=/etc/mysql/debian.cnf \–auto-repair –optimize –all-databases -u root -p`grep -i password /root/.my.cnf |sed -e 's#password=##g'`>> /var/log/cronwork.log

mysqlcheck –defaults-extra-file=/etc/mysql/debian.cnf \–optimize –all-databases -u root -p`grep -i password /root/.my.cnf |sed -e 's#password=##g'`>> /var/log/cronwork.log

c) And finally starting the Apache Webserver again:
 

server:~# /etc/init.d/apache2 start


Some innodse got freed up:
 

server:~# df -i /home Filesystem Inodes IUsed IFree IUse% Mounted on
/dev/md2 17006592 16797196 209396 99% /home


And hooray by God's Grace and with help of prayers of The most Holy Theotokos (Virgin) Mary, websites started again !

Adding another level of security to your shared Debian Linux webhosting server with SuPHP

Tuesday, April 7th, 2015

suphp_improve-apache-security-protect-against-virus-internal-server-infections-suphp-webserver-logo

There are plenty of security schemes and strategies you can implement if you're a Shared Web Hosting company sysadmin however probably the most vital one is to install on Apache + PHP Webserver SuPHP module.

# apt-cache show suphp-common|grep -i descrip -A 4

Description: Common files for mod suphp Suphp consists of an Apache module (mod_suphp for either Apache 1.3.x or Apache 2.x) and a setuid root binary (suphp) that is called by the Apache module to change the uid of the process executing the PHP interpreter to the owner of the php script.

So what SuPHP actuall  does is to run separate CPanel / Kloxo etc. Users with separate username and groupid permissions coinciding with the user present in /etc/passwd , /etc/shadow files existing users, thus in case if someone hacks some of the many customer sites he would be able to only write files and directories under the user with which the security breach occured.

On servers where SuPHP is not installed, all  systemusers are using the same UserID / GuID to run PHP executable scripts under separate domains Virtualhost which are coinciding with Apache (on Debian / Ubuntu  uid, gid – www-data) or on (CentOS / RHEL / Fedora etc. – user apache) so once one site is defaced  exploited by a worm all or most server websites might end up infected with a Web Virus / Worm which will be trying to exploit even more sites of a type running silently in the background.  This is very common scenarios as currently there are donezs of PHP / CSS / Javasripts / XSS vulnerability exploited on VPS and Shared hosting servers due to failure of a customer to update his own CMS  scripts / Website  (Joomla, Wordpress, Drupal etc.) and the lack of resource to regularly monitor all customer activities / websites.

Therefore installing SuPHP Apache module is essential one to install on new serverslarge hosting providers as it saves the admin a lot of headache from spreading malware across all hosted servers sites ..
Some VPS admins that are security freaks tend to also install SuPHP module together with many chrooted Apache / LiteSpeed / Nginx webservers each of which running in a separate Jailed environment.

Of course using SuPHP besides giving a improved security layer to the webserver has its downsides such as increased load for the server and making Apache PHP scripts being interpretted a little bit slower than with plain Apache + PHP but performance difference while running a site on top of SuPHP is often not so drastic so you can live it up ..

Installing SuPHP on a Debian / Ubuntu servers is a piece of cake, just run the as root superuser, usual:
 

# apt-get install libapache2-mod-suphp


Once installed only thing to make is to turn off default installed Apache PHP module (without SuPHP compiled support and restart Apache webserver):
 

# a2dismod php5 …

# /etc/init.d/apache2 restart


To test the SuPHP is properly working on the Apache Webserver go into some of many hosted server websites DocumentRoot

And create new file called test_suphp.php with below content:

# vim test_suphp.php
<?php
system('id');
?>

Then open in browser http://whatever-website/test_suphp.php assuming that system(); function is not disabled for security reasons in php.ini you should get an User ID, GroupID bigger than reserved system IDs on GNU / Linux e.g. ID > UID / GID 99

Its also a good idea to take a look into SuPHP configuration file /etc/suphp/suphp.conf and tailor options according to your liking 

If different hosted client users home directories are into /home directory, set in suphp.conf

;Path all scripts have to be in

docroot=/home/


Also usually it is a good idea to set 

umask=0022 

Check your Server Download / Upload Internet Speed from Console on Linux / BSD / Unix howto

Tuesday, March 17th, 2015

tux-check-internet-network-download-upload-speed-on-linux-console-terminal-linux-bsd-unix
If you've been given a new dedicated server from a New Dedicated-Server-Provider or VPS with Linux and you were told that a certain download speed to the Server is guaranteed from the server provider, in order to be sure the server's connection to the Internet told by service provider is correct it is useful to run a simple measurement console test after logging in remotely to the server via SSH.

Testing connection from Terminal is useful because as you probably know most of Linux / UNIX servers doesn't have a GUI interface and thus it is not possible to test Internet Up / Down Bandwidth through speedtest.net.
 

1. Testing Download Internet Speed given by ISP / Dedi-Server Provider from Linux Console

For the download speed (internet) test the historical approach was to just try downloading the Linux kernel source code from www.kernel.org with some text browser such as lynx or links count the seconds for which the download is completed and then multiple the kernel source archive size on the seconds to get an approximate bandwidth per second, however as nowdays internet connection speeds are much higher, thus it is better to try to download some Linux distribution iso file, you can still use kernel tar archive but it completed too fast to give you some good (adequate) statistics on Download bandwidth.

If its a fresh installed Linux server probably you will probably not have links / elinks and lynx text internet browers  installed so install them depending on deb / rpm distro with:

If on Deb Linuz distro:


root@pcfreak:/root# apt-get install –yes links elinks lynx


On RPM Based Linuz distro:


[root@fedora ~]# yum install -y lynx elinks links


Conduct Internet  Download Speed with links
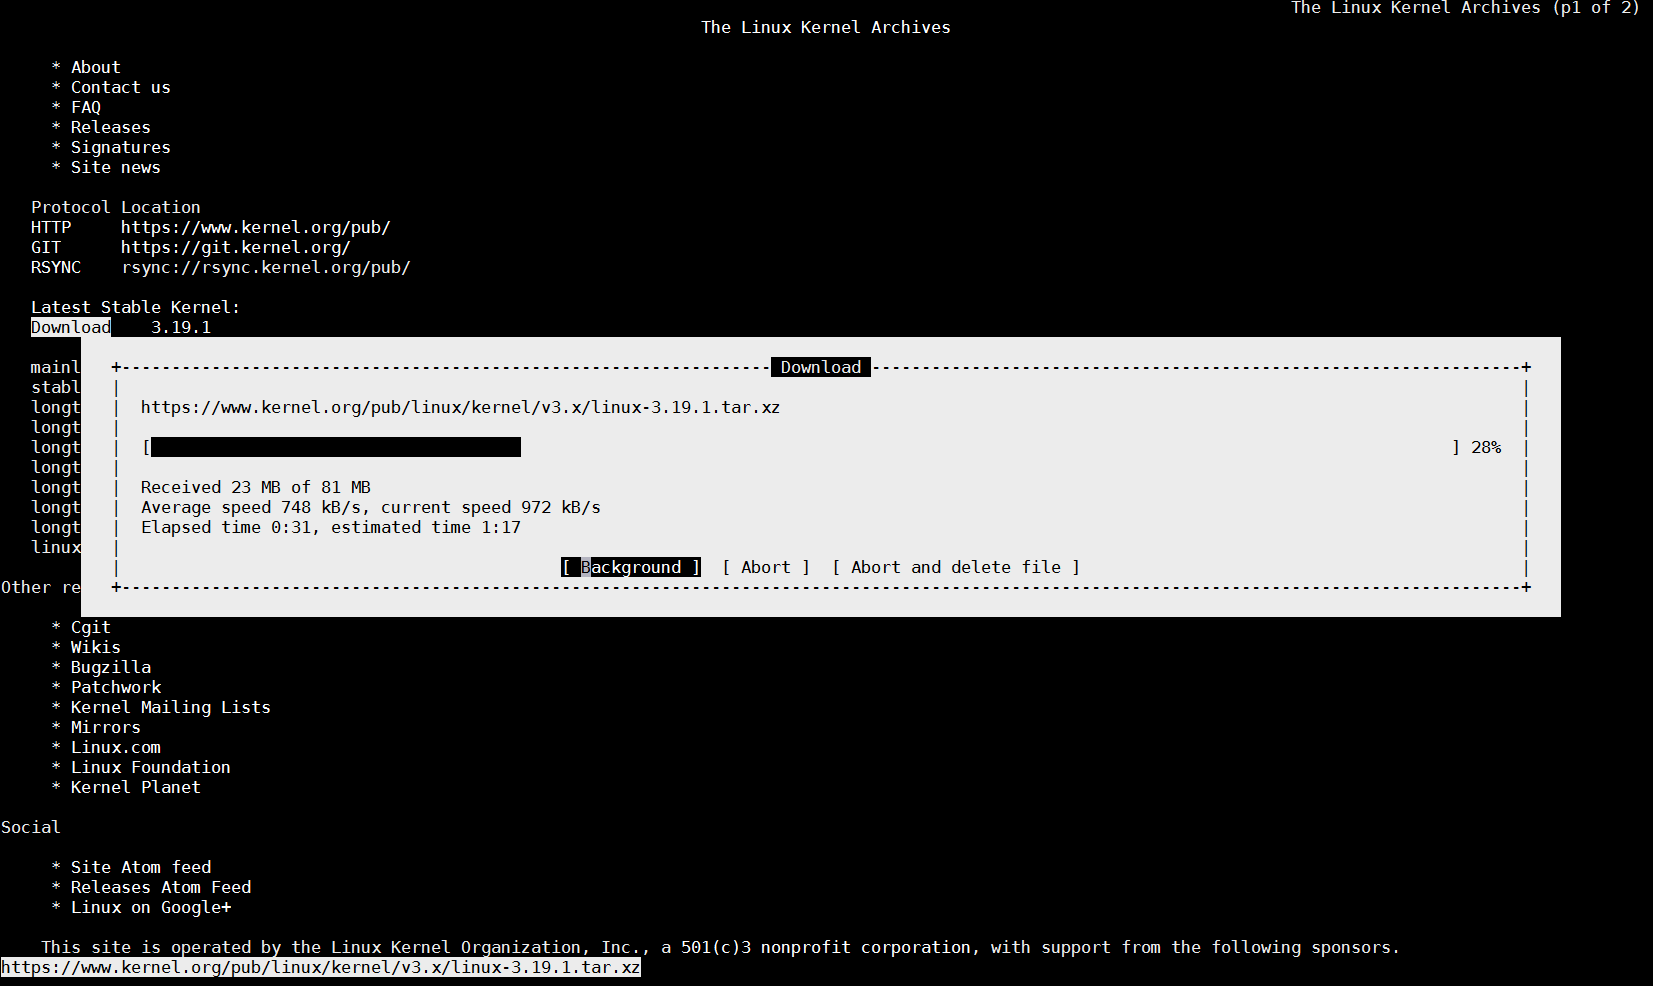
root@pcfreak:/root# links https://www.kernel.org/pub/linux/kernel/v3.x/linux-3.19.1.tar.xz

check_your_download_speed-from-console-linux-with-links-text-browser

(Note that the kernel link is current latest stable Kernel source code archive in future that might change, so try with latest archive.)

You can also use non-interactive tool such as wget curl or lftp to measure internet download speed

To test Download Internet Speed with wget without saving anything to disk set output to go to /dev/null 


root@pcfreak:~# wget -O /dev/null https://www.pc-freak.net//~hipo/hirens-bootcd/HirensBootCD15/Hirens.BootCD.15.0.zip


check_bandwidth_download-internet-speed-with-wget-from-console-non-interactively-on-linux

You see the Download speed is 104 Mbit/s this is so because I'm conducting the download from my local 100Mbit network.

For the test you can use my mirrored version of Hirens BootCD

2. Testing Uplink Internet speed provided by ISP / Server Provider from Linux (SSH) Console

To test your uplink speed you will need lftp or iperf command tool.


root@pcfreak:~# apt-cache show lftp|grep -i descr -A 12
Description: Sophisticated command-line FTP/HTTP client programs
 Lftp is a file retrieving tool that supports FTP, HTTP, FISH, SFTP, HTTPS
 and FTPS protocols under both IPv4 and IPv6. Lftp has an amazing set of
 features, while preserving its interface as simple and easy as possible.
 .
 The main two advantages over other ftp clients are reliability and ability
 to perform tasks in background. It will reconnect and reget the file being
 transferred if the connection broke. You can start a transfer in background
 and continue browsing on the ftp site. It does this all in one process. When
 you have started background jobs and feel you are done, you can just exit
 lftp and it automatically moves to nohup mode and completes the transfers.
 It has also such nice features as reput and mirror. It can also download a
 file as soon as possible by using several connections at the same time.


root@pcfreak:/root# apt-cache show iperf|grep -i desc -A 2
Description: Internet Protocol bandwidth measuring tool
 Iperf is a modern alternative for measuring TCP and UDP bandwidth performance,
 allowing the tuning of various parameters and characteristics.


To test Upload Speed to Internet connect remotely and upload any FTP file:


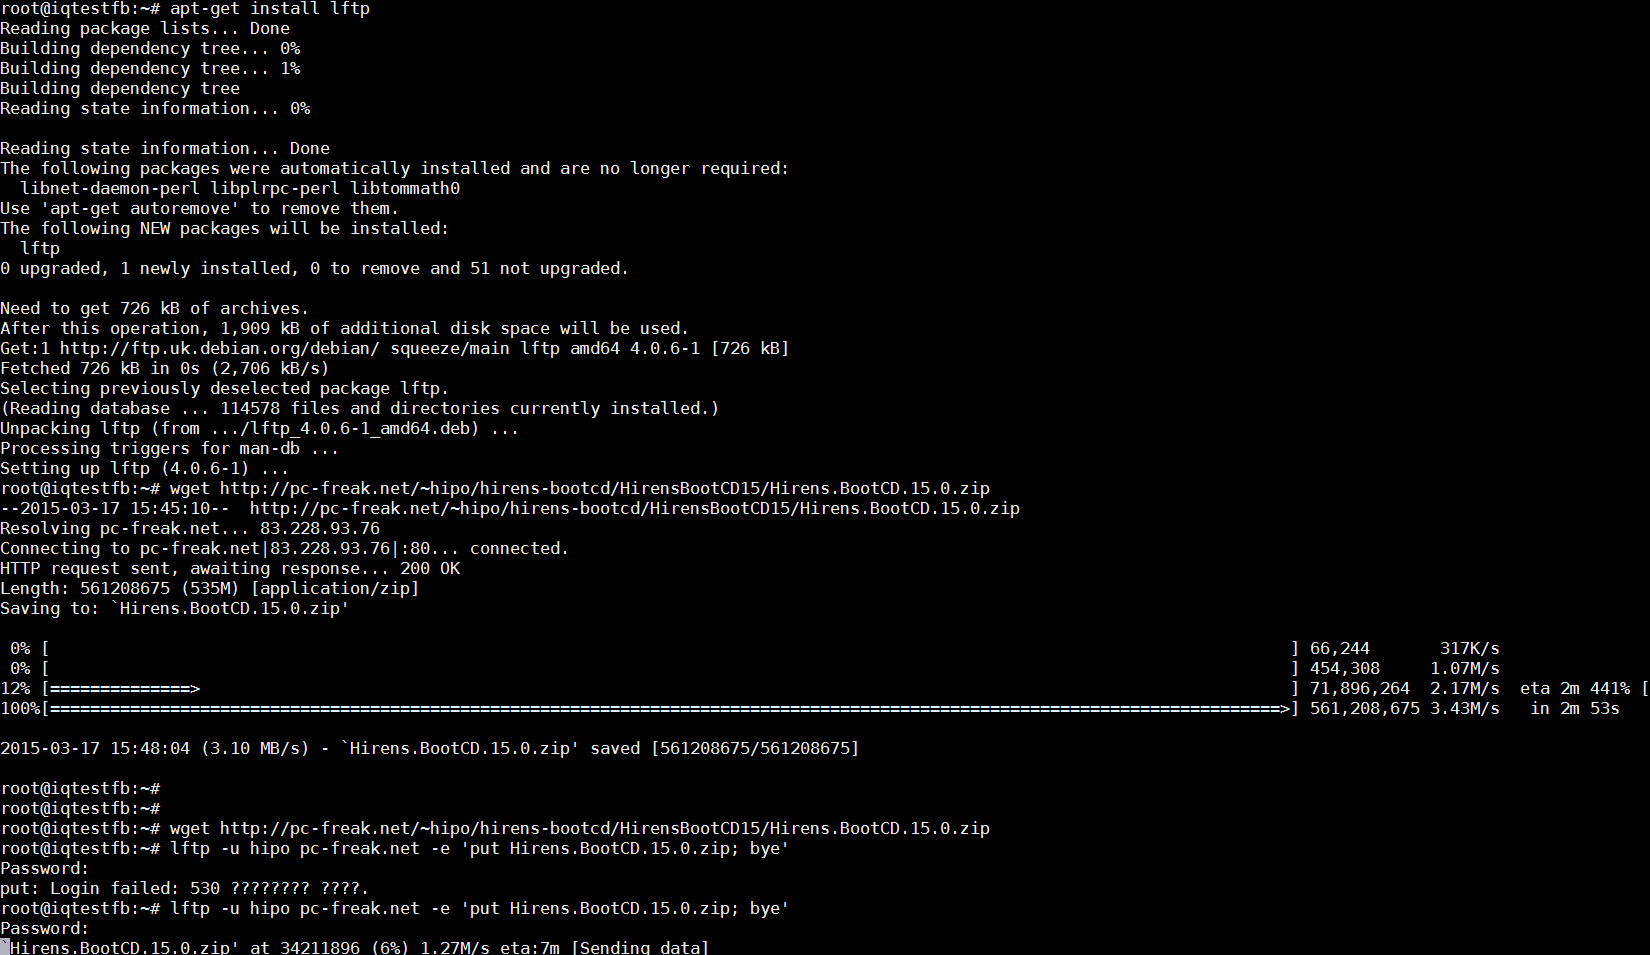
root@pcfreak:/root# lftp -u hipo www.pc-freak.net -e 'put Hirens.BootCD.15.0.zip; bye'


uploading-file-with-lftp-screenshot-test-upload-internet-speed-linux

On Debian Linux to install iperf:


root@pcfreak:/root# apt-get install –yes iperf


On latest CentOS 7 and Fedora (and other RPM based) Linux, you will need to add RPMForge repository and install with yum


[root@centos ~]# rpm -ivh  rpmforge-release-0.5.3-1.el7.rf.x86_64.rpm

[root@centos ~]# yum -y install iperf


Once having iperf on the server the easiest way currently to test it is to use
serverius.net speedtest server –  located at the Serverius datacenters, AS50673 and is running on a 10GE connection with 5GB cap.


root@pcfreak:/root# iperf -c speedtest.serverius.net -P 10
————————————————————
Client connecting to speedtest.serverius.net, TCP port 5001
TCP window size: 16.0 KByte (default)
————————————————————
[ 12] local 83.228.93.76 port 54258 connected with 178.21.16.76 port 5001
[  7] local 83.228.93.76 port 54252 connected with 178.21.16.76 port 5001
[  5] local 83.228.93.76 port 54253 connected with 178.21.16.76 port 5001
[  9] local 83.228.93.76 port 54251 connected with 178.21.16.76 port 5001
[  3] local 83.228.93.76 port 54249 connected with 178.21.16.76 port 5001
[  4] local 83.228.93.76 port 54250 connected with 178.21.16.76 port 5001
[ 10] local 83.228.93.76 port 54254 connected with 178.21.16.76 port 5001
[ 11] local 83.228.93.76 port 54255 connected with 178.21.16.76 port 5001
[  6] local 83.228.93.76 port 54256 connected with 178.21.16.76 port 5001
[  8] local 83.228.93.76 port 54257 connected with 178.21.16.76 port 5001
[ ID] Interval       Transfer     Bandwidth
[  9]  0.0-10.2 sec  4.05 MBytes  3.33 Mbits/sec
[ 10]  0.0-10.2 sec  3.39 MBytes  2.78 Mbits/sec
[ 11]  0.0-10.3 sec  3.75 MBytes  3.06 Mbits/sec
[  4]  0.0-10.3 sec  3.43 MBytes  2.78 Mbits/sec
[ 12]  0.0-10.3 sec  3.92 MBytes  3.18 Mbits/sec
[  3]  0.0-10.4 sec  4.45 MBytes  3.58 Mbits/sec
[  5]  0.0-10.5 sec  4.06 MBytes  3.24 Mbits/sec
[  6]  0.0-10.5 sec  4.30 MBytes  3.42 Mbits/sec
[  8]  0.0-10.8 sec  3.92 MBytes  3.03 Mbits/sec
[  7]  0.0-10.9 sec  4.03 MBytes  3.11 Mbits/sec
[SUM]  0.0-10.9 sec  39.3 MBytes  30.3 Mbits/sec


You see currently my home machine has an Uplink of 30.3 Mbit/s per second, that's pretty nice since I've ordered a 100Mbits from my ISP (Unguaranteed Bandwidth Connection Speed) and as you might know it is a standard practice for many Internet Proviers to give Uplink speed of 1/4 from the ISP provided overall bandwidth 1/4 would be 25Mbi/s, meaning my ISP (Bergon.NET) is doing pretty well providing me with even more than promised (ordered) bandwidth.

Iperf is probably the choice of most sysadmins who have to do regular bandwidth in local networks speed between 2 servers or test  Internet Bandwidth speed on heterogenous network with Linux / BSDs / AIX / HP-UX (UNIXes). On HP-UX and AIX and other UNIXes for which iperf doesn't have port you have to compile it yourself.

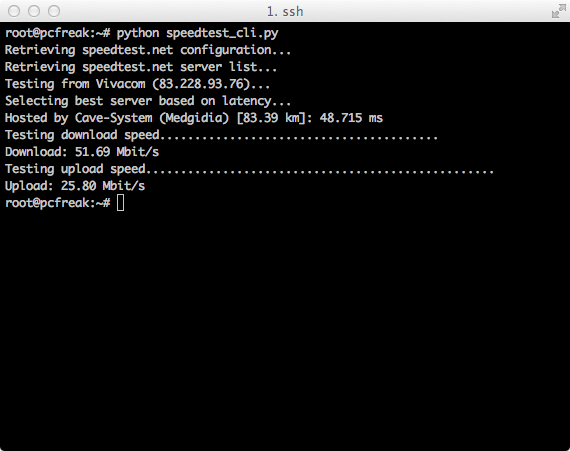
If you don't have root /admin permissions on server and there is python language enterpreter installed you can use speedtest_cli.py script to test internet throughput connectivity
speedtest_cli uses speedtest.net to test server up / down link just in case if script is lost in future I've made ownload mirror of speedtest_cli.py is here

Quickest way to test net speed with speedtest_cli.py:


$ lynx -dump https://raw.github.com/sivel/speedtest-cli/master/speedtest_cli.py > speedtest_cli.py
$ chmod +x speedtest_cli.py
python speedtest_cli.py

speedtest_cli_pyhon_script_screenshot-on-gnu-linux-test-internet-network-speed-on-unix