Posts Tagged ‘ssh’

How to make SSH tunnel with PuTTY terminal client

Monday, November 18th, 2013

Create-how to make ssh tunnel with Putty on microsoft windows Vista / 7 XP / 2000
Earlier I blogged how to create SSH tunnels on Linux. Another interesting thing is how to make SSH tunnels on Windows. This can be done with multiple SSH clients but probably quickest and most standard way is to do create SSH tunnel with Putty. So why would one want to make SSH tunnel to a Windows host? Lets say your remote server has a port filtered to the Internet but available to a local network to which you don't have direct access, the only way to access the port in question then is to create SSH tunnel between your computer and remote machine on some locally binded port (lets say you need to access port 80 on remote host and you will access it through localhost tunneled through 8080). Very common scenario where tunneling comes handy if you have a Tomcat server behind firewalled DMZ| / load balancer or Reverse Proxy. Usually on well secured networks direct access to Tomcat application server will be disabled to its listen port (lets say 11444). Another important great think of SSH tunnels is all information between Remote server and local PC are transferred in strong SSH crypted form so this adds extra security level to your communication.
Once "real life" case of SSH tunnel is whether you have to deploy an application which fails after deployment with no meaningful message but error is returned by Apache Reverse Proxy. To test directly tomcat best thing is to create SSH tunnel between remote host 11444 and local host through 11444 (or any other port of choice). Other useful case would be if you have to access directly via CLI interface an SQL server lets say MySQL (remote port 3306 filtered) and inaccessible with mysql cli or Oracle DB with Db listener on port 1521 (needed to accessed via sqlplus).

In that case Putty's Tunneling capabilities comes handy especially if you don't have a Linux box at hand.
To create new SSH tunnel in putty to MySQL port 3306 on localhost (3306) – be sure MySQL is not running on localhost 😉
Open Putty Navigate in left pane config bar to:

SSH -> Tunnels

Type in

Source Port

– port on which SSH tunnel will be binded on your Windows (localhost / 127.0.0.1) in this example case 3306.

Then for

Destination
– IP address or host of remote host with number of port to which SSH tunnel will be opened.

N.B. ! in order to make tunneling possible you will need to have opened access to SSH port of remote (Destination) host

make ssh tunnel on Microsoft Windows putty to remote filtered mysql shot

make ssh tunnels on Microsoft windows putty to remote filtered mysql 2 screenshot

open ssh tunnel via WINDOWS port 22 on microsoft windows 7 screenshot

Once click Open you will be prompted for username on remote host in my case to my local router 83.228.93.76. Once you login to remote host open command prompt and try to connect Windows Command prompt Start -> Run (cmd.exe) ;

C:\Users\\hipo> telnet localhost 3306

Connection should be succesful and you from there on assuming you have the MySQL cli version for windows installed you can use to login to remote SQL via SSH tunnel with;

C:\Users\\hipo> mysql -u root -h localhost -p

To later remove existing SSH Tunnel go again to SSH -> Tunnels press on SSH tunnel and choose Remove

Further you can craete multiple SSH tunnels for all services to remote host where access is needed. Important think to remember when creating multiple SSH connections is source port on localhost to remote machine should be unique

MobaXTerm: A good gnome-terminal like tabbed SSH client for Windows / Windows Putty Tabs Alternative

Wednesday, November 13th, 2013

Mobaxterm ssh client putty MS Windows alternative with tabs suitable for ex linux users

mobaxterm with tabbed ssh connections screenshot best putty windows ssh client alternative now

Last 10+ years I worked on GNU / Linux as Desktop. Last 7 years most of my SSH connections were managed from GNOME and I'm quite used to gnome-terminal ssh tabbing. In my new Employee Hewlett Packard. I'm forced to work on Microsoft Windows 7 and thus I used for a month or so Putty and Kitty fork from version 0.63 of PuTTY advertising itself as the best telnet / SSH client in the world. Both of the two lack tabbing and have interface which is pretty unfamiliar to me. As I'm so used to using native UNIX terminal. Fortunately a colleague of mine Ivelin was using an SSH client called MobaXTerm which very much did emulation similar to my favourite gnome-terminal. MobaXterm is not free software / open source app but this doesn't matter so much to me as anyways I'm running a non-free Win OS on my desktop. What makes MobaXterm so attractive is its rich functionality (cosmic years infront of Putty).

Here is website description of MobaXterm quoted from its website:

MobaXterm is an enhanced terminal for Windows with an X11 server, a tabbed SSH client and several other network tools for remote computing (VNC, RDP, telnet, rlogin). MobaXterm brings all the essential Unix commands to Windows desktop, in a single portable exe file which works out of the box.

Overall list of features MobaXterm offers are;

  •     multitab terminal with embedded Unix commands (ls, cd, cat, sed, grep, awk, rsync, wget, …)

  •     embedded X11 server for easily exporting your Unix/Linux display

  •     a session manager with several network utilities: SSH, RDP, VNC, Telnet, Rlogin, FTP, SFTP and XDMCP

  •     passwords management for SSH, RDP, VNC, SFTP (on demand password saving)

  •     easy graphical file transfer using drag and drop during SSH sessions

  •     advanced SSH tunnels creation tool (graphical port forwarding builder)

  •     tasks automation using scripts or macros

Mobaxterm is portable just like Putty so its useful to use on HOP stations to servers like used in big companies like HP. Featured embedded Unix commands (e.g., ls, cd, cat, sed, grep, awk, rsync, wget) gives a feeling like you're working on pure Linux console making people addicted to Linux / BSD quite confortable. Some other very useful terminal emulator functions are support for anti-aliasing session manager (save / remember passwords for ssh sessions in Crypted format so much missing in Putty) and it even supports basic macros.
Basic UNIX commands embedded in MobaXterm are taken and ported from Cygwin projectLinux-like environment for Windows making it possible to port software running on POSIX systems (such as Linux, BSD, and Unix systems) to Windows. A very cool think is also MobaXterm gives you a Linux like feel of console navigation in between basic files installed from Cygwin. Some downside I found is program menus which look at first glimpse a bit confusing especially for people used to simplicity of gnome-terminal. Once logged in to remote host via ssh command the program offers you to log you in also via SFTP protocol listing in parallel small window with possibility to navigate / copy / move etc. between server files in SFTP session which at times is pretty useful as it saves you time to use some external SFTP connector tools like  WinSCP.

From Tools configuration menu, there are few precious tools as well;
         – embedded text editor MobaTextEditor
         – MobaFoldersDiff (Able to show diffeernces between directories)
         – AsciiTable (Complete List of Ascii table with respective codes and characters)
         – Embedded simple Calculator
         – List open network ports – GUI Tool to list all open ports on Windows localhost
         – Network packets capture – A Gui tool showing basic info like from UNIX's tcpdump!
         – Ability to start quickly on local machine (TFTP, FTP, SFTP / SSH server, Telnet server, NFS server, VNC Server and even simple implementation of HTTP server)

Mobaxterm list of tools various stuff

         Mobaxterm run various services quickly on Windows servers management screenshot

Below are few screenshots to get you also idea about what kind of configuration MobaXterm supports
  mobaxterm terminal configuration settings screenshot

mobaxterm better putty alternative x11 configuration tab screenshot

mobaxterm windows ssh client for linux users configuration ssh tab screenshot

mobaxterm-putty-alternative-for-windows-configuration-display-screenshot
MobaXTerm Microsoft Windows ssh client configuration misc menu screenshot
To configure and use Telnet, RSH, RDP, VNC, FTP etc. Sessions use the Sessions tab on top menu.

One very handy thing is MobaXterm supports export of remote UNIX display with no requirement to install special Xserver like already a bit obsolete Xming – X server for Windows.
The X Display Manager Control Protocol (XCMCP) is a key feature of the X11 architecture. Together with XDMCP, the X network protocol allows distributed operation of the X server and X display manager. The requesting X server runs on the client (usually as an X terminal), thus providing a login service, that why the X server ported to MobaXterm from Cygwin also supports XDMCP. If, for example, you want to start a VNC session with a remote VNC server, all you have to do is enter the remote VNC server’s IP address in the VNC area; the default VNC port is already registered.

Accessing the remote Windows server via RDP (Remote Desktop Protocol) is also a piece of cake. Once you establish a session to RDP or other Proto it is possible to save this session so later you just choose between session to access. The infamous (X11 Port Forwarding) or creation of SSH encrypted tunnels between hosts to transfer data securily or hide your hostname is also there.

MobaXterm is undoubtedly a very useful and versatile tool. Functionally, the software is well mannered, and Windows users who want to sniff a little Linux/Unix air can get a good idea of how Linux works. A closer look reveals that anything you can do with MobaXterm can be achieved directly with freely available tools (Cygwin) and Unix tools ported from Cygwin. However, although Cygwin provides a non-Posix environment for Windows, it doesn’t offer a decent terminal, which is one thing Moba-Xterm has going for it.

Admittedly, in pure vanilla Cygwin, you can start an X server automatically and then use xterm, but xterm lacks good-quality fonts, whereas MobaXterm conveniently lets you integrate a font server.

Enabling talkd (Console Chat) between logged in users on FreeBSD and other BSDs

Sunday, June 10th, 2012

Talk between two useres on FreeBSD 7.2 screenshot, console peer to peer interactive talk program UNIX, Linux, BSD

Those who are in familiar with older UNIXes, UNIX BSD derivatives and GNU Linux should certainly remember the times, when we hackers used to talk to each other using talk service.

Those who don't know what talk command is it is a simple console / ssh utility to talk to another logged in users.

Talk is very similar to write and mesg one liner messasing utilities available for *nixes, the difference is it is intendted to provide interactive chat between the two logged in users. People who came to know UNIX or free software in older times most likely don't know talk, however I still remember how precious this tool was for communication back in the day.

I believe still it can be useful so I dediced to install ot on one FreeBSD host.

In order to have the talk service running on BSD it is necessery to have /usr/libexec/ntalkd installed on the system this however is installed by default with standard BSD OS installs, so no need for any external ports install to run it.

talk doesn't have it's own init script to start is not written to run as it own service but in order to run it is is necessery to enable it via inetd

Enabling it is done by;;;

1 — Editting /etc/inetd.conf

Inside the conf the line::

#ntalk dgram udp wait tty:tty /usr/libexec/ntalkd ntalkd

should be uncommented e.g, become ;;;

ntalk dgram udp wait tty:tty /usr/libexec/ntalkd ntalkd

2 — Restart inetd

freebsd# /etc/rc.d/inetd restart
Stopping inetd.
Starting inetd.

talk is planned to be used for peer to peer conversations over SSH so in a way it is the GRANDFATHER 🙂 of IRC, ICQ and Skype;;;

Here is an example on how talk is used ,, Let's say there are three logged in users

pcfreak# w
12:39PM up 3 days, 16:25, 3 users, load averages: 1.12, 0.91, 0.71
USER TTY FROM LOGIN@ IDLE WHAT
testuser p0 192.168.0.7 10:50AM - bash
hipo p3 192.168.0.8 12:23PM - w
root p4 :ttyp2:S.0 12:24PM - vim /usr/local/www/dat

I'm logged in with my username hipo and I would like to talk to testuser ;;;;

pcfreak% tty
/dev/ttyp3

You see I'm logged in on /dev/ttyp3 (this is the specific naming on BSDs) on Linux equivalent is /dev/tty3So to talk the other user testuser;;;;;-

$ talk testuser ttyp0
[No connection yet]
[Waiting for your party to respond]

The testuser logged in via SSH will then get a message ||;

Message from Talk_Daemon@pcfreak at 12:44 on 2012/06/10 ...
talk: connection requested by hipo@localhost
talk: respond with: talk hipo@localhost

To enter a talk session then the logged in testuser has to type:

$ talk hipo@localhost


HasciiCAM supposed to stream ASCII video over the network on GNU / Linux

Tuesday, May 22nd, 2012

Richard M. Stallman (RMS) Face portrait rendered in ASCII art from a video with hasciicam
To continue with my lately ASCII centered articles I found hasciicam
hasciicam is a program to stream ASCII video over the network on Linux and probably can be easily made working on FreeBSDtoo.

The project concept is interesting in a matter of fun (play) point of view, however not too usable as we all know ASCII character looking faces doesn't look too pretty.

Below is the Debian (Squeeze) package description:

noah:~# apt-cache show hasciicam|grep -i description -A 7
Description: (h)ascii for the masses: live video as text
Hasciicam makes it possible to have live ASCII video on the web. It
captures video from a tv card and renders it into ascii, formatting the
output into an html page with a refresh tag or in a live ASCII window or
in a simple text file as well, giving the possibility to anybody that has a
bttv card, a Linux box and a cheap modem line to show a live ASCII video
feed that can be browsable without any need for plugin, java etc.
Homepage: http://ascii.dyne.org/

On hasciicam Project webpage is it is stated as a hardware you need to have:
 

"As hardware you need to have a webcam or a videocard supported by "video 4 linux", most of the gear you can buy around should work well."

To install and test it I run:

noah:~# apt-get --yes install hasciicam

Though it is stated on the project website supposed to work display video fine with most 'linux ready' webcams, it didn't with this very standard one.

Here is the exact WebCamera model as identified to the kernel:

noah:~# dmesg|grep -i camera
[ 1.433661] usb 2-2: Product: USB2.0 Camera
[ 10.107840] uvcvideo: Found UVC 1.00 device USB2.0 Camera (1e4e:0102)
[ 10.110660] input: USB2.0 Camera as /devices/pci0000:00/0000:00:1d.7/usb2/2-2/2-2:1.0/input/input11

By the way, I use the very same CAM daily on for Skype video calls as well as the Camera is working with no problems to save video or pictures inside Cheese

Here is the exact WebCamera model as identified to the kernel:

noah:~# dmesg|grep -i camera
[ 1.433661] usb 2-2: Product: USB2.0 Camera
[ 10.107840] uvcvideo: Found UVC 1.00 device USB2.0 Camera (1e4e:0102)
[ 10.110660] input: USB2.0 Camera as /devices/pci0000:00/0000:00:1d.7/usb2/2-2/2-2:1.0/input/input11

The just installed deb has one binary file only /usr/bin/hasciicam. To test it with the camera I issued:

noah:~# hasciicam -d /dev/video0
HasciiCam 1.0 - (h)ascii 4 the masses! - http://ascii.dyne.org
(c)2000-2006 Denis Roio < jaromil @ dyne.org >
watch out for the (h)ASCII ROOTS

Device detected is /dev/video0
USB2.0 Camera
1 channels detected
max size w[640] h[480] - min size w[48] h[32]
Video capabilities:
VID_TYPE_CAPTURE can capture to memory
!! error in ioctl VIDIOCGMBUF: : Invalid argument

Unfortunately as you see from the output, it failed to detect the web camera model.
The exact camera besides its kernel detection naminf is a cheap external USB 2.0 (fake brand / nonanem) "universal" Web PC Camera (SUPER .3mega pixel)

For those who have a further interest in building and installing hasciicam on other Linux platforms than Debian and Ubuntu or whoever wants to look in the code check check Project webpage is. For those who are less of programmers (like me) the project is written in C programming language and uses aa-lib in order to render the video to ASCII.

On the site you will notice two totally schizophrenic looking pictures of presumably the project head developer …

hasciiart video streamed ASCII screenshot of some crazy looking guy smoking marijuanna or smth

As I read in man hasciicam manual page it's said to be able to generate ascii plain text and html files as well as directly to write the output to console, which later probably can be streamed via the network.
Pitily as it didn't detect my camera I couldn't make some testing of its network capabilities.

A Streaming of ASCII couuld be done through pushing the .html output to a webserver and setting a php or javascript to loop through and refresh the browser over the uploaded files every sec or so.

Also I assume the ASCII video output saved in plain console could be streamed via netcat or some tiny scripted perl or bash script and directly observed via a telnet or ssh connection.
One playful way I can think of checking a stored video without the use of FTP is to login via ssh and do:

$ ssh someuser@somehost
$ watch -n 1 "cat video-ascii.html"

🙂

Well something disturbing about hasciicam from a (purely Christian point of view) is it was developed by some kind of non profit organization called RastaSoft on the project website, some of its authors has written JAH BLESS.

As I didn't succeeded seeing it working, I'll be interested to hear if someone who red this article and give it a try can report the web camera model used.

Browse the web graphically in text console TTYs with w3m-img and links2 on Debian, Ubuntu, Fedora and CentOS Linux

Sunday, May 6th, 2012

links2 (links console graphics) www browser logo picture

Lately, I'm starting to use my tty consoles more and more. Most of the people should be probably aware of the existence of lynx, elinks and w3m text browsers enabling the console geeks to browse or debug web pages in plain text mode.

Anyhow, for people who did not used one of the aforementioned browsers to text brose the net I warmly suggest you give them a try. A good review on 'em is in one of my  previous post – Text mode console browsing with lynx, elinks, w3m and links text browsers

For people dedicated to only use console and text mode console on their Personal Computer, simply installing and using this text browsers will not allow you to view any images tags in the html.

Nowdays one of the reasons many people would decide not to use console for web is because they want to see pictures. Hence I believe by having the opportunity to have almost fully functional text browsing in Linux cosnole /  terminal many might choose not to bother with heavy resource consuming desktop browsers like Firefox, Google Chrome, Opera etc..

Another good reason why you might want to use a console browser instead of its Desktop resource monsters, would be improved efficiency of work. It is a well evident fact keyboard access to commands is always faster than mouse and GUI!

Besides that, I'm convinced there should be many hard core geeks out there, who still can happily live without Macromedia Flash ads and Videos in Web. For this group of users having support for graphical browsing in console is also a must.
Following my previous thoughts there should be many people who doesn't have a specific requirement for GUI programs but still use (mutt, ssh, vim, mpg321, zgv etc.).

I'm sure there are plenty of this people who do most of their work in text console and use the X windows server in conjunction with mimalistic graphical environment like (DropBox, XFCE …) for the one and only reason to view  pictures embedded in web pages.

I'm one of all this guys prior mentioned, keen on console tty browsing. Therefore while checking the available console browsers few days ago, I've stumbled on a text console w3m browser capable of displaying website with images in console called w3m-img.

w3m-img is displays pictures in web over a plain console tty or in X terminals (mlterm, xterm etc.).

Here is the description returned by apt-cache show w3m-img

debian:~# apt-cache show w3m-img|grep -i description -A 3
Description: inline image extension support utilities for w3m
w3m-img provides some utilities to support inline images for w3m
on terminal emulator in X Window System environments and Linux
framebuffer.

w3m-img doesn't rely on svgalib for displaying the pictures, but comes with its own written console image display & rendering library called w3mimgdisplay. – /usr/lib/w3m/w3mimgdisplay.

One w3m-img pre-requirement in order to be able to display pictures in plain text console ttys is to have the Linux kernel framebuffer enabled..

Actually, framebuffer is enabled by default on latest stable Debian and derivatives as well as on most other Linux releases as of time of writing.
Framebuffer is also active on other RPM based distros (Fedora, CentOS, SuSE) etc.

The Frambebuffer on or off is controlled via some directives added in grub or lilo configuration files – (depending on the installed boot loader).

Some people can only boot their PCs with the framebuffer kernel support switched off at boot time or the system will not boot Linux at all.
Unfortunately this unlucky ones, would not be able to use the picture rendering w3m-img capabilities but don't be desperate, there is hope 🙂

For people who can't run their Linux distro with a framebuffer kernel support enabled there is a custom hacked version of linksconsole text browser called links-graphic. links-graphic supports both console graphical text browsing using the framebuffer or alternatively svgalib as a console graphics render machine.

I used to be actively using links-graphics WWW browser quite often about 8 years ago and just remembering it brings me good memories of the good old console "hacking" years 🙂

Anyways, w3m-img packaged version is currently available for both rpm and deb based Linux distributions. Here is how to install on both.

1.Install and use w3m-img on Debian, Ubuntu, Mint Linux-es

debian:~# apt-get --yes install w3m-img
....

This should install w3m-img, if of course there is already no previous install of w3m package on the system.

In case you have the w3m deb installed, you will have to first remove the existing w3m installed version before installing the w3m-img package, otherwise you will probably end up with an installation conflict (at least I got such a dependency conflict while apt-getting). Probably the conflict would never occur if aptitude install w3m-img is used instead of apt ….

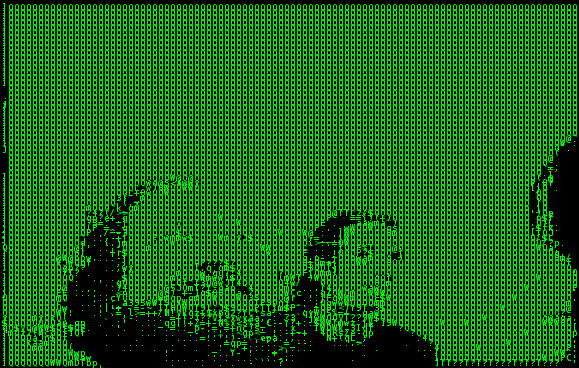
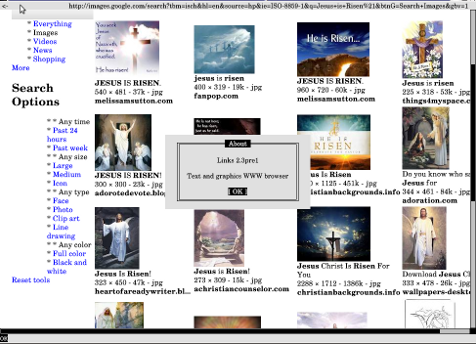
Usage of w3m-img is exactly the same as using the w3m text only browser version. Below is a screenshot example of w3m-img in action:

debian:~# w3m http://images.google.com

w3m-img text (console) browsing images.google.com screenshot

Jesus Christ Pantocrator Orthodox icon google image search screenshot Debian Squeeze Linux

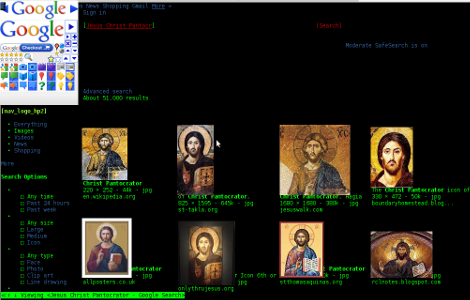
As you can see in the upper screenshots w3m-img displays pictures pretty nice, whether even images.google.com search functionality works fine.

Generally IMHO a lot of pages looks cool with w3m-img.
Some elements placement during rendering, comes at odd positions but this is normal, since original w3m text browser doesn't have any support for Javascript 1 / 2.

For those people who would like to have both javascript basic support and images in a plain text console browsing you, again you will have to compile links2 WWW browser from source manually with svgalib support enabled.

2. Installing w3m-img to text-browse with images on Fedora, CentoS, RHEL, Redhat etc.

[root@centos ~]# yum -y install w3m-img
....

A very cool thing of w3m graphical console browser is it support  most major image formats including animated GIF files 🙂

The way animated GIFs are viewed is very old school, here is a notice extracted from README.img contained in the pack.
 

Notice
If you want to see GIF animation, please hit a suitable key, such
as 'h', 'l', etc., repeatedly, because a frame is rewritten
according to the re-drawing demand from w3m.
Some code in w3mimg/fb/fb.c was originally written by Mr. Yamasaki.
http://www.sainet.or.jp/~yamasaki/download/fb-sample.tar.gz

As one can read in order to see an animated GIF file with w3m you will have to keep pumping the h or l key or Enter key 😀 😀 😀 (like a nintendo game ain't it?)

Here is the also the complete list of Supported browser features mentioned in README.img
 

Support

* Display inline image (GIF,PNG,JPEG, etc.) on terminals
(xterm,rxvt, etc.) of X11 or Linux framebuffer device.
* Support inline image of img tag.
Support of attributes "width", "height", and "align".
* Direct display of image file which header is "Content-type: image/*"
* Support of

tag.
Support of attributes "shape" and "coords" of

tag.
* Support of an attribute "ismap" of img tag.
"w3m" adds coordinate of the cursor as ?, to url, and sends url.
* Support of an attribute "type=image" of img tag.
"w3m" sends coordinate of the cursor as .x=&.y=.
* Asynchronous loading of image files.
* Using cache of image file as pixmap.
* Support of GIF animation when use GdkPixbuf.

Something else which I find worthy to mention is the browser behaviour, whether a webpage has Adobe Flash .swf or .flv files embedded. If such files are contained in website source code, they will be simply ignored and the w3m keeps running stable (no strange flash crashes! hooray!).

While website with flash is opened in w3m, Adobe Flash's field on the screen shows either a blank rectangle or an empty square (depending on the site embedded flash banner dimensions and form).

W3m-Img text web browser with picture viewing support adobe flash enabled youtube.com opened screenshot

Stability of w3m in opening flash website is something really nice. I say this because I still remember how terrible the situation with links with svgalib support compiled in used to be. I remember back in the day with links2 most "flash enabled" websites lead the browser to a ugly core dump.

3. Install and use links2 on Debian and derivatives Linux to browse in console graphically with javascript support

As aforementioned, there is a hacked version of links browser called links-graphics
This hacked version is available as a package within Debian, Ubuntu and presumably most if not all of the rest deb based Linux repos.

On Fedora and the other RPM family Linuces links-graphics, should be downloaded separately as rpm and installed and is inavailable through default rpm repositories.

On Debian distros links-graphics is available by installing links2.
debian:~# apt-get install --yes links2
....

Later to start links2 in graphics mode in lets say tty1 on a machine booted its kernel with framebuffer support, type:

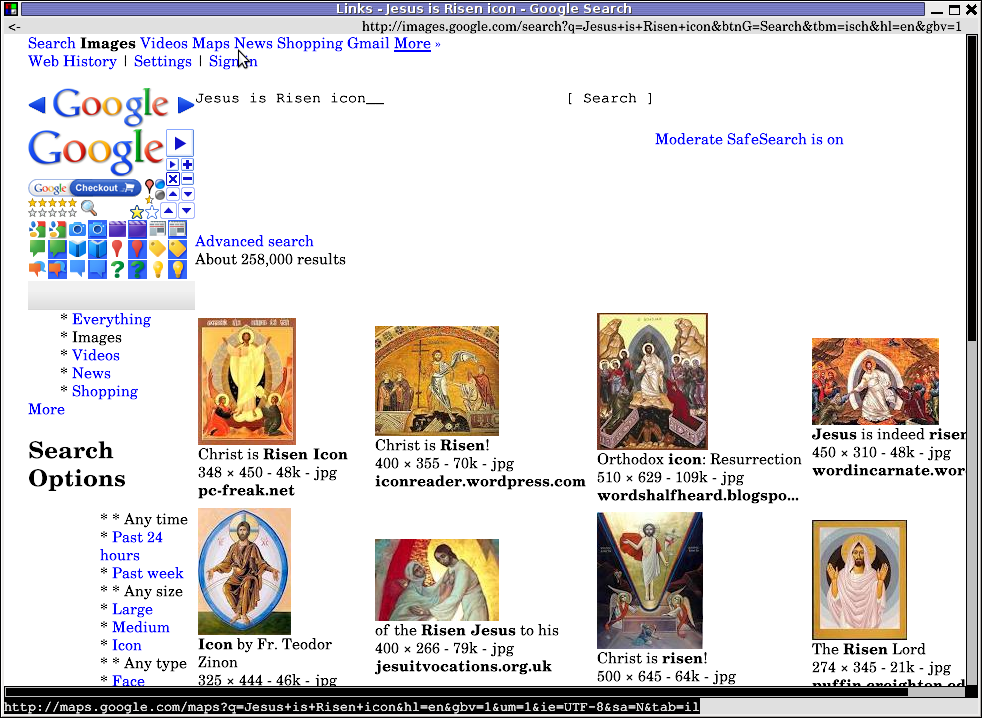
debian:~# links2 -driver fb http://images.google.com

Actually links2 looks, way better in console than w3m but this is quite normal, as links is way more "user friendly GUI text browser".

For those, using their console ttys without framebuffer enabled you can alternatively run links2 with its svgalib graphics support like so:

debian:~# links2 -driver svgalib -mode 320x200x16 http://images.google.com

links graphics / xlinks images in X window on Debian GNU / Linux screenshot

Note that the svgalib driver is not working on my machine, as my Linux kernel framebuffer is already enabled. Probably if I want to use links2 through  svgalib I will have to reboot and boot machine with framebuffer kernel support switched off…

links2 also supports X window graphics and is a great for Graphical environment WWW browser substitute to CPU intensive Iceweasel / Firefox or Google Chrome.

Links2 can be also used as a default browser in X windows (GUI) with any graphic manager. In my view it is   perfect web browser  for scientists and people who does not need support for Adobe Flash Player or HTML5 standards.

To use links in XFCE or GNOME Desktop env, the quickest way is to prepare new Application Launcher to run command:

debian:~# links2 -g

Google Images links2 graphics in GNOME desktop env screenshot

It is useful to use a quick alias to links -g in my ~/.bashrc in order to allow easier browsing from console by typing xlinks someurladdress.com

If you want to add this xlinks shell alias  exec:

debian:~# echo 'alias xlinks='links2 -g $1' >> ~/.bashrc

4. Install links with graphics console support on Fedora, CentOS and RHEL

[root@fedora ~]# cd /usr/local/src
[root@fedora src]# wget -q http://jakub.horky.net/rpm/links/links-2.1pre15-2/links-2.1pre15-2.i386.rpm
[root@fedora src]# rpm -ivh --nodeps links-2.1pre15-2/links-2.1pre15-2.i386.rpm
Preparing... ########################################### [100%]
Installing... ########################################### [100%]

If you get some errors with missing libraries after installing and launching links2, try to resolve them by manually linking them with ln cmd or look for the library package rpm versions and install them via yum. Another way is to fetch the links2 source from Links2 official website links.twibright.com and build from source.

Since the last time in 8 years ago I used links2,  it evolved a lot. The version now did not crash as before with flash websites are viewed.  Generally Links2 now is way more  stable.
To sum it up most people, will probably want to use Links2 for console graphical browsing as the speed and support for HTML and Javascript and web site formatting is way advanced than w3m-img

I haven't compared the speed of opening pages, but since w3m-img is html and graphics render is more simple than xlinks I suppose at some occasions w3m-img will be faster in site rendering.
However still links2 performs really light fast and its web page opening time is swift and more than good.. If xlinks opening performance is compared to most (if not all) traditional desktop browsers used nowdays Links2 will definitely beat them.

A good links2 application instead of a traditional desktop browser is also for people who aim at  improving website browsing time.

I haven't thoroughfully enough, researched on other text console grahic browser alternatives programs. If I miss something and you know amy other better ones please let me know.

Wish you a Happy Browsing 😉

How to copy / clone installed packages from one Debian server to another

Friday, April 13th, 2012

1. Dump all installed server packages from Debian Linux server1

First it is necessery to dump a list of all installed packages on the server from which the intalled deb packages 'selection' will be replicated.

debian-server1:~# dpkg --get-selections \* > packages.txt

The format of the produced packages.txt file will have only two columns, in column1 there will be the package (name) installed and in column 2, the status of the package e.g.: install or deinstall

Note that you can only use the –get-selections as root superuser, trying to run it with non-privileged user I got:

hipo@server1:~$ dpkg --set-selections > packages.txt
dpkg: operation requires read/write access to dpkg status area

2. Copy packages.txt file containing the installed deb packages from server1 to server2

There is many way to copy the packages.txt package description file, one can use ftp, sftp, scp, rsync … lftp or even copy it via wget if placed in some Apache directory on server1.

A quick and convenient way to copy the file from Debian server1 to server2 is with scp as it can also be used easily for an automated script to do the packages.txt file copying (if for instance you have to implement package cloning on multiple Debian Linux servers).

root@debian-server1:~# scp ./packages.txt hipo@server-hostname2:~/packages.txt
The authenticity of host '83.170.97.153 (83.170.97.153)' can't be established. RSA key fingerprint is 38:da:2a:79:ad:38:5b:64:9e:8b:b4:81:09:cd:94:d4. Are you sure you want to continue connecting (yes/no)? yes Warning: Permanently added '83.170.97.153' (RSA) to the list of known hosts. hipo@83.170.97.153's password:
packages.txt

As this is the first time I make connection to server2 from server1, I'm prompted to accept the host RSA unique fingerprint.

3. Install the copied selection from server1 on server2 with apt-get or dselect

debian-server2:/home/hipo# apt-get update
...
debian-server2:/home/hipo# apt-get upgrade
Reading package lists... Done
Building dependency tree
Reading state information... Done
debian-server2:/home/hipo# dpkg --set-selections < packages.txt
debian-server2:/home/hipo# apt-get -u dselect-upgrade --yes

The first apt-get update command assures the server will have the latest version of the packages currently installed, this will save you from running an outdated versions of the installed packages on debian-server2

Bear in mind that using apt-get sometimes, might create dependency issues. This is depending on the exact package names, being replicated in between the servers

Therefore it is better to use another approach with bash for loop to "replicate" installed packages between two servers, like so:

debian-server2:/home/hipo# for i in $(cat packages.txt |awk '{ print $1 }'); do aptitude install $i; done

If you want to automate the questioning about aptitude operations pass on the -y

debian-server2:/home/hipo# for i in $(cat packages.txt |awk '{ print $1 }'); do aptitude -y install $i; done

Be cautious if the -y is passed as sometimes some packages might be removed from the server to resolve dependency issues, if you need this packages you will have to again install them manually.

4. Mirroring package selection from server1 to server2 using one liner

A quick one liner, that does replicate a set of preselected packages from server1 to server2 is also possible with either a combination of apt, ssh, awk and dpkg or with ssh + dpkg + dselect :

a) One-liner code with apt-get unifying the installed packages between 2 or more servers

debian-server2:~# apt-get --yes install `ssh root@debian-server1 "dpkg -l | grep -E ^ii" | awk '{print $2}'`
...

If it is necessery to install on more than just debian-server2, copy paste the above code to all servers you want to have identical installed packages as with debian-server1 or use a shor for loop to run the commands for each and every host of multiple servers group.

In some cases it might be better to use dselect instead as in some situations using apt-get might not correctly solve the package dependencies, if encountering problems with dependencies better run:

debian-server2:/home/hipo# ssh root@debian-server1 'dpkg --get-selections' | dpkg --set-selections && dselect install

As you can see using this second dselect installed "package" mirroring is also way easier to read and understand than the prior "cryptic" method with apt-get, hence I personally think using dselect method is a better.

Well that's basically it. If you need to synchronize also configurations, either an rsync/scp shell script, should be used with all defined server1 config files or in case if a cloning of packages between identical server machines is necessery dd or some other tool like Norton Ghost could be used.
Hope this helps, someone.

How to delete million of files on busy Linux servers (Work out Argument list too long)

Tuesday, March 20th, 2012

How to Delete million or many thousands of files in the same directory on GNU / Linux and FreeBSD

If you try to delete more than 131072 of files on Linux with rm -f *, where the files are all stored in the same directory, you will get an error:

/bin/rm: Argument list too long.

I've earlier blogged on deleting multiple files on Linux and FreeBSD and this is not my first time facing this error.
Anyways, as time passed, I've found few other new ways to delete large multitudes of files from a server.

In this article, I will explain shortly few approaches to delete few million of obsolete files to clean some space on your server.
Here are 3 methods to use to clean your tons of junk files.

1. Using Linux find command to wipe out millions of files

a.) Finding and deleting files using find's -exec switch:

# find . -type f -exec rm -fv {} \;

This method works fine but it has 1 downside, file deletion is too slow as for each found file external rm command is invoked.

For half a million of files or more, using this method will take "long". However from a server hard disk stressing point of view it is not so bad as, the files deletion is not putting too much strain on the server hard disk.
b.) Finding and deleting big number of files with find's -delete argument:

Luckily, there is a better way to delete the files, by using find's command embedded -delete argument:

# find . -type f -print -delete

c.) Deleting and printing out deleted files with find's -print arg

If you would like to output on your terminal, what files find is deleting in "real time" add -print:

# find . -type f -print -delete

To prevent your server hard disk from being stressed and hence save your self from server normal operation "outages", it is good to combine find command with ionice, e.g.:

# ionice -c 3 find . -type f -print -delete

Just note, that ionice cannot guarantee find's opeartions will not affect severely hard disk i/o requests. On  heavily busy servers with high amounts of disk i/o writes still applying the ionice will not prevent the server from being hanged! Be sure to always keep an eye on the server, while deleting the files nomatter with or without ionice. if throughout find execution, the server gets lagged in serving its ordinary client requests or whatever, stop the execution of the cmd immediately by killing it from another ssh session or tty (if physically on the server).

2. Using a simple bash loop with rm command to delete "tons" of files

An alternative way is to use a bash loop, to print each of the files in the directory and issue /bin/rm on each of the loop elements (files) like so:

for i in *; do
rm -f $i;
done

If you'd like to print what you will be deleting add an echo to the loop:

# for i in $(echo *); do \
echo "Deleting : $i"; rm -f $i; \

The bash loop, worked like a charm in my case so I really warmly recommend this method, whenever you need to delete more than 500 000+ files in a directory.

3. Deleting multiple files with perl

Deleting multiple files with perl is not a bad idea at all.
Here is a perl one liner, to delete all files contained within a directory:

# perl -e 'for(<*>){((stat)[9]<(unlink))}'

If you prefer to use more human readable perl script to delete a multitide of files use delete_multple_files_in_dir_perl.pl

Using perl interpreter to delete thousand of files is quick, really, really quick.
I did not benchmark it on the server, how quick exactly is it, but I guess the delete rate should be similar to find command. Its possible even in some cases the perl loop is  quicker …

4. Using PHP script to delete a multiple files

Using a short php script to delete files file by file in a loop similar to above bash script is another option.
To do deletion  with PHP, use this little PHP script:

<?php
$dir = "/path/to/dir/with/files";
$dh = opendir( $dir);
$i = 0;
while (($file = readdir($dh)) !== false) {
$file = "$dir/$file";
if (is_file( $file)) {
unlink( $file);
if (!(++$i % 1000)) {
echo "$i files removed\n";
}
}
}
?>

As you see the script reads the $dir defined directory and loops through it, opening file by file and doing a delete for each of its loop elements.
You should already know PHP is slow, so this method is only useful if you have to delete many thousands of files on a shared hosting server with no (ssh) shell access.

This php script is taken from Steve Kamerman's blog . I would like also to express my big gratitude to Steve for writting such a wonderful post. His post actually become  inspiration for this article to become reality.

You can also download the php delete million of files script sample here

To use it rename delete_millioon_of_files_in_a_dir.php.txt to delete_millioon_of_files_in_a_dir.php and run it through a browser .

Note that you might need to run it multiple times, cause many shared hosting servers are configured to exit a php script which keeps running for too long.
Alternatively the script can be run through shell with PHP cli:

php -l delete_millioon_of_files_in_a_dir.php.txt.

5. So What is the "best" way to delete million of files on Linux?

In order to find out which method is quicker in terms of execution time I did a home brew benchmarking on my thinkpad notebook.

a) Creating 509072 of sample files.

Again, I used bash loop to create many thousands of files in order to benchmark.
I didn't wanted to put this load on a productive server and hence I used my own notebook to conduct the benchmarks. As my notebook is not a server the benchmarks might be partially incorrect, however I believe still .they're pretty good indicator on which deletion method would be better.

hipo@noah:~$ mkdir /tmp/test
hipo@noah:~$ cd /tmp/test;
hiponoah:/tmp/test$ for i in $(seq 1 509072); do echo aaaa >> $i.txt; done

I had to wait few minutes until I have at hand 509072  of files created. Each of the files as you can read is containing the sample "aaaa" string.

b) Calculating the number of files in the directory

Once the command was completed to make sure all the 509072 were existing, I used a find + wc cmd to calculate the directory contained number of files:

hipo@noah:/tmp/test$ find . -maxdepth 1 -type f |wc -l
509072

real 0m1.886s
user 0m0.440s
sys 0m1.332s

Its intesrsting, using an ls command to calculate the files is less efficient than using find:

hipo@noah:/tmp/test$ time ls -1 |wc -l
509072

real 0m3.355s
user 0m2.696s
sys 0m0.528s

c) benchmarking the different file deleting methods with time

– Testing delete speed of find

hipo@noah:/tmp/test$ time find . -maxdepth 1 -type f -delete
real 15m40.853s
user 0m0.908s
sys 0m22.357s

You see, using find to delete the files is not either too slow nor light quick.

– How fast is perl loop in multitude file deletion ?

hipo@noah:/tmp/test$ time perl -e 'for(<*>){((stat)[9]<(unlink))}'real 6m24.669suser 0m2.980ssys 0m22.673s

Deleting my sample 509072 took 6 mins and 24 secs. This is about 3 times faster than find! GO-GO perl 🙂
As you can see from the results, perl is a great and time saving, way to delete 500 000 files.

– The approximate speed deletion rate of of for + rm bash loop

hipo@noah:/tmp/test$ time for i in *; do rm -f $i; done

real 206m15.081s
user 2m38.954s
sys 195m38.182s

You see the execution took 195m en 38 secs = 3 HOURS and 43 MINUTES!!!! This is extremely slow ! But works like a charm as the running of deletion didn't impacted my normal laptop browsing. While the script was running I was mostly browsing through few not so heavy (non flash) websites and doing some other stuff in gnome-terminal) 🙂

As you can imagine running a bash loop is a bit CPU intensive, but puts less stress on the hard disk read/write operations. Therefore its clear using it is always a good practice when deletion of many files on a dedi servers is required.

b) my production server file deleting experience

On a production server I only tested two of all the listed methods to delete my files. The production server, where I tested is running Debian GNU / Linux Squeeze 6.0.3. There I had a task to delete few million of files.
The tested methods tried on the server were:

– The find . type -f -delete method.

– for i in *; do rm -f $i; done

The results from using find -delete method was quite sad, as the server almost hanged under the heavy hard disk load the command produced.

With the for script all went smoothly. The files were deleted for a long long time (like few hours), but while it was running, the server continued with no interruptions..

While the bash loop was running, the server load avarage kept at steady 4
Taking my experience in mind, If you're running a production, server and you're still wondering which delete method to use to wipe some multitude of files, I would recommend you go  the bash for loop + /bin/rm way. Yes, it is extremely slow, expect it run for some half an hour or so but puts not too much extra load on the server..

Using the PHP script will probably be slow and inefficient, if compared to both find and the a bash loop.. I didn't give it a try yet, but suppose it will be either equal in time or at least few times slower than bash.

If you have tried the php script and you have some observations, please drop some comment to tell me how it performs.

To sum it up;

Even though there are "hacks" to clean up some messy parsing directory full of few million of junk files, having such a directory should never exist on the first place.

Frankly, keeping millions of files within the same directory is very stupid idea.
Doing so will have a severe negative impact on a directory listing performance of your filesystem in the long term.

If you know better (more efficient) ways to delete a multitude of files in a dir please share in comments.

FreeBSD Jumbo Frames network configuration short how to

Wednesday, March 14th, 2012

FreeBSD Jumbo Frames Howto configure FreeBSD

Recently I wrote a post on how to enable Jumbo Frames on GNU / Linux , therefore I thought it will be useful to write how Jumbo Frames network boost can be achieved on FreeBSD too.

I will skip the details of what is Jumbo Frames, as in the previous article I have thoroughfully explained. Just in short to remind you what is Jumbo Frames and why you might need it? – it is a way to increase network MTU transfer frames from the MTU 1500 to MTU of 9000 bytes

It is interesting to mention that according to specifications, the maximum Jumbo Frames MTU possible for assignment are of MTU=16128
Just like on Linux to be able to take advantage of the bigger Jumbo Frames increase in network thoroughput, you need to have a gigabyt NIC card/s on the router / server.

1. Increasing MTU to 9000 to enable Jumbo Frames "manually"

Just like on Linux, the network tool to use is ifconfig. For those who don't know ifconfig on Linux is part of the net-tools package and rewritten from scratch especially for GNU / Linux OS, whether BSD's ifconfig is based on source code taken from 4.2BSD UNIX

As you know, network interface naming on FreeBSD is different, as there is no strict naming like on Linux (eth0, eth1, eth2), rather the interfaces are named after the name of the NIC card vendor for instance (Intel(R) PRO/1000 NIC is em0), RealTek is rl0 etc.

To set Jumbro Frames Maximum Transmission Units of 9000 on FreeBSD host with a Realtek and Intel gigabyt ethernet cards use: freebsd# /sbin/ifconfig em0 192.168.1.2 mtu 9000
freebsd# /sbin/ifconfig rl0 192.168.2.2 mtu 9000

!! Be very cautious here, as if you're connected to the system remotely over ssh you might loose connection to it because of broken routing.

To prevent routing loss problems, if you're executing the above two commands remotely, you better run them in GNU screen session:

freebsd# screen
freebsd# /sbin/ifconfig em0 192.168.1.2 mtu 9000; /sbin/ifconfig rl0 192.168.1.2 mtu 9000; \
/etc/rc.d/netif restart; /etc/rc.d/routed restart

2. Check MTU settings are set to 9000

If everything is fine the commands will return empty output, to check further the MTU is properly set to 9000 issue:

freebsd# /sbin/ifconfig -a|grep -i em0em0: flags=8843<UP,BROADCAST,RUNNING,SIMPLEX,MULTICAST> metric 0 mtu 9000freebsd# /sbin/ifconfig -a|grep -i rl0
rl0: flags=8843<UP,BROADCAST,RUNNING,SIMPLEX,MULTICAST> metric 0 mtu 9000

3. Reset routing for default gateway

If you have some kind of routing assigned for em0 and rl0, network interfaces they will be affected by the MTU change and the routing will be gone. To reset the routing to the previously properly assigned routing, you have to restart the BSD init script taking care for assigning routing on system boot time:

freebsd# /etc/rc.d/routing restart
default 192.168.1.1 done
add net default: gateway 192.168.1.1
Additional routing options: IP gateway=YES.

4. Change MTU settings for NIC card with route command

There is also a way to assign higher MTU without "breaking" the working routing, e.g. avoiding network downtime with bsd route command:

freebsd# grep -i defaultrouter /etc/rc.conf
defaultrouter="192.168.1.1"
freebsd# /sbin/route change 192.168.1.1 -mtu 9000
change host 192.168.1.1

5. Finding the new MTU NIC settings on the FreeBSD host

freebsd# /sbin/route -n get 192.168.1.1
route to: 192.168.1.1
destination: 192.168.1.1
interface: em0
flags: <UP,HOST,DONE,LLINFO,WASCLONED>
recvpipe sendpipe ssthresh rtt,msec rttvar hopcount mtu expire
0 0 0 0 0 0 9000 1009

6. Set Jumbo Frames to load automatically on system load

To make the increased MTU to 9000 for Jumbo Frames support permanent on a FreeBSD system the /etc/rc.conf file is used:

The variable for em0 and rl0 NICs are ifconfig_em0 and ifconfig_rl0.
The lines to place in /etc/rc.conf should be similar to:

ifconfig_em0="inet 192.168.1.1 netmask 255.255.255.0 media 1000baseTX mediaopt half-duplex mtu 9000"

Change in the above lines the gateway address 192.168.1.1 and the netmask 255.255.255.0 to yours corresponding gw and netmask.
Also in the above example you see the half-duplex ifconfig option is set insetad of full-duplex in order to prevent some duplex mismatches. A full-duplex could be used instead, if you're completely sure on the other side of the host is configured to support full-duplex connections. Otherwise if you try to set full-duplex with other side set to half-duplex or auto-duplex a duplex mismatch will occur. If this happens insetad of taking the advantage of the Increase Jumbo Frames MTU the network connection could become slower than originally with standard ethernet MTU of 1500. One other bad side if you end up with duplex-mismatch could be a high number of loss packets and degraded thoroughout …

7. Setting Jumbo Frames for interfaces assigning dynamic IP via DHCP

If you need to assign an MTU of 9000 for a gigabyt network interfaces, which are receiving its TCP/IP network configuration over DHCP server.
First, tell em0 and rl0 network interfaces to dynamically assign IP addresses via DHCP proto by adding in /etc/rc.conf:

ifconfig_em0="DHCP"
ifconfig_rl0="DHCP"

Secondly make two files /etc/start_if.em0 and /etc/start_if.rl0 and include in each file:

ifconfig em0 media 1000baseTX mediaopt full-duplex mtu 9000
ifconfig rl0 media 1000baseTX mediaopt full-duplex mtu 9000

Copy / paste in root console:

echo 'ifconfig em0 media 1000baseTX mediaopt full-duplex mtu 9000' >> /etc/start_if.em0
echo 'ifconfig rl0 media 1000baseTX mediaopt full-duplex mtu 9000' >> /etc/start_if.rl0

Finally, to load the new MTU for both interfaces, reload the IPs with the increased MTUs:

freebsd# /etc/rc.d/routing restart
default 192.168.1.1 done
add net default: gateway 192.168.1.1

8. Testing if Jumbo Frames is working correctly

To test if an MTU packs are transferred correctly through the network you can use ping or tcpdumpa.) Testing Jumbo Frames enabled packet transfers with tcpdump

freebsd# tcpdump -vvn | grep -i 'length 9000'

You should get output like:

16:40:07.432370 IP (tos 0x0, ttl 50, id 63903, offset 0, flags [DF], proto TCP (6), length 9000) 192.168.1.2.80 > 192.168.1.1.60213: . 85825:87285(1460) ack 668 win 14343
16:40:07.432588 IP (tos 0x0, ttl 50, id 63904, offset 0, flags [DF], proto TCP (6), length 9000) 192.168.1.2.80 > 192.168.1.1.60213: . 87285:88745(1460) ack 668 win 14343
16:40:07.433091 IP (tos 0x0, ttl 50, id 63905, offset 0, flags [DF], proto TCP (6), length 9000) 192.168.1.2.80 > 192.168.1.1.60213: . 23153:24613(1460) ack 668 win 14343
16:40:07.568388 IP (tos 0x0, ttl 50, id 63907, offset 0, flags [DF], proto TCP (6), length 9000) 192.168.1.2.80 > 192.168.1.1.60213: . 88745:90205(1460) ack 668 win 14343
16:40:07.568636 IP (tos 0x0, ttl 50, id 63908, offset 0, flags [DF], proto TCP (6), length 9000) 192.168.1.2.80 > 192.168.1.1.60213: . 90205:91665(1460) ack 668 win 14343
16:40:07.569012 IP (tos 0x0, ttl 50, id 63909, offset 0, flags [DF], proto TCP (6), length 9000) 192.168.1.2.80 > 192.168.1.1.60213: . 91665:93125(1460) ack 668 win 14343
16:40:07.569888 IP (tos 0x0, ttl 50, id 63910, offset 0, flags [DF], proto TCP (6), length 9000) 192.168.1.2.80 > 192.168.1.1.60213: . 93125:94585(1460) ack 668 win 14343

b.) Testing if Jumbo Frames are enabled with ping

Testing Jumbo Frames with ping command on Linux

linux:~# ping 192.168.1.1 -M do -s 8972
PING 192.168.1.1 (192.168.1.1) 8972(9000) bytes of data.
9000 bytes from 192.168.1.1: icmp_req=1 ttl=52 time=43.7 ms
9000 bytes from 192.168.1.1: icmp_req=2 ttl=52 time=43.3 ms
9000 bytes from 192.168.1.1: icmp_req=3 ttl=52 time=43.5 ms
9000 bytes from 192.168.1.1: icmp_req=4 ttl=52 time=44.6 ms
--- 192.168.0.1 ping statistics ---
4 packets transmitted, 4 received, 0% packet loss, time 3003ms
rtt min/avg/max/mdev = 2.397/2.841/4.066/0.708 ms

If you get insetad an an output like:

From 192.168.1.2 icmp_seq=1 Frag needed and DF set (mtu = 1500)

--- 192.168.1.1 ping statistics ---
0 packets transmitted, 0 received, +4 errors

This means a packets with maximum MTU of 1500 could be transmitted and hence something is not okay with the Jumbo Frames config.
Another helpful command in debugging MTU and showing which host in a hop queue support jumbo frames is Linux's traceroute

To debug a path between host and target, you can use:

linux:~# traceroute --mtu www.google.com
...

If you want to test the Jumbo Frames configuration from a Windows host use ms-windows ping command like so:

C:\>ping 192.168.1.2 -f -l 8972
Pinging 192.168.1.2 with 8972 bytes of data:
Reply from 192.168.1.2: bytes=8972 time=2ms TTL=255
Ping statistics for 192.168.1.2:
Packets: Sent = 4, Received = 4, Lost = 0 (0% loss),
Approximate round trip times in milli-seconds:
Minimum = 2ms, Maximum = 2ms, Average = 2ms

Here -l 8972 value is actually equal to 9000. 8972 = 9000 – 20 (20 byte IP header) – 8 (ICMP header)

How to add multiple email accounts in qmail’s vpopmail with vpasswd via ssh (console) / Little shell script to add multiple email addresses

Sunday, June 12th, 2011

I’ve been assigned the task to add on one of the qmail powered servers I administrate about 50 email addresses via command line.

Each email addresses was required to be configured to have the same mail password.
Adding the email addresses via an interface would be a killing time consuming task and will probably require at least 1 hour of time to add the emails with qmailwebmin, qadmin, qubit or the other vpopmail qmail web administration interfaces available nowdays.

To solve the task, I’ve used a line oner bash shell script which reads all my 80 emails from a file and adds them with vpopmail’s command line tool vpasswd on the mail server.

Here is the one liner shell script I’ve written to solve the task:

debian:~# while read line; do vadduser $line Email_Pass_Phrase; done < email_list_file.txt

In above’s code I’ve used the email_list_file.txt file is a text file on the server and contains list of all my 50 email addresses, where each line in the file contains one email. The Email_Pass_Phrase is actually the password I’ve set for all the new email addresses being created with vpasswd

That’s all now the 50 email addresses on the server are created and I’ve saved at least one hour of boring repeating actions in the browser 😉