Posts Tagged ‘cmd’
Tuesday, November 25th, 2014 
If you're a system administrator of Windows Servers or or just a PC support in a small company and you have to fix PCs running Microsoft Windows XP / 7 / 8 daily, sooner or later you will be interested into how to optimize your windows maintainance work to be able to do more adminsitration work for less time.
M$ Windows OS has evolved a lot over the past 10+ years and many of the features available GUI are now either possibile to be done via a standard commands and the GUI interfaces. Various adminsitration and common daily work simplification goodies are now accessible through quick access shortcuts and commands.
Virtually all Windows operating system environment could be now customized by using such shortcuts, this reduces the multitude of annoying double clicks which are truely pissing off sysadmins and tech-supports involved in Windows Ticket solving.
Win Shortcuts and Commands helps to:
- Quickly invoke almost all System Settings available from Windows Control Panel
- Access all admins tools GUIs throguh command
- Speed up Opening Video, Pictures, Documents, Downloads folders start Windows Update, Configure Printers / Fax / Add Sharings
etc..
A lot of the commands were new to me thus I decided to try out all of the commands in command prompt (cmd). Many of the tools down-mentioned were news to me and let me understand better on Windows Internals, so if you time try them out.
| Function | Comand |
| Open Documents Folder | Start menu -> Search (Type documents) |
| Open Videos folder | Start -> Search (Type videos) |
| Open Downloads Folder | Start -> Search (Type downloads) |
| Open Favorites Folder | favorites |
| View Recent messages of your PC | Start menu -> Search (Type recent) |
| Open Recent Folder | N/A |
| Open Pictures Folder | Start menu -> Search (Type pictures) |
| Windows Sideshow | control.exe /name Microsoft.WindowsSideshow |
| Windows CardSpace (Windows ID Manager) | control.exe /name Microsoft.cardspace |
| Windows Anytime Upgrade | Start menu -> Search dialog (Type WindowsUpdate) |
| Taskbar and Start Menu | control.exe /name Microsoft.TaskbarandStartMenu |
| Troubleshooting | control.exe /name Microsoft.Troubleshooting |
| User Accounts (Run user accounts Interface) | control.exe /name Microsoft.UserAccounts |
| Adding a new Device | devicepairingwizard |
| Add Hardware Wizard | hdwwiz |
| Advanced User Accounts Management | netplwiz |
| Advanced User Accounts (Authorization Mgr) | azman.msc |
| Windows Backup and Restore | sdclt |
| Bluetooth File Transfer | fsquirt |
| Calculator | calc |
| Certificates Manager | certmgr.msc |
| Change Computer Performance Settings | systempropertiesperformance (Remove visual effects) |
| Change Data Execution Prevention Settings | systempropertiesdataexecutionprevention |
| Change Data Execution Prevention Settings | printui |
| Character Map | charmap |
| ClearType Tuner | cttune (Make text onscreen more readable) |
| Color Management | colorcpl |
| Command Prompt | cmd |
| Component Services | comexp.msc |
| Component Services | dcomcnfg |
| Computer Management Interface | compmgmt.msc |
| Computer Management Interface | compmgmtlauncher |
| Connect to Network Project via Network | netproj |
| Connect to a Projector | displayswitch (Alias for Fn key + F4) |
| Run Control Panel command | control |
| Create A Shared Folder Wizard | shrpubw |
| Create a System Repair Disc | recdisc |
| Credential Backup and Restore Wizard | credwiz |
| Data Execution Prevention | systempropertiesdataexecutionprevention |
| Date and Time | timedate.cpl |
| Default Location | locationnotifications |
| Device Manager | devmgmt.msc |
| Device Manager | hdwwiz.cpl |
| Device Pairing Wizard | devicepairingwizard |
| Diagnostics Troubleshooting Wizard | msdt |
| Digitizer Calibration Tool | tabcal |
| DirectX Diagnostic Tool | dxdiag |
| Disk Cleanup | cleanmgr |
| Disk Defragmenter | dfrgui |
| Disk Management | diskmgmt.msc |
| Display (Change font size of text onscreen) | dpiscaling |
| Display Color Calibration | dccw |
| Display Switch | displayswitch |
| DPAPI Key Migration Wizard | dpapimig |
| Driver Verifier Manager | verifier |
| Ease of Access Center | utilman |
| EFS Wizard | rekeywiz |
| Event Viewer | eventvwr.msc |
| Fax Cover Page Editor | fxscover |
| File Signature Verification | sigverif |
| Font Viewer | fontview |
| Game Controllers | joy.cpl |
| Windows Getting Started Iface | gettingstarted |
| IExpress Wizard | iexpress |
| Another alias for Getting Started | irprops.cpl |
| Install or Uninstall Display Languages | lusrmgr |
| Internet Explorer | iexplore |
| Run Internet Explorer Internet Options | inetcpl.cpl |
| iSCSI Initiator Configuration Tool | iscsicpl |
| Language Pack Installer | lpksetup |
| Local Group Policy Editor | gpedit.msc |
| Local Security Policy | secpol.msc |
| Local Users and Groups | lusrmgr.msc |
| Location Activity | locationnotifications |
| Magnifier | magnify |
| Malicious Software Removal Tool | mrt (Might be not existent on some Windows versions) |
| Manage Your File Encryption Certificates | rekeywiz |
| Math Input Panel | mip |
| Microsoft Management Console | mmc |
| Microsoft Support Diagnostic Tool | msdt |
| Mouse | main.cpl |
| NAP Client Configuration | napclcfg.msc |
| Narrator | narrator |
| Network Connections | ncpa.cpl |
| New Scan Wizard | wiaacmgr |
| Notepad | notepad |
| ODBC Data Source Administrator | odbcad32 |
| ODBC Driver Configuration | odbcconf |
| On-Screen Keyboard | osk |
| Paint | mspaint |
| Pen and Touch | tabletpc.cpl |
| People Near Me | collab.cpl |
| Performance Monitor | perfmon.msc |
| Performance Options | systempropertiesperformance |
| Phone and Modem | telephon.cpl |
| Phone Dialer | dialer |
| Power Options | powercfg.cpl |
| Presentation Settings | presentationsettings |
| Print Management | printmanagement.msc |
| Printer Migration | printbrmui |
| Printer User Interface | printui |
| Private Character Editor | eudcedit |
| Problem Steps Recorder | psr |
| Programs and Features (Install / Uninstall) | appwiz.cpl |
| Protected Content Migration | dpapimig |
| Region and Language | intl.cpl |
| Registry Editor | regedit |
| Registry Editor 32 | regedt32 |
| Remote Access Phonebook | rasphone |
| Remote Desktop Connection | mstsc |
| Resource Monitor | resmon |
| Resultant Set of Policy | rsop.msc |
| SAM Lock Tool | syskey |
| Screen Resolution | desk.cpl |
| Securing the Windows Account Database | syskey |
| Services | services.msc |
| Set Program Access and Computer Defaults | computerdefaults |
| Share Creation Wizard | shrpubw |
| Shared Folders | fsmgmt.msc |
| Snipping Tool | snippingtool |
| Sound | mmsys.cpl |
| Sound recorder | soundrecorder |
| SQL Server Client Network Utility | cliconfg |
| Sticky Notes | stikynot |
| Stored User Names and Passwords | credwiz |
| Sync Center | mobsync |
| System Configuration | msconfig |
| System Configuration Editor | sysedit |
| System Information | msinfo32 |
| System Properties | sysdm.cpl |
| System Properties (Advanced Tab) | systempropertiesadvanced |
| System Properties (Computer Name Tab) | systempropertiescomputername |
| System Properties (Hardware Tab) | systempropertieshardware |
| System Properties (Remote Tab) | systempropertiesremote |
| System Properties (System Protection Tab) | systempropertiesprotection |
| System Restore | rstrui |
| Task Manager | taskmgr |
| Task Scheduler | taskschd.msc |
| Trusted Platform Module (TPM) Management | tpm.msc |
| User Account Control Settings | useraccountcontrolsettings |
| Utility Manager | utilman |
| Version Reporter Applet | winver |
| Volume Mixer | sndvol |
| Windows Action Center | wscui.cpl |
| Windows Activation Client | slui (Runs on Windows license activation time) |
| Windows Anytime Upgrade Results | windowsanytimeupgraderesults |
| Windows CardSpace | infocardcpl.cpl |
| Windows Disc Image Burning Tool | isoburn (Command line tool to burn images) |
| Windows DVD Maker | dvdmaker (N/A on Windows 7, 8) |
| Windows Easy Transfer | migwiz (N/A on many Windows versions) |
| Run Windows Explorer | explorer |
| Windows Fax and Scan | wfs |
| Windows Features | optionalfeatures |
| Windows Firewall | firewall.cpl |
| Windows Firewall with Advanced Security | wf.msc |
| Windows Journal | journal (N/A on Windows 7) |
| Windows Media Player | wmplayer (N/A on many Windows releases) |
| Windows Memory Diagnostic Scheduler | mdsched (Check your PC memory on next boot) |
| Windows Mobility Center (Stats) | mblctr |
| Windows Picture Acquisition Wizard | wiaacmgr |
| Windows PowerShell | powershell |
| Windows PowerShell ISE | powershell_ise |
| Windows Remote Assistance | msra |
| Windows Repair Disc | recdisc |
| Windows Script Host | wscript |
| Windows Update | wuapp |
| Windows Update Standalone Installer | wusa |
| Show Windows Version | winver |
| WMI Management | wmimgmt.msc |
| WordPad | write |
| XPS Viewer | xpsrchvw |
Most of above commands works fine with Windows XP, Vista and Windows 7 / 8, Windows 2003 / 2012, however some cmds are missing across some win versions.
Here is list of other useful Windows shortcut keys:
General keyboard shortcuts
- Ctrl+C (Copy)
- Ctrl+X (Delete selected item and save a copy to the clipboard)
- Ctrl+V (Paste)
- Ctrl+Z (Undo)
- Delete (Delete)
- Shift+Delete (Delete the selected item permanently without moving the item to the Recycle Bin)
- Ctrl while dragging an item (Copy the selected item)
- Ctrl+Shift while dragging an item (Create a shortcut to the selected item)
- F2 key (Rename the selected item)
- Ctrl+Right Arrow (Move the cursor to the beginning of the next word)
- Ctrl+Left Arrow (Move the cursor to the beginning of the previous word)
- Ctrl+Down Arrow (Move the cursor to the beginning of the next paragraph)
- Ctrl+Up Arrow (Move the cursor to the beginning of the previous paragraph)
- Ctrl+Shift with any arrow key (Highlight a block of text)
- Shift with any arrow key (Select more than one item in a window or on the desktop, or select text in a document)
- Ctrl+A (Select all)
- F3 key (Search for a file or a folder)
- Alt+Enter (View the properties for the selected item)
- Alt+F4 (Close the active item, or exit the active program)
- Alt+Enter (Display the properties of the selected object)
- Alt+Spacebar (Open the shortcut menu for the active window)
- Ctrl+F4 (Close the active document in programs that enable multiple documents to be open at the same time)
- Alt+Tab (Switch between the open items)
- Alt+Esc (Cycle through items in the order in which they were opened)
- F6 key (Cycle through the screen elements in a window or on the desktop)
- F4 key (Display the Address bar list in My Computer or in Windows Explorer)
- Shift+F10 (Display the shortcut menu for the selected item)
- Alt+Spacebar (Display the System menu for the active window)
- Ctrl+Esc (Display the Start menu)
- Alt+Underlined letter in a menu name (Display the corresponding menu)
- Underlined letter in a command name on an open menu (Perform the corresponding command)
- F10 key (Activate the menu bar in the active program)
- Right Arrow (Open the next menu to the right, or open a submenu)
- Left Arrow (Open the next menu to the left, or close a submenu)
- F5 key (Update the active window)
- Backspace (View the folder one level up in My Computer or Windows Explorer)
- Esc (Cancel the current task)
- Shift when you insert a CD into the CD drive (Prevent the CD from automatically playing)
- Ctrl+Shift+Esc (Open Task Manager)
Dialog box keyboard shortcuts
- Ctrl+Tab (Move forward through the tabs)
- Ctrl+Shift+Tab (Move backward through the tabs)
- Tab (Move forward through the options)
- Shift+Tab (Move backward through the options)
- Alt+Underlined letter (Perform the corresponding command, or select the corresponding option)
- Enter (Perform the command for the active option or button)
- Spacebar (Select or clear the check box if the active option is a check box)
- Arrow keys (Select a button if the active option is a group of option buttons)
- F1 key (Display Help)
- F4 key (Display the items in the active list)
- Backspace (Open a folder one level up if a folder is selected in the Save As or Open dialog box)
Microsoft natural keyboard shortcuts
- Windows Logo (Display or hide the Start menu)
- Windows Logo+Break (Display the System Properties dialog box)
- Windows Logo+D (Display the desktop)
- Windows Logo+M (Minimize all the windows)
- Windows Logo+Shift+M (Restore the minimized windows)
- Windows Logo+E (Open My Computer)
- Windows Logo+F (Search for a file or a folder)
- Ctrl+Windows Logo+F (Search for computers)
- Windows Logo+F1 (Display Windows Help)
- Windows Logo+ L (Lock the keyboard)
- Windows Logo+R (Open the Run dialog box)
- Windows Logo+U (Open Utility Manager)
Accessibility keyboard shortcuts
- Right Shift for eight seconds (Switch FilterKeys on or off)
- Left Alt+left Shift+Print Screen (Switch High Contrast on or off)
- Left Alt+left Shift+Num Lock (Switch the MouseKeys on or off)
- Shift five times (Switch the StickyKeys on or off)
- Num Lock for five seconds (Switch the ToggleKeys on or off)
- Windows Logo +U (Open Utility Manager)
Windows Explorer keyboard shortcuts
- End (Display the bottom of the active window)
- Home (Display the top of the active window)
- Num Lock+Asterisk sign (*) (Display all the subfolders that are under the selected folder)
- Num Lock+Plus sign (+) (Display the contents of the selected folder)
- Num Lock+Minus sign (-) (Collapse the selected folder)
- Left Arrow (Collapse the current selection if it is expanded, or select the parent folder)
- Right Arrow (Display the current selection if it is collapsed, or select the first subfolder)
Keyboard Shortcuts for Character Map
After you double-click a character on the grid of characters, you can move through the grid by using the keyboard shortcuts:
- Right Arrow (Move to the right or to the beginning of the next line)
- Left Arrow (Move to the left or to the end of the previous line)
- Up Arrow (Move up one row)
- Down Arrow (Move down one row)
- Page Up (Move up one screen at a time)
- Page Down (Move down one screen at a time)
- Home (Move to the beginning of the line)
- End (Move to the end of the line)
- Ctrl+Home (Move to the first character)
- Ctrl+End (Move to the last character)
- Spacebar (Switch between Enlarged and Normal mode when a character is selected)
Microsoft Management Console (MMC) main window keyboard shortcuts
- Ctrl+O (Open a saved console)
- Ctrl+N (Open a new console)
- Ctrl+S (Save the open console)
- Ctrl+M (Add or remove a console item)
- Ctrl+W (Open a new window)
- F5 key (Update the content of all console windows)
- Alt+Spacebar (Display the MMC window menu)
- Alt+F4 (Close the console)
- Alt+A (Display the Action menu)
- Alt+V (Display the View menu)
- Alt+F (Display the File menu)
- Alt+O (Display the Favorites menu)
Microsoft Management Console (MMC) window keyboard shortcuts
- Ctrl+P (Print the current page or active pane)
- Alt+Minus sign (-) (Display the window menu for the active console window)
- Shift+F10 (Display the Action shortcut menu for the selected item)
- F1 key (Open the Help topic, if any, for the selected item)
- F5 key (Update the content of all console windows)
- Ctrl+F10 (Maximize the active console window)
- Ctrl+F5 (Restore the active console window)
- Alt+Enter (Display the Properties dialog box, if any, for the selected item)
- F2 key (Rename the selected item)
- Ctrl+F4 (Close the active console window. When a console has only one console window, this shortcut closes the console)
Remote desktop connection navigation
- Ctrl+Alt+End (Open the Microsoft Windows NT Security dialog box)
- Alt+Page Up (Switch between programs from left to right)
- Alt+Page Down (Switch between programs from right to left)
- Alt+Insert (Cycle through the programs in most recently used order)
- Alt+Home (Display the Start menu)
- Ctrl+Alt+Break (Switch the client computer between a window and a full-screen display)
- Alt+Delete (Display the Windows menu)
- Ctrl+Alt+Minus sign (-) (Put a snapshot of the complete client window area on the Terminal server clipboard and provide the same functionality as pressing Alt+Print Screen on a local computer)
- Ctrl+Alt+Plus sign (+) (Put a snapshot of the active window in the client on the Terminal server clipboard and provide the same functionality as pressing Print Screen on a local computer.)
Microsoft Internet Explorer navigation
- Ctrl+B (Open the Organize Favorites dialog box)
- Ctrl+E (Open the Search bar)
- Ctrl+F (Start the Find utility)
- Ctrl+H (Open the History bar)
- Ctrl+I (Open the Favorites bar)
- Ctrl+L (Open the Open dialog box)
- CtrlL+N (Start another instance of the browser with the same web address)
- Ctrl+O (Open the Open dialog box, the same as CTRL+L)
- Ctrl+P (Open the Print dialog box)
- Ctrl+R (Update the current webpage)
- Ctrl+W (Close the current window)
Complete list of Windows Keyboard Shorcuts is on Microsoft website
Tags: beginning, cmd, command prompt, complete list, control, Ctrl Left Arrow Move, Ctrl Right Arrow Move, Device, exe, firewall, General, joy, list, Microsoft, msconfig, phone, Programs, Securing, Shift Print Screen Switch High Contrast, Start, system administrator, Touch, Windows
Posted in Everyday Life, System Administration, Various, Windows | 1 Comment »
Friday, July 22nd, 2011 There are few commands I usually use to track if my server is possibly under a Denial of Service attack or under Distributed Denial of Service
Sys Admins who still have not experienced the terrible times of being under a DoS attack are happy people for sure …
1. How to Detect a TCP/IP Denial of Service Attack This are the commands I use to find out if a loaded Linux server is under a heavy DoS attack, one of the most essential one is of course netstat.
To check if a server is under a DoS attack with netstat, it’s common to use:
linux:~# netstat -ntu | awk '{print $5}' | cut -d: -f1 | sort | uniq -c | sort -n|wc -l
If the output of below command returns a result like 2000 or 3000 connections!, then obviously it’s very likely the server is under a DoS attack.
To check all the IPS currently connected to the Apache Webserver and get a very brief statistics on the number of times each of the IPs connected to my server, I use the cmd:
linux:~# netstat -ntu | awk '{print $5}' | cut -d: -f1 | sort | uniq -c | sort -n

221 80.143.207.107 233 145.53.103.70 540 82.176.164.36
As you could see from the above command output the IP 80.143.207.107 is either connected 221 times to the server or is in state of connecting or disconnecting to the node.
Another possible way to check, if a Linux or BSD server is under a Distributed DoS is with the list open files command lsof
Here is how lsof can be used to list the approximate number of ESTABLISHED connections to port 80.
linux:~# lsof -i TCP:80

litespeed 241931 nobody 17u IPv4 18372655 TCP server.www.pc-freak.net:http (LISTEN)

litespeed 241931 nobody 25u IPv4 18372659 TCP 85.17.159.89:http (LISTEN)

litespeed 241931 nobody 30u IPv4 29149647 TCP server.www.pc-freak.net:http->83.101.6.41:54565 (ESTABLISHED)

litespeed 241931 nobody 33u IPv4 18372647 TCP 85.17.159.93:http (LISTEN)

litespeed 241931 nobody 34u IPv4 29137514 TCP server.www.pc-freak.net:http->83.101.6.41:50885 (ESTABLISHED)

litespeed 241931 nobody 35u IPv4 29137831 TCP server.www.pc-freak.net:http->83.101.6.41:52312 (ESTABLISHED)

litespeed 241931 nobody 37w IPv4 29132085 TCP server.www.pc-freak.net:http->83.101.6.41:50000 (ESTABLISHED)
Another way to get an approximate number of established connections to let’s say Apache or LiteSpeed webserver with lsof can be achieved like so:
linux:~# lsof -i TCP:80 |wc -l

2100
I find it handy to keep track of above lsof command output every few secs with gnu watch , like so:
linux:~# watch "lsof -i TCP:80"
2. How to Detect if a Linux server is under an ICMP SMURF attack
ICMP attack is still heavily used, even though it’s already old fashioned and there are plenty of other Denial of Service attack types, one of the quickest way to find out if a server is under an ICMP attack is through the command:
server:~# while :; do netstat -s| grep -i icmp | egrep 'received|sent' ; sleep 1; done

120026 ICMP messages received

1769507 ICMP messages sent

120026 ICMP messages received

1769507 ICMP messages sent
As you can see the above one liner in a loop would check for sent and recieved ICMP packets every few seconds, if there are big difference between in the output returned every few secs by above command, then obviously the server is under an ICMP attack and needs to hardened.
3. How to detect a SYN flood with netstat
linux:~# netstat -nap | grep SYN | wc -l

1032
1032 SYNs per second is quite a high number and except if the server is not serving let’s say 5000 user requests per second, therefore as the above output reveals it’s very likely the server is under attack, if however I get results like 100/200 SYNs, then obviously there is no SYN flood targetting the machine 😉
Another two netstat command application, which helps determining if a server is under a Denial of Service attacks are:
server:~# netstat -tuna |wc -l

10012
and
server:~# netstat -tun |wc -l

9606
Of course there also some other ways to check the count the IPs who sent SYN to the webserver, for example:
server:~# netstat -n | grep :80 | grep SYN |wc -l
In many cases of course the top or htop can be useful to find, if many processes of a certain type are hanging around.
4. Checking if UDP Denial of Service is targetting the server
server:~# netstat -nap | grep 'udp' | awk '{print $5}' | cut -d: -f1 | sort |uniq -c |sort -n
The above command will list information concerning possible UDP DoS.
The command can easily be accustomed also to check for both possible TCP and UDP denial of service, like so:
server:~# netstat -nap | grep 'tcp|udp' | awk '{print $5}' | cut -d: -f1 | sort |uniq -c |sort -n

104 109.161.198.86

115 112.197.147.216

129 212.10.160.148

227 201.13.27.137

3148 91.121.85.220
If after getting an IP that has too many connections to the server and is almost certainly a DoS host you would like to filter this IP.
You can use the /sbin/route command to filter it out, using route will probably be a better choice instead of iptables, as iptables would load up the CPU more than simply cutting the route to the server.
Here is how I remove hosts to not be able to route packets to my server:
route add 110.92.0.55 reject
The above command would null route the access of IP 110.92.0.55 to my server.
Later on to look up for a null routed IP to my host, I use:
route -n |grep -i 110.92.0.55
Well hopefully this should be enough to give a brief overview on how, one can dig in his server and find if he is under a Distributed Denial of Service, hope it’s helpful to somebody out there.
Cheers 😉
Tags: apache webserver, approximate number, awk print, BSD, checking, cmd, command, course, Denial, denial of service, denial of service attack, Detect, difference, dos attack, ESTABLISHED, freak, How to, HTTP, ICMP, ips, Linux, linux server, linux webserver, LISTEN, litespeed, netstat, nobody, node, ntu, number, server pc, Service, sleep, statistics, SYN, SYNs, sys admins, tcp, terrible times, Watch
Posted in Linux, System Administration | 5 Comments »
Saturday, May 4th, 2013 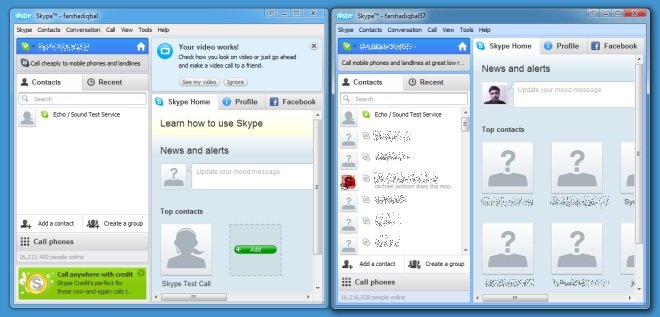
Whether you tried running simultaneously more than 1 Skype clients by clicking twice on Skype Desktop icon or invoking Skype via Windows Start menu; You already have figured out that Skype on Windows is set-up by defaykt to only support one logged in Skype user.
In case you wonder why on earth someone might need to run in parallel few Skype accounts on one Windows PC, possible scenario is;;;
You work for a company and just for clarity you have to communicate with clients from one skype name and with another skype name to communicate to company management.
In Linux in Skype version this is not so and thus for people like me who come from Linux it is rather uneasy to not be able to login in second Skype instance, whether you go to a friend who already keeps logged in with his Skype user …
Thus this triggered me to research a bit if simulatenous user login is possible?
Yes it is possible and very easy, to do so the user has to run manually Skype from command line like so:
On 32bit PC hardware with 32 bit of Microsoft Windows issue in win cmd.exe (command prompt) from:
START -> RUN -> cmd.exe
cd C:\\Program Files\\Skype\Phone\\
C:\\Program Files\\Skype\\Skype /secondary
or to directly paste in command prompt:
“C:\\Program Files\\Skype\\Phone\\Skype.exe” /secondary
If you are on a 64bit machine run in cmd prompt:
“C:\\Program Files (x86)\\Skype\Phone\\Skype.exe” /secondary
To easily run few instances of Skype in parallel, you can make shortcuts on Desktop. pointing to any of both above commands.
That's all now you can login as many skype users as you like on 1 Win PC. All parallel logged in users can receive and write messages. However you should bear in mind that situation with answering Skype calls is a bit complicated as you cannot speak in parallel through different logged in skype users. Anyhow whether you have to react on Skype voice / video calls incoming in similar or same time from 2 skype accounts, you can use – Set Skype Call on Hold functionality and hence keep voice video in parallel with different skype accounts.
Tags: bear in mind, bit, Call, clarity, cmd, command, company management, desktop icon, earth, exe, instances, Linux, login, machine, Microsoft, microsoft windows, pc hardware, run, Run Skype, Shortcuts, Skype, Skype Desktop, support, video, Windows, windows pc, windows xp
Posted in Everyday Life, Various, Windows | 1 Comment »
Friday, January 10th, 2014 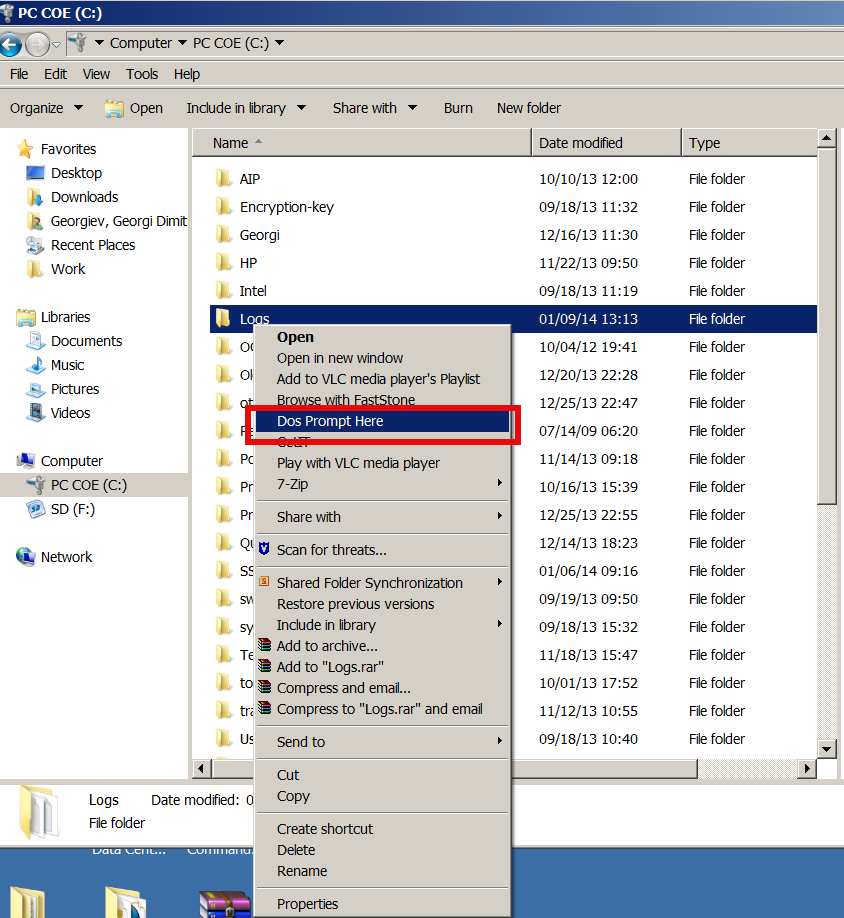
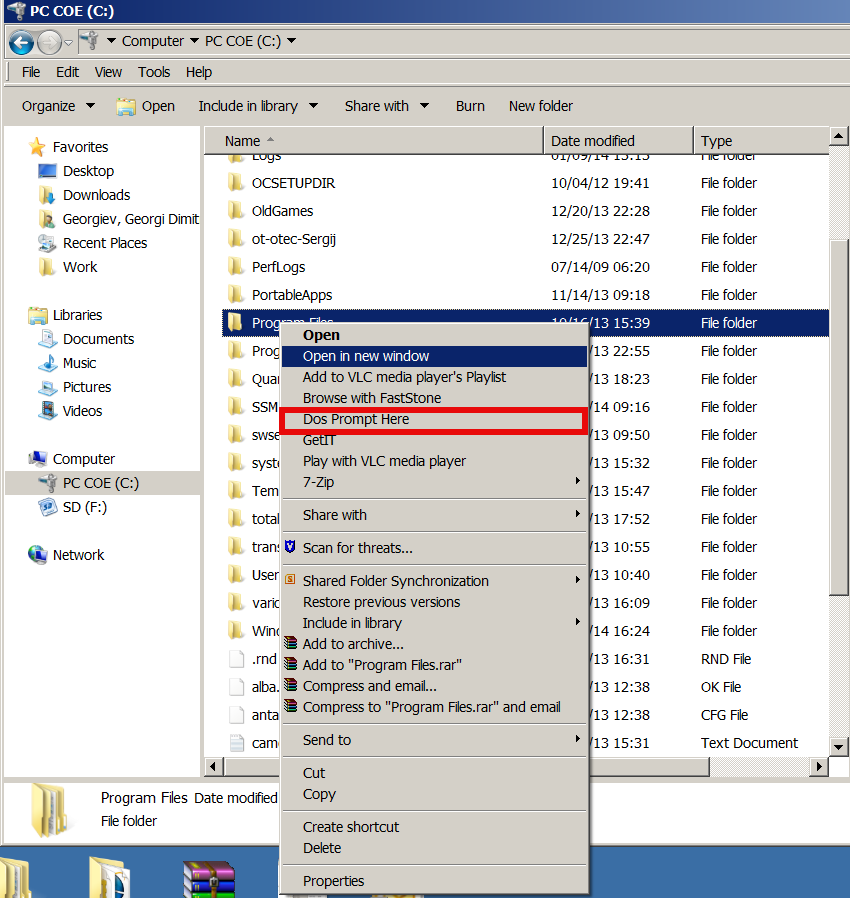
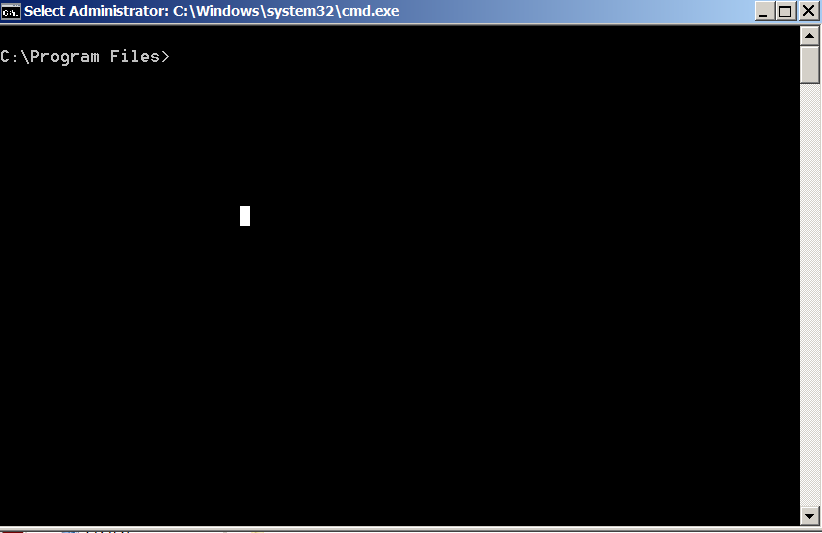
If you have to use Windows on system administration level, you had to use command prompt daily, thus its useful to be able to be able to open Command Line starting from desired directory with no need to copy directory Path by hand and CD to it manually.
By default Command Prompt, cmd.exe always opens itself setting a path to user home directory, reading what is defined by win system variable %USERPROFILE% or %HOMEPATH% – MS Windows equivalent of UNIX's $HOME shell variable.
To add open in DOS Prompt Here Command Prompt option to Windows Explorer menus its necessary to apply few rules to Windows registry DB
Use above Download link and launch it and from there on clicking with right Mouse button to any directory will enable you to open directory in CMD.EXE.
Here is content of little registry tweak adding the new menu Dos Prompt Here button
Windows Registry Editor Version 5.00
[HKEY_CLASSES_ROOT\Directory\shell\DosHere]
@="Dos &Prompt Here"
[HKEY_CLASSES_ROOT\Directory\shell\DosHere\Command]
@="cmd.exe /k cd %1"
[HKEY_CLASSES_ROOT\Drive\shell\DosHere]
@="Dos &Prompt Here"
[HKEY_CLASSES_ROOT\Drive\shell\DosHere\Command]
@="cmd.exe /k cd %1"
This little registry code is originally for Windows 2000, anyways it is compatible with all NT technology based Windowses, Add DOS Prompt Here tweak works fine on Windows XP, Windows 7 and Windows 8 (Home, Pro and Business editions).
By Mentioning $HOME its interesting to say Windows equivalent of Linux's as it might be useful to know:
 linux:~# echo $HOME

/home/hipo
is
 C:\\> echo %USERPROFILE%

C:\\Users\\georgi
To list all Windows Command Prompt environment variable equivalent to Linux's bash shell env / setenv is SET command), here is example output from my Winblows;
C:\Users\georgi> SET
ALLUSERSPROFILE=C:\\ProgramData

APPDATA=C:\\Users\georgi\AppData\Roaming

CLASSPATH=.;C:\\Program Files (x86)\\Java\\jre6\\lib\\ext\\QTJava.zip

CommonProgramFiles=C:\\Program Files\Common Files

CommonProgramFiles(x86)=C:\\Program Files (x86)\\Common Files

CommonProgramW6432=C:\\Program Files\\Common Files

COMPUTERNAME=GEORGI

ComSpec=C:\\Windows\\system32\\cmd.exe

DEFLOGDIR=C:\\ProgramData\\McAfee\\DesktopProtection

FP_NO_HOST_CHECK=NO

HOMEDRIVE=C:

HOMEPATH=\\Users\\georgi

LOCALAPPDATA=C:\\Users\\georgi\\AppData\\Local

NUMBER_OF_PROCESSORS=4

OS=Windows_NT

Path=C:\\Program Files\\RA2HP\\;C:\\Windows\\system32;C:\\Windows;C:\\Windows\\S

Wbem;C:\\Windows\\System32\\WindowsPowerShell\v1.0\;C:\\Program Files\\WIDCOM

oth Software\\;C:\\Program Files\\WIDCOMM\\Bluetooth Software\\syswow64;C:\\Pr

les (x86)\\Hewlett-Packard\\HP ProtectTools Security Manager\\Bin\\;C:\\Progr

\\ActivIdentity\\ActivClient\\;C:\\Program Files (x86)\\ActivIdentity\\ActivCl

\\Program Files (x86)\\QuickTime\\QTSystem\\

PATHEXT=.COM;.EXE;.BAT;.CMD;.VBS;.VBE;.JS;.JSE;.WSF;.WSH;.MSC

PROCESSOR_ARCHITECTURE=AMD64

PROCESSOR_IDENTIFIER=Intel64 Family 6 Model 58 Stepping 9, GenuineIntel

PROCESSOR_LEVEL=6

PROCESSOR_REVISION=3a09

ProgramData=C:\\ProgramData

ProgramFiles=C:\\Program Files

ProgramFiles(x86)=C:\\Program Files (x86)

ProgramW6432=C:\\Program Files

PROMPT=$P$G

PSModulePath=C:\\Windows\\system32\\WindowsPowerShell\\v1.0\Modules\\

PTSMInstallPath_X86=C:\\Program Files (x86)\\Hewlett-Packard\\HP ProtectToo

ity Manager\\

PUBLIC=C:\\Users\\Public

QTJAVA=C:\\Program Files (x86)\\Java\\jre6\\lib\\ext\\QTJava.zip

SESSIONNAME=Console

SystemDrive=C:

SystemRoot=C:\\Windows

TEMP=C:\\Users\\georgi\\AppData\\Local\\Temp

TMP=C:\\Users\\georgi\\AppData\\Local\\Temp

USERDNSDOMAIN=EMEA.CPQCORP.NET

USERDOMAIN=EMEA

USERNAME=georgi

USERPROFILE=C:\\Users\\georgi

VSEDEFLOGDIR=C:\\ProgramData\\McAfee\\DesktopProtection

windir=C:\\Windows

windows_tracing_flags=3

windows_tracing_logfile=C:\\BVTBin\\Tests\\installpackage\\csilogfile.log
Hope this little trick hopes someone out there.
I will be glad to hear of other cool useful windows registry tweaks?
Tags: bash shell, cmd, command, command prompt, DB, deal, exe, fine, home, home directory, Java, lib, Linux, list, Set, system, tweaks, Windows, Windows Command Prompt, windows explorer, windows registry, zip
Posted in System Administration, Windows | 1 Comment »
Monday, August 8th, 2011 
I’ve recently built new mail qmail server with vpopmail to serve pop3 connectins and courierimap and courierimaps to take care for IMAP IMAPS.
I further used telnet to test if the Linux server pop3 service on (110) and imap on (143) worked fine, straight after the completed qmail install.
Here is how to test mail server with vpopmail listening for connections on pop3 port :
debian:~# telnet mail.mymailserver.com 110

Trying 111.222.333.444...

Connected to mail.mymailserver.com.

Escape character is '^]'.

+OK <2813.1312745988@mymailserver.com>

USER hipo@mymailserver.com

+OK

PASS here_goes_my_secret_pass

+OK

LIST

1 309783

2 64053

3 2119

4 64357

5 317893

RETR 1

My first mail content retrieved with RETR commandgoes here ....

quit

+OK

Connection closed by foreign host.
You see I have 5 messages in my mailbox, as you can see I used RETR command to check the content of my mail, this is handy as I can read my mails straight with telnet (if the mail is in plain text), of course it’s a bit more complicated if I have to read encrypted or html mail, though still its easy to write a tiny parser and pipe the content produced by telnet command to lynx or some other text based browser.
Now another sys admin handy tip is the use of telnet to check my mail servers IMAP servers is correctly operating.
Here is how:
debian:~# telnet mail.mymailserver.com 143

Trying 111.222.333.444...

Connected to localhost.

Escape character is '^]'.

* OK [CAPABILITY IMAP4rev1 UIDPLUS CHILDREN NAMESPACE THREAD=ORDEREDSUBJECT THREAD=REFERENCES SORT QUOTA IDLE ACL ACL2=UNION STARTTLS] Courier-IMAP ready. Copyright 1998-2010 Double Precision, Inc. See COPYING for distribution information.

01 LOGIN hipo@mymailserver.com here_goes_my_secret_pass

A OK LOGIN Ok.

02 LIST "" *

* LIST (Unmarked HasNoChildren) "." "INBOX"

02 OK LIST completed

03 SELECT INBOX

* FLAGS (Draft Answered Flagged Deleted Seen Recent)

* OK [PERMANENTFLAGS (* Draft Answered Flagged Deleted Seen)] Limited

* 5 EXISTS

* 5 RECENT

* OK [UIDVALIDITY 1312746907] Ok

* OK [MYRIGHTS "acdilrsw"] ACL

03 OK [READ-WRITE] Ok

04 STATUS INBOX (MESSAGES)

* STATUS "INBOX" (MESSAGES 5)

04 OK STATUS Completed.

05 FETCH 1 ALL

...

06 FETCH 1 BODY

...

07 FETCH 1 ENVELOPE

...
As you can see according to standard to send commands to IMAP server from console after a telnet connection you will have to always include a command line number like 01, 02, 03 .. etc.
Using such a line numbering is not obligitory and also letters like A, B, C could be use still line numbering with numbers is generally a good idea since it’s easier for reading on the screen.
Now line 02 shows you available mailboxes, line 03 SELECT INBOX selects the imap Inbox to be further operated with, 04 STATUS INBOX cmd displays status about current mailboxes in folder.
FETCH 1 ALL instructs the imap server to get list of all IMAP message headers. Next command in line 05 FETCH 1 BODY will display the message body of the first message in list.
The 07 FETCH 1 ENVELOPE will display the mail headers for the 1 message.
Few other IMAP commands which might be helpfun on connection are:
08 FETCH 1 FULL

09 FETCH * FULL
First one would fetch complete content of a message numbered one from the imap server and the second one 09 FETCH * FULL will get all the mail content for all messages located on the remote IMAP server.
The STATUS command aforementioned earlier could take the following list of arguments:
MESSAGES, UNSEEN, RECENT UIDNEXT UIDVALIDITY
These commands are a gold mine for me as a sysadmin as it helps quickly solve problems, hope they would help to somebody out there as well 😉
This way is a way shorter than bothering each time to check, if some customer e-mail account is improperly configured by creating setting up a new account in Thunderbird.
Tags: acl, ALL, bit, care, cmd, com, content, course, Deleted, double precision, Draft, first mail, FULL, handy tip, hipo, host, html mail, imap, imaps, Linux, linux server, Lynx, mail content, mail server service, mail servers, new mail, parser, PASS, pop, pop mail server, precision inc, quot, RETR, server pop3, starttls, sys admin, Telnet, text, vpopmail
Posted in Linux, Postfix, Qmail, System Administration | 2 Comments »
Thursday, April 19th, 2012 I'm doing replication for one server. Its not the first time I do configure replication between two MySQL database nodes, however since I haven't done it for a few years, my "know how" has mostly vanished so I had some troubles in setting it up. Once I followed some steps to configure replication I had to check if the two MASTER / Slave MySQL db nodes communicate properly. Hence I decided to drop a short post on that just in case if someone has to do the same or if I myself forget how I did it so I can check later on:
1. Check if MASTER MySQL server node is configured properly
The standard way to check a MySQL master node status info is with:
mysql> show master status;
+——————+———-+———————————————————+——————+
| File | Position | Binlog_Do_DB | Binlog_Ignore_DB |
+——————+———-+———————————————————+——————+
| mysql-bin.000007 | 106 | database1,database2,database3 | |
+——————+———-+———————————————————+——————+
1 row in set (0.00 sec)
By putting \G some extra status info is provided:
mysql> show master status\G;
*************************** 1. row ***************************
File: mysql-bin.000007
Position: 106
Binlog_Do_DB: database1,database2,database3
Binlog_Ignore_DB:
1 row in set (0.00 sec)
ERROR:
No query specified
2. Check if Slave MySQL node is configured properly
To check status of the slave the cmd is:
mysql> show slave status;
The command returns an output like:
mysql> show slave status;+———————————-+————-+————-+————-+—————+——————+———————+————————-+—————+———————–+——————+——————-+——————————————————-+———————+——————–+————————+————————-+—————————–+————+————+————–+———————+—————–+—————–+—————-+—————+——————–+——————–+——————–+—————–+——————-+—————-+———————–+——————————-+—————+—————+—————-+—————-+| Slave_IO_State | Master_Host | Master_User | Master_Port | Connect_Retry | Master_Log_File | Read_Master_Log_Pos | Relay_Log_File | Relay_Log_Pos | Relay_Master_Log_File | Slave_IO_Running | Slave_SQL_Running | Replicate_Do_DB | Replicate_Ignore_DB | Replicate_Do_Table | Replicate_Ignore_Table | Replicate_Wild_Do_Table | Replicate_Wild_Ignore_Table | Last_Errno | Last_Error | Skip_Counter | Exec_Master_Log_Pos | Relay_Log_Space | Until_Condition | Until_Log_File | Until_Log_Pos | Master_SSL_Allowed | Master_SSL_CA_File | Master_SSL_CA_Path | Master_SSL_Cert | Master_SSL_Cipher | Master_SSL_Key | Seconds_Behind_Master | Master_SSL_Verify_Server_Cert | Last_IO_Errno | Last_IO_Error | Last_SQL_Errno | Last_SQL_Error |+———————————-+————-+————-+————-+—————+——————+———————+————————-+—————+———————–+——————+——————-+——————————————————-+———————+——————–+————————+————————-+—————————–+————+————+————–+———————+—————–+—————–+—————-+—————+——————–+——————–+——————–+—————–+——————-+—————-+———————–+——————————-+—————+—————+—————-+—————-+| Waiting for master to send event | HOST_NAME.COM | slave_user | 3306 | 10 | mysql-bin.000007 | 106 | mysqld-relay-bin.000002 | 251 | mysql-bin.000007 | Yes | Yes | database1,database2,database3 | | | | | | 0 | | 0 | 106 | 407 | None | | 0 | No | | | | | | 0 | No | 0 | | 0 | |+———————————-+————-+————-+————-+—————+——————+———————+————————-+—————+———————–+——————+——————-+——————————————————-+———————+——————–+————————+————————-+—————————–+————+————+————–+———————+—————–+—————–+—————-+—————+——————–+——————–+——————–+—————–+——————-+—————-+———————–+——————————-+—————+—————+—————-+—————-+
As you can see the output is not too readable, as there are too many columns and data to be displayed and this doesn't fit neither a text console nor a graphical terminal emulator.
To get more readable (more verbose) status for the SQL SLAVE, its better to use command:
mysql> show slave status\G;
Here is a sample returned output:
mysql> show slave status\G;*************************** 1. row *************************** Slave_IO_State: Waiting for master to send event Master_Host: HOST_NAME.COM Master_User: slave_user Master_Port: 3306 Connect_Retry: 10 Master_Log_File: mysql-bin.000007 Read_Master_Log_Pos: 106 Relay_Log_File: mysqld-relay-bin.000002 Relay_Log_Pos: 251 Relay_Master_Log_File: mysql-bin.000007 Slave_IO_Running: Yes Slave_SQL_Running: Yes Replicate_Do_DB: database1,database2,database3 Replicate_Ignore_DB: Replicate_Do_Table: Replicate_Ignore_Table: Replicate_Wild_Do_Table: Replicate_Wild_Ignore_Table: Last_Errno: 0 Last_Error: Skip_Counter: 0 Exec_Master_Log_Pos: 106 Relay_Log_Space: 407 Until_Condition: None Until_Log_File: Until_Log_Pos: 0 Master_SSL_Allowed: No Master_SSL_CA_File: Master_SSL_CA_Path: Master_SSL_Cert: Master_SSL_Cipher: Master_SSL_Key: Seconds_Behind_Master: 0Master_SSL_Verify_Server_Cert: No Last_IO_Errno: 0 Last_IO_Error: Last_SQL_Errno: 0 Last_SQL_Error: 1 row in set (0.00 sec)ERROR: No query specified
If show master status or shwo slave status commands didn't reveal replication issue, one needs to stare at the mysql log for more info.
Tags: Auto, Cipher, cmd, condition, configure, Connect, Draft, event, exec, host, info, key, Master, master node, master slave, mysql server, name, Path, quot, Replicate, replication, Retry, server node, show, slave status, someone, Space, SQL, time, User
Posted in MySQL, System Administration, Web and CMS | 4 Comments »
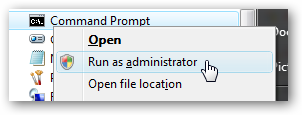
Wednesday, November 23rd, 2011 I needed to show the Administrator user on one Windows 7 install.
Achieving this is done through command prompt – cmd.exe where the command prompt with the exclusive option of Run as Administrator .
The exact command that unhides the Administrator user so further on on next windows login screen one sees Administrator user ready for use is:
C:> net user administrator /active:yes
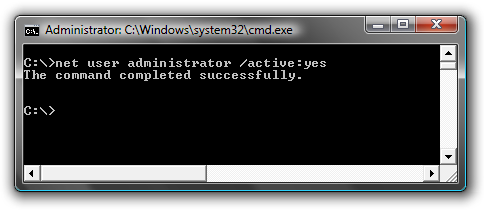
Unhiding Administrator user is always handy whether one needs to do some bunch of operations with Super User. After finishing all my required tasks with administrator I reverted back and hid the Administrator user once again like so:
C:> net user administrator /active:no
This commands also works fine on Vista and presumably on Windows XP.
Tags: Achieving, administrator, bunch, cmd, command, command prompt, exact command, exe, fine, login, option, run, screen, show, Super, unhide, Unhiding, use, User, Vista, Windows, windows xp
Posted in System Administration, Various, Windows | No Comments »
Saturday, January 14th, 2012 Mounting ISO files in Linux is easy with mount cmd, however remembering the exact command one has to issue is a hard task because mounting ISO files is not a common task.
Mounting ISO files directly by clicking on the ISO file is very nice, especially for lazy people uninitiated with the command line 😉
Besides that I'm sure many Windows users are curious if there is an equivallent program to DaemonTools for Linux / BSD*?
The answer to this question is YES!
There are two major programs which can be used as a DaemonTools substitute on Linux:
These are FuriousISOMount and AcetoneISO
AcetoneISO is more known and I've used it some long time ago and if I'm correct it used to be one of the first ISO Mount GUI programs for Linux. There is a project called GMount-ISO / (GMountISO) which of the time of writting this article seems to be dead (at least I couldn't find the source code).
Luckily FuriousISOMount and AcetoneISO are pretty easy to install and either one of the two is nowdays existing in most Linux distributions.
Probably the programs can also be easily run on BSD platform also quite easily using bsd linux emulation.
If someone has tried something to mount GUIs in Free/Net/OpenBSD, I'll be interesting to hear how?
1. Mount ISO files GUI in GNOME with Furius ISO Mount
FuriousISOMount is a simple Gtk+ interface to mount -t iso9660 -o loop command.
To start using the program on Debian / Ubuntu install with apt;
debian:~# apt-get install furiusisomount

The following extra packages will be installed:

fuseiso fuseiso9660 libumlib0

The following NEW packages will be installed:

furiusisomount fuseiso fuseiso9660 libumlib0
…
To access the program in GNOME after install use;
Applications -> Accessories -> Furious ISO Mount
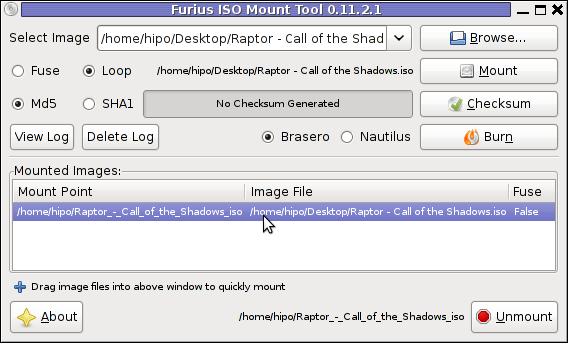
When mounting it is important to choose Loop option to mount the iso instead of Fuse
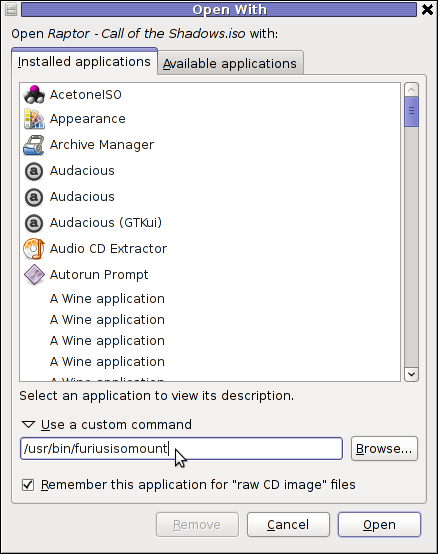
After the program is installed to associate the (.iso) ISO files, to permanently be opened with furiusisomount roll over the .iso file and choose Open With -> Other Application -> (Use a custom command) -> furiusisomount
2. Mount ISO Files in KDE Graphical Environment with AcetoneISO
AcetoneISO is build on top of KDE's QT library and isway more feature rich than furiousisomount.
Installing AcetoneISO Ubuntu and Debian is done with:
debian:~# apt-get install acetoneiso

The following NEW packages will be installed:

acetoneiso gnupg-agent gnupg2 libksba8 pinentry-gtk2 pinentry-qt4

0 upgraded, 6 newly installed, 0 to remove and 35 not upgraded.

Need to get 3,963 kB of archives.

After this operation, 8,974 kB of additional disk space will be used.

...
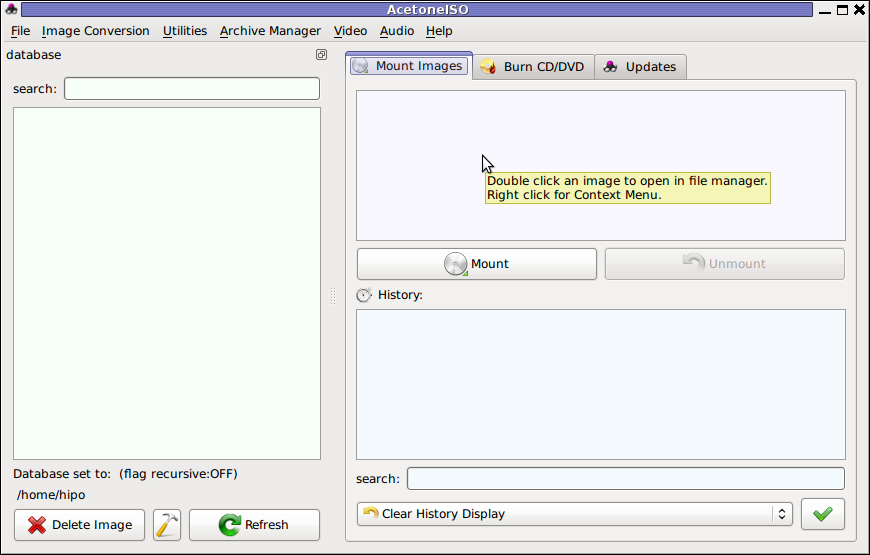
AcetoneISO supports:
- conversion between different ISO formats
- burn images to disc
- split ISO image volumes
- encrypt images
- extract password protected files
Complete list of the rich functionality AcetoneISO offers is to be found on http://www.acetoneteam.org/viewpage.php?page_id=6
To start the program via the GNOME menus use;
Applications -> Accessories -> Sound & Video -> AcetoneISO
I personally don't like AcetoneISO as I'm not a KDE user and I see the functionality this program offers as to rich and mostly unnecessery for the simple purpose of mounting an ISO.
3. Mount ISO image files using the mount command
If you're a console guy and still prefer mounting ISO with the mount command instead of using fancy gui stuff use:
# mount -t iso9660 -o loop /home/binary/someiso.iso /home/username/Iso_Directory_Name
Tags: AcetoneISO, Auto, BSD, cmd, custom, debian gnu, Draft, emulation, exact command, file, Files, Free, GMount-ISO, Gnome, graphical environment, gtk interface, guis, image files, ISO, iso file, iso files, iso9660, libumlib, long time, loop command, most linux distributions, nbsp, Open, OpenBSD, option, platform, roll, someone, something, source code, substitute, time, Ubuntu, windows users, YES
Posted in Gnome, Linux, Linux and FreeBSD Desktop, Linux Audio & Video | No Comments »
Tuesday, February 7th, 2012 
Many younger people, might not know lpr command, historically it was heavily used for printing in the early GNU / Linux days.
lpr ships the text to be printed to the printer which is physically attached on LPT (Line Print Terminal) parallel port . Those who lived the DOS era surely know in those "ancient" days, everyone who wanted to print has to use the LPT parallel port
Present time, everyone knows there is almost no modern printer that is attached to the PC via LPT port but rather the USB port is used for communication between the printer the computer.
Nevertheless The USB printers on Linux are managed by CUPS, the lpr command is still functional shipping the text to be printed via CUPS (cups-lpd daemon).
Before cups-lpd was introduced the service managing the print jobs was lpd
Hence lpr is still functional.
To print a plain text file of one page with lpr on Linux:
linux:~# cat text-file-to-print.txt | lpr
For multiple printers to switch between multiple printers there is the PRINTER shell variable:
linux:~# export PRINTER=printer-Name-and-Type
To print a really long text file (a book in TXT) the pr command comes handy. As you can read in the cmd manual pr – converts text files for printing
Lets say you would like to have a 60 lines of text per printed page, the cmd to issue is:
linux:~# pr -l60 text-file-to-print.txt | lrp
All queued printing jobs can be reviewed with the lpq, if you have a printer attached try:
linux:~# lpq

lp is ready and printing

Rank Owner Job Files Total Size

active hipo 1 text-file-to-print.txt 62045 bytes
Since some years it is pretty rare for people to use lpq, since most of the parallel printing is managed by CUPS server, what most people use nowdays to check the printer queue is lpstat : e.g.
linux:~# lpstat

...
Printing status and all things related to queued jobs for printing gets logged in /var/log/lpr.log
There is even more simplistic way to print directly to the printer (if the printer is attached via a LPT port) through the kernel /dev/lp, for example:
linux:~# cat text-file-to-print.txt >> /dev/lp
For more than one printer attached the naming of /dev/lp, might probably be /dev/lp0, /dev/lp1 etc.
The lprm command also exists in case if you would like to cancel a printjob in the queue. Lets say I want to cancel a job in the queue with Job ID 5:
linux:~# lrpm 5

...
To cancel a current running job in the middle the /usr/bin/cancel command exists.
An interesting historic fact is that nowdays opening lpr, lpq or any of the other tools for simple text mode printing one sees on top of the page Apple Inc.
Lets clear this up CUPS (Common Unix Printing System) (open source) printing platform is not owned by Apple, since it is licensed under GPL2 and LGPL. The reason why the Apple Inc. shows up in man pages is because in year 2007, the founder of CUPS printing server Michael Sweet hired him to work for Apple Inc. "purchasing" the CUPS source. However as we know they did not really purchased the code, because the code was already belonging to the community (licensed under GPL2). Apple however as a marketing trick used the fact that Sweet worked for them and as probably as a matter of marketing asked him to place the Apple Inc. in the copyright source and manual areas. Obviously this is not true, since Apple Inc. does not hold copyright for CUPS as CUPS can be copied by anyone (its open source) 😉
Most of the people will never print using this commands, since printing is now, ages ahead, anyways for simple people (like me), who just need to print a text with no special fonts or graphics text printing is just great.
Text printing is also a good learning experience for Linux novices and is good to be known just as a piece of UNIX history.
Tags: Auto, cmd, code, Copyright, Draft, everyone, file, Files, gnu linux, job, jobs, Linux, linux pr, lpd, lpd daemon, lpq, lpstat, page, parallel port, parallel printing, present time, Print, printer name, printer queue, printing, printingRank, queue, Shell, shipping, ships, Sizeactive, terminal, text, time, usb port, usb printers
Posted in Linux, System Administration | 1 Comment »
Monday, January 9th, 2012 I've recently had to set up a backup system to synchronize backup archive files between two remote servers and as I do usually with this situation I just set up a crontab job to periodically execute rsync to copy data from source server to the destination server . Copying SRC to DEST is the default behaviour rsync uses, however in this case I had to copy from the destination server to the source server host (in other words sync files the reversely.
The usual way to copy with rsync via SSH (from SRC to DEST) is using a cmd line like:
debian:~$ /usr/bin/rsync -avz -e ssh backup-user@xxx.xxx.xxx.xxx:/home/backup-user/my-directory .
Where the xxx.xxx.xxx.xxx is my remote server IP with which files are synched.
According to rsync manual, the proposed docs SYNOPSIS is in the format;
Local: rsync [OPTION…] SRC… [DEST
Obviusly the default way to use rsync is to copy source to destination which I used until now, but in this case I had to the other way around and copy files from a destination host to the source server. It was logical that swapping the SRC and DEST would complete my required task. Anyways I consulted with some rsync gurus in irc.freenode.net , just to make sure it is proper to just swap the SRC, DEST arguments.
I was told this is possible, so I swapped args;
debian:~$ /usr/bin/rsync -avz -e ssh . backup-user@xxx.xxx.xxx.xxx:/home/backup-user/my-directory

...
Surprisingly this worked 😉 Anyways I was adviced by by a good guy nick named scheel , that putting -e ssh to command line is generally unnecessery except if there is no some uncommon used SSH port over which the data is transferred. An example case in which -e 'ssh is necessery would be if transferring via lets say SSH port 1234;
rsync -avz -e 'ssh -p1234' /source user@host:/dest
In all other cases omitting '-e ssh' is better as '-e ssh' is rsync default. Therefore my final swapped line I put in cron to copy from a destinatio to source host with rsync looked like so:
05 03 2 * * /usr/bin/ionice -c 3 /usr/bin/rsync -avz my-directory backup-user@xxx.xxx.xxx.xxx:/home/backup-user/ >/dev/null 2>&1
Tags: archive files, Auto, avz, backup system, case, cmd, cmd line, copy, copying, cron, default, default behaviour, destIn, destinatio, destination, destination host, destination server, docs, Draft, example, example case, few words, format, gurus, host, job, nbsp, necessery, nick, option, port 1234, remote server, rsync, scheel, server host, server ip, source host, source server, ssh port, sync files, system, usr bin
Posted in FreeBSD, Linux, System Administration | No Comments »


