Posts Tagged ‘org’

How to resolve network issues with Java 6 JRE on Debian / Java proxy spawn on Debian sid not working by default – A Small tip on running WebScarab and Paros local Proxy on Debian’s Java

Wednesday, April 28th, 2010

In an attempt to use Paros Proxy and WebScarab on Debian I faced a shitty issues with Java’s Networking.

Neither of the forementioned Security Applications’s Local Proxy to be spawned by the Java server won’t work.

I assured my self there is nothing running on the ports 8080 on which the two Java applications attempted to run their local proxy server.
Being sure that nothing is listening on the 8080 port. I suspected that there is something wrong with Debian’s Java networking.
A quick search in Google pointed me to the Debian.Net’s forums where the issue was described as serious proxy error after updates .

The error that was returned by the ParosProxy Server on my Desktop Debian can be reviewed below:

hipo@noah:~/paros$ /usr/lib/jvm/java-6-sun-1.6.0.17/jre/bin/java -jar paros.jar
file:/home/hipo/paros/paros.jar
java.net.SocketException: Invalid argument
at java.net.PlainSocketImpl.socketBind(Native Method)
at java.net.PlainSocketImpl.bind(PlainSocketImpl.java:365)
at java.net.ServerSocket.bind(ServerSocket.java:319)
at java.net.ServerSocket.<init>(ServerSocket.java:185)
at org.parosproxy.paros.core.proxy.ProxyServer.createServerSocket(Unknown Source)
at org.parosproxy.paros.core.proxy.ProxyServer.startServer(Unknown Source)
at org.parosproxy.paros.control.Proxy.startServer(Unknown Source)
at org.parosproxy.paros.control.Control.init(Unknown Source)
at org.parosproxy.paros.control.Control.<init>(Unknown Source)
at org.parosproxy.paros.control.Control.initSingletonWithView(Unknown Source)
at org.parosproxy.paros.Paros.runGUI(Unknown Source)
at org.parosproxy.paros.Paros.run(Unknown Source)
at org.parosproxy.paros.Paros.main(Unknown Source)

All a man can grasp from the Error is that there is something wrong with running the Paros Proxy server.
So far so good since the last release of Paros Proxy originates back to the year 2006 and it’s not really supported this days at first I thought this could be causing the error.
By the way the paros proxy is available via the debian packaging system. So I use the packaged version of paros to install the Debian packaged version of Paros Proxy issue the cmd:

root@noah:~# apt-get install paros

In that manner of thoughts I decided to try out the newer more modern HTTP and HTTPS Security Analysing Application WebScarab

I followed the start up instructions on WebScarab’s Website in order to run the application.
It was really simple. All I had to do is download the webscarab-current.zip which of the time of writting this post is webscarab-20100414-0036 and then launch the Java Debian Virtual machine.

However though my hopes that WebScarab’s local Proxy server will be running fine I was unpleasently suprised by the error which shown below:

hipo@noah:~/webscarab-20100414-0036$ java -jar webscarab.jar
Help set not found
11:43:36 main(Proxy.parseListenerConfig): No proxies configured!?
11:43:39 Proxy(Proxy.run): Unable to start listener 127.0.0.1:8008

Ain’t pretty heh?! … Even nasty !

However I was lucky to find the solution in some 20 minutes, so hopefully it took you less to find this post.

The solution to the above Proxy Spawn Error with Paros and Webscarab on Debian Lenny’s Java 6 Sun Server is really simple and it comes to this:

1. edit /etc/sysctl.d/bindv6only.conf and change the value

net.ipv6.bindv6only = 1
# to
net.ipv6.bindv6only = 0

2. Restart procps

root@noah:/home/hipo/webscarab-20100414-0036# invoke-rc.d procps restart

Now launch once again either Paros Proxy or Webscarab, the Local Proxy Server by each of them will bind to either port 8008 (WebScarab) or port 8008 (Paros Proxy).

How to deb upgrade PHP 5.3.3-7 / MySQL Server 5.1 to PHP 5.4.37 MySQL 5.5 Server on Debian 6.0 / 7.0 Squeeze / Wheezy GNU / Linux

Thursday, February 12th, 2015

how-to-deb-upgrade-mysql-server-5.1-to-mysql-5.5-php-5.3-to-php-5.4-5.5-upgrade-howto-on-old-stable-debian-squeeze-wheezy

I've been still running Debian Squeeze 6.0 GNU / Linux on few of the Linux / Apache / MySQL servers I'm administrating and those servers are running few Wordperss / Joomla websites which lately face severe MySQL performance issues. I tried to optimize using various mysql performance optimization scripts such as mysql-tuner.pl, Tuning-primer.sh and Percona Toolkit – a collection of advanced command-line tools for system administrators and tech / support staff to perform a variety of MySQL and system tasks that are too difficult or complex to perform manually. Though with above tools and some my.cnf tunizations I managed to achieve positive performance improvement results with above optimizations, still I didn't like how MyQSL served queries and since the SQL server is already about 5 years old (running version 5.1) and the PHP on sever is still at 5.3 branch, I was advised by my dear colleague Anatoliy to try version update as a mean to improve SQLserver performance. I took seriously the suggestion to try upgrade as a mean to resolve performance issues in this article I will explain in short what I had to do to make MySQL upgrade a success

Of course to try keep deb installed software versions as fresh as possible possible deb packagse, I'm already using Debian Back Ports (for those who hear it a first time Debian Backports is a special repository for Stable versioned Debian Desktop and Servers  – supporting stable releases of Debian Linux) which allows you to keep install packages versions less outdated (than default installable software which usually are way behind latest stable package versions with 2-5 years).

If you happen to administer Stable Debian servers and you never used BackPorts I warmly recommend it as it often includes security patches of packages part of Debian stable releases that reached End Of Support (EOS) and already too old even for security updates to be issued by respective Debian Long Term Suport (LTS) repositories.

If you're like me and still in situation to manage remotely Debian 6.0 Squeeze and its the first time you hear about BackPorts and Debian LTShttps://wiki.debian.org/LTS/ to start using those two add to your /etc/apt/sources.list below 3 lines

Open with vim editor and press shift+G to go to last line of file and then press I to enter INSERT mode, once you're done to save, press (ESC) then press : and type x! in short key combination for exit and save setting in vim is 
 

Esc + :x! 


debian-server:~# vim /etc/apt/sources.list
deb http://http.debian.net/debian squeeze-lts main contrib non-free
deb-src http://http.debian.net/debian squeeze-lts main contrib non-free
deb http://http.debian.net/debian-backports squeeze-backports main

If you haven't been added a security updates line in /etc/apt/sources.list make sure you add also:


deb http://security.debian.org/ squeeze/updates main contrib non-free
deb-src http://security.debian.org/ squeeze/updates main contrib non-free


Then to apply latest security updates and packages from LTS / Backports repository run the usual:


debian-server:~# apt-get update && apt-get –yes upgrade
….

If you need to search a package or install something from just added backports repository use:


debian-server:~# apt-cache -t squeeze-backports search "mysql-server"
auth2db – Powerful and eye-candy IDS logger, log viewer and alert generator
torrentflux – web based, feature-rich BitTorrent download manager
cacti – Frontend to rrdtool for monitoring systems and services
mysql-server-5.1 – MySQL database server binaries and system database setup
mysql-server-core-5.1 – MySQL database server binaries
mysql-server – MySQL database server (metapackage depending on the latest version)


To install specific packages only with all their dependencies from Backports while keeping rest of packages from Debian Stable:


debian-server:~# apt-get install -t squeeze-backports "package_name"

In same way you can also search or install specific packages from LTS repo:


debian-server:~# apt-get search -t squeeze-lts "package_name"

debian-server:~# apt-get install -t squeeze-lts "package_name"

Latest mysql available from Debian BackPorts and LTS is still quite old 5.1.73-1+deb6u1 therefore I made an extensive research online on how can I easily update MySQL 5.1 to MySQL 5.5 / 5.6 on Debian Stable Linux.
 

Luckily there were already DotDeb deb repositories for Debian LAMP (Linux / Apache  / MySQL / PHP / Nginx ) running servers prepared in order to keep the essential Webserver services up2date even long after distro official support is over. I learned about existence of this repo thanks to a Ryan Tate's post who updates his LAMP stack on TurnKey Linux which by the way is based on slightly modified official stable Debian Linux releases packages

To start using DotDeb repos add in /etc/apt/sources.list (depending whereh you're on Squeeze or Wheeze Debian):


deb http://packages.dotdeb.org squeeze all
deb-src http://packages.dotdeb.org squeeze all

or for Debian Wheezy add repos:


deb http://packages.dotdeb.org wheezy all
deb-src http://packages.dotdeb.org wheezy all


I was updating my DebianLatest MySQL / PHP / Apache release to Latest ones on (6.0.4) Squeeze so added above squeeze repos:

Before refreshing list of package repositories, to authenticate repos issue:


debian-server:~# wget -q http://www.dotdeb.org/dotdeb.gpg
debian-server:~# apt-key add dotdeb.gpg

Once again to update my packages from newly added DodDeb repository


debian-server:~# apt-get update

Before running the SQL upgrade to insure myself, I dumped all databases with:


debian-server:~# mysqldump -u root -p -A > /root/dump.sql

Finally I was brave enough to run apt-get dist-upgrade to update with latest LAMP packages


debian-server:~# apt-get dist-upgrade
Reading package lists… Done
Building dependency tree
Reading state information… Done
Calculating upgrade… Done
The following packages will be REMOVED:
  mysql-client-5.1 mysql-server mysql-server-5.1
The following NEW packages will be installed:
  libaio1 libmysqlclient18 mysql-client-5.5 mysql-client-core-5.5 python-chardet python-debian
The following packages will be upgraded:
  curl krb5-multidev libapache2-mod-php5 libc-bin libc-dev-bin libc6 libc6-dev libc6-i386 libcurl3 libcurl3-gnutls libcurl4-openssl-dev libevent-1.4-2
  libgssapi-krb5-2 libgssrpc4 libjasper1 libk5crypto3 libkadm5clnt-mit7 libkadm5srv-mit7 libkdb5-4 libkrb5-3 libkrb5-dev libkrb53 libkrb5support0 libmysqlclient-dev
  libxml2 libxml2-dev locales mysql-client mysql-common ntp ntpdate php-pear php5 php5-cgi php5-cli php5-common php5-curl php5-dev php5-gd php5-imagick php5-mcrypt
  php5-mysql php5-odbc php5-recode php5-sybase php5-xmlrpc php5-xsl python-reportbug reportbug unzip

50 upgraded, 6 newly installed, 3 to remove and 0 not upgraded.
Need to get 51.7 MB of archives.
After this operation, 1,926 kB of additional disk space will be used.
Do you want to continue [Y/n]? Y

As you see from above output above command updates Apache webservers / PHP and PHP related modules, however it doesn't update MySQL installed version, to update also MySQL server 5.1 to MySQL server 5.5


debian-server:~#  apt-get install –yes mysql-server mysql-server-5.5

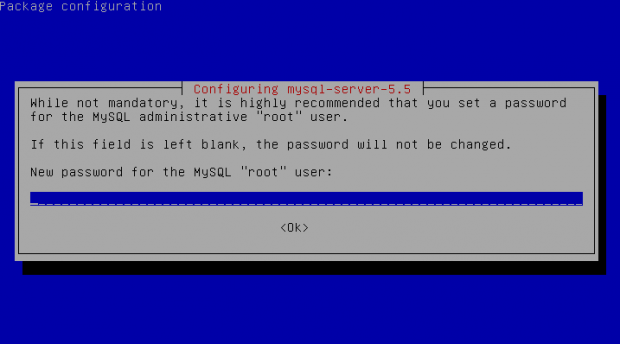
You will be prompted with the usual Debian ncurses text blue interface to set a root password to mysql server, just set it the same as it used to be on old upgraded MySQL 5.1 server.

Well now see whether mysql has properly restarted with ps auxwwf


debian-server:~#  ps axuwwf|grep -i sql
root     22971  0.0  0.0 112360   884 pts/11   S+   15:50   0:00  |                   \_ grep -i sql
root     19436  0.0  0.0 115464  1556 pts/1    S    12:53   0:00 /bin/sh /usr/bin/mysqld_safe
mysql    19837  4.0  2.3 728192 194552 pts/1   Sl   12:53   7:12  \_ /usr/sbin/mysqld –basedir=/usr –datadir=/var/lib/mysql –plugin-dir=/usr/lib/mysql/plugin –user=mysql –pid-file=/var/run/mysqld/mysqld.pid –socket=/var/run/mysqld/mysqld.sock –port=3306
root     19838  0.0  0.0 110112   700 pts/1    S    12:53   0:00  \_ logger -t mysqld -p daemon.error

In my case it was running, however if it fails to run try to debug what is going wrong on initialization by manually executing init script /etc/init.d/mysql stop; /etc/init.d/mysql start and look for errors. You can also manually try to run mysqld_safe from console if it is not running run:


debian-server:~# /usr/bin/mysqld_safe &

This should give you a good hint on why it is failing to run
 

One more thing left is to check whether php modules load correctly to do so issue:


debian-server:~# php -v
Failed loading /usr/lib/php5/20090626/xcache.so:  /usr/lib/php5/20090626/xcache.so: cannot open shared object file: No such file or directory

Failed loading /usr/lib/php5/20090626/xdebug.so:  /usr/lib/php5/20090626/xdebug.so: cannot open shared object file: No such file or directory


You will likely get an exception (error) like above.
To solve the error, reinstall xcache and xcache-debug debs


debian-server:~# apt-get purge php5-xcache php5-xdebug

Now PHP + MySQL + Apache environment should be running much smootly.
debian-squeeze-wheeze-update-install-mysql-sevver5.55-620x344-howto

Upgrading the MySQL server / PHP library to MySQL server 5.6 / PHP 5.5 on Wheeze Linux is done in very much analogous ways all you have to do is change the repositories with above wheeze 7.0 ones and to follow the process as described in this article. I haven't tested update on Wheezy yet, so if you happen to try my article with wheezy reports and got a positive upgrade result please drop a comment.

Ditaa convert ASCII diagrams into bitmap graphic (pictures)

Monday, May 12th, 2014

ditta_convert-ascii-art-diagram-to-png-jpg-picture
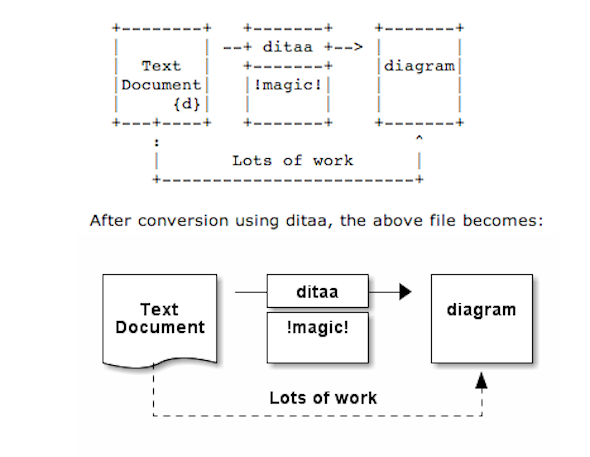
As part of my passion for ASCII art, I've found another interesting tool useful to ASCII art maniacs like me, the tool is called ditta and is able to convert manually drawn ASCII art diagrams to graphics, below is tool description from my debian apt-cache as well as a screenshot:

 apt-cache show ditaa|grep -i ditaa -A 4

Package: ditaa
Priority: optional
Section: graphics
Installed-Size: 164
Maintainer: David Paleino <dapal@debian.org>

Filename: pool/main/d/ditaa/ditaa_0.9+ds1-2_all.deb
Size: 107270
MD5sum: 05ec52d9274b954b053f1835ca5d7a7f
SHA1: 792d91d05fff2a2a19c0ebce317351d138436c18
SHA256: c4319d32e7918aab782e2f38cdad745bc9023f9f09a999033d983095ee4f70d5

 DiTAA is a small command-line utility that can convert diagrams drawn using
 ASCII art ("drawings" that contain characters that resemble lines, like | /
 and -), into proper bitmap graphics.
 .
 DiTAA also uses special markup syntax to increase the possibilities of shapes
 and symbols that can be rendered.
Homepage: http://ditaa.org


To install ditaa on Debian and Ubuntu Linux:

debian:~# apt-get install --yes ditaa
...

Ditaa text diagram to Graphics converter is also available in Fedora Linux and in Source RPMs to be used on Redhat Based RPM distributions.
To install in most of RPM based Linuxes:

[root@fedora:~]# yum install -y ditaa

For most people probably Ditta will not be of any value except as a PoC and of a Hack value just like Ditaa's home page suggests. Nomatter that Ditta is cool but has just 2 drawback it doesn't understand non-latin characters i.e. Cyrillic and requires Java Virtual Machine .. but if you're a real geek you will do  the sacrifice to install a whole bunch of the heavy java for the sake of some oldschool fun 🙂 Being written in Java makes Ditta multi-platform, but you will need a Java VM version of at least 1.6 (it doesn't work with Java 1.5).

The format Ditta understands is close to HTML

<ditaa [optional parameters]>
 
... (some ditaa-code) ...
 
</ditaa>


There are also special tags understood by Ditta which are automatically turned into shaped graphical buttons and forms.
 

Possible tags

Not all shape selector tags are documented on the ditaa site. A quick source scan revealed:

tag Description
{c} decision(Choice)
{d} document
{io} input/output, parallelogram
{mo} manual operation
{o} ellipse, circle
{s} storage
{tr} trapezoid (looks like an inverted {mo} )

Here is an example Ditta code
 

<ditaa round noedgesep right>
+--------+   +-------+    +-------+
|        | --+ ditaa +--> |       |
|  Text  |   +-------+    |diagram|
|Document|   |!magic!|    |       |
|     {d}|   |  c478 |    |       |
+---+----+   +-------+    +-------+
:                         ^
|       Lots of work      :
+-------------------------+
</ditaa>

This Ditta code will generate following picture:

ditaa_convert-ascii-art-picture-to-graphic-png-jpg-bmp


To learn more on ditta please check Ditaa's Project homepage on Sourceforge
Many thanks to Cybercity's 30 Cool Open Source Software of 2013 for inspiring this post.

Use apt-get with Proxy howto – Set Proxy system-wide in Linux shell and Gnome

Friday, May 16th, 2014

linux-apt-get-configure-proxy-howto-set-proxy-systemwide-in-linux

I juset setup a VMWare Virtual Machine on my HP notebook and installed Debian 7.0 stable Wheezy. Though VMWare identified my Office Internet and configured automatically NAT, I couldn't access the internet from a browser until I remembered all HP traffic is going through a default set browser proxy.
After setting a proxy to Iceweasel, Internet pages started opening normally, however as every kind of traffic was also accessible via HP's proxy, package management with apt-get (apt-get update, apt-get install etc. were failing with errors):


# apt-get update

Ign cdrom://[Debian GNU/Linux 7.2.0 _Wheezy_ – Official i386 CD Binary-1 20131012-12:56] wheezy Release.gpg
Ign cdrom://[Debian GNU/Linux 7.2.0 _Wheezy_ – Official i386 CD Binary-1 20131012-12:56] wheezy Release
Ign cdrom://[Debian GNU/Linux 7.2.0 _Wheezy_ – Official i386 CD Binary-1 20131012-12:56] wheezy/main i386 Packages/DiffIndex
Ign cdrom://[Debian GNU/Linux 7.2.0 _Wheezy_ – Official i386 CD Binary-1 20131012-12:56] wheezy/main Translation-en_US
Err http://ftp.by.debian.org wheezy Release.gpg
  Could not connect to ftp.by.debian.org:80 (86.57.151.3). – connect (111: Connection refused)
Err http://ftp.by.debian.org wheezy-updates Release.gpg
  Unable to connect to ftp.by.debian.org:http:
Err http://security.debian.org wheezy/updates Release.gpg
  Cannot initiate the connection to security.debian.org:80 (2607:ea00:101:3c0b:207:e9ff:fe00:e595). – connect (101: Network is unreachable) [IP: 2607:ea00:101:3c0b:207:e9ff:fe00:e595 80]
Reading package lists…


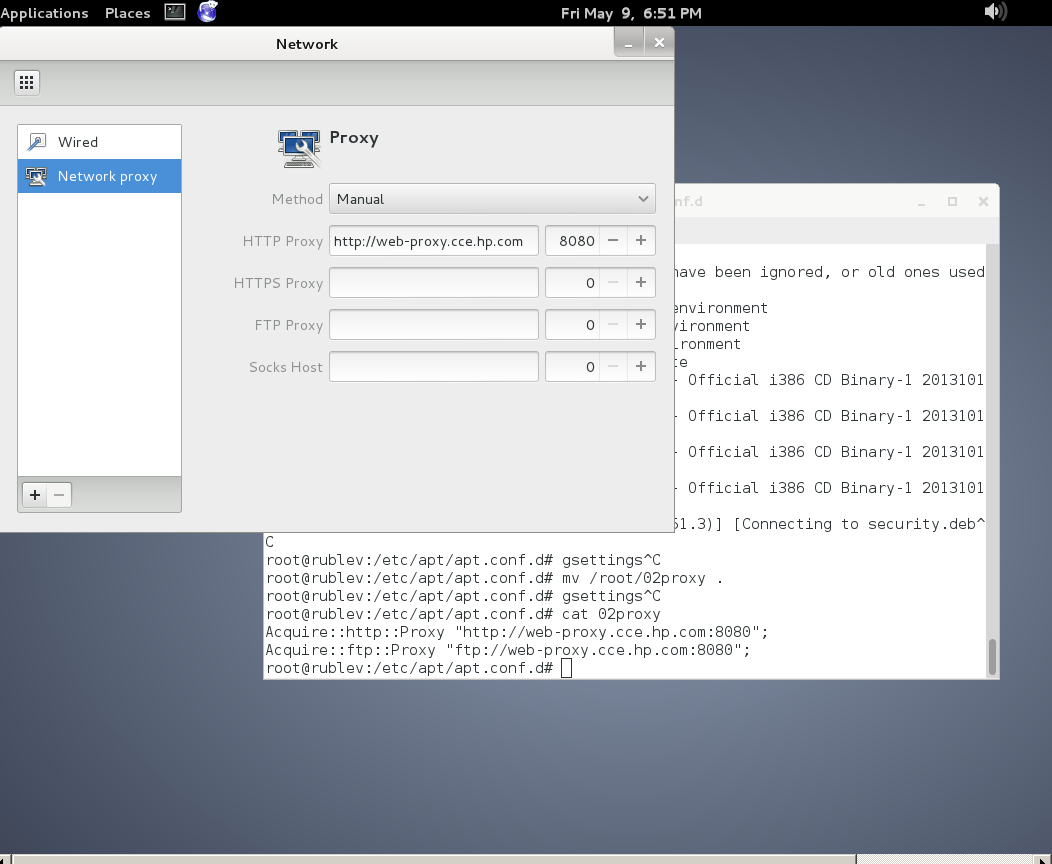
This error is caused because apt-get is trying to directly access above http URLs and because port 80 is filtered out from HP Office, it fails in order to make it working I had to configure apt-get to use Proxy host – here is how:

a) Create /etc/apt/apt.conf.d/02proxy file (if not already existing)
and place inside:
 

Acquire::http::proxy::Proxy "https://web-proxy.cce.hp.com";
Acquire::ftp::proxy::Proxy "ftp://web-proxy.cce.hp.com";


To do it from console / gnome-terminal issue:
echo ''Acquire::http::Proxy "https://web-proxy.cce.hp.com:8088";' >> /etc/apt/apt.conf.d/02proxy
echo ''Acquire::ftp::Proxy "https://web-proxy.cce.hp.com:8088";' >> /etc/apt/apt.conf.d/02proxy

That's all now apt-get will tunnel all traffic via HTTP and FTP proxy host web-proxy.cce.hp.com and apt-get works again.

Talking about Proxyfing Linux's apt-get, its possible to also set proxy shell variables, which are red and understood by many console programs like Console browsers lynx, links, elinks  as well as wget and curl commands, e.g.:


export http_proxy=http://192.168.1.5:5187/
export https_proxy=$http_proxy
export ftp_proxy=$http_proxy
export rsync_proxy=$http_proxy
export no_proxy="localhost,127.0.0.1,localaddress,.localdomain.com"

For proxies protected with username and password export variables should look like so: echo -n "username:"
read -e username
echo -n "password:"
read -es password
export http_proxy="http://$username:$password@proxyserver:8080/"
export https_proxy=$http_proxy
export ftp_proxy=$http_proxy
export rsync_proxy=$http_proxy
export no_proxy="localhost,127.0.0.1,localaddress,.localdomain.com"

To make this Linux proxy settings system wide on Debian / Ubuntu there is the /etc/environment file add to it:
 

http_proxy=http://proxy.server.com:8080/
https_proxy=http://proxy.server.com:8080/
ftp_proxy=http://proxy.server.com:8080/
no_proxy="localhost,127.0.0.1,localaddress,.localdomain.com"
HTTP_PROXY=http://proxy.server.com:8080/
HTTPS_PROXY=http://proxy.server.com:8080/
FTP_PROXY=http://proxy.server.com:8080/
NO_PROXY="localhost,127.0.0.1,localaddress,.localdomain.com"


To make proxy global (systemwide) for most (non-Debian specific) Linux distributions shell environments create new file /etc/profile.d/proxy.sh and place something like:

function proxy(){
echo -n "username:"
read -e username
echo -n "password:"
read -es password
export http_proxy="http://$username:$password@proxyserver:8080/"
export https_proxy=$http_proxy
export ftp_proxy=$http_proxy
export rsync_proxy=$http_proxy
export no_proxy="localhost,127.0.0.1,localaddress,.localdomain.com"
echo -e "nProxy environment variable set."
}
function proxyoff(){
unset HTTP_PROXY
unset http_proxy
unset HTTPS_PROXY
unset https_proxy
unset FTP_PROXY
unset ftp_proxy
unset RSYNC_PROXY
unset rsync_proxy
echo -e "nProxy environment variable removed."
}

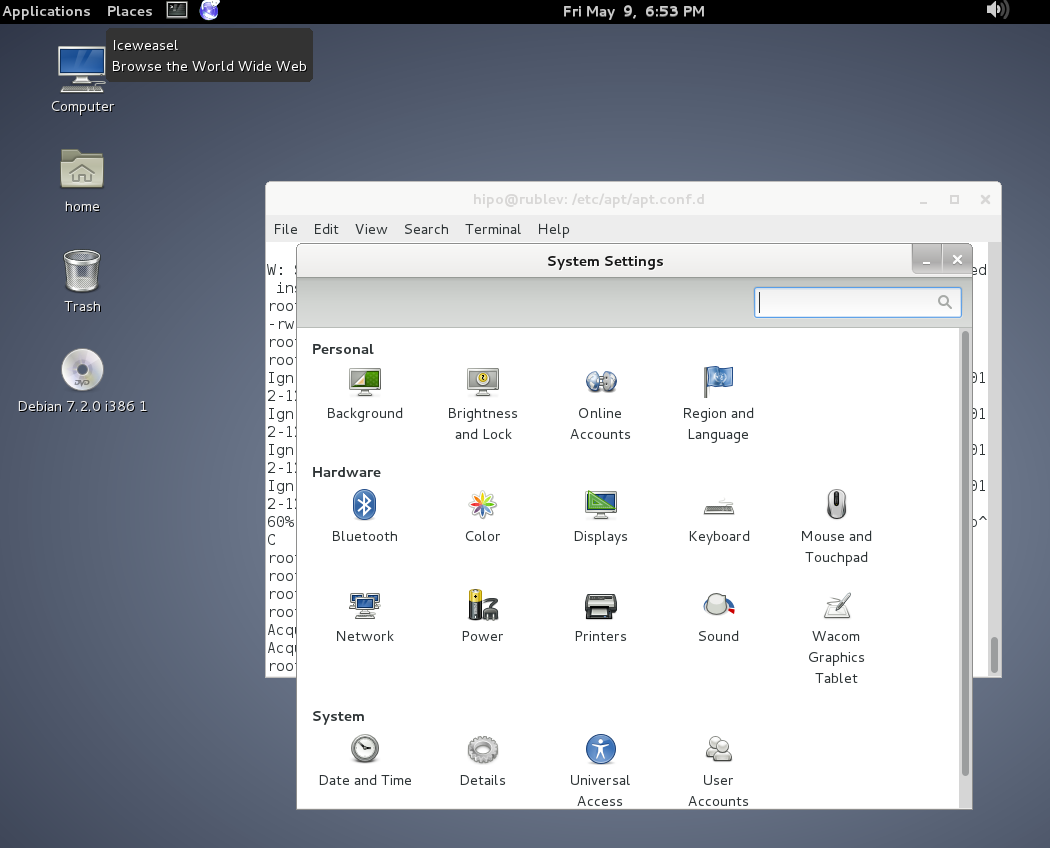
To set Global Proxy (make Proxy Systemwide) for a user in GNOME Desktop environment launch gnome-control-center

And go to Network -> Network Proxy

/images/gnome-configure-systemwide-proxy-howto-picture1

/images/gnome-configure-systemwide-proxy-howto-picture2

To make proxy settings also system wide for some GUI Gnome GTK3 applications

gsettings set org.gnome.system.proxy mode 'manual'
gsettings set org.gnome.system.proxy.http host 'your-proxy.server.com'
gsettings set org.gnome.system.proxy.http port 8080

yum add proxy on CentOS, RHEL, Fedora Linux howto

Thursday, June 5th, 2014

yum-via-proxy-yum-package-management-mascot
Whether you had to install a CentOS server in a DMZ-ed network with paranoic system firewall rules or simply you want to use your own created RPM local repository to run RPM installs and CentOS system updates via monitored Proxy you will have to configure yum to use a proxy.

There is a standard way to do it by adding a proxy directive to /etc/yum.conf as explained in CentOS official documetnation.
However for some reason:

proxy=http://your-proxy-url.com:8080
proxy_username=yum-user
proxy_password=qwerty

proxy vars adding to /etc/yum.conf [main] section is not working on CentOS 6.5?
However there is a dirty patch by using the OS environment standard variable http_proxy
To make yum work via proxy in gnome-terminal run first:

export http_proxy=http://your-proxy-server.com:8080

or if proxy is protected by username / password run instead:

export username='yum-user'
export password='qwerty'
export http_proxy="http://$username:$password@your-proxy-server:8080/

Afterwards yum will work via the proxy, i.e.:

yum update && yum upgrade

To make http_proxy exported system wide check my previous post – Set Proxy System-Wide

Hope this helps someone.

Can you swim after communion? – What is better not to do after receiving the holy sacraments

Tuesday, July 29th, 2014

is-it-allowed-to-swim-after-holy-communion
I took the sacraments this Sunday, and as we're on a holiday and we go to swimming daily. I never swim eucharist in my wife, so a logical came is it allowed to swim after receiving the holy sacraments?

I've googled around to see for an answer but it seems from what I find there is no official plain answer telling whether swimming is allowed or not after communion.

As there is no official church position on this question, this question is solved privately with your priest (spiritual father), if you have such, if not you can do it according to your own conscious.

I've red there are some priests who say, the best practice is not to swim after communion at least 9 hours after holy communion.

For monks the question to swim or not after receiving the holy sacraments is clearly answered as monks are not allowed to go to a beach / undress or wear a swimwear. The reason for that swimming could turn to pleasing the flesh and even a passion in some cases.

otec_Georgi_Jeglarci_communion_chalice_holy-potir

For layman swimming is allowed, but it is dangerous to swim for the only reason, one can hurt himself during swimming and there might be bleeding and it is well known rule to try to follow not to have bleeding or open wounds during communion. Of course in some cases for old people who believe and take the holy blood and flesh of the Lord Jesus Christ with permanent open wounds this rule cannot be observed and with such there might be exceptions. But the general rule for healthy people to follow is to preserve themselves from bleeding after receiving holy communion.
Also an interesting thing that is good to observe after communion is not to take haircut on the same day, cut nails and even it is recommended to not take shower the same day.
The reason to generally try to not wash the body is because the blessing and renewal of the body by the holy spirit which is received in form of Christ's blood and flesh is bathing us and we don't want to wash out this blessing.

Christ-giving-holy-sacraments-to-holy-apostle-Paul

Of course to shower or not after communion is a personal decision. Also the one of the reasons not to haircut on same day as holy communion is it is usual to get a shower after haircut and it is better not to do that. No bleeding on the same day as communion is because we physically receive holy Christ's body and flesh and his holy gifts run through all our body including in the blood and we don't want to have to waste and "spill" this grace through bleeding.
Also on day of receiving holy sacraments it is church rule not to kiss, not to spit and walking barefoot (for the danger that you can hurt yourself and have a blood spill).

lastsupper-holy-orthodox-icon-what-to-do-after-holy-communion

If for some reason you fall and bleed the proper way to deal with the situation is to burn the tissue with the blood.

The number 9 hours to wait is significant in that it reminds us of the hours our Lord Jesus Christ spent to pay our debts with his holy blood and thus grant us salvation. This is the way of the cross starting from 9:00 AM – 6:00 PM, the trial, crucifixion, death, and laying in the tomb took a total of 9 hours.
Also trying consedering not to spit, not chew chewing gum, wash, take shower and kiss is important as it is a mean of watchfulness and as Christians we have to be watchful, at least some minor time after being allowed to re-join the Holy Body of Christ through the holy sacraments gifts in Church.

If you're bringing to communion your kids it is a different story and you can be less vigilent to obseve all this, as it is impossible to know what a kid could do.
It should be known except spitting, right after receiving the holy communion all is not a must observe rules but it is good ones to follow.

Most of the information of this post is based on Coptic Oriental Orthodox forum with questions and answers on wha it is better not to do after communion, anyways as we Eastern Orthodox Chrsitians are so close in faith to Copts, the answers there are true for us too.

Improve Websites SEO: Optimize images to Increase website loading performance on Linux server – Image Compress tools

Friday, December 5th, 2014

Optimize-website-images-pictures-to-Increase-website-loading-performance-on-Linux-server_Image_Compress_tools-Improve-Websites_SEO
Part of our daily life as Web hosting system adminstrators is to constantly strive to better utilize our Linux / Windows hosting servers hardware.
Therefore it is our constant task to look for new better ways to optimize our Apache Sites and Webservers in order to return served application content light fast to keep the Boss and customers happy 🙂

There are things to tune up for better server performance and better CPU / memory utilization on both server Application server side as well as the website programming code backend, html and pictures / images

Thus it is critically important to not only keep the Webserver / PHP engine optimized but keep hosted sites  stored images and source code clean and efficient.

We as admins usually couldn't directly interfere with clearning the source code and often we have to host a crappy written sites with picture upload forms with un-optimized Image files that was  produced on old Photo Cameras, "Ancient" Mobile Mobiles, Win XP MS Paint, various versions Photoshop, Gimp etc.).

It is a well known fact that a big part from a Website User Experience is how fast the user loads a page, thus if HTML / CSS loaded images loads slow has a negative impact on user look & feel about website

Therefore by optimizing the size of hosted sites Images, you Save Network bandwidth and in some cases when Large Gallery sites HDD disk space.

On Linux, there are already a many command line tools to inspect and optimize (compress) the size of PNG, JPEG, GIF, BMP, PNM, Tiff Images, most famous ones are:

  • optipng – PNG optimizer that recompresses image files to a smaller size, without losing any information.
  • jpegoptim –   lossless JPEG optimization (based on optimizing the Huffman tables) and "lossy" optimization based on setting a maximum quality factor.
  • pngcrush – Recommended tool to use by Stoyan Stefanov (Yahoo Yslow Developer)
  • jpegtran – Recommended to use by Google 
  • gifsicle –  command-line tool for creating, editing, and getting information about GIF images and animations. 

It is hence useful to first run manually availale Linux image optimization tools (to get an idea what they do) and later automate them to run as scripts to optimize server stored images size and make pictures load faster on websites and thus improve End Users Experience and speed up Image content delivery to GoogleBot / YahooBot / Bing Crawlers which will make Search Engines to position server hosted sites better (more SEO Friendly).


  • How much percents of  space (Mega / Gigabytes ) Pictures compress can save you?

If you run it on 500MB image directory, you can probably save about 20 to 50MB of size, so don't expect extraordinary file reduce, however 5% to 10% reduce in size is not bad too. If you host 100 sites each with half gigas of data this would mean saving of 5GB of data and some 5GB from backups 🙂 At extraordinary cases you can expect 20% to 30% of storage reduce. For even better image compression you can try out GIMP's – Save for Web option.
 

  • Installing jpegtran, optpng, jpegoptim, pngcrush gifsicle on Debian / Ubuntu (deb based) Linux
     

apt-get install –yes libjpeg-progs optipng jpegoptim pngcrush gifsicle


  • Installing  jpegtran, optpng, jpegoptim, pngcrush, gifsicle on Fedora / CentOS / RHEL (RPM based distros)
     

yum -y install pngcrush libjpeg-turbo-utils opt-jpg opt-png opt-gif


gifsicle is not availale by default on Redhacks 🙂 but there is a RPM package for fedora from http://pkgs.repoforge.org/gifsicle/


Some examples of running image compression on GNU / Linux

  • optipng and jpegoptim optimize for all files in directory
     

cd /home/sites/

find . -iname '*.png' -print0 | xargs -0 optipng -o7 -preserve
find . -iname '*.jpg' -print0 |
 xargs -0 jpegoptim –max=90 –strip-all –preserve –totals


In jpegoptim command, the option –strip-all will strip any metadata including Exif data from images. For websites JPEG metadata is usually not needed, so usually its ok to strip them.

Above jpegoptim example will decrease slightly JPEG image quality to 90%. quality level of 90 is still high enough and website visitors are unlikely to spot any visible quality reduction / defects in the image.


  • pngcrush all files in a directory example
     

cd /home/sites/

for png in `find $IMG_DIR -iname "*.png"`; do
    echo "crushing $png …"
        pngcrush -rem alla -reduce -brute "$png" temp.png


    # preserve original on error
    if [ $? = 0 ]; then
        mv -f temp.png $png
        else
        rm temp.png
        fi
done

  • Run jpegtran on sites directory
     

find /home/sites -name "*.jpg" -type f -exec jpegtran -copy none -optimize -outfile {} {} ;


  • Set a script to compress / reduce size of Sites Images


Here is a basic optimize_images.sh which I used earlier before and was reducing the overall images size just 5 to 10%, then I found the much improved version of optimize images shell script  (useful to  clear up EXIF picture data / And Comments from JPG / PNG files). The script execution could take very long time on large image directories and thus could cause a high HDD disk I/O, however if ran once a week at night time its not such a big deal. 

To set it to run on your server as a cronjob:
 

cd /usr/sbin/
wget -q https://www.pc-freak.net/bshscr/optimize_images2.sh
crontab -u root -e 


Sample cron job to run once a month on 10th and 27th in 3 o'clock AM:
 

 00 3 10,27 * * /usr/sbin/optimize_images2.sh 2>&1 >/dev/null


Also if you need to further optimize million of tiny sized PNG files Yahoo Smush.it service could be helpful. For compression maniacs its worthy to check out also TinyPNG Service (however be awre that this service compresses files with significant quality loss) making picture quality visibly deteriorated.

Besides optimizing server stored Pictures, here are some other stuff that helps in increasing server utilization / lower webpages loading time.

Starting up with the installation (when site is to use Apache + PHP) for its backend, the first thing to on the freshlyinstalled Linux server is to implement the following list of Apache common Timeout variables that help better scale the webserver for the CMS-es hosted, enable Webserver caching with (mod_deflate), enable eAccelerator tune PHP common php variable etc.

Other thing  I sometimes use to speed-up performance of Apache child responce time up to 20-30  is to Include into Virtualhost / httpd.conf Apache configuration any htacces mod_rewrite rules.

On too heavily loaded sites On-line stores / Large Company website portals with more than 60 000 – 100 000 unique IP visitors a day it is useful tip to disable completely Apache logging in access.log / error.log.

Often when old architecture websites are moved from older Linux OS version to a newer one with newer versions of Apache / PHP often sites are working without major code rework, but use many functions which are already obsolete and thus many WARNING messages crap is logged into php_error.log / error.log. Thus to save disk space and decrease hard disk I/O operations it is good to Disable PHP Notices and Warnings messages
 

How to change default Comments and No Comments location in WordPress in wordpress default theme

Tuesday, April 5th, 2011

For a number of time I’ve been planning to change my blog comments placement. Until this very day however I’ve kept the default wordpress theme’s Comments button placement.

I realize the default Comments button placement is a bit hard to see and not that much intuitive for the user that enters my blog for a first time.

My first guess was that there might be somewhere a wordpress plugin which will allow me to adjust my comments button placement.
After some research online and a realization that probably there is no such plugin existing yet. I’ve forced myself to tune it up myself.

It was clear to me that in order to change the it will be necessery to edit the WordPress templates files. I’m not a designer and when I hear about templates I usually get scared, however I took the time to take a look at the default wordpress template and find out actually that template modifications is actually rather easier than I thought.

My previous idea was that in order to edit templates you have to be some kind of CSS and HTML guru (which I’m not). Nevertheless it seems that in order to play and adjust in a good way the templates you don’t need ot be a pro.
Even an uneducated fool like myself can easily do almost everything he thinks of throughout few lines of code in the wp templates.

To get back to the major topic thanks God after a bit of review and reading of wordpress.org documentation and some user forums. I’ve figured out that in order to change my Comments placement you need to modify the file:
 

  • blog/wp-content/themes/default/index.php

In index.php find the line starting with:

You will notice within this opened paragraph the php code:

<?php the_tags('Tags: ', ', ', '
'); ?> Posted in <?php the_category(', ') ?>
| <?php edit_post_link('Edit', '', ' | '); ?>
<?php comments_popup_link('No Comments »', '1 Comment »', '% Comments »'); ?>

This is the actual default theme php code that makes the wordpress Comments or No Comments that maes the comments appear on the blog.

Now I’ve decided to let this be as it is but add one more Comment button to wordpress on a different location that is more appealing to my blog visitors

After quick evaluation I’ve determined that probably the best location that the Comments button should have is right after the end of the post text

If you think my idea for button placement is appropriate, to set this location for the Comments button, you will have to find the follwoing code in index.php:

<div class="entry">
<?php the_content('Read the rest of this entry »'); ?>
</div>

Right after the end of this code place the following code:

<?php comments_popup_link('No Comments »', '1 Comment »', '% Comments »'); ?>
</div>

Recovering long lost website information (data) with wayback machine

Monday, May 9th, 2011

Wayback machine, see 2 years old website from cache service

I needed a handy way to recover some old data of an expired domain containing a website, with some really imprtant texts.
The domains has expired before one year and it was not renewed for the reason that it’s holder was not aware his website was gone. In the meantime somebody registered this domain as a way to generate ads profit from it the website was receiving about 500 to 1000 visitors per day.
Now I have the task to recover this website permanently lost from the internet data. I was not able to retrieve anything from the old domain name be contained via google cache, yahoo cache, bing etc.
It appears most of the search engines store a cached version of a crawled website for only 34 months. I’ve found also a search engine gigablast which was claimed to store crawled website data for 1 year, but unfortunately gigablast contained not any version of the website I was looking for.Luckily (thanks God) after a bit of head-banging there I found a website that helped me retrieve at least some parts from the old lost website.

The website which helped me is called WayBack Machine

The Wayback Machine , guys keeps website info snapshots of most of the domain names on the internet for a couple of years back, here is how wayback machine website describes its own provided services:

The Internet Archive's Wayback Machine puts the history of the World Wide Web at your fingertips.

Another handy feature wayback machine provides is checking out how certain websites looked like a couple of years before, let’s say you want to go back in the past and see how yahoo’s website looked like 2 years ago.

Just go to web.archive.org and type in yahoo and select a 2 years old website snapshot and enjoy 😉

It’s really funny how ridiculous many websites looked like just few years from now 😉