Posts Tagged ‘something’

How to remove the meta generator Content (Joomla! – Copyright) in Joomla 1.5

Thursday, December 30th, 2010

Joomla-remove-meta-generator-content-to-hide-joomla-site-install
Do you wonder How to change <meta name="Generator" content="Joomla! – Copyright (C) 2005 – 2007 Open Source Matters. All rights reserved." /> in Joomla 1.5

If yes, Here is how I've just found to remove the:


in my Joomla installation.

I need to remove that as a part of making my website not to leak out that it runs on top of Joomla.

So here is how:

1. Go to your Joomla website main root directory
2. Edit /libraries/joomla/document/html/renderer/head.php
Look for line: 83 in the /libraries/joomla/document/html/renderer/head.php
There you will notice the code:

$strHtml .= $tab.'<meta name="generator" content="'.$document->getGenerator().'" />'.$lnEnd;

In order to remove the <meta name="generator" content="Joomla …." /> change the above code to something like:

$strHtml .= $tab.'<meta name="generator" content="My Custom Web site Generator name" />'.$lnEnd;

That's all now next time you refresh your website the content="Joomla! – Copyright (C) 2005 – 2009 Open Source Matters. All rights reserved." will be no more.
Cheers! 🙂

How to make a mirror of website on GNU / Linux with wget / Few tips on wget site mirroring

Wednesday, February 22nd, 2012

how-to-make-mirror-of-website-on-linux-wget

Everyone who used Linux is probably familiar with wget or has used this handy download console tools at least thousand of times. Not so many Desktop GNU / Linux users like Ubuntu and Fedora Linux users had tried using wget to do something more than single files download.
Actually wget is not so popular as it used to be in earlier linux days. I've noticed the tendency for newer Linux users to prefer using curl (I don't know why).

With all said I'm sure there is plenty of Linux users curious on how a website mirror can be made through wget.
This article will briefly suggest few ways to do website mirroring on linux / bsd as wget is both available on those two free operating systems.

1. Most Simple exact mirror copy of website

The most basic use of wget's mirror capabilities is by using wget's -mirror argument:

# wget -m http://website-to-mirror.com/sub-directory/

Creating a mirror like this is not a very good practice, as the links of the mirrored pages will still link to external URLs. In other words link URL will not pointing to your local copy and therefore if you're not connected to the internet and try to browse random links of the webpage you will end up with many links which are not opening because you don't have internet connection.

2. Mirroring with rewritting links to point to localhost and in between download page delay

Making mirror with wget can put an heavy load on the remote server as it fetches the files as quick as the bandwidth allows it. On heavy servers rapid downloads with wget can significantly reduce the download server responce time. Even on a some high-loaded servers it can cause the server to hang completely.
Hence mirroring pages with wget without explicity setting delay in between each page download, could be considered by remote server as a kind of DoS – (denial of service) attack. Even some site administrators have already set firewall rules or web server modules configured like Apache mod_security which filter requests to IPs which are doing too frequent HTTP GET /POST requests to the web server.
To make wget delay with a 10 seconds download between mirrored pages use:

# wget -mk -w 10 -np --random-wait http://website-to-mirror.com/sub-directory/

The -mk stands for -m/-mirror and -k / shortcut argument for –convert-links (make links point locally), –random-wait tells wget to make random waits between o and 10 seconds between each page download request.

3. Mirror / retrieve website sub directory ignoring robots.txt "mirror restrictions"

Some websites has a robots.txt which restricts content download with clients like wget, curl or even prohibits, crawlers to download their website pages completely.

/robots.txt restrictions are not a problem as wget has an option to disable robots.txt checking when downloading.
Getting around the robots.txt restrictions with wget is possible through -e robots=off option.
For instance if you want to make a local mirror copy of the whole sub-directory with all links and do it with a delay of 10 seconds between each consequential page request without reading at all the robots.txt allow/forbid rules:

# wget -mk -w 10 -np -e robots=off --random-wait http://website-to-mirror.com/sub-directory/

4. Mirror website which is prohibiting Download managers like flashget, getright, go!zilla etc.

Sometimes when try to use wget to make a mirror copy of an entire site domain subdirectory or the root site domain, you get an error similar to:

Sorry, but the download manager you are using to view this site is not supported.
We do not support use of such download managers as flashget, go!zilla, or getright

This message is produced by the site dynamic generation language PHP / ASP / JSP etc. used, as the website code is written to check on the browser UserAgent sent.
wget's default sent UserAgent to the remote webserver is:
Wget/1.11.4

As this is not a common desktop browser useragent many webmasters configure their websites to only accept well known established desktop browser useragents sent by client browsers.
Here are few typical user agents which identify a desktop browser:
 

  • Mozilla/5.0 (Windows NT 6.1; rv:6.0) Gecko/20110814 Firefox/6.0
  • Mozilla/5.0 (X11; Linux i686; rv:6.0) Gecko/20100101 Firefox/6.0
  • Mozilla/6.0 (Macintosh; I; Intel Mac OS X 11_7_9; de-LI; rv:1.9b4) Gecko/2012010317 Firefox/10.0a4
  • Mozilla/5.0 (Windows NT 6.1; Win64; x64; rv:2.2a1pre) Gecko/20110324 Firefox/4.2a1pre

etc. etc.

If you're trying to mirror a website which has implied some kind of useragent restriction based on some "valid" useragent, wget has the -U option enabling you to fake the useragent.

If you get the Sorry but the download manager you are using to view this site is not supported , fake / change wget's UserAgent with cmd:

# wget -mk -w 10 -np -e robots=off \
--random-wait
--referer="http://www.google.com" \--user-agent="Mozilla/5.0 (Windows; U; Windows NT 5.1; en-US; rv:1.8.1.6) Gecko/20070725 Firefox/2.0.0.6" \--header="Accept:text/xml,application/xml,application/xhtml+xml,text/html;q=0.9,text/plain;q=0.8,image/png,*/*;q=0.5" \--header="Accept-Language: en-us,en;q=0.5" \--header="Accept-Encoding: gzip,deflate" \--header="Accept-Charset: ISO-8859-1,utf-8;q=0.7,*;q=0.7" \--header="Keep-Alive: 300"

For the sake of some wget anonimity – to make wget permanently hide its user agent and pretend like a Mozilla Firefox running on MS Windows XP use .wgetrc like this in home directory.

5. Make a complete mirror of a website under a domain name

To retrieve complete working copy of a site with wget a good way is like so:

# wget -rkpNl5 -w 10 --random-wait www.website-to-mirror.com

Where the arguments meaning is:
-r – Retrieve recursively
-k – Convert the links in documents to make them suitable for local viewing
-p – Download everything (inline images, sounds and referenced stylesheets etc.)
-N – Turn on time-stamping
-l5 – Specify recursion maximum depth level of 5

6. Make a dynamic pages static site mirror, by converting CGI, ASP, PHP etc. to HTML for offline browsing

It is often websites pages are ending in a .php / .asp / .cgi … extensions. An example of what I mean is for instance the URL http://php.net/manual/en/tutorial.php. You see the url page is tutorial.php once mirrored with wget the local copy will also end up in .php and therefore will not be suitable for local browsing as .php extension is not understood how to interpret by the local browser.
Therefore to copy website with a non-html extension and make it offline browsable in HTML there is the –html-extension option e.g.:

# wget -mk -w 10 -np -e robots=off \
--random-wait \
--convert-links http://www.website-to-mirror.com

A good practice in mirror making is to set a download limit rate. Setting such rate is both good for UP and DOWN side (the local host where downloading and remote server). download-limit is also useful when mirroring websites consisting of many enormous files (documental movies, some music etc.).
To set a download limit to add –limit-rate= option. Passing by to wget –limit-rate=200K would limit download speed to 200KB.

Other useful thing to assure wget has made an accurate mirror is wget logging. To use it pass -o ./my_mirror.log to wget.
 

12 must have Joomla extension plugins / Essential modules for new Joomla CMS install

Thursday, June 16th, 2011

Joomla bundle of must have extensions picture

These days very often I have to install, plain new Joomla based websites. I’ve realized that since there is no structured guide to follow describing the most essential plugins that every new fresh new joomla installation is required to have.
Thus I took the time and wrote this post, as it will be useful to myself in my future new joomla based websites establishment, I also believe these guide will be useful to other Joomla enthusiasts or administrators in their daily work.

Below I will describe in short the installation, configuration and oddities I’ve faced during installment of the above described bundle of plugins on a plan Joomla 1.5 install.These article will walk through 12 joomla essential plugins that I believe every fresh Joomla installation should be equipped with.
Hope this guide will be helpful to you. Now let’s start it up:

1. JoomlaXplorer – A sophisticated web file explorer for Joomla

One of the basic modules, beneficial with a new joomla CMS install is Joomla Xptplorer . This module enables the joomla admin to browse files in a web file explorer, on the server where the joomla CMS is installed. Below you see how handy the joomla web explorer provided by the plugin is:
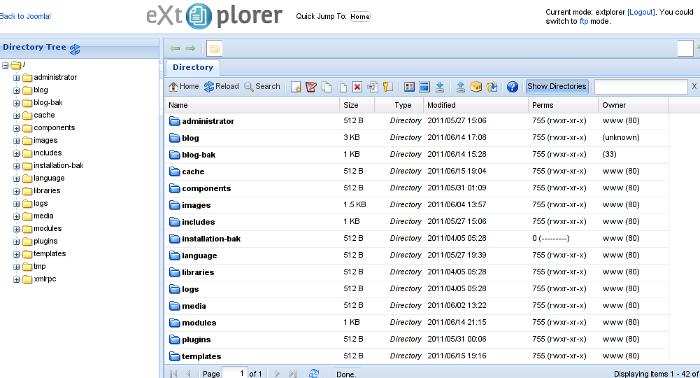
Joomla file explorer extplorer module

Installing and using the plugin is a piece of cake. To install the plugin:

a. download Joomla file Xplorer from here or from the official plugin website.

b. Install the plugin through the admin joomla menu:

Extensions -> Install/Uninstall

c. Start using the newly installed plugin by following to menus:

Components -> eXtplorer

2. JCrawler Generate easily sitemap.xml to aim the overall Joomla website SEO optimization

JCrawler logo plugin joomla

I have previously written a very through tutorial on how to install configure and generate website sitemap with Jcrawler module, You can read my article titled: How to build website sitemap.xml in Joomla here

3. sh404SEF – Make your Joomla links and content more user friendly

sh404sef Joomla Search Engine Optimization plugin

sh404SEF is a great Joomla plugin, which will seriously improve SEO and could contribute well for a website to be better indexed with major search engines.

I have previously written an article describing thoroughfully the install and use procedures for the module.
You can read the article Making your Joomla URLS Google friendly with sh404sef plugin / Simple Joomla link SEO here

4. Akeeba Backup Joomla solution

Akeeba backup Joomla Module

Installing a joomla backup solution is very essential if you does take care about your data, it often happens that server hard disk got crashes or a RAID massives got corrupted or some kind of other unexpected disaster hits the server. In these terrible times, having a website backup will save you nerves and data recovery funds, not to mention that in many cases data recovery is impossible.

Joomla has a very easy to use software for creating full website backup called Akeeba Backup

To start using the software one must:

a. Download Akeeba Backup and install it via:

Extensions -> Install/Uninstall

After the Akeeba Backup installation is over, to create your first backup, one needs to navigate to:

Components -> Akeeba Backup -> Backup Now

Each Akeeba backup (a version of the website’s files data and sql info) will be created in an archive file with the extension .jpa
The backup files are created under joomla’s website (main) root directory in directory location administrator/components/com_akeeba/backup

The Akeeba plugin also has capabilities to recover a (.jpa) backup restore point easily.
To recover a backup with the Akeeba plugin one needs to do it once again, via the plugin joomla web interface.
5. Google Analytics (place easy tracking code) in Joomla

Google Analytics Tracking Module for Joomla

a. Download the Google Analytics Tracking Module
The module is available from Joomla Extensions on joomla.org

At the current time of writting you need to download the analytics_tracking15,zip file

b. Install the Google Analytics Tracking Module;
Login as joomla admin and navigate to;

Extensions -> Install

Place the analytics_tracking15.zip url to the Install URL: field.
Again as of time of writting you need to place https://www.pc-freak.net/files/analytics_tracking15.zip;

c. Open the Module Manager

Extensions -> Module Manager

d. Click over Google Analytics Tracking Module
On the right pane you will notice in the Module Parameters the Analytics_uacct_code field. In the uacct_code field you need to paste your UA obtained from your created google-analytics account.
This code is usually something like UA-2101595-10
Now place your code their and press the save green button located near the right top of the screen. You should see the text in blue Item Saved which would indicate your UA code is stored already in the Google Analytics Tracking Module, now press the Cancel button located again on the right top.
As a last step before the Google analytics is set-up on the Joomla you need to enable the plugin to do you need to press over the tick left sided from the text reading Google Analytics Tracking Module in the Module Manager
e. Click over the Enabled button in Module Manager;
Google Analytics Tracking Module -> Enabled

6. Itprism (Facebook, Twitter etc.) Social Network share buttons Joomla plugin

ITPShare Large Social Buttons Joomla

a. to add the itpsocialbuttons to joomla Download the Itpsocialbuttons latest module files from http://itprism.com/free-joomla-extensions/social-buttons-plugin or use my mirrored module files below:

Download mod_itpsocialbuttons .zip file
Download plg_itpsocialbuttons .zip

After having the two files necessery to be installed to make the ITPSocialButtons appear on website, installation is done like with any other installation:

Extensions -> Install/Uninstall -> Upload Package File (Choose File)

Next its necessery to configure the plugin to do so, follow to menus:

Extensions -> Module Manager -> Share

You will notice the Share dialog in the list of Module Name column in Module Manager

Here is a screenshot on how the settings options for ITpsocialbuttons will look like:
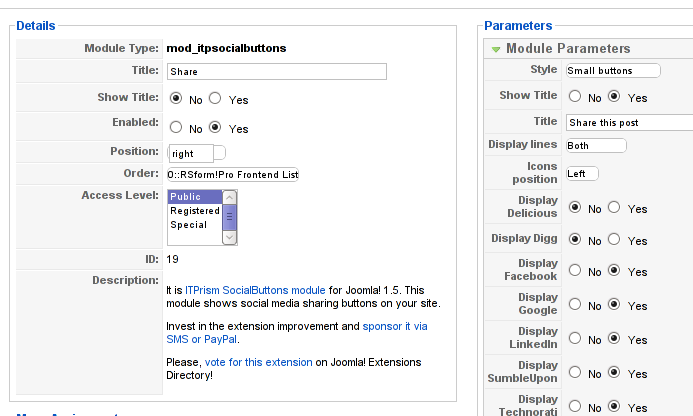
Mod ITpSocialButtons settings screen

The options which I personally changed was:

Show Title – I set this one to No as I wanted to omit the plugin title text to appear on my website.
Further on I’ve set the Enabled option to Yes to enable the plugin and choose the buttons Style option to be of a Small buttons type.
I’ve also found that the most suitable position for the Social Share buttons were to be of a right – Position .

Here is how the social network itprism share buttons looks like:
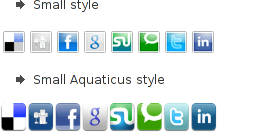
ITprism Joomla Social Share Plugin various button types

The plugin supports sharing of joomla pages to the following list of social networks:
 

  • Delicios.com
  • Digg.com
  • Facebook
  • Google Bookmarks
  • StumbleUpon
  • Technorati
  • Twitter
  • LinkedIn

The module configuration, also allows the user to configure the type of social network buttons, one wants to display on the website.

7. Joomla JCE Content Editor

This content editor is really awesome compared to the default editor TinyMCE. If you want to have an options rich content editor for Joomla, then this is the one for you 🙂
download JCE Content Editor here

After installing the JCE Joomla content editor in order to enable it as a default editor you need to go to the following location:

Site -> Global Configuration -> Default WYSIWYG Editor

There place on Editor TinyMCE and change it with Editor – JCE

Now go to edit some article, and you will see the difference in the editor 🙂

8. Add gallery Joomla capabilities with sigplus (Image Gallery Plus) and Very Simple Image Gallery

Image Gallery Plus sigplus Joomla Screenshot

Image Gallery Plus plugin (sigplus) gallery review screenshot

sigplus Image Gallery Plus is a straightforward way to add image or photo galleries to a Joomla article with a simple syntax. It takes a matter of minutes to set up a gallery but those who are looking for a powerful gallery solution will not be disappointed either: sigplus is suitable for both beginner and advanced users.

Download Sigplus Joomla Image Gallery plugin here
Using sigllus is quite easy all one has to do is use Joomla Media Manager from links:

Site -> Media Manager

Create new folder in the stories folder, let’s say New Pictures and further on use Media Manager to upload all desired pictures to be later displayed.

Being done with uploading the images you want to display, go to Article Manager :

Content -> Article Manager

From there choose your article where new uploaded pictures you want to display and type in the article:

{gallery}New Pictures{/gallery}.

Note that New Pictures is the directory just recently created as stated below, it’s important that there is no spacing between {gallery}and New Pictures, if one tries {gallery} New Pictures {/gallery} instead of {gallery}New Pictures{/gallery} an error will occur instead of the pictures being displayed in a scrolled gallery.

Sigplus Image Gallery has also a number of configuration options, which might make it look a bit more decent.
I have to say in my view the default way sigplus displays pictures is awful!

Another alternative if you don’t like Sigplus ‘s way of creating new galleries is to use Very Simple Image Gallery
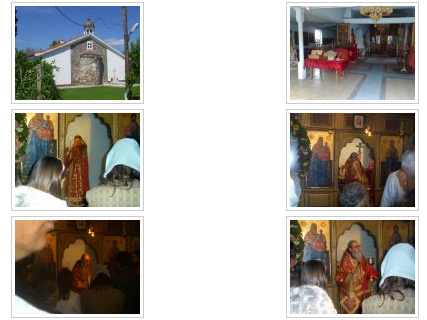
Very Simple Image Gallery joomla screenshot

Here is a screenshot on a sample gallery created with Very Simple Image Gallery Joomla Plugin

You can download Very simple image gallery here

After installing the plugin. It’s use is analogous to the Sigplus . To use it likewise sigplus create new directory through Media Manager and in stories and upload your files in let’s say New Pictures1 . Later on in your article place, the code

{vsig}New Pictures1{/vsig}

Gallery will be generated automatically by the plugin. I think Simple Image Gallery is a bit more advanced and gives a better outlook to Galleries, though it’s configuration settings are much less than with SigPlus image gallery.

To add pictures comments e.g. img link alt=” and title=” tib you need to place a code within the Article manager similar to:

{vsig_c}0|Picture_1.JPG|Some sample text|Some other text{/vsig_c}
{vsig_c}0|Picture_2.JPG|Some example text|Some text{/vsig_c}
etc. ..

Note that the 0 in above example specifies the gallery number if you for instance are using a couple of galleries with Simple Image Gallery , the first one you used would be call 0 . The text specified as comments to the picture will also appear after you preview the gallery right below the picture when clicked on as a picture description in a really nice way.
9. Install Google maps plugin for Joomla
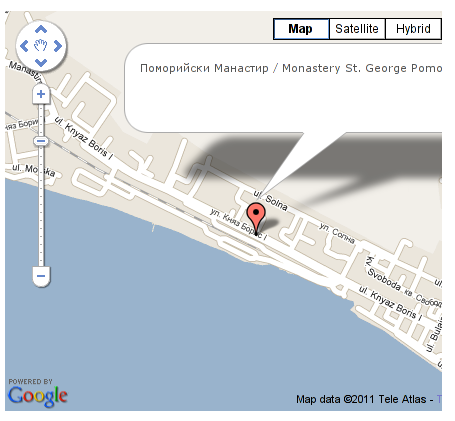
Google Maps plugin for Joomla screenshot

It’s a wise idea that every website has a location map on it’s website, for that reason Google maps is just great.
To install Google maps capability to joomla one can use a plugin called Google Maps .

You can straighly download Joomla’s Googlemap plugin from here

Afterwards use Extension Manager to install the plugin e.g. follow:

Extensions -&gr; Install/Uninstall (Choose File)

and click on Upload File & Install button.

To further enable and configure the Joomla Googlemap plugin you will have to go to the location:

Extensions -> Plugin Manager

Therein you will have to find and enable the Google Maps plugin which is to be found in the column named Plugin Manager
On my Joomla installation the plugin was located in the second page with modules, so if you don’t find the module on the listing with modules on the first page, make sure you scroll to the bottom of the page and click on Next button.

Therein in the list you will most likely notice Google Maps use the Enable button to enable it.

Next step is to configure the plugin, to do so press on the plugin name Google Maps
All configuration necessery here is to place Googlemaps API Key in the respective field (you will see it among config options).

Issuing a new Google Maps api key takes just few seconds, if you already have a gmail account just go to http://code.google.com/apis/maps/signup.html and take few seconds to issue the key.

You will get the key right on your gmail account after being issued (to repeat myself issuing takes few seconds so no worrier here).

One moreOnce having the key place it in the Googlemaps API Key field and configuring Address (which is one of the list of many options the plugin provides) you will be done with configuration.

To display a google map the location you just configured go to the Article Manager , select the article where you want the google maps location picture of your address to appear and type in the Article:

{mosmap|text='Exact street address location'|zoom='15'|zoomType='Large'|zoomNew='0'}

After you save the article a very nice Google map showing you the location’s streets will appear.
You can further conifgure a number of things related to the google map to appear, one thing you might want to play with is the zoom option which as you see in below’s code is equal to 15, e.g. zoom=’15’
Set it to another one if you want to regulate your googlemaps zoom level. For more thoroughful options take a look at the extensive plugin documentation.

10. Joomla Xmap (generating static HTML sitemap) Download Xmap from here , install it the usual plugin way.

Right after installation on the plugin succesful install screen you will notice the link component menu .
Clicking on the component menu you will be leaded to a page showing you few links Sitemap’s URL :
 

  • XML Sitemap:
  • HTML Sitemap:
  • News Sitemap:
  • Images Sitemap:

11. Add Joomla donate Paypal capabilities with Joomla PAYPAL DONATION MODULE

Paypal Donation Module Joomla Screenshot

Just recently I’ve written a a post on how to add a paypal donation capabilities to joomla, you can read my previous post here

12. Install Joomla RSForms Module (Advanced Joomla Forms Support)
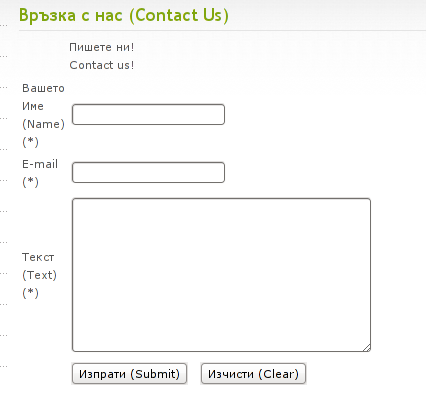
Simple Joomla RsForm contact form

If you’re planning to add a complicated form support for Joomla, there are plenty of plugins, however one that was suggested by a friend of mine which is deep in Joomla world and moreover works good on my joomla installations is RSForms

Joomla – RSForms! is free to download and has great and easy interface to create new joomla forms.

At the time of writting I use these three RSForms components on new Joomla installations:

RSform Pro 1.1.0 com
Mod RsForm for Joomla 1.5
Mod Rsform list for Joomla

For latest release of RSForms! use the link http://www.rsjoomla.com/joomla-components/rsform.html

Installation is like any other module and is done through Extensions -> Install/Uninstall menu.

After installation, setting up a new form is available from the Joomla Menus:

Components -> RSform!Pro -> Manage Forms

I would not enter in details on how to edit the default RSForms or create a new RSForm. Just take some time and learn it by trying 😉

After the rsform is ready, to enable the new form, navigate to Joomla menus:

Menus -> Main Menu

Press the New button located in the buttons bar nearby the page header in the list of options in Select Menu item Type you will notice the RSForm!Pro as an option, press on it to establish the new form in the menus.

A follow up window will appear where one can set a Title: and Alias: for the new form as well as few other options.
After finalizing the settings press on Apply button to save the settings and the new form should appear in Joomla.

Probably there are many more handy plugins, which I’m missing here thus I’ll be glad if readers suggest some more helpful essential (must have plugins) for Joomla.
Feedback on this tutorial is very welcome!
Looking forward to hear for your opinions if my article was helpful to you 😉


Free Software Songs and Videos Collection – (Anthem of Free Software) various interpretations

Friday, November 18th, 2011

Richard Stallman picture

I've gathered a collection of 15 Audio and Video songs dedicated to the Free Software / Open Source movement . All of the songs are based on the The Free Software Song Anthem written by Richard Mathew Stallman in the year 1991. The motive of the song is a Traditional Bulgarian song called Sadi Moma Bqla Loza – translated to bulgarian to something like Maid is Planting white Vines
The original Free Software Song symbolizes all free software and the Free Software Movement and GNU and is in the Bulgarian unique / specific folk rhythm of 7 / 8 beats .

Most of the songs which I post hereby could also be found and downloaded from GNU's official Free Software Song page
However some of the songs were only available from Youtube in the non-free format Flash Video (flv) . Hence, since the songs were dedicated to Free Software and apparently were being spread in a non-free format they either was missing any licensing or licensed under GFDL free music / art GNU like license.
To fix up this irragularity and add some freedom in terms of audio format of spreading, I've downloaded them and used ffmpeg2theora to convert the songs to the Free / Open Standard format Ogg Vorbis
I'm quite sure that many people, who use Ubuntu or Linux Mint are pretty much unfamiliar with the Free Software Songs existence, also many people most likely have never heard the Free Software Songs or even those who heard it have rarely heard more than 2 or 3 of the song variations.
Hereby, I'm sure many people who are lovers of Free Software will highly benefit and get inspired to continue in the Free Software by listening to these post shared little Free Software Song Collection .

The covers of the Original version publicly sang by Richard Stallman are in different musical genres, some of the song performances are in Folklore, played on Piano other covers are performed by musical bands in pop / punk en popular music styles, there are one person performances, cheerful christmas like soundings, 8 bit free software song, Metal free software variations etc. In the collection I've included also few other nice songs which are propaganda on free software, even though not a cover of the Free Software Song , I found them myself worthy to be included in the collection..:

Herein you can download or listen all the Free Software Songs version (Enjoyment is guaranteed! 😉 ):


Fenster-Free-Software-Song.ogg
Free_Software_Song_en_español.ogv
Free_Software_Song_feat._Flat_Eric.ogv
Jono_Bacon_-_-Free_Software_Song_2_Metal_Version.ogv
Markushaist_piano_-free-software-song.ogg
Metal_Free_Software_Song_v2.0.ogv
Stallman_Free_Software_Song_Video_320x240.ogv
The_Gnu_Song.ogv
The_Pink_Stainless_Tail_Free_Software_Song.ogv
free-software-song-herzog.ogg
free-software-song-rhythmic.ogg
free_software_song_sunnata.ogg
freesoft.ogg
jonobacon-freesoftwaresong2.ogg
pjj-and-hairyone-freesoftwaresong.ogg
I've also prepared a bundle containing all the 15 Free Software Songs which you can download from here
Enjoy the nice music! Don't forget to share it with everyone you could among with educating the people how important it is to value their freedom in this age of technological human enslavement 😉
 

Two partly fulfilled interesting Orthodox prophecies concerning the end of the world

Saturday, March 7th, 2009

Recently I googled a bit about something and by accident (no accidents really exist) :)I stumbled upon two interesting prophecies One of Saint Kosmas from Aitolia and theother was St. Nile’s. You could check them out in youtube.Or simply follow check them here:
1. Saint Nile’s prophecy
Saint Kosmas prophecy Glory be to the Father, The Son and The Holy Spirit! Now and forever and ever! Amen!END—–

Your Firefox profile cannot be loaded. It may be missing or inaccessible – Fix

Tuesday, May 27th, 2014


your-firefox-profile-cannot-be-loaded-it-may-be-missing-or-inaccessible

When I opened firefox I was offered that firefox cleans some data. Pressing on it took a long so I killed firefox process from Windows taskmanager (taskmgr).  . Next time Firefox was started I got the error (warning):
 

Your Firefox profile cannot be loaded. It may be missing or inaccessible"

Firefox version is 29.0.1.

Once the dialog, Firefox fails to further open. To fix Your Firefox profile cannot be loaded. It may be missing or inaccessible press windows-key+R to invoke <Open program prompt and type in:

%appdata%Mozilla

In explorer Window that will pop=up rename the folder labelled "Firefox" to something like old-Firefox.
On next start of firefox, you will be offered to recrate "the missiong profile and it will force Firefox to re-create profile.

If you want to import some of your old data into the new profile afterwards: Recovering important data from an old profile check Recovering important data from an old profile Another approach is to to go to Firefox profile folder and delete profiles.ini, this will also make firefox recreate the file on its next start. Enjoy ! 🙂


Linux: How to see / change supported network bandwidth of NIC interface and get various eth network statistics with ethtool

Monday, January 19th, 2015

linux-how-to-see-change-supported-network-bandwidth-of-NIC-interface-and-view-network-statistics
If you're a novice Linux sysadmin and inherited some dedicated servers without any documentation and hence on of the first things you have to do to start a new server documentation is to check the supported TCP/IP network speed of servers Network (ethernet) Interfaces. On Linux this is very easy task to verify the speed of LAN card supported Local / Internet traffic install ethtool (if not already preseont on the servers) – assuming you're dealing with Debian / Ubuntu Linux servers.

1. Install ethtool on Deb and RPM based distros

dedi-server1:~# apt-cache show ethtool|grep -i desc -A 3
Description: display or change Ethernet device settings
 ethtool can be used to query and change settings such as speed, auto-
 negotiation and checksum offload on many network devices, especially
 Ethernet devices.

dedi-server1:~# apt-get install –yes ethtool
..

ethtool should be installed by default on CentOS / Fedora / RHEL and  syntax is same like on Debs. If you happen to miss ethtool on any (SuSE) / RedHat / RPM based distro install it with yum

[root@centos:~] # yum -y install ethtool


2. Get ethernet configurations

To check the current eth0 / eth1 / ethX network (Speed / Duplex) and other network related configuration configuration:
 

dedi-server5:~# ethtool eth0

Settings for eth0:
        Supported ports: [ TP ]
        Supported link modes:   10baseT/Half 10baseT/Full
                                100baseT/Half 100baseT/Full
                                1000baseT/Full
        Supports auto-negotiation: Yes
        Advertised link modes:  10baseT/Half 10baseT/Full
                                100baseT/Half 100baseT/Full
                                1000baseT/Full

        Advertised pause frame use: No
        Advertised auto-negotiation: Yes
        Speed: 1000Mb/s
        Duplex: Full
        Port: Twisted Pair
        PHYAD: 1
        Transceiver: internal
        Auto-negotiation: on
        MDI-X: off
        Supports Wake-on: pumbag
        Wake-on: g
        Current message level: 0x00000001 (1)
        Link detected: yes

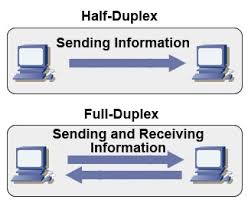
Having a NIC configured to act as Duplex is very important as Duplex communication enables LAN card to communicate both sides (Sent / Receive) packets simultaneously.

full-duplex-half-duplex-explained-picture

Probably most interesting parameters for most admins are the ones that are telling whether the NIC UpLink is 10megabyte / 100 megabyte or 1Gigabyte as well as supported Receive / Send ( Transfer ) speeds of LAN, a common useful ethtool admin use to just show current LAN ethernet interface speed:

server-admin1:~# ethtool eth0 |grep -i speed
        Speed: 1000Mb/s


To get info about NIC (kernel module / driver) used with ethtool:

dedi-server3:~# ethtool -i eth0 driver: e1000e
version: 1.2.20-k2
firmware-version: 1.8-0
bus-info: 0000:06:00.0

3. Make LAN Card blink to recognize eth is mapped to which Physical LAN

Besides that ethtool has many other useful use cases, for example if you have a server with 5 lan or more LAN cards, but you're not sure to which of all different EthX interfaces correspond, a very useful thing is to make eth0, eth1, eth2, eth3, etc. blink for 5 seconds in order to identify which static IP is binded physically to which NIC , here is how:

ethtool -p eth0 5


Then you can follow the procedure for any interface on the server and map them with a sticker 🙂

Ethtool is also useful for getting "deep" (thorough) statistics on Server LAN cards, this could be useful to identify sometimes hard to determine broadcast flood attacks:
 

4. Get network statistics with ethtool for interfaces
 

dedi-server5:~# ethtool -S eth0|grep -vw 0
NIC statistics:
     rx_packets: 6196644448
     tx_packets: 7197385158
     rx_bytes: 2038559235701
     tx_bytes: 8281206569250
     rx_broadcast: 357508947
     tx_broadcast: 172
     rx_multicast: 34731963
     tx_multicast: 20
     rx_errors: 115
     multicast: 34731963
     rx_length_errors: 115
     rx_no_buffer_count: 26391
     rx_missed_errors: 10059
     tx_timeout_count: 3
     tx_restart_queue: 2590
     rx_short_length_errors: 115
     tx_tcp_seg_good: 964136993
     rx_long_byte_count: 2038559235701
     rx_csum_offload_good: 5824813965
     rx_csum_offload_errors: 42186
     rx_smbus: 383640020

5. Turn on Auto Negotiation and change NIC set speed to 10 / 100 / 1000 Mb/s

Auto-negotiation is important as an ethernet procedure by which two communication devices (2 network cards) choose common transmission parameters such as speed, duplex mode, and flow control in order to achieve maximum transmission speed over the network. On 1000BASE-T basednetworks the standard is a mandatory. There is also backward compatability for older 10BASE-T Networks.

a) To raise up NIC to use 1000 Mb/s in case if the bandwidth was raised to 1Gb/s but NIC settings were not changed:

dedi-server1:~# ethtool -s eth0 speed 1000 duplex half autoneg off


b) In case if LAN speed has to be reduced for some weird reason to 10 / 100Mb/s


dedi-server1:~# ethtool -s eth0 speed 10 duplex half autoneg off

dedi-server1:~# ethtool -s eth0 speed 100 duplex half autoneg off

c) To enable disable NIC Autonegotiation:

dedi-server1:~# ethtool -s eth0 autoneg on


6. Change Speed / Duplex settings to load on boot

a) Set Network to Duplex on Fedora / CentOS etc.

Quickest way to do it is of course to use /etc/rc.local. If you want to do it following distribution logic on CentOS / RHEL Linux:

Add to /etc/sysconfig/network-scripts/ifcfg-eth0

vim /etc/sysconfig/network/-scripts/ifcfg-eth0

ETHTOOL_OPTS="speed 1000 duplex full autoneg off"

To load the new settings restart networking (be careful to have physical access to server if something goes wrong 🙂 )

service network restart

b) Change network speed / duplex setting on Debian / Ubuntu Linux

Add at the end of /etc/network/interfaces

vim /etc/network/interfaces

post-up ethtool -s eth0 speed 100 duplex full autoneg off

7. Tune NIC ring buffers

dedi-server1:~# ethtool -g eth0

Ring parameters for eth0:
Pre-set maximums:
RX:             4096
RX Mini:        0
RX Jumbo:       0
TX:             4096
Current hardware settings:
RX:             256
RX Mini:        0
RX Jumbo:       0
TX:             256

As you can see the default setting of RX (receive) buffer size is low 256 and on busy servers with high traffic loads, depending on the hardware NIC vendor this RX buffer size varies.
Through increasing the Rx/Tx ring buffer size , you can decrease the probability of discarding packets in the NIC during a scheduling delay.
A change in rx buffer ring requires NIC restart so (be careful not to loose connection to remote server), be sure to have iLO access to it.

Here is how to raise Rx ring buffer size 4 times from default value:

ethtool -G eth0 rx 4096 tx 4069

How to set a crontab to execute commands on a seconds time interval on GNU / Linux and FreeBSD

Sunday, October 30th, 2011

crontab-execute-cron-jobs-every-second-on-linux-cron-logo
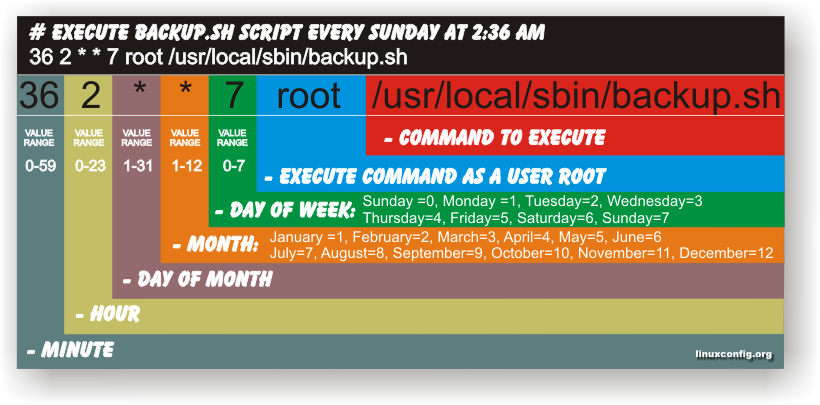
Have you ever been in need to execute some commands scheduled via a crontab, every let’s say 5 seconds?, naturally this is not possible with crontab, however adding a small shell script to loop and execute a command or commands every 5 seconds and setting it up to execute once in a minute through crontab makes this possible.
Here is an example shell script that does execute commands every 5 seconds:

#!/bin/bash
command1_to_exec='/bin/ls';
command2_to_exec='/bin/pwd';
for i in $(echo 1 2 3 4 5 6 7 8 9 10 11); do
sleep 5;
$command1_to_exec; $command2_to_exec;
done

This script will issue a sleep every 5 seconds and execute the two commands defined as $command1_to_exec and $command2_to_exec

Copy paste the script to a file or fetch exec_every_5_secs_cmds.sh from here

The script can easily be modified to execute on any seconds interval delay, the record to put on cron to use with this script should look something like:

# echo '* * * * * /path/to/exec_every_5_secs_cmds.sh' | crontab -

Where of course /path/to/exec_every_5_secs_cmds.sh needs to be modified to a proper script name and path location.

Another way to do the on a number of seconds program / command schedule without using cron at all is setting up an endless loop to run/refresh via /etc/inittab with a number of predefined commands inside. An example endless loop script to run via inittab would look something like:

while [ 1 ]; do
/bin/ls
sleep 5;
done

To run the above sample never ending script using inittab, one needs to add to the end of inittab, some line like:

mine:234:respawn:/path/to/script_name.sh

A quick way to add the line from consone would be with echo:

echo 'mine:234:respawn:/path/to/script' >> /etc/inittab

Of course the proper paths, should be put in:

Then to load up the newly added inittab line, inittab needs to be reloaded with cmd:

# init q

I've also red, some other methods suggested to run programs on a periodic seconds basis using just cron, what I found in stackoverflow.com's  as a thread proposed as a solution is:

* * * * * /foo/bar/your_script
* * * * * sleep 15; /foo/bar/your_script
* * * * * sleep 30; /foo/bar/your_script
* * * * * sleep 45; /foo/bar/your_script

One guy, even suggested a shorted way with cron:

0/15 * * * * * /path/to/my/script

Redirect http URL folder to https e.g. redirect (http:// to https://) with mod_rewrite – redirect port 80 to port 443 Rewrite rule

Saturday, July 17th, 2010

There is a quick way to achieve a a full url redirect from a normal unencrypted HTTP request to a SSL crypted HTTPS

This is achieved through mod_rewrite using the RedirectMatch directive.

For instance let’s say we’d like to redirect https://www.pc-freak.net/blog to https://www.pc-freak.net/blog.
We simply put in our .htacess file the following rule:

Redirect permanent /blog https://www.cadiabank.com/login

Of course this rule assumes that the current working directory where the .htacess file is stored is the main domain directory e.g. / .
However this kind of redirect is a way inflexible so for more complex redirect, you might want to take a look at mod rewrite’s RedirectMatch directive.

For instance if you inted to redirect all urls (https://www.pc-freak.net/blog/something/asdf/etc.) which as you see includes the string blog/somestring/asdf/etc. to (https://www.pc-freak.net/blog/something/asdf/etc then you might use some htaccess RedirectMatch rule like:

RedirectMatch permanent ^/blog/(.*)$ https://www.pc-freak.net.net$1
or
RedirectMatch permanent ^/blog/(.*)$ https://www.pc-freak.net.net/$1

Hopefully your redirect from the http protocol to https protocol with mod_rewrite rule should be completed.
Also consider that the Redirect directive which by the way is an Apache directive should be faster to process requests, so everywhere you can I recommend using instead of RedirectMatch which calls the external Apache mod_rewrite and will probably be times slower.