Posts Tagged ‘system’

Intel and IBM future tech world vision about the world, do we really want this?

Saturday, June 30th, 2012

the-hellish-future-as-envisioned-by-leading-it-companies-IBM-and-intel-and-the-slavery-of-Internet-of-Things

I'm quite a visionary person as such I'm always interested to prognosis on what the world might look like few years from now. Below are two videos showing IBM and Intel's vision on what might future bring us. I don't know about you but I'm strong in my conviction that I DON'T WANT TO LIVE IN SUCH WORLD. I'm pretty sure that many other people share my opinion that such a world is not fun and is far from what really we're supposed to live. The sad thing is the corporations are already powerful enough to impose their vision and make the vision reality.

It is my understanding that the main problem we have to solve is not how we can embed better or newer technology to change our life (for good?) but rather how we can get out of the trap of living in a fake world like the one displayed in the video. Obviously the vision of this two giant companies is not far from what we're forewarned in the holy bible in Revelation. In revelation we read that there will be a unified system, where everything and everyone on this earth will be market and whoever does not have the mark "of the beast" he will not be able to buy or sell within the system. This prophecy closely matches the vision of future marketing offered as a possible outcome by IBM. I don't think IBM have red in Revelation to get their idea on their infernal system shown within their vision of supermarket video

The logical conclusion might dirive therefore is there is a higher force who leads IBM (and possible most if not all of corporations) on creating the fake tech-nocrat culture society which is building right in front our eyes.
The destruction of real communities and the worsening conditions within the Orthodox Church are another symptom that the End Times as prophecised centuries before are closer than we think.

It is my firm believe that people who does understand about this problem should start uniting and say no to technology innovation that leads us in this technological trap ,,,,,

I'm sure even people who does not have a believe in Jesus Christ and are not Christian from other religions are also seeing that the direction this world has taken up is dark.
We should be very dumb and blind not to see that technology is boxing us and leading us to a modern day techno slavery …..

Intel | Future Technology | Vision

IBM's vision on how future market might look like

Windows: command to show CPU info, PC Motherboard serial number and BIOS details

Wednesday, March 2nd, 2016

windows-command-to-show-motherboard-bios-and-cpu-serials-and-specific-info-with-wmic

Getting CPU information, RAM info and other various hardware specifics on Windows from the GUI interface is pretty trivial from Computer -> Properties
even more specifics could be obtained using third party Windows software such as CPU-Z

Perhaps there are plenty of many other ones to get and log info about hardware on PC or notebook system, but for Windwos sysadmins especially ones who are too much in love with command prompt way of behaving and ones who needs to automatizate server deployment processes with BATCH (.BAT)  scripts getting quickly info about hardware on freshly installed remote host Win server with no any additional hardware info tools, you'll be happy to know there are command line tools you can use to get extra hardware information on Windows PC / server:

The most popular tool available to present you with some basic hardware info is of course systeminfo


C:\> systeminfo

Host Name:                 REMHOST
OS Name:                   Microsoft Windows Server 2012 R2 Standard
OS Version:                6.3.9600 N/A Build 9600
OS Manufacturer:           Microsoft Corporation
OS Configuration:          Member Server
OS Build Type:             Multiprocessor Free
Registered Owner:          Registrar
Registered Organization:   Registrar
Product ID:                00XXX-X0000-00000-XX235
Original Install Date:     17/02/2016, 11:38:39
System Boot Time:          18/02/2016, 14:16:48
System Manufacturer:       VMware, Inc.
System Model:              VMware Virtual Platform
System Type:               x64-based PC
Processor(s):              1 Processor(s) Installed.
                           [01]: Intel64 Family 6 Model 45 Stepping 7 GenuineInt
el ~2600 Mhz
BIOS Version:              Phoenix Technologies LTD 6.00, 11/06/2014
Windows Directory:         C:\Windows
System Directory:          C:\Windows\system32
Boot Device:               \Device\HarddiskVolume1
System Locale:             de;German (Germany)
Input Locale:              de;German (Germany)
Time Zone:                 (UTC+01:00) Amsterdam, Berlin, Bern, Rome, Stockholm,
 Vienna
Total Physical Memory:     4,095 MB
Available Physical Memory: 2,395 MB
Virtual Memory: Max Size:  10,239 MB
Virtual Memory: Available: 8,681 MB
Virtual Memory: In Use:    1,558 MB
Page File Location(s):     C:\pagefile.sys
Domain:                    dom1.domain.com
Logon Server:              \\DOM
Hotfix(s):                 148 Hotfix(s) Installed.
                           [01]: KB2894852
                           [02]: KB2894856
                           [03]: KB2918614
                           [04]: KB2919355
…..


Now though systeminfo's hardware details and installed Windows KBXXXXX OS Hotfix patches are getting lists the command does not provide you with info about  system’s BIOS, thus to get this info you'll have to use also wmic (Windows Management Instrumentation Command).


So What Is WMIC?

WMIC extends WMI for operation from several command-line interfaces and through batch scripts. Before WMIC, you used WMI-based applications (such as SMS), the WMI Scripting API, or tools such as CIM Studio to manage WMI-enabled computers. Without a firm grasp on a programming language such as C++ or a scripting language such as VBScript and a basic understanding of the WMI namespace, do-it-yourself systems management with WMI was difficult. WMIC changes this situation by giving you a powerful, user-friendly interface to the WMI namespace.

WMIC is more intuitive than WMI, in large part because of aliases. Aliases take simple commands that you enter at the command line, then act upon the WMI namespace in a predefined way, such as constructing a complex WMI Query Language (WQL) command from a simple WMIC alias Get command. Thus, aliases act as friendly syntax intermediaries between you and the namespace. For example, when you run a simple WMIC command such as

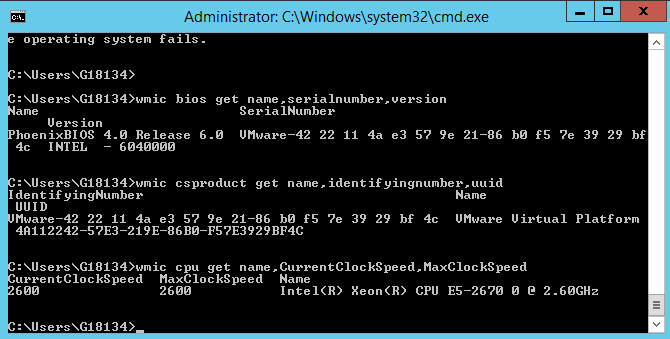
Here is how to wmic to get PC Motherboard serial numbers, CPU and BIOS details:


C:\> wmic bios get name,serialnumber,version


Above will print  name if your BIOS, current version and it’s serial number if there is any.

If you need to get more info about the specific Motherboard installed on host:


C:\> wmic csproduct get name,identifyingnumber,uuid


This command will show motherboard modification and it’s UUID

If you want to quickly get what is Windows running hardware CPU clock speed
 

C:\> wmic cpu get name,CurrentClockSpeed,MaxClockSpeed


Also if you have turbo boost CPUs above command will help you find what’s the Max Clock Speed your system is capable of for the current hardware configuration.

If you do have dynamic clock speed running, then add this line, will refresh and monitor the Clock speed every 1 second.
 

C:\> wmic cpu get name,CurrentClockSpeed,MaxClockSpeed /every:1

Actually wmic is a great tool

How to delete “Temporary Internet Files”/Content.IE5 with DEL and RD commands on Windows 7 / 8 folder contents – Clean Up Temporary files and folders to speed up and free disk space

Tuesday, February 3rd, 2015

7logo_clean-up-windows-commands-tips-and-tricks-how-to-clean-up-windows-pc-manuallyI
've been called urgently today by miss Jenia Pencheva who is the president of Christian Air Ticket Agency GoodFaithAir, her personal computer caused her quite a lot of headache, I've previously fixed it once and she was happy with that thus when she experienced problems she give me a call for remote IT support :).

She explahed her PC was unable to boot normally and in order to have some Windows she ended in Safe-Mode with Networking state. This problems caused her business losses as during PC in Safe mode the screen resolution even though with networking and she couldn't use the flight ticket ordering systems  to purchase her customers new tickets.  I've earlier installed TeamViewr on her PC so after Logging on the PC, I've immediately realized the Hard Disk was almost full (less than 1Giga free on C: Drive – where Windows install lived)

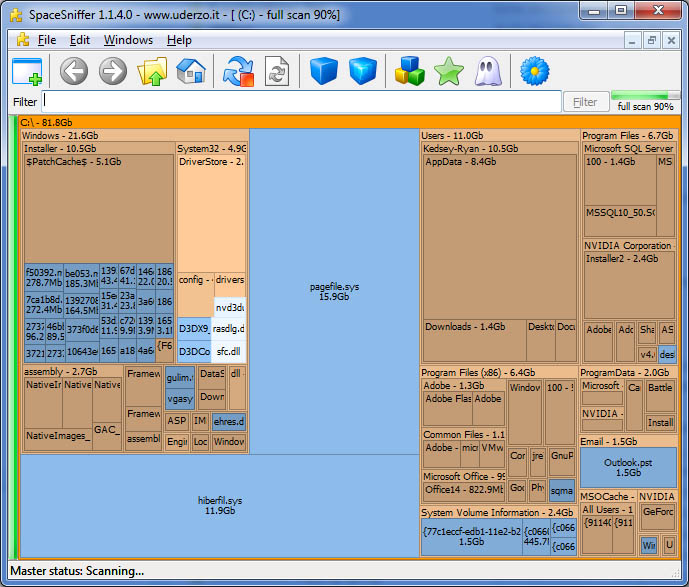
After a thorough investigation on which directory is occupying most of disk space (110GB) with a nice program called SpaceSniffer which is perfect for finding lost space on your hard disks, I've found System for ticket reservation Amadeus CRS (Computer Reservation System) was causing the disk full-full troubles.

spacesniff-visualize-disk-data-in-windows-nice-check-large-directories

I've found troubling directory  was:

C:Users\goodfaithair\AppData\Local\Microsoft\Windows\Temporary Internet Files\Content.IE5

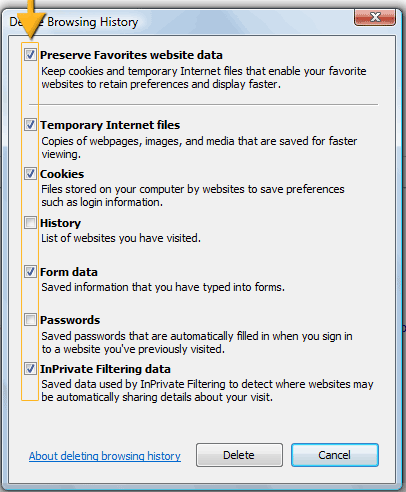
To solve it I first tried to Clean up Internet Explorer Cache (I've checked ticks Temporary Internet files, Cookies, History, Download History, Form Data, InPrivate Filtering Data).

clean-up-Microsoft-Internet-Explorer-browser-cache-IE-7-8-9-10-11

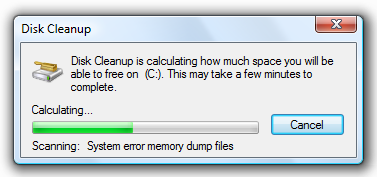
Then I used Microsoft Windows embedded clean manager (cleanmgr.exe) to run disk clean up, however Desk Clean Up managed to clear up only about 1Giga and on the computer HDD which is 150Gb still on Windows installation drive C: only 1.5GB were free.
diskcleanup-ms-windows-7-8-screenshot-free-disk-space-tool
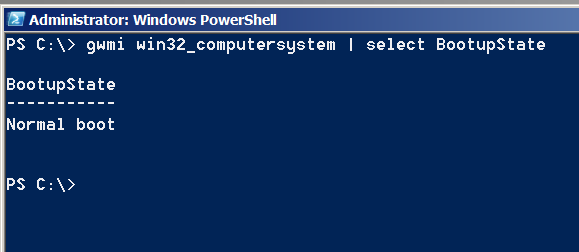
Besides that the system was having a second trouble as there were some failed updates (Computer was not shutdown properly but shutdown during Windows Update) and this was making the machine to enter Safe-Mode, I was fixing the system over TeamViewer session so after restart I had no way to see if Windows boots Normal or Safe-Mode after restart, thus to find out whether Windows was in Safe-Mode after another restart I've used below PowerShell one-liner script:

check-whether-windows-is-working-in-safe-mode-gwmi-powershell-screenshot

PS C:> gwmi win32_computersystem | select BootupState

BootupState
———–
Fail-safe with network boot

Note that possible return results from above command are:

Normal boot
Fail-safe boot
Fail-safe with network boot

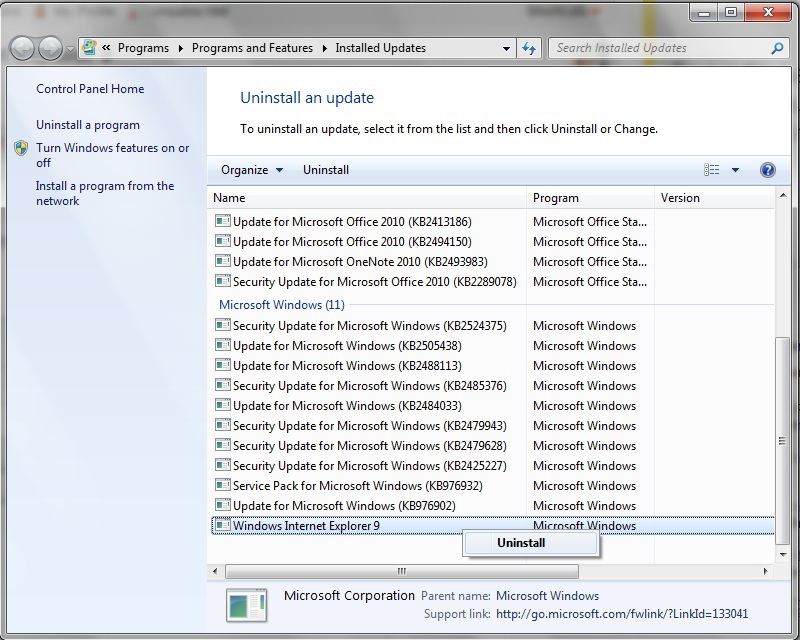
I've been struggling for a while (had to restart it multiple times) until finally I managed to make it boot in normal mode. Because PC was failing to apply some Windows Update, thus dropping by in Safe-Mode each time. To solve that I had to go and Delete two of the last Applied updates (KB2979xxxx files).
 

Control Panel ->  Program and Features -> View Installed Updates


MS-Windows-7-8-9-uninstall-updates-Patches-Control_Panel_screenshot_fix_unbootable_problems-because-updates
I've restarted and since I couldn't see the screen on Windows boot-time, I don't know what really happened but the PC booted again in Safe-Mode, and I thought the classical way to fix PC booting in Safe-Mode with SFC command will help:

C:> sfc /scannow

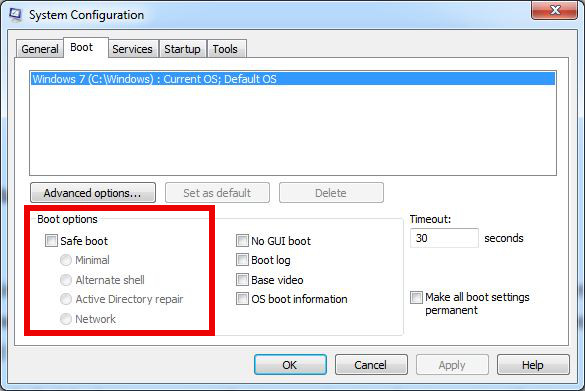
but for my surprise this helped not as the system continuously booted in Safe-Mode, to fix the Windows PC always booting to Safe-Mode, I had to change it running msconfig and unticking Safe Mode field

C:> msconfig

windows-always-booting-to-safe-mode-fix-howto-services-msc-screenshot

Then I tried to delete Temporary Internet Files with below DEL cmd line
 

C:> del "C\:Users\MyName\AppData\Local\Microsoft\Windows\Temporary Internet Files*.*"


To finally succeeding in manually delete huge Temporary Internet FilesContent.IE5 folder, I had to use good old RD (Remove Directory) command.


C:> RD "C:Users\username\AppData\Local\Microsoft\Windows\Temporary Internet Files\Content.IE5" /Q /S

I used also following dels command to delete other common locations where Windows stores temporary files

For those who like to batch DeletingTemporary Internet Files and most common Temp locations to be cleaned on Windows boot I recommend you schedule a start of (clean-temporary-internet-files-content_ie5_folder.bat) on every PC boot.

To Clean-up other common Temporary file locations that could take you disk space the command line way run in new Administarator privileged command prompt:
 

cls
cleanmgr /sageset:99
del /F /S /Q "%systemroot%temp*.*"
del /F /S /Q "%systemroot%Prefetch*.*"
del /F /S /Q "C:Documents and SettingsDefault UserLocal SettingsTemporary Internet FilesContent.IE5*.*"
del /F /S /Q "C:Documents and SettingsDefault UserLocal SettingsTemp*.*"
del /F /S /Q "C:Documents and SettingsDefault UserLocal SettingsHistory*.*"
 
del /F /S /Q "C:Documents and Settings%UserName%Local SettingsTemporary Internet FilesContent.IE5*.*"
del /F /S /Q "C:Documents and Settings%UserName%Local SettingsTemp*.*"
del /F /S /Q "C:Documents and Settings%UserName%Local SettingsHistory*.*"
 
del /F /S /Q "C:Documents and Settings%UserName%Local SettingsApplication DataTemp*.*"
del /F /S /Q "C:Documents and Settings%UserName%Local SettingsApplication DataTemporary Internet FilesContent.IE5
*.*"
 
del /F /S /Q "C:AppDataLocalMicrosoftWindowsHistory*. *"
del /F /S /Q "C:AppDataLocalMicrosoftWindowsTemporary Internet FilesContent.IE5*.*"
del /F /S /Q "C:AppDataLocalMicrosoftWindowsTemporary Internet FilesLowContent.IE5*.*"
del /F /S /Q "C:AppDataLocalMicrosoftWindowsTemporary Internet FilesTemporary Internet FilesContent.IE5*.*"
del /F /S /Q "C:AppDataLocalMicrosoftWindowsTemporary Internet FilesTemporary Internet FilesLowContent.IE5*.*"
 
del /F /S /Q "C:Users%UserName%AppDataLocalTemp*.*"
del /F /S /Q "C:Temp*.*"
del /F /S /Q "C:Users%UserName%AppDataLocalMicrosoftW indo wsTemporary Internet FilesLowContent.IE5*.*
del /F /S /Q "C:Users%UserName%AppDataLocalMicrosoftW indo wsHistory*.*
 
 
::Rem: No need to duplicate the following section for each registered User
del /F /S /Q "%homepath%Cookies*.*"
del /F /S /Q "%homepath%recent*.*"
del /F /S /Q "%homepath%Local Settingscookies*.*"
 
del /F /S /Q "%homepath%Local SettingsHistory*.*"
del /F /S /Q "%homepath%Local SettingsTemp*.*"
del /F /S /Q "%homepath%Local SettingsTemporary Internet FilesContent.IE5*.*"
 
cleanmgr /sagerun:99

Note that in some cases running above commands might left you loose some sensitive data and in case where Internet is slow cleaning temporary files, might have impact on surfing also you will loose your history so be sure you know what you're doing as you might loose sensitive data.

Finally I've run MalwareBytes to clean up the PC slowness caused by Spyware and other left Malware I've run MalwareBytes, RogueKiller, AdwCleaner, RKill, TDSSKiller in order and I found and removed few Malwares as well.

That's all, hope you learned something new. Enjoy!
 

Top AIX UNIX Performance tracking commands every Linux admin / user should know

Monday, March 16th, 2015

IBM_AIX_UNIX-Performance-Tracking-every-commands-Linux-sysadmin-and-user-should-know-AIX_logo

Though IBM AIX is basicly UNIX OS and many of the standard Linux commands are same or similar to AIX's if you happen to be a Linux sysadmin and you've been given some 100 AIX servers,  you will have to invest some time to read on AIX, however as a starter you should be aware to at least be able to do performance tracking on system to prevent system overloads. If that's the case I advise you check thoroughfully below commands documentation.

fcstat – Displays statistics gathered by the specified Fibre Channel device driver

filemon – Performance statistics for files, logical/physical volumes and virtual memory segments

fileplace – Displays the placement of file blocks within logical or physical volumes.

entstat – Displays the statistics gathered by the specified Ethernet device driver

iostat – Statistics for ttys, disks and cpu ipcs – Status of interprocess communication facilities

lsps – Statistics about paging space

netstat – Shows network status

netpmon – Performance statistics for CPU usage, network device-driver I/O, socket calls & NFS

nfsstat – Displays information about NFS and RPC calls

pagesize – Displays system page size ps – Display status of current processes

pstat – Statistics about system attributes

sar – System Activity Recorder

svmon – Captures a snapshot of the current contents of both real and virtual memory

traceroute – intended for use in network testing, measurement, and management.

tprof – Detailed profile of CPU usage by an application vmstat – Statistics about virtual memory and cpu/hard disk usage

topas – AIX euqivalent of Linux top command

Here are also useful examples use of above AIX performance tracking commands

To display the statistics for Fiber Channel device driver fcs0, enter:

fcstat fcs0

To monitor the activity at all file system levels and write a verbose report to the fmon.out file, enter:

filemon -v -o fmon.out -O all

To display all information about the placement of a file on its physical volumes, enter:

fileplace -piv data1

To display a continuous disk report at two second intervals for the disk with the logical name disk1, enter the following command:

iostat -d disk1 2

To display extended drive report for all disks, enter the following command:

iostat -D

To list the characteristics of all paging spaces, enter:

lsps -a

List All Ports (both listening and non listening ports)

netstat -a | more

The netpmon command uses the trace facility to obtain a detailed picture of network activity during a time interval.

netpmon -o /tmp/netpmon.log -O all;

netpfmon is very much like AIX Linux equivalent of tcpdump To print all of the supported page size with an alphabetical suffix, enter:

pagesize -af

To display the i-nodes of the system dump saved in the dumpfile core file

pstat -i dumpfile

To report current tty activity for each 2 seconds for the next 40 seconds, enter the following command:

sar -y -r 2 20

To watch system unit for 10 minutes and sort data, enter the following command:

sar -o temp 60 10

To report processor activity for the first two processors, enter the following command:

sar -u -P 0,1

To display global statistics for virtual memory in a one line format every minute for 30 minutes, enter the following command:

svmon -G -O summary=longreal -i 60 30

The traceroute command is intended for use in network testing, measurement, and management. While the ping command confirms IP network reachability, you cannot pinpoint and improve some isolated problems

traceroute aix1

Basic global program and thread-level summary / Reports processor usage

prof -x sleep 10

Single process level profiling

tprof -u -p workload -x workload

Reports virtual memory statistics

vmstat 10 10

To display fork statistics, enter the following command:

vmstat -f

To display the count of various events, enter the following command: vmstat -s To display the count of various events, enter the following command:

vmstat -s

To display time-stamp next to each column of output of vmstat, enter the following command:

vmstat -t

To display the I/O oriented view with an alternative set of columns, enter the following command:

vmstat -I

To display all the VMM statistics available, enter the following command:

vmstat -vs


If you already have some experience with some BSD (OpenBSD or FreeBSD) you will feel much more confortable with AIX as both operating system share common ancestor OS (UNIX System V), actually IBM AIX is U. System V with 4.3 BSD compatible extensions. As AIX was the first OS to introduce file system journalling, journalling capabilities on AIX are superb. AIX was and is still widely used by IBM for their mainframes, on IBM RS/6000 series (in 1990s), nowdays it runs fine on PowerPC-based systems and IA-64 systems.
For GUI loving users which end up on AIX try out SMIT (System Management Interface tool for AIX). AIX was using bash shell in prior versions up to AIX 3 but in recent releases default shell is Korn Shell (ksh88).
Nowdays AIX just like HP-UX and rest of commercial UNICes are loosing ground as most of functionalities is provided by commercial Linux distributions like RHEL so most of clients including Banks and big business clients are migrating to Linux.


Happy AIX-ing ! 🙂

How to get rid of Debian and Ubuntu GNU / Linux obsolete configuration files and system directories

Wednesday, October 19th, 2011

debian_ubuntu-linux-get-rid-of-obsolete-files
I've been using Debian GNU / Linux on my Thinkpad laptop for almost 3 years and half. Initially the Debian version which I had installed was a stable Debian Lenny. As I was mostly dissatisfied of the old versions of the programs, I migrated to testing / unstable
Testing / unstables shipped program versions were a bit better but still back in the day I wanted to get advantage of the latest program versions so for a while I switched to unstable .
Later I regretted for this bad idea, after the migration to Unstable, it was too buggy to run on a notebook one uses for everyday work.
Then to revert back to a bit stable I downgraded to testing unstable again.
When Debian launched Debian Squeeze I set in my /etc/apt/sources.list file software repositories to be the one for the stable Debian Squeeze.

As you can see, I've done quite a lot of "experiments" and "excersises". Many packages were installed, then removed, some became obsolete with time others I just temporary installed out of curiosity. Anyways as a result I ended up with many packages uninstalled / removed , which still kept some of their directory structres and configurations on the machine.

Today, I decided to check how many of these obsolete packages are still present in dpkg database and I was shocked to find out 412 debs were still in my package database! To check the number I used cmd:

root@noah:~# dpkg -l | grep -i '^rcs.*$'|wc -l

Considering the tremendous number of packs waiting to be purged, I decided to get rid of this old and already unnecessery files for the sake of clarity, besides that removing the old already uninstalled packages removes old configuration files, readmes, directories and frees some little space and therefore frees some inodes 😉

Before proceeding to remove them, I carefully reviewed and all the package names which I was about to completely purge in order to make sure there is no package with a configuration files I might need in future:

root@noah:~# dpkg -l |grep -i '^rcs.*$'
...
After reviewing all the deb packages possessing the rc – (remove candidate) flag, I used the following bash one liners to remove the obsolete deb packages:

root@noah:~# for i in $(dpkg -l |grep -i '^rcs.*$'|awk '{ print $2 }'); do echo dpkg --purge $i done...
root@noah:~# for i in $(dpkg -l |grep -i '^rcs.*$'|awk '{ print $2 }'); do dpkg --purge $i done

First line will just print out what will be purged with dpkg , so after I checked it out I used the second one to purge all the RC packs.

PortQRY Native Windows command line Nmap like port scanner – Check status of remote host ports on Windows

Monday, June 30th, 2014

Windows_command_line_and_gui_port-scanner-portqry-like-nmap-check-status-of-remote-host-service-windows-xp-7-2000-2003-2008-server
Linux users know pretty well Nmap (network mapper) tool which is precious in making a quick server host security evaluation.
Nmap binary port is available for Windows too, however as nmap is port for its normal operation you have to install WinPcap (Packet Capture Library).
And more importantly it is good to mention if you need to do some remote port scanning from Windows host, there is Microsoft produced native tool called PortQry (Port Query).

PortQRY is a must have tool for the Windows Admin as it can help you troubleshoot multiple network issues.

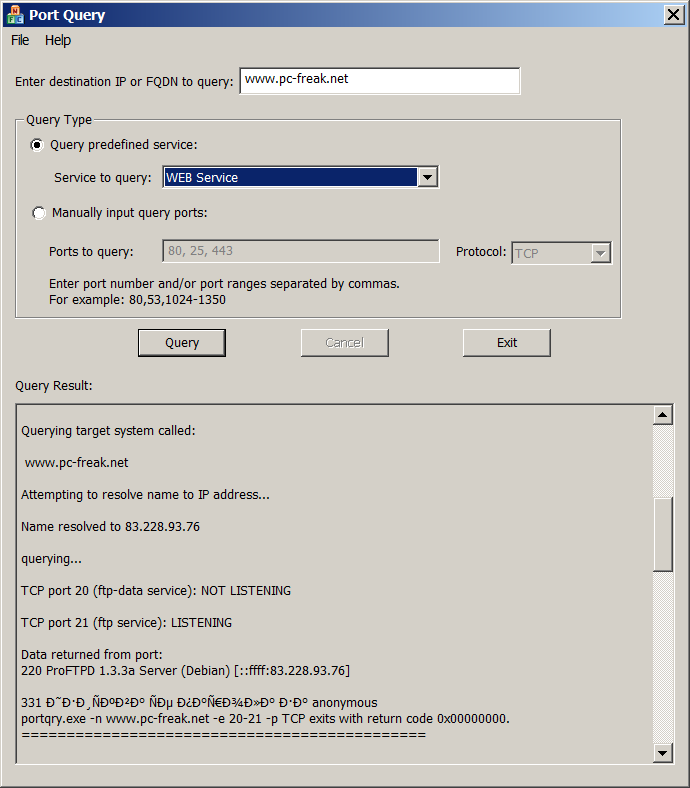
windows-nmap-native-alternative-portqry-gui-ui-web-service-port-scan-screenshot
As of time of writting this post PortQRY is at version 2, PortQRY tool has also a GUI (UI) Version for those lazy to type in command line.

Port Query UI tool (portqueryui.exe) is a tool to query open ports on a machine. This tool makes use of command line version port query tool (portqry.exe). The UI provides the following functionalities:

   1. Following "Enter destination IP or FQDN to query:”, an edit box needs the user to specify the IP address or FDQN name of the destination to query port status.

   2. The end user is able to choose Query type:

        – Predefined services type. It groups ports into service, so that you can query multiple ports for a service by a single click. Service includes "Domains and Trusts", "DNS Queries", "NetBIOS     communication", "IPSEC", "Networking", "SQL Service", "WEB Service", "Exchange Server",          "Netmeeting", and other services.

You can check detail port and protocol info for each service category by opening Help -> Predefined Services…

PORTQRY is part of Windows Server 2003 Support Tools and can be added to any NT based Windows (XP, 2003, Vista, 7, 8)
 You can download portqry command line tool here or my mirrored portqry version command line port scanner here and PortQRY UI here.

PortQRY comes in PortQryV2.exe package which when run extracts 3 files: PortQry.exe program, EULA and readme file. Quickest way to make portqry globally accessible from win command prompt is to copy it to %SystemRoot% (The environment variable holding default location for Windows Installation directory).
It is good idea to add PortQRY to default PATH folder to make it accessible from command line globally.

PorQry has 3 modes of operation:

Command Line Mode, Interactive Mode and Local Mode

portqry-windows-native-security-port-network-scanner-nmap-equivalent-help-screenshot
 

Command Line Mode – is when it is invoked with parameters.

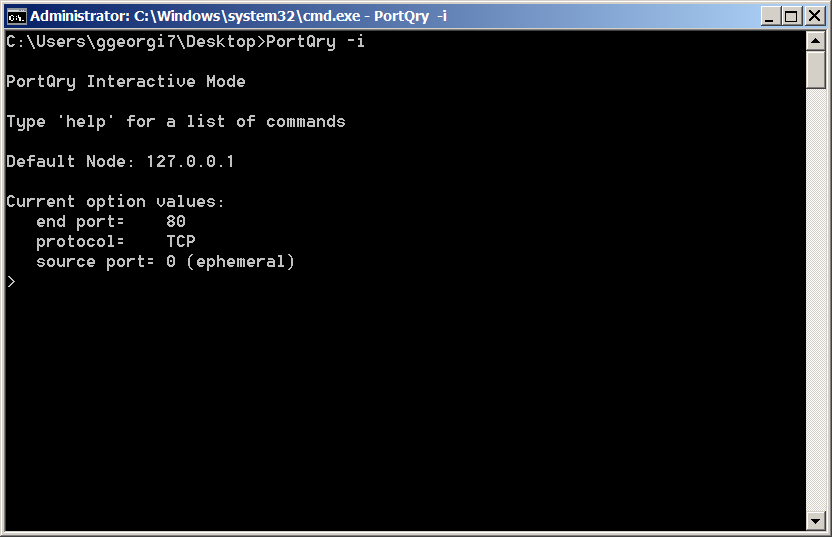
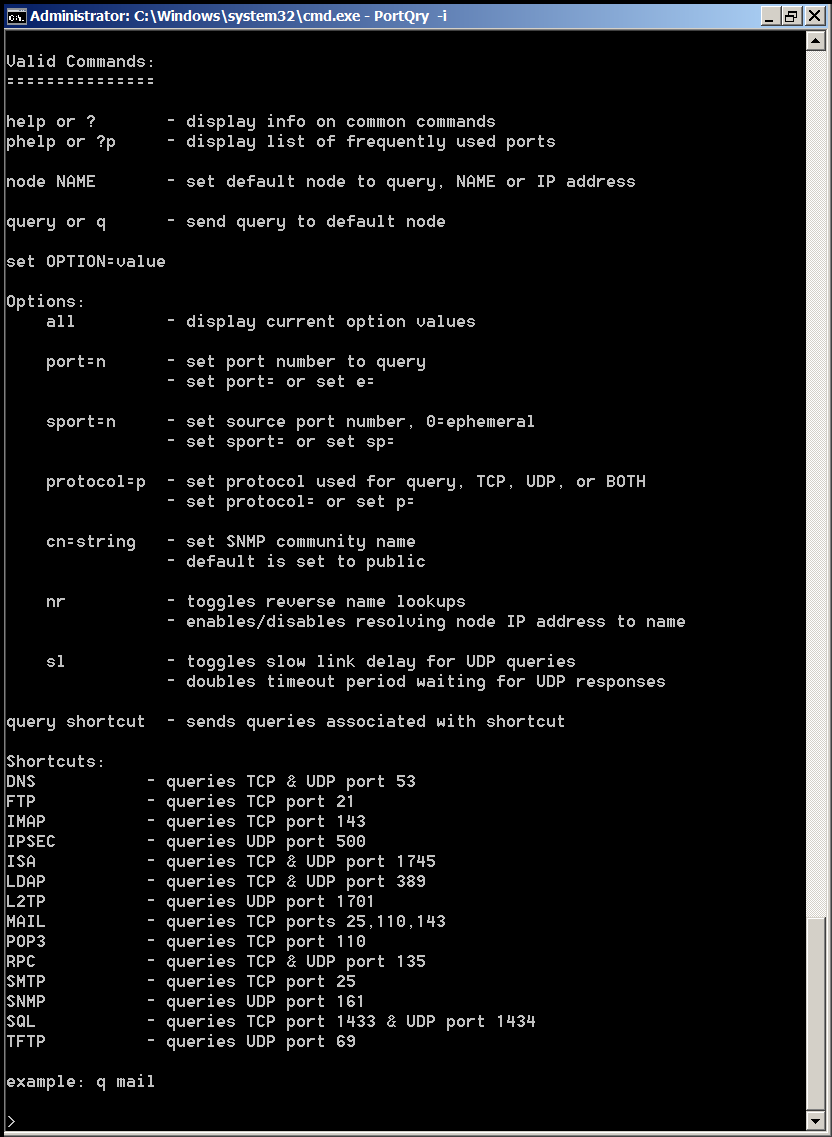
Interactive Mode is when it runs in interactive CLI console

portqry-windows-native-security-port-network-scanner-nmap-equivalent-interactive-mode-screenshot

portqry-windows-native-security-port-network-scanner-nmap-equivalent-interactive-mode-help-screenshot
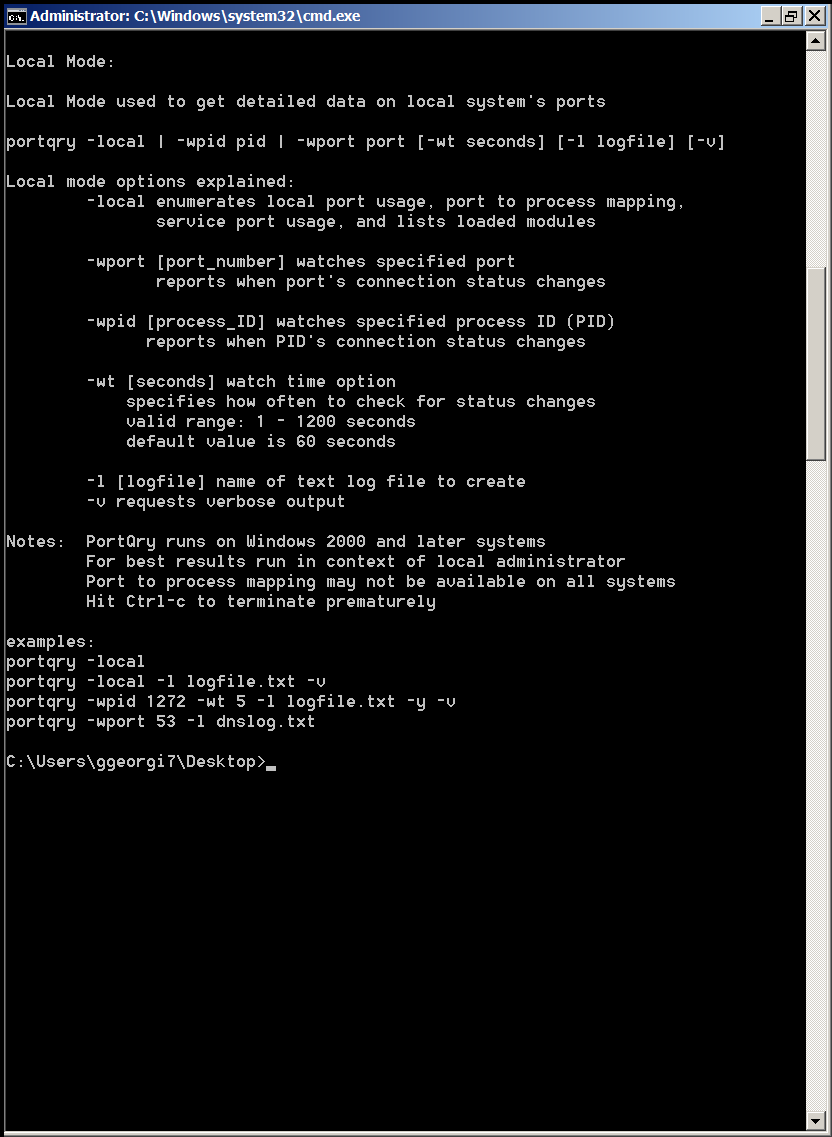
and Local Mode is used whether information on local system ports is required.

portqry-windows-native-security-port-network-scanner-nmap-equivalent-local-mode-screenshot


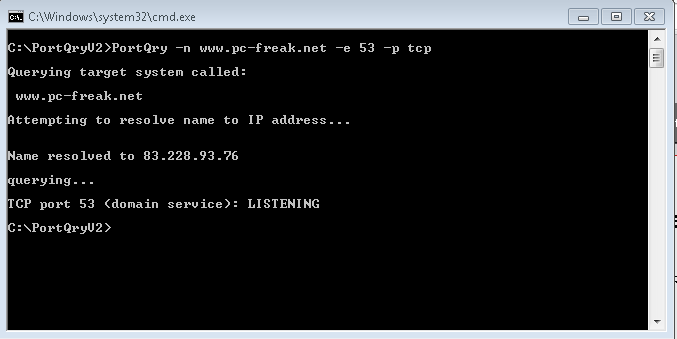
Here are some examples on basic usage of portqry:
 

1. Check if remote server is running webserver is listening on (HTTPS protocol) TCP port 80

portqry -n servername -e 80
 

Querying target system called:

 www.pc-freak.net

Attempting to resolve name to IP address…


Name resolved to 83.228.93.76

querying…

TCP port 80 (http service): FILTERED

2. Check whether some common Samba sharing and DNS UDP ports are listening

portqry -n servername -p UDP -o 37,53,88,135
 

Querying target system called:

servername

Attempting to resolve name to IP address…


Name resolved to 74.125.21.100

querying…

UDP port 37 (time service): NOT LISTENING

UDP port 53 (domain service): NOT LISTENING

UDP port 88 (kerberos service): NOT LISTENING

UDP port 135 (epmap service): NOT LISTENING

3. Scan open ports in a port range – Check common services port range (port 1-1024)

portqry -n 192.168.1.20 -r 1:1024 | find ": LISTENING"

4. Logging network scan output to file

Portqry –n localhost –e 135 -l port135.txt
 

Querying target system called:

 localhost

Attempting to resolve name to IP address…


Name resolved to 127.0.0.1

querying…

TCP port 135 (epmap service): LISTENING

Using ephemeral source port
Querying Endpoint Mapper Database…
Server's response:

UUID: d95afe70-a6d5-4259-822e-2c84da1ddb0d
ncacn_ip_tcp:localhost[49152]

UUID: 2f5f6521-cb55-1059-b446-00df0bce31db Unimodem LRPC Endpoint
ncacn_np:localhost[PIPEwkssvc]

Total endpoints found: 38


5. Scanning UDP and TCP protocols port

PortQry -n www.pc-freak.net -e 25 -p both


Querying target system called:

 www.pc-freak.net

Attempting to resolve name to IP address…


Name resolved to 83.228.93.76

querying…

TCP port 53 (domain service): LISTENING

UDP port 53 (domain service): LISTENING or FILTERED

Sending DNS query to UDP port 53…


6. Checking remote server whether LDAP ports are listening

Portqry -remotehost.com -p tcp -e 389
Portqry -n remotehost.com -p tcp -e 636
Portqry -n remotehost.com -p both -e 3268
Portqry -n remotehost.com -p tcp -e 3269


7. Making SNMP community name requests

portqry -n host2 -cn !my community name! -e 161 -p udp


8. Initiating scan from pre-selected source port

A network socket request initiation is useful from certain port because, some remote services expect connection from certain ports, lets say you're connecting to mail server, you might want to set as a source port – port 25, to make remote server another SMTP is connecting.

portqry -n www.pc-freak.net -e 25 -sp 25


9. Scanning whether server ports required by Active Directories are opened

Common ports used in Windows hosts to communicate between each other to sustain Active Directory are:

88 (Kerberos)
135 (RPC)
389 (LDAP)
445 (CIFS)
3268 (Global Catalog)

portqry -n remote-host.com -o 88,135,389,445,3268 -p both

portqry has also a silent mode with the "-q" switch if you want to get only whether a port is LISTENING (opened).

On port scan it returns three major return codes (very useful for scripting purposes);

  • returncode 0 – if port / service is listening
  • returncode 1 – if service is not listening
  • returncode 2 – if service is listening or filtered

PortQry is very simple port scanner for win sysadms and is precious tool for basic network debugging (services)  on Windows farms, however it doesn't have the powerful cracker functionality, application / OS versioning etc. like Nmap.


How to improve Linux kernel security with GrSecurity / Maximum Linux kernel security with GrSecurity

Tuesday, May 3rd, 2011

In short I’ll explain here what is Grsecurity http://www.grsecurity.net/ for all those who have not used it yet and what kind of capabilities concerning enhanced kernel security it has.

Grsecurity is a combination of patches for the Linux kernel accenting at the improving kernel security.

The typical application of GrSecurity is in the field of Linux systems which are administered through SSH/Shell, e.g. (remote hosts), though you can also configure grsecurity on a normal Linux desktop system if you want a super secured Linux desktop ;).

GrSecurity is used heavily to protect server system which require a multiple users to have access to the shell.

On systems where multiple user access is required it’s a well known fact that (malicious users, crackers or dumb script kiddies) get administrator (root) privileges with a some just poped in 0 day root kernel exploit.
If you’re an administrator of a system (let’s say a web hosting) server with multiple users having access to the shell it’s also common that exploits aiming at hanging in certain daemon service is executed by some of the users.
In other occasions you have users which are trying to DoS the server with some 0 day Denial of Service exploit.
In all this cases GrSecurity having a kernel with grsecurity is priceless.

Installing grsecurity patched kernel is an easy task for Debian and Ubuntu and is explained in one of my previous articles.
This article aims to explain in short some configuration options for a GrSecurity tightened kernel, when one have to compile a new kernel from source.

I would skip the details on how to compile the kernel and simply show you some picture screens with GrSecurity configuration options which are working well and needs to be set-up before a make command is issued to compile the new kernel.

After preparing the kernel source for compilation and issuing:

linux:/usr/src/kernel-source$ make menuconfig

You will have to select options like the ones you see in the pictures below:

[nggallery id=”8″]

After completing and saving your kernel config file, continue as usual with an ordinary kernel compilation, e.g.:

linux:/usr/src/kernel-source$ make
linux:/usr/src/kernel-source$ make modules
linux:/usr/src/kernel-source$ su root
linux:/usr/src/kernel-source# make modules_install
linux:/usr/src/kernel-source# make install
linux:/usr/src/kernel-source# mkinitrd -o initrd.img-2.6.xx 2.6.xx

Also make sure the grub is properly configured to load the newly compiled and installed kernel.

After a system reboot, if all is fine you should be able to boot up the grsecurity tightened newly compiled kernel, but be careful and make sure you have a backup solution before you reboot, don’t blame me if your new grsecurity patched kernel fails to boot! You’re on your own boy 😉
This article is written thanks to based originally on his article in Bulgarian. If you’re a Bulgarian you might also checkout static’s blog

Maximal protection against SSH attacks. If your server has to stay with open SSH (Secure Shell) port open to the world

Thursday, April 7th, 2011

Brute Force Attack SSH screen, Script kiddie attacking
If you’re a a remote Linux many other Unix based OSes, you have defitenily faced the security threat of many failed ssh logins or as it’s better known a brute force attack

During such attacks your /var/log/messages or /var/log/auth gets filled in with various failed password logs like for example:

Feb 3 20:25:50 linux sshd[32098]: Failed password for invalid user oracle from 95.154.249.193 port 51490 ssh2
Feb 3 20:28:30 linux sshd[32135]: Failed password for invalid user oracle1 from 95.154.249.193 port 42778 ssh2
Feb 3 20:28:55 linux sshd[32141]: Failed password for invalid user test1 from 95.154.249.193 port 51072 ssh2
Feb 3 20:30:15 linux sshd[32163]: Failed password for invalid user test from 95.154.249.193 port 47481 ssh2
Feb 3 20:33:20 linux sshd[32211]: Failed password for invalid user testuser from 95.154.249.193 port 51731 ssh2
Feb 3 20:35:32 linux sshd[32249]: Failed password for invalid user user from 95.154.249.193 port 38966 ssh2
Feb 3 20:35:59 linux sshd[32256]: Failed password for invalid user user1 from 95.154.249.193 port 55850 ssh2
Feb 3 20:36:25 linux sshd[32268]: Failed password for invalid user user3 from 95.154.249.193 port 36610 ssh2
Feb 3 20:36:52 linux sshd[32274]: Failed password for invalid user user4 from 95.154.249.193 port 45514 ssh2
Feb 3 20:37:19 linux sshd[32279]: Failed password for invalid user user5 from 95.154.249.193 port 54262 ssh2
Feb 3 20:37:45 linux sshd[32285]: Failed password for invalid user user2 from 95.154.249.193 port 34755 ssh2
Feb 3 20:38:11 linux sshd[32292]: Failed password for invalid user info from 95.154.249.193 port 43146 ssh2
Feb 3 20:40:50 linux sshd[32340]: Failed password for invalid user peter from 95.154.249.193 port 46411 ssh2
Feb 3 20:43:02 linux sshd[32372]: Failed password for invalid user amanda from 95.154.249.193 port 59414 ssh2
Feb 3 20:43:28 linux sshd[32378]: Failed password for invalid user postgres from 95.154.249.193 port 39228 ssh2
Feb 3 20:43:55 linux sshd[32384]: Failed password for invalid user ftpuser from 95.154.249.193 port 47118 ssh2
Feb 3 20:44:22 linux sshd[32391]: Failed password for invalid user fax from 95.154.249.193 port 54939 ssh2
Feb 3 20:44:48 linux sshd[32397]: Failed password for invalid user cyrus from 95.154.249.193 port 34567 ssh2
Feb 3 20:45:14 linux sshd[32405]: Failed password for invalid user toto from 95.154.249.193 port 42350 ssh2
Feb 3 20:45:42 linux sshd[32410]: Failed password for invalid user sophie from 95.154.249.193 port 50063 ssh2
Feb 3 20:46:08 linux sshd[32415]: Failed password for invalid user yves from 95.154.249.193 port 59818 ssh2
Feb 3 20:46:34 linux sshd[32424]: Failed password for invalid user trac from 95.154.249.193 port 39509 ssh2
Feb 3 20:47:00 linux sshd[32432]: Failed password for invalid user webmaster from 95.154.249.193 port 47424 ssh2
Feb 3 20:47:27 linux sshd[32437]: Failed password for invalid user postfix from 95.154.249.193 port 55615 ssh2
Feb 3 20:47:54 linux sshd[32442]: Failed password for www-data from 95.154.249.193 port 35554 ssh2
Feb 3 20:48:19 linux sshd[32448]: Failed password for invalid user temp from 95.154.249.193 port 43896 ssh2
Feb 3 20:48:46 linux sshd[32453]: Failed password for invalid user service from 95.154.249.193 port 52092 ssh2
Feb 3 20:49:13 linux sshd[32458]: Failed password for invalid user tomcat from 95.154.249.193 port 60261 ssh2
Feb 3 20:49:40 linux sshd[32464]: Failed password for invalid user upload from 95.154.249.193 port 40236 ssh2
Feb 3 20:50:06 linux sshd[32469]: Failed password for invalid user debian from 95.154.249.193 port 48295 ssh2
Feb 3 20:50:32 linux sshd[32479]: Failed password for invalid user apache from 95.154.249.193 port 56437 ssh2
Feb 3 20:51:00 linux sshd[32492]: Failed password for invalid user rds from 95.154.249.193 port 45540 ssh2
Feb 3 20:51:26 linux sshd[32501]: Failed password for invalid user exploit from 95.154.249.193 port 53751 ssh2
Feb 3 20:51:51 linux sshd[32506]: Failed password for invalid user exploit from 95.154.249.193 port 33543 ssh2
Feb 3 20:52:18 linux sshd[32512]: Failed password for invalid user postgres from 95.154.249.193 port 41350 ssh2
Feb 3 21:02:04 linux sshd[32652]: Failed password for invalid user shell from 95.154.249.193 port 54454 ssh2
Feb 3 21:02:30 linux sshd[32657]: Failed password for invalid user radio from 95.154.249.193 port 35462 ssh2
Feb 3 21:02:57 linux sshd[32663]: Failed password for invalid user anonymous from 95.154.249.193 port 44290 ssh2
Feb 3 21:03:23 linux sshd[32668]: Failed password for invalid user mark from 95.154.249.193 port 53285 ssh2
Feb 3 21:03:50 linux sshd[32673]: Failed password for invalid user majordomo from 95.154.249.193 port 34082 ssh2
Feb 3 21:04:43 linux sshd[32684]: Failed password for irc from 95.154.249.193 port 50918 ssh2
Feb 3 21:05:36 linux sshd[32695]: Failed password for root from 95.154.249.193 port 38577 ssh2
Feb 3 21:06:30 linux sshd[32705]: Failed password for bin from 95.154.249.193 port 53564 ssh2
Feb 3 21:06:56 linux sshd[32714]: Failed password for invalid user dev from 95.154.249.193 port 34568 ssh2
Feb 3 21:07:23 linux sshd[32720]: Failed password for root from 95.154.249.193 port 43799 ssh2
Feb 3 21:09:10 linux sshd[32755]: Failed password for invalid user bob from 95.154.249.193 port 50026 ssh2
Feb 3 21:09:36 linux sshd[32761]: Failed password for invalid user r00t from 95.154.249.193 port 58129 ssh2
Feb 3 21:11:50 linux sshd[537]: Failed password for root from 95.154.249.193 port 58358 ssh2

This brute force dictionary attacks often succeed where there is a user with a weak a password, or some old forgotten test user account.
Just recently on one of the servers I administrate I have catched a malicious attacker originating from Romania, who was able to break with my system test account with the weak password tset .

Thanksfully the script kiddie was unable to get root access to my system, so what he did is he just started another ssh brute force scanner to crawl the net and look for some other vulnerable hosts.

As you read in my recent example being immune against SSH brute force attacks is a very essential security step, the administrator needs to take on a newly installed server.

The easiest way to get read of the brute force attacks without using some external brute force filtering software like fail2ban can be done by:

1. By using an iptables filtering rule to filter every IP which has failed in logging in more than 5 times

To use this brute force prevention method you need to use the following iptables rules:
linux-host:~# /sbin/iptables -I INPUT -p tcp --dport 22 -i eth0 -m state -state NEW -m recent -set
linux-host:~# /sbin/iptables -I INPUT -p tcp --dport 22 -i eth0 -m state -state NEW
-m recent -update -seconds 60 -hitcount 5 -j DROP

This iptables rules will filter out the SSH port to an every IP address with more than 5 invalid attempts to login to port 22

2. Getting rid of brute force attacks through use of hosts.deny blacklists

sshbl – The SSH blacklist, updated every few minutes, contains IP addresses of hosts which tried to bruteforce into any of currently 19 hosts (all running OpenBSD, FreeBSD or some Linux) using the SSH protocol. The hosts are located in Germany, the United States, United Kingdom, France, England, Ukraine, China, Australia, Czech Republic and setup to report and log those attempts to a central database. Very similar to all the spam blacklists out there.

To use sshbl you will have to set up in your root crontab the following line:

*/60 * * * * /usr/bin/wget -qO /etc/hosts.deny http://www.sshbl.org/lists/hosts.deny

To set it up from console issue:

linux-host:~# echo '*/60 * * * * /usr/bin/wget -qO /etc/hosts.deny http://www.sshbl.org/lists/hosts.deny' | crontab -u root -

These crontab will download and substitute your system default hosts with the one regularly updated on sshbl.org , thus next time a brute force attacker which has been a reported attacker will be filtered out as your Linux or Unix system finds out the IP matches an ip in /etc/hosts.deny

The /etc/hosts.deny filtering rules are written in a way that only publicly known brute forcer IPs will only be filtered for the SSH service, therefore other system services like Apache or a radio, tv streaming server will be still accessible for the brute forcer IP.

It’s a good practice actually to use both of the methods 😉
Thanks to Static (Multics) a close friend of mine for inspiring this article.

35 years passed since first Bulgarian Аstronaut visited open space (cosmos)

Thursday, April 10th, 2014


soyuz-33_spaceship_pad
On 10th of April 1976 in 20:34 mins Moscow time from Boikonur Cosmodrome was launched s spaceship "Souyz-33 / Union-33" . On spacecraft flies 3 cosmonauts part of the space program Inter-cosmos, one of which is the Bulgarian cosmonaut and explorer Georgi Ivanov. Georgi Ivanov became the first Bulgarian who the leave planet earth, becoming the first space visitor with Bulgarian nationality.

Georgi_Ivanov_first-Bulgarian-cosmonaut

Ivanov spend in space 1 day 23 hours and 1 minute, after that the capsule landed in 320 km south-easy from Jezkazgan (Khazakhstan).
For his short stay in space in Earth's orbit Ivanov made 31 full turns around Planet Earth. With his flight to space Bulgaria joined the elite club of  "austranaut nations", making Bulgaria the sixth nation in world who sent representative in space.

syiuz-33-mission-logo-stamp

Flight mission's goal was linkage of their spaceship with orbital station "Salute-6" but because of technical malfunction "Syiuz 33"s moving with higher than forecasted and speed autoamtic correction system turns on which damages part of fuel camera, making necessary to cancel the flight.

Georgi-Ivanov-cosmonaut-with-russian-colleague-soyuz

Returning home on Earth he was awarded with medals "Hero of the USSR" and "Hero of Republic Bulgaria"
Nevertheless the mission was unsuccesful and dangerous Ivanov's pulse during all flight kept normal.

Georgi Ivanov is born in Lovech on 2-nd of July 1940 in family of Anastasia Kakalova and Ivan Ivanov Kakalov.During his school years he excercised parachutism, graduating in high-school "Todor Kirkov" Lovech in 1958.

Ivanov entered Bulgarian army in 1958 graduated Military school in Dolna Mitropolia (1964) with specialty of flight engineer and a pilot of class 1.
He served in Bulgarian National Army as a pilot, senior pilot, commander  and a squadron commander. In 1984 he defended his thesis and received a science degree "candidate of physics sciences". Georgi Ivanov is currently 73 years old. Nowadays Ivanov's birthouse in qr. "Varosha" is of historical importance and is preserved as a museum.

The fact that we Bulgarians have a cosmonaut is a great pride for me and all of us Bulgarians. Let us not forget our heroes and patriots and know our history.