Posts Tagged ‘hosts’
Thursday, December 8th, 2011 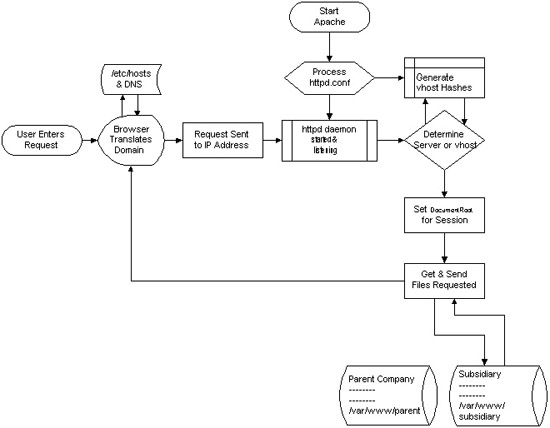
I decided to start this post with this picture I found on onlamp.com article called “Simplify Your Life with Apache VirtualHosts .I put it here because I thing it illustrates quite well Apache’s webserver internal processes. The picture gives also a good clue when Virtual Hosts gets loaded, anways I’ll go back to the main topic of this article, hoping the above picture gives some more insight on how Apache works.;
Here is how to list all the enabled virtualhosts in Apache on Debian GNU / Linux serving pages:
server:~# /usr/sbin/ apache2ctl -S

VirtualHost configuration:

wildcard NameVirtualHosts and _default_ servers:

*:* is a NameVirtualHost

default server exampleserver1.com (/etc/apache2/sites-enabled/000-default:2)

port * namevhost exampleserver2.com (/etc/apache2/sites-enabled/000-default

port * namevhost exampleserver3.com (/etc/apache2/sites-enabled/exampleserver3.com:1)

port * namevhost exampleserver4.com (/etc/apache2/sites-enabled/exampleserver4.com:1)

...

Syntax OK
The line *:* is a NameVirtualHost, means the Apache VirtualHosts module will be able to use Virtualhosts listening on any IP address (configured on the host), on any port configured for the respective Virtualhost to listen on.
The next output line:
port * namevhost exampleserver2.com (/etc/apache2/sites-enabled/000-default
Shows requests to the domain on any port will be accepted (port *) by the webserver as well as indicates the <VirtualHost> in the file /etc/apache2/sites-enabled/000-default:2 is defined on line 2 (e.g. :2).
To see the same all enabled VirtualHosts on FreeBSD the command to be issued is:
freebsd# pcfreak# /usr/local/sbin/httpd -S VirtualHost configuration:

wildcard NameVirtualHosts and _default_ servers:

*:80 is a NameVirtualHost

default server www.pc-freak.net (/usr/local/etc/apache2/httpd.conf:1218)

port 80 namevhost www.pc-freak.net (/usr/local/etc/apache2/httpd.conf:1218)

port 80 namevhost pcfreak.afraid.org (/usr/local/etc/apache2/httpd.conf:1353)

...

Syntax OK
On Fedora and the other Redhat Linux distributions, the apache2ctl -S should be displaying the enabled Virtualhosts.
One might wonder, what might be the reason for someone to want to check the VirtualHosts which are loaded by the Apache server, since this could be also checked if one reviews Apache / Apache2’s config file. Well the main advantage is that checking directly into the file might sometimes take more time, especially if the file contains thousands of similar named virtual host domains. Another time using the -S option is better would be if some enabled VirtualHost in a config file seems to not be accessible. Checking directly if Apache has properly loaded the VirtualHost directives ensures, there is no problem with loading the VirtualHost. Another scenario is if there are multiple Apache config files / installs located on the system and you’re unsure which one to check for the exact list of Virtual domains loaded.
Tags: apache, apache2, clue, com, config, configured, ctl, debian gnu, default port, default server, exampleserver, file, freak, freebsd, gnu linux, host, hosts, insight, ip address, life, Linux, lt, namevhost, NameVirtualHosts, onlamp, option, pcfreak, quot, reason, sbin, server pc, servers, someone, syntax, time, topic, Virtual, virtual hosts, Virtualhost, virtualhost configuration, VirtualHosts
Posted in Linux, System Administration | No Comments »
Tuesday, October 18th, 2011 I’m Configuring a new Exim server to relay / forward mail via a remote Qmail SMTP server
Even though I configured properly the exim to forward via my relaying mail server with host mail.domain.com, still the mail forwarding from the Exim -> Qmail failed to work out with an error:
Fix to mail forwarding error "Received-SPF: none (domain.com: domain at maildomain does not designate permitted sender hosts)
I pondered for a while on what might be causing this “mysterous” error just to realize I forgot to add the IP address of my Exim mail server in the Qmail relay server
To solve the error I had to add in /etc/tcp.smtp on my Qmail server a record for my Exim server IP address xx.xx.xx.xx, like so:
debian-server:~# echo 'xx.xx.xx.xx:allow,RELAYCLIENT="",QS_SPAMASSASSIN="0"' >> /etc/tcp.smtp
The QS_SPAMASSASSIN=”0″ as you might have guessed instructs Qmail not to check the received mails originating from IP xx.xx.xx.xx with spamassassin.
Finally on the Qmail server to load up the new tcp.smtp settings I had to rebuild /etc/tcp.smtp.cdb and restart qmail :
– reload qmail cdb
linux-server:/var/qmail# qmailctl cdb

Reloaded /etc/tcp.smtp.

- restart qmail
linux-server:/var/qmail# qmailctl restart

Restarting qmail:

* Stopping qmail-smtpdssl.

* Stopping qmail-smtpd.

* Sending qmail-send SIGTERM and restarting.

* Restarting qmail-smtpd.

* Restarting qmail-smtpdssl.
This solved the issue and now mails are forwarded without problems via the Qmail SMTPD.
Tags: cdb, com, Configuring, domain, exim, forward mail, Forwarding, hosts, issue, Linux, mail, mail domain, mail server, none, Qmail, qmailctl, qs, quot, quot quot, relay, relay server, RELAYCLIENT, relaying mail, sender, Sending, server ip address, serverTo, SMTPD, smtpThe, spamassassin, SPF, var, while
Posted in Everyday Life, Linux, Qmail, System Administration, Various | No Comments »
Wednesday, December 28th, 2011 
I've recently installed a jabber server on one Debian Lenny server and hence decided to describe my installations steps hoping this would help ppl who would like to run their own jabber server on Debian . After some research of the jabber server softwares available, I decided to install Ejabberd
The reasons I choose Ejabberd is has rich documentation, good community around the project and the project in general looks like one of the best free software jabber servers available presently. Besides that ejabberd doesn't need Apache or MySQL and only depends on erlang programming language.
Here is the exact steps I followed to have installed and configured a running XMPP jabber server.
1. Install Ejabberd with apt
The installation of Ejabberd is standard, e.g.:
debian:~# apt-get --yes install ejabberd
Now as ejabberd is installed, some minor configuration is necessery before the server can be launched:
2. Edit /etc/ejabberd/ejabberd.cfg
Inside I changed the default settings for:
a) Uncomment%%override_acls.. Changed:
%%%% Remove the Access Control Lists before new ones are added.%%%%override_acls.
to
%%

%% Remove the Access Control Lists before new ones are added.

%%

override_acls.
b) Admin User from:
%% Admin user

{acl, admin, {user, "", "example.com"}}.
to
%% Admin user

{acl, admin, {user, "admin", "jabber.myserver-host.com"}}.
c) default %% Hostname of example.com to my real hostname:
%% Hostname

{hosts, ["jabber.myserver-host.com"]}.
The rest of the configurations in /etc/ejabberd/ejabberd.cfg can stay like it is, though it is interesting to read it carefully before continuing as, there are some config timings which might prevent the XMPP server from user brute force attacks as well as few other goodies like for example (ICQ, MSN , Yahoo etc.) protocol transports.
3. Add iptables ACCEPT traffic (allow) rules for ports which are used by Ejabberd
The minimum ACCEPT rules to add are:
/sbin/iptables -A INPUT -p tcp -m tcp --dport 22 -j ACCEPT

/sbin/iptables -A INPUT -p tcp -m tcp --dport 5222 -j ACCEPT

/sbin/iptables -A INPUT -p udp -m udp --dport 5222 -j ACCEPT

/sbin/iptables -A INPUT -p tcp -m tcp --dport 5223 -j ACCEPT

/sbin/iptables -A INPUT -p udp -m udp --dport 5223 -j ACCEPT

/sbin/iptables -A INPUT -p tcp -m tcp --dport 5269 -j ACCEPT

/sbin/iptables -A INPUT -p udp -m udp --dport 5269 -j ACCEPT

/sbin/iptables -A INPUT -p tcp -m tcp --dport 5280 -j ACCEPT

/sbin/iptables -A INPUT -p udp -m udp --dport 5280 -j ACCEPT

/sbin/iptables -A INPUT -p tcp -m tcp --dport 4369 -j ACCEPT

/sbin/iptables -A INPUT -p udp -m udp --dport 4369 -j ACCEPT

/sbin/iptables -A INPUT -p tcp -m tcp --dport 53873 -j ACCEPT
Of course if there is some specific file which stores iptables rules or some custom firewall these rules has to be added / modified to fit appropriate place or chain.
4. Restart ejabberd via init.d script
debian:~# /etc/init.d/ejabberd restart

Restarting jabber server: ejabberd is not running. Starting ejabberd.
5. Create ejabberd necessery new user accounts
debian:~# /usr/sbin/ejabberdctl register admin jabber.myserver-host.com mypasswd1

debian:~# /usr/sbin/ejabberdctl register hipo jabber.myserver-host.com mypasswd2

debian:~# /usr/sbin/ejabberdctl register newuser jabber.myserver-host.com mypasswd3

debian:~# /usr/sbin/ejabberdctl register newuser1 jabber.myserver-host.com mypasswd4

...
etc.
ejabberdctl ejabberd server client (frontend) has multiple other options and the manual is a good reading.
One helpful use of ejabberdctl is:
debian:~# /usr/sbin/ejabberdctl status

Node ejabberd@debian is started. Status: started

ejabberd is running
ejabberctl can be used also to delete some existent users, for example to delete the newuser1 just added above:
debian:~# /usr/sbin/ejabberdctl unregister newuser jabber.myserver-host.com
6. Post install web configurations
ejabberd server offers a web interface listening on port 5280, to access the web interface right after it is installed I used URL: http://jabber.myserver-host.com:5280/admin/
To login to http://jabber.myserver-host.com:5280/admin/ you will need to use the admin username previously added in this case:
admin@jabber.myserver-host.com mypasswd1
Anyways in the web interface there is not much of configuration options available for change.
7. Set dns SRV records
I'm using Godaddy 's DNS for my domain so here is a screenshot on the SRV records that needs to be configured on Godaddy:

In the screenshto Target is the Fually qualified domain hostname for the jabber server.
Setting the SRV records for the domain using Godaddy's DNS could take from 24 to 48 hours to propagate the changes among all the global DNS records so be patient.
If instead you use own custom BIND DNS server the records that needs to be added to the respective domain zone file are:
_xmpp-client._tcp 900 IN SRV 5 0 5222 jabber.myserver-host.com.

_xmpp-server._tcp 900 IN SRV 5 0 5269 jabber.myserver-host.com.

_jabber._tcp 900 IN SRV 5 0 5269 jabber.myserver-host.com.
8. Testing if the SRV dns records for domain are correct
debian:~$ nslookup
> set type=SRV

> jabber.myserver-host.com

 ...
> myserver-host.com
If all is fine above nslookup request should return the requested domain SRV records.
You might be wondering what is the purpose of setting DNS SRV records at all, well if your jabber server has to communicate with the other jabber servers on the internet using the DNS SRV record is the way your server will found the other ones and vice versa.
DNS records can also be checked with dig for example
$ dig SRV _xmpp-server._tcp.mydomain.net
[…]
;; QUESTION SECTION:
;_xmpp-server._tcp.mydomain.net. IN SRV
;; ANSWER SECTION:
_xmpp-server._tcp.mydomain.net. 259200 IN SRV 5 0 5269 jabber.mydomain.net.
;; ADDITIONAL SECTION:
jabber.mydomain.net. 259200 IN A 11.22.33.44
;; Query time: 109 msec
;; SERVER: 212.27.40.241#53(212.27.40.241)
;; WHEN: Sat Aug 14 14:14:22 2010
;; MSG SIZE rcvd: 111
9. Debugging issues with ejabberd
Ejabberd log files are located in /var/log/ejabberd , you will have to check the logs in case of any issues with the jabber XMPP server. Here is the three files which log messages from ejabberd:
debian:~$ ls -1 /var/log/ejabberd/

ejabberd.log

erl_crash.dump

sasl.log
I will not get into details on the logs as the best way to find out about them is to read them 😉
10. Testing ejabberd server with Pidgin
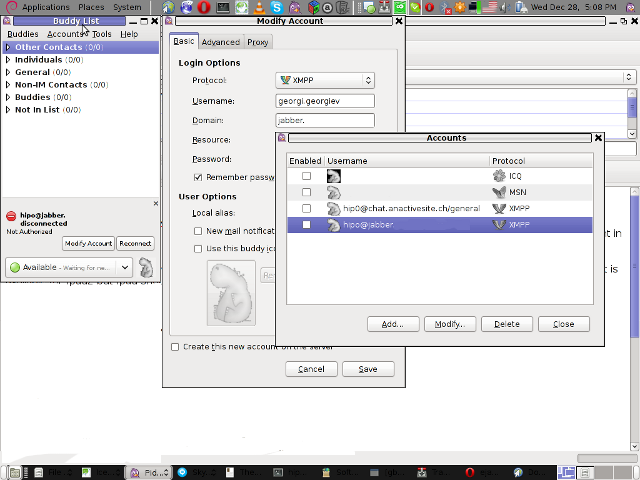
To test if my Jabber server works properly I used Pidgin universal chat client . However there are plenty of other multiplatform jabber clients out there e.g.: Psi , Spark , Gajim etc.
Here is a screenshot of my (Accounts -> Manage Accounts -> Add) XMPP protocol configuration
Tags: admin, apache, best free software, brute force, cfg, com, configure, custom, default hostname, default settings, DNS, doesn, dport, ejabberd, ejabberdctl, exact steps, file, GNU, goodies, hostname, hosts, init, INPUT, Install, installation, Jabber, Linux, Lists, mypasswd, necessery, override, ports, ppl, programming language, Protocol, quot, quot quot, rich documentation, server, servers, software, tcp, transports, uncomment, User, xmpp
Posted in Linux, System Administration, Various | 8 Comments »
Friday, November 25th, 2011 There are two handy Windows commands which can be used to renew IP address or flush prior cached DNS records which often create problems with resolving hosts.
1. To renew the IP address (fetch address from DHCP server)
C:> ipconfig /release

C:> ipconfig /renew
In above cmd ipconfig /release will de-assign the IP address configured on all Windows LAN and Wireless interfaces, whether ipconfig /renew will send request for IP address to the DNS server.
To unassign and assign again IP address from DHCP server only for a particular LAN or WLAN card:
C:> ipconfig /release LAN

C:> ipconfig /renew LAN

C:> ipconfig /release WLAN

C:> ipconfig /renew WLAN
2. Adding specific routing to Windows
Windows has a Route command similar by syntax to Linux’s route command.
To add routing via a specific predefined IP addresses on Windows the commands should be something like:
C:> Route add 192.168.40.0 mask 255.255.255.0 192.168.41.253

C:> Route add 0.0.0.0 mask 0.0.0.0 192.168.41.254
The first command adds IP 192.168.40.0 in the network of 255 hosts to be routed via 192.168.41.253
The second one adds 192.168.41.254 as a default gateway for all outbound traffic from the Windows host.
To make permanent routing -p switch is used.
3. To clear Windows DNS cache (flush DNS cached records)
C:> ipconfig /flushdns
This will clear all IP records corresponding to hostnames previously cached on the Windows host. Using ipconfig /flushdns is especially handy when IP address for a specific DNS host is changed. Flushing the Windows DNS cache can save us a lot of waiting before the domain example.com starts resolving to the new IP address let’s say 1.2.3.4 instead of the old one 2.2.2.2
Tags: Cache, card, card c, com, command, configured, default gateway, DHCP, DNS, dns host, dns server, domain, domain example, first command, flush dns cache, flushdns, gateway, host, hosts, how to renew ip address, ipconfig, ipconfig flushdns, ipconfig release, mask, network, outbound, outbound traffic, predefined, records c, release c, request, Route, routing, server c, something, switch, unassign, Vista, windows commands, windows lan, WLAN, WLANC
Posted in System Administration, Windows | 1 Comment »
Tuesday, September 20th, 2011 To prevent tracking and increase anonymity in IPv6 networks the Linux kernel has a variable to change randomly the MAC identifier. This feature will be very useful in terms of security in the short future, when all the IPv4 IP addresses are finished. The UIE (Extended Unified Udentifier) for an ipv6 address can be changed with command:
sysctl -w net.ipv6.conf.all.use_tempaddr=2
Microsoft Windows Vista and Windows 7 has the UIE enabled by default, enabling the random MAC changes automatically for a host cvan be done as usual by adding the net.ipv6.conf.all_use_tempaddr=2 to /etc/sysctl.conf
On an IPv6 network every ifconfig eth0 down and ifconfig eth0 up will instruct the lan card to be set a different MAC address for the ipv6 ip on the interface.
Changing the UIE randomly however also have security downsides if the host gets infected with a Virus or Worm. The security downsides of the enabled UIE affects mainly Windows hosts on IPv6 networks as UIE variable is enabled by default there.I’ve found this great tip in an article in the latest Linux Magazine October 2011. Its the first time I saw a paper Linux Magazine, the magazine contains a lot of helpful info on the latest Linux developments and latest trends in the Linux world. Subscription to receive the magazine via normal post is for the magazine costs 6.65 EUR per month (80 EUR) yearly. The 80 euro yearly includes 12 CDS (each magazine is bundled with a newly launched new version of a Linux distribution).
There is also a cheaper subscription for the magazine which costs 64.90 EUR.
Tags: anonymity, card, default, distribution, eth, euro, Extended, feature, future, host, hosts, info, ip addresses, ipv6 address, ipv6 network, ipv6 networks, lan card, latest trends, Linux, linux developments, linux distribution, linux kernel, linux magazine, linux world, mac address, Microsoft, microsoft windows vista, month, October, pc mac, Subscription, sysctl, time, tip, UIE, Unified, virus, world subscription, worm
Posted in Linux, System Administration | 2 Comments »
Tuesday, August 30th, 2011 
In this article in short, I’ll explain how I configured Nagios on a Debian GNU/Linux release (Squeeze 6) to monitor a couple of Windows hosts running inside a local network. Now let’s start.
1. Install necessery nagios debian packages
apt-get install nagios-images nagios-nrpe-plugin nagios-nrpe-server nagios-plugins nagios-plugins-basic nagios-plugins-standard

nagios3 nagios3-cgi nagios3-common nagios3-core
2. Edit /etc/nagios-plugins/config/nt.cfg
In the File substitute:
define command { command_name check_nt command_line /usr/lib/nagios/plugins/check_nt -H '$HOSTADDRESS$' -v '$ARG1$' }
With:
define command {

command_name check_nt

command_line /usr/lib/nagios/plugins/check_nt -H '$HOSTADDRESS$' -p 12489 -v $ARG1$ $ARG2$

}
3. Modify nrpe.cfg to put in allowd hoss to connect to the Nagions nrpe server
vim /etc/nagios/nrpe.cfg
Lookup inside for nagios’s configuration directive:
allowed_hosts=127.0.0.1
In order to allow more hosts to report to the nagios nrpe daemon, change the value to let’s say:
allowed_hosts=127.0.0.1,192.168.1.4,192.168.1.5,192.168.1.6
This config allows the three IPs 192.168.1.4-6 to be able to report for nrpe.
For the changes to nrpe server to take effect, it has to be restrarted.
debian:~# /etc/init.d/nagios-nrpe-server restart
Further on some configurations needs to be properly done on the nrpe agent Windows hosts in this case 192.168.1.4,192.168.1.5,192.168.1.6
4. Install the nsclient++ on all Windows hosts which CPU, Disk, Temperature and services has to be monitored
Download the agent from http://sourceforge.net/projects/nscplus and launch the installer, click twice on it and follow the installation screens. Its necessery that during installation the agent has the NRPE protocol enabled. After the installation is complete one needs to modify the NSC.ini
By default many of nsclient++ tracking modules are not enabled in NSC.ini, thus its necessery that the following DLLs get activated in the conf:
FileLogger.dll

CheckSystem.dll

CheckDisk.dll

NSClientListener.dll

SysTray.dll

CheckEventLog.dll

CheckHelpers.dll
Another requirement is to instruct the nsclient++ angent to have access to the Linux installed nagios server again with adding it to the allowed_hosts config variable:
allowed_hosts=192.168.1.1
In my case the Nagios runs on Debian Lenny (Squeeze) 6 and possess the IP address of 192.168.1.1
To test the intalled windows nsclient++ agents are properly installed a simple telnet connection from the Linux host is enough:
5. Create necessery configuration for the nagios Linux server to include all the Windows hosts which will be monitored
There is a window.cfg template file located in /usr/share/doc/nagios3-common/examples/template-object/windows.cfg on Debian.
The file is a good start point for creating a conf file to be understand by nagios and used to periodically refresh information about the status of the Windows hosts.
Thus it’s a good idea to copy the file to nagios3 config directory:
debian:~# mkdir /etc/nagios3/objects

debian:~# cp -rpf /usr/share/doc/nagios3-common/examples/template-object/windows.cfg /etc/nagios3/objects/windows.cfg
A sample windows.cfg content, (which works for me fine) and monitor a couple of Windows nodes running MS-SQL service and IIS and makes sure the services are up and running are:
define host{

use windows-server ; Inherit default values from a template

host_name Windows1 ; The name we're giving to this host

alias Iready Server ; A longer name associated with the host

address 192.168.1.4 ; IP address of the host

}

define host{

use windows-server ; Inherit default values from a template

host_name Windows2 ; The name we're giving to this host

alias Iready Server ; A longer name associated with the host

address 192.168.1.4 ; IP address of the host

}

define hostgroup{

hostgroup_name windows-servers ; The name of the hostgroup

alias Windows Servers ; Long name of the group

}

define hostgroup{

hostgroup_name IIS

alias IIS Servers

members Windows1,Windows2

}

define hostgroup{

hostgroup_name MSSQL

alias MSSQL Servers

members Windows1,Windows2

}

define service{

use generic-service

host_name Windows1

service_description NSClient++ Version

check_command check_nt!CLIENTVERSION

}

define service{ use generic-service

host_name Windows1

service_description Uptime

check_command check_nt!UPTIME

}

define service{ use generic-service

host_name Windows1

service_description CPU Load

check_command check_nt!CPULOAD!-l 5,80,90

}

define service{

use generic-service

host_name Windows1

service_description Memory Usage

check_command check_nt!MEMUSE!-w 80 -c 90

define service{

use generic-service

host_name Windows1

service_description C: Drive Space

check_command check_nt!USEDDISKSPACE!-l c -w 80 -c 90

}

define service{

use generic-service

host_name Windows1

service_description W3SVC

check_command check_nt!SERVICESTATE!-d SHOWALL -l W3SVC

}

define service{

use generic-service

host_name Windows1

service_description Explorer

check_command check_nt!PROCSTATE!-d SHOWALL -l Explorer.exe

}

define service{

use generic-service

host_name Windows2

service_description NSClient++ Version

check_command check_nt!CLIENTVERSION

}

define service{ use generic-service

host_name Windows2

service_description Uptime

check_command check_nt!UPTIME

}

define service{ use generic-service

host_name Windows2

service_description CPU Load

check_command check_nt!CPULOAD!-l 5,80,90

}

define service{

use generic-service

host_name Windows2

service_description Memory Usage

check_command check_nt!MEMUSE!-w 80 -c 90

define service{

use generic-service

host_name Windows2

service_description C: Drive Space

check_command check_nt!USEDDISKSPACE!-l c -w 80 -c 90

}

define service{

use generic-service

host_name Windows2

service_description W3SVC

check_command check_nt!SERVICESTATE!-d SHOWALL -l W3SVC

}

define service{

use generic-service

host_name Windows2

service_description Explorer

check_command check_nt!PROCSTATE!-d SHOWALL -l Explorer.exe

}

define service{ use generic-service

host_name Windows1

service_description SQL port Check

check_command check_tcp!1433

}

define service{

use generic-service

host_name Windows2

service_description SQL port Check

check_command check_tcp!1433

}
The above config, can easily be extended for more hosts, or if necessery easily setup to track more services in nagios web frontend.
6. Test if connectivity to the nsclient++ agent port is available from the Linux server
debian:~# telnet 192.168.58.6 12489

Trying 192.168.58.6...

Connected to 192.168.58.6.

Escape character is '^]'.

asd

ERROR: Invalid password.
Another good idea is to launch on the Windows host the NSClient++ (system tray) , e.g.:
Start, All Programs, NSClient++, Start NSClient++ (system tray).
Test Nagios configuration from the Linux host running nagios and nrpe daemons to check if the check_nt, can succesfully authenticate and retrieve data generated from the nsclient++ on the Windows host:
debian:~# /usr/lib/nagios/plugins/check_nt -H 192.168.1.5 -p 12489 -v CPULOAD -w 80 -c 90 -l 5,80,90,10,80,90
If everything is okay and the remote Windows system 192.168.1.5 has properly configured and running NSClient++ the above command should return an output like:
CPU Load 1% (5 min average) 1% (10 min average) | '5 min avg Load'=1%;80;90;0;100 '10 min avg Load'=1%;80;90;0;100
In case of the command returns:
could not fetch information from server
instead this means that probably there is some kind of problem with authentication or handshake of the Linux host’s nagios check_nt to the Windows server’s running on 12489.
This is sometimes caused by misconfigured NSC.ini file, however in other occasions this error is caused by misconfigured Windows Firewall or because the NSClient++ is not running with Administrator user.
By the way important note to make about Windows 2008r2 is that if NSClient++ is running there it’s absolutely required to Login with Windows Administrator and run the NSClient++ /start , if it’s run through the Run As Adminsitrator with an admin privileged user the aforementioned error might appear, so be careful.
I’ve experienced this error myself and it took me about 40 minutes to find that I have to run it directly with Administrator user after logging as Administrator.
7. Create nagios web iface Apache configuration
nagios debian pachage is shipped with a config which is suitable to be set
debian:~# cp -rpf /usr/share/doc/nagios3-common/examples/apache2.conf /etc/apache2/sites-avalable/nagios

debian:~# ln -sf /etc/apache2/sites-available/nagios /etc/apache2/sites-enabled/nagios
The /etc/apache2/sites-available/nagios can easily be configured to work on Virtualhost, to do so the above copied file need to be wrapped inside a VirtualHost directive. For that put in the beginning of the file;
<VirtualHost *:80>
and in the end of the file:
<VirtualHost *:80>
8. Restart nagios server and Apache for the new settings to take effect
debian:~# /etc/init.d/apache2 restart

...

debian:~# /etc/init.d/nagios3 restart
If some custom configuration about tracking the Debian Linux nagios host running services needs to be made, its also helpful for one to check in /etc/nagios3/conf.d
Well that’s mostly what I had to do to make the Nagios3 server to keep track of a small Windows network on Debian GNU/Linux Squeeze 6, hope this small article helps. Cheers 😉
Tags: allowd, cgi, change, config, configuration directive, CPULOAD, debian gnu, debian packages, description, directive, dllCheckEventLog, drive, explorer, file, gnu linux, hoss, host, hostgroup, hosts, IIS, images, Install, installation, Iready, lib, Linux, linux release, Load, local network, memory, nagios plugins, necessery, NSC, nsclient, Protocol, servers, Space, SQL, squeeze, start 1, substitute, template, test, Uptime, value, version, vim
Posted in Linux, System Administration, Various | 2 Comments »
Wednesday, August 24th, 2011 I’ve been playing with configuring a new nagios running on a Linux host which’s aim is to monitor few Windows servers.
The Linux host’s exim is configured to act as relay host to another SMTP server, so all email ending up in the Linux localhost on port 25 is forwarded to the remote SMTP.
The remote smtp only allows the Linux to send email only in case if a real existing username@theserverhostname.com is passed it, otherwise it rejects mail and does not sent properly the email.
As the newly configured Nagios installatio is supposed to do e-mail notification, I was looking for a way to change the default user with which Nagios sends mails, which is inherited directly after the username with which /usr/sbin/nagios3 and /usr/sbin/nrpe are running (on Debian this is nagios@theserverhostname.com).
Thanksfully, there is a work around, I’ve red some forum threads explaning that the username with whch nagios sends mail can be easily changed from /etc/nagios3/commands.cfg by passing the -a “From: custom_user@myserverhostname.com” to all occurance of /usr/bin/mail -s , its preferrable that the -a custom_user@myserverhostname.com is inserted before the -s “” subject option. Hence the occurance of mail command should be changed from:
| /usr/bin/mail -s "** $NOTIFICATIONTYPE$
To:
| /usr/bin/mail -a "From: custom_user@theserverhostname.com" -s "** $NOTIFICATIONTYPE$
Now to read it’s new configurations nagios requirs restart:
debian:~# /etc/init.d/nagios3 restart

...
Now in case of failed services or Hosts Down nagios will send it’s mail from the custom user custom_user@theserverhostname.com and nagios can can send mail properly via the remote relay SMTP host 😉
Tags: aim, com, command, custom, debian gnu, default user, e mail notification, email, exim, forum, forum threads, gnu linux, hosts, Linux, linux host, localhost, mail command, myserverhostname, nagios, notification, NOTIFICATIONTYPE, occurance, option, port, preferrable, relay, smtp server, Thanksfully, theserverhostname, username, usr, way, whch, windows servers, work
Posted in FreeBSD, Linux, System Administration | No Comments »
Saturday, July 16th, 2011 
It was necessery to clean up some squid cache for some proxy users on a Debian host. Until now I’ve used to run only custom build Squid server on Slackware Linux.
Thus I was curious if Debian guys were smart enough to implement a proxy cache cleaning option as an option to be passed on to squid’s init script.
Honestly I was quite suprised squid clear cache option is not there;
squid-cache:~# /etc/init.d/squid3

Usage: /etc/init.d/squid3 {start|stop|reload|force-reload|restart}

squid-cache:/#
As it was not embedded into init script I still hoped, there might be some Debian way to do the proxy cache clearing, so I spend some 10 minutes checking online as well as checked in squid3‘s manual just to find there is no specific command or Debian accepted way to clean squid’s cache.
Since I couldn’t find any Debian specific, way I did it the old fashioned way 😉 (deleted directory/file structures in /var/spool/squid3/* and used squid’s -z option, to recreate the swap directories.
Here is how:
squid-cache:~# /etc/init.d/squid3 stop;

squid-cache:~# rm -Rf /var/spool/squid3/*;

squid-cache:~# squid3 -z; /etc/init.d/squid3 start
Finally I was quite amazed to realize, there was not even a crontab script to periodically clear and re-create proxy cache.
My previous experience with maintaning an office Squid proxy cache has prooved, that periodic cache clean ups are very helpful, especially to resolve issues with cached unreslovable DNS entries in the server.
Clearing up squid cache every week or something, guarantees that failure to resolve certain hosts at certain times would not stay unresolvable like forever 😉
In that manner of thougths, I decided to put the following crontab which will twice a month clear up proxy’s cache, to possibly solve some failed squid DNS issues.
squid-cache:~# crontab -u root -l > file;

echo '00 04 12,26 * * /etc/init.d/squid3 stop; rm -Rf /var/spool/squid3/*; squid3 -z; /etc/init.d/squid3 start >/dev/null 2>&1'

>> file; crontab file
By the way, implementing the squid clear cache in Debian and Ubuntu ‘s init scripts and putting a periodic proxy clear up cron, seems like a feature worthy to be proposed to the distro developers and hopefully be embbed in some of the upcoming distro releases 😉
Tags: amp, cache option, clear cache, clearing, command, cron, crontab script, dev, DNS, dns entries, experience, failure, feature, fi, fil, file, file structures, guarantees, Honestly, hosts, init script, Linux, necessery, online, option, proxy, proxy cache, proxy users, rf, root, something, specific, spool, squid, squid cache, Stop, thougths, Ubuntu, ups, Usage, var, way
Posted in Linux, System Administration | No Comments »
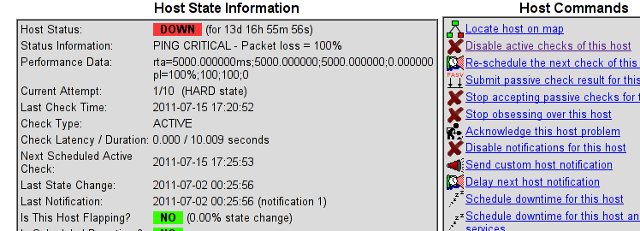
Friday, July 15th, 2011 At the company where I administrate some servers, they’re running Nagios to keep track of the servers status and instantly report if problems with connectivity to certain servers occurs.
Now one of the servers which had configured UP host checks is up, but because of heavy ICMP denial of service attacks to the servers the ICMP protocol ping is completely disabled.
In Nagios this host was constantly showing as DOWN in the usual red color, so nagios reported issue even though all services on the client are running fine.
As this is quite annoying, I checked if Nagios supports host checking without doing the ICMP ping test. It appeared it does through something called in nagios Submit passive check result for host
Enabling the “Submit passive check result for this host” could be done straight from Nagios’s web interface (so I don’t even have to edit configurations! ;).
Here is how I did it. In Nagios I had to navigate to:
Hosts -> Click over my host (hosting1) which showed in red as down

You see my down host which I clicked over showing in red in above pic.
On next Nagios screen I had to select, Disable active checks of this host
and press on the Commit button.
Next following text appears on browser:
Your command request was successfully submitted to Nagios for processing.
Note: It may take a while before the command is actually processed.
Afterwards I had to click on Submit passive check result for this host and in:
Check Output to type in:
check_tcp -p 80
Here is the Screenshot of the Command Options dialog:
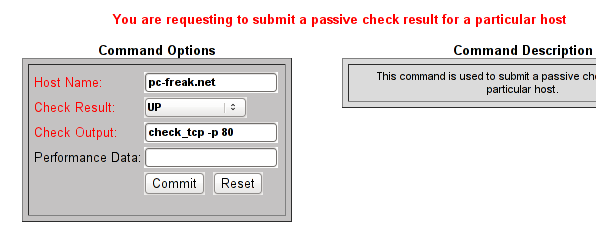
That’s all now Nagious should start checking the down host by doing a query if the webserver on port 80 is up and running instead of pinging it.
As well as the server is no longer shown in the Nagio’s Down host list.
Tags: Button, check result, checks, client, command options, command request, Commit, company, connectivity, denial of service, denial of service attacks, downYou, host, host list, hosts, ICMP, icmp ping, icmp protocol, Nagio, nagios, Output, ping, ping test, processing, request, screen, screenshot, servers, something, status, Submit, test, text, type, web interface
Posted in Linux, System Administration | 4 Comments »
Saturday, July 9th, 2011 
These days, I’m managing many, many servers. The servers are ordered in few groups. Each of the servers in the server groups contains identical hardware, identical Linux distribution as well as identical configuration.
Since managing multiple servers normally, takes a lot of time, applying changes to every single host loosing time in looking for the password is not a a good idea.
Thus I was forced to start managing the servers in a cluster like fashion, by executing commands on a server group using a simple for bash loop etc.
To be able to use this mass execution of course I needed away either to pass on the server group password just once and issue a command on the whole server group or use a passwordless authentication ssh key pair.
Before I switched to using SSH keys to authenticate passwordless, I first tried to use a bit of tools which were claimed to be helpful in the task of executing the same commands to a group of servers. I have tested the tools pssh, sudossh and dsh but none of them was capable of logging in and executing a bunch of commands to the group of remote servers.
I gave my best to make pssh work on Debian and CentOS distributions, but even though all my experiemnts and efforts to make the so much talked about pssh to work were bad!
I’ve seen also another tool called Cluster SSH which was said to be capable of issuing commands simultaneously on a number of hosts.
Cluster SSH looked promising, however the only problem was it’s supposed to run under xterm or some kind of X graphics based terminal and therefore it did not matched my desired.
Finally I got pissed of trying these mostly useless mass command linux server administration tools and decided to come COME BACK TO THE PRIMITIVE 😉 and use the good all known, well established method of Passwordless SSH server login with ssh public/private DSA key auth.
Therefore here the problem come to this to generate one single DSA ssh authenticatoin key and replicate/copy it to the whole group of 50 servers.
These task initially seemed quite complex, but with the help of a one liner bash shell script, it seemed to be a piece of cake 😉
To achieve this task, all I had to do is:
a. Generate an SSH key with ssh-keygen command
and
b. Use a one liner shell script to copy the generated id_rsa.pub file, to each server.
and
c. Create a file containig all server IP addresses to pass to the shell script.
Here are the two lines of code you will have to use to achieve these tasks:
1. Generate a DSA ssh key
linux:~# ssh-keygen -t dsa
Generating public/private dsa key pair.
Enter file in which to save the key (/home/hipo/.ssh/id_dsa): y
Enter passphrase (empty for no passphrase):
Enter same passphrase again:
Your identification has been saved in y.
Your public key has been saved in y.pub.
The key fingerprint is:
b0:28:48:a2:60:65:5a:ed:1b:9d:6c:ff:5f:37:03:e3 hipo@www.pc-freak.net
Here press enter few times and be sure not to fill in any passphrase when asked ’bout it.
2. Create a file containing all server IPs
Just create a file let’s say server-list.txt and make sure you include all the server IPs, one per line.
3. Use the following little script to upload the newly generated id_dsa.pub to the server list
linux:~# while read line; do ssh-copy-id -i ~/.ssh/id_dsa.pub root@"$line"; done < server-list.txt
Now you will have to paste the server password for about 50 times (if you have a file with 50 servers), however the good news is it will be just a wait and paste 50 times, if the servers are all configured to have the same root administrator pass (which was the case with me).
So until you do the boring pasting part, you can start up a nice music and enjoy 😉
Cheers 😉
Tags: administration tools, authentication, BACK, CentOS, course, distributions, DSA, dsh, fashion, file, hipo, host, hosts, Linux, linux distribution, mass, mass execution, none, passphrase, password, PRIMITIVE, pssh, root, server administration, server group, server groups, server login, servers, Shell, ssh server, terminal, time, tool, work, xterm
Posted in Linux, Linux and FreeBSD Desktop, Programming, System Administration | 2 Comments »


How to install and configure Jabber Server (Ejabberd) on Debian Lenny GNU / Linux
Wednesday, December 28th, 2011I've recently installed a jabber server on one Debian Lenny server and hence decided to describe my installations steps hoping this would help ppl who would like to run their own jabber server on Debian . After some research of the jabber server softwares available, I decided to install Ejabberd
The reasons I choose Ejabberd is has rich documentation, good community around the project and the project in general looks like one of the best free software jabber servers available presently. Besides that ejabberd doesn't need Apache or MySQL and only depends on erlang programming language.
Here is the exact steps I followed to have installed and configured a running XMPP jabber server.
1. Install Ejabberd with apt
The installation of Ejabberd is standard, e.g.:
debian:~# apt-get --yes install ejabberd
Now as ejabberd is installed, some minor configuration is necessery before the server can be launched:
2. Edit /etc/ejabberd/ejabberd.cfg
Inside I changed the default settings for:
a) Uncomment%%override_acls.. Changed:
%%%% Remove the Access Control Lists before new ones are added.%%%%override_acls.to
%%
%% Remove the Access Control Lists before new ones are added.
%%
override_acls.
b) Admin User from:
%% Admin user
{acl, admin, {user, "", "example.com"}}.
to
%% Admin user
{acl, admin, {user, "admin", "jabber.myserver-host.com"}}.
c) default %% Hostname of example.com to my real hostname:
%% Hostname
{hosts, ["jabber.myserver-host.com"]}.
The rest of the configurations in /etc/ejabberd/ejabberd.cfg can stay like it is, though it is interesting to read it carefully before continuing as, there are some config timings which might prevent the XMPP server from user brute force attacks as well as few other goodies like for example (ICQ, MSN , Yahoo etc.) protocol transports.
3. Add iptables ACCEPT traffic (allow) rules for ports which are used by Ejabberd
The minimum ACCEPT rules to add are:
/sbin/iptables -A INPUT -p tcp -m tcp --dport 22 -j ACCEPT
/sbin/iptables -A INPUT -p tcp -m tcp --dport 5222 -j ACCEPT
/sbin/iptables -A INPUT -p udp -m udp --dport 5222 -j ACCEPT
/sbin/iptables -A INPUT -p tcp -m tcp --dport 5223 -j ACCEPT
/sbin/iptables -A INPUT -p udp -m udp --dport 5223 -j ACCEPT
/sbin/iptables -A INPUT -p tcp -m tcp --dport 5269 -j ACCEPT
/sbin/iptables -A INPUT -p udp -m udp --dport 5269 -j ACCEPT
/sbin/iptables -A INPUT -p tcp -m tcp --dport 5280 -j ACCEPT
/sbin/iptables -A INPUT -p udp -m udp --dport 5280 -j ACCEPT
/sbin/iptables -A INPUT -p tcp -m tcp --dport 4369 -j ACCEPT
/sbin/iptables -A INPUT -p udp -m udp --dport 4369 -j ACCEPT
/sbin/iptables -A INPUT -p tcp -m tcp --dport 53873 -j ACCEPT
Of course if there is some specific file which stores iptables rules or some custom firewall these rules has to be added / modified to fit appropriate place or chain.
4. Restart ejabberd via init.d script
debian:~# /etc/init.d/ejabberd restart
Restarting jabber server: ejabberd is not running. Starting ejabberd.
5. Create ejabberd necessery new user accounts
debian:~# /usr/sbin/ejabberdctl register admin jabber.myserver-host.com mypasswd1
etc.debian:~# /usr/sbin/ejabberdctl register hipo jabber.myserver-host.com mypasswd2
debian:~# /usr/sbin/ejabberdctl register newuser jabber.myserver-host.com mypasswd3
debian:~# /usr/sbin/ejabberdctl register newuser1 jabber.myserver-host.com mypasswd4
...
ejabberdctl ejabberd server client (frontend) has multiple other options and the manual is a good reading.
One helpful use of ejabberdctl is:
debian:~# /usr/sbin/ejabberdctl status
Node ejabberd@debian is started. Status: started
ejabberd is running
ejabberctl can be used also to delete some existent users, for example to delete the newuser1 just added above:
debian:~# /usr/sbin/ejabberdctl unregister newuser jabber.myserver-host.com
6. Post install web configurations
ejabberd server offers a web interface listening on port 5280, to access the web interface right after it is installed I used URL: http://jabber.myserver-host.com:5280/admin/
To login to http://jabber.myserver-host.com:5280/admin/ you will need to use the admin username previously added in this case:
admin@jabber.myserver-host.com mypasswd1
Anyways in the web interface there is not much of configuration options available for change.
7. Set dns SRV records
I'm using Godaddy 's DNS for my domain so here is a screenshot on the SRV records that needs to be configured on Godaddy:
In the screenshto Target is the Fually qualified domain hostname for the jabber server.
Setting the SRV records for the domain using Godaddy's DNS could take from 24 to 48 hours to propagate the changes among all the global DNS records so be patient.
If instead you use own custom BIND DNS server the records that needs to be added to the respective domain zone file are:
_xmpp-client._tcp 900 IN SRV 5 0 5222 jabber.myserver-host.com.
_xmpp-server._tcp 900 IN SRV 5 0 5269 jabber.myserver-host.com.
_jabber._tcp 900 IN SRV 5 0 5269 jabber.myserver-host.com.
8. Testing if the SRV dns records for domain are correct
debian:~$ nslookup
> set type=SRV
> jabber.myserver-host.com
...
> myserver-host.com
If all is fine above nslookup request should return the requested domain SRV records.
You might be wondering what is the purpose of setting DNS SRV records at all, well if your jabber server has to communicate with the other jabber servers on the internet using the DNS SRV record is the way your server will found the other ones and vice versa.
DNS records can also be checked with dig for example
$ dig SRV _xmpp-server._tcp.mydomain.net
[…]
;; QUESTION SECTION:
;_xmpp-server._tcp.mydomain.net. IN SRV
;; ANSWER SECTION:
_xmpp-server._tcp.mydomain.net. 259200 IN SRV 5 0 5269 jabber.mydomain.net.
;; ADDITIONAL SECTION:
jabber.mydomain.net. 259200 IN A 11.22.33.44
;; Query time: 109 msec
;; SERVER: 212.27.40.241#53(212.27.40.241)
;; WHEN: Sat Aug 14 14:14:22 2010
;; MSG SIZE rcvd: 111
9. Debugging issues with ejabberd
Ejabberd log files are located in /var/log/ejabberd , you will have to check the logs in case of any issues with the jabber XMPP server. Here is the three files which log messages from ejabberd:
debian:~$ ls -1 /var/log/ejabberd/
ejabberd.log
erl_crash.dump
sasl.log
I will not get into details on the logs as the best way to find out about them is to read them 😉
10. Testing ejabberd server with Pidgin
To test if my Jabber server works properly I used Pidgin universal chat client . However there are plenty of other multiplatform jabber clients out there e.g.: Psi , Spark , Gajim etc.
Here is a screenshot of my (Accounts -> Manage Accounts -> Add) XMPP protocol configuration
Tags: admin, apache, best free software, brute force, cfg, com, configure, custom, default hostname, default settings, DNS, doesn, dport, ejabberd, ejabberdctl, exact steps, file, GNU, goodies, hostname, hosts, init, INPUT, Install, installation, Jabber, Linux, Lists, mypasswd, necessery, override, ports, ppl, programming language, Protocol, quot, quot quot, rich documentation, server, servers, software, tcp, transports, uncomment, User, xmpp
Posted in Linux, System Administration, Various | 8 Comments »