Archive for March, 2012

How to resolve (fix) WordPress wp-cron.php errors like “POST /wp-cron.php?doing_wp_cron HTTP/1.0″ 404” / What is wp-cron.php and what it does

Monday, March 12th, 2012

fix wordpress wp-cron.php 404 HTTP error, what is wp-cron.php schedule logo

One of the WordPress websites hosted on our dedicated server produces all the time a wp-cron.php 404 error messages like:

xxx.xxx.xxx.xxx - - [15/Apr/2010:06:32:12 -0600] "POST /wp-cron.php?doing_wp_cron HTTP/1.0

I did not know until recently, whatwp-cron.php does, so I checked in google and red a bit. Many of the places, I've red are aa bit unclear and doesn't give good exlanation on what exactly wp-cron.php does. I wrote this post in hope it will shed some more light on wp-config.php and how this major 404 issue is solved..
So

what is wp-cron.php doing?


  • wp-cron.php is acting like a cron scheduler for WordPress.
  • wp-cron.php is a wp file that controls routine actions for particular WordPress install.
  • Updates the data in SQL database on every, request, every day or every hour etc. – (depending on how it's set up.).
  • wp-cron.php executes automatically by default after EVERY PAGE LOAD!
  • Checks all pending comments for spam with Akismet (if akismet or anti-spam plugin alike is installed)
  • Sends all scheduled emails (e.g. sent a commentor email when someone comments on his comment functionality, sent newsletter subscribed persons emails etc.)
  • Post online scheduled articles for a day and time of particular day

Suppose you're writting a new post and you want to take advantage of WordPress functionality to schedule a post to appear Online at specific time:

What is wordpress wp-cron.php, Scheduling wordpress post screenshot

The Publish Immediately, field execution is being issued on the scheduled time thanks to the wp-cron.php periodic invocation.

Another example for wp-cron.php operation is in handling flushing of WP old HTML Caches generated by some wordpress caching plugin like W3 Total Cache
wp-cron.php takes care for dozens of other stuff silently in the background. That's why many wordpress plugins are depending heavily on wp-cron.php proper periodic execution. Therefore if something is wrong with wp-config.php, this makes wordpress based blog or website partially working or not working at all.
 

Our company wp-cron.php errors case

In our case the:
212.235.185.131 – – [15/Apr/2010:06:32:12 -0600] "POST /wp-cron.php?doing_wp_cron HTTP/1.0" 404
is occuring in Apache access.log (after each unique vistor request to wordpress!.), this is cause wp-cron.php is invoked on each new site visitor site request.
This puts a "vain load" on the Apache Server, attempting constatly to invoke the script … always returning not found 404 err.

As a consequence, the WP website experiences "weird" problems all the time. An illustration of a problem caused by the impoper wp-cron.php execution is when we are adding new plugins to WP.

Lets say a new wordpress extension is download, installed and enabled in order to add new useful functioanlity to the site.

Most of the time this new plugin would be malfunctioning if for example it is prepared to add some kind of new html form or change something on some or all the wordpress HTML generated pages.
This troubles are result of wp-config.php's inability to update settings in wp SQL database, after each new user request to our site.
So the newly added plugin website functionality is not showing up at all, until WP cache directory is manually deleted with rm -rf /var/www/blog/wp-content/cache/

I don't know how thi whole wp-config.php mess occured, however my guess is whoever installed this wordpress has messed something in the install procedure.

Anyways, as I researched thoroughfully, I red many people complaining of having experienced same wp-config.php 404 errs. As I red, most of the people troubles were caused by their shared hosting prohibiting the wp-cron.php execution.
It appears many shared hostings providers choose, to disable the wordpress default wp-cron.php execution. The reason is probably the script puts heavy load on shared hosting servers and makes troubles with server overloads.

Anyhow, since our company server is adedicated server I can tell for sure in our case wordpress had no restrictions for how and when wp-cron.php is invoked.
I've seen also some posts online claiming, the wp-cron.php issues are caused of improper localhost records in /etc/hosts, after a thorough examination I did not found any hosts problems:

hipo@debian:~$ grep -i 127.0.0.1 /etc/hosts
127.0.0.1 localhost.localdomain localhost

You see from below paste, our server, /etc/hosts has perfectly correct 127.0.0.1 records.

Changing default way wp-cron.php is executed

As I've learned it is generally a good idea for WordPress based websites which contain tens of thousands of visitors, to alter the default way wp-cron.php is handled. Doing so will achieve some efficiency and improve server hardware utilization.
Invoking the script, after each visitor request can put a heavy "useless" burden on the server CPU. In most wordpress based websites, the script did not need to make frequent changes in the DB, as new comments in posts did not happen often. In most wordpress installs out there, big changes in the wordpress are not common.

Therefore, a good frequency to exec wp-cron.php, for wordpress blogs getting only a couple of user comments per hour is, half an hour cron routine.

To disable automatic invocation of wp-cron.php, after each visitor request open /var/www/blog/wp-config.php and nearby the line 30 or 40, put:

define('DISABLE_WP_CRON', true);

An important note to make here is that it makes sense the position in wp-config.php, where define('DISABLE_WP_CRON', true); is placed. If for instance you put it at the end of file or near the end of the file, this setting will not take affect.
With that said be sure to put the variable define, somewhere along the file initial defines or it will not work.

Next, with Apache non-root privileged user lets say www-data, httpd, www depending on the Linux distribution or BSD Unix type add a php CLI line to invoke wp-cron.php every half an hour:

linux:~# crontab -u www-data -e

0,30 * * * * cd /var/www/blog; /usr/bin/php /var/www/blog/wp-cron.php 2>&1 >/dev/null

To assure, the php CLI (Command Language Interface) interpreter is capable of properly interpreting the wp-cron.php, check wp-cron.php for syntax errors with cmd:

linux:~# php -l /var/www/blog/wp-cron.php
No syntax errors detected in /var/www/blog/wp-cron.php

That's all, 404 wp-cron.php error messages will not appear anymore in access.log! 🙂

Just for those who can find the root of the /wp-cron.php?doing_wp_cron HTTP/1.0" 404 and fix the issue in some other way (I'll be glad to know how?), there is also another external way to invoke wp-cron.php with a request directly to the webserver with short cron invocation via wget or lynx text browser.

– Here is how to call wp-cron.php every half an hour with lynxPut inside any non-privileged user, something like:
01,30 * * * * /usr/bin/lynx -dump "http://www.your-domain-url.com/wp-cron.php?doing_wp_cron" 2>&1 >/dev/null

– Call wp-cron.php every 30 mins with wget:

01,30 * * * * /usr/bin/wget -q "http://www.your-domain-url.com/wp-cron.php?doing_wp_cron"

Invoke the wp-cron.php less frequently, saves the server from processing the wp-cron.php thousands of useless times.

Altering the way wp-cron.php works should be seen immediately as the reduced server load should drop a bit.
Consider you might need to play with the script exec frequency until you get, best fit cron timing. For my company case there are only up to 3 new article posted a week, hence too high frequence of wp-cron.php invocations is useless.

With blog where new posts occur once a day a script schedule frequency of 6 up to 12 hours should be ok.


Boost local network performance (Increase network thoroughput) by enabling Jumbo Frames on GNU / Linux

Saturday, March 10th, 2012

Jumbo Frames boost local network performance in GNU / Linux

So what is Jumbo Frames? and why, when and how it can increase the network thoroughput on Linux?

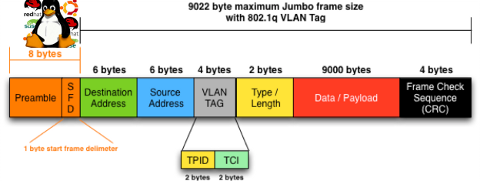
Jumbo Frames are Ethernet frames with more than 1500 bytes of payload. They can carry up to 9000 bytes of payload. Many Gigabit switches and network cards supports them.
Jumbo frames is a networking standard for many educational networks like AARNET. Unfortunately most commercial ISPs doesn't support them and therefore enabling Jumbo frames will rarely increase bandwidth thoroughput for information transfers over the internet.
Hopefully in the years to come with the constant increase of bandwidths and betterment of connectivity, jumbo frames package transfers will be supported by most ISPs as well.
Jumbo frames network support is just great for is small local – home networks and company / corporation office intranets.

Thus enabling Jumbo Frame is absolutely essential for "local" ethernet networks, where large file transfers occur frequently. Such networks are networks where, there is often a Video or Audio streaming with high quality like HD quality on servers running File Sharing services like Samba, local FTP sites,Webservers etc.

One other advantage of enabling jumbo frames is reduce of general server overhead and decrease in CPU load / (CPU usage), when transferring large or enormous sized files.Therefore having jumbo frames enabled on office network routers with GNU / Linux or any other *nix OS is vital.

Jumbo Frames traffic is supported in GNU / Linux kernel since version 2.6.17+ in earlier 2.4.x it was possible through external third party kernel patches.

1. Manually increase MTU to 9000 with ifconfig to enable Jumbo frames

debian:~# /sbin/ifconfig eth0 mtu 9000

The default MTU on most GNU / Linux (if not all) is 1500, to check the default set MTU with ifconfig:

linux:~# /sbin/ifconfig eth0|grep -i mtu
UP BROADCAST MULTICAST MTU:1500 Metric:1

To take advantage of Jumbo Frames, all that has to be done is increase the default Maximum Transmission Unit from 1500 to 9000

For those who don't know MTU is the largest physical packet size that can be transferred over the network. MTU is measured by default in bytes. If a information has to be transferred over the network which exceeds the lets say 1500 MTU (bytes), it will be chopped and transferred in few packs each of 1500 size.

MTUs differ on different netework topologies. Just for info here are the few main MTUs for main network types existing today:
 

  • 16 MBit/Sec Token Ring – default MTU (17914)
  • 4 Mbits/Sec Token Ring – default MTU (4464)
  • FDDI – default MTU (4352)
  • Ethernet – def MTU (1500)
  • IEEE 802.3/802.2 standard – def MTU (1492)
  • X.25 (dial up etc.) – def MTU (576)
  • Jumbo Frames – def max MTU (9000)

Setting the MTU packet frames to 9000 to enable Jumbo Frames is done with:

linux:~# /sbin/ifconfig eth0 mtu 9000

If the command returns nothing, this most likely means now the server can communicate on eth0 with MTUs of each 9000 and therefore the network thoroughput will be better. In other case, if the network card driver or card is not a gigabit one the cmd will return error:

SIOCSIFMTU: Invalid argument

2. Enabling Jumbo Frames on Debian / Ubuntu etc. "the Debian way"

a.) Jumbo Frames on ethernet interfaces with static IP address assigned Edit /etc/network/interfaces and you should have for each of the interfaces you would like to set the Jumbo Frames, records similar to:

Raising the MTU to 9000 if for one time can be done again manually with ifconfig

debian:~# /sbin/ifconfig eth0 mtu 9000

iface eth0 inet static
address 192.168.0.5
network 192.168.0.0
gateway 192.168.0.254
netmask 255.255.255.0
mtu 9000

For each of the interfaces (eth1, eth2 etc.), add a chunk similar to one above changing the changing the IPs, Gateway and Netmask.

If the server is with two gigabit cards (eth0, eth1) supporting Jumbo frames add to /etc/network/interfaces :

iface eth0 inet static
address 192.168.0.5
network 192.168.0.0
gateway 192.168.0.254
netmask 255.255.255.0
mtu 9000

iface eth1 inet static
address 192.168.0.6
network 192.168.0.0
gateway 192.168.0.254
netmask 255.255.255.0
mtu 9000

b.) Jumbo Frames on ethernet interfaces with dynamic IP obtained via DHCP

Again in /etc/network/interfaces put:

auto eth0
iface eth0 inet dhcp
post-up /sbin/ifconfig eth0 mtu 9000

3. Setting Jumbo Frames on Fedora / CentOS / RHEL "the Redhat way"

Enabling jumbo frames on all Gigabit lan interfaces (eth0, eth1, eth2 …) in Fedora / CentOS / RHEL is done through files:
 

  • /etc/sysconfig/network-script/ifcfg-eth0
  • /etc/sysconfig/network-script/ifcfg-eth1

etc. …
append in each one at the end of the respective config:

MTU=9000

[root@fedora ~]# echo 'MTU=9000' >> /etc/sysconfig/network-scripts/ifcfg-eth


a quick way to set Maximum Transmission Unit to 9000 for all network interfaces on on Redhat based distros is by executing the following loop:

[root@centos ~]# for i in $(echo /etc/sysconfig/network-scripts/ifcfg-eth*); do \echo 'MTU=9000' >> $i
done

P.S.: Be sure that all your interfaces are supporting MTU=9000, otherwise increase while the MTU setting is set will return SIOCSIFMTU: Invalid argument err.
The above loop is to be used only, in case you have a group of identical machines with Lan Cards supporting Gigabit networks and loaded kernel drivers supporting MTU up to 9000.

Some Intel and Realtek Gigabit cards supports only a maximum MTU of 7000, 7500 etc., so if you own a card like this check what is the max MTU the card supports and set it in the lan device configuration.
If increasing the MTU is done on remote server through SSH connection, be extremely cautious as restarting the network might leave your server inaccessible.

To check if each of the server interfaces are "Gigabit ready":

[root@centos ~]# /sbin/ethtool eth0|grep -i 1000BaseT
1000baseT/Half 1000baseT/Full

If you're 100% sure there will be no troubles with enabling MTU > 1500, initiate a network reload:

[root@centos ~]# /etc/init.d/network restart
...

4. Enable Jumbo Frames on Slackware Linux

To list the ethernet devices and check they are Gigabit ones issue:

bash-4.1# lspci | grep [Ee]ther
0c:00.0 Ethernet controller: D-Link System Inc Gigabit Ethernet Adapter (rev 11)
0c:01.0 Ethernet controller: D-Link System Inc Gigabit Ethernet Adapter (rev 11)

Setting up jumbo frames on Slackware Linux has two ways; the slackware way and the "universal" Linux way:

a.) the Slackware way

On Slackware Linux, all kind of network configurations are done in /etc/rc.d/rc.inet1.conf

Usual config for eth0 and eth1 interfaces looks like so:

# Config information for eth0:
IPADDR[0]="10.10.0.1"
NETMASK[0]="255.255.255.0"
USE_DHCP[0]=""
DHCP_HOSTNAME[1]=""
# Config information for eth1:
IPADDR[1]="10.1.1.1"
NETMASK[1]="255.255.255.0"
USE_DHCP[1]=""
DHCP_HOSTNAME[1]=""

To raise the MTU to 9000, the variables MTU[0]="9000" and MTU[1]="9000" has to be included after each interface config block, e.g.:

# Config information for eth0:
IPADDR[0]="172.16.1.1"
NETMASK[0]="255.255.255.0"
USE_DHCP[0]=""
DHCP_HOSTNAME[1]=""
MTU[0]="9000"
# Config information for eth1:
IPADDR[1]="10.1.1.1"
NETMASK[1]="255.255.255.0"
USE_DHCP[1]=""
DHCP_HOSTNAME[1]=""
MTU[1]="9000"

bash-4.1# /etc/rc.d/rc.inet1 restart
...

b.) The "Universal" Linux way

This way is working on most if not all Linux distributions.
Insert in /etc/rc.local:

/sbin/ifconfig eth0 mtu 9000 up
/sbin/ifconfig eth1 mtu 9000 up

5. Check if Jumbo Frames are properly enabled

There are at least two ways to display the MTU settings for eths.

a.) Using grepping the MTU from ifconfig

linux:~# /sbin/ifconfig eth0|grep -i mtu
UP BROADCAST MULTICAST MTU:9000 Metric:1
linux:~# /sbin/ifconfig eth1|grep -i mtu
UP BROADCAST MULTICAST MTU:9000 Metric:1

b.) Using ip command from iproute2 package to get MTU

linux:~# ip route get 192.168.2.134
local 192.168.2.134 dev lo src 192.168.2.134
cache mtu 9000 advmss 1460 hoplimit 64

linux:~# ip route show dev wlan0
192.168.2.0/24 proto kernel scope link src 192.168.2.134
default via 192.168.2.1

You see MTU is now set to 9000, so the two server lans, are now able to communicate with increased network thoroughput.
Enjoy the accelerated network transfers 😉


 

How to increase brightness on Fujitsu Siemens Amilo PI22515 notebook with Slackware Linux

Friday, March 9th, 2012

Increase LCD screen brightness on Fujitsu Siemens Amilo laptop with Linux Slackware

A friend of mine has Fujitsu Siemens Amilo laptop and is full time using his computer with Slackware Linux.

He is quite happy with Slackware Linux 13.37 on the laptop, but unfortunately sometimes his screen brightness lowers. One example when the screen gets darkened is when he switch the computer on without being plugged in the electricity grid. This lowered brightness makes the screen un-user friendly and is quite tiring for the eye …

By default the laptop has the usual function keys and in theory pressing Function (fn) + F8 / F7 – should increase / decrease the brightness with no problems, however on Slackware Linux (and probably on other Linuxes too?), the function keys are not properly recognized and not responding whilst pressed.
I used to have brigtness issues on my Lenovo notebook too and remember how irritating this was.
After a bit of recalling memories on how I solved this brightness issues I remembered the screen brigthness on Linux is tunable through /proc virtual (memory) filesystem.

The laptop (Amilo) Fujitsu Siemens video card is:

lspci |grep -i vga
00:02.0 VGA compatible controller: Intel Corporation Mobile GM965/GL960 Integrated Graphics Controller (primary) (rev 03)

I took a quick look in /proc and found few files called brightness:
 

  • /proc/acpi/video/GFX0/DD01/brightness
  • /proc/acpi/video/GFX0/DD02/brightness
  • /proc/acpi/video/GFX0/DD03/brightness
  • /proc/acpi/video/GFX0/DD04/brightness
  • /proc/acpi/video/GFX0/DD05/brightness

cat-ting /proc/acpi/video/GFX0/DD01/brightness, /proc/acpi/video/GFX0/DD03/brightness, /proc/acpi/video/GFX0/DD04/brightness all shows not supported and therefore, they cannot be used to modify brightness:

bash-4.1# for i in $(/proc/acpi/video/GFX0/DD0{1,3,4,5}/brightness); do \
cat $i;
done
<not supported>
<not supported>
<not supported>
<not supported>

After a bit of testing I finally succeeded in increasing the brightness.
Increasing the brightness on the notebook Intel GM965 video card model is done, through file:

/proc/acpi/video/GFX0/DD02/brightness

To see all the brightness levels the Fujitsu LCD display supports:

bash-4.1# cat /proc/acpi/video/GFX0/DD02/brightness
levels: 13 25 38 50 63 75 88 100
current: 25

As you can see the dark screen was caused cause the current: brightness is set to a low value of 25.
To light up the LCD screen and make the screen display fine again, I increased the brightness to the maximum level 100, e.g.:

bash-4.1# echo '100' > /proc/acpi/video/GFX0/DD02/brigthness

Just for the fun, I've written also a two lines script which gradually increases LCDs brightness 🙂

bash-4.1# echo '13' > /proc/acpi/video/GFX0/DD02/brightness;
bash-4.1# for i in \
$(cat /proc/acpi/video/GFX0/DD02/brightness|grep 'levels'|sed -e 's#levels:##g'); do \
echo $i > /proc/acpi/video/GFX0/DD02/brightness; sleep 1; \done

fujitsu_siemens_brightness_fun.sh script is fun to observe in changing the LCD screen gradually in one second intervals 🙂

Here is also a tiny program that reduces and increases the notebook laptop brightness written in C. My friend Dido, coded it in just few minutes just for the fun 🙂
To permanently solve the issues with darkened screen on boot time it is a good idea to include echo '100' > /proc/acpi/video/GFX0/DD02/brigthness in /etc/rc.local:

bash-4.1# echo '100' > /proc/acpi/video/GFX0/DD02/brigthness

I've also written another Universal Linux Increase laptop screen brightness Shell script which should be presumable also working for all Laptop models running Linux 🙂

My maximize_all_linux_laptops_brightness.sh "universal increase Linux brightness" script is here
I'll be glad to hear from people who had tested the script on other laptops and can confirm it works fine for them.
 

diskinfo Linux hdparm FreeBSD equivalent command for disk info and benchmarking

Thursday, March 8th, 2012

FreeBSD Linux hdparm equivalent is diskinfo artistic logo

On Linux there is the hdparm tool for various hard disk benchmarking and extraction of hard disk operations info.
As the Linux manual states hdparmget/set SATA/IDE device parameters

Most Linux users should already know it and might wonder if there is hdparm port or equivalent for FreeBSD, the aim of this short post is to shed some light on that.

The typical use of hdparm is like this:

linux:~# hdparm -t /dev/sda8

/dev/sda8:
Timing buffered disk reads: 76 MB in 3.03 seconds = 25.12 MB/sec
linux:~# hdparm -T /dev/sda8
/dev/sda8:
Timing cached reads: 1618 MB in 2.00 seconds = 809.49 MB/sec

The above output here is from my notebook Lenovo R61i.
If you're looking for alternative command to hdparm you should know in FreeBSD / OpenBSD / NetBSD, there is no exact hdparm equivalent command.
The somehow similar hdparm equivallent command for BSDs (FreeBSD etc.) is:
diskinfo

diskinfo is not so feature rich as linux's hdparm. It is just a simple command to show basic information for hard disk operations without no possibility to tune any hdd I/O and seek operations.
All diskinfo does is to show statistics for a hard drive seek times I/O overheads. The command takes only 3 arguments.

The most basic and classical use of the command is:

freebsd# diskinfo -t /dev/ad0s1a
/dev/ad0s1a
512 # sectorsize
20971520000 # mediasize in bytes (20G)
40960000 # mediasize in sectors
40634 # Cylinders according to firmware.
16 # Heads according to firmware.
63 # Sectors according to firmware.
ad:4JV48BXJs0s0 # Disk ident.

Seek times:
Full stroke: 250 iter in 3.272735 sec = 13.091 msec
Half stroke: 250 iter in 3.507849 sec = 14.031 msec
Quarter stroke: 500 iter in 9.705555 sec = 19.411 msec
Short forward: 400 iter in 2.605652 sec = 6.514 msec
Short backward: 400 iter in 4.333490 sec = 10.834 msec
Seq outer: 2048 iter in 1.150611 sec = 0.562 msec
Seq inner: 2048 iter in 0.215104 sec = 0.105 msec

Transfer rates:
outside: 102400 kbytes in 3.056943 sec = 33498 kbytes/sec
middle: 102400 kbytes in 2.696326 sec = 37978 kbytes/sec
inside: 102400 kbytes in 3.178711 sec = 32214 kbytes/sec

Another common use of diskinfo is to measure hdd I/O command overheads with -c argument:

freebsd# diskinfo -c /dev/ad0s1e
/dev/ad0s1e
512 # sectorsize
39112312320 # mediasize in bytes (36G)
76391235 # mediasize in sectors
75784 # Cylinders according to firmware.
16 # Heads according to firmware.
63 # Sectors according to firmware.
ad:4JV48BXJs0s4 # Disk ident.

I/O command overhead:
time to read 10MB block 1.828021 sec = 0.089 msec/sector
time to read 20480 sectors 4.435214 sec = 0.217 msec/sector
calculated command overhead = 0.127 msec/sector

Above diskinfo output is from my FreeBSD home router.

As you can see, the time to read 10MB block on my hard drive is 1.828021 (which is very high number),
this is a sign the hard disk experience too many read/writes and therefore needs to be shortly replaced with newer faster one.
diskinfo is part of the basis bsd install (bsd world). So it can be used without installing any bsd ports or binary packages.

For the purpose of stress testing hdd, or just some more detailed benchmarking on FreeBSD there are plenty of other tools as well.
Just to name a few:
 

  • rawio – obsolete in FreeBSD 7.x version branch (not available in BSD 7.2 and higher)
  • iozone, iozone21 – Tools to test the speed of sequential I/O to files
  • bonnie++ – benchmark tool capable of performing number of simple fs tests
  • bonnie – predecessor filesystem benchmark tool to bonnie++
  • raidtest – test performance of storage devices
  • mdtest – Software to test metadata performance on filsystems
  • filebench – tool for micro-benchmarking storage subsystems

Linux hdparm allows also changing / setting various hdd ATA and SATA settings. Similarly, to set and change ATA / SATA settings on FreeBSD there is the:

  • ataidle

tool.

As of time of writting ataidle is in port path /usr/ports/sysutils/ataidle/

To check it out install it as usual from the port location:

FreeBSD also has also the spindown port – a small program for handling automated spinning down ofSCSI harddrive
spindown is useful in setting values to SATA drives which has problems with properly controlling HDD power management.

To keep constant track on hard disk operations and preliminary warning in case of failing hard disks on FreeBSD there is also smartd service, just like in Linux.
smartd enables you to to control and monitor storage systems using the Self-Monitoring, Analysisand Reporting Technology System (S.M.A.R.T.) built into most modern ATA and SCSI hard disks.
smartd and smartctl are installable via the port /usr/ports/sysutils/smartmontools.

To install and use smartd, ataidle and spindown run:

freebsd# cd /usr/ports/sysutils/smartmontools
freebsd# make && make install clean
freebsd# cd /usr/ports/sysutils/ataidle/
freebsd# make && make install clean
freebsd# cd /usr/ports/sysutils/spindown/
freebsd# make && make install clean

Check each one's manual for more info.

Recommended logrorate practices on heavy loaded (busy) Apache Linux servers

Wednesday, March 7th, 2012

Apache logrotate Debian good configuration for heavy loaded servers

If you are sys admin of Apache Webserver running on Debian Linux relying on logrorate to rorate logs, you might want to change the default way logroration is done.

Little changes in the way Apache log files are served on busy servers can have positive outcomes on the overall way the server CPU units burden. A good logrotation strategy can also prevent your server from occasional extra overheads or downtimes.

The way Debian GNU / Linux process logs is well planned for small servers, however the default logroration Apache routine doesn't fit well for servers which process millions of client requests each day.

I happen to administrate, few servers which are constantly under a heavy load and have occasionally overload troubles because of Debian's logrorate default mechanism.

To cope with the situation I have made few modifications to /etc/logrorate.d/apache2 and decided to share it here hoping, this might help you too.

1. Rotate Apache acccess.log log file daily instead of weekly

On Debian Apache's logrorate script is in /etc/logrotate.d/apache2

The default file content will be like so like so:

debian:~# cat /etc/logrotate.d/apache2
/var/log/apache2/*.log {
weekly
missingok
rotate 52
size 1G
compress
delaycompress
notifempty
create 640 root adm
sharedscripts
postrotate
if [ -f "`. /etc/apache2/envvars ; echo ${APACHE_PID_FILE:-/var/run/apache2.pid}`" ]; then
/etc/init.d/apache2 reload > /dev/null
fi
endscript
}

To change the rotation from weekly to daily change:

weekly

to

#weekly

2. Disable access.log log file gzip compression

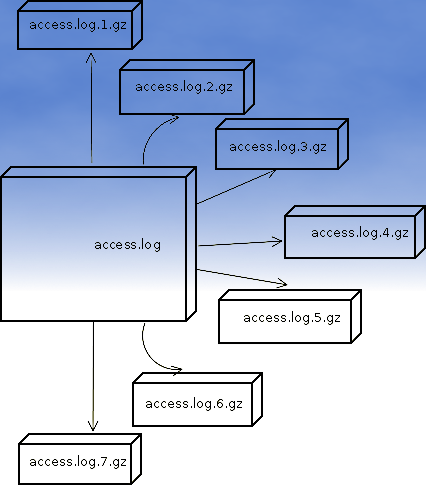
By default apache2 logrotate script is tuned ot make compression of rotated file (exmpl: copy access.log to access.log.1 and gzip it, copy access.log to access.log.2 and gzip it etc.). On servers where logs are many gigabytes, once logrotate initiates its scheduled work it will have to compress an enormous log record of apache requests. On very busy Apache servers from my experience, just for a day the log could grow up to approximately 8 / 10 Gigabytes.
I'm sure there are more busy servers out there, which log files are growing to over 100GB for just a single day.
Gzipping a 100GB file piece takes an enormous load on the CPU, as well as often takes long time. When this logrotation gzipping occurs at a moment where the servers CPU cores are already heavy loaded from Apache serving HTTP requests, Apache server becomes inaccessible to most of the clients.
Then for end clients various oddities are experienced, for example Apache dropped connection errors, webserver returning empty pages, or simply inability to respond to the client browser.
Sometimes as a result of the overload, even secure shell connection to SSHD to the server is impossible …

To prevent your server from this roration overloads remove logrorate's default access.log gzipping by commenting:

compress

to

#comment

3. Change maximum log roration by logrorate to be up to 30

By default logrorate is configured to create and keep up to 52 rotated and gzipped access.log files, changing this to a lower number is a good practice (in my view), in cases where log files grow daily to 10 or more GBs. Doing so will save a lot of disk space and reduce the chance the hard disk gets filled in because of the multiple rorated ungzipped enormous access.log files.

To tune the default keep max rorated logs to 30, change:

rotate 52

to rotate 30

The way logrorate's apache log processing on RHEL / CentOS Linux is working better on high load servers, by default on CentOS logrorate is not configured to do log gzipping at all.

Here is the default /etc/logrorate.d/httpd script for
CentOS release 5.6 (Final)

[hipo@centos httpd]$ cat /etc/logrotate.d/httpd /var/log/httpd/*log {
missingok
notifempty
sharedscripts
postrotate
/bin/kill -HUP `cat /var/run/httpd.pid 2>/dev/null` 2> /dev/null || true
endscript
}


Why and How facebook profits because of you? – People, The real facebook investors

Tuesday, March 6th, 2012

Facebook people real facebook investors, facebook profits because of you / facebook greedy money logo

Facebook is usually praised and very seldom criticized. I've seen already on a couple of occasions on the TV channel news on earthquake occasions or some kind of other calamities, where facebook was said to help the rescuing teams etc. We constantly hear how facebook has helped people point their location in disastrous situations or just helping people organize a protest against a harmful company activity. Whilst this might be true, the harms it does are quite big as well. A primary harm it does is to economy as we know it. As people are engaged in filling in Mark Zuckerberg and facebook investors pockets, they rarely think about how actually facebook gets their money?

Let me explain:

Basicly facebook makes money out of its constantly increased social network data content. This could have not been possible without the 800 000 000+ million of people who constantly post updates on facebook, create groups, post pictures, add likes, comment and post links to other facebook pages. If people had not all this volunteers (facebook users) to post all this bunch of mostly junky information, facebook inc. would not have a penny. Therefore what makes facebook grow is the people itself who willingly choose to be part of this money making machine. One would think with regular company the investors are the owners of the company shares. This classical business model is not facebook model, there it is rather different as the real investors in facebook are not the capital shareholders but the regular social network user base – this means (you and me)!.

For all those who still don't get what I'm talking about I will shortly explain.
Everyone who has a basic idea on how internet advertising works is aware that the primary origin for facebook todays profit is the left pane sky scraper field with ever changing advertisements.

Various advertisers pays facebook all the time big money for displaying those stupid advertisement. As many peole are viewing and clicking the advertisements, facebook makes billions out if its advertisers.

So far so good, facebook generates its profits out of peoples free time and delibarately information sharing you would say and you might argue me that facebook steals people (time / money). This would have been true if you don't put in the picture for a contrast, a regular blogger, who makes its daily living out of blogging.
What a regular blogger does is frequent blogging on various kind of topics of his interest. Various bloggers blog at various titles, but most of them has a few major topics which they're following.

The more articles a blogger collects and the higher the uniqueness of this information is the bigger the probability this blog to have a good users base and the more interesting content it will have for search engine robots like Google Bot Crawlers or Yahoo Bot etc. etc.
With all priod said, the higher the probability this blog to have more traffic drawn from web searches to the blog. As the blogger content increases with time when it gets 10000 or more unique articles (pages), consequently it can be used as an advertising place. A 10000 pages blog could earn a person a few hundred of euros (200, 300 EUR) per month.

Well the business scheme behind facebook is exactly the same, except they store and physically own the data of the facebook registered persons. The user posts content on his facebook wall, makes pages or does various activities which generate pages, the content gets indexed in Google and with time the overall facebook website content grows. As new users joins facebook with the increased popularity of website. The website is growing exponentially like in a atoms chain reaction.

Because of this steady content growth, it becomes an interesting place not only for advertisers but for all kind of people that use the internet.
And there you have the monetarization facebook makes billions of dollars every second because of you.  This is the shocking truth, they get their money because people click or view advertisement on each others profile, so there you're YOU make the little people who develop facebook and the original investors richer and richer with every day, where you make yourself poorer and poorer by investing your personal time in facebook instead of using it to work on something that will potentially generate you some dividents in short or long future.

Actually social network is nothing more than just a multiple blogging platform, but some marketing person come with this marketing hype work "social network".
The social network buzz word is in my view just another big marketing "white lie"!. Correct me if i'm wrong but what in fact is a "Social network?". I don't see facebook neither as social, network as network. I don't know about you but I have never made a long lasting friend or relationship using facebook so far. I think the poor Facebook creator Zuckerberg made facebook with a viral mindset. He intended it to be like a social virus and so far he succeed pretty much. I just wait and eager to see who will start the anti-virus for Zuckerberg's (facebook) – people time eating virus. 
 

Possible way to Improve wordpress performance with wp-config.php 4 config variables

Tuesday, March 6th, 2012

Wordpress improve performance wp-config.php logo chromium effect GIMP

Nowdays WordPress is ran by million of blogs and websites all around the net. I myself run wordpress for this blog in general wordpress behaves quite well in terms of performance. However as with time the visitors tend to increase, on frequently updated websites or blogs. As a consequence, the blog / website performance slowly starts to decrease as result of the MySQL server read / write operations creating I/O and CPU load overheads. Buying a new hardware and migrating the wordpress database is a possible solution, however for many small or middle size wordpress blogs en sites like mine this is not easy task. Getting a dedicated server or simply upgrading your home server hardware is expensive and time consuming process… In my efforts to maximize my hardware utilization and increase my blog decaying performance I've stumbled on the article Optimize WordPress performance with wp-config.php

According to the article there are 4 simple wp-config.php config directvies useful in decreasing a lot of queries to the MySQL server issued with each blog visitor.

define('WP_HOME','http://www.yourblog-or-siteurl.com');
define('WP_SITEURL','http://www.yourblog-or-siteurl.com');
define('TEMPLATEPATH', '/var/www/blog/wp-content/themes/default');
define('STYLESHEETPATH', '/var/www/blog/wp-content/themes/default');

1. WP_HOME and WP_SITEURL wp-config.php directvies

The WP_HOME and WP_SITEURL variables are used to hard-code the address of the wordpress blog or site url, so wordpress doesn't have to check everytime in the database on every user request to know it is own URL address.

2. TEMPLATEPATH and TEMPLATEPATH wp variables

This variables will surely improve performance to Wodpress blogs which doesn't implement caching. On wp install with enabled caching plugins like WordPress Super Cache, Hyper Cache or WordPress Db Cache is used, I don't know if this variables will have performance impact …

So far I have tested the vars on a couple of wordpress based installs with caching enabled and even on them it seems the pages load faster than before, but I cannot say this for sure as I did not check the site loading time in advance before hardcoding the vars.

Anyways even if the suggested variables couldn't make positive impact on performance, having the four variables in wp-config.php is a good practice for blogs or websites which are looking for extra clarity.
For multiple wordpress installations living on the same server, having defined the 4 vars in different wordpress seems like a good idea too.

How to disable nginx static requests access.log logging

Monday, March 5th, 2012

NGINX logo Static Content Serving Stop logging

One of the companies, where I'm employed runs nginx as a CDN (Content Delivery Network) server.
Actually nginx, today has become like a standard for delivering tremendous amounts of static content to clients.
The nginx, server load has recently increased with the number of requests, we have much more site visitors now.
Just recently I've noticed the log files are growing to enormous sizes and in reality this log files are not used at all.
As I've used disabling of web server logging as a way to improve Apache server performance in past time, I thought of implying the same little "trick" to improve the hardware utilization on the nginx server as well.

To disable logging, I proceeded and edit the /usr/local/nginx/conf/nginx.conf file, commenting inside every occurance of:

access_log /usr/local/nginx/logs/access.log main;

to

#access_log /usr/local/nginx/logs/access.log main;

Next, to load the new nginx.conf settings I did a restart:

nginx:~# killall -9 nginx; sleep 1; /etc/init.d/nginx start

I expected, this should be enough to disable completely access.log, browser request logins. Unfortunately /usr/local/nginx/logs/access.log was still displaying growing with:

nginx:~# tail -f /usr/local/nginx/logs/access.log

After a bit thorough reading of nginx.conf config rules, I've noticed there is a config directive:

access_log off;

Therefore to succesfully disable logging I had to edit config occurance of:

access_log /usr/local/nginx/logs/access.log main

to

After a bit thorough reading of nginx.conf config rules, I've noticed there is a config directive:

access_log off;

Therefore to succesfully disable logging I had to edit config occurance of:

access_log /usr/local/nginx/logs/access.log main

to

access_log /usr/local/nginx/logs/access.log main
access_log off;

Finally to load the new settings, which thanksfully this time worked, I did nginx restart:

nginx:~# killall -9 nginx; sleep 1; /etc/init.d/nginx start

And hooray! Thanks God, now nginx logging is disabled!

As a result, as expected the load avarage on the server reduced a bit 🙂

How to exclude files on copy (cp) on GNU / Linux / Linux copy and exclude files and directories (cp -r) exclusion

Saturday, March 3rd, 2012

I've recently had to make a copy of one /usr/local/nginx directory under /usr/local/nginx-bak, in order to have a working copy of nginx, just in case if during my nginx update to new version from source mess ups.

I did not check the size of /usr/local/nginx , so just run the usual:

nginx:~# cp -rpf /usr/local/nginx /usr/local/nginx-bak
...

Execution took more than 20 seconds, so I check the size and figured out /usr/local/nginx/logs has grown to 120 gigabytes.

I didn't wanted to extra load the production server with copying thousands of gigabytes so I asked myself if this is possible with normal Linux copy (cp) command?. I checked cp manual e.g. man cp, but there is no argument like –exclude or something.

Even though the cp command exclude feature is not implemented by default there are a couple of ways to copy a directory with exclusion of subdirectories of files on G / Linux.

Here are the 3 major ones:

1. Copy directory recursively and exclude sub-directories or files with GNU tar

Maybe the quickest way to copy and exclude directories is through a littke 'hack' with GNU tar nginx:~# mkdir /usr/local/nginx-new;
nginx:~# cd /usr/local/nginx#
nginx:/usr/local/nginx# tar cvf - \. --exclude=/usr/local/nginx/logs/* \
| (cd /usr/local/nginx-new; tar -xvf - )

Copying that way however is slow, in my case it fits me perfectly but for copying large chunks of data it is better not to use pipe and instead use regular tar operation + mv

# cd /source_directory
# tar cvf test.tar --exclude=dir_to_exclude/*\--exclude=dir_to_exclude1/* . \
# mv test.tar /destination_directory
# cd /destination# tar xvf test.tar

2. Copy folder recursively excluding some directories with rsync

P>eople who has experience with rsync , already know how invaluable this tool is. Rsync can completely be used as for substitute=de.a# rsync -av –exclude='path1/to/exclude' –exclude='path2/to/exclude' source destination

This example, can also be used as a solution to my copy nginx and exclude logs directory casus like so:

nginx:~# rsync -av --exclude='/usr/local/nginx/logs/' /usr/local/nginx/ /usr/local/nginx-new

As you can see for yourself, this is a way more readable for the tar, however it will not work on servers, where rsync is not installed and it is unusable if you have to do operations as a regular users on such for that case surely the GNU tar hack is more 'portable' across systems.
rsync has also Windows version and therefore, the same methodology should be working on MS Windows and good for batch scripting.
I've not tested it myself, yet as I've never used rsync on Windows, if someone has tried and it works pls drop me a short msg in comments.
3. Copy directory and exclude sub directories and files with find

Find in collaboration with cp can also be used to exclude certain directories while copying. Actually this method is better than the GNU tar hack and surely more efficient. For machines, where rsync is not installed it is just a perfect way to copy files from location to location, while excluding some directories, here is an example use of find and cp, for the above nginx case:

nginx:~# cd /usr/local/nginx
nginx:~# mkdir /usr/local/nginx
nginx:/usr/local/nginx# find . -type d \( ! -name logs \) -print -exec cp -rpf '{}' /usr/local/nginx-bak \;

This will find all directories inside /usr/local/nginx with find command print them on the screen, then execute recursive copy over each found directory and copy to /usr/local/nginx-bak

This example will work fine in the nginx case because /usr/local/nginx does not contain any files but only sub-directories. In other occwhere the directory does contain some files besides sub-directories the files had to also be copied e.g.:

# for i in $(ls -l | egrep -v '^d'); do\
cp -rpf $i /destination/directory

This will copy the files from source directory (for instance /usr/local/nginx/my_file.txt, /usr/local/nginx/my_file1.txt etc.), which doesn't belong to a subdirectory.

The cmd expression:

# ls -l | egrep -v '^d'

Lists only the files while excluding all the directories and in a for loop each of the files is copied to /destination/directory

If someone has better ideas, please share with me 🙂