Posts Tagged ‘installation’

How to remove the meta generator Content (Joomla! – Copyright) in Joomla 1.5

Thursday, December 30th, 2010

Joomla-remove-meta-generator-content-to-hide-joomla-site-install
Do you wonder How to change <meta name="Generator" content="Joomla! – Copyright (C) 2005 – 2007 Open Source Matters. All rights reserved." /> in Joomla 1.5

If yes, Here is how I've just found to remove the:


in my Joomla installation.

I need to remove that as a part of making my website not to leak out that it runs on top of Joomla.

So here is how:

1. Go to your Joomla website main root directory
2. Edit /libraries/joomla/document/html/renderer/head.php
Look for line: 83 in the /libraries/joomla/document/html/renderer/head.php
There you will notice the code:

$strHtml .= $tab.'<meta name="generator" content="'.$document->getGenerator().'" />'.$lnEnd;

In order to remove the <meta name="generator" content="Joomla …." /> change the above code to something like:

$strHtml .= $tab.'<meta name="generator" content="My Custom Web site Generator name" />'.$lnEnd;

That's all now next time you refresh your website the content="Joomla! – Copyright (C) 2005 – 2009 Open Source Matters. All rights reserved." will be no more.
Cheers! 🙂

Speeding up Apache through apache2-mpm-worker and php5-cgi on Debian / How to improve Apache performance and decrease server memory consumption

Friday, March 18th, 2011

speeding up apache through apache2-mpm-worker and php5-cgi on Debian Linux / how to improve apache performance and decrease server responce time
By default most Apache running Linux servers on the Internet are configured to use with the mpm prefork apache module
Historically prefork apache module is the predecessor of the worker module therefore it's believed to be a way more tested and reliable, if you need a critical reliable webserver configuration.

However from my experience by so far with the Apache MPM Worker I can boldly say that many of the rumors concerning the unreliabity of apache2-mpm-worker are just myths.

The old way Apache handles connections e.g. the mod prefork is the well known way that high amount of the daemons on Linux and BSD are still realying on.
When prefork is a used by Apache, every new TCP/IP connection arriving at your Linux server on the Apache configured port let's say on port 80 is being served by Apache in a way that the Apache process (mother process) parent does fork a new Apache parent copy in order to serve the new request.
Thus by using the prefork Apache needs to fork new process (if it doesn't have already an empty forked one waiting for connections) and serve the HTTP request of the new client, after the request of the client is completed the newly forked Apache usually dies (even though it again depends on the way the Apache server is configured via the Apache configuration – apache2.conf / httpd.conf etc.).

Now you can imagine how slow and memory consuming it is that all the time the parent Apache process spawns new processes, kills old ones etc. in order to fulfill the client requests.

Now just to compare the Apace mpm prefork does not use the old forking way, but relies on a few Apache processes which handles all the requests without constantly being destroyed and recreated like with the prefork module.
This saves operations and system resources, threaded programming has already been proven to be more efficient way to handle tasks and is heavily adopted in GUI programming for instance in Microsoft Windows, Mac OS X, Linux Gnome, KDE etc.

There is plenty of information and statistical data which compares Apache running with prefork and respectively worker modules online.
As the goal of this article is not to went in depths with this kind of information I would not say more on it but let you explore online a bit more about them in case if you're interested.

The purpose of this article is to explain in short how to substitute the Apache2-MPM-Prefork and how your server performance could benefit out of the use of Apache2-MPM-Worker.
On Debian the default Apache process serving module in Apache 1.3x,Apache 2.0x and 2.2x is prefork thus the installation of apache2-mpm-worker is not "a standard way" to install Apache

Deciding to swith from the default Debian apache-mpm-prefork to apache-mpm-worker is quite a serious and responsible decision and in some cases might cause troubles, if you have decided to follow my article be sure to consider all the possible negative consequences of switching to the apache worker !

Now after having said a bunch of info which might be not necessary with the experienced system admin I'll continue on with the steps to install the apache2-mpm-worker.

1. Install the apache2-mpm-worker

debian:~# apt-get install apache2-mpm-worker php5-cgi
Reading state information... Done
The following packages were automatically installed and are no longer required:
The following packages will be REMOVED apache2-mpm-prefork libapache2-mod-php5
The following NEW packages will be installed apache2-mpm-worker
0 upgraded, 1 newly installed, 2 to remove and 46 not upgraded.
Need to get 0B/259kB of archives.After this operation, 6193kB disk space will be freed.

As you can notice in below's text confirmation which will appear you will have to remove the apache2-mpm-prefork and the apache2-mpm-worker modules before you can proceed to install the apache2-mpm-prefork.

You might ask yourself if I remove my installed libphp how would I be able to use my Apache with my PHP based websites? And why does the apt package manager requires the libapache2-mod-php5 to get removed.
The explanation is simple apache2-mpm-worker is not thread safe, in other words scripts which does use the php fork(); function would not work correctly with the Apache worker module and will probably be leading to PHP and Apache crashes.
Therefore in order to install the apache mod worker it's necessary that no libapache2-mod-php5 is existent on the system.
In order to have a PHP installed on the server again you will have to use the php5-cgi deb package, this is the reason in the above apt-get command I'm also requesting apt to install the php5-cgi package next to apache2-mpm-worker.

2. Enable the cgi and cgid apache modules

debian:~# a2enmod cgi
debian:~# a2enmod cgid

3. Activate the mod_actions apache modules

debian:~# cd /etc/apache2/mods-enabled
debian:~# ln -sf ../mods-available/actions.load
debian:~# ln -sf ../mods-available/actions.conf

4. Add configuration options in order to enable mod worker to use the newly installed php5-cgi

Edit /etc/apache2/mods-available/actions.conf vim, mcedit or nano (e.g. your editor of choice and add inside:

&ltIfModule mod_actions.c>
Action application/x-httpd-php /cgi-bin/php5
</IfModule>

After completing all the above instructions, you might also need to edit your /etc/apache2/apache2.conf to tune up, how your Apache mpm worker will serve client requests.
Configuring the <IfModule mpm_worker_module> in apache2.conf is necessary to optimize your newly installed mpm_worker module for performance.

5. Configure the mod_worker_module in apache2.conf One example configuration for the mod worker is:

<IfModule mpm_worker_module>
StartServers 2
MaxClients 150
MinSpareThreads 25
MaxSpareThreads 75
ThreadsPerChild 25
MaxRequestsPerChild 0
</IfModule>

Consider the fact that this configuration is just a sample and it's in no means configured for serving Apache requests for high load Apache servers and you need to further play with the values to have a good results on your server.

6. Check that all is fine with your Apache configurations and no syntax errors are encountered

debian:~# /usr/sbin/apache2ctl -t
Syntax OK

If you get something different from Syntax OK track the error and fix it before you're ready to restart the Apache server.

7. Now restart the Apache server

debian:~# /etc/init.d/apache2 restart

All should run fine and hopefully your PHP scripts should be interpreted just fine through the php5-cgi instead of the libapache2-mod-php5.
Using the /usr/bin/php5-cgi will increase with some percentage your server CPU load but on other hand will drasticly decrease the Webserver memory consumption.
That's quite logical because the libapache2-mod-hp5 is loaded once during apache server whether a new instance of /usr/bin/php5-cgi is invoked during each of Apache requests via the mod worker.

There is one serious security flow coming with php5-cgi, DoS against a server processing scripts through php5-cgi is much easier to be achieved.
An example for a denial attack which could affect a website running with mod worker and php5-cgi, could be simulated from a simple user with a web browser which holds up the f5 or ctrl + r browser page refresh buttons.
In that case whenever php5-cgi is used the CPU load would rise drastic, one possible solution to this denial of service issues is by installing and using libapache2-mod-evasive like so:

8. Install libapache2-mod-evasive

debian:~# apt-get install libapache2-mod-evasive
The Apache mod evasive module is a nice apache module to minimize HTTP DoS and brute force attacks.
Now with mod worker through the php5-cgi, your apache should start serving requests more efficiently than before.
For some performance reasons some might even want to try out the fastcgi with the worker to boost the Apache performance but as I have never tried that I can't say how reliable a a mod worker with a fastcgi would be.

N.B. ! If you have some specific php configurations within /etc/php5/apache2/php.ini you will have to set them also in /etc/php5/cgi/php.ini before you proceed with the above instructions to install Apache otherwise your PHP scripts might not work as expected.

Mod worker is also capable to work with the standard mod php5 Apache module, but if you decide to go this route you will have to recompile your PHP lib manually from source as in Debian this option is not possible with the default php library.
This installation worked fine on Debian Lenny but suppose the same installation should work fine on Debian Squeeze as well as Debian testing/unstable.
Feedback on the afore-described mod worker installation is very welcome!

12 must have Joomla extension plugins / Essential modules for new Joomla CMS install

Thursday, June 16th, 2011

Joomla bundle of must have extensions picture

These days very often I have to install, plain new Joomla based websites. I’ve realized that since there is no structured guide to follow describing the most essential plugins that every new fresh new joomla installation is required to have.
Thus I took the time and wrote this post, as it will be useful to myself in my future new joomla based websites establishment, I also believe these guide will be useful to other Joomla enthusiasts or administrators in their daily work.

Below I will describe in short the installation, configuration and oddities I’ve faced during installment of the above described bundle of plugins on a plan Joomla 1.5 install.These article will walk through 12 joomla essential plugins that I believe every fresh Joomla installation should be equipped with.
Hope this guide will be helpful to you. Now let’s start it up:

1. JoomlaXplorer – A sophisticated web file explorer for Joomla

One of the basic modules, beneficial with a new joomla CMS install is Joomla Xptplorer . This module enables the joomla admin to browse files in a web file explorer, on the server where the joomla CMS is installed. Below you see how handy the joomla web explorer provided by the plugin is:
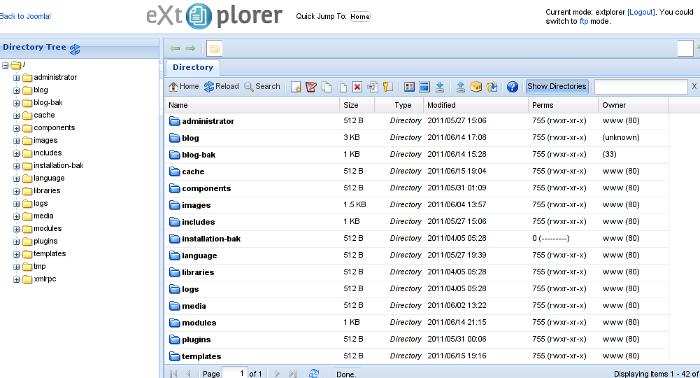
Joomla file explorer extplorer module

Installing and using the plugin is a piece of cake. To install the plugin:

a. download Joomla file Xplorer from here or from the official plugin website.

b. Install the plugin through the admin joomla menu:

Extensions -> Install/Uninstall

c. Start using the newly installed plugin by following to menus:

Components -> eXtplorer

2. JCrawler Generate easily sitemap.xml to aim the overall Joomla website SEO optimization

JCrawler logo plugin joomla

I have previously written a very through tutorial on how to install configure and generate website sitemap with Jcrawler module, You can read my article titled: How to build website sitemap.xml in Joomla here

3. sh404SEF – Make your Joomla links and content more user friendly

sh404sef Joomla Search Engine Optimization plugin

sh404SEF is a great Joomla plugin, which will seriously improve SEO and could contribute well for a website to be better indexed with major search engines.

I have previously written an article describing thoroughfully the install and use procedures for the module.
You can read the article Making your Joomla URLS Google friendly with sh404sef plugin / Simple Joomla link SEO here

4. Akeeba Backup Joomla solution

Akeeba backup Joomla Module

Installing a joomla backup solution is very essential if you does take care about your data, it often happens that server hard disk got crashes or a RAID massives got corrupted or some kind of other unexpected disaster hits the server. In these terrible times, having a website backup will save you nerves and data recovery funds, not to mention that in many cases data recovery is impossible.

Joomla has a very easy to use software for creating full website backup called Akeeba Backup

To start using the software one must:

a. Download Akeeba Backup and install it via:

Extensions -> Install/Uninstall

After the Akeeba Backup installation is over, to create your first backup, one needs to navigate to:

Components -> Akeeba Backup -> Backup Now

Each Akeeba backup (a version of the website’s files data and sql info) will be created in an archive file with the extension .jpa
The backup files are created under joomla’s website (main) root directory in directory location administrator/components/com_akeeba/backup

The Akeeba plugin also has capabilities to recover a (.jpa) backup restore point easily.
To recover a backup with the Akeeba plugin one needs to do it once again, via the plugin joomla web interface.
5. Google Analytics (place easy tracking code) in Joomla

Google Analytics Tracking Module for Joomla

a. Download the Google Analytics Tracking Module
The module is available from Joomla Extensions on joomla.org

At the current time of writting you need to download the analytics_tracking15,zip file

b. Install the Google Analytics Tracking Module;
Login as joomla admin and navigate to;

Extensions -> Install

Place the analytics_tracking15.zip url to the Install URL: field.
Again as of time of writting you need to place https://www.pc-freak.net/files/analytics_tracking15.zip;

c. Open the Module Manager

Extensions -> Module Manager

d. Click over Google Analytics Tracking Module
On the right pane you will notice in the Module Parameters the Analytics_uacct_code field. In the uacct_code field you need to paste your UA obtained from your created google-analytics account.
This code is usually something like UA-2101595-10
Now place your code their and press the save green button located near the right top of the screen. You should see the text in blue Item Saved which would indicate your UA code is stored already in the Google Analytics Tracking Module, now press the Cancel button located again on the right top.
As a last step before the Google analytics is set-up on the Joomla you need to enable the plugin to do you need to press over the tick left sided from the text reading Google Analytics Tracking Module in the Module Manager
e. Click over the Enabled button in Module Manager;
Google Analytics Tracking Module -> Enabled

6. Itprism (Facebook, Twitter etc.) Social Network share buttons Joomla plugin

ITPShare Large Social Buttons Joomla

a. to add the itpsocialbuttons to joomla Download the Itpsocialbuttons latest module files from http://itprism.com/free-joomla-extensions/social-buttons-plugin or use my mirrored module files below:

Download mod_itpsocialbuttons .zip file
Download plg_itpsocialbuttons .zip

After having the two files necessery to be installed to make the ITPSocialButtons appear on website, installation is done like with any other installation:

Extensions -> Install/Uninstall -> Upload Package File (Choose File)

Next its necessery to configure the plugin to do so, follow to menus:

Extensions -> Module Manager -> Share

You will notice the Share dialog in the list of Module Name column in Module Manager

Here is a screenshot on how the settings options for ITpsocialbuttons will look like:
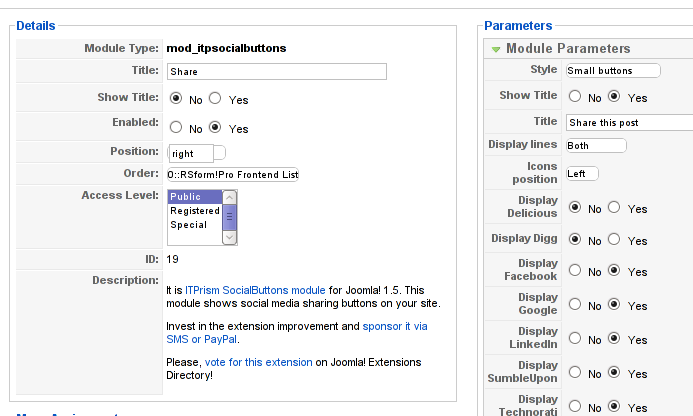
Mod ITpSocialButtons settings screen

The options which I personally changed was:

Show Title – I set this one to No as I wanted to omit the plugin title text to appear on my website.
Further on I’ve set the Enabled option to Yes to enable the plugin and choose the buttons Style option to be of a Small buttons type.
I’ve also found that the most suitable position for the Social Share buttons were to be of a right – Position .

Here is how the social network itprism share buttons looks like:

ITprism Joomla Social Share Plugin various button types

The plugin supports sharing of joomla pages to the following list of social networks:
 

  • Delicios.com
  • Digg.com
  • Facebook
  • Google Bookmarks
  • StumbleUpon
  • Technorati
  • Twitter
  • LinkedIn

The module configuration, also allows the user to configure the type of social network buttons, one wants to display on the website.

7. Joomla JCE Content Editor

This content editor is really awesome compared to the default editor TinyMCE. If you want to have an options rich content editor for Joomla, then this is the one for you 🙂
download JCE Content Editor here

After installing the JCE Joomla content editor in order to enable it as a default editor you need to go to the following location:

Site -> Global Configuration -> Default WYSIWYG Editor

There place on Editor TinyMCE and change it with Editor – JCE

Now go to edit some article, and you will see the difference in the editor 🙂

8. Add gallery Joomla capabilities with sigplus (Image Gallery Plus) and Very Simple Image Gallery

Image Gallery Plus sigplus Joomla Screenshot

Image Gallery Plus plugin (sigplus) gallery review screenshot

sigplus Image Gallery Plus is a straightforward way to add image or photo galleries to a Joomla article with a simple syntax. It takes a matter of minutes to set up a gallery but those who are looking for a powerful gallery solution will not be disappointed either: sigplus is suitable for both beginner and advanced users.

Download Sigplus Joomla Image Gallery plugin here
Using sigllus is quite easy all one has to do is use Joomla Media Manager from links:

Site -> Media Manager

Create new folder in the stories folder, let’s say New Pictures and further on use Media Manager to upload all desired pictures to be later displayed.

Being done with uploading the images you want to display, go to Article Manager :

Content -> Article Manager

From there choose your article where new uploaded pictures you want to display and type in the article:

{gallery}New Pictures{/gallery}.

Note that New Pictures is the directory just recently created as stated below, it’s important that there is no spacing between {gallery}and New Pictures, if one tries {gallery} New Pictures {/gallery} instead of {gallery}New Pictures{/gallery} an error will occur instead of the pictures being displayed in a scrolled gallery.

Sigplus Image Gallery has also a number of configuration options, which might make it look a bit more decent.
I have to say in my view the default way sigplus displays pictures is awful!

Another alternative if you don’t like Sigplus ‘s way of creating new galleries is to use Very Simple Image Gallery

Very Simple Image Gallery joomla screenshot

Here is a screenshot on a sample gallery created with Very Simple Image Gallery Joomla Plugin

You can download Very simple image gallery here

After installing the plugin. It’s use is analogous to the Sigplus . To use it likewise sigplus create new directory through Media Manager and in stories and upload your files in let’s say New Pictures1 . Later on in your article place, the code

{vsig}New Pictures1{/vsig}

Gallery will be generated automatically by the plugin. I think Simple Image Gallery is a bit more advanced and gives a better outlook to Galleries, though it’s configuration settings are much less than with SigPlus image gallery.

To add pictures comments e.g. img link alt=” and title=” tib you need to place a code within the Article manager similar to:

{vsig_c}0|Picture_1.JPG|Some sample text|Some other text{/vsig_c}
{vsig_c}0|Picture_2.JPG|Some example text|Some text{/vsig_c}
etc. ..

Note that the 0 in above example specifies the gallery number if you for instance are using a couple of galleries with Simple Image Gallery , the first one you used would be call 0 . The text specified as comments to the picture will also appear after you preview the gallery right below the picture when clicked on as a picture description in a really nice way.
9. Install Google maps plugin for Joomla
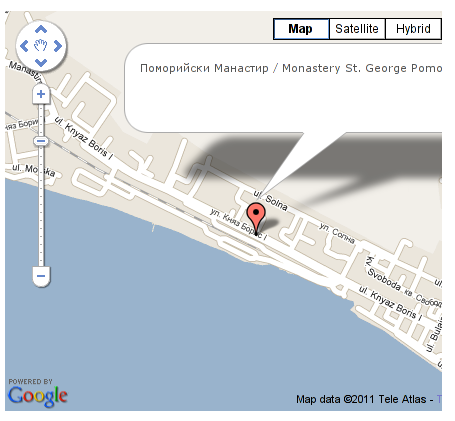
Google Maps plugin for Joomla screenshot

It’s a wise idea that every website has a location map on it’s website, for that reason Google maps is just great.
To install Google maps capability to joomla one can use a plugin called Google Maps .

You can straighly download Joomla’s Googlemap plugin from here

Afterwards use Extension Manager to install the plugin e.g. follow:

Extensions -&gr; Install/Uninstall (Choose File)

and click on Upload File & Install button.

To further enable and configure the Joomla Googlemap plugin you will have to go to the location:

Extensions -> Plugin Manager

Therein you will have to find and enable the Google Maps plugin which is to be found in the column named Plugin Manager
On my Joomla installation the plugin was located in the second page with modules, so if you don’t find the module on the listing with modules on the first page, make sure you scroll to the bottom of the page and click on Next button.

Therein in the list you will most likely notice Google Maps use the Enable button to enable it.

Next step is to configure the plugin, to do so press on the plugin name Google Maps
All configuration necessery here is to place Googlemaps API Key in the respective field (you will see it among config options).

Issuing a new Google Maps api key takes just few seconds, if you already have a gmail account just go to http://code.google.com/apis/maps/signup.html and take few seconds to issue the key.

You will get the key right on your gmail account after being issued (to repeat myself issuing takes few seconds so no worrier here).

One moreOnce having the key place it in the Googlemaps API Key field and configuring Address (which is one of the list of many options the plugin provides) you will be done with configuration.

To display a google map the location you just configured go to the Article Manager , select the article where you want the google maps location picture of your address to appear and type in the Article:

{mosmap|text='Exact street address location'|zoom='15'|zoomType='Large'|zoomNew='0'}

After you save the article a very nice Google map showing you the location’s streets will appear.
You can further conifgure a number of things related to the google map to appear, one thing you might want to play with is the zoom option which as you see in below’s code is equal to 15, e.g. zoom=’15’
Set it to another one if you want to regulate your googlemaps zoom level. For more thoroughful options take a look at the extensive plugin documentation.

10. Joomla Xmap (generating static HTML sitemap) Download Xmap from here , install it the usual plugin way.

Right after installation on the plugin succesful install screen you will notice the link component menu .
Clicking on the component menu you will be leaded to a page showing you few links Sitemap’s URL :
 

  • XML Sitemap:
  • HTML Sitemap:
  • News Sitemap:
  • Images Sitemap:

11. Add Joomla donate Paypal capabilities with Joomla PAYPAL DONATION MODULE

Paypal Donation Module Joomla Screenshot

Just recently I’ve written a a post on how to add a paypal donation capabilities to joomla, you can read my previous post here

12. Install Joomla RSForms Module (Advanced Joomla Forms Support)
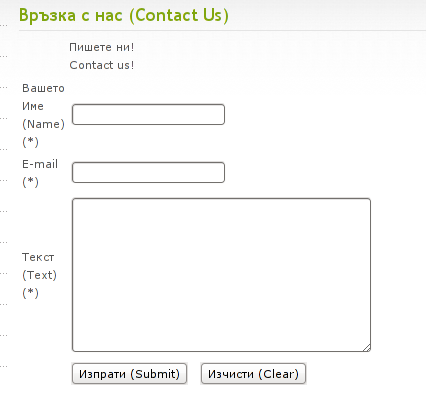
Simple Joomla RsForm contact form

If you’re planning to add a complicated form support for Joomla, there are plenty of plugins, however one that was suggested by a friend of mine which is deep in Joomla world and moreover works good on my joomla installations is RSForms

Joomla – RSForms! is free to download and has great and easy interface to create new joomla forms.

At the time of writting I use these three RSForms components on new Joomla installations:

RSform Pro 1.1.0 com
Mod RsForm for Joomla 1.5
Mod Rsform list for Joomla

For latest release of RSForms! use the link http://www.rsjoomla.com/joomla-components/rsform.html

Installation is like any other module and is done through Extensions -> Install/Uninstall menu.

After installation, setting up a new form is available from the Joomla Menus:

Components -> RSform!Pro -> Manage Forms

I would not enter in details on how to edit the default RSForms or create a new RSForm. Just take some time and learn it by trying 😉

After the rsform is ready, to enable the new form, navigate to Joomla menus:

Menus -> Main Menu

Press the New button located in the buttons bar nearby the page header in the list of options in Select Menu item Type you will notice the RSForm!Pro as an option, press on it to establish the new form in the menus.

A follow up window will appear where one can set a Title: and Alias: for the new form as well as few other options.
After finalizing the settings press on Apply button to save the settings and the new form should appear in Joomla.

Probably there are many more handy plugins, which I’m missing here thus I’ll be glad if readers suggest some more helpful essential (must have plugins) for Joomla.
Feedback on this tutorial is very welcome!
Looking forward to hear for your opinions if my article was helpful to you 😉

Linux: basic system CPU, Disk and Network resource monitoring via phpsysinfo lightweight script

Wednesday, June 18th, 2014

phpsysinfo-logo-simple-way-to-web-monitor-windows-linux-server-cpu-disk-network-resources

There are plenty of GNU / Linux softwares to monitor server performance (hard disk space, network and CPU load) and general hardware health both text based for SSH console) and from web.

Just to name a few for console precious tools, such are:

And for web based Linux / Windows server monitoring my favourite tools are:

phpsysinfo is yet another web based Linux monitoring software for small companies or home router use it is perfect for people who don't want to spend time learning how to configure complicated and robust multiple server monitoring software like Nagios or Icanga.

phpsysinfo is quick and dirty way to monitor system uptime, network, disk and memory usage, get information on CPU model, attached IDEs, SCSI devices and PCIs from the web and is perfect for Linux servers already running Apache and PHP.

1. Installing PHPSysInfo on Debian, Ubuntu and deb derivative Linux-es

PHPSysInfo is very convenient and could be prefered instead of above tools for the reason it is available by default in Debian and Ubuntu package repositories and installable via apt-get and it doesn't require any further configuration, to roll it you install you place a config and you forget it.
 

 # apt-cache show phpsysinfo |grep -i desc -A 2

Description: PHP based host information
 phpSysInfo is a PHP script that displays information about the
 host being accessed.


Installation is a piece of cake:

# apt-get install --yes phpsysinfo

Add phpsysinfo directives to /etc/apache2/conf.d/phpsysinfo.conf to make it accessible via default set Apache vhost domain under /phpsysinfo

Paste in root console:
 

cat > /etc/apache2/conf.d/phpsysinfo.conf <<-EOF
Alias /phpsysinfo /usr/share/phpsysinfo
<Location /phpsysinfo>
 Options None
 Order deny,allow
 Deny from all
 #Allow from localhost
 #Allow from 192.168.56.2
 Allow from all
</Location>
EOF


Above config will allow access to /phpsysinfo from any IP on the Internet, this could be a security hole, thus it is always better to either protect it with access .htaccess password login or allow it only from certain IPs, from which you will access it with something like:

Allow from 192.168.2.100

Then restart Apache server:

# /etc/init.d/apache2 restart


To access phpsysinfo monitoring gathered statistics, access it in a browser http://defaultdomain.com/phpsysinfo/

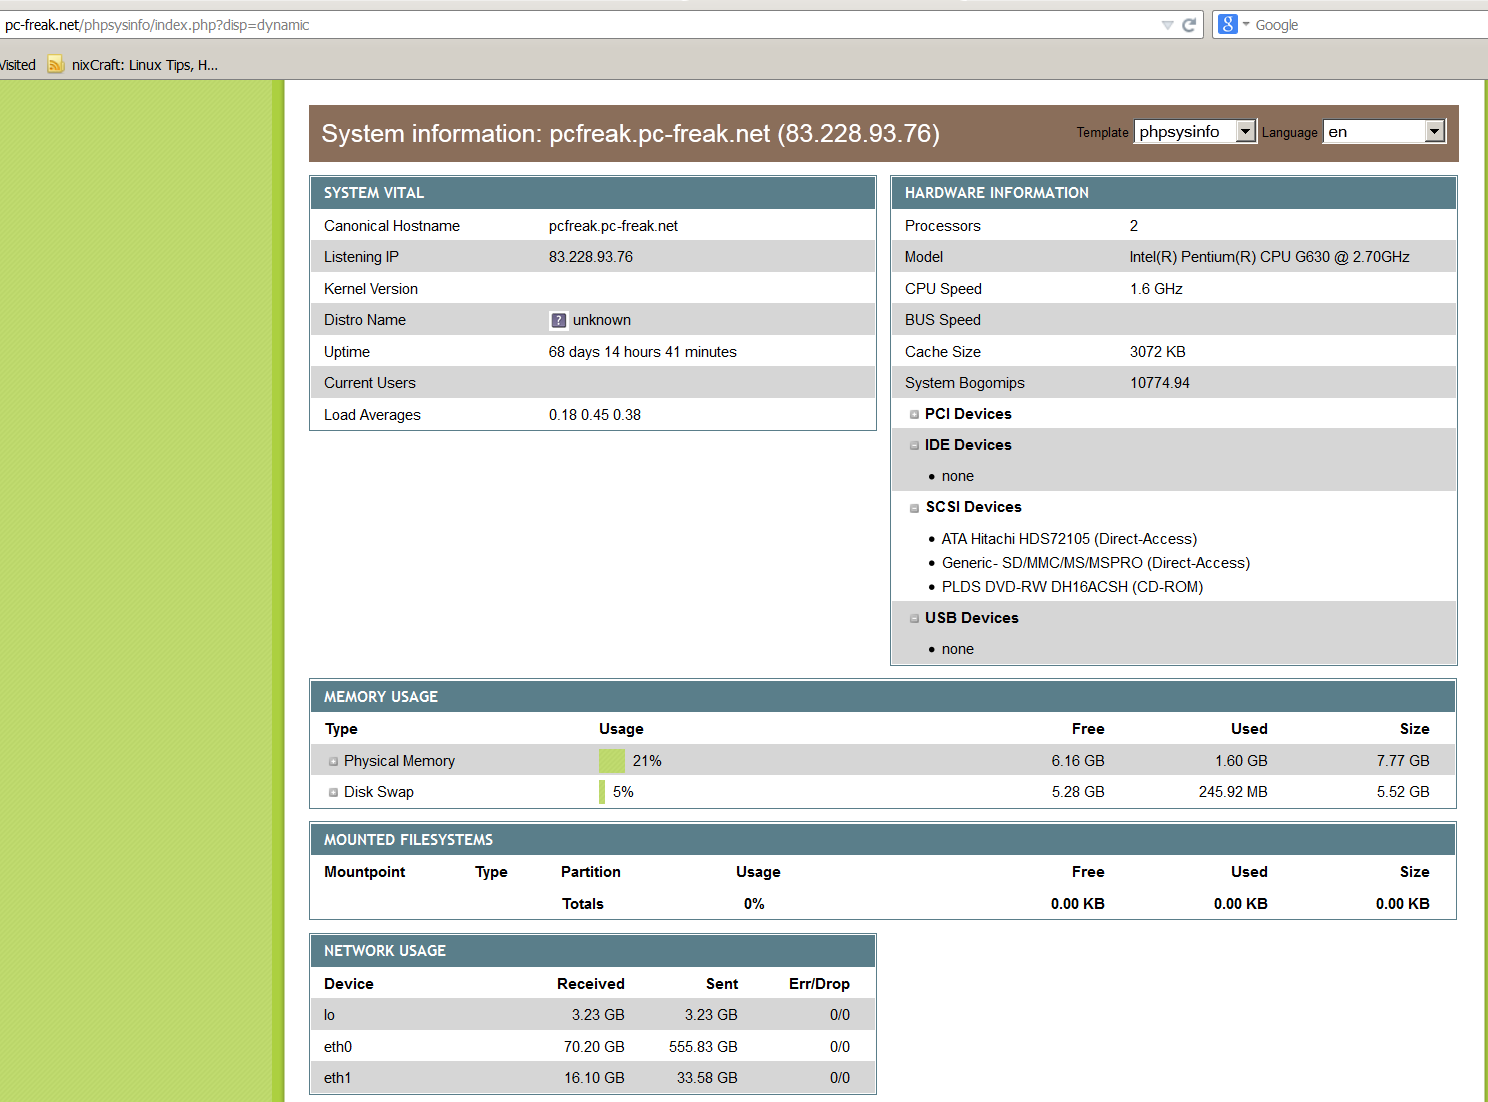
phpsysinfo_on_debian_ubuntu_linux-screenshot-quick-and-dirty-web-monitoring-for-windows-and-linux-os

2. Installing PHPSysinfo on CentOS, Fedora and RHEL Linux
 

Download and untar

# cd /var/www/html
# wget https://github.com/phpsysinfo/phpsysinfo/archive/v3.1.13.tar.gz
# tar -zxvf phpsysinfo-3.1.13.tar.gz
# ln -sf phpsysinfo-3.1.13 phpsysinfo
# mv phpsysinfo.ini.new phpsysinfo.ini


Install php php-xml and php-mbstring RPM packages
 

yum -y install php php-xml php-mbstring
...

Start Apache web service

[root@ephraim html]# /etc/init.d/httpd restart

[root@ephraim html]# ps ax |grep -i http
 8816 ?        Ss     0:00 /usr/sbin/httpd
 8819 ?        S      0:00 /usr/sbin/httpd

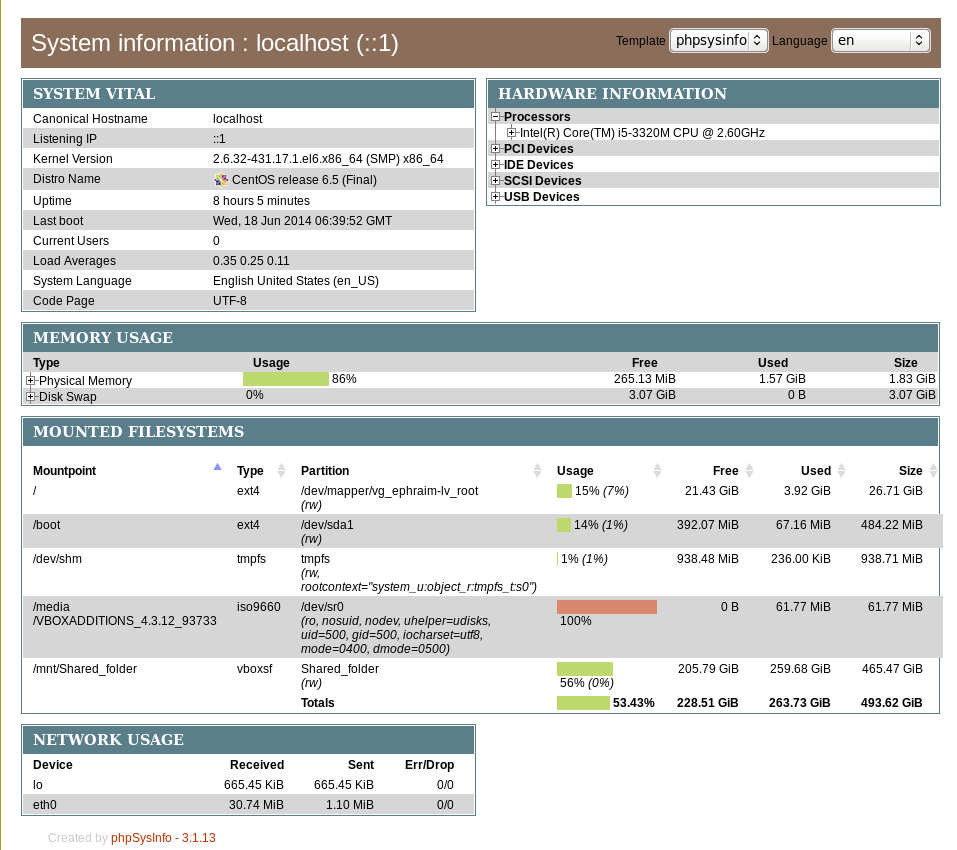
phpsysinfo-install-on-centos-rhel-fedora-linux-simple-monitoring

As PhpSysInfo is written in PHP it is also possible to install phpsysinfo on Windows.

phpsysinfo is not the only available simple monitoring server performance remotely tool, if you're looking for a little bit extended information and a better visualization interface alternative to phpsysinfo take a look at linux-dash.

In context of web monitoring other 2 web PHP script tools useful in remote server monitoring are:

OpenStatus – A simple and effective resource and status monitoring script for multiple servers.
LookingGlass – User-friendly PHP Looking Glass (Web interface to use Host (Nslookup), Ping, Mtr – Matt Traceroute)

StatusNet – Start your own hosted microblogging twitter like social network on Debian GNU / Linux

Monday, July 14th, 2014

build-your-own-microblogging-service-like-twitter-on-debian-linux-Status.net-logo
I like experimenting with free and open source projects providing social networking capabilities like twitter and facebook. Historically I have run my own social network with Elgg – Open Source Social Network Engine. I had a very positive impression from Elgg as a social engine as, there are plenty of plugins and one can use Elgg to run free alternative to very basic equivalent of facebook, problem with Elgg I had however is if is not all the time monitored it quickly fills up with spam and besides that I found it to be still buggy and not easy to update.
The other social network free software I heard of isBuddyPress which I recently installed with Multisite (MuSite) enabled.

Since BuddyPress is WordPress based and it supports all the nice wordpress plugins, my impression is social networking based on wordpress behaves much more stable and since there is Akismet for WordPress, the amount of spammer registrations is much lower than with Elgg.

Recently I started blogging much more actively and I realized everyday I learn and read too much interesting articles and I don't log them anywhere and thought I need a way besides twitter to keep flashy notes of what I'm doing reading, learning in a short notes. I don't want to use Twitter on purpose, because I don't want to improve twitter's site SEO with adding my own stuff on their website but I want to keep my notes on my own local hosted server.

As I didn't wanted to loose time with Complexity of Elgg anymore and wanted to try to something new and I know the open source microblogging social network (Twitter Equivalent) – identi.ca runs StatusNet – Free and Open Source Social software. StatusNet is well known under the motto of "Decentralized Twitter"

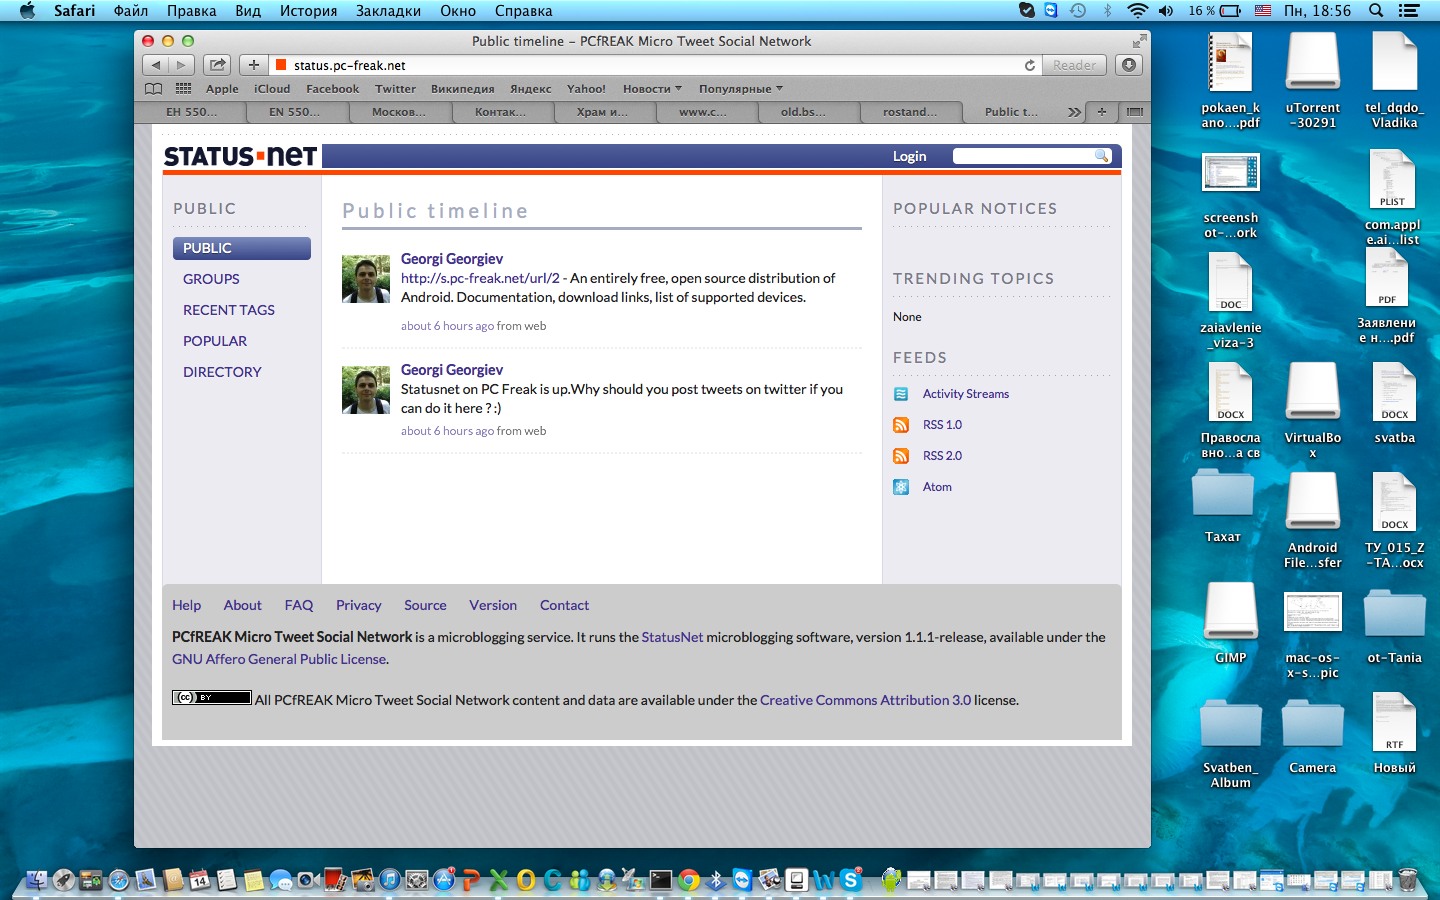
screenshot-status-net-microblogging-twitter-like-free-software-network

I took the time to grab it and install it to my home brew machine www.pc-freak.net. If you haven't seen StatusNet so far – you can check out demo of my installation here – registration is not freely opened because, i don't want spammers to break in, however if you want to give a try drop me a mail or comment below and I will open access for you ..

There is no native statusnet package for Debian Linux (as I'm running Debian) so to install it, I've grabbed statusnet.

To install StatusNet, everything was pretty straight forward and literally following instructionsf rom INSTALL file, i.e.:

# status.example.com maps to /var/www/status/
cd /var/www/status/
wget http://status.net/statusnet-0.9.6.tar.gz
tar -xzf statusnet-0.9.6.tar.gz --strip-components=1
rm statusnet-0.9.6.tar.gz
cd ..
chgrp www-data status/
chmod g+w status/
cd status/
chmod a+w avatar/ background/ file/

mysqladmin -u "root" -p "sql-root-password" create statusnet
mysql -u root -p
GRANT ALL on statusnet.* TO 'statusnetuser'@'localhost' IDENTIFIED BY 'statusnet-secret-password';

To Change default behaviour of URls to be more SEO friendly and not to show .php in URL (e.g. add so called fancy URLs – described in INSTALL):

cp htaccess.sample .htaccess


Then had to configure a VirtualHost under a subdomain http://statusnet.yourdomain.com/install.php or you can alternatively install and access it in browser via http://your-domain.com/status/install.php

An important note to open here is you have to set the URLs via which status.net will be accessed further before proceeding with the install, if you will be using HTTPS here is time to configure it and test it before proceeding with install …  Just be warned that if you don't set the URLs properly now and try to modify them further you will get a lot of issues hard to solve which will cost you a lot of time and nervee ..

If you want to enable twitter bridging in Statusnet you will need to get Twitter consumer and secret keys, to get that you have to create new application on https://dev.twitter.com/apps afterwards you will be taken to a page containing Consumer Key & Consumer Secret string.
StatusNet installation will auto generate config.php, you can further edit it manually with text editor. Content of my current statusnet config.php is here.

Most important options to change are:

$config['daemon']['user'] = 'www-data';
$config['daemon']['group'] = 'www-data';

www-data is user with which Apache is running by default on Debian Linux.

$config['site']['profile'] = 'private';

By default Status.Net will be set to run as private – e.g. it will be fitted for priv. use – messages posted will not publicly be visible. Here the possible options to choose between are:

$config['site']['profile'] = 'private';
$config['site']['profile'] = 'community';
$config['site']['profile'] = 'singleuser';
$config['site']['profile'] = 'public';

singleuser is pretty self explanatory, setting public option will open registration for any user on the internet – probably your network will quickly be filled with spam – so beware with this option. community will make statusnet publicly visible but, registration will only possible via use creation / invitation to join the network from admin.

vi /var/www/status/config.php
$config['site']['fancy'] = true;

Then to enable twitter to statusnet bridge add to config.php

vi /var/www/status/config.php

addPlugin('TwitterBridge');
$config['twitter']['enabled'] = true;
$config['twitterimport']['enabled'] = true;
$config['avatar']['path'] = '/avatar';
$config['twitter']['consumer_key'] = 'XXXXXXXX';
$config['twitter']['consumer_secret'] = 'XXXXXXXX';
# disable sharing location by default
$config['location']['sharedefault'] = 'false';

Notice, I decided to disable statusnet sharedefault folder, because i don't have a lot of free space to provide to users. If you want to let users be allowed to share files (you the space for that), you might want to set a maximum quote of uploaded files (to prevent your webserver from being DoSed – for example by too many huge uploads), here is some reasonable settings:
 

$config['attachments']['file_quota'] = 7000000;
$config['attachments']['thumb_width'] = 400;
$config['attachments']['thumb_height'] = 300;


If you want to get the best out of performance of your new statusnet microblogging service, after each modification of config.php be sure to run:


php scripts/checkschema.php

Running checkschema.php is also useful, to check whether adding new plugins to check whether plugin will not throw an error.

Here is some extra useful config.php plugins to enable:
 

addPlugin('Gravatar', array());
#addPlugin('Textile');
addPlugin('InfiniteScroll');
addPlugin('Realtime');
addPlugin('Blog');
addPlugin('SiteNoticeInSidebar');
addPlugin('WikiHashtags');
addPlugin('SubMirror');
addPlugin('LinkPreview');
addPlugin('Blacklist');


If you expect to have quickly growing base of users it is recommended to also check out whether your MySQL is tuned with mysqltuner and optimize it for performance

Another useful think you would like to do is to increased the number of Statusnet avatars in the 'following' – 'followers' – 'groups' sections on my profile page by editing

lib/groupminilist.php

and

lib/profileminilist.php

line 36 in both files.
To get the full list of possible variables that can be set in config.php run in terminal:

 php scripts/setconfig.php -a

If you happen to encounter some oddities and issues with StatusNet after installation, this is most likely to some PHP hardering on compile time or some PHP.ini functions disabled for security or some missing component to install which is described as a prerequirement in statusnet INSTALL file

to debug the issues enable statusnet logging by adding in config.php

$config['site']['logdebug'] = true;
$config['site']['logfile'] = '/var/log/statusnet.log';

By default logs produced will be quite verbose and there will be plenty of information you will probably not need and will lead to a lot of "noise", to get around this, there is the LogFilter Plugin for some reasonable logging use in config.php:

addPlugin('LogFilter', array( 'priority' => array(LOG_ERR => true,
LOG_INFO => true,
LOG_DEBUG => false),
'regex' => array('/About to push/i' => false,
'/twitter/i' => false,
'/Successfully handled item/i' => false)
));

If you want tokeep log of statusnet it is a good idea to rorate logs periodically to keep them from growing too big, to do this create in /etc/logrotate.d new files /etc/logrotate.d/statusnet with following content:

/var/log/statusnet/*.log {
daily
missingok
rotate 7
compress
delaycompress
notifempty
create 770 www-data www-data
sharedscripts
postrotate
/path/to/statusnet/scripts/stopdaemons.sh > /dev/null
/path/to/statusnet/scripts/startdaemons.sh > /dev/null
endscript
}

You will probably want to to add new Links, next to StatusNet main navigation links for logged in users, this is possible by adding new line to

lib/primarynav.php

and

lib/secondarynav.php

You will have to add a PHP context like:

 $this->action->menuItem('https://www.pc-freak.net/blog/',
                              _m('MENU','Pc-Freak.Net Blog'),
                              _('A pC Freak Blog'),
                              false,
                              'nav_pcfreak');

Once you're done with installation, make sure you change permissions or move install.php from /var/www/status, otherwise someone might overwrite your config.php and mess your installation …

chmod 000 /var/www/status/install.php There is plenty of other things to do with StatusNet (Support for communication with Jabber XMPP protocol, notification via SMS etc. There are also some plugins to add more statusnet functionality.


Enjoy micro blogging ! 🙂

Install TorrentFlux Bit Torrent Web management interface on Debian / Ubuntu Linux

Tuesday, July 15th, 2014

torrent flux logo
Torrentflux
is web based, feature-rich BitTorrent download manager.
Torrentflux is a must have installed server software for anyone who does regular torrent downloads and want to access the downloads from anywhere on the internet.

TorrentFlux is a PHP based BitTorrent controller that runs on a web
 server. It can manage all of your BitTorrent downloads from anywhere
 through a convenient and easy-to-use web interface.
 .
 TorrentFlux uses a MySQL database to manage the downloads.

 TorrentFlux enables you to run BitTorrent downloads unattended on a monitor-less or remote server 24 hours a day, while still maintaining complete control from any web browser. Now you can control your  downloading on your firewall, or keep up with downloads while on  vacation. It uses the BitTornado client to download files, and also  requires a web server with PHP.
 
 Some of the Torrentflux features:

   * Upload Torrents via URL or File Upload
   * Start, Stop, and Delete Torrents with ease
   * Advanced Torrent start options (ports, speeds, etc.)
   * Multi-user interface
   * RSS Feeds, download Torrents files with a click
   * Run several torrents at once
   * View Download Progress of all torrents at a glance
   * View drive space at a glance
   * View Torrent file meta information
   * Built-in User management and Security
   * Private Messaging
   * Themes (selectable per user)
   * Upload History


Before installing Bittorrent you will need to have a running version of Debian, Ubuntu or any other debian derivative (though it can easily be run on any Linux distro). To install AMP (Apache MySQL Server, PHP) you can follow first part of my previous article Installing Usual PHP Apache MySQL for new Debian GNU / Linux installs.

So what for is TorrentFlux Useful?
Torrenflux is precious and must have if you have to access filtered torrent from outside of your homecountry and you have a running server already in your home country in that I was using TorrentFlux to access Bulgarian Zamunda.Net Torrent Tracker from Holland and was downloading first movies from the Bulgarian Torrent Tracker to my Fluxbox installed on my Dobrich home router and then used FTP to transfer movies to the Netherlands. Talking about many people choose to also install VSFTP and use it together with Torrentflux …

1. Install TorrentFlux and its dependencies (BitTornado, Bittorrent, Zip, Unzip, Bzip etc.) the "Debian Way"


On my Debian 7 Wheezy home machine  I run

apt-get install –yes bzip2 php5-gd php5-cli unrar-free grep python net-tools mawk wget unzip cksfv vlc-nox uudeview python-crypto libxml-simple-perl libxml-dom-perl libdbd-mysql-perl bittorrent bittornado


a) Install TorrentFlux the Debian Way

apt-get install –yes torrentflux


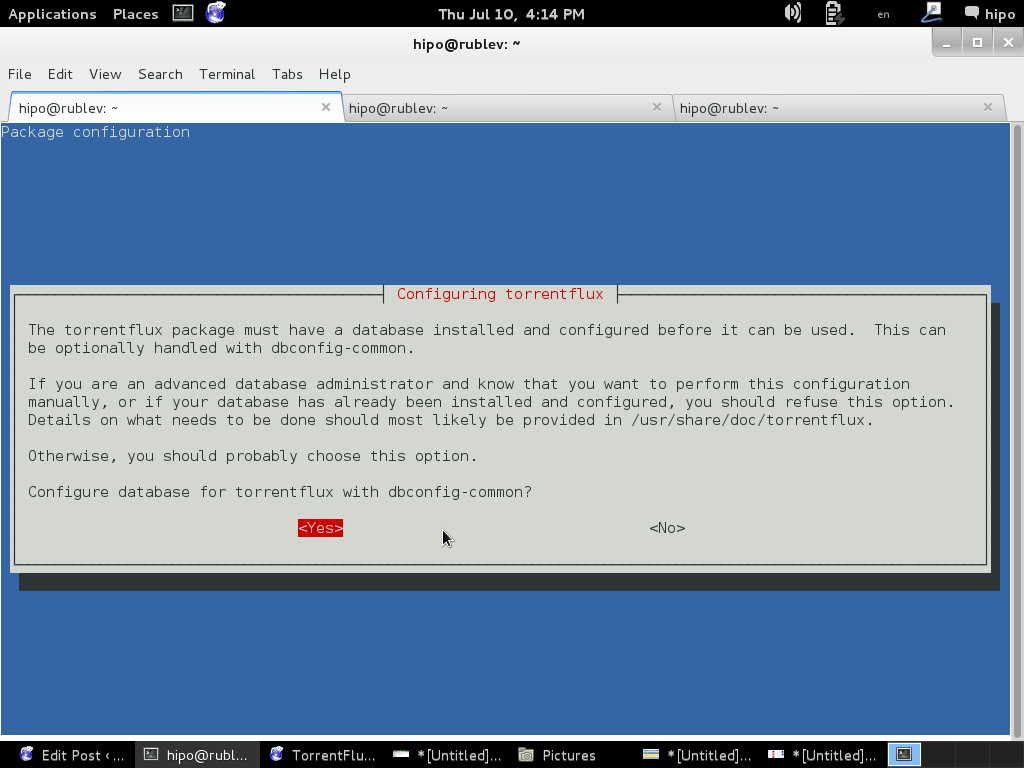
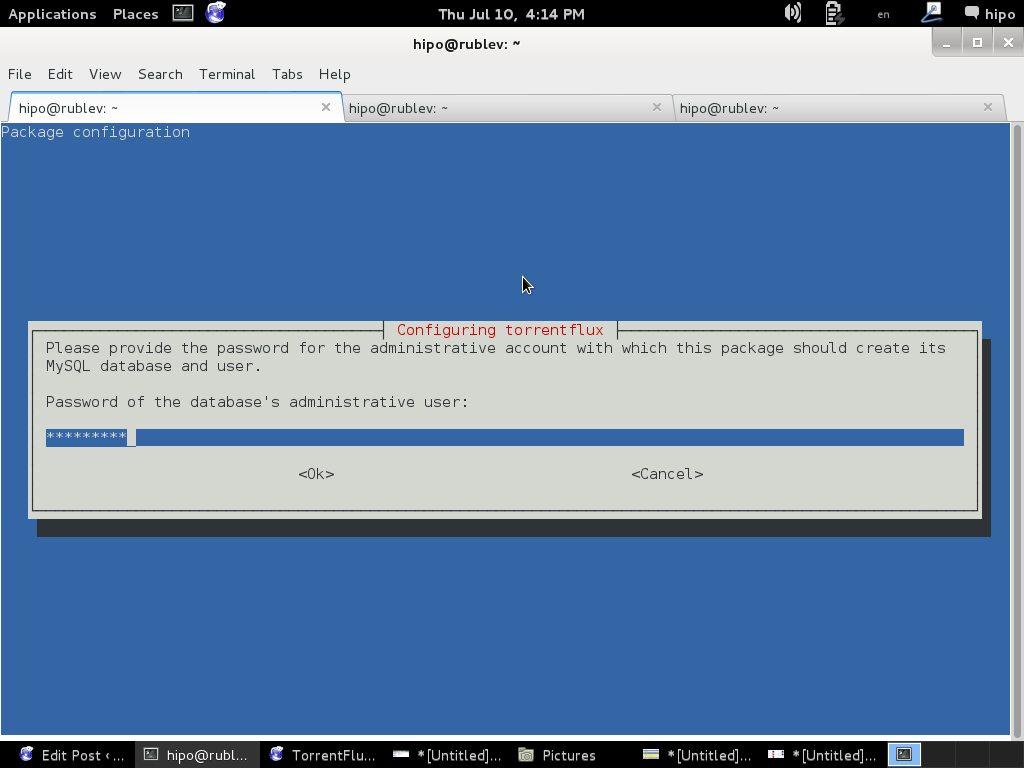
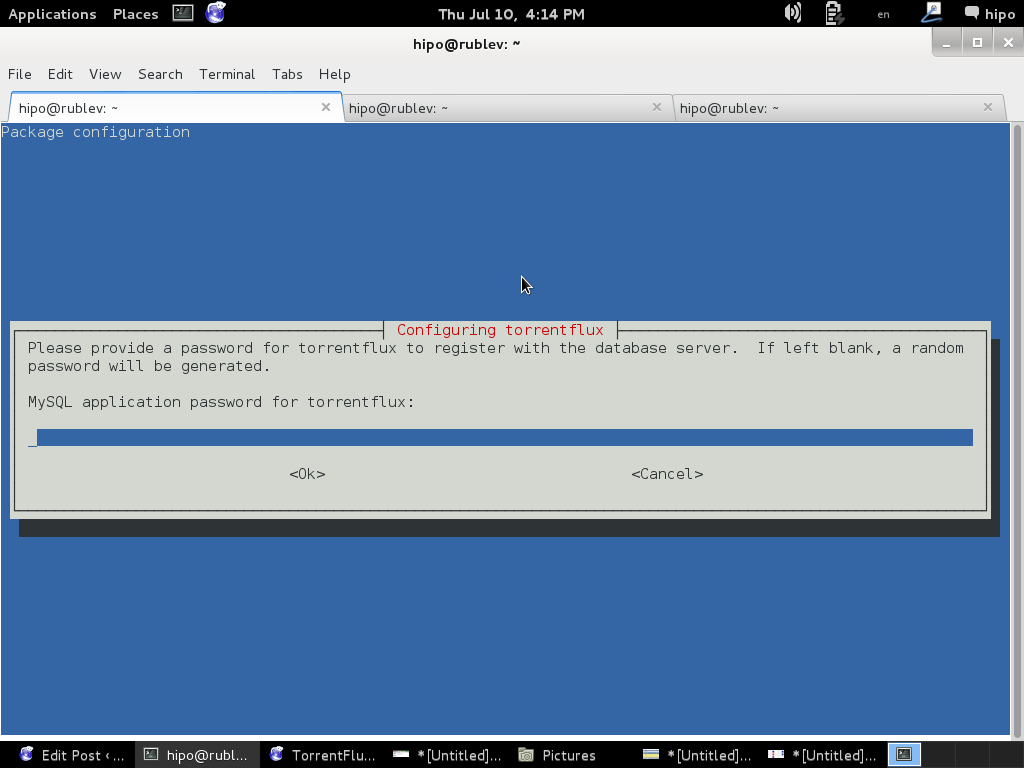
You will be prompted with a coule of screens, to set a new MySQL database user and password and SQL database, as well as offered to restart Apache to make Torrentflux accessible like as on below screenshots.

configuring-torrentflux-debian-linux-screenshot-2


configuring-torrentflux-debian-linux-screenshot 3

configuring-torrentflux-debian-linux-screenshot-4

To make new installed torrentflux accessible from web you will either have to configure it via some new Apache VirtualHost or make a symbolic link to /usr/share/torrentflux/www :
 

cd /var/www/
ln -sf /usr/share/torrentflux/www/ torrentflux


That's all you're all done to access torrentflux either access it via your default configured webserver domain name or via localhost if you're logged in to same pc where installing.

http://www.your-domain.com/torrentflux

or

http://127.0.0.1/torrentflux

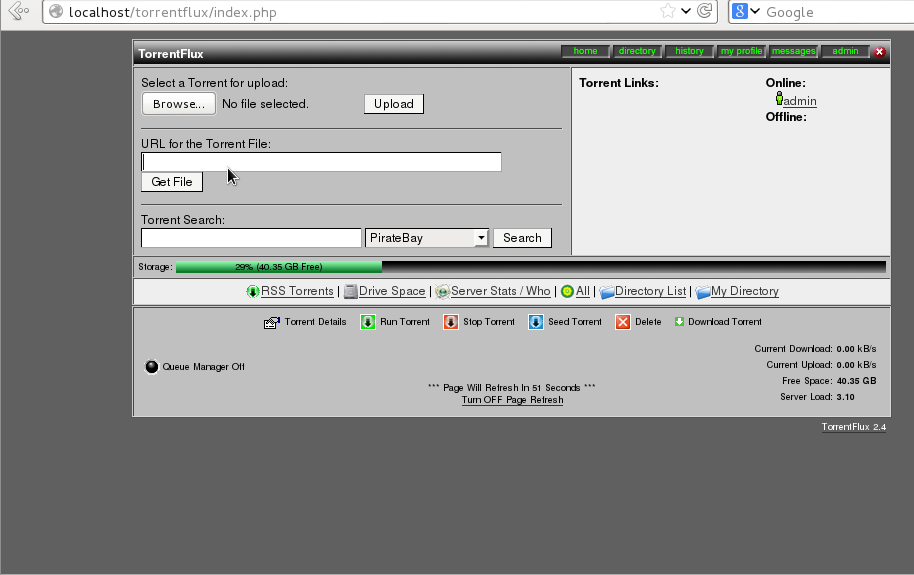
configuring-torrentflux-after-first-login-in-web-debian-linux

2. Install latest Torrentflux version from source

Alternatively if you want to have the latest version (because the Debian version is part of the stable distribution is a little bit outdated you will have to fetch Torrentflux-b4rt and unarchive it:

cd /tmp/
wget http://download.berlios.de/tf-b4rt/torrentflux-b4rt_1.0-beta2.tar.bz2

tar -xjf torrentflux-b4rt_1.0-beta2.tar.bz2

mv torrentflux-b4rt_1.0-beta2 /opt/torrentflux

Then to make torrentflux visible from web server I had to create a symbolic link to installation directory:
 

ln -sf /opt/torrentflux/html /var/www/torrentflux

For further initial configuration its necessery to make Torrentflux config writtable by www-data (the user with which Apache is running on Debian).


chown -R www-data:www-data /var/www/torrentflux/inc/config/


Next it its required to create somewhere download folder where TorrentFlux will keep downloaded Torrents

mkdir /var/lib/torrentflux


Apache HTTP server will have to have write ther:

chown -R www-data:www-data /var/lib/torrentflux


If you already haven't restarted Apache earlier in installing TorrentFlux pre-requirements, you will have to do it now:


/etc/init.d/apache2 restart


As TorrentFlux depends on its MySQL backend, we need to also create manually TorrentFlux database username and a password
 

export SQL_DB='torrentflux';
TFLUXSQL_USERNAME='torrentflux';
TFLUX_SQL_PWD='any-secret-password';

echo "CREATE DATABASE IF NOT EXISTS $SQL_DB DEFAULT CHARACTER SET utf8 DEFAULT COLLATE utf8_unicode_ci"
| mysql –user=root –password

echo "GRANT ALL PRIVILEGES ON $SQL_DB.*
TO $TFLUXSQL_USERNAME@localhost
IDENTIFIED BY $TFLUX_SQL_PWD;" | mysql –user=root –password


Substitute with your Database, Username and Password above shell variables – $SQL_DB, $TFLUX_USERNAME, $TFLUX_SQL_PWD

To configure TorrentFlux access it in browser:

http://your-domain.com/torrentflux
 

By accessing it for a first time, you will redirected to setup.php, in case something goes wrong and yuo're not redirected (probably some mod_rewrite issues add setup.php to url – e.g., acess –

http://your-domain.com/torrentflux/setup.php

I will not enter details, about Web config, because everything there is pretty clear.

Just in short – you will have to now choose:

Choose Database
Choose Database Information of database (put in the exact name of TorrentFlux databse previously created)
Uncheck the box for "Create new database"
Choose as a download location upper created directory – /var/lib/torrentflux

If you get an error on software dependencies screen for missing unrar – just install it
VLC may show an error as well, that's not a problem because VLC is probably not to be used.
Finally after completion of all, you will get an error that setup.php cannot be deleted.
 

To prevent, someone to re-configure it through http://your-domain/torrentflux/setup.php URL remove setup.php


rm /var/www/torrentflux/setup.php

To prevent someone rewrite anything in config file from web we have to revert back config/ folder not to be writable by Apache


chown -R root:root /var/www/torrentflux/inc/config/

Now in browser to access torrentflux type:


http://ipofyourbox/torrentflux

/torrentflux should redirect you to login.php if for some reason it doesn't type it manually in URL.

First account you will login is the super user account, you can allow multiple users to use it by adding multiple accounts.

torrentflux-install-on-debian-ubuntu-gnu-linux-web-management-torrent-interface

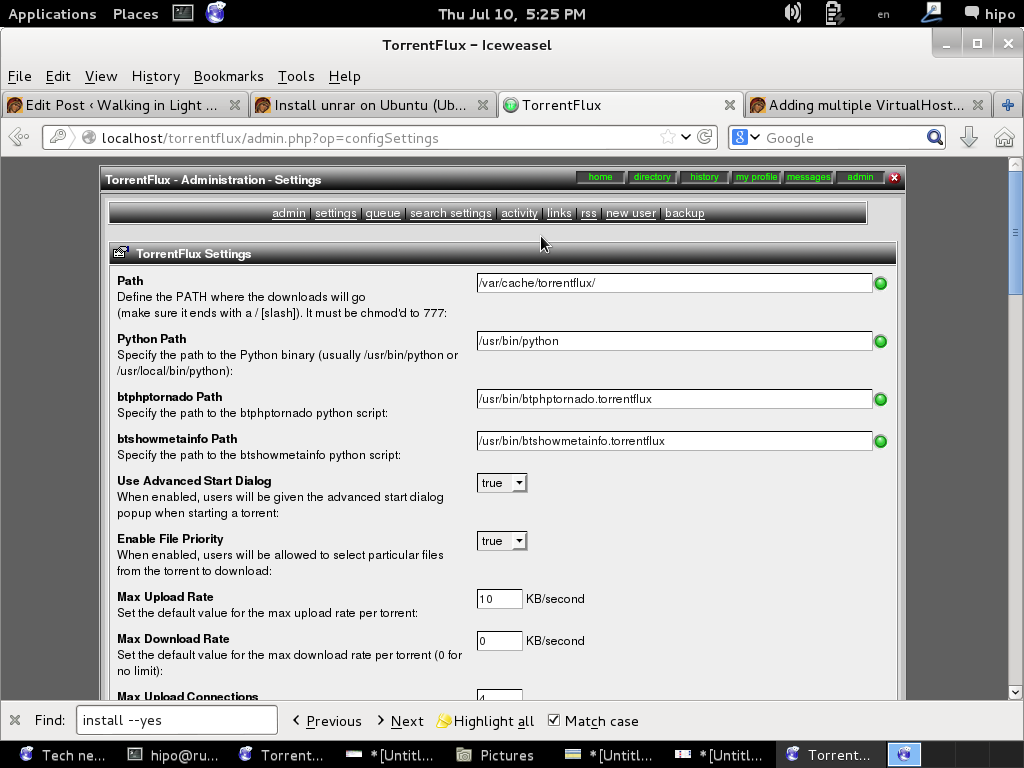
As you will see there is plety of configuration options to play with.

You will definitely want to look in Server Page, some very important page to look is the Transfer Page – from there you can adjust the bandwidth of your connection on 100Mbit network this would be 12500 – to use the maximum possible connection provided by your ISP set the max bandwidth to 0. You have the option to also set a default bittorrent client, by default this will be bittornado.


If you have troubles downloading from TorrentTrackers make sure your router is configured to forward port 49160 to 49300

Now if you have a lot of storage create accounts also for your friends and enjoy torrentflux 🙂


Apache SSLCertificateChainFile adding SSL with Certificate Chain / What is Certificate Chain

Friday, January 31st, 2014

configure-apache-ssl-certificate-chain-ssl-certificate-keychain-each-signing-each-other

If you work in a big company with large network infrastructure who has to deal with SSL Certificates you will sooner or later will have to learn about existence of SSL Certificate Chains.
Its worthy thus to know what is SSL Certificate Chains and how such a chain is configured in Apache?

Personal SSL certificates (certificates issued to an individual or a company) can be used by clients to uniquely identify themselves when they are involved in starting an SSL connection.
SSL Certificate file contains X.509 certificate, which, in turn, contains a public key used for encryption.
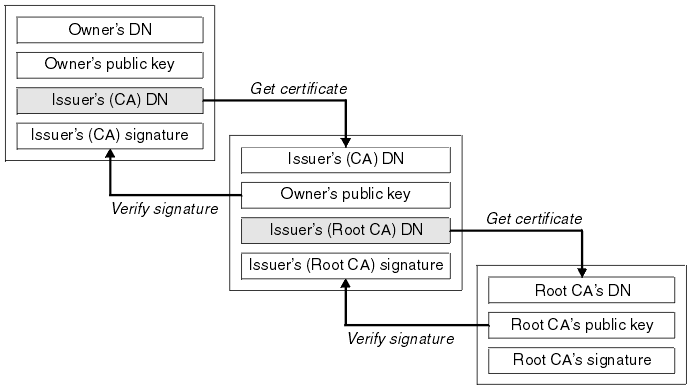
Each personal certificate has zero or more certificate chains of certification authority certificates that extend back to the root certification authority.
 

Certificate R (Root Certification Authority)
|
| represents issuer of
V
Certificate I1 (Intermediate Certification Authority)
|
| represents issuer of
V
Certificate I2 (A subsidiary Intermediate Certification Authority)
|
| represents issuer of
V
Certificate I3 (A further subsidiary Intermediate Certification Authority)
|
| represents issuer of
V
Certificate P (A personal certificate that is used to identify its owner 
on an SSL handshake)

Certificate chains are used to verify the authenticity of each certificate in that chain, including the personal certificate. Each certificate in the chain is validated using its 'parent' certificate, which in turn is validated using the next certificate up the chain, and so on, from the personal certificate up to the root certification authority certificate.

Now after explaining thoroughfully what is SSL Certificate Chain, here is how to configure a SSL Certificate in Apache Webserver.

Open apache2.conf or httpd.conf (depending on GNU / Linux distribution) and add to it;

  SSLEngine On
   SSLCertificateFile conf/cert/webserver-host.crt
   SSLCertificateKeyFile conf/cert/webserver-host.key
   SSLCertificateChainFile conf/cert/internet-v4.crt
   # SSLCertificateChainFile conf/cert/intranet-v3.crt
   SSLOptions +StdEnvVars +OptRenegotiate +ExportCertData

SSLCertificateChainFile conf/cert/chain-cert.crt
loads a chain of separate Personal SSL certificates each signing each other on different levels, chain is leading to top ROOT CA (Certificate Authority).

How to check and repair broken MySQL ISAM tables

Monday, July 11th, 2011

MySQL repair artistic picture

If you are stuffed with errors in /var/log/mysqld.log similar to:

110711 11:00:48 [ERROR] /usr/libexec/mysqld: Incorrect information in file: './anyboots_moncler_spaccio/zen_seo_cache.frm'
110711 11:00:48 [ERROR] /usr/libexec/mysqld: Incorrect information in file: './anyboots_moncler_spaccio/zen_sessions.frm'

This is a sure sign something terrible has happened with your mysql database tables that lead to corruption.
Having corrupt table in mysql installation can severely lead to data loss as well as significantly reduce the speed and performance of a MySQL server in this awful times mysqlcheck is the best friend of the administrator, here is how you can check and repair broken tables in MySQL server:

mysql-server:~# mysqlcheck --all-databases -u root -p
chillor_hjbgl.vn_users OK
chillor_lul.mybb_adminlog OK
chillor_lul.mybb_adminoptions OK
chillor_lul.mybb_adminsessions OK
chillor_lul.mybb_adminviews OK
chillor_lul.mybb_announcements OK
...

You will notice the corrupt sql tables will be reported as corrupt by the tool and mysqlcheck will try it’s best to recover the corrupt tables.

In most cases this should be enough to recover corrupt tables.

How to fix “ERROR 1577 (HY000) at line 1: Cannot proceed because system tables used by Event Scheduler were found damaged at server start”

Saturday, May 12th, 2012

After migrating databases data from FreeBSD MySQL 5.0.83 server to a Debian Squeeze Linux MySQL version 5.1.61, below is a mysql –version issued on both the FreeBSD and the Debian servers

freebsd# mysql --version
mysql Ver 14.12 Distrib 5.0.83, for portbld-freebsd7.2 (i386) using 5.2

debian:~# mysql --version
mysql Ver 14.14 Distrib 5.1.61, for debian-linux-gnu (i486) using readline 6.1

The data SQL dump from the FreeBSD server was dumped with following command arguments:

freebsd# mysqldump --opt --allow-keywords --add-drop-table --all-databases -u root -p > complete_db_dump.sql

Then I used sftp to transfer complete_db_dump.sql dump to the a brand new installed latest Debian Squeeze 6.0.2. The Debian server was installed using a "clean Debian install" without graphical environment with CD downloaded from debian.org's site.

On the Debian machine I imported the dump with command:

debian:~# mysq -u root -p < complete_db_dump.sql

Right After the dump was imported I re-started SQL server which was previously installed with:

debian:~# apt-get install mysql-server
The error I got after restarting the mysql server:

debian:~# #/etc/init.d/mysql restart

was:

ERROR 1577 (HY000) at line 1: Cannot proceed because system tables used by Event Scheduler were found damaged at server start
ERROR 1547 (HY000) at line 1: Column count of mysql.proc is wrong. Expected 20, found 16. The table is probably corrupted

This error cost me a lot of nerves and searching in google to solve. It took me like half an hour of serious googling ,until I finally found the FIX!!!:

debian:~# mysql_upgrade -u root -h localhost -p --verbose --force
Enter password:
Looking for 'mysql' as: mysql
Looking for 'mysqlcheck' as: mysqlcheck
Running 'mysqlcheck' with connection arguments: '--port=3306' '--socket=/var/run/mysqld/mysqld.sock' '--host=localhost'
bible.holy_bible OK
bible.holybible OK
bible.quotes_meta OK

Afterwards finally I had to restart the mysql server once again in order to finally get rid of the shitty:

ERROR 1547 (HY000) at line 1: Column count of mysql.proc is wrong. Expected 20, found 16. The table is probably corrupted error!

debian:~# /etc/init.d/mysql restart
Stopping MySQL database server: mysqld.
Starting MySQL database server: mysqld.
Checking for corrupt, not cleanly closed and upgrade needing tables..

This solved the insane Column count of mysql.proc is wrong. Expected 20, found 16 once and for all!

Before I came with this fix I tried all kind of forum suggested fixes like:

debian:~# mysql_upgrade -u root -p
Looking for 'mysql' as: mysql
Looking for 'mysqlcheck' as: mysqlcheck
This installation of MySQL is already upgraded to 5.1.61, use --force if you still need to run mysql_upgrade

debian:~# mysql_upgrade -p
Looking for 'mysql' as: mysql
Looking for 'mysqlcheck' as: mysqlcheck
This installation of MySQL is already upgraded to 5.1.61, use --force if you still need to run mysql_upgrade

And few more, none of them worked the only one that worked was:

debian:~# #mysql_upgrade -u root -h localhost -p --verbose --force

I have to say big thanks to Mats Lindth wonderful blog post which provided me with the solution.

It seems, since Oracle bought the Community edition of MySQL thinks with this database server are getting more and more messy and backwards incompatible day by day.
Lately, I'm experiencing too much hassles with MySQL version incompitabilities. Maybe I should think for migrating permanently to Postgre …

By the way the ERROR 1547 (HY000) at line 1: Column count of mysql.proc is wrong. is most probably caused of some kind of password hashing incompitability between the password hashing between the BSD and Debian SQL versions, as mysql -u root -p < dump.sql, does override default stored user passwords in the mysql database tables… Such password, hashing issues were common in prior MySQL 4 to MySQL 5 migrations I've done, however since MySQL 5+ is already storing its password strings encrypted with md5 encryption I wonder why on earth this mess happens ….