Posts Tagged ‘squeeze’
Friday, December 23rd, 2011 I just bought an USB Camera (my notebook doesn't include an embedded camera). The camera is some infamous brand chineese name Eilondo
and on the camera all that is written is SUPER USB2.0 1.3 mega pixel
I bought exactly this camera because I was said by the shop reseller that the camera works without any driver installations on Windows XP and Windows Vista
On my Debian Squeeze GNU / Linux it was detected in dmesg without any troubles, here is how the camera got detected in my kernel log :
 debian:~# dmesg |tail -n 10

[25385.734932] usb 2-1: USB disconnect, address 4

[25388.905049] usb 2-1: new high speed USB device using ehci_hcd and address 5

[25389.050753] usb 2-1: New USB device found, idVendor=1e4e, idProduct=0102

[25389.050757] usb 2-1: New USB device strings: Mfr=1, Product=2, SerialNumber=0

[25389.050760] usb 2-1: Product: USB2.0 Camera

[25389.050762] usb 2-1: Manufacturer: Etron Technology, Inc.

[25389.050936] usb 2-1: configuration #1 chosen from 1 choice

[25389.056056] uvcvideo: Found UVC 1.00 device USB2.0 Camera (1e4e:0102)

[25389.058242] uvcvideo: UVC non compliance - GET_DEF(PROBE) not supported. Enabling workaround.

[25389.059113] input: USB2.0 Camera as /devices/pci0000:00/0000:00:1d.7/usb2/2-1/2-1:1.0/input/input26
I was troubled by the message uvcvideo: UVC non compliance – GET_DEF(PROBE) not supported. Enabling workaround. , and hence looked for an application to test if the camera can recored properly.
While checking in packages available in Software Center , I found a plenty of programs under the search keyword Camera
I however decided to test it using just one application Cheese – A tool to take pictures and videos from your webcam which I've seen to be quite popular among Liunx users.
Cheese is part of GNOME Desktop, so that was another reason I decided to give it a try. I was pleasently surprised about how good these tiny but functional proggie is.
To run Cheese in GNOME I nagivated to the menus:
Applications -> Sound & Video -> Cheese Webcam Booth
Just in case if Cheese is not installed, installing it with apt:
debian:~# apt-get install cheese
Cheese has capabilities to take pictures, a consequential photos take up, as well as create Video movies.

The program has support to apply 12 Effects / (Masks) to add some fun to the pictures or video snapshots.

Probably the best thing about Cheese is its simplistic interface, which for me personally is a main criterion to evaluate a program quality ;).
Tags: Camera, center, Cheese, compliance, DEF, dmesg, doesn, ehci, Eilondo, Gnome, gnome desktop, GNU, hcd, high speed, idVendor, INPUT, kernel, Linux, log, non, notebook, pci, Product, proggie, Search, search keyword, SerialNumber, shop, software, software center, speed usb, squeeze, tail, technology inc, tool, usb 2, usb2, video, webcam, windows xp
Posted in Entertainment, FreeBSD, Linux, Linux and FreeBSD Desktop, Linux Audio & Video | No Comments »
Friday, January 27th, 2012 By default latest Debian GDM does not provide an automatic way to login using user AVATARS (like Windows does).
This is pretty strange, especially if you compare to Ubuntu and many other Linux distributions which already has support for AVATAR login via GDM
The reason for this is that currently Debian is shipped with old version of gdm2 and this gdm version does not have support for clickable login avatars.
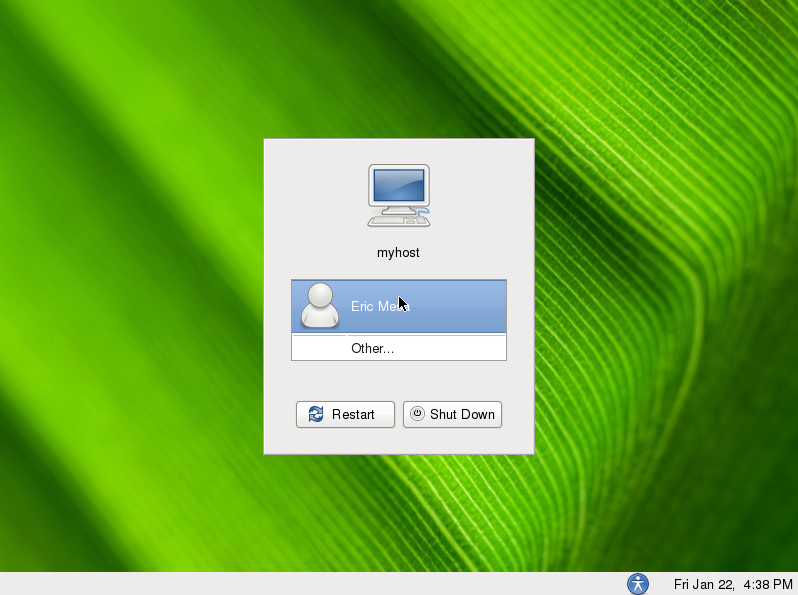
Debian looks by default like this:

Thanksfully this non-user friendly GNOME login screen behaviour can be changed by simply installing gdm3
root@debian:~# apt-get --yes install gdm3

...
This will remove the old gdm installed package as well as fast-user-switch-applet and install the gdm3.
Having installed the gdm3 with configured a background will look like so:
I was quite stunned that gdm3 does not have included support for themes . As far as I've spoken with some ppl in irc.freenode #gnome the reason for this oddity is it crashed a lot when a theme is configred.
By default the gdm2 themes are provided by a package called gdm-themes, since gdm3 does not support themes (yet), the package gdm3-themes is missing.
Tags: avatar, avatars, behaviour, Debian, debian gnu, freenode, GDM, Gnome, gnu linux, Linux, linux distributions, login, nbsp, non-user, oddity, old version, package, ppl, reason, root, screen, squeeze, support, support themes, Thanksfully, theme, Ubuntu, version, way
Posted in Gnome, Linux, Linux and FreeBSD Desktop, Various | No Comments »
Thursday, August 11th, 2011 I’ve completed a qmail installation few days ago on a fresh installed Debian Squeeze 64 bit server. All is configured and works fine, except qmailadmin and vqadmin.
As the mail server was missing any kind of web mail administration panel, I needed to make at least one of the two above to make with qmail.
I decided to concentrate on qmailadmin and took the time to make it work. I used the following command lines and got the compile failure during make compilation:
debian:/usr/local/src/qmailadmin-1.2.15# ./configure --enable-cgibindir=/usr/lib/cgi-bin --enable-htmldir=/var/www/qmailadmin/ --enable-modify-quota

...

debian:/usr/local/src/qmailadmin-1.2.15# make

...
The source make failed with the following error:
In file included from template.c:45:

qmailadmin.h:37:1: warning: "MAX_FILE_NAME" redefined

In file included from template.c:28:

/home/vpopmail/include/vpopmail.h:146:1: warning: this is the location of the previous definition

template.c: In function "send_template_now":

template.c:505: error: "VERSION" undeclared (first use in this function)

template.c:505: error: (Each undeclared identifier is reported only once

template.c:505: error: for each function it appears in.)

make[1]: *** [template.o] Error 1

make[1]: Leaving directory `/usr/local/src/qmailadmin-1.2.15'

make: *** [all] Error 2
To workaround these compile issues, I’ve had to modify the C source file belonging to qmailadmin ( template.c ), e.g.:
debian:/usr/local/src/qmailadmin-1.2.15# vim template.c
In the file I had to add besides the line:
#include "util.h"
The code:
#define VERSION ""
Aterwards qmailadmin’s compile and install via make && make install-strip succeeded and now works perfectly fine 😉
Tags: Administration, administration panel, amp, bit, c source, code, compilation, configure, configured, failure, few days, file, function, identifier, installation, lib, Linux, location, mail administration, mail server, make, name, oncetemplate, panel, qmail installation, qmailadmin, quot, Quota, source file, squeeze, template, template c, time, undeclared identifier, util, version, vim, vqadmin
Posted in Linux, Qmail, System Administration, Web and CMS | 13 Comments »
Monday, February 13th, 2012 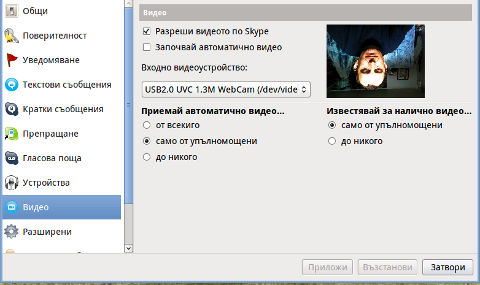
Does your camera show video correctly in cheese but shows captured video upside-down (inverted) in skype ?
This is an issue a friend of mine experienced on his Asus K51AC-SX037D laptop on both Ubuntu and Debian Linux.
As you can see in the picture above it is funny as with this bug the person looks like a batman 😉
As the webcam upside-down issue was present on both latest Ubuntu 11.10 and latest stable Debian Squeeze 6.02, my guess was other GNU / Linux rpm based distro like Fedora might have applied a fix to this weird Skype inverted video (bat human like) issue.
Unfortunately testing the webcam with Skype on latest both Fedora 16 and Linux Mint 12 appeared to produce the same webcam bug.
A bit of research for the issue online and try outs of a number of suggested methods to resolve the issue led finally to a work around, thanks to this post
Here is few steps to follow to make the webcam show video like it should:
1. Install libv4l-0 package
root@linux:~# apt-get --yes install libv4-0

...
Onwards to start skype directly from terminal and test the camera type:
hipo@linux:~$ LD_PRELOAD=/usr/lib/libv4l/v4l1compat.so skype
This is the work around for 32 bit Linux install, most people however will probably have installed 64 bit Linux, for 64bit Linux installs the above command should be little different:
hipo@linux:~$ LD_PRELOAD=/usr/lib32/libv4l/v4l1compat.so skype
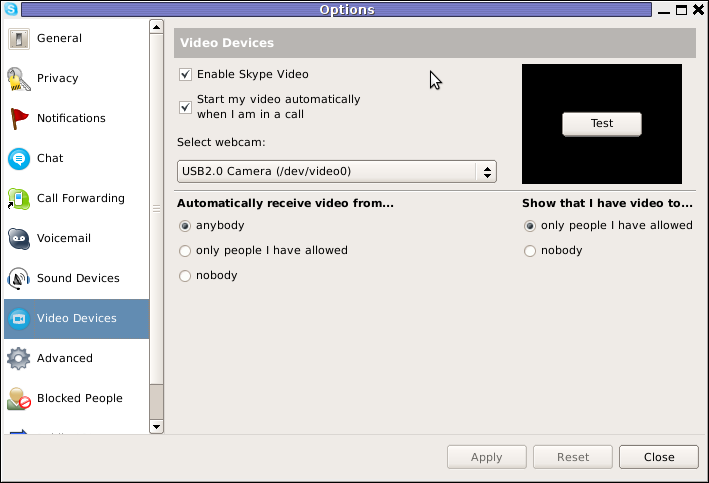
Once skype is launched test the camera and see if the camera capture is now uninverted, through menus:
S -> Options -> Video Devices -> Test
2. Create a skype Wrapper script Launcher
To make skype launch everytime with exported shell variable:
LD_PRELOAD=/usr/lib32/libv4l/v4l1compat.so
A new skype wrapper bash shell script should be created in /usr/local/bin/skype , the file should contain:
#!/bin/sh

LD_PRELOAD=/usr/lib32/libv4l/v4l1compat.so

/usr/bin/skype
To create the script with echo in a root terminal issue;
root@linux:~# echo '#!/bin/sh' >> /usr/local/bin/skype

root@linux:~# echo 'LD_PRELOAD=/usr/lib32/libv4l/v4l1compat.so' >> /usr/local/bin/skype

root@linux:~# echo '/usr/bin/skype' >> /usr/local/bin/skype

root@linux:~# chmod +x /usr/local/bin/skype
3. Edit the Skype gnome menu to substitute /usr/bin/skype Skype Launcher with /usr/local/bin/skype
Gnome 2 has a handy menu launcher, allowing to edit and add new menus and submenus (menus and items) to the Application menu, to launch the editor one has to click over Applications with last mouse button (right button) and choose Edit Menus
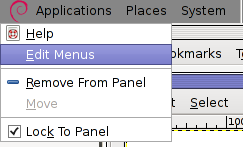
The menu editor like the one in the below screenshot will appear:

In the preceeding Launcher properties window, Command: skype has to be substituted with:
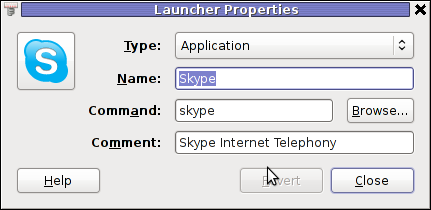
Command: /usr/local/bin/skype
For console freaks who doesn't want to bother in editting Skype Launcher via GUI /usr/share/applications/skype.desktop file can be editted in terminal. Inside skype.desktop substitute:
Exec=skype
with
Exec=/usr/local/bin/skype
As one can imagine the upside-down video image in Skype is not a problem because of Linux, but rather another bug in Skype (non-free) software program.
By the way everyone, who is using his computer with Free Software operating system FreeBSD, Linux etc. knows pretty well by experience, that Skype is a very problematic software; It is often a cause for system unexpected increased system loads, problems with (microphone not capturing), camera issues, issues with pulseaudio, problem with audio playbacks … Besides the long list of bugs there are unexpected display bugs in skype tray icon, bugs in skype messanger windows and at some rare occasions the program completely hangs and had to be killed with kill command and re-launched again.
Another worrying fact is Skype's versions available for GNU / Linux and BSD is completely out of date with its "competitor" operating systems MS Windows, MacOS X etc.
For people like me and my friend who want to use free operating system the latest available skype version is not even stable … current version fod download from skype's website is (Skype 2.2Beta)!
On FreeBSD the skype situation is even worser, freebsd have only option to run Skype ver 1.3 or v. 2.0 at best, as far as I know skype 2.2 and 2.2beta is not there.
Just as matter of comparison the latest Skype version on Windows is 5.x. Windows release is ages ahead its Linux and BSD ver. From a functional point of view the difference between Linux's 2.x and Windows 5.x is not that much different, what makes difference is is the amount of bugs which Linux and BSD skype versions contain…
Skype was about 6 months ago bought by Microsoft, therefore the prognosis for Skype Linux support in future is probably even darker. Microsoft will not probably bother to release new version of Skype for their competitor free as in freedom OSes.
I would like to thank my friend and brother in Christ Stelian for supplying me with the Skype screenshots, as well as for being kind to share how he fixed his camera with me.
Tags: Asus, Auto, bash shell script, batman, BSD, Button, camera capture, camera show, camera type, debian gnu, Desktop, distro, Draft, exec, fedora, file, gnu linux, gt options, hipo, laptop, launcher, ld, linux rpm, menu, Microsoft, person, PRELOAD, quot, root, root linux, rpm, Shell, show, Skype, software, squeeze, terminal, test, Ubuntu, ubuntu linux, video, video devices, web camera, webcam, work, wrapper script
Posted in Linux, Linux and FreeBSD Desktop, Skype on Linux | 29 Comments »
Thursday, September 10th, 2009 While playing with my installed programs on my recently updated Debian I stepped into a problem with /usr/lib32/alsa-lib/libasound_module_pcm_pulse.so. It seems the library was linked to two non-existing libraries: /emul/ia32-linux/lib/libwrap.so.0 as well as /emul/ia32-linux/usr/lib/libgdbm.so.3. A temporary solution to the issue is pointed out in Debian of the Debian Bug reports . As the report reads to solve that it’s required to:
1. Download libwrap0_7.6.q-18_i386.deb and libgdbm3_1.8.3-6+b1_i386.deb.
2. Extract the packages:dpkg -X libwrap0_7.6.q-18_i386.deb /emul/ia32-linux/dpkg -X libgdbm3_1.8.3-6+b1_i386.deb /emul/ia32-linux/
3. echo /emul/ia32-linux/lib >> /etc/ld.so.conf.d/ia32.conf
4. Execute /sbin/ldconfig
5. Check if all is properly linkedExecute ldd /usr/lib32/alsa-lib/libasound_module_pcm_pulse.so|grep -i “not found”Hopefully all should be fixed now.
Tags: b1, bug reports, conf, deb, Debian, debian bug, download, dpkg, emul, grep, issue, ld, ldquo, lib, libasound, libgdbm, libraries, linkedExecute, Linux, Module, pulse, report, rsquo, sbin, sid, solution, squeeze, temporary solution, Unstable, usr
Posted in Linux and FreeBSD Desktop, Linux Audio & Video, Skype on Linux, System Administration | No Comments »
Friday, December 9th, 2011 While reading some log files on one of the co-located servers at UK2.net , I’ve noticed dmesg log was filling in with tons of junk messages like:
[4288245.609762] IPv6 addrconf: prefix with wrong length 48

[4288445.984153] IPv6 addrconf: prefix with wrong length 48

[4288646.296110] IPv6 addrconf: prefix with wrong length 48

[4288846.609119] IPv6 addrconf: prefix with wrong length 48

[4289046.922604] IPv6 addrconf: prefix with wrong length 48

[4289247.267273] IPv6 addrconf: prefix with wrong length 48

[4289447.545800] IPv6 addrconf: prefix with wrong length 48

[4289647.857789] IPv6 addrconf: prefix with wrong length 48

[4289848.169308] IPv6 addrconf: prefix with wrong length 48

[4290048.595104] IPv6 addrconf: prefix with wrong length 48

[4290248.808497] IPv6 addrconf: prefix with wrong length 48

[4290449.103503] IPv6 addrconf: prefix with wrong length 48

[4290649.418747] IPv6 addrconf: prefix with wrong length 48

[4290849.742731] IPv6 addrconf: prefix with wrong length 48
After checking the message to make sure it would not suddeny lead to server hang ups I figured out the message is not dangerous but just an annoying warning that some other (routing) host on the same network as mine is advertising something using IPv6, that doesn’t fit with my IPv6 server config.
Actually the server doesn’t use the IPv6 configuration at all, and the assigned configuration is just some kind of auto set IPv6 IP address.
The server, where this message appeared is powered by 64 bit Debian GNU / Linux Squeeze
To resolve the annoying message, 5 of the kernel sysctl settings needs to be modified with cmds:
debian:~# sysctl net.ipv6.conf.all.accept_ra=0

debian:~# sysctl net.ipv6.conf.all.autoconf=0

debian:~# sysctl net.ipv6.conf.lo.autoconf=0

debian:~# sysctl net.ipv6.conf.eth0.autoconf=0

debian:~# sysctl net.ipv6.conf.eth1.autoconf=0
Furthermore to prevent the IPv6 addrconf: prefix with wrong length 48 to re-appear after future server reboots / boots the two sysctl values of course needs to be included in /etc/sysctl.conf e.g.:
debian:~# echo 'net.ipv6.conf.all.accept_ra = 0' >> /etc/sysctl.conf

debian:~# echo 'net.ipv6.conf.all.autoconf = 0' >> /etc/sysctl.conf

echo 'net.ipv6.conf.lo.autoconf = 0' >> /etc/sysctl.conf

echo 'net.ipv6.conf.eth0.autoconf = 0' >> /etc/sysctl.conf

echo 'net.ipv6.conf.eth1.autoconf = 0' >> /etc/sysctl.conf
My server has 2 etherhet interfaces, eth0 and eth1 that’s the reason I had to set up autoconf kernel the two vars net.ipv6.conf.eth0.autoconf and net.ipv6.conf.eth1.autoconf , for more interfaces more kernel vars (eth2, eth3) etc. needs to be set to “0”
I’ve seen posts online of people complaining about a similar errors to IPv6 addrconf: prefix with wrong length 48, like:
IPv6 addrconf: prefix with wrong length 96

IPv6 addrconf: prefix with wrong length 128
The solution to this messages is also done by setting the above described sysctl kernel vars. Setting the vars will suppress the messages which by the way with time could take up A LOT of disk space and fills /var/log/dmesg with this useless message, hence applying the “fix” is a must 😉
Another thing, I’ve noticed while I was researching about the error and the respective fix is that people on other deb based distributions like Ubuntu as well as on Fedora GNU / Linux had also experienced the issue.
Tags: addrconf, annoying message, autoconf, bit, boots, confdebian, config, confMy, course, Disk, dmesg, doesn, eth, GNU, host, ipv6 configuration, junk messages, kernel, Linux, log, lot, prefix, quot, ra, reason, servers, something, squeeze, suddeny, time, Ubuntu, ups
Posted in Linux, System Administration | 1 Comment »
Thursday, December 1st, 2011 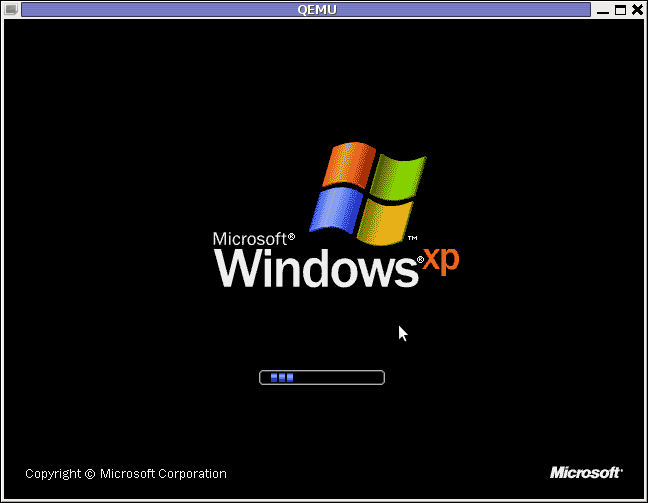
I have never did a proper install of Windows XP on Debian before hand. Even though I experimented once long time ago. I had zero success with installing Windows XP Service Pack 2 . The only Windows I can make correctly working before hand on these early days on my Debian powered notebook with qemu virtual machine emulator was Windows 2000 .
I decided to give it another go today as I hoped the qemu has advanced and I’ve seen many reports online of people who were able to correctly make Windows XP SP2 work out.
As I’ve seen many blog posts online of people who succesfully run with qemu Windows XP SP2, in order to escape from repeating the other guys experience and conduct a fresh experiment, I decided to give qemu a try with Microsoft.Windows.XP.Professional.SP3.Integrated.June.2011.Corporate
Before I proceed with using latest qemu I,
1. Installed qemu using the usual:
debian:~# apt-get install --yes qemu qemu-keymaps qemu-system qemu-user qemu-utils uml-utilities

...
Afterwards,
2. Created a new directory where the qemu Windows image will be stored:
debian:~# su hipo

hipo@noah:~$ mkdir windows

hipo@noah:~$ cd windows

hipo@noah:/home/hipo/windows$
As a following step I loaded the tun kernel module which is necessery for Qemu to properly handle the Windows LAN networking.
3. Load and set proper permissions for tun kernel module
In case if /dev/net is not existing first step is to create the proper device, however in most cases /dev/net should be there:
debian:~# mkdir -p /dev/net

debian:~# mknod /dev/net/tun c 10 200
As a next step its necessery to load tun kernel module and set the proper permissions:
debian:~# modprobe tun

debian:~# echo 'tun' >> /etc/modules

debian:~# chgrp users /dev/net/tun

debian:~# chmod g+w /dev/net/tun
Next step is to create an image file with dd or with qemu-img which will be holding the Virtual Machine Windows installation.
4. Create image file for Windows using dd
I decided to create a the image file to be with a size of 5 Gigabytes, this is of course custom so other people might prefer having it less or more the absolute minimum for a proper Windows XP SP3 install is 2000 Megabytes.
debian:~# su hipo -; cd windows;

debian:/home/hipo/windows$ dd of=hd.img bs=1024 seek=5000000 count=0

0+0 records in

0+0 records out

0 bytes (0 B) copied, 1.5505e-05 s, 0.0 kB/s
Notice here that the file dd will create will appear like 0 kb file until the Windows install from a BootCD is run with qemu.
5. Download an image of Microsoft.Windows.XP.Professional.SP3.Integrated.June.2011.Corporate from thepiratebay.org
Microsoft.Windows.XP.Professional.SP3.Integrated.June.2011.Corporate is currently available for download from the thepiratebay.org if in the times to come it is not available it will most likely be available from torrentz.net, isohunt.com etc. so I’ll skip more explanations with this step and let you use your favourite torrent program of choice to download the MS Windows iso. Just to make a note here I used transmission as this is my favourite torrent client. After downloading the iso I used K3B to burn the Image file as Bootable ISO. I’m naturally a GNOME user so to burn it as Image I just open it with K3B by using the GNOME menu and selecting Open with K3B
Next I instructed qemu to boot from the just burnt CD.
6. Boot windows Installation with Qemu from the Boot CD
debian:/home/hipo/windows$ qemu -boot d -cdrom /dev/cdrom -hda hd.img
Notice here that I’m running the qemu virtual machine emulator with a non-privileged reasons. This is important as qemu might have holes in the emulation of Windows Networking stack which if executed as root superuser. Can allow some malicious attacker to remotely compromise your GNU / Linux PC …
Qemu window will pop-up where one installs the Windows as it will install it using an ordinary PC. To switch qemu to fullscreen mode to have the complete feeling like installing Windows on an non-emulated PC ctrl + alt + f can be pressed.
The Windows installation took like 1 hour 20 minutes on my dual core 1.8 Ghz notebook with 2 GB of RAM. But I should say while installing I had multiple applications running; xmms, transmission, epiphany, icedove, evince etc. probably if I just run the Virtual Machine with no other applications to extra load my PC, probably the Windows install would have been done in max 50 minutes time.
After the installation is complete. To
7. Further run the installed Windows
debian:/home/hipo/windows$ qemu -hda hd.img -boot c

...
As a next step its necessery to;
8. Bring up the tap0 interface and configure it for the user
I’m running my qemu emulator with my user hipo , so I run cmds:
debian:/home/hipo/windows$ su - root

debian:~# tunctl -u hipo

Set 'tap0' persistent and owned by uid 1000
9. Enable ip_forwarding and arp proxy and for wlan0 and tap0
debian:~# echo 1 > /proc/sys/net/ipv4/conf/wlan0/proxy_arp

debian:~# echo 1 > /proc/sys/net/ipv4/conf/tap0/proxy_arp

debian:~# echo 1 > /proc/sys/net/ipv4/conf/tap0/proxy_arp
10. Install the proper Network Drivers inside Windows
That’s just in case, if they’re not supported by the Windows default existing drivers.
To do so, I downloaded my LAN drivers from the Vendor and put it on USB and sticked the USB drive to my laptop. In order to make the Kingston USB drive I used to transfer my LAN and Video drivers. I had to restart qemu with the parameter -usb -usbdevice host:0951:1625 , where I used lsusb to check and get the correct USB ID 0951:1625, like shown in the command below:
debian:~# lsusb |grep -i kingston

Bus 001 Device 006: ID 0951:1625 Kingston Technology DataTraveler 101 II
After on I booted again the Windows XP with the following command line in order to make qemu detect the USB Drive:
debian:/home/hipo/windows# sudo qemu -boot c -hda hd.img -usb -usbdevice host:0951:1625
One oddity here is that in order for qemu to detect the USB stick, I had to run it via sudo with super user privileges.Don’t ask me why this is the only way it worked …
Next on used the Windows device manager from Control Panel -> System -> Device Manager to point my undetected hardware to the correct Win drivers.
For the GUI preferring user qemu has a nice GNOME GUI interface called qemu-launcher, if you like to use qemu via it instead of scripting the qemu launcher commands, you can install and use via:
debian:~# apt-get install --yes qemu-launcher qemuctl

...

debian:/home/hipo/windows$ qemu-launcher
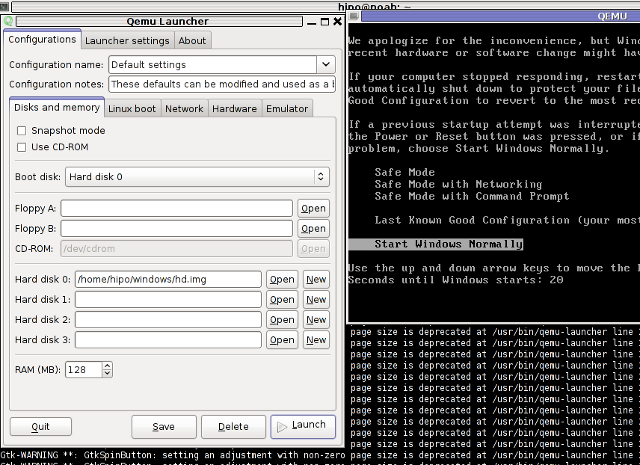
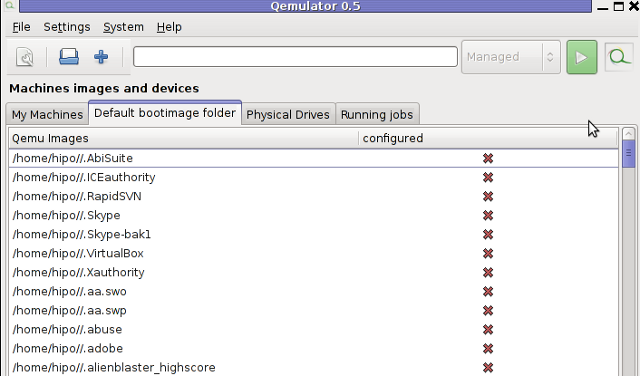
Another GUI alternative to qemu-launcher, which easifys the work with qemu is qemulator; here is a screenshot:
Tags: chmod, dd, debian gnu, download, experiment, favourite, file, Gnome, gnu linux, hipo, Image, image file, img, installation, installing windows, ipv, ISO, June, kernel module, Load, machine emulator, Microsoft, microsoft windows xp professional, mkdir, necessery, noah, Pack, Professional, proper permissions, qemu windows, Service, squeeze, time, Virtual, virtual machine, windows 2000, windows installation, windows xp, windows xp professional, windows xp service pack, windows xp sp2, work
Posted in FreeBSD, Linux, Linux and FreeBSD Desktop, System Administration, Windows | 1 Comment »
Monday, November 21st, 2011 
After installing vnstat to keep an eye on server IN and OUT traffic on a Debian Squeeze server. I used the usual:
debian:~# vnstat -u -i eth0
In order to generate the initial database for the ethernet interface used by vnstat to generate its statistics.
However even though /var/lib/vnstat/eth0 got generated with above command statistics were not further generated and trying to check them with command:
debian:~# vnstat --days
Returned the error message:
eth0: Not enough data available yet.
To solve the eth0: Not enough data available yet. message I tried completely removing vnstat package by purging the package e.g.:
debian:~# apt-get --yes remove vnstat

...

debian:~# dpkg --purge vnstat

...
Even though dpkg –purge was invoked /var/lib/vnstat/ refused to be removed since it contained vnstat’s db file eth0
Therefore I deleted by hand before installing again vnstat:
debian:~# rm -rf /var/lib/vnstat/
Tried installing once again vnstat “from scratch”:
debian:~# apt-get install vnstat

...
After that I tried regenerating the vnstat db file eth0 once again with vnstat -u -i eth0 , hoping this should fix the error but it was no go and after that the error:
debian:~# vnstat --hours

eth0: Not enough data available yet.
persisted.
I checked in Debian bugs mailing lists and I found, some people complaining about the same issue with some suggsetions on how the error can be work arouned, anyways none of the suggestions worked for me.
Being irritated I further removed / purged once again vnstat and decided to give it a try by installing vnstat from source
As of time of writting this article, the latest stable vnstat version is 1.11 .
Therefore to install vnstat from source I issued:
debian:~# cd /usr/local/src

debian:/usr/local/src# wget http://humdi.net/vnstat/vnstat-1.11.tar.gz

...

debian:/usr/local/src# tar -zxvvf vnstat-1.11.tar.gz

debian:/usr/local/src# cd vnstat-1.11

debian:/usr/local/src/vnstat-1.11# make & make all & make install

debian:/usr/local/src/vnstat-1.11# cp examples/vnstat.cron /etc/cron.d/vnstat

debian:/usr/local/src/vnstat-1.11# vnstat -u -i eth0

Error: Unable to read database "/var/lib/vnstat/eth0".

Info: -> A new database has been created.
As a last step I put on root crontab to execute:
debian:~# crontab -u root -e
*/5 * * * * /usr/bin/vnstat -u >/dev/null 2>&1
This line updated vnstat db eth0 database, every 5 minutes. After the manual source install vnstat works, just fine 😉
Tags: amp, bin, bugs, cron, debian gnu, dpkg, error message, eth, ethernet interface, eye, file, GNU, gnu linux, hourseth, initial database, installdebian, lib, Linux, none, package, quot, Returned, rf, root, scratch, squeeze, statistics, tar, tar gz, time, traffic, vnstatdebian, wget, work, zxvvf
Posted in Linux, System Administration, Various | 6 Comments »
Monday, June 21st, 2010 If you are a system administrator, you have probably wondered at least once ohw to configure your Linux server to automatically reboot itself if it crashes, is going through a mass CPU overload, e.g. the server load average “hits the sky”.
I just learned from a nice article found here that there is a kernel variable which when enabled takes care to automatically restart a crashed server with the terrible Kernel Panic message we all know.
The variable I’m taking about is kernel.panic for instance kernel.panic = 20 would instruct your GNU Linux kernel to automatically reboot if it experiences a kernel panic system crash within a time limit of 20 seconds.
To start using the auto-reboot linux capabilities on a kernel panic occurance just set the variable to /etc/sysctl.conf
debian-server:~# echo 'kernel.panic = 20' >> /etc/sysctl.conf
Now we will also have to enable the variable to start being use on the system, so execute:
debian-server:~# sysctl -p
There you go automatic system reboots on kernel panics is now on.
Now to further assure yourself the linux server you’re responsible of will automatically restart itself on a emergency situation like a system overload I suggest you check Watchdog
You might consider checking out this auto reboot tutorial which explains in simple words how watchdog is installed and configured.
On Debian installing and maintaining watchdog is really simple and comes to installing and enabling the watchdog system service, right afteryou made two changes in it’s configuration file /etc/watchdog.conf
To do so execute:
debian-server:~# apt-get install watchdog

debian-server:~# echo "file = /var/log/messages" >> /etc/watchdog.conf

debian-server:~# echo "watchdog-device = /dev/watchdog" >> /etc/watchdog.conf
Well that should be it, you might also need to load some kernel module to monitor your watchdog.
On my system the kernel modules related to watchdog are located in:
/lib/modules/2.6.26-2-amd64/kernel/drivers/watchdog/
If not then you should certainly try the software watchdog linux kernel module called softdog , to do so issue:
debian-server:~# /sbin/modprobe softdog
It’s best if you load the module while the softdog daemon is disabled.
If you consider auto loadig the softdog software watchdog kernel driver you should exec:
debian-server:~# echo 'softdog' >> /etc/modules
Finally a start of the watchdog is necessery:
debian-server:~# /etc/init.d/watchdog start

Stopping watchdog keepalive daemon....

Starting watchdog daemon....
That should be all your automatic system reboots should be now on! 🙂
Tags: auto reboot, care, configuration file, configure, crash, debian gnu, debian server, emergency, emergency situation, file, gnu linux, How to automatically reboot (restart) Debian GNU Lenny Linux on kernel panic, init, instance, kernel panic, kernel panics, limit, linux capabilities, linux kernel, linux server, log, log messages, modprobe, nbsp, necessery, ohw, quot, server load, sky, software, software watchdog with kernel module softdog, some general CPU overload or system crash, squeeze, Stopping, system administrator, system crash, system overload, time, time limit, tutorial, Watchdog, watchdog system
Posted in Linux, System Administration | 6 Comments »
Friday, September 30th, 2011 Just run across across a super nice top like, program for system administrators, its called nethogs and is definitely entering my “l337” admin outfit next to tools like iftop, nettop, ettercap, darkstat htop, iotop etc.
nethogs is ultra easy to use, to get immediately in console statistics about running processes UPLOAD and DOWNLOAD bandwidth consumption just run it:
linux:~# nethogs
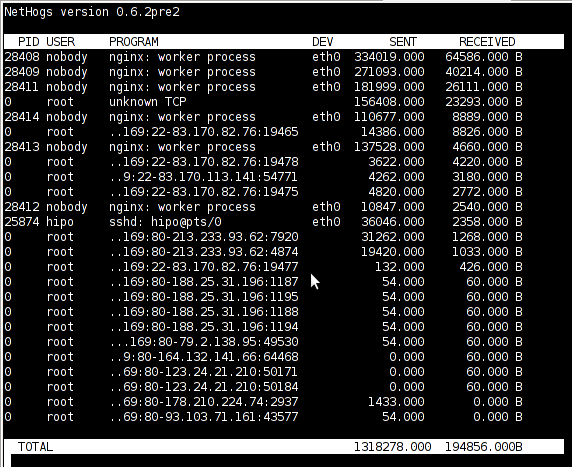
Nethogs running on Debian GNU/Linux serving static web content with Nginx
If you need to check what program is using what amount of network bandwidth, you will definitely love this tool. Having information of bandwidth consumption is also viewable partially with iftop, however iftop is unable to track the bandwidth consumption to each process using the network thus it seems nethogs is unique at what it does.
Nethogs supports IPv4 and IPv6 as well as supports network traffic over ppp. The tool is available via package repositories for Debian GNU/Lenny 5 and Debian Squeeze 6.
To install Nethogs on CentOS and Fedora distributions, you will have to install it from source. On CentOS 5.7, latest nethogs which as of time of writting this article is 0.8.0 compiles and installs fine with make && make install commands.
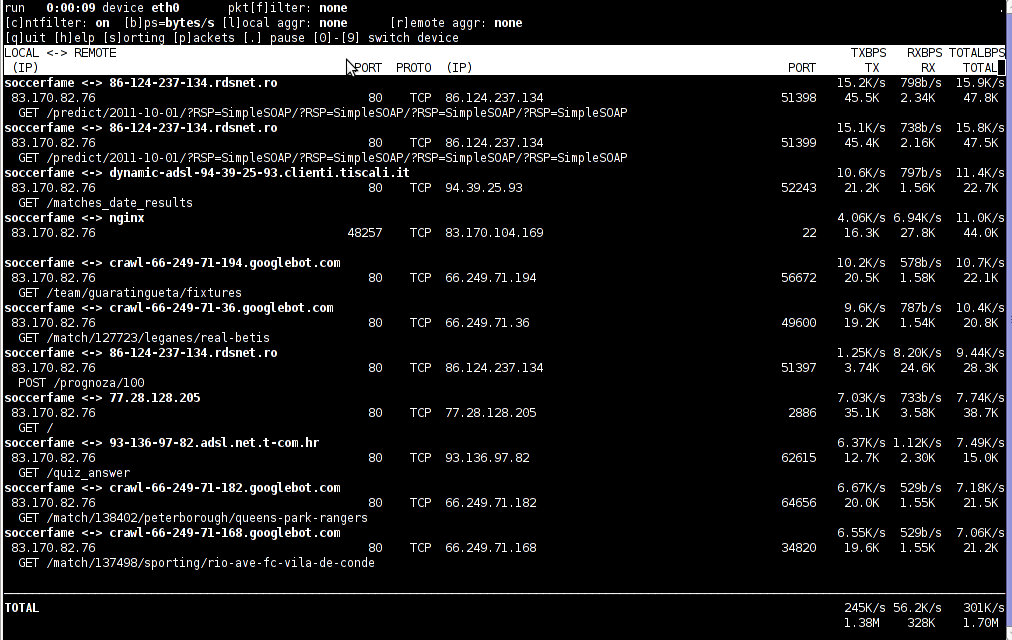
In the manner of thoughts of network bandwidth monitoring, another very handy tool to add extra understanding on what kind of traffic is crossing over a Linux server is jnettop
jnettop shows which hosts/ports is taking up the most network traffic.
It is available for install via apt in Debian 5/6).
Here is a screenshot on jnettop in action:
To install jnettop on latest Fedoras / CentOS / Slackware Linux it has to be download and compiled from source via jnettop’s official wiki page
I’ve tested jnettop install from source on CentOS release 5.7 and it seems to compile just fine using the usual compile commands:
[root@prizebg jnettop-0.13.0]# ./configure

...

[root@prizebg jnettop-0.13.0]# make

...

[root@prizebg jnettop-0.13.0]# make install
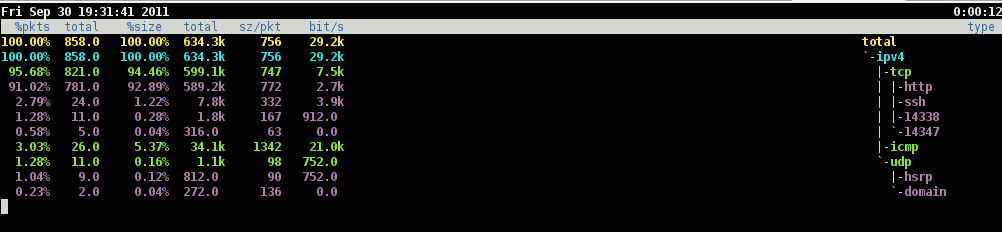
If you need to have an idea on the network traffic passing by your Linux server distringuished by tcp/udp/icmp network protocols and services like ssh / ftp / apache, then you will definitely want to take a look at nettop (if of course not familiar with it yet).
Nettop is not provided as a deb package in Debian and Ubuntu, where it is included as rpm for CentOS and presumably Fedora?
Here is a screenshot on nettop network utility in action:
FreeBSD users should be happy to find out that jnettop and nettop are part of the ports tree and the two can be installed straight, however nethogs would not work on FreeBSD, I searched for a utility capable of what Nethogs can, but couldn’t find such.
It seems the only way on FreeBSD to track bandwidth back and from originating process is using a combination of iftop and sockstat utilities. Probably there are other tools which people use to track network traffic to the processes running on a hos and do general network monitoringt, if anyone knows some good tools, please share with me.
Tags: action, amount, bandwidth consumption, CentOS, centos 5, configure, consumption, darkstat, debian gnu, distributions, ettercap, fedora, gnu linux, handy tool, information, l337, Linux, linux server, Monitoring, nbsp, Nethogs, network bandwidth, network traffic, nginx, package, page, ppp, prizebg, quot, repositories, root, running processes, screenshot, slackware linux, squeeze, static web, system administrators, time, tool, upload, web content
Posted in FreeBSD, Linux, System Administration | No Comments »


