4. Restart polipo for the new config settings to take affect
debian:~# /etc/init.d/polipo restart
Make sure in your /etc/tor/torrc you have existing the following two torrc directives:
debian:~# vim /etc/tor/torrc

SocksPort 9050 # what port to open for local application connections

SocksListenAddress 127.0.0.1 # accept connections only from localhost
5. Start up tor server if it’s not already started
debian:~# /etc/init.d/tor retart
6. Install pidgin if you haven’t got it installed already
debian:~# apt-get install pidgin
8. Start up the recent installed pidgin multi-protocol instant messanger
hipo@debian:~$ pidgin &
If you already previously properly installed and configured version of pidgin.
9. In pidgin messanger do the following changes to configure it to proxy traffic via tor
In your either your existing ICQ / MSN pidgin account navigate to:
Accounts -> Manage Accounts
Under Protocol ICQ
click Modify..
Now go to Proxy
The default Proxy setting in Debian Sid/Squeeze would Use GNOME Proxy Settings however in other Linux distributions or *BSD it could be either No Proxy or some other setting.
Now substitute whatever options is choosen with SOCKS 5
In the below data input field with a name Host: type 127.0.0.1
For the Port: field box type the port 9050
You specify for a local proxy port 9050 because this is the default port where we have previosly configured polipo to proxify traffic to tor’s anonymity network
The settings tor tunneling of traffic for Protocol MSN are analogous like for the ICQ Protocol so I won’t repeat myself on that.
This described tor tunneling for ICQ and MSN traffic should be applicable to other IM protocols under the same logic. Here is the time to nota that the above instructions should be also applicable for Gain with minor changes or even without any.
Of course because tunneling traffic via Poplipo and it’s handling over to a tor node which will pass traffic randomly through different geographical locations whether tor servers reside will be more time consuming, so login account login time to your Messanger protocol of choice will vary and would be a bit longer.
The use of tor for your MSN and ICQ traffic is twofold:
1. Using tor anonymizing traffic network will keep your anonymity on the net private
2. Using the tor anonimity online services will let you access IM servers despite firewall blocking applied by administrators on certain places for instance (in your School or Your work env) and will therefore let you still use your favourite IM in spite of the applied firewall restrictions.
Anyways as we all know life is not perfect 🙂 Despite the slower logins and the bit slower message transmission, at least you won’t be easily tracable by third party prying eyes, administrators or any other messanger spying sniffer traffic logger installed somewhere in between yourself and the end side of an IM server.
Hope this article helps somebody out there and will be a step further in the battle for securying your privacy online.
By the default wordpress does not have support for changing the exact font, therefore copying and pasting a text made in Open Office or MS Word often places in the Post or Page wp edit fonts different from the default one set for articles. Hence some articles after being published on a wordpress blog show up with improper font and the only way to fix that is to change the font first in Open Office and then copy back to wordpress instead of simply being able to change the font from within the wordpress article.
To get around this problem, there is a nice plugin fckeditor-for-wordpress-plugin which aids wordpress with an awesome Word like edit functionalities. , downhload location for FCKEdit for WordPress is here
Here is a screenshot of the extra nice functionality the FCKEditor for wordpress providces.
Installing the plugin is like installing any other wordpress plugin and comes easily to:
debian:/~# cd /var/www/blog/wp-content/plugins

debian:/plugins# wget http://downloads.wordpress.org/plugin/fckeditor-for-wordpress-plugin.3.3.1.zip

...

debian:/plugins# unzip fckeditor-for-wordpress-plugin.3.3.1.zip

...

debian:/plugins# cd fckeditor-for-wordpress-plugin/
And further enabling the plugin from:
Plugins -> Inactive -> (Dean's FCKEditor For WordPress) Enable
fckeditor for wordpress will replace the default wordpress editor TinyMCE straight after being enabled. I’ve done also a mirror of the current version as of time of writting of this article, one can download the fckeditor for wordpress mirrored here Now really file editting inside wordpress admin panel is way easier and convenient 😉 Cheers
A combination of two wordpress caching plugins (Hyper Cache and Db Cachesignificantly improves the access times of a wordpress based blogs and websites.
Installing the two websites has drastically improved my blog opening times, so in my view having the two plugins on every wordpress install out there is a must! 🙂 The plugins installation is straight forward, here is how I installed them.
1. Installing Hyper Cache on WordPress
To install Hyper Cache all I had to do is download and enable the plugin, the plugin doesn’t require any configuration. I always love it when I don’t have to bother with reading configuration options and pondering for some 20 minutes on the plugin features, so in that perspective Hyper Cache in my view is a good alternative to WordPress Super Cache
Besides that WordPress Super Cache was having issues when enabled on few wordpress based websites I manage these days. For comparison Hyper Cache worked just great on all wordpress install I tried the plugin so far.
To install all I had to do is download the plugin unzip and enable it:
a. Download and unzip it
debian:/var/www/blog# wget http://downloads.wordpress.org/plugin/hyper-cache.zip

...

debian:/var/www/blog# cd wp-content/plugins

debian:/var/www/blog/wp-content/plugins# unzip hyper-cache.zip
b. Enable Hyper Cache plugin
To enable the plugin follow to standard plugin location;
Plugins -> Inactive -> Hyper Cache (Enable)
To enable the plugin follow to standard plugin location;
What Db Cache, does it does caching of last queries made to MySQL for specified time, so if the query has to be refetched again from wordpress’s php frontend the queries results are fetched straight for the memory. This decreases the load towards the MySQL server and increases the webpages loading time.
As the plugin page suggests it’s way faster than other html caching-plugins like WP-Cache or WP Super Cache
However, I think its still slower than using a combination of WP Super Cache’s alternativeHyper Cache and Db Cache . Combining this two could rise the webpage opening times according to some statisticonline at best cases up to 830% !! 😉 Let me proceed with how I did the install of Db Cache .
c. Make sure the permissions for Db Cache are correct
On Debian to enable Db Cache, the permissions should be changed for Apache to have a read/write permissions to plugin directory, on Debian to fix the permissions I used the commands:
On other GNU/Linux distributions the above commands (user and group) www-data:www-data, should be set to whatever user/group Apache is running with, on Slackware this would be nobody:nobody, on CentOS and RHEL it would be apache:apache.
Lately, I have to deal with some wordpress based installs in big part of my working time. One of the wordpress sites needed to have added a multi language support.
My first research in Google pointed me to WPML Multilingual CMSThe WordPress Multilingual Plugin WPML Multilingual CMS looks nice and easy to use but unfortunately its paid, the company couldn’t afford to pay for the plugin so I looked forward online for a free alternative and stumbled upon QTranslate
QTranslate is free and very easy to install. Its installed the wordpress classic way and the installation went smoothly, e.g.:
After activating the plugin, there is a Settings button from which qTranslate‘s various plugin parameteres can be tuned.
In my case my site had to support both English and Arabic, so from the settings I added support for Arabic translation to the wordpress install.
Adding Arabic is done in the following way:
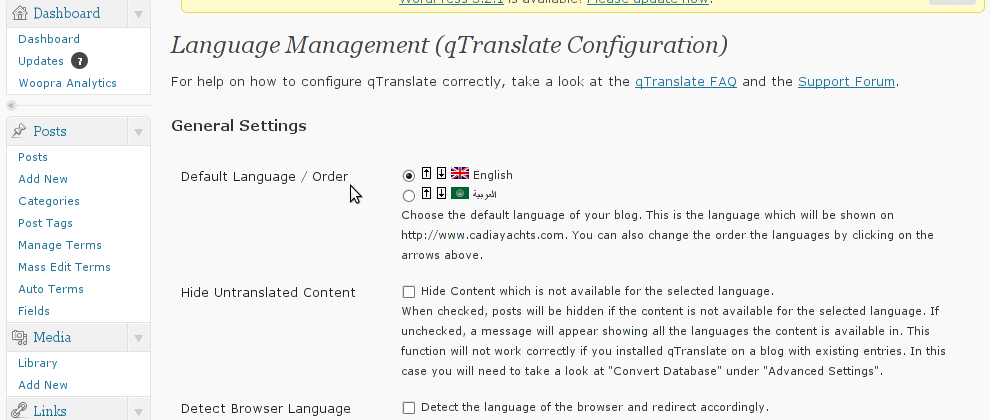
a. From the Language Management (qTranslate Configuration) from the Languages menu and the Languages (Add Languages) I had to choose a language code (in my case a language code of ar – for Arabic). Next I had to choose the Arabic flag from the follow up flag list.
In next text box Name , again I had to fill Arabic, for Locale en_US.UTF-8 The following Date Format and Time Format text boxes are optional so I left them blank. To complete the process of adding the Arabic as a new language wordpress should support I pressed the Add Language button and the Arabic got added as a second language.
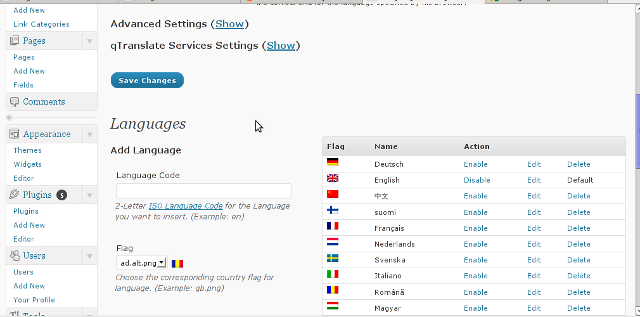
Afterwards the Arabic was added as second language, on the bottom of the left wordpress menu pane a button allowing a switch between English, Arabic appeared (see below screenshot):
Finally to make Arabic appear as a second language of choice on the website I added it as a Widget in the Widgets menu from the AWidgets menu:
Appearance -> Widgets
In widgets I added qTranslate Language Chooser to the Sidebar without putting any kind of Title for qtranslate widget . I found it most helpful to choose the Text and Image as an option on how to display the Language switching in the wp.
The aim of this small post is to give just a brief idea of how I fix my qmail server after breaking it or in case it is broken after mail bomb attacks, etc.
Most common cases when I break my qmail queue myself, are after I’m implementing some new patches and reinstall parts of the qmail server with a patched version of default qmail binaries. On other occasions, I simply used the qmailctl to start or stop the server as a part of some routine tasks necessery for the administration of the qmail server.
Everybody who has already experience with qmail should have experienced, that qmail is very fragile and could break even with a simple changes, though if it works once it’s rock solid piece of mail servant.
Below I explain few ways I used through my days as a qmail sys admin to deal with broken or messed queues.
1. Fixing a broken qmail queue using automatic tools There are few handy tools which in most cases are able to solve issues with the queue, one very popular one isqueue-repair – check http://pyropus.ca/software/queue-repair/. Installation of qmail-repair is dead easy, but it needs to be installed from source as no official debian package is available:
The tool will walk through the mail sub-directories containing mail queued files in /var/qmail/queue and will list any issues found. It’s recommended that the qmail server is stopped before any queue modify operations are issued on the server:
linux:/usr/local/src# qmailctl stop

...
Further on in order to solve any found issues with the queue, there is the “-r”/repair option:
Another tool which comes handy whether a repair of a messed qmail queue is needed is qmhandle – http://sourceforge.net/projects/qmhandle/
The use of qmhandle is also pretty easy, all one has to do is to follow the usual classical steps of a download the source & compile:
linux:/usr/local/src# wget https://www.pc-freak.net/files/qmhandle-1.3.2.tar.gz

linux:/usr/local/src# tar -zxvvf qmhandle-1.3.2

...

linux:/usr/local/src# cd qmhandle-1.3.2
Once again it’s necessery that the qmail server is stopped via its init script before qmHandle tool is used, e.g.:
linux:~# qmailctl stop

...
There is a difference between qmail queue repair tool and qmail handle , while qmail queue-repair tool is used to fix improper permissions of queued files with the qmail queue, qmhandle ‘s application is to completely delete the stored mail contents of a broken queue.
Deleting all the qmail queue content is in some cases the only option to fix the queue. Often such a drastic measure is required after a heavy mail server overload, let’s say a result of spammers or caused by virus infected mail users which send a massive amounts of spam mails.
Thus at many cases when queue-repair was unable to solve a queue mess, I use qmhandble and sacrifice all the queued emails by completely wiping them out like so:
Above command would eradicate all queued emails. Hopefully after the qmail server gets launched again with qmailctl start all the mail server operations should be back to normal.
Note that the use of qmhandle’s queue delete capabilities is pretty dangerous, if you forgot to stop the qmail server before issuing the above command!
Note that in order to use both qmHandle and queue-repair tools you will need to install python interpreter as both of the tools are written in python.
To check what is currently in the queue in Qmail, there are also native tools available, as you should probably know if you have dealt with qmail, e.g.:
debian:~# qmail-qstat

debian:~# qmail-qstat

messages in queue: 2

messages in queue but not yet preprocessed: 0
Often when there are problems with Qmail and more specificly with qmail server queue the qmail-qstat command does show messages in queue, however when an attempt to check what kind of messages are in the queue with qmail-qread no messages are shown, for instance below you see an example of that, even though qmail-qstat claims 2 messages are in the queue, qmail-qread is unable to list the messages:
debian:~# qmail-qread

debian:~#
If all is fine with qmail queue above’s qmail-qread command should have returned something similar to:
debian:~# qmail-qread

26 May 2011 07:46:47 GMT #659982 3517 <hipo@www.pc-freak.net>

remote somemail@gmail.nl

26 May 2011 07:46:47 GMT #659983 3517 <hipo@www.pc-freak.net>
2. Fixing qmail queue manually This is very dangerous initiative, so before you try anything, make sure that you know what you’re doing, the possibility that you make the situation worst if you attempt to tamper manually the qmail queue is quite high 🙂
However if you’re still convinced to try fixing it manually, take a look at /var/qmail/queue it’s very likely that there are permission issues with some of the queued files, in order to fix the situation it’s necessery that the following directories:
gets explored with midnight commander / mc or some kind of convenient file explorer.
If there are queued files owned by users different from qmailq and user group qmail , for instance if owned by the root user, a simple chown qmailq:qmail to the wrong permissions file, should be able to resolve the issues.
Apart from all I explain above, there are many other ways suggested online on howto clean a qmail queue, one very popular one is using James’s qfixq shell script.
This script as of this very date is not working on Debian based systems, the script is dedicated initially to run on Fedora and Redhat based Linuces
Moreover myy experience with qfixq was never successful.
One very important note which is often a cause of many problems, is always make sure you stop and start the qmail server with an interval of at least of 10 seconds.
I’ve managed many servers which after an immediate (undelayed) qmailctl stop and qmailctl start was unable to run the whole engine of the qmail server (and either email sending or email receiving was not properly working) afterwards.
In that cases many weird behaviours are common, consider this seriously if you deal with the qmail-queue, it might happen that even if you have fixed your qmail queue, after a restart the qmail might breaks up. I’ve experienced this kind of oddities numerous times, thus when I do changes to qmail I always make sure I restart the server a couple of times (at least 5 times 😉 ) always with a good delay between the HUPs.
And as always with qmail prayer is always needed, this server is complex, you never know what will happen next 🙂
I've recently decided to add Comment as OpenID functionality to my wordpress blog. The reasons to do that is that I myself have today created an OpenID account. Already million of people have OpenID account without even knowing. Most major search engines and social websites like Google, Yahoo, Live Journal, Hyves, Blogger, Flicker, MySpace automatically creates an OpenID account for newly registered users. It is up to the user to check with each of the aforementioned providers what is the URL of their OpenID account.
Even though OpenID popularity is steadly rising, I'm sure there are still plenty of users who did not heard, used or noticed OpenID yet.
So What the heck is OpenID? For all those who still haven't heard about it, OpenID is a universal web site login system With just one "unified" OpenID account the user can login to multiple websites with no need to create multiple accounts across each and every different website on the internet. The only requirement for the user to be able to use OpenID is that the website in question to have (support) for OpenID credential and the user to have existing OpenID account.
Therefore using one single OpenID you can sign in as a certain user to multiple websites on the internet with no need for annoying registration process to each and every new website you encounter. Another benefit OpenID gives to the user is that you don't have to memorize or keep notes of a tens or thousands of different login accounts across the many different websites on the net. Using OpenID also saves the user from troubles with forgotten password or username as just one OpenID login is used to login you everywhere.
For WordPress blogging platform the Russian Igor Korolev, has written a wordpress plugin – comments-to-wordpress . This plugin adds support for OpenID authentication in WordPress comments.
Here is how to OpenID to WordPress:
1. Download the comments-with-wordpress plugin and unzipAs of writting of this article latest comments-to-wordpress plugin is ver. 1.4. Download the plugin to blog path directory lets say, /var/www/blog/wp-content/plugins/ and unzip:
Next the plugin has to be Enabled, just like any other wordpress plugin via admin menus:
Plugins -> Inactive -> Comments with OpenID (enable)
Once the plugin is enaabled it is necessery to add some code with a text editor in file /var/www/blog/wp-content/themes/default/comments.php
Small noet to make here: If you're not using the default WordPress theme (like I do), you will have to edit the /themes/your-theme-name/comments.php instead.
Save the comments.php file and you Identification for new comments with OpenID will appear in your wordpress Comments form.
The OpenID plugin will add a number of service OpenIDs to choose between like you can see in my blog's plugin section or the screenshot below:
The URL https://www.google.com/accounts/o8/id is just a sample and showed because I clicked on the Google icon. If you have a Google profile you can check the exact ID and use it as URL there. Simply if your browser is logged in Gmail and you have Google profile. OpenID should work. As you can see the plugin supports a number of services which already support OpenID auth, the list of services can be easily extended by adding minor changes in …/plugins/comments-with-openid/comments-with-openid.php
There is also another wordpress plugin with the openid name – http://wordpress.org/extend/plugins/openid/
Downloading and enabling the other openid plugin also adds support for OpenID login in your http://your-url.com/wp-admin/ login page.
Installing the OpenID plugin is needed especially if you're a blogger blogging on 5 or 10 different topic oriented blogs, once downloading and installing the OpenID plugin will allow you to login across the blog ring without loosing time or bothering to remember different passwords across all the blogs. Here is a screenshot of the /wp-admin wordpress login page with the OpenID wp plugin enabled:
As of time of writting according to http://openid.net/get-an-openid/what-is-openid/'s website there are over 50000 major websites on the net already accepting OpenID login. Of course as every technlogy OpenID is not perfect and along with its convenience in some cases it could impose security hole. OpenID opponents claim under some circumstances OpenID is prone to forgery, XSS (cross site scripting) and XSFR attacks. Everyone who is about to use OpenID should be also aware of the great security risk it impose if one OpenID account gets stolen through sniffing, this could mean multiple websites can be accesses with the one single OpenID by the malicious user and a lot of confidential data owned by the user can be revealed or deleted … With this said I think OpenID is not a recommended login technology for Windows users, as windows is famous for being vulnerable to so many Viruses and Spyware/Malware etc.. With non-free software OSes like MS Windows, the user never cannot for sure if the system is infected, hence using OpenID to transfer credentials over the internet or store an OpenID SSL/(TLS) certificate to identify in websites is TOO DANGEROUS! Hope this article was helpful. Cya
Since its early days dosbox has elolved a lot. For all those who haven't heard of dosbox, it is x86 Free Software Linux / FreeBSD DOS emulator
DosBox supports, almost all the game classics we used top lay in oldschool times when DOS (Disk Operating System ) version was running on top of most personal computer.
The most spread versions of DOS people used to use on their PCs were Novell (DR-DOS) more rarely used, and MS-DOS (The Microsoft DOS ver.).
I'm sometimes being sentimental about the past so I remembered for Raptor – Call of the Shadows !
Having a bit of experience with DOSBox to run few DOS games I've decided to give a try with dosbox.
First I have to dig for this shareware, since this game is part of the sharewares, nowdays a binary version of it is freely distributed on the net. Finding the game however took me about 10 minutes, as most of the download links for Raptor, were either dead or required some kind of registration. After a bit of look I found it on an old torrent with few seeders and succeded downloading.
Nicely Raptor works out of the box directly launched with dosbox emulator. Dosbox has packages for most Linux distributions. I personally used it on my Debian Linux so installed via apt:
debian:~# apt-get install dosbox
...
The game works without any dosbox hacks, just download, unarchive and launch with dosbox:
hipo@debian:~$ wget https://www.pc-freak.net/files/Raptor_Call_of_The_Shadows_Apogee_arcade.tar.gz
...
hipo@debian:~$ tar -zxvf Raptor_Call_of_The_Shadows_Apogee_arcade.tar.gz
...
hipo@debian:~$ cd Raptor/
hipo@debian:/home/hipo/Raptor$ dosbox rap.exe
People like me 😉 who lived in that glorious times when DOS was a standard for a desktop operating system pretty much like MS Windows is today, certainly remember the awesome games produced by Apogee Software a company later known as 3D Realms
Apogee until this very day remain one of the greatest game creation companies in history of games. 3D Realms played a crucial role in development of PC game industry as well as has a great santimental value to probably million of old school arcade game addicts.
They can be ben undoubtedly can be praised for having created some of the most awesome arcade games for all times.
Some of the early hit games they created you probably know, few of the titles are:
Duke Nukem I, II
Arctic Adventure
Monster Bash
Stargunner
Commander Keen series
Wolfenstein 3D
Blake Stone
Terminal Velocity (Terminal Reality)
Shadow Warrior
Death Rally
Blood
Apogee was also notable for being a company to had established the so spread mostly during the late 80s up to the early years of the second millenium.
ShareWare model of distribution is an interesting phenomenon, that co-relates more or less with the ideas of Free Software. The idea of ShareWare games was games are distributed for Free and the end customer (gamer) is asked to pay for a game only if he likes it.
Some of the shareware published games was available for free download and play, however the game was only bundled with only a number of game levels to unlock the rest of the game levels you had to play some money.
The shareware games produced were then freely published and shared via dial up access BBS nodes (A text based Bulletin Board System similar to nowdays Forums). BBS has historically been the major way of sharing knowledge and exchanging ideas and opinions preceding the massive rise of the WEB. Today most computer users would probably even haven't heard about BBS, if you like to have a general idea on how BBSes seemed to look dahmer.vistech.net .
ShareWare started to loose speed with the decline of BBS and the emergence of Free Software.
Some of the conceptual ideas of ShareWare found its way in "Open Source & Free Software", and commercial companies like RedHat and SuSE.
If you have tried some other Apogee games with Dosbox on Linux and FreeBSD and you can positively confirm they work it will be great. In theory all of the DOS games of apogee should work fine with dosbox. Any feedback or game recommendations of your favourite games of the DOS years are mostly welcome in comments. I'm curious to hear what was your favourite DOS game. Maybe when I have time I'll prepare a list of my favourite games put them here 😉
I’m realizing the more I’m converting to a fully functional GUI user, the less I’m doing coding or any interesting stuff… I remembered of the old glorious times, when I was full time console user and got a memory on a nifty trick I was so used to back in the day. Back then I was quite often writing shell scripts which were fetching (html) webpages and converting the html content into a plain TEXT (TXT) files
In order to fetch a page back in the days I used lynx – (a very simple UNIX text browser, which by the way lacks support for any CSS or Javascipt) in combination with html2text – (an advanced HTML-to-text converter).
Let’s say I wanted to fetch a my personal home page https://www.pc-freak.net/, I did that via the command:
The content from www.pc-freak.net got spit by lynx as an html source and passed html2pdf wchich saves it in plain text file pcfreak_page.txt The bit more advanced elinks – (lynx-like alternative character mode WWW browser) provides better support for HTML and even some CSS and Javascript so to properly save the content of many pages in plain html file its better to use it instead of lynx, the way to produce .txt using elinks files is identical, e.g.:
By the way back in the days I was used more to links , than the superior elinks , nowdays I have both of the text browsers installed and testing to fetch an html like in the upper example and pipe to html2text produced garbaged output.
Here is the time to tell its not even necessery to have a text browser installed in order to fetch a webpage and convert it to a plain text TXT!. wget file downloading tools supports source dump as well, for all those who did not (yet) tried it and want to test it:
$ wget -qO- https://www.pc-freak.net | html2text
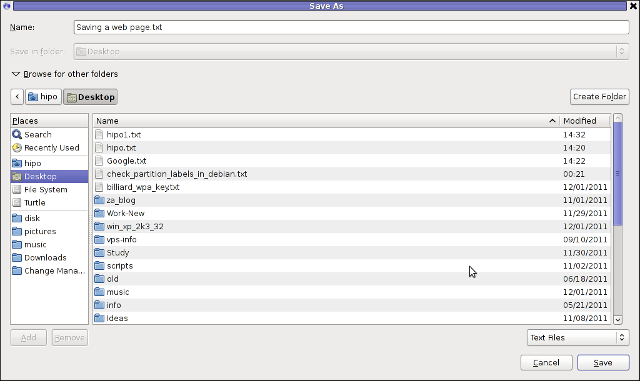
Anyways of course, some pages convertion of text inside HTML tags would not properly get saved with neither lynx or elinks cause some texts might be embedded in some elinks or lynx unsupported CSS or JavaScript. In those cases the GUI browser is useful. You can use any browser like Firefox, Epiphany or Opera ‘s File -> Save As (Text Files) embedded functionality, below is a screenshot showing an html page which I’m about to save as a plain Text File in Mozilla Firefox:
Besides being handy in conjunction with text browsers, html2text is also handy for converting .html pages already existing on the computer’s hard drive to a plain (.TXT) text format. One might wonder, why would ever one would like to do that?? Well I personally prefer reading plain text documents instead of htmls 😉 Converting an html files already existing on hard drive with html2text is done with cmd:
$ html2text index.html >index.txt
To convert a whole directory full of .html (documentation) or whatever files to plain text .TXT , cd the directory with HTMLs and issue the one liner bash loop command:
$ cd html/
html$ for i in $(echo *.html); do html2text $i > $(echo $i | sed -e 's#.html#.txt#g'); done
Now lay off your back and enjoy reading the dox like in the good old hacker days when .TXT files were fashionable 😉
Even though dpkg –purge was invoked /var/lib/vnstat/ refused to be removed since it contained vnstat’s db file eth0
Therefore I deleted by hand before installing again vnstat:
debian:~# rm -rf /var/lib/vnstat/
Tried installing once again vnstat “from scratch”:
debian:~# apt-get install vnstat
...
After that I tried regenerating the vnstat db file eth0 once again with vnstat -u -i eth0 , hoping this should fix the error but it was no go and after that the error:
debian:~# vnstat --hours eth0: Not enough data available yet.
persisted.
I checked in Debian bugs mailing lists and I found, some people complaining about the same issue with some suggsetions on how the error can be work arouned, anyways none of the suggestions worked for me.
Being irritated I further removed / purged once again vnstat and decided to give it a try by installing vnstat from source As of time of writting this article, the latest stable vnstat version is 1.11 . Therefore to install vnstat from source I issued:
debian:~# cd /usr/local/src
debian:/usr/local/src# wget http://humdi.net/vnstat/vnstat-1.11.tar.gz
...
debian:/usr/local/src# tar -zxvvf vnstat-1.11.tar.gz
debian:/usr/local/src# cd vnstat-1.11
debian:/usr/local/src/vnstat-1.11# make & make all & make install
debian:/usr/local/src/vnstat-1.11# cp examples/vnstat.cron /etc/cron.d/vnstat
debian:/usr/local/src/vnstat-1.11# vnstat -u -i eth0
Error: Unable to read database "/var/lib/vnstat/eth0".
Info: -> A new database has been created.
As a last step I put on root crontab to execute:
debian:~# crontab -u root -e
*/5 * * * * /usr/bin/vnstat -u >/dev/null 2>&1
This line updated vnstat db eth0 database, every 5 minutes. After the manual source install vnstat works, just fine 😉
After upgrading my sis’s notebook from Ubuntu 11.04 to Ubuntu 11.10 on her Acer Aspire 5736Z the default gnome wireless network manager started behaving oddly. The Network Manager did not show any networks, even though the network drivers showed that are loaded properly on the Linux host and using the normal commands like iwlist or iwconfig I could list and see the networks and even connect to a network.
As my sister is not a console geek like me it was necessery of course to have an easy way to connect herself to the Internet with nice GUI application. I personally love WICD Network Manager and as the default gnome manager was misbehaving I immediately installed her wicd. With wicd , the wireless networks were properly listed and there was no connection issues to the wireless networks, however the wicd system tray was missing and hence everytime she wanted to connect to a wireless network, she had to keep wicd-client running active in the Dock or run it manually every time on connect, when she had to change her physical location and connect to another wireless network. This of course is quite unhandy and gives her a bad image of Linux and I definitely want to make her love free software and GNU / Linux. Thus I want to give her a GNU / Linux she will be easy to use.
To make her more satisfied with her Ubuntu I googled around to see what causes the wicd systray to be missing after some research online I found out, its probably due to either wicd bug or some kind of interface changes in unity newer versions of Ubuntu. Some people online suggested a fix via changing values in gconf-editor but this work around by changing the values in gconf-editor:
'desktop' -> 'unity' -> 'panel'
I tried this suggested fix which was reported to work on Ubuntu 11.04 but the gconf registry suggested pathway was missing at all so this solution did not worked.
I further read some other suggested solution using wicd-client by invoking it with two args like so:
stanimira@ubuntu:~$ wicd-client -n &
...stanimira@ubuntu:~$ wicd-client -a &
stanimira@ubuntu:~$ wget https://www.pc-freak.net/files/add-wicd-to-whitelist.sh
...
stanimira@ubuntu:~$ sh add-wicd-to-whitelist.sh
...
For my surprise running the script doesn’t immediately changed nothing and wicd wireless connectivity indicator was still missing from the tray. I thought it might need to reload gnome so I give it a restart and HOORAY! after the restart the WICD connected wireless strength show up, like you can see in the screenshot below 😉
Now hope this fix will, help out there experiencing the same issues to work around his wireless network connectivity issues 😉 Cheers.


How to add OpenID functionality to WordPress Comments / What is OpenID?
Tuesday, February 14th, 2012I've recently decided to add Comment as OpenID functionality to my wordpress blog. The reasons to do that is that I myself have today created an OpenID account. Already million of people have OpenID account without even knowing. Most major search engines and social websites like Google, Yahoo, Live Journal, Hyves, Blogger, Flicker, MySpace automatically creates an OpenID account for newly registered users.
It is up to the user to check with each of the aforementioned providers what is the URL of their OpenID account.
Even though OpenID popularity is steadly rising, I'm sure there are still plenty of users who did not heard, used or noticed OpenID yet.
So What the heck is OpenID?
For all those who still haven't heard about it, OpenID is a universal web site login system With just one "unified" OpenID account the user can login to multiple websites with no need to create multiple accounts across each and every different website on the internet.
The only requirement for the user to be able to use OpenID is that the website in question to have (support) for OpenID credential and the user to have existing OpenID account.
Therefore using one single OpenID you can sign in as a certain user to multiple websites on the internet with no need for annoying registration process to each and every new website you encounter. Another benefit OpenID gives to the user is that you don't have to memorize or keep notes of a tens or thousands of different login accounts across the many different websites on the net.
Using OpenID also saves the user from troubles with forgotten password or username as just one OpenID login is used to login you everywhere.
For WordPress blogging platform the Russian Igor Korolev, has written a wordpress plugin – comments-to-wordpress . This plugin adds support for OpenID authentication in WordPress comments.
Here is how to OpenID to WordPress:
1. Download the comments-with-wordpress plugin and unzipAs of writting of this article latest comments-to-wordpress plugin is ver. 1.4.
Download the plugin to blog path directory lets say, /var/www/blog/wp-content/plugins/ and unzip:
# cd /var/www/blog/wp-content/plugins

# wget http://downloads.wordpress.org/plugin/comments-with-openid.zip

...

# unzip comments-with-openid.zip

...
I've also done a mirror for download of comments-with-openid 1.4 here
2. Enable Comments with OpenID wp plugin
Next the plugin has to be Enabled, just like any other wordpress plugin via admin menus:
Plugins -> Inactive -> Comments with OpenID (enable)
Once the plugin is enaabled it is necessery to add some code with a text editor in file /var/www/blog/wp-content/themes/default/comments.php
Small noet to make here: If you're not using the default WordPress theme (like I do), you will have to edit the /themes/your-theme-name/comments.php instead.
Inside the file look for the form input fields:
<p> <input type="text" name="author" ....

...

<p> <input type="text" name="email" id="email" ....

...

<p> <input type="text" name="url" id="url" ....

...
Before the html tags code:
Paste the following code:
<?php comments_with_openid(); ?>
Save the comments.php file and you Identification for new comments with OpenID will appear in your wordpress Comments form.
The OpenID plugin will add a number of service OpenIDs to choose between like you can see in my blog's plugin section or the screenshot below:
The URL https://www.google.com/accounts/o8/id is just a sample and showed because I clicked on the Google icon. If you have a Google profile you can check the exact ID and use it as URL there. Simply if your browser is logged in Gmail and you have Google profile. OpenID should work. As you can see the plugin supports a number of services which already support OpenID auth, the list of services can be easily extended by adding minor changes in …/plugins/comments-with-openid/comments-with-openid.php
There is also another wordpress plugin with the openid name – http://wordpress.org/extend/plugins/openid/
Downloading and enabling the other openid plugin also adds support for OpenID login in your http://your-url.com/wp-admin/ login page.
Installing the OpenID plugin is needed especially if you're a blogger blogging on 5 or 10 different topic oriented blogs, once downloading and installing the OpenID plugin will allow you to login across the blog ring without loosing time or bothering to remember different passwords across all the blogs. Here is a screenshot of the /wp-admin wordpress login page with the OpenID wp plugin enabled:
As of time of writting according to http://openid.net/get-an-openid/what-is-openid/'s website there are over 50000 major websites on the net already accepting OpenID login.
Of course as every technlogy OpenID is not perfect and along with its convenience in some cases it could impose security hole. OpenID opponents claim under some circumstances OpenID is prone to forgery, XSS (cross site scripting) and XSFR attacks. Everyone who is about to use OpenID should be also aware of the great security risk it impose if one OpenID account gets stolen through sniffing, this could mean multiple websites can be accesses with the one single OpenID by the malicious user and a lot of confidential data owned by the user can be revealed or deleted …
With this said I think OpenID is not a recommended login technology for Windows users, as windows is famous for being vulnerable to so many Viruses and Spyware/Malware etc..
With non-free software OSes like MS Windows, the user never cannot for sure if the system is infected, hence using OpenID to transfer credentials over the internet or store an OpenID SSL/(TLS) certificate to identify in websites is TOO DANGEROUS!
Hope this article was helpful. Cya
Tags: authentication, Auto, benefit, code, Comment, Draft, file, functionality, google, hyves, igor korolev, Journal, login, login accounts, major search engines, need, openid, password, php, platform, plugin, popularity, quot, Russian, Search, support, tens, text, type, universal web, url, username, wget, what the heck, Wordpress, writting, Yahoo
Posted in System Administration, Web and CMS, Wordpress | 2 Comments »