Posts Tagged ‘init’
Friday, October 14th, 2011 After setupping a brand new Qmail installation following the QmailRocks Thibs Qmail Debian install guide , I’ve come across unexpected re-occuring error message in /var/log/qmail/qmail-smtpdssl/ , here is the message:
@400000004e9807b10d8bdb7c command-line: exec sslserver -e -vR -l my-mailserver-domain.com -c 30 -u 89 -g 89

-x /etc/tcp.smtp.cdb 0 465 rblsmtpd -r zen.spamhaus.org -r dnsbl.njabl.org -r dnsbl.sorbs.net -r bl.spamcop.net qmail-smtpd

my-mailserver-domain.com /home/vpopmail/bin/vchkpw /bin/true 2>&1

@400000004e9807b10dae2ca4 sslserver: fatal: unable to load certificate
I was completely puzzled initially by the error as the sertificate file /var/qmail/control/servercert.pem was an existing and properly self generated one. Besides that qmail daemontools init script /service/qmail-smtpd/run was loading the file just fine, where the same file failed to get loaded when sslserver command with the cert argument was invoked via /service/qmail-smtpdssl/run
It took me quite a while to thoroughfully investigate on what’s wrong with the new qmail install. Thanksfully after almost an hour of puzzling I found it out and I was feeling as a complete moron to find that the all issues was caused by incorrect permissions of the /var/qmail/control/servercert.pem file.
Here are the incorrect permissions the file possessed:
linux:~# ls -al /var/qmail/control/servercert.pem

-rw------- 1 qmaild qmail 2311 2011-10-12 13:21 /var/qmail/control/servercert.pem
To fix up the error I had to allow all users to have reading permissions over servercert.pem , e.g.:
linux:~# chmod a+r /var/qmail/control/servercert.pem
After adding all users readable bit on servercert.pem the file permissions are like so:
linux:~# ls -al /var/qmail/control/servercert.pem

-rw-r--r-- 1 qmaild qmail 2311 2011-10-12 13:21 /var/qmail/control/servercert.pem
Consequently I did a qmail restart to make sure the new readable servercert.pem will get loaded from the respective init script:
linux:~# qmailctl restart

* Stopping qmail-smtpdssl.

* Stopping qmail-smtpd.

* Sending qmail-send SIGTERM and restarting.

* Restarting qmail-smtpd.

* Restarting qmail-smtpdssl.
Now the annoying sslserver: fatal: unable to load certificate message is no more and all works fine, Hooray! 😉
Tags: amp, argument, certificate, com, control, dae, dnsbl, error message, exec, file, gnu linux, guide, incorrect permissions, init, installation, Linux, log, moron, njabl, pem, pemTo, qmail installation, qmailctl, qmaild, QmailRocks, rblsmtpd, reading, rw 1, script, script service, sertificate, smtp, spamhaus, sslserver, Stopping, vr, zen
Posted in Linux, Qmail, System Administration | 3 Comments »
Thursday, February 9th, 2012 Every now and then I have to work on servers running CentOS or Fedora Linux. Very typical problem that I observe on many servers which I have to inherit is the previous administrator did not know about the existence of NTP (Network Time Protocol) or forgot to install the ntpd server. As a consequence the many installed server services did not have a correct clock and at some specific cases this caused issues for web applications running on the server or any CMS installed etc.
The NTP Daemon is existing in GNU / linux since the early days of Linux and it served quite well so far. The NTP protocol has been used since the early days of the internet and for centuries is a standard protocol for BSD UNIX.
ntp is available in I believe all Linux distributions directly as a precompiled binary and can be installed on Fedora, CentOS with:
[root@centos ~]# yum install ntp
ntpd synchronizes the server clock with one of the /etc/ntp.conf defined RedHat NTP list
server 0.rhel.pool.ntp.org

server 1.rhel.pool.ntp.org

server 2.rhel.pool.ntp.org
To Synchronize manually the server system clock the ntp CentOS rpm package contains a tool called ntpdate :
Hence its a good practice to use ntpdate to synchronize the local server time with a internet server, the way I prefer to do this is via a government owned ntp server time.nist.gov, e.g.
[root@centos ~]# ntpdate time.nist.gov

8 Feb 14:21:03 ntpdate[9855]: adjust time server 192.43.244.18 offset -0.003770 sec
Alternatively if you prefer to use one of the redhat servers use:
[root@centos ~]# ntpdate 0.rhel.pool.ntp.org

8 Feb 14:20:41 ntpdate[9841]: adjust time server 72.26.198.240 offset 0.005671 sec
Now as the system time is set to a correct time via the ntp server, the ntp server is to be launched:
[root@centos ~]# /etc/init.d/ntpd start

...
To permanently enable the ntpd service to start up in boot time issue also:
[root@centos ~]# chkconfig ntpd on
Using chkconfig and /etc/init.d/ntpd cmds, makes the ntp server to run permanently via the ntpd daemon:
[root@centos ~]# ps ax |grep -i ntp

29861 ? SLs 0:00 ntpd -u ntp:ntp -p /var/run/ntpd.pid -g
If you prefer to synchronize periodically the system clock instead of running permanently a network server listening (for increased security), you should omit the above chkconfig ntpd on and /etc/init.d/ntpd start commands and instead set in root crontab the time to get synchronize lets say every 30 minutes, like so:
[root@centos ~]# echo '30 * * * * root /sbin/ntpd -q -u ntp:ntp' > /etc/cron.d/ntpd
The time synchronization via crontab can be also done using the ntpdate cmd. For example if you want to synchronize the server system clock with a network server every 5 minutes:
[root@centos ~]# crontab -u root -e
And paste inside:
*/5 * * * * /sbin/ntpdate time.nist.gov 2>1 > /dev/null
ntp package is equipped with ntpq – Standard NTP Query Program. To get very basic stats for the running ntpd daemon use:
[root@centos ~]# ntpq -p

remote refid st t when poll reach delay offset jitter

======================================================

B1-66ER.matrix. 192.43.244.18 2 u 47 64 17 149.280 41.455 11.297

*ponderosa.piney 209.51.161.238 2 u 27 64 37 126.933 32.149 8.382

www2.bitvector. 132.163.4.103 2 u 1 64 37 202.433 12.994 13.999

LOCAL(0) .LOCL. 10 l 24 64 37 0.000 0.000 0.001
The remote field shows the servers to which currently the ntpd service is connected. This IPs are the servers which ntp uses to synchronize the local system server clock. when field shows when last the system was synchronized by the remote time server and the rest is statistical info about connection quality etc.
If the ntp server is to be run in daemon mode (ntpd to be running in the background). Its a good idea to allow ntp connections from the local network and filter incoming connections to port num 123 in /etc/sysconfig/iptables :
-A INPUT -s 192.168.1.0/24 -m state --state NEW -p udp --dport 123 -j ACCEPT

-A INPUT -s 127.0.0.1 -m state --state NEW -p udp --dport 123 -j ACCEPT

-A INPUT -s 0.0.0.0 -m state --state NEW -p udp --dport 123 -j DROP
Restrictions on which IPs can be connected to the ntp server can also be implied on a ntpd level through /etc/ntp.conf. For example if you would like to add the local network IPs range 192.168.0.1/24 to access ntpd, in ntpd.conf should be added policy:
# Hosts on local network are less restricted.

restrict 192.168.0.1 mask 255.255.255.0 nomodify notrap
To deny all access to any machine to the ntpd server add in /etc/ntp.conf:
restrict default ignore
After making any changes to ntp.conf , a server restart is required to load the new config settings, e.g.:
[root@centos ~]# /sbin/service ntpd restart
In most cases I think it is better to imply restrictions on a iptables (firewall) level instead of bothering change the default ntp.conf
Once ntpd is running as daemon, the server listens for UDP connections on udp port 123, to see it use:
[root@centos ~]# netstat -tulpn|grep -i ntp

udp 0 0 10.10.10.123:123 0.0.0.0:* 29861/ntpd

udp 0 0 80.95.28.179:123 0.0.0.0:* 29861/ntpd

udp 0 0 127.0.0.1:123 0.0.0.0:* 29861/ntpd

udp 0 0 0.0.0.0:123 0.0.0.0:* 29861/ntpd
Tags: Auto, boot time, BSD, bsd unix, CentOS, configure, consequence, correct time, dport, Draft, early days of the internet, existence, feb 14, GNU, gnu linux, government, init, INPUT, internet server, level, linux distributions, list server, listserver, network time protocol, ntp daemon, ntp protocol, ntpd, ntpntpd, orgserver, package, Protocol, Redhat, root, rpm, server, server clock, server services, server system, server time, standard protocol, system, system clock, system time, time issue, time server, tool, typical problem, yum
Posted in Linux, System Administration | 1 Comment »
Wednesday, January 11th, 2012 Since I've blogged about my recent skype issues. I've played a lot with pulseaudio, alsa, alsa-oss to experimented a lot until I figured out why Skype was failing to properly delivery sound and record via my embedded laptop mic.
Anyways, while researching on the cause of my Thinkpad r61 mic issues, I've red a bunch of blog posts by people experiencing microphone oddities with Lenovo Thinkpads
Throughout the search I come across one very good article, which explained that in many cases the Thinkpad sound problems are caused by the snd-hda-intel alsa kernel module. snd-hda-intel fails to automatically set proper sb model type argument during Linux install when the soundcard is initialized with some argument like options snd-hda-intel model=auto
Hence, the suggested fix which should resolve this on many Thinkpad notebooks is up to passing the right module argument:
To fix its neceessery to edit /etc/modprobe.d/alsa-base.conf .
debian:~# vim /etc/modprobe.d/alsa-base.conf
Find the line in the file starting with:
options snd-hda-intel model=
and substitute with:
options snd-hda-intel model=thinkpad
Finally a restart of Advaned Linux Sound Architecture (alsa) is required:
debian:~# /etc/init.d/alsa restart

...
At most cases just restarting the alsa via its init script is not enough, since the ssnd-hda-intel kernel module is already in use by some program or something, so its best to do a reboot to make sure the module is loaded with the new model=thinkpad argument.
My exact laptop sound card model is:
debian:~# lspci |grep -i audio

00:1b.0 Audio device: Intel Corporation 82801H (ICH8 Family) HD Audio Controller (rev 03)
After changing the module and using alsamixer and aumix to make sure mic is unmuted and its volume is high enough, mic sound rec works fine.
Tags: Advaned, alsa, alsamixer, architecture, argument, audio controller, aumix, Auto, blogged, card, card model, cause, confFind, Draft, file, init, init script, intel corporation, kernel module, laptop, microphone, model auto, model type, modprobe, new model, oddities, pulseaudio, Reboot, script, Search, snd, Solve, something, sound architecture, sound card, soundcard, ssnd, substitute, thinkpad notebooks, thinkpad r61, thinkpads, type, type argument, Ubuntu, vim
Posted in Linux, Various | No Comments »
Wednesday, December 28th, 2011 
I've recently installed a jabber server on one Debian Lenny server and hence decided to describe my installations steps hoping this would help ppl who would like to run their own jabber server on Debian . After some research of the jabber server softwares available, I decided to install Ejabberd
The reasons I choose Ejabberd is has rich documentation, good community around the project and the project in general looks like one of the best free software jabber servers available presently. Besides that ejabberd doesn't need Apache or MySQL and only depends on erlang programming language.
Here is the exact steps I followed to have installed and configured a running XMPP jabber server.
1. Install Ejabberd with apt
The installation of Ejabberd is standard, e.g.:
debian:~# apt-get --yes install ejabberd
Now as ejabberd is installed, some minor configuration is necessery before the server can be launched:
2. Edit /etc/ejabberd/ejabberd.cfg
Inside I changed the default settings for:
a) Uncomment%%override_acls.. Changed:
%%%% Remove the Access Control Lists before new ones are added.%%%%override_acls.
to
%%

%% Remove the Access Control Lists before new ones are added.

%%

override_acls.
b) Admin User from:
%% Admin user

{acl, admin, {user, "", "example.com"}}.
to
%% Admin user

{acl, admin, {user, "admin", "jabber.myserver-host.com"}}.
c) default %% Hostname of example.com to my real hostname:
%% Hostname

{hosts, ["jabber.myserver-host.com"]}.
The rest of the configurations in /etc/ejabberd/ejabberd.cfg can stay like it is, though it is interesting to read it carefully before continuing as, there are some config timings which might prevent the XMPP server from user brute force attacks as well as few other goodies like for example (ICQ, MSN , Yahoo etc.) protocol transports.
3. Add iptables ACCEPT traffic (allow) rules for ports which are used by Ejabberd
The minimum ACCEPT rules to add are:
/sbin/iptables -A INPUT -p tcp -m tcp --dport 22 -j ACCEPT

/sbin/iptables -A INPUT -p tcp -m tcp --dport 5222 -j ACCEPT

/sbin/iptables -A INPUT -p udp -m udp --dport 5222 -j ACCEPT

/sbin/iptables -A INPUT -p tcp -m tcp --dport 5223 -j ACCEPT

/sbin/iptables -A INPUT -p udp -m udp --dport 5223 -j ACCEPT

/sbin/iptables -A INPUT -p tcp -m tcp --dport 5269 -j ACCEPT

/sbin/iptables -A INPUT -p udp -m udp --dport 5269 -j ACCEPT

/sbin/iptables -A INPUT -p tcp -m tcp --dport 5280 -j ACCEPT

/sbin/iptables -A INPUT -p udp -m udp --dport 5280 -j ACCEPT

/sbin/iptables -A INPUT -p tcp -m tcp --dport 4369 -j ACCEPT

/sbin/iptables -A INPUT -p udp -m udp --dport 4369 -j ACCEPT

/sbin/iptables -A INPUT -p tcp -m tcp --dport 53873 -j ACCEPT
Of course if there is some specific file which stores iptables rules or some custom firewall these rules has to be added / modified to fit appropriate place or chain.
4. Restart ejabberd via init.d script
debian:~# /etc/init.d/ejabberd restart

Restarting jabber server: ejabberd is not running. Starting ejabberd.
5. Create ejabberd necessery new user accounts
debian:~# /usr/sbin/ejabberdctl register admin jabber.myserver-host.com mypasswd1

debian:~# /usr/sbin/ejabberdctl register hipo jabber.myserver-host.com mypasswd2

debian:~# /usr/sbin/ejabberdctl register newuser jabber.myserver-host.com mypasswd3

debian:~# /usr/sbin/ejabberdctl register newuser1 jabber.myserver-host.com mypasswd4

...
etc.
ejabberdctl ejabberd server client (frontend) has multiple other options and the manual is a good reading.
One helpful use of ejabberdctl is:
debian:~# /usr/sbin/ejabberdctl status

Node ejabberd@debian is started. Status: started

ejabberd is running
ejabberctl can be used also to delete some existent users, for example to delete the newuser1 just added above:
debian:~# /usr/sbin/ejabberdctl unregister newuser jabber.myserver-host.com
6. Post install web configurations
ejabberd server offers a web interface listening on port 5280, to access the web interface right after it is installed I used URL: http://jabber.myserver-host.com:5280/admin/
To login to http://jabber.myserver-host.com:5280/admin/ you will need to use the admin username previously added in this case:
admin@jabber.myserver-host.com mypasswd1
Anyways in the web interface there is not much of configuration options available for change.
7. Set dns SRV records
I'm using Godaddy 's DNS for my domain so here is a screenshot on the SRV records that needs to be configured on Godaddy:

In the screenshto Target is the Fually qualified domain hostname for the jabber server.
Setting the SRV records for the domain using Godaddy's DNS could take from 24 to 48 hours to propagate the changes among all the global DNS records so be patient.
If instead you use own custom BIND DNS server the records that needs to be added to the respective domain zone file are:
_xmpp-client._tcp 900 IN SRV 5 0 5222 jabber.myserver-host.com.

_xmpp-server._tcp 900 IN SRV 5 0 5269 jabber.myserver-host.com.

_jabber._tcp 900 IN SRV 5 0 5269 jabber.myserver-host.com.
8. Testing if the SRV dns records for domain are correct
debian:~$ nslookup
> set type=SRV

> jabber.myserver-host.com

 ...
> myserver-host.com
If all is fine above nslookup request should return the requested domain SRV records.
You might be wondering what is the purpose of setting DNS SRV records at all, well if your jabber server has to communicate with the other jabber servers on the internet using the DNS SRV record is the way your server will found the other ones and vice versa.
DNS records can also be checked with dig for example
$ dig SRV _xmpp-server._tcp.mydomain.net
[…]
;; QUESTION SECTION:
;_xmpp-server._tcp.mydomain.net. IN SRV
;; ANSWER SECTION:
_xmpp-server._tcp.mydomain.net. 259200 IN SRV 5 0 5269 jabber.mydomain.net.
;; ADDITIONAL SECTION:
jabber.mydomain.net. 259200 IN A 11.22.33.44
;; Query time: 109 msec
;; SERVER: 212.27.40.241#53(212.27.40.241)
;; WHEN: Sat Aug 14 14:14:22 2010
;; MSG SIZE rcvd: 111
9. Debugging issues with ejabberd
Ejabberd log files are located in /var/log/ejabberd , you will have to check the logs in case of any issues with the jabber XMPP server. Here is the three files which log messages from ejabberd:
debian:~$ ls -1 /var/log/ejabberd/

ejabberd.log

erl_crash.dump

sasl.log
I will not get into details on the logs as the best way to find out about them is to read them 😉
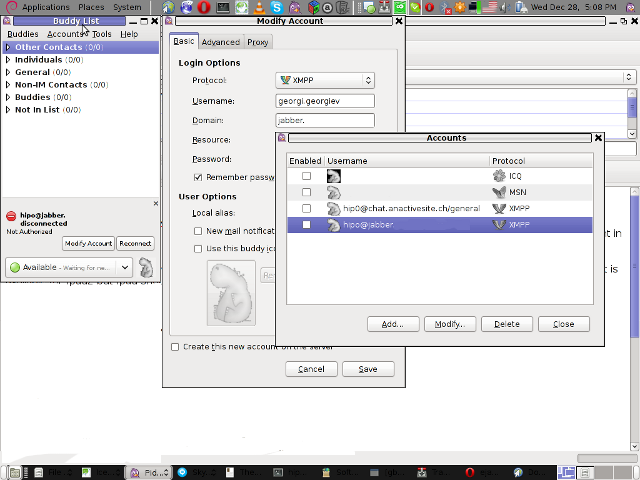
10. Testing ejabberd server with Pidgin
To test if my Jabber server works properly I used Pidgin universal chat client . However there are plenty of other multiplatform jabber clients out there e.g.: Psi , Spark , Gajim etc.
Here is a screenshot of my (Accounts -> Manage Accounts -> Add) XMPP protocol configuration
Tags: admin, apache, best free software, brute force, cfg, com, configure, custom, default hostname, default settings, DNS, doesn, dport, ejabberd, ejabberdctl, exact steps, file, GNU, goodies, hostname, hosts, init, INPUT, Install, installation, Jabber, Linux, Lists, mypasswd, necessery, override, ports, ppl, programming language, Protocol, quot, quot quot, rich documentation, server, servers, software, tcp, transports, uncomment, User, xmpp
Posted in Linux, System Administration, Various | 8 Comments »
Tuesday, November 1st, 2011 My FreeBSD router has started running out of space, I looked for ways to clean up some space. So I remembered some programs are generating core files while they crash. Some of these files are really huge and ban be from 1Mb to > 1G.
I used find to first list all my produced core files starting from root directory (/) , like so:
find / -name core -exec du -hsc {} ;

....
Having a list of my core files with the respective core file size and after reviewing, I deleted one by one the cores which were there just taking up space.
It’s a wise idea that core dumps file generation on program crash is completely disabled, however I forgot to disable cores, so I had plenty of the cores – (crash files which are handy for debug purposes and fixing the bug that caused the crash).
Further on I used an /etc/rc.conf – dumpdev=NO , variable which instructs the kernel to not generate core files on program crash:
freebsd# echo 'dumpdev=NO' >> /etc/rc.conf
Next, to make dumpdev=NO , take affect I rebooted the server:
freebsd# shutdown -r now

...
There is a way to instruct every server running daemon to know about the newly set dumpdev=NO by restarting each of the services with their init scripts individually, but I was too lazy to do that.
Tags: ban, conf, confNext, core dump, core dumps, core files, cores, crash, DEBUG, dump, dumpdev, exec, file, freebsd, freebsd router, generation, hsc, idea, init, init scripts, kernel, list, name, obsolete program, plenty, program core, program crash, root, root directory, running out of space, shutdown, Space, taking up space, way, wise idea
Posted in FreeBSD, System Administration | No Comments »
Monday, June 21st, 2010 If you are a system administrator, you have probably wondered at least once ohw to configure your Linux server to automatically reboot itself if it crashes, is going through a mass CPU overload, e.g. the server load average “hits the sky”.
I just learned from a nice article found here that there is a kernel variable which when enabled takes care to automatically restart a crashed server with the terrible Kernel Panic message we all know.
The variable I’m taking about is kernel.panic for instance kernel.panic = 20 would instruct your GNU Linux kernel to automatically reboot if it experiences a kernel panic system crash within a time limit of 20 seconds.
To start using the auto-reboot linux capabilities on a kernel panic occurance just set the variable to /etc/sysctl.conf
debian-server:~# echo 'kernel.panic = 20' >> /etc/sysctl.conf
Now we will also have to enable the variable to start being use on the system, so execute:
debian-server:~# sysctl -p
There you go automatic system reboots on kernel panics is now on.
Now to further assure yourself the linux server you’re responsible of will automatically restart itself on a emergency situation like a system overload I suggest you check Watchdog
You might consider checking out this auto reboot tutorial which explains in simple words how watchdog is installed and configured.
On Debian installing and maintaining watchdog is really simple and comes to installing and enabling the watchdog system service, right afteryou made two changes in it’s configuration file /etc/watchdog.conf
To do so execute:
debian-server:~# apt-get install watchdog

debian-server:~# echo "file = /var/log/messages" >> /etc/watchdog.conf

debian-server:~# echo "watchdog-device = /dev/watchdog" >> /etc/watchdog.conf
Well that should be it, you might also need to load some kernel module to monitor your watchdog.
On my system the kernel modules related to watchdog are located in:
/lib/modules/2.6.26-2-amd64/kernel/drivers/watchdog/
If not then you should certainly try the software watchdog linux kernel module called softdog , to do so issue:
debian-server:~# /sbin/modprobe softdog
It’s best if you load the module while the softdog daemon is disabled.
If you consider auto loadig the softdog software watchdog kernel driver you should exec:
debian-server:~# echo 'softdog' >> /etc/modules
Finally a start of the watchdog is necessery:
debian-server:~# /etc/init.d/watchdog start

Stopping watchdog keepalive daemon....

Starting watchdog daemon....
That should be all your automatic system reboots should be now on! 🙂
Tags: auto reboot, care, configuration file, configure, crash, debian gnu, debian server, emergency, emergency situation, file, gnu linux, How to automatically reboot (restart) Debian GNU Lenny Linux on kernel panic, init, instance, kernel panic, kernel panics, limit, linux capabilities, linux kernel, linux server, log, log messages, modprobe, nbsp, necessery, ohw, quot, server load, sky, software, software watchdog with kernel module softdog, some general CPU overload or system crash, squeeze, Stopping, system administrator, system crash, system overload, time, time limit, tutorial, Watchdog, watchdog system
Posted in Linux, System Administration | 6 Comments »
Monday, October 17th, 2011 Often when some of my companies, I’m employed with rents dedicated GNU / Linux servers co-located in data centers,
usually the local hostname is configured while the system is being installed, therefore many times when we forget to tell the Dedicated provider what kind of hostname, we’re intending to use they came up with some kind of hostname which is randomly set based on the dedicated provider’s company name or a server ID number. Cosenquently the machine hostname assigned due to company local server numbering policy.
Hence after one logs in to the newly purchased server with over SSH protocol, then we end up with a hostname like for example:
server56663:~#
This hostname naming, often doesn’t make much sense for the services running on the server and doesn’t have nothing to do to the provided internet services by the server, however its really important for me to orientate myself which server I have logged to. Therefore one of the first things I do while configuring a new server is to change the local server assigned hostname .
Besides having the hostname shown by the shell prompt, there is a quick command to print out the Fully Qualified Domain hostname, by issuing:
>server56663:~# hostname --fqdn

server56663.dedicompany.com
The Universal GNU / Linux way which works on almost all Linux distributions to change the configured hostname goes like this:
Edit /etc/hosts . A default /etc/hosts file looks something like:
server56663:~# cat /etc/hosts127.0.0.1 localhost.localdomain localhost

127.0.1.1 server56663.dedicompany.com server56663

# The following lines are desirable for IPv6 capable hosts

::1 ip6-localhost ip6-loopback

fe00::0 ip6-localnet

ff00::0 ip6-mcastprefix

ff02::1 ip6-allnodes

ff02::2 ip6-allrouters
On the second line which assigns the hostname for the loopback IP address 127.0.0.1 , you see the identifier for the local hostname:
127.0.1.1 server56663.dedicompany.com server56663
To change that to a custom local hostname of choice, the line should be modified to look like:
127.0.1.1 CustomHostName server56663.dedicompany.com server56663
On some GNU / Linux distributions the line 127.0.1.1 might be completely absent, this is the case with for example CentOS and Fedora and many other distros
On these Gnu / Linux distributions the /etc/hosts might looks like:
# Do not remove the following line, or various programs# that require network functionality will fail.127.0.0.1 localhost.localdomain localhost
Alas on Fedora, CentOS and other distros to set the localhost hostname, one more line should be added to /etc/hosts . The line to add looks like so:
123.123.123.123 CustomHostName
After modification and adding the custom hostname name there the file should look something like:
[root@centos ~]# cat /etc/hosts127.0.0.1 localhost localhost123.123.123.123 CustomHostName
After including correct records in /etc/hosts , next the hostname command is used to change the localhost name configured to show as a machine name on user ssh login:
server56663:~# hostname CustomHostName

server56663:~#
Further to check that the new hostname is set for all ssh sessions incoming to the ssh server from now on the hostname command is used without arguments:
server56663:~# hostname

CustomHostName
Even though now the hostname is changed to CustomHostName still, the hostname for the current opened ssh session is keeping the old hostname:
server56663:~# hostname

server56663
To see the hostname change in your shell prompt you will have to logout and login again to the system.
Here its good to mention the Linux kernel has a variable kernel.hostname, which can be used to set the local machine hostname. Actually the hostname command automatically set the kernel.hostname kernel variable.
If of course one want to change the kernel var directly without using the hostname command, this can be achieved with sysctl, e.g.:
server56663:~# sysctl kernel.hostname=CustomHostName
On Debian GNU / Linux the way to change the hostname there is a “debian way” approach:
Debian has a file /etc/hostname , which is there just for the sake of configuring the system hostname. During system boot process Debian reads /etc/hostname file and sets the machine hostname to the word inside. The /etc/hostname file is being red and configured by Debian’s /etc/init.d/hostname.sh shell script.
Therefore after changing the hostname in Debian by editting /etc/honstmame , the /etc/init.d/hostname.sh needs to be invoked for the new hostname to be set system wide, like so;
server56663:~# /etc/init.d/hostname.sh
Just like with other GNU / Linux distributions for the new hostname to be active on the current shell a logout and login via ssh is necessery again.
With Fedora, CentOS and other Redhat based distributions the “proper” way to change the hostname is:
a. change the /etc/hosts way described above in the aticle.
b. Edit /etc/sysconfig/network file and write inside the new custom hostname.
[root@centos ~]# grep -i hostname /etc/sysconfig/network

HOSTNAME=localhost.localdomain
After HOSTNAME value is set to the new desired hostname and file is saved, the network script should be invoke with restart argument:
[root@centos ~]# /etc/init.d/network restart
One more thing to consider always when changing a hostname is that some of the system services are using the configured local machine hostname, and hence need to be restarted also from a active shell where the new hostname is already set and active.
Since the system hostname is being configured usually, with the rest of server configurations on system boot, after setting the desired hostname it is a good idea to have a system reboot. This will guarantee that all running daemons will read the newly set hostname:
E.g.:
server56663:~# shutdown -r now
On next boot the hostname should be set to whatever you put as a custom hostname.
Tags: allnodesff, allroutersOn, CentOS, change, com, custom, doesn, domain, file, gnu linux, hostname, hosts file, init, internet services, ip6, Linux, linux distributions, linux servers, localdomain, localhost, localnet, localnetff, login, logs, loopback, mcastprefix, mcastprefixff, number, orientate, Protocol, Qualified, quot, rents, root, sense, server id, Shell, something, ssh, Universal
Posted in Linux, System Administration, Various | 1 Comment »
Saturday, August 27th, 2011 Yesterday, most of the time I’m playing around with Squirrelmail, finally, time came when I had enough free time to fix the squirrelmail installed on mail.www.pc-freak.net
The installed version there has been broken after upgrade of the Apache webserver on the FreeBSD and failed with some stupid preg_match exception immediately after a user tries to login, anyways I decided to not install the squirrelmail from freebsd ports but rather download it directly from squirrelmail.org .
Installation went smoothly, however after testing to send email typing the email in Bulgarian with a default charset of (UTF-8) set from the Desktop machine from which I’ve written it, suddenly the sent emails encoding ended garbled.
One of my employees complained about receiving emails which are unreadable thus I proceeded immediately to check and fix the webmail letters encoding.
My logical first assumption was that the problem is caused by the FreeBSD missing a correct locale, thus the first thing I did in order to isolate the problem was check the installed locales:
pcfreak# locale -a | grep -i UTF-8|wc -l

56
As the above command output shows an UTF-8 locales was installed so I further checked if a specific locale for Bulgarian UTF-8 – bg_BG.UTF-8 is installed on the system:
pcfreak# locale -a |grep bg_BG.UTF-8

bg_BG.UTF-8
Being sure that the bg_BG.UTF-8 is installed I excluded missing locales as a possible problem cause.
Next I’ve noticed that locale command returns a default setting for my root and users set to:
pcfreak# locale

LANG=en_US.ISO8859-1

LC_CTYPE="C"

LC_COLLATE="C"

LC_TIME="C"

LC_NUMERIC="C"

LC_MONETARY="C"

LC_MESSAGES="C"

LC_ALL=
Obviously the en_US.ISO8859-1 is not compatible with UTF-8, so I had to change a consult with the FreeBSD handbook suggested a way to change the LANG and LC_COLLATE locale set variables by creating a ~/.login_conf inside the user home directory which default locale has to be set.
In my case I assumed that possible the improper LANG is set to the running Apache as Apache is run via the init script /usr/local/etc/rc.d/apache2 , therefore to work it around for apache either I had to add manually:
LANG=bg_BG.UTF-8
somewhere near the beginning of the Apache init script, or alternatively set a proper .login.conf inside the root user home dir, e.g. /root/.login.conf. An example file which sets the default locale for the root user on BSD to LANG=bg_BG.UTF-8 , is shown below:
pcfreak# cat /root/.login_conf

me:

:charset=UTF-8:

:lang=bg_BG.UTF-8:
To fix the default encoding to be set to bg_BG.UTF-8 in all shell user accounts existing on pc-freak, I used a small script which copies the /root/.login_conf to all /home directories and immediately after chowns the user to be owned by the respective user, here is bash one liner script used:
pcfreak# cd /home; for i in $(echo *); do cp -rpf /root/.login_conf $i/; chown $i:$i $i/.login_conf; done;
Now after relogging to all active shells the default LANG character setting and LC_COLLATE were changed and I could see this by issuing again the locale command:
pcfreak# locale

LANG=bg_BG.UTF-8

LC_CTYPE="bg_BG.UTF-8"

LC_COLLATE="bg_BG.UTF-8"

LC_TIME="bg_BG.UTF-8"

LC_NUMERIC="bg_BG.UTF-8"

LC_MONETARY="bg_BG.UTF-8"

LC_MESSAGES="bg_BG.UTF-8"

LC_ALL=
To make sure the apache is reading the new LANG locale settings, further on I forced apache restart:
pcfreak# /usr/local/etc/rc.d/apache2 restart
I opened a browser and sent one more mail typed in cyrillic with squirrelmail addressing my own email to test, if finally the mail char encoding issues are gone. But NOO!! still the same issue.
I was out of ideas as it seems there was no logical reason for the cyrillic letters to break when sent via squirrelmail.
And then the lightbulb was up with the idea to check the squirrelmail configuration encoding itself, thus I launched immediately the squirrel ./configure script and guess what, the encoding there was also imroperly SET to en_US.ISO8859-1!
pcfreak# cd /var/www/webmail; ./configureSquirrelMail Configuration : Read: config.php (1.4.0)

----------------------------------------

Main Menu --

1. Organization Preferences

2. Server Settings

...

8. Plugins

9. Database

10. Languages

Command >> 10

SquirrelMail Configuration : Read: config.php (1.4.0)

----------------------------------------

Language preferences

1. Default Language : eu_US

2. Default Charset : en_US.ISO8859-1

3. Enable lossy encoding : false

Command >>
To change the encoding to properly play with Bulgarian, cyrillic in UTF-8 I choose:
Command >> 1

SquirrelMail attempts to set the language in many ways. If it

can not figure it out in another way, it will default to this

language. Please use the code for the desired language.
[en_US]: bg_BG
Command >> 2

SquirrelMail attempts to set the language in many ways. If it

can not figure it out in another way, it will default to this

language. Please use the code for the desired language.

[en_US.ISO8859-1]: bg_BG.UTF-8
Finally to save the new settings into squirrelmail configuration used the S cmd:
Command >> S

...
And Hallelujah! My Bulgarian letters started being properly encoded and sent in squirrelmail 😉 thx God
Tags: apache webserver, assumption, bg, charset, code, collate, config, configure, CTYPE, default locale, Desktop, desktop machine, download, exception, free time, freebsd handbook, freebsd ports, grep, home directory, init, installed version, ISO, lc, login, machine, mail, MONETARY, numeric, pcfreak, php, preg, root, script, Squirrel, thislanguage, time, time c, utf 8, webmail
Posted in Linux, Linux and FreeBSD Desktop, System Administration, Web and CMS | 1 Comment »
Wednesday, August 10th, 2011 
I’m in charge of dozen of Linux servers these days and therefore am required to restart many of the servers with a support ticket (because many of the Data Centers where the servers are co-located does not have a web interface or IPKVM connected to the server for that purpose). Therefore the server restart requests in case of crash sometimes gets processed in few hours or in best case in at least half an hour.
I’m aware of the existence of Hardware Watchdog devices, which are capable to detect if a server is hanged and auto-restart it, however the servers I administrate does not have Hardware support for Watchdog timer.
Thanksfully there is a free software project called Watchdog which is easily configured and mitigates the terrible downtimes caused every now and then by a server crash and respective delays by tech support in Data Centers.
I’ve recently blogged on the topic of Debian Linux auto-restart in case of kernel panic , however now i had to conifgure watchdog on some dozen of CentOS Linux servers.
It appeared installation & configuration of Watchdog on CentOS is a piece of cake and comes to simply following few easy steps, which I’ll explain quickly in this post:
1. Install with yum watchdog to CentOS
[root@centos:/etc/init.d ]# yum install watchdog

...
2. Add to configuration a log file to log watchdog activities and location of the watchdog device
The quickest way to add this two is to use echo to append it in /etc/watchdog.conf:
[root@centos:/etc/init.d ]# echo 'file = /var/log/messages' >> /etc/watchdog.conf

echo 'watchdog-device = /dev/watchdog' >> /etc/watchdog.conf
3. Load the softdog kernel module to initialize the software watchdog via /dev/watchdog
[root@centos:/etc/init.d ]# /sbin/modprobe softdog
Initialization of softdog should be indicated by a line in dmesg kernel log like the one above:
[root@centos:/etc/init.d ]# dmesg |grep -i watchdog

Software Watchdog Timer: 0.07 initialized. soft_noboot=0 soft_margin=60 sec (nowayout= 0)
4. Include the softdog kernel module to load on CentOS boot up
This is necessery, because otherwise after reboot the softdog would not be auto initialized and without it being initialized, the watchdog daemon service could not function as it does automatically auto reboots the server if the /dev/watchdog disappears.
It’s better that the softdog module is not loaded via /etc/rc.local but the default CentOS methodology to load module from /etc/rc.module is used:
[root@centos:/etc/init.d ]# echo modprobe softdog >> /etc/rc.modules

[root@centos:/etc/init.d ]# chmod +x /etc/rc.modules
5. Start the watchdog daemon service
The succesful intialization of softdog in step 4, should have provided the system with /dev/watchdog, before proceeding with starting up the watchdog daemon it’s wise to first check if /dev/watchdog is existent on the system. Here is how:
[root@centos:/etc/init.d ]# ls -al /dev/watchdogcrw------- 1 root root 10, 130 Aug 10 14:03 /dev/watchdog
Being sure, that /dev/watchdog is there, I’ll start the watchdog service.
[root@centos:/etc/init.d ]# service watchdog restart

...
Very important note to make here is that you should never ever configure watchdog service to run on boot time with chkconfig. In other words the status from chkconfig for watchdog boot on all levels should be off like so:
[root@centos:/etc/init.d ]# chkconfig --list |grep -i watchdog

watchdog 0:off 1:off 2:off 3:off 4:off 5:off 6:off
Enabling the watchdog from the chkconfig will cause watchdog to automatically restart the system as it will probably start the watchdog daemon before the softdog module is initialized. As watchdog will be unable to read the /dev/watchdog it will though the system has hanged even though the system might be in a boot process. Therefore it will end up in an endless loops of reboots which can only be fixed in a linux single user mode!!! Once again BEWARE, never ever activate watchdog via chkconfig!
Next step to be absolutely sure that watchdog device is running it can be checked with normal ps command:
[root@centos:/etc/init.d ]# ps aux|grep -i watchdog

root@hosting1-fr [~]# ps axu|grep -i watch|grep -v greproot 18692 0.0 0.0 1816 1812 ? SNLs 14:03 0:00 /usr/sbin/watchdog

root 25225 0.0 0.0 0 0 ? ZN 17:25 0:00 [watchdog] <defunct>
You have probably noticed the defunct state of watchdog, consider that as absolutely normal, above output indicates that now watchdog is properly running on the host and waiting to auto reboot in case of sudden /dev/watchdog disappearance.
As a last step before, after being sure its initialized properly, it’s necessery to add watchdog to run on boot time via /etc/rc.local post init script, like so:
[root@centos:/etc/init.d ]# echo 'echo /sbin/service watchdog start' >> /etc/rc.local
Now enjoy, watchdog is up and running and will automatically restart the CentOS host 😉
Tags: CentOS, crash, data, dmesg, existence, file, free software project, half an hour, hardware support, host, init, installation, installation configuration, kernel panic, Linux, linux server, linux servers, log, log messages, modprobe, necessery, piece of cake, root, server crash, server downtime, software, support, support ticket, tech support, ticket, time, topic, Watchdog, watchdog timer, web interface, yum
Posted in Linux, System Administration | 1 Comment »
Saturday, July 23rd, 2011 
I’ve been in a situation today, where one Linux server’s hard drive SCSI driver or the physical drive is starting to break off where in dmesg kernel log, I can see a lot of errors like:
[178071.998440] sd 0:0:0:0: [sda] Result: hostbyte=DID_BAD_TARGET driverbyte=DRIVER_OK,SUGGEST_OK
[178071.998440] end_request: I/O error, dev sda, sector 89615868
I tried a number of things to remount the hdd which was throwing out errors in read only mode, but almost all commands I typed on the server were either shown as missng or returning an error:
Input/output error
Just ot give you an idea what I mean, here is a paste from the shell:
linux-server:/# vim /etc/fstab

-bash: vim: command not found

linux-server:/# vi /etc/fstab

-bash: vi: command not found

linux-server:/# mcedit /etc/fstab

-bash: /usr/bin/mcedit: Input/output error

linux-server:/# fdisk -l

-bash: /sbin/fdisk: Input/output error
After I’ve tried all kind of things to try to diagnose the server and all seemed failing, I thought next a reboot might help as on server boot the filesystems will get checked with fsck and fsck might be able to fix (at least temporary) the mess.
I went on and tried to restart the system, and guess what? I got:
/sbin/reboot init Input/output error
I hoped that at least /sbin/shutdown or /sbin/init commands might work out and since I couldn’t use the reboot command I tried this two as well just to get once again:
linux-server:/# shutdown -r now

bash: /sbin/shutdown: Input/output error

linux-server:/# init 6

bash: /sbin/init: Input/output error
You see now the situation was not pinky, it seemed there was no way to reboot the system …
Moreover the server is located in remote Data Center and I the tech support there is conducting assigned task with the speed of a turtle.
The server had no remote reboot, web front end or anything and thefore I needed desperately a way to be able to restart the machine.
A bit of research on the issue has led me to other people who experienced the /sbin/reboot init Input/output error error mostly caused by servers with failing hard drives as well as due to HDD control driver bugs in the Linux kernel.
As I was looking for another alternative way to reboot my Linux machine in hope this would help. I came across a blog post Rebooting the Magic Way – http://www.linuxjournal.com/content/rebooting-magic-way
As it was suggested in Cory’s blog a nice alternative way to restart a Linux machine without using reboot, shutdown or init cmds is through a reboot with the Magic SysRQ key combination
The only condition for the Magic SysRQ key to work is to have enabled the SysRQ – CONFIG_MAGIC_SYSRQ in Kernel compile time.
As of today luckily SysRQ Magic key is compiled and enabled by default in almost all modern day Linux distributions in this numbers Debian, Fedora and their derivative distributions.
To use the sysrq kernel capabilities as a mean to restart the server, it’s necessery first to activate the sysrq through sysctl, like so:
linux-server:~# sysctl -w kernel.sysrq=1

kernel.sysrq = 1
I found enabling the kernel.sysrq = 1 permanently in the kernel is also quite a good idea, to achieve that I used:
echo 'kernel.sysrq = 1' >> /etc/sysctl.conf
Next it’s wise to use the sync command to sync any opened files on the server as well stopping as much of the server active running services (MySQL, Apache etc.).
linux-server:~# sync
Now to reboot the Linux server, I used the /proc Linux virtual filesystem by issuing:
linux-server:~# echo b > /proc/sysrq-trigger
Using the echo b > /proc/sysrq-trigger simulates a keyboard key press which does invoke the Magic SysRQ kernel capabilities and hence instructs the kernel to immediately reboot the system.
However one should be careful with using the sysrq-trigger because it’s not a complete substitute for /sbin/reboot or /sbin/shutdown -r commands.
One major difference between the standard way to reboot via /sbin/reboot is that reboot kills all the running processes on the Linux machine and attempts to unmount all filesystems, before it proceeds to sending the kernel reboot instruction.
Using echo b > /proc/sysrq-trigger, however neither tries to umount mounted filesystems nor tries to kill all processes and sync the filesystem, so on a heavy loaded (SQL data critical) server, its use might create enormous problems and lead to severe data loss!
SO BEWARE be sure you know what you’re doing before you proceed using /proc/sysrq-trigger as a way to reboot ;).
Tags: dmesg, drive, drive scsi, driverbyte, emergency, errorJust, fdisk, filesystems, fsck, hard drive, hdd, hostbyte, init, input output, kernel, Linux, log, machine, mcedit, number, pinky, reboot web, remote reboot, remount, request, Result, sda, sector, server boot, server shutdown, Shell, shell linux, target, tech support, turtle, vim, web front
Posted in Linux, System Administration | 5 Comments »


How to install and configure Jabber Server (Ejabberd) on Debian Lenny GNU / Linux
Wednesday, December 28th, 2011I've recently installed a jabber server on one Debian Lenny server and hence decided to describe my installations steps hoping this would help ppl who would like to run their own jabber server on Debian . After some research of the jabber server softwares available, I decided to install Ejabberd
The reasons I choose Ejabberd is has rich documentation, good community around the project and the project in general looks like one of the best free software jabber servers available presently. Besides that ejabberd doesn't need Apache or MySQL and only depends on erlang programming language.
Here is the exact steps I followed to have installed and configured a running XMPP jabber server.
1. Install Ejabberd with apt
The installation of Ejabberd is standard, e.g.:
debian:~# apt-get --yes install ejabberd
Now as ejabberd is installed, some minor configuration is necessery before the server can be launched:
2. Edit /etc/ejabberd/ejabberd.cfg
Inside I changed the default settings for:
a) Uncomment%%override_acls.. Changed:
%%%% Remove the Access Control Lists before new ones are added.%%%%override_acls.to
%%
%% Remove the Access Control Lists before new ones are added.
%%
override_acls.
b) Admin User from:
%% Admin user
{acl, admin, {user, "", "example.com"}}.
to
%% Admin user
{acl, admin, {user, "admin", "jabber.myserver-host.com"}}.
c) default %% Hostname of example.com to my real hostname:
%% Hostname
{hosts, ["jabber.myserver-host.com"]}.
The rest of the configurations in /etc/ejabberd/ejabberd.cfg can stay like it is, though it is interesting to read it carefully before continuing as, there are some config timings which might prevent the XMPP server from user brute force attacks as well as few other goodies like for example (ICQ, MSN , Yahoo etc.) protocol transports.
3. Add iptables ACCEPT traffic (allow) rules for ports which are used by Ejabberd
The minimum ACCEPT rules to add are:
/sbin/iptables -A INPUT -p tcp -m tcp --dport 22 -j ACCEPT
/sbin/iptables -A INPUT -p tcp -m tcp --dport 5222 -j ACCEPT
/sbin/iptables -A INPUT -p udp -m udp --dport 5222 -j ACCEPT
/sbin/iptables -A INPUT -p tcp -m tcp --dport 5223 -j ACCEPT
/sbin/iptables -A INPUT -p udp -m udp --dport 5223 -j ACCEPT
/sbin/iptables -A INPUT -p tcp -m tcp --dport 5269 -j ACCEPT
/sbin/iptables -A INPUT -p udp -m udp --dport 5269 -j ACCEPT
/sbin/iptables -A INPUT -p tcp -m tcp --dport 5280 -j ACCEPT
/sbin/iptables -A INPUT -p udp -m udp --dport 5280 -j ACCEPT
/sbin/iptables -A INPUT -p tcp -m tcp --dport 4369 -j ACCEPT
/sbin/iptables -A INPUT -p udp -m udp --dport 4369 -j ACCEPT
/sbin/iptables -A INPUT -p tcp -m tcp --dport 53873 -j ACCEPT
Of course if there is some specific file which stores iptables rules or some custom firewall these rules has to be added / modified to fit appropriate place or chain.
4. Restart ejabberd via init.d script
debian:~# /etc/init.d/ejabberd restart
Restarting jabber server: ejabberd is not running. Starting ejabberd.
5. Create ejabberd necessery new user accounts
debian:~# /usr/sbin/ejabberdctl register admin jabber.myserver-host.com mypasswd1
etc.debian:~# /usr/sbin/ejabberdctl register hipo jabber.myserver-host.com mypasswd2
debian:~# /usr/sbin/ejabberdctl register newuser jabber.myserver-host.com mypasswd3
debian:~# /usr/sbin/ejabberdctl register newuser1 jabber.myserver-host.com mypasswd4
...
ejabberdctl ejabberd server client (frontend) has multiple other options and the manual is a good reading.
One helpful use of ejabberdctl is:
debian:~# /usr/sbin/ejabberdctl status
Node ejabberd@debian is started. Status: started
ejabberd is running
ejabberctl can be used also to delete some existent users, for example to delete the newuser1 just added above:
debian:~# /usr/sbin/ejabberdctl unregister newuser jabber.myserver-host.com
6. Post install web configurations
ejabberd server offers a web interface listening on port 5280, to access the web interface right after it is installed I used URL: http://jabber.myserver-host.com:5280/admin/
To login to http://jabber.myserver-host.com:5280/admin/ you will need to use the admin username previously added in this case:
admin@jabber.myserver-host.com mypasswd1
Anyways in the web interface there is not much of configuration options available for change.
7. Set dns SRV records
I'm using Godaddy 's DNS for my domain so here is a screenshot on the SRV records that needs to be configured on Godaddy:
In the screenshto Target is the Fually qualified domain hostname for the jabber server.
Setting the SRV records for the domain using Godaddy's DNS could take from 24 to 48 hours to propagate the changes among all the global DNS records so be patient.
If instead you use own custom BIND DNS server the records that needs to be added to the respective domain zone file are:
_xmpp-client._tcp 900 IN SRV 5 0 5222 jabber.myserver-host.com.
_xmpp-server._tcp 900 IN SRV 5 0 5269 jabber.myserver-host.com.
_jabber._tcp 900 IN SRV 5 0 5269 jabber.myserver-host.com.
8. Testing if the SRV dns records for domain are correct
debian:~$ nslookup
> set type=SRV
> jabber.myserver-host.com
...
> myserver-host.com
If all is fine above nslookup request should return the requested domain SRV records.
You might be wondering what is the purpose of setting DNS SRV records at all, well if your jabber server has to communicate with the other jabber servers on the internet using the DNS SRV record is the way your server will found the other ones and vice versa.
DNS records can also be checked with dig for example
$ dig SRV _xmpp-server._tcp.mydomain.net
[…]
;; QUESTION SECTION:
;_xmpp-server._tcp.mydomain.net. IN SRV
;; ANSWER SECTION:
_xmpp-server._tcp.mydomain.net. 259200 IN SRV 5 0 5269 jabber.mydomain.net.
;; ADDITIONAL SECTION:
jabber.mydomain.net. 259200 IN A 11.22.33.44
;; Query time: 109 msec
;; SERVER: 212.27.40.241#53(212.27.40.241)
;; WHEN: Sat Aug 14 14:14:22 2010
;; MSG SIZE rcvd: 111
9. Debugging issues with ejabberd
Ejabberd log files are located in /var/log/ejabberd , you will have to check the logs in case of any issues with the jabber XMPP server. Here is the three files which log messages from ejabberd:
debian:~$ ls -1 /var/log/ejabberd/
ejabberd.log
erl_crash.dump
sasl.log
I will not get into details on the logs as the best way to find out about them is to read them 😉
10. Testing ejabberd server with Pidgin
To test if my Jabber server works properly I used Pidgin universal chat client . However there are plenty of other multiplatform jabber clients out there e.g.: Psi , Spark , Gajim etc.
Here is a screenshot of my (Accounts -> Manage Accounts -> Add) XMPP protocol configuration
Tags: admin, apache, best free software, brute force, cfg, com, configure, custom, default hostname, default settings, DNS, doesn, dport, ejabberd, ejabberdctl, exact steps, file, GNU, goodies, hostname, hosts, init, INPUT, Install, installation, Jabber, Linux, Lists, mypasswd, necessery, override, ports, ppl, programming language, Protocol, quot, quot quot, rich documentation, server, servers, software, tcp, transports, uncomment, User, xmpp
Posted in Linux, System Administration, Various | 8 Comments »